
Manual Index
-
Chapters
The Manual is divided into seven chapters. Click a chapter title to display that chapter's table of contents in the area below.
Chapter One
Intro & General Info
PSYBooks Manual
Chapter One
Welcome to PSYBooks
We've tried to make PSYBooks so user-friendly that it practically teaches itself. However, if you aren't sure about something, click the "Help" icon next to Logout in the top right corner of your app to access both this Manual and our Support Staff (via phone, chat, email, or video). Although there is no right or wrong way to get started in PSYBooks, the following list may help you get up and running in the least amount of time:
Group Practices
PSYBooks offers tools for two distinct types of group practices: Group/Clinic accounts, where there's one or more owners and everyone else is an employee of the practice, and Group of Individuals (GOI), where group members share office space and perhaps even an admin staff, yet each remains an independent practitioner. Although both of these types of entities can be called a group practice, their needs are very different. For this reason, PSYBooks offers two distinct set of tools:
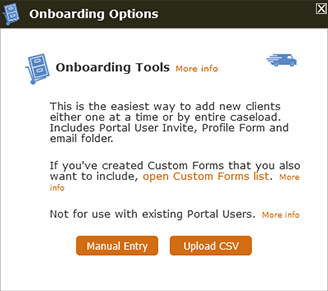
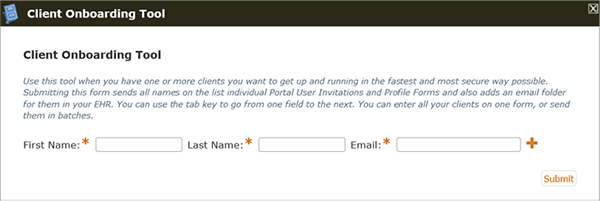
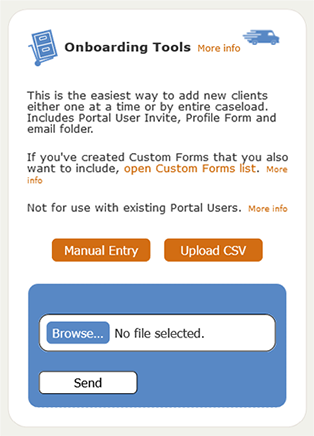
Onboard Clients
Enter clients one at a time or upload a csv file to onboard your entire caseload. All you have to do is add their names and email addresses and all portals, charts and encrypted email systems are set up automatically. Learn moreCustom Forms
The Custom Forms tool allows you to convert the forms you regularly use in your practice to online forms. This means you can send things like your Intake Form, Practice Policies, Informed Consents, HIPAA documents, Good Faith Estimates, etc. all within the app. Recipients won't have to download your forms, fill them out, scan the completed forms and send them back to you. Everything stays within the app for better security, tracking and record retention. Learn more-
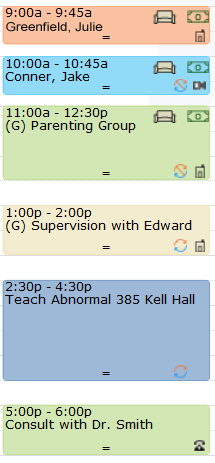
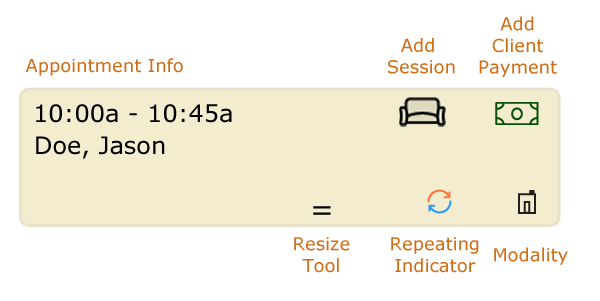
Appointments and Sessions
Appointments and Sessions work together, following the natural workflow of adding the appointment first (as an anticipated encounter) and then, after the session, adding the session as the completed encounter. You can add both sessions and client payments right from the appointment block on the calendar, and readily see which tasks you've yet to complete. Everything is on one page so you don't have to flip screens to find what you want. Learn more -
Notes, Reminders & Memos
PSYBooks allows you to attach a note to almost every task you do. Notes have a combination of structured and open-ended formats for maximum flexibility. Treatment Plans and Progress Notes are linked and will auto-populate, allowing you to write your notes quickly and move on. Clinical notes are stamped with session start and stop time, CPT Codes, and Diagnoses, as required by some insurance companies. There's also a note format for your personal psychotherapy notes, which are kept separate from all notes in the patients' medical records. Learn more -
Credit Card Processing
Although you don't have to use PSYBooks to process your credit card payments, doing so will streamline your workflow, save data entry time, and keep all tasks within one application. Our Payment Processing Company is Stripe. You can sign up now or later. You are not charged until you use it, at which time the fee is deducted from the amount deposited to your bank. In other words, you won't ever have a separate bill to pay. Learn more Sign Up to Receive ERAs (Electronic EOBs) (Only applies to those planning to eFile from PSYBooks.)
Learn about ERAs and get the forms you need to get started. Learn moreAdd Therapists to the Practice (Only applies to Group/Clinic and GOI accounts.)
To ensure that all accounts are linked to enable you to get the lower rate, other subscribers must join through invites sent by either the practice owner (for Group/Clinic accounts) or a designated subscriber (GOI accounts). At least one other therapist in the office must sign up during the free trial or the account will be converted to an Individual Account and the credit card will be charged the higher rate for Indiduals. Learn more-
Add Video to Your Account
PSYBooks offers two types of video, SecureVideo and PSYBooks Connect. Connect is less expensive than SecureVideo and also offers the option to record sessions, which cannot be done with SecureVideo. Read more about the two types of video.
You can add either video product to your account at any time. There are several ways to do it, one being to go to Libraries > Therapists > Manage Subscription and add the Video Feature. Please note that although new subscribers can enjoy a free trail of PSYBooks Connect (if you sign up during your free trial period), we cannot offer free trials of SecureVideo. PSYBooks is charged by SecureVideo for your video account as soon as you sign up. For that reason, we can't offer free trials or refunds on that product. When you do sign up, the payments for SecureVideo will be pro-rated and rolled into your regular PSYBooks subscription payment, meaning that you only get a single charge from PSYBooks each month to your credit card.


How to Use the Manual
PSYBooks is designed to be as user-friendly as possible so you may never need to consult this Manual. If you DO need to look something up, the easiest thing would be to use the Search tool at the top. However, if you want a more in depth understanding of the program, you can use the left nav on this page to navigate to the section you want.
To best use the left nav, it may help to understand how the Manual is organized. The Manual is divided into seven chapters:
- General Info
- Charts & Main Tools
- A Client Chart
- Tools
- Libraries
- Calendar
- Mobile
Chapters 2, 4, 5 and 6 correspond to these sections of the Global Nav:

Chapter 3, A Client Chart, is actually a subsection of Chapter 2, Charts. The client chart is given it's own chapter since that's where you'll spend most of your time.
Within each of those broad sections, you can find information on all tools and tables in that section and also a general description of how things work. Clicking the chapter name on the left nav will load the detailed index for that section. From there, you can click on the specific item you want to view.
Chapter 7 is about the PSYBooks Mobile app.
There is also an entirely separate section that discusses the Portal.
Getting Started with PSYBooks
There is no right or wrong way to get started in PSYBooks. However, the following list may help you get up and running in the least amount of time:
Get Oriented
Layout and Orientation Terminology
PSYBooks is divided into 5 main sections listed in the blue bar at the top of each page: Charts, Tools, Libraries, Calendar and Portal. If you hover over any of these main items, you'll see its sub-sections. For example, hovering over Charts displays Active and Archived.
We often use breadcrumb syntax to describe where something is. For example, we might say that something is on the "Charts > Active" page or the "Charts > Archived" page.
A client's chart is accessed by clicking their name on the table on either the "Charts > Active" page or the "Charts > Archived" page. Once you're inside a chart, you'll notice several tabs across the top: Demographics, Family, Insurance, Sessions & Payments, etc. Syntax for finding something in a client's chart is: "Charts > Active > Client Chart > (Tab Name)". Sometimes we might shorten it to just the word Chart (or Client Chart) and the tab name, e.g., "Chart > Notes".
Tools
The word "tools" in PSYBooks is both the name of an entire section of the app, and, in a more general sense, the name of anything that might be used to accomplish a task. These general tools don't all look alike. For example, the four images below are all tools in PSYBooks. Notice that in some cases a tool is just a link (e.g., "Add Client Medication").

Tools for each main section are on the left. For example, tools on the Active Charts page are Add Session, Add Payments & Allocations, etc. Continuing the syntax described above, we might describe the Add Session tool as being at: Charts > Active > Add Session. Sometimes additional tools are found at the top of a page, especially in the client chart areas. The syntax for finding them is the same. For example, the tool for adding a client's insurance company is at: Chart > Insurance > Add Client Insurance. Once there, you would click on the Insurance tab and the Add Client Insurance tool would be on that page.
Getting Help
This Manual is extensive and is the best way to get additional help with PSYBooks. Each table or tool in the program is described in detail in the Manual and there are numerous screenshots to help orient you. The Help section (last item on the global nav) also has a Contact Us tab which has a set of FAQs and a way to email us if you need additional help.
Setting up Group/Clinic Accounts
Setting up Group/Clinic Accounts
PSYBooks is in the process of developing a full set of tools for Group and Clinic practices that will allow maximum flexibility and customization for your practice, while at the same time, maintaining ease of use for practice owners, employees and admins. The description that follows describes features that are available as of May 15, 2024, as well as giving glimpses into what's coming.
PSYBooks has an entire dashboard dedicated to owners of Group Practices. A full description of that dashboard is found in this section of the Manual: Libraries > Therapist > Group/Clinic Tools.
Setting up Group of Individuals (GOI) Accounts
The General Process
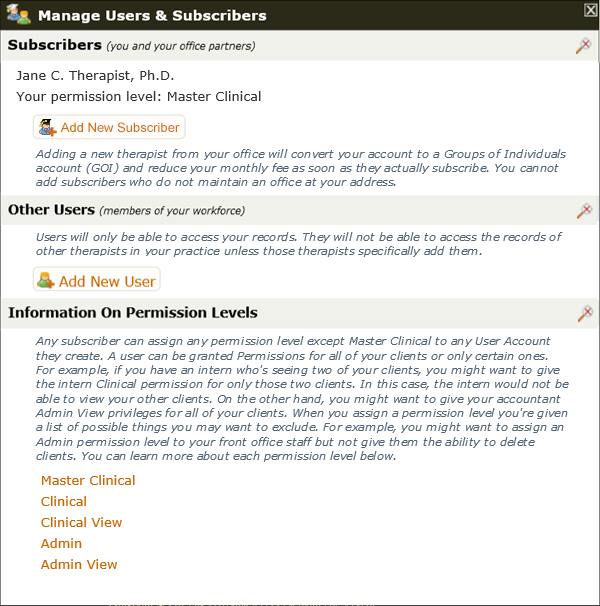
The first step in setting up a GOI (Groups of Individuals) account in PSYBooks is for one therapist in the office to create a new GOI subscription at PSYBooks. The therapist can do it themselves, or an admin can do it on behalf of the therapist, but the initial account will need to be in one of the therapists' names. After this, others in the office are added to that initial account to form the group. By doing it this way, PSYBooks knows all the accounts are linked and can apply the appropriate discounts. You'll be prompted to add others in your group once you've signed in to your new account, but you can also do this with the Manage Users & Subscribers tool at any time.
The most important thing to understand about GOI accounts is the difference between "Users" and "Subscribers". Subscribers have paid accounts (i.e., they "subscribe") whereas User accounts are free. In general, Subscribers are the therapists in the office and each will need a separate PSYBooks account. Users, on the other hand, do NOT have paid PSYBooks accounts, but rather, are added to one or more Subscriber accounts so they can "use" all or certain portions of that account for tasks such as billing, scheduling, exchanging encrypted email, etc. To qualify for the GOI discount, Subscribers must all practice at the same office. Users can be anywhere; they are not required to be on premises with the therapists. Users are often admins, but there are other uses for User accounts as well.
Interns and Supervisees: Users or Subscribers?
If an intern or supervisee has their own clients for whom they do their own billing, they will need to have their own separate Subscriber account. However, if the intern's clients actually belong to the supervisor and the supervisor does the billing, the intern may be able to sign up as a User of that Subscriber and thus have a free account. In both cases, the supervisor can be given full access to the supervisee's account, to enable them to sign off on notes or anything else they may need to do in the supervisee's account.
When making the decision about how to designate supervisees, notice that in GOI accounts, client records cannot be transferred from one account to another. (This will be a feature in our new Group/Clinic accounts.) For this reason, in situations where an intern in a GOI account may start out working under their supervisor but eventually want to move to their own account, they may want to set up a Subscriber account from the outset. Otherwise, they will have to create all new records for their clients when they move from being a User on their supervisor's account to having their own account. Their old client records will not be able to be transferred to their new account.
Let's Get Started
PSYBooks is designed to have maximum flexibility so there's more than one way to set up a GOI practice. However, here's one possible checklist you can use:
Create the Initial Account
The first PSYBooks GOI account that is created becomes the "Master Clinical" account. The Master Clinical account is the only one that can add other subscribers. Although the Master Clinical permission level can eventually be transferred to any other subscriber in the practice, when you're getting things set up, it will be easiest if the initial subscriber is someone who's willing to participate in the setup. The initial setup can be done by the therapist with the Master Clinical account, or, in practices with one or more admin staff, it's also possible for an admin to assume this role.
Having an Admin Set Up the Accounts
An admin can set up the entire practice and then notify the therapists when they can start using it. In this case, the admin would subscribe for the initial account holder, then add all the other subscribers and users - including adding themselves as a User - from that initial account. During the setup process, the admin may need to create usernames and passwords for one or more of the subscribers. However, once the admin has created his or her own User account, the subscribers should change their passwords and the admin should only sign in with their User account from that point forward. The User account will allow the admin to toggle back and forth between subscriber accounts to carry out their duties, which is much easier than having to sign in to each account separately. Also, when the admin(s) use their own User accounts instead of just signing in with the subscribers' usernames and passwords, PSYBooks can track what is being done in each subscriber's account and by whom as required by HIPAA.
Add the Other Subscribers
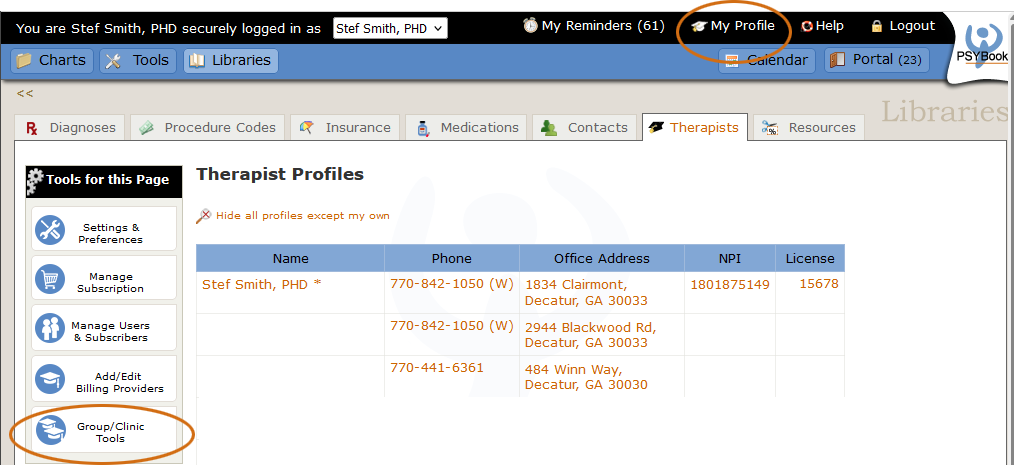
To begin adding other subscribers, the Master Clinical subscriber or their admin should click the "My Profile" link at the top of any page. This takes you to the Therapists page in the Libraries. On the left nav of this page is a tool called Manage Users & Subscribers which will allow you to add everyone else in your office:
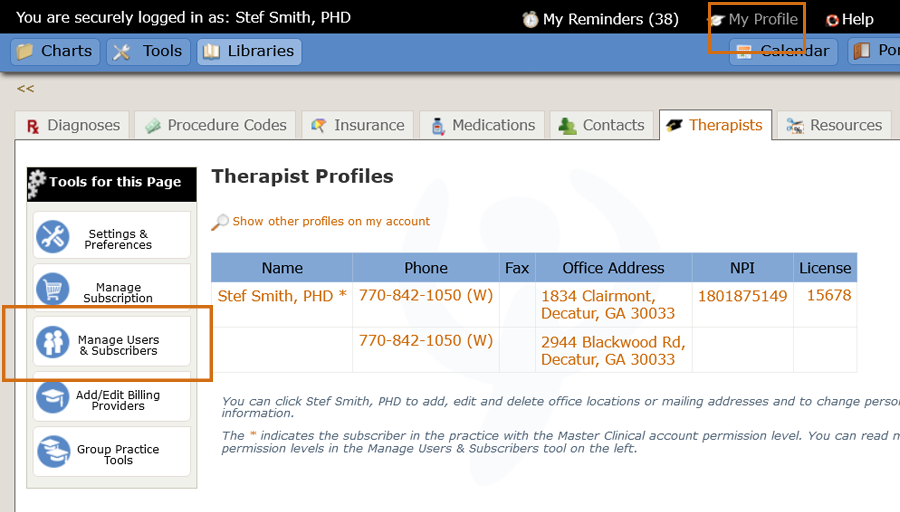
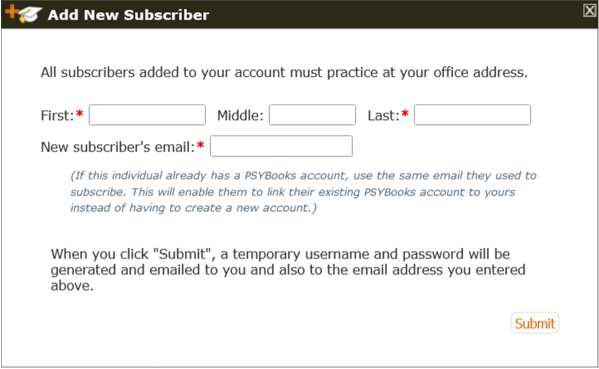
You can read details about adding subscribers in the Libraries section of the Manual: Add New Subscriber
Add Users
Unlike the ability to add subscribers, ALL subscribers can add Users. It may make sense to add those Users that will be shared by all therapists in the practice from the Master Clinical account. However, Users can be added from any subscriber's account.
There are several things to know about Users in GOI accounts:
- Users may be shared by any combination of therapists in the practice. For example, all therapists would most likely need access to all front office staff and other Admin Users, but therapists Jane Smith and Bob Jones may share an accountant that no one else in the practice needs to access.
- Users can be given different permission levels and work with different clients. For example, Jane Smith may have a practicuum student, Gerta, who sees one or two of Jane's clients from time to time. If Jane does all of Gerta's billing, she may be able to add Gerta as a User and only give her access to the clients she actually sees.
- When a User has been "shared" with two or more subscribers, the User will be able to toggle back and forth between subscriber accounts from their own account, making it easier to do their work. However, a subscriber must have "accepted" the User before the User will be able to access their account. If you have a User account and are not able to toggle to all subscribers in the practice, it means that those subscribers have not yet "accepted" your User invite.
You can read details about adding Users in the Libraries section of the Manual: Add New User
Set Up Calendar Sharing
Calendar sharing is a permission that each subscriber has to grant. There's no "central switch" that can be thrown to enable all Subscribers' calendars to be shared, because individual therapists may want to choose their own calendar settings. A User who is shared with all therapists will automatically be able to see each therapist's calendar by toggling back and forth between accounts. However, if the User wants to be able to see all (or some) therapists' schedules on a single page so they don't have to toggle, those therapists will have to have specifically shared their calendars with one another.
The tool to allow calendar sharing is part of the General Settings tool, which is found on the left nav of the Calendar page. The mockup below is of the General Settings tool in Stef Smith's account:
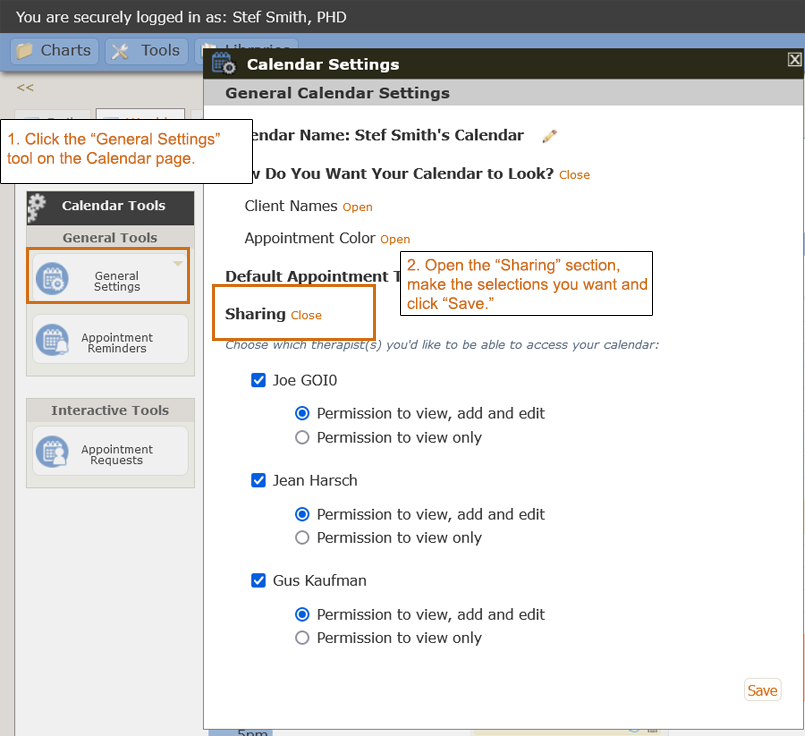
At the bottom of the Calendar Settings window is a section called "Sharing". Once the Sharing section is opened, we can see that this example is a 3-person practice consisting of therapists Stef Smith (the account we're viewing), Jean Harsch and Gus Kaufman. Stef only wants Jean to be able to access her calendar, so she checked Jean's name and gave her the permissions she wanted her to have (i.e., view, add and edit - or just view). Then she clicked "Save".
The screenshot below is of Jean's account, after Stef shared her calendar with her:
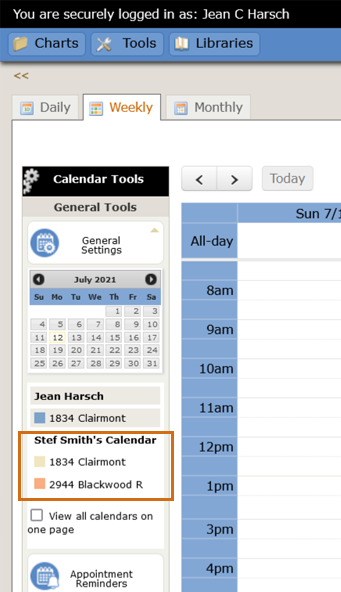
Notice that Stef's calendar is now shared on Jean's page. (The part in the orange box wouldn't be there had Stef not shared her calendar with Jean.) You can click Stef's address (1700 Neuse Blvd) and toggle to Stef's calendar from Jean's account. Another option is that Jean could check the "View all calendars on one page" checkbox and be able to see both her and Stef's calendars on the same page.
Notice that so far, Stef is the only one who has shared her calendar - and she only shared with Jean. This means that although Jean can see her appointments, Stef can't see Jean's. If either or both of the other subscribers wants to share their calendars, they'd have to go through the same process from their own accounts. In other words, each therapist gets to choose whether they share their calendar and with whom. You can customize it to fit the needs of your specific practice.
Wrapping Up
At this point, the practice as a whole is set up and is ready for each subscriber to begin setting up their own accounts by adding clients, populating libraries, etc. More information on these individual subscriber tasks is below. Admins can also complete these tasks for the subscribers although at this point, Admins should be signing in with their own User accounts instead of using a subscriber's username and password.
Add Clients/Patients
There are several ways to add clients in PSYBooks, depending on your personal preferences. Probably the easiest way, and the one we recommend, is to start by sending the new client an invitation to create a Portal User account. There's a box on that form you can check to include a Profile Form, which means the new client can then fill out their own PSYBooks chart. Once they've created a Portal Account, you can send them the rest of the forms you need them to have, requesting eSignatures on the ones that need it. You only need their name and email address to send them a Portal User invitation, they do their own data entry work, and your forms can be sent securely.
Adding a new client chart is easy because the only required fields are first and last name and birthday: How to add a client.
Completing that step will create the Demographics page in the chart which is the only essential thing you have to do unless you're filing insurance for the client. (Filing insurance just requires a few extra clicks: Add insurance information.)
Once the chart has been created, you'll see that it's is broken down into several sections displayed as tabs across the top: Demographics, Family, Insurance, Sessions & Payments, Medication, Contacts, Files and Notes.
The Sessions & Payments and Notes sections both get populated automatically as you work in the program. For example, each time you add a session for a specific client, it will be displayed in their Sessions & Payments tab. Once you've added a session, anything pertaining to that session (such as client payments and adjustments, claims sent to insurance companies, insurance payments and client statements) are displayed beneath that session in the Sessions & Payments tab. Similarly, anytime you add a note that pertains to a specific client – no matter where you are in the program – that note will be displayed in their Notes tab. The remaining sections of the chart (Family, Medication, Contacts and Files) are available for you if you want to use them.
The Files tab allows you to upload digital documents and know that they are being transmitted and stored in a way that meets HIPAA/HITECH standards. You might, for example, want to store copies of a client's intake forms, insurance cards, EOBs, testing reports – any files that your own practice needs.
Once you have added your clients, you're ready to add calendar appointments, sessions, payments or whatever else you need. Basically, you're all set! Add appointments Add sessions Add payments
Populate Your Libraries
Bullet Point To-Dos
- Go to Libraries > Diagnoses and enter the diagnoses you use most often.
- Do the same with Libraries > Procedure Codes, Libraries > Insurance Companies and Libraries > Medications. (Some libraries already have the most common items entered so you may not have much to do.)
- Go to Libraries > Therapists and check out your profile (by clicking your name in the table) to make sure everything is correct. Also take a look at the Settings & Preferences tool and the Manage Subscription tool, just to familiarize yourself with what's there.
More Info
Libraries are where PSYBooks stores information it uses elsewhere. For example, many therapists use diagnoses and/or procedure codes when they add a session for a client. Those values can be entered right on the Add Session form, but if they are already in your Libraries, they will appear in the appropriate dropdown list on the Add Session form so that all you have to do is select them.
There are six libraries in PSYBooks: Diagnoses, Procedure Codes, Insurance, Medications, Contacts and Therapists. The first five hold information you may need in working with clients. The last library – Therapists – holds your profile, settings and subscription information. The Therapists library is also the place to add additional Users or Subscribers to your account.
The Diagnoses and Procedure Codes libraries hold the current lists of these items. For example, the Diagnoses library has complete lists of both the ICD and the DSM codes that are currently in use. Similarly, the Procedure Codes library has a list of the current CPT codes that are most commonly used by mental health professionals. And when they change? You don't have to do a thing. PSYBooks will install the new list for you in plenty of time for you to use it on the required date.
Sign up for Credit Card Processing
Before you can accept credit card payments through PSYBooks, you'll have to create an account in Stripe, our payment processing company. It does not cost anything to sign up with Stripe; you pay nothing unless you use it. The per charge fee is automatically deducted from the amount deposited directly to your bank account.
There are two things it may be helpful to know before you begin the sign-up process:
You have to have a web address
Stripe's financial partners require them to perform some type of verification to help ensure 1) that you are who you say you are and 2) that your clients have a way to get in touch with you in case they have issues or questions about charges you make on their behalf. If you have a website for your practice, use that. If not, you can use some of the automated listings most medical professionals find themselves on such as Yelp, ZocDoc, Healthgrades, Yellowpages, Superpages, etc. If you're not sure where you're listed, try Googling yourself and use one of the URLs that has accurate information on you as your web address.
Receiving payments from HSA, HRA and FSA accounts
Banks have certain guidelines and restrictions they must follow before allowing merchants to process cards from HSAs (Health Spending Accounts), HRAs (Health Reimbursement Accounts) and FSAs (Flexible Spending Accounts). Unfortunately, neither PSYBooks nor Stripe has any control over whether the issuing companies will allow you to process these types of cards.
The best way to ensure success is to provide a brief, one or two sentence narrative of the services you provide as a healthcare professional on the Stripe sign-up form. This will allow the issuing companies to better determine whether your services fall within HSA and FSA rules and guidelines.
You can create a Stripe account in one of two ways:
-
Manage Subscription tool at Libraries > Therapists
If you go to the Therapists tab in your Libraries and click the Manage Subscription tool on the left, you'll see a form like this:

In the Add/Remove Feature section, if you click on the More info link beside Credit Card Processing, it will open to this:
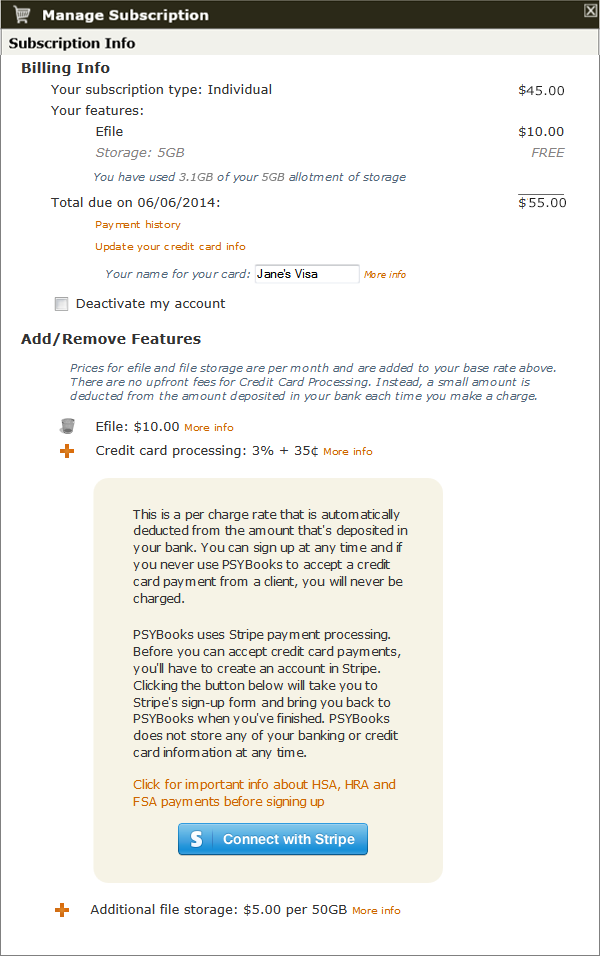
Clicking the blue Connect to Stripe button will take you to the Stripe site to create your account and bring you back to PSYBooks when you've finished.
-
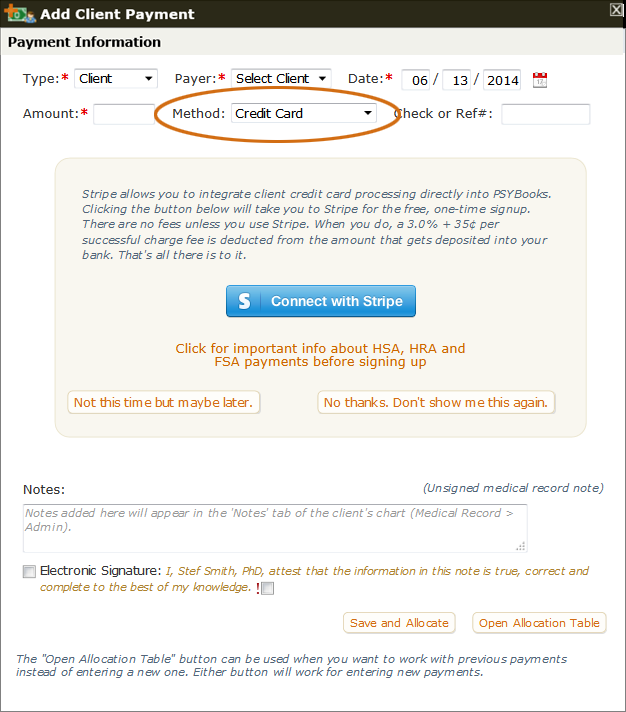
Add Client Payment Tool
You can also create your Stripe account right from the Add Client Payment Tool (Charts > Active > Add Payments & Allocations > Client) by changing the Method select box to Credit Card. That produces a section like this that also has the Connect to Stripe button:
Get Ready to Efile and Receive ERAs
The first step to begin efiling in PSYBooks is to determine which of three previous efile categories you fall into. Answer in terms of what's been done on your behalf, i.e., you might have efiled yourself or an office manager or billing person might have done it for you. The categories are:
- You've never efiled.
- You've efiled with another program that did not use Office Ally as the clearinghouse.
- You've efiled with another program that DID use Office Ally as the clearinghouse.
Once you've determined your category, instructions for what to do are below:
Category #1 Users (Never Efiled):
- You'll need to fill out some forms, but before you do, it will be helpful to understand these terms:
- Payer: For our purposes, "Payer" means the insurance company.
- EDI: Electronic Data Interchange, i.e., the ability to efile.
- EFT: Electronic Funds Transfer, i.e., asking the insurance company to deposit your payments directly into your bank.
- ERA: Electronic Remittance Advice, i.e., the electronic form of EOBs. Signing up for these will save you a considerable amount of data entry time (and possibly even some gnashing of teeth.)
- Now that you're familiar with the terms, check Office Ally's Payer EDI Enrollment Forms to see if the insurance companies you intend to use require pre-enrollment. Some do, others don't. If one or more of your companies is listed, fill out the supplied form(s) and follow the directions on that form for how to submit. Notice that each insurance company that requires pre-enrollment has its own form, so you'll have to fill out a form for each company you intend to use.
- If there's a checkbox on the form asking if you want to receive ERAs, check that. (Although not essential, most users will want to do this.)
- If there's no ERA checkbox on the form and you'd like to receive ERAs, you'll need to apply for ERAs separately. ERA enrollment forms can be found at the following link, listed by insurance company: Payer ERA Enrollment Forms. Again, there's no one-size-fits-all, so you'll have to fill out an ERA enrollment form for each company from whom you want to receive ERAs that did NOT have an ERA checkbox on the EDI Enrollment Form. Notice that much of this form has already been filled out for you with Office Ally's information. Don't change any of the pre-filled information. This will ensure that your ERAs are delivered back to your PSYBooks account.
- Once you receive notification that you've been accepted for efiling, you will most likely need to contact OA and tell them. This information, along with specific instructions on how to do this, should be on the initial EDI and/or ERA form you filled out above.
- If your insurance company does NOT appear in Office Ally's Payer EDI Enrollment Forms mentioned in step #2, it means that your insurance company does not require pre-enrollment, so you can skip that step. However, you will still probably want to sign up for ERAs by filling out and submitting your insurance companies' enrollment forms from this list: Payer ERA Enrollment Forms. As mentioned above, don't change any of the pre-filled information. Office Ally has added these parts to ensure that your ERAs are delivered back to your PSYBooks account.
Category #2 Users (Efiled, But Not With Office Ally):
This category of user will need to go through all the same steps needed for Category #1 Users. However, all you're doing here is essentially telling the insurance companies that you'll be using a different clearinghouse. If you kept copies of the forms you used when you signed up with your previous clearinghouse, you may be able to copy the same info on the Office Ally forms.
Category #3 Users (Efiled With Office Ally):
If you've been efiling and receiving ERAs through Office Ally, you're good to go with PSYBooks. Just begin efiling - either with the Add Session tool on your Calendar (the couch icon) or with the Add Session tool on your Charts page. Claims will be efiled and your ERAs will be returned to the PSYBooks app.
Vocabulary
Status Bar
The term status bar refers to the black bar that runs across the top of each page in your PSYBooks app. It's called the status bar because one of the primary things it does is to orient you to the account you're in. For example, in the screenshot below, we can see that Stef C. Smith, Ph.D. is logged in to her own account:

The status bar is also a handy place for additional global tools. Since these tools are on the status bar, you can access them from anywhere in the program, as opposed to having to navigate to a specific page to find them.
There are five tools on the status bar and one additional tool that, although not on the status bar, is nevertheless another global tool that can be used on all pages so it will be discussed with the others:
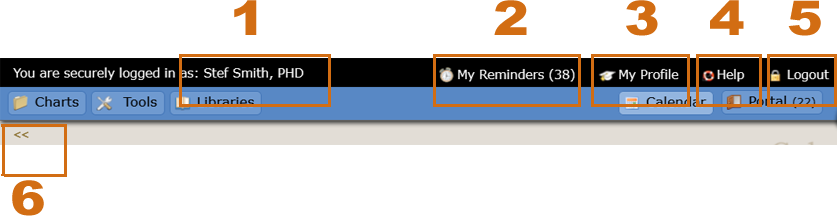
These six tools are:
- Therapist's name
- My Reminders
- My Profile
- Help
- Logout
- Show/Hide Left Nav
Each will be discussed below:
The Therapist's Name

The therapist's name is a link that goes to the My Profile page. It does exactly the same thing as the My Profile tool which is also on the Status Bar.
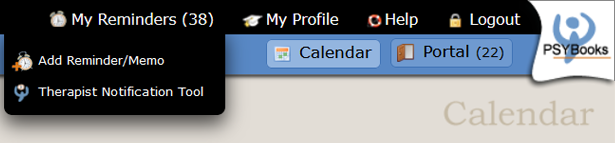
My Reminders

"My Reminders" is actually short for "My Notes & Reminders" which is a section of the app that houses tools you can use to send notes to yourself and also to other subscribers and Admins in your practice. It's somewhat analogous to the Notes tab in a client's chart, except that these are your notes, as opposed to belonging to a client. You can access "My Notes & Reminders" either by clicking the "My Reminders" link in the Status Bar, as shown above, or by going to Tools > My Notes & Reminders.
Hovering over My Reminders in the Status Bar displays this dropdown which gives you access to two of the tools that are part of this area: "Add Reminder/Memo" and the "Therapist Notification Tool."
My Profile

As mentioned above, the My Profile tool does exactly the same thing as clicking the therapist's name on the left. The My Profile page is actually the Therapists section of the Libraries. The two places to access it from the status bar are just to give you easier access. Since the profile is technically part of your Libraries, details about the various tools available on the My Profile page can be found in the Libraries > Therapists section of this Manual.
Help

Clicking the Help link in the Status Bar will give you information on how to reach us by phone, email or chat. It also gives you a quick link to this support site for times when you need refresh your memory on how to do something.
Logout

The logout tool allows you to manually log out when you're not using your app. You can set times for auto logout in the Settings & Preferences tool in the left nav of your profile.
Show/Hide Left Nav

A close-up of the tool in its default ("Hide") position:

This tool is helpful for users with lower resolution screens. It allows you to temporarily hide and/or show the left nav tools on any page in the app. Although it works the same for all pages, the place you would most likely need it is for the Sessions & Payments tab on a client chart. Devices with lower resolutions may produce a scrollbar at the bottom, like this:
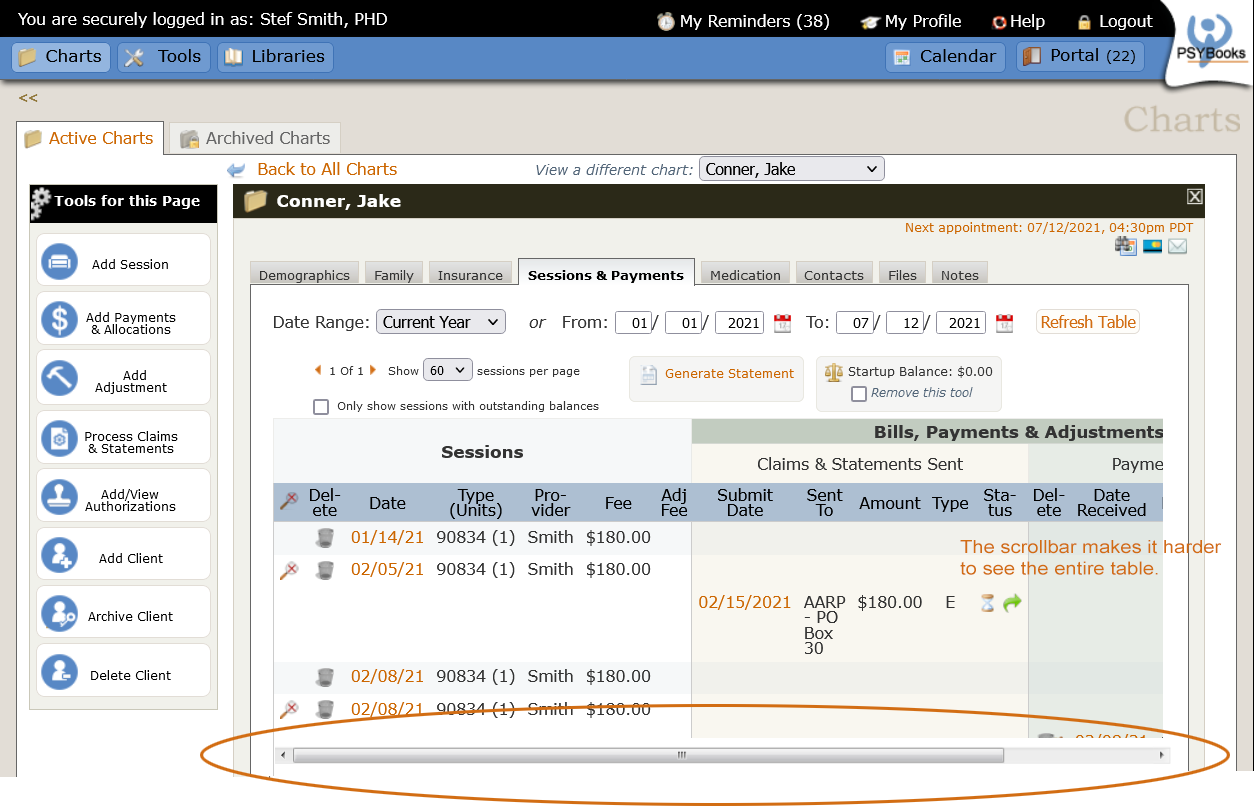
The browser automatically adds the scrollbar when the content on the screen is wider than the device can handle. Although the scrollbar makes it possible to see the entire table, scrolling can be annoying on a large table like this where you really need to be able to see the whole thing on one screen. To remedy this, you can use the Hide Left Nav tool - the two left-pointing arrows in the gold area - to hide the left nav. This is the same screen as above but with the left nav closed:
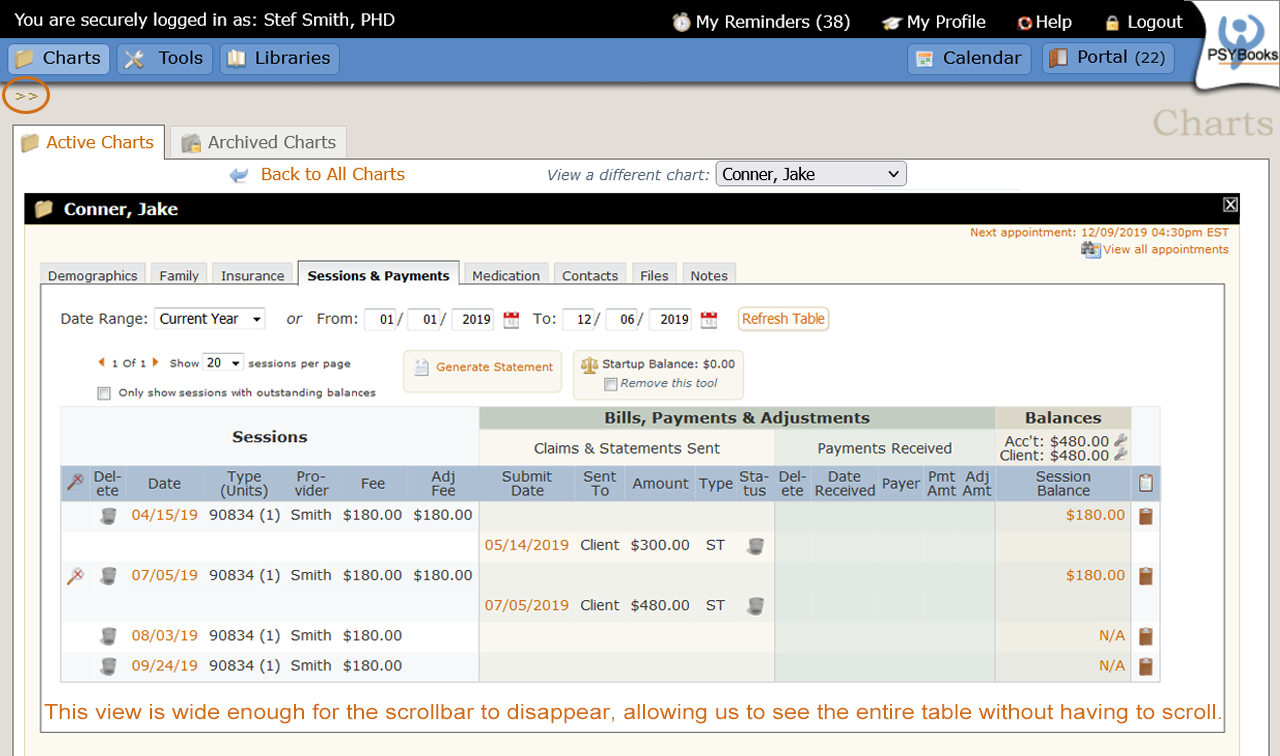
Notice that the scrollbar has disappeared and it's now possible to view the entire table. Also, the Show/Hide Left Nav tool has reversed direction. It's now in the "Show" position, with the arrows now point to the right, since clicking it a second time would show the left nav again.

Global Nav
The term Global Nav stands for 'global navigation' and is a general phrase to describe the main level of navigation in any website or application. In PSYBooks, the global nav is the blue navigation bar right under the Status Bar at the top of each page:

As you can see from the global nav, PSYBooks has five main sections:
- Charts
- Tools
- Libraries
- Calendar
- Portal
Local Nav
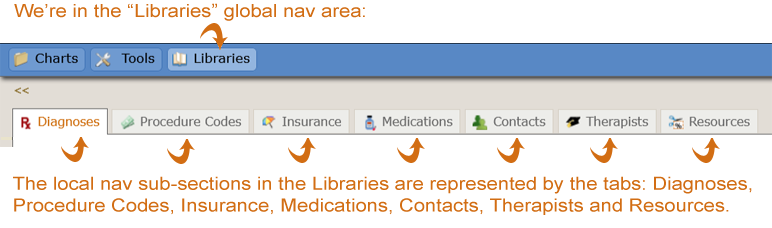
The term Local Nav stands for local navigation and refers to links used to navigate to various sub-sections within a global nav section of a website. You might think of a global nav item as being a state, whereas the local nav would be the main cities within that state. PSYBooks has more than one way to display local nav items. When you're in any of the global nav areas, the local nav sections are indicated by the tabbed items. Clicking on a tab will take you to that section:
Another way to see local nav items is to hover over any global nav item. The local nav will appear on a drop-down menu like this:

Notice that in this example, we're actually IN the Charts area, but we have our cursor over Libraries in the global nav, which enables us to see the local nav of Libraries. If we wanted to go to one of the Libraries sub-sections (e.g., Medications), we could just click the blue Medications bar in the Libraries local nav dropdown.
Left Nav
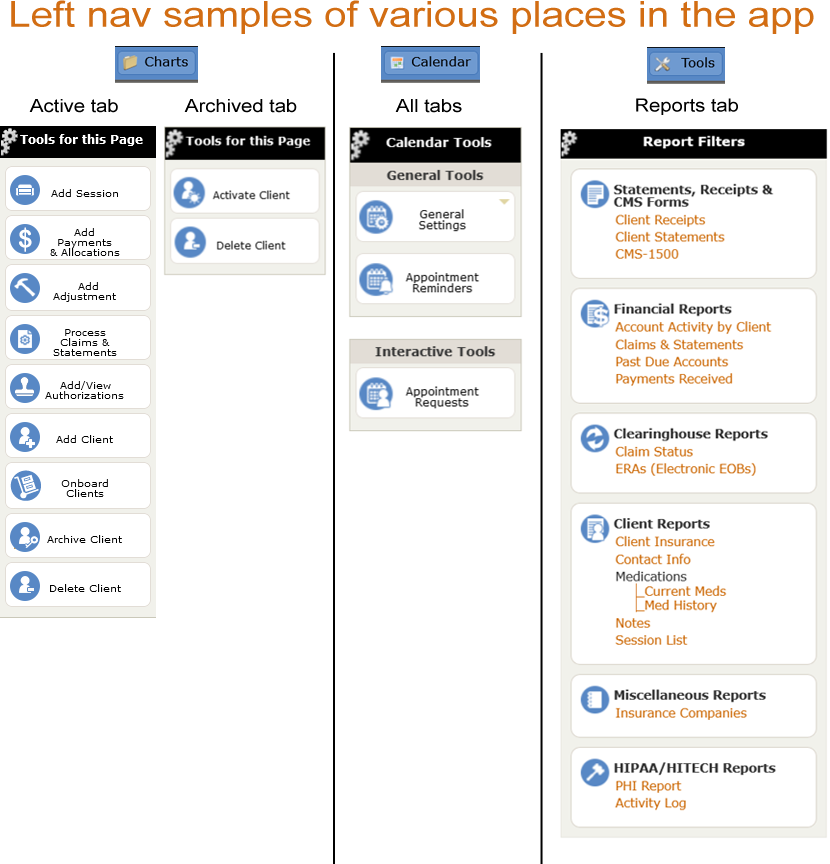
Almost all pages in PSYBooks have a left nav ('left navigation'). The left nav holds tools or links that you will need for completing tasks on that page. Some left navs are quite long (for example, the index of the Manual in the Help section - where you are now). Others are very short with only one or two tools. Some examples of left navs in the various sections are below:
Breadcrumbs
A common way of describing a location in a website is to use "breadcrumbs". Breadcrumbs display hierarchial levels in a site separated by the > sign. Often in the Manual, you'll see things like, "Libraries > Medications". This would refer to the Medications sub-section of the global nav Libraries item.
Status Indicators
A status indicator is a new element or a change in an existing element to help you know where you are. Status indicators help you get your bearings in a website the way a highway sign or an address help you find your way when traveling. For example, the lighter blue outlines around items in the global nav are one type of status indicator:
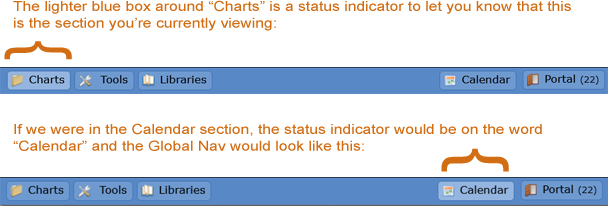
Additionally, the name of the section you're in is written out on the right side of each page as is shown when we're in the "Charts" section:

Local nav items are often displayed as tabs. The status indicator here is whether the tab appears to be the one on top, or whether it's in the background. In the screenshot below, the user is in the Insurance Companies section of the Libraries:

Notes in PSYBooks
-
Types of Notes
Almost all forms in PSYBooks have a section where you can enter notes. Although most notes that pertain to clients become part of the client's medical record, PSYBooks also gives you the opportunity to write personal Psychotherapy notes that are not part of the medical record.
Additionally, notes that ARE part of the medical record are broken into two categories: Clinical medical record notes and Office medical record notes. Although these categories have no meaning outside of PSYBooks, they may be useful to you. For example, some forms, such the Add Session form, may be more likely to lend themselve to notes that are more clinical in nature. Other forms, for example, a note you might want to include on an Add Payment form, may tend to be more administrative in nature. Having two separate catories of medical record notes allows you to give permission for a User to see one type of note but not others. For example, you might want your front office staff to be able to see your Office medical record notes, but not your Clinical medical record notes or your personal psychotherapy notes.
Most of the note types are assigned by PSYBooks, with notes that are more likely to contain sensitive information being assigned a "Clinical" designation, whereas notes that are more likely to be more administrative in nature being categorized as "Office" notes. Additionally, there are several notes where you can choose whether to make them part of the medical record or whether you'd rather categorize a note as a Psychotherapy note so it's NOT in the medical record. You make the choices about how you want to best use the note features in PSYBooks.
The various note types in PSYBooks are as follows:
Always in the Medical Record > Clinical category
- Add/Edit Intake
- Add/Edit Mental Status Exam (MSE)
- Add/Edit Progress Note
- Add/Edit Treatment Plan
Always in the Medical Record > Office category
- Add/Edit Adjustment
- Add/Edit Authorization
- Add/Edit Client Payment
- Add/Edit Client Payment Allocation
- Add/Edit ERA
- Add/Edit Client Insurance
- Add/Edit Insurance Payment Allocation
- Add/Edit Resubmit Claim Note
Can be in Medical Record > Clinical or Psychotherapy categories (you make that choice):
- Add/Edit Client
- Add/Edit Session
- Add/Edit Client Family
- Add/Edit Client Medication
Always in the Psychotherapy (Personal) category
- Add/Edit Open-Ended
Notice that when the four notes that can be either Psychotherapy or Medical Record Notes are used as Medical Record Notes, they are in the Clinical subcategory. This means that the Medical > Clinical note set has a total of eight possible note types: four that are always Med > Clin (Intake, MSE, Progress & Treatment Plan) and four that may be Med > Clin (Client, Session, Family & Client Med). Similarly, the Psychotherapy note set has a total of five possible note types: one that is always a Psych note (Open-Ended) and four that may be Psych notes (Client, Session, Family & Client Med).
No need to try to remember the categories. Each note tells you what kind of note it is right on the form such as can be seen in this client medication form:
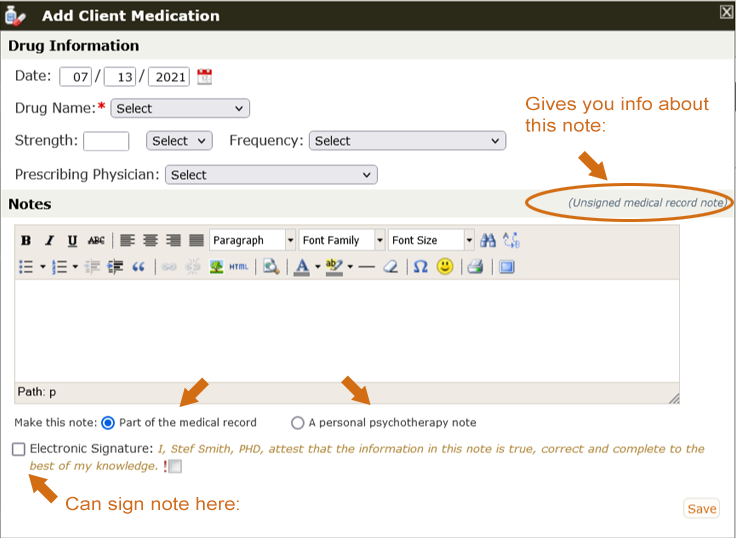
Notice in the gold bar that begins the Notes section of this form, there's a phrase at the end of the row that says "Unsigned medical record note." If you used the radio buttons at the bottom to change the note to a personal psychotherapy note, the phrase in the gold bar would change to "Unsigned psychotherapy note". If you signed the note by checking the Electronic Signature checkbox, the phrase would change to "Signed medical record note" or "Signed psychotherapy note".
If the note types seem overwhelming, remember that they are only meant as user-aids. If you have no need to differentiate between Psychotherapy notes and Medical Record notes - or between Clinical and Office Medical Record Notes, you don't need to worry about note types at all.
Note Edits & Revisions
Unsigned notes can always be edited in PSYBooks. In this case, editing means exactly what you think it would, i.e., the original note is replaced with the new one. Once a note has been signed, you can no longer overwrite the original note. However, you can always add a revision. Adding a revision saves both the original note and the revision.
Whether you're editing an unsigned note or creating a revision, the mechanism for doing it is the same. In many cases, you can type in the textarea itself and at other times, a small popup window will open to allow you to make the edits.
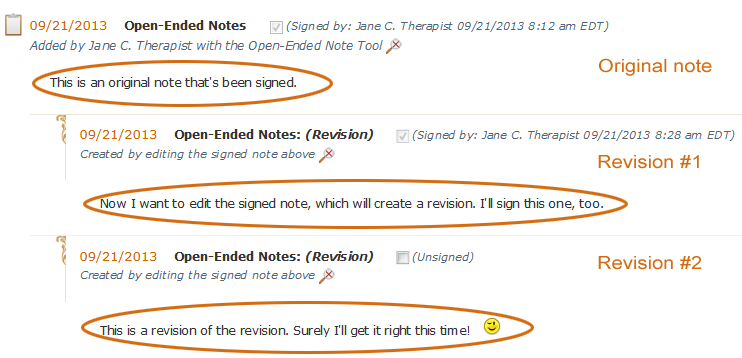
Edits will overwrite the original note in the client's Notes tab. Revisions are similar but both the original note plus all revisions are displayed. The original signed note is always shown first, then revisions are underneath. Revisions are indented and have a gold scroll at the left edge to help differentiate them from original notes. Notice that each time a note is signed - even when what's signed is a revision - it creates the situation where that note or revision can no longer be edited (overwritten) and a new revision must be created. For this reason, it's possible to have more than one revision attached to a single note as can be seen in the example below:
Mark Important/Show Important
Each note in PSYBooks has a checkbox with an exclamation point that allows you to mark that note as important:
 The mark important checkbox is typically at the end of the signature, like this:
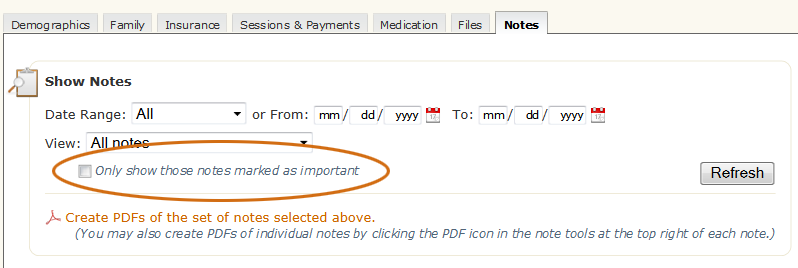
Checking the mark important checkbox will allow you to easily view important notes on the Notes tab of the client's chart. In the Show Notes section of the Notes tab, there's a 'show important' checkbox you can check to show only notes you've marked as important:
These two features - mark important and show important - complement one another. Together, they allow you to flag notes throughout the application - both medical record notes and your personal psychotherapy notes - so you can easily pull them up when you want to view them. The mark as important tool is a toggle, which means you can have a note marked important for awhile and then unmark it when you no longer need it.
HIPAA/HITECH
There are no HIPAA compliant products or services, because by definition, only HIPAA covered entities (e.g., you) and business associates (e.g., PSYBooks) can be compliant. In other words, it's not a product or service that's compliant, it's how you, as a covered entity, or we, as a business associate, write and implement our policies and procedures.
That being said, however, if your practice management system doesn't provide you with the proper tools, it may make your compliance difficult, if not impossible. PSYBooks works diligently to assure that we are in compliance with HIPAA and also that we provide the technical features and functions that facilitate your own compliance. For example:
- PSYBooks logs all activities that take place in your account so you'll be able to easily give an accurate accounting of who has accessed your clients' PHI and what actions they took.
- PSYBooks provides you with flexible, easy-to-use PHI Reports.
- PSYBooks gives you 5GB of free file storage that is encrypted both in transmission (i.e., when you upload your files) and also at rest. This can enable you to maintain your entire HIPAA/HITECH compliance repository within PSYBooks.
- PSYBooks allows you to create user accounts and limit the user's access to the specific tasks and/or clients they need to perform their duties.
If you are in need of HIPAA compliance products, templates, training, etc., we recommend you review the HIPAA Survival Guide ("HSG") Store. Carlos Leyva, the author of these materials, is an attorney who specializes in HIPAA/HITECH and digital law.
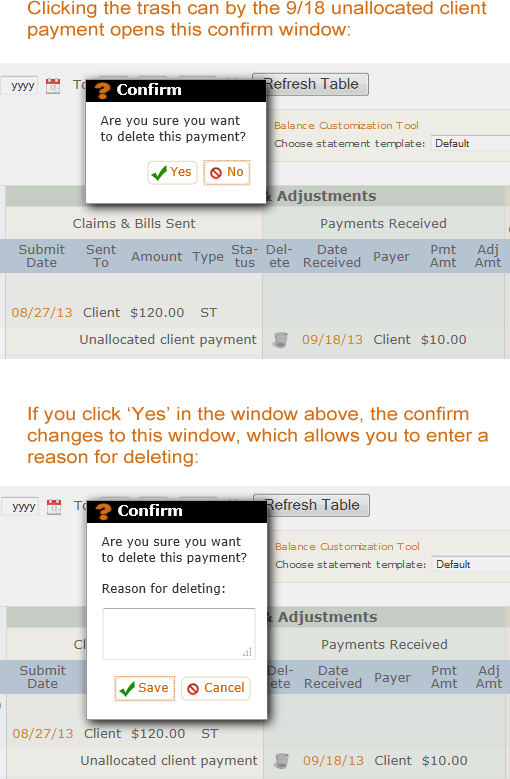
How PSYBooks Handles Deletions
In general, it's not a good idea to make deletions in a patient's medical record, and in fact, it's often illegal. However, there are times (for example, if you accidentally make an erroneous entry) when it is helpful to delete certain items to keep your records more accurate. The way PSYBooks handles this is that although you are allowed to remove almost anything you've entered in a client's chart, the information is not really deleted. The removed information is kept in the Activity Log in the Reports section for a period of ten years and can be accessed at any time. This accomplishes the joint goals of maintaining complete medical records without deletions while also giving you control over what you actually see in your clients' charts.
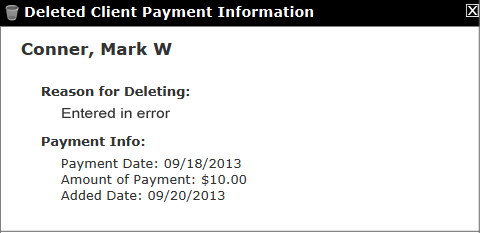
Additionally, when you do decide to delete an item, you're given a textarea that allows you to enter your reason for deleting. For example, if you mistakenly enter a payment in the wrong client's chart and then try to delete it, you get this window:
If you enter a reason and then click "Save", you can go to Reports > Activity Log and run a current report. You'll see the deleted item listed with an orange link in the Description column:
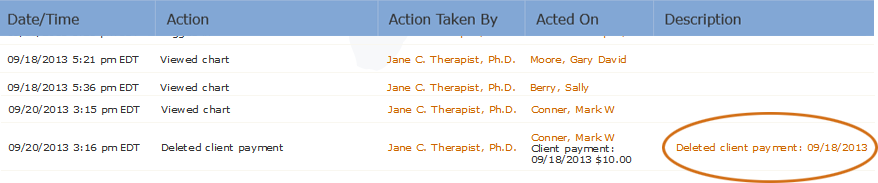
Clicking on the Deleted client payment link in the Description column opens the window below. Notice that the reason the user wrote in the 'Reason for deleting' textbox is displayed here along with all pertinent information about the payment that was deleted: