

Manual Index
-
Chapters
The Portal Manual is currently divided into four chapters. Click a chapter title to display that chapter's content on the right.
Manual for the PSYBooks Portal
PSYBooks Email and HIPAA
The Security Rule
There are two places email can be vulnerable to hackers: 1) when it's "in motion" (i.e., traveling from your computer to the recipient's computer or vice versa) and 2) when it's "at rest" (just sitting in your mailbox or theirs). According to HIPAA, email can be called "encrypted" if only the first piece is done. However, PSYBooks' email is encrypted both places: in motion and at rest. This means that NO one can read your email except someone who has the password to get into your account. Unlike some other companies, we can't go behind the scenes and read your email. This also means that your email is much less vulnerable to hackers since the majority of breeches take place when data is at rest. Because of this, our email system meets the HIPAA/Hitech Security Rules and then some.
The Privacy Rule
However, there is still the HIPAA Privacy Rule to consider. PSYBooks helps you with this part, too, by a series of alerts and reminders. However, to give you maximum flexibility with the program, there are situations you will need to monitor on your own. For example, unless you have appropriate releases (which will not be typical) it's important to make sure you don't inadvertently reveal one client's name and email address to someone who shouldn't have it by putting those names in the To or CC boxes. If you need to send the same email to two or more people at least one of whom is a client, it's typically better to use BCC. (You can put your own name in the To field.) If you don't want to ever have to worry about it, just make a practice of either sending email to one client at a time or, if you send to more than one client - or to a client and any other type of Portal User, put all names in the BCC field. You will never have difficulty with either of those methods. However, there may be times you want some exceptions to these rules, which is fine as long as you've covered all your HIPAA Privacy bases. Possible times you might want exceptions are below:
Exceptions & Pros and Cons to using To/CC instead of BCC
If you have two or more clients who have signed the appropriate releases to allow them to communicate with one another, putting all names in the To and/or CC fields has some benefits. Examples of this might be a group where all group members have signed releases, or perhaps a spouse or other family members in family therapy situations. The benefits might be based on therapeutic reasons, for example, to discourage splitting. When all names are in the BCC field, although each member is receiving exactly the same communication from you, they have no way of knowing that they are. Also, if BCCd members reply to your email - even if they hit "Reply All", you will receive separate emails from each but none of the other recipients will see what anyone else in the group has said to you. From a logistical standpoint, this means that your own inbox could become rather full since at that point, you're just corresponding with one of the recipients of the original email at a time.
However, remember that if you don't want to have to worry about HIPAA at all, you can always follow these two rules. Either:
- Never include any other Portal User on an email to a client or
- If you need to email a client and someone else, put all names in the BCC field and yourself in the To field.
And, of course, if you're only emailing your office staff or any other non-client Portal Users you may have, you don't have to be concerned about HIPAA at all and you can use To, CC and BCC however you normally would. It's only when one or more clients is involved that you have to exercise caution.
Mastering the Hard Stuff
You Can Only Send Email to Portal Users
For the most part, PSYBooks' email works like any other email system so it should be intuitive and easy to learn. However, there are two keys to understanding how encrypted email works in PSYBooks that may be a little confusing at first. They're covered below:
The first, and probably the most important thing to understand, is that you can NOT send an email to someone who isn't already a Portal User. In other words, if you want to send someone an email through your portal, you can't just type their name in the To field of the Compose Mail form and send it. The whole key to sending and receiving encrypted email is that the two people have a "secure channel" set up between them. That channel is established by first sending them an invitation to join your Portal with the Add Portal User tool on the Portal Users page. Once they accept your invitation, the To field of your Compose Mail tool will populate with their names and look something like this:
When you click on the To field of the Compose Mail form, a dropdown list of all of your existing Portal Users appears as shown in the screenshot. If you do not have any Portal Users, there will be no names here and you will not be able to send email. Notice that the cursor is on a blank area right below the words "Enter name to search here . . . " There's a tendency to think that this blank area is where you can write in an email address, but it's not. Instead, the blank area is a search field for users who may have extremely long dropdown boxes. You can type the first few letters of the person you want and the results will be shown below. With a small number of Portal Users such as in the screenshot, it's probably easier to just go ahead and check the box you're looking for and not use search at all.
The Mailboxes
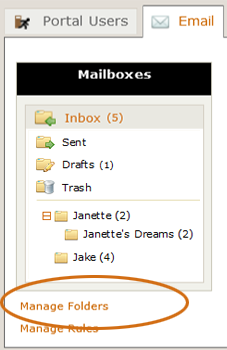
PSYBooks provides you with the standard Inbox, Sent, Drafts and Trash mailboxes. In addition, you're allowed to create specialized folders of your own. This means that your mailboxes might look something like this:
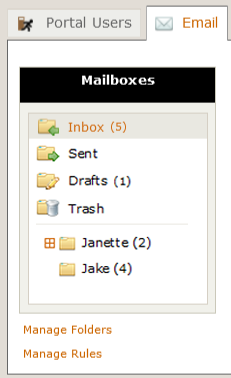
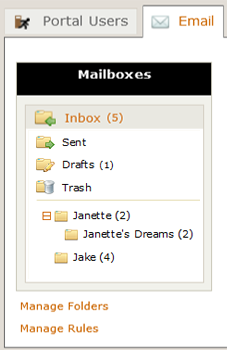
Notice the standard boxes at the top (Inbox, Sent, Drafts and Trash) and two user-created folders in the section below (one for Janette and the other for Jake). You can tell by the small numbers in parentheses that there are currently 2 unread emails from Janette and 4 from Jake. In addition, the orange box beside Janette's name means that this user has created a sub-folder in the Janette folder. When we click the orange box, it opens and we can see that the sub-folder is called "Janette's Dreams". Evidently this client sends her therapist a lot of dreams via email and the therapist wanted to keep those separate:
Creating Folders
There are two ways to add these user-created folders. The first is with the Add Portal User form when you first invite the user to join your portal. In the Permissions section, there's a box that's checked by default that allows PSYBooks to create a folder for the user you're adding:
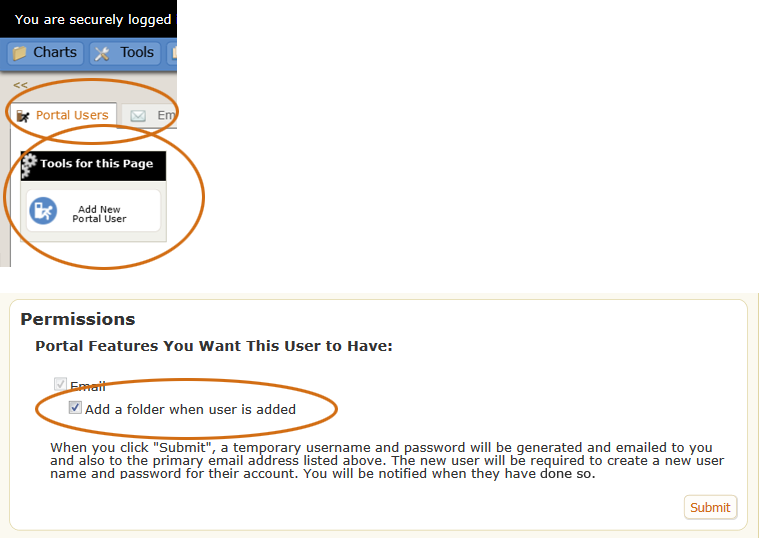
You can uncheck the box if you don't want a folder to be added but it's a handy feature. When a folder is added this way, it will automatically have a rule so that that user's email will automatically go to the respective folder and your email will be kept organized.
The second way to add a user-defined folder is with the "Manage Folders" tool which is a link right below the mailboxes:
When you click that link, the form that opens looks like this:
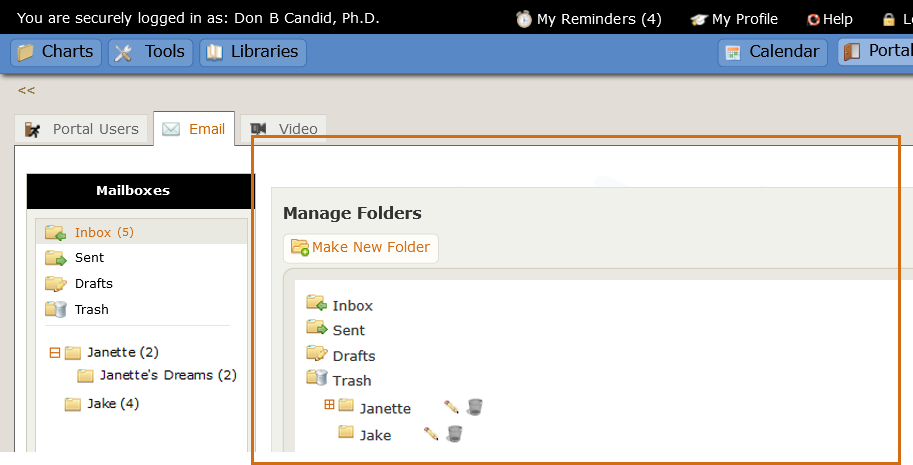
Notice that this form has a button at the top to allow you to make new folders, and it also has both edit and delete tools by the Janette and Jake folders that have already been created.
Creating/Managing Rules
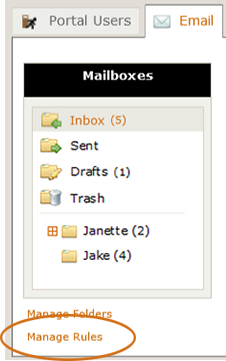
There's another link beneath your mailboxes called "Manage Rules":
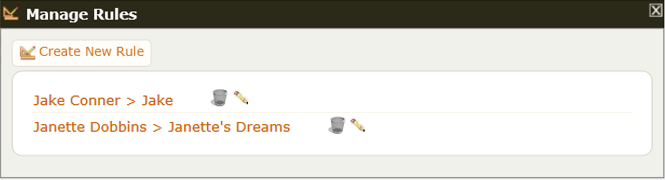
That link opens the form below, which allows you to specify which mail you want to go into which folder (with the "Create New Rule" button) and also to edit or delete those rules you've already created (with the edit and delete tools by each existing rule):
Header Tools
Each mailbox has a number of header tools at the top of each page that look something like this:
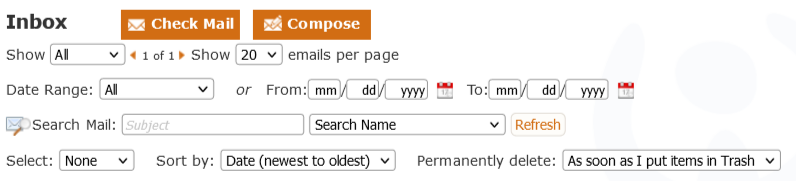
Going from left to right in the top row, mail comes into your PSYBooks account automatically, so you won't really need the "Check Mail" button often. However, the one next to it, "Compose Mail" is probably the one you'll use most often. We'll look at it in detail later. The next tool "Show" allows you to show all email, only those you've read or only those marked unread. The small orange arrows allow you to navigate from one page to the next if you have more than one page of email. The "Show 'x' emails per page" allows you to choose how many emails you want to see at one time. There's also a "Sort By" tool to the far right that has a lot of features to help you find what you're looking for:

The second row of header tools is to narrow your email view to certain dates. For example, the "Date Range" tool allows you to see all email, only those that have come in today, etc. If you're looking for something specific, you can enter specific dates in the "From" and "To" boxes to focus the view more tightly. Any changes made on this line will need to be followed by clicking the "Refresh" button on the next line:

The third row of tools (visible in the above screenshot), allows you to search your email, either for a text string or by using the dropdown to search by the person's name.
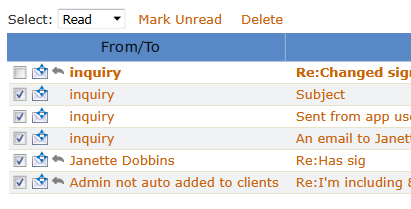
The fourth row of tools allows you to select all emails or those that are read or unread and then gives you some global tools for working with them. For example, the in the screenshot below, the user has chosen to select the emails that are read and now has the option of marking them unread or deleting them.
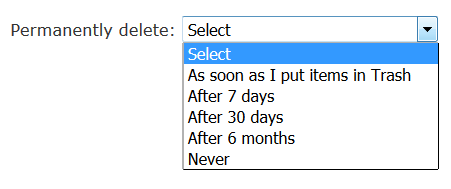
There's also a tool on the far right of this line that allows you to choose when, if ever, PSYBooks should delete email that you've placed in the Trash folder.
Compose Email
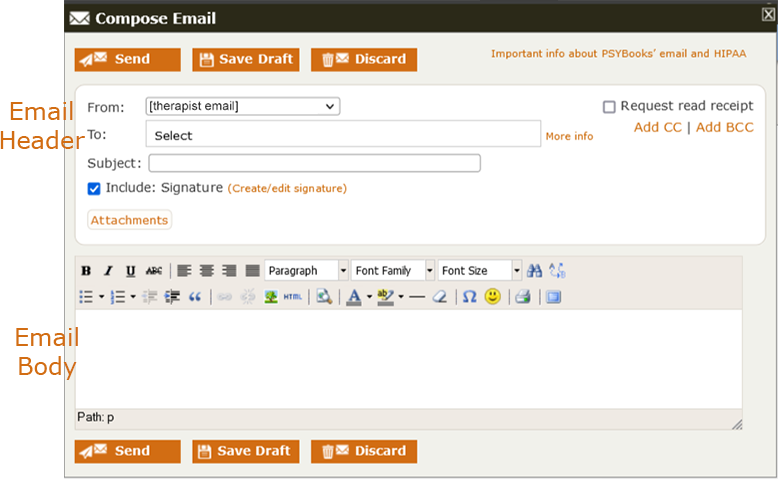
When you open the Compose Email tool, it looks something like this:
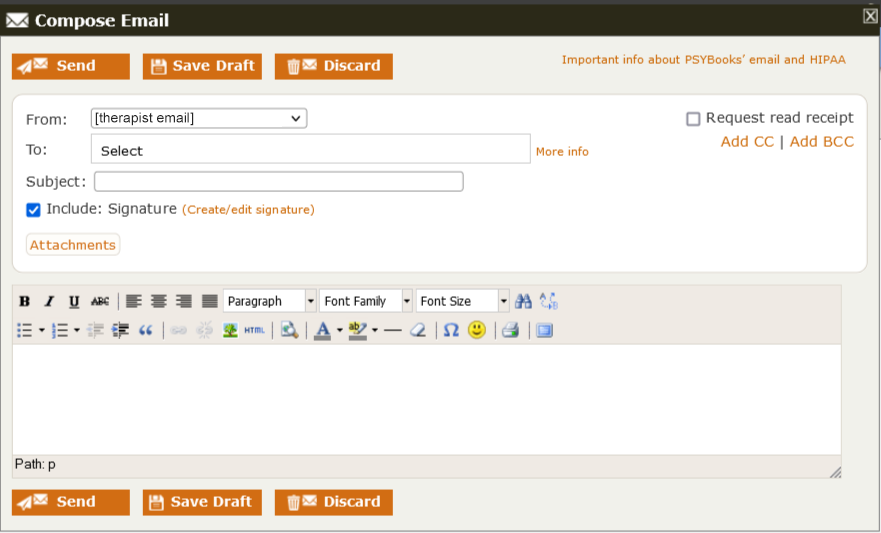
The three buttons across the top: Send, Save Draft, and Discard are self-explanatory. The next row will have your email address already listed in the "From" field. On the far right, notice that if you want, you can request a read receipt. The recipient will not know you've done this, but it will allow you to see who's opened your email and when.
The To, CC and BCC Fields
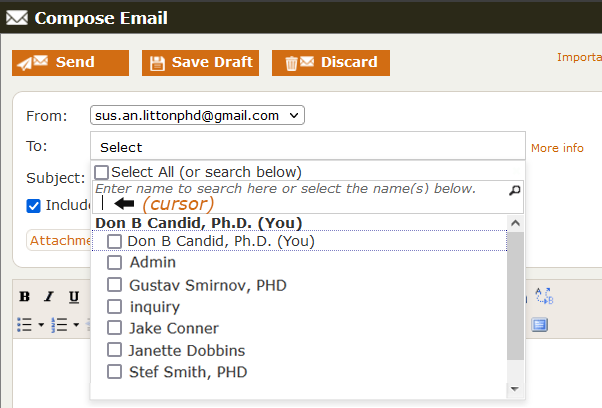
The To field - along with the CC and BCC fields - are the only part of this form that may seem new or unusual to you. To allow for encryption, the only people you can email are those people who are already your Portal Users. The "Add Portal User" tool on the Portal Users tab allows you to invite others to join your portal. Once they accept the invitation, a secure channel is established between the two of you and you can send anything you want back and forth. This means that, unlike non-encrypted email, you can NOT just type a person's email address in the To field. Instead, you select from a list of Portal Users that are automatically entered for you as people you invite accept your Portal User invitations. The same is true for the CC and BCC fields.The screenshot below shows a form where both the "Add CC" and the "Add BCC" links have been clicked. Notice that all three ways to send an email - To, CC and BCC - are select boxes, not blank text fields:
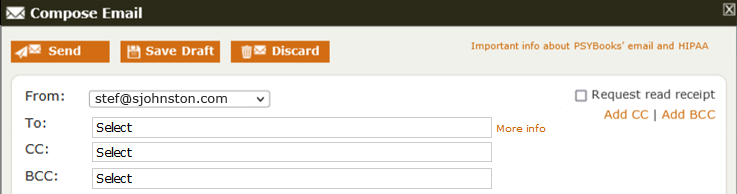
If you click the To, CC or BCC boxes on the word Select, they will open to show something similar to this:
As mentioned above, even though your cursor lands in a blank area that LOOKS like you should be able to type in an email address, you can't. This area is a search tool for users who have many Portal Users and may want help in locating the one(s) they want. With a Portal User list as small as this one, it's probably easier to just scan the list to find the name(s) you want and check the box(es). Notice that although you CAN put multiple client names in the To and/or CC boxes, most of the time, it's better not to for HIPAA privacy reasons. In fact, often if you try to do that, PSYBooks will either give you an alert asking if you're sure that's what you want to do, or just change all the client names to BCCs to be on the safe side.
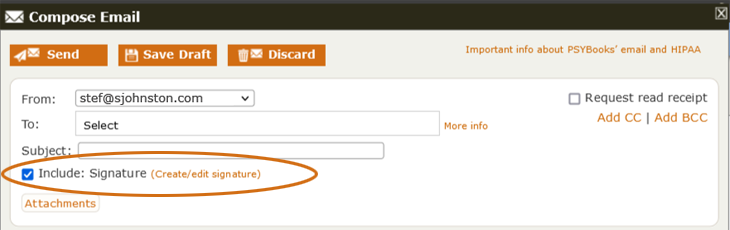
The row below the To field is the Subject line, which is just like any other email system.
Create and Edit Signatures
The next row has a tool for creating and/or editing signatures you may want to add to your emails:
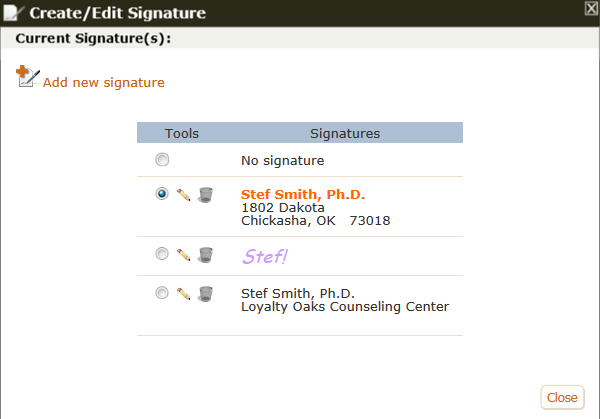
If you click the Create/edit signature link, a window like this opens:
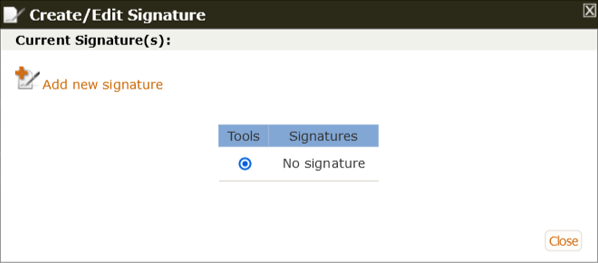
Notice that the defaut signature is blank - no signature at all. If you click the "Add new signature" button at the top, it adds a section at the bottom of the form where you can create a new signature:
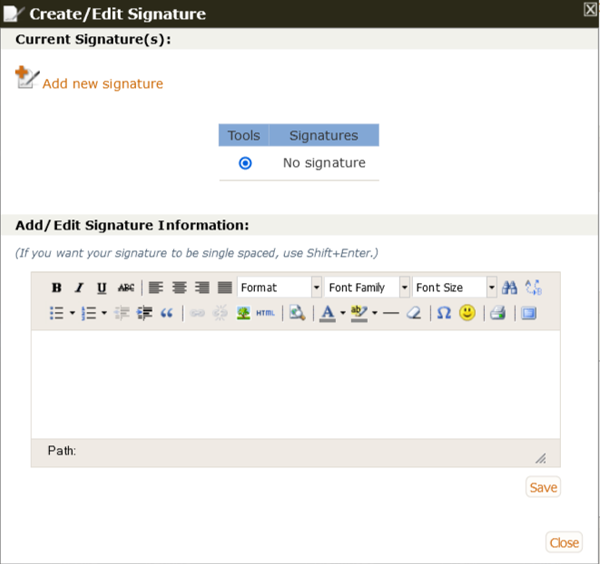
When you save your newly created signature, it will be added to the list. The screenshot below has three different signatures the user has created for different purposes. She can easily change back and forth - or edit or delete any of these - to add what she needs to a specific email:
Attachments
Below that, is a button for adding attachments. Again, this works just like other email systems except it's important to note that in PSYBooks, even the attachments you send are encrypted; again, both while in motion and also once they arrive at the recipient's portal. You can send statements, test results, or any other potentially sensitive information in the body of your emails as well as in the documents you attach and it will all be encrypted.
Also, when you send attachments in PSYBooks, you can designate any that you want the recipient to eSign and send back to you. The entire eSign process will be discussed below.
The Body of the Email
The body of the email, where you write the email's content, is just like any other - complete with some formatting tools you can use to personalize your documents a bit.
The Email Tables and Table Tools
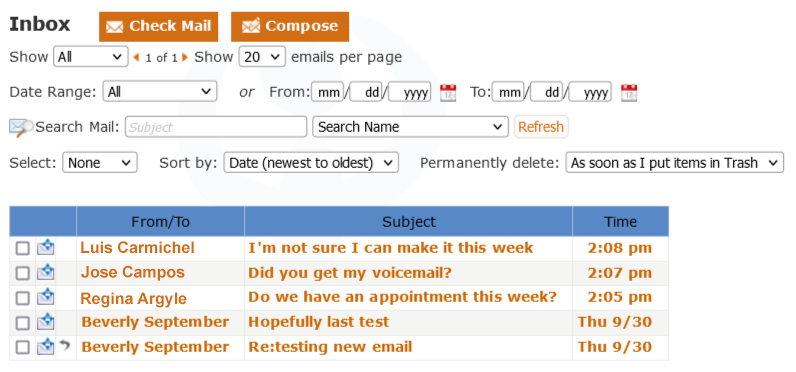
Once email starts coming in, it will be displayed in tables similar to this The orange lettering in the tables below is bold, indicating that none of these emails has been read. Once an email has been read, it is no longer presented in a bold font.:
There are three table tools on the email tables:
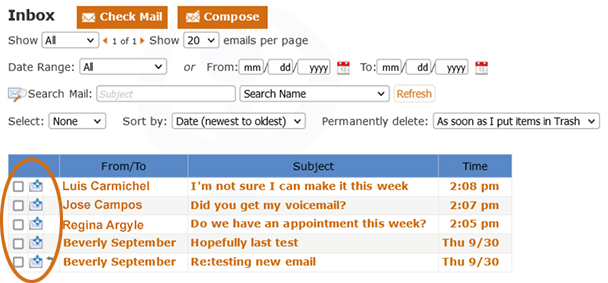
From left to right, the first is just a checkbox which allows you to select emails you want to delete or mark read or unread. The second is a "Move" tool, which allows you to move emails OUT of the inbox and INTO one of your user-defined folders or vice versa. The third tool - the backwards pointing arrow - is really just an indicator/status tool so you can see which emails you've already replied to and which you haven't.
eSigning in PSYBooks
PSYBooks' eSign process is easy, flexible and HIPAA Compliant. It allows you to request eSignatures on any document, including documents that are already stored in PSYBooks storage areas as well as documents from your computer or other storage devices. When the patient eSigns the file(s) and returns them to you, you are notified both via email and also on your TNT (Therapist Notification Tool). Files returned by patients are automatically placed in the Files tab of their chart, ensuring that your patient's medical records are all stored in one place. You also have a copy of the signed file in a special category named "Documents That Have Been eSigned" in the My Files & Templates tool on the Tools > My Files page of the app.
Basically, the eSign process begins with an email. However, there's more than one way to send encrypted emails and files in PSYBooks. The most obvious one is by using the Compose Email tool at Portal > Email. However, if you have the documents you need to send uploaded to the Files, Forms & Templates page, you can send files with eSign requests from there. This graphic shows how it works:
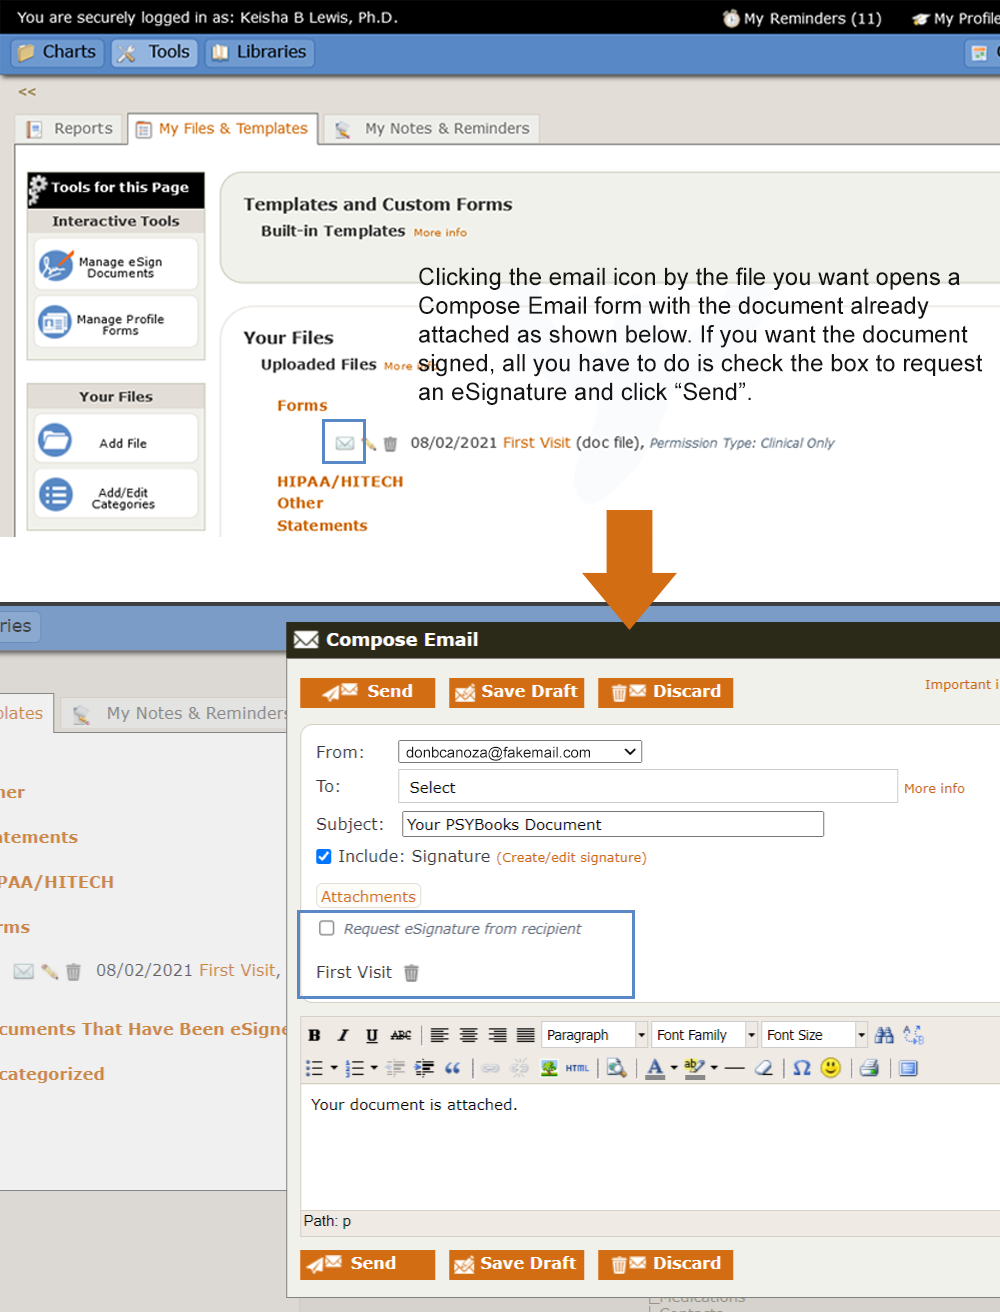
An example of one possible work flow is to download one of our free form templates, customize it for your practice, upload the customized form to your personal encrypted file space at (Tools > Files, Forms & Templates). Obviously, if you already have your own forms that you prefer, you can upload those instead. Then, when you need to send a patient one of your forms so they can eSign it, you can click the email next to that form on Tools > My Files to send it to the patient for them to eSign as shown above. We'll cover the various steps in the eSign process below.
You also have a special tool to allow you to track documents you've sent for eSigning. It's called the "Manage eSign Documents" tool and it lives on Tools > My Files & Templates. This tool provides time/date stamps for each stage of the eSign process and also gives you tools to email the Portal User, reset their password, and remind them to return the documents to you - all on that one tool.
Request a Signature
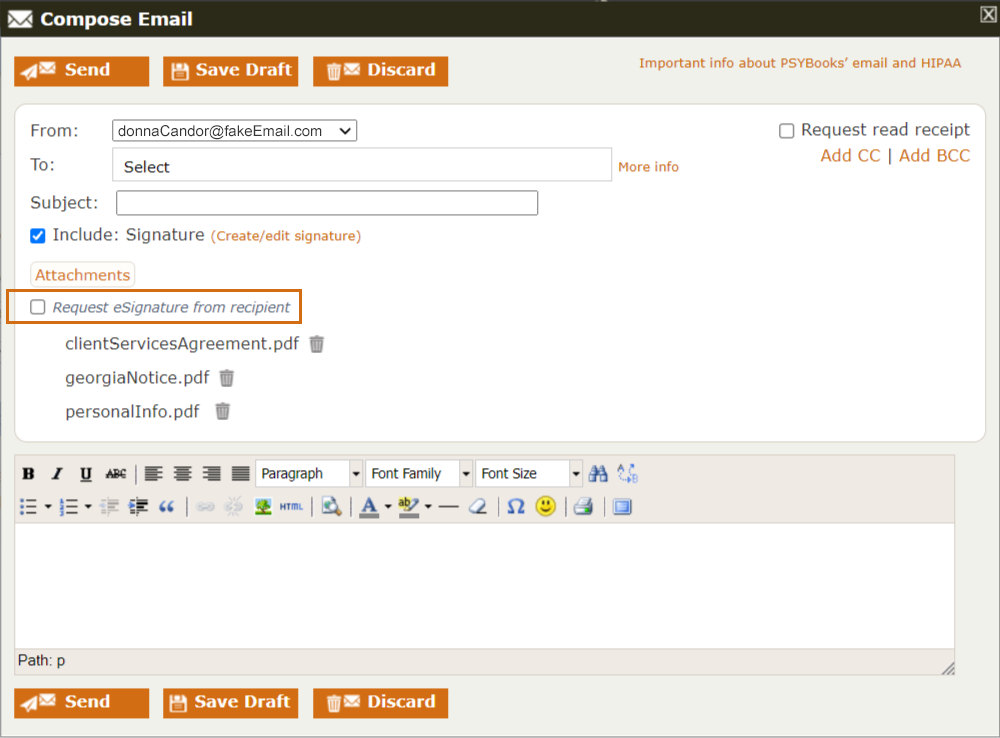
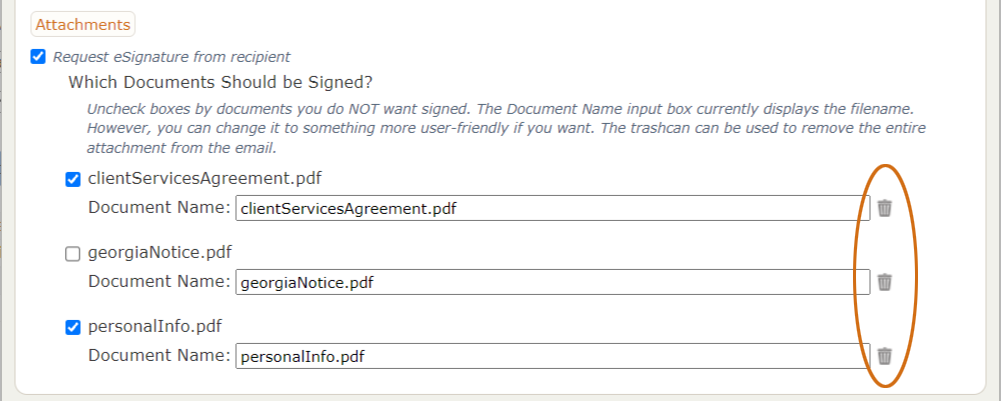
The entire eSign process begins by adding attachments to a regular PSYBooks email. As as soon as you attach your documents, you're given the option to request an eSignature on some or all of them. The user below attached 3 PDF documents to this email: clientServicesAgreement.pdf, georgiaNotice.pdf and personalInfo.pdf. This is the default screen that was produced by attaching the documents (note the "Request eSignature from recipient" checkbox that is added automatically when you attach documents):
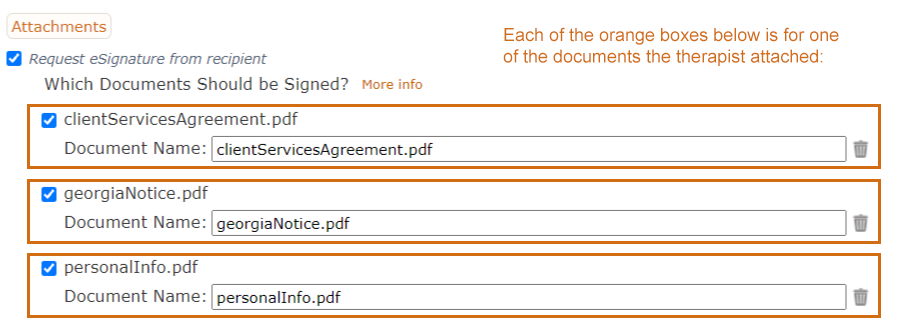
By default, when the user checks the "Request eSignature" checkbox, a checkbox is put in front of each attachment, indicating eSignatures are wanted on all documents:
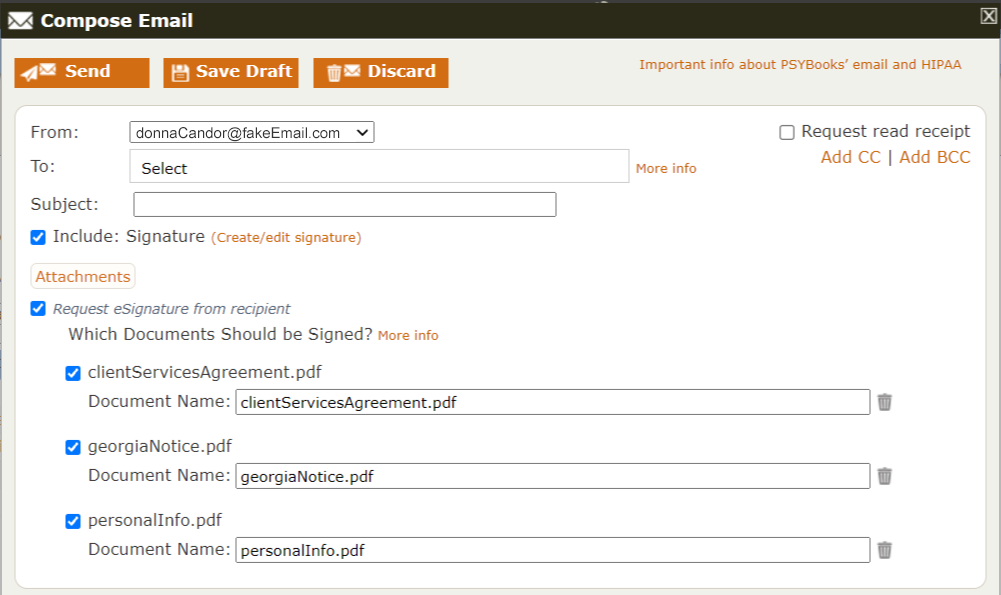
A closer view of that bottom portion looks like this - allowing us to see that each of the 3 attached documents is presented separately. By default, all checkboxes in front of each document are checked. That means, if the therapist doesn't do anything else and clicks "Send," the recipient will receive all 3 documents and be instructed to sign them all.
If there are any the therapist does NOT need signed, they can uncheck the box in front of those documents. In the screenshot below, the therapist has indicated that they do NOT need the recipient to sign the georgiaNotice.pdf file:
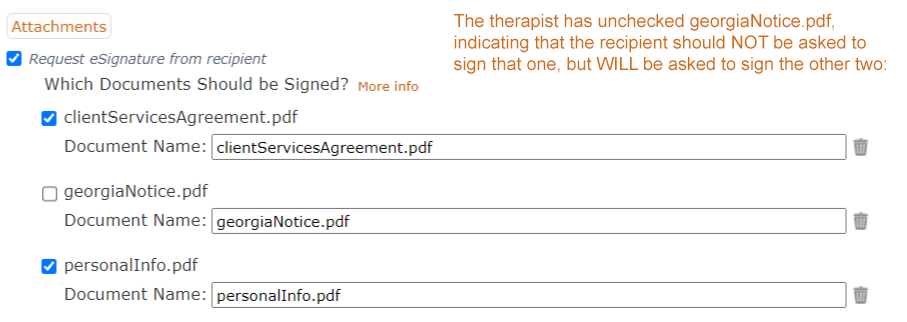
Should the therapist send the email like this, the recipient will still receive all three documents, but will only be asked to sign the two that remain checked, i.e., clientServicesAgreement.pdf and personalInfo.pdf.
There are two more tools that are available to you in this section. To discuss them, we'll look at a row for a single document. The first thing to know is the difference between a file name (a.k.a. filename) and a document name. Essentially, the filename is the name of the file you uploaded from your computer, your cloud storage or wherever you went to find the file you attached to the email. Filenames are designed to be read by computers and as such, may or may NOT be particularly understandable by humans. Document names, on the other hand, are a name YOU give to the file to make it easy for both you and your patients to understand what that document is. The single row example below shows both the filename and the document name:

By default, PSYBooks uses the filename for the Document Name, such as you can see above where both fields say "personalInfo.pdf." However, you can change the Document Name to anything you like. Shorter names are usually better than longer ones, so the therapist in this case might want to change the Document Name to Personal Info, or even just to Intake Form:
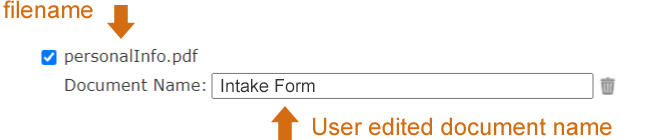
Notice that there's no reason to add an extension (e.g., .pdf or .doc) to a Document Name since extensions only matter on filenames.
The final tool in this section is the trash can, which allows you to remove an attachment from the email before you send it in case you change your mind:
Once you have the Compose Email attachments the way you want them, just send the email as you normally would.
File types
When you need a document signed, the best file type to send is a PDF. Although you can send other file types for signatures, sending PDFs will give both you and your recipient the smoothest process. When you send PDFs, your recipient will be able to read the document right on the page, with the PDF Preview Tool. They don't have to download the file to be able to read it. When other file types (.doc, .txt, .xls, .jpg, etc.) are sent, the user has to download them to view them, which adds an extra step.
The Patient (or Other Recipient's) Experience of the eSign Process
When the therapist sends an email with documents they want the recipient to sign, the first thing that happens is that the recipient is notified that they have an email in their PSYBooks Portal - just as would happen with any other Portal Email they received. The email they receive might look something like this (their email may look a bit different, depending on what program they are using to receive their email, but this is the basic template):
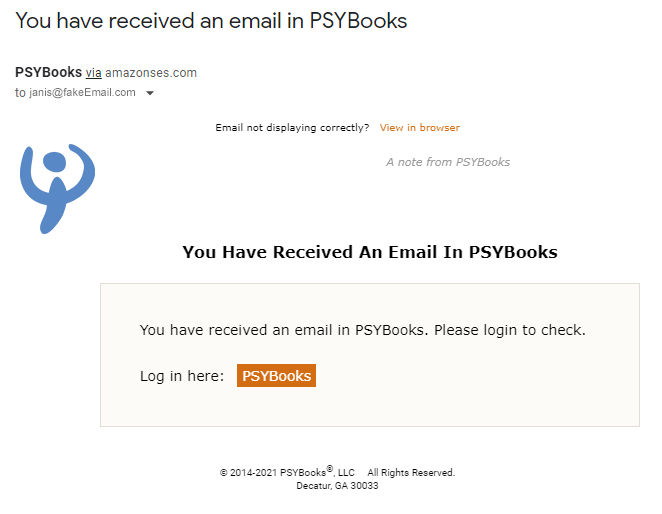
Notice that the therapist's name is not mentioned anywhere on the email. This is done as a further protection under the HIPAA Privacy Rule. If anyone else intercepts this email, they will not be able to connect the recipient with the therapist unless they also have the username and password. Clicking the orange link on the email will take the recipient to the sign-in page for their PSYBooks Portal where they can enter their username and password. (If they've forgotten their password, you can send them a link to reset their password on your Portal User's Page or on the Manage eSign Documents tool.)
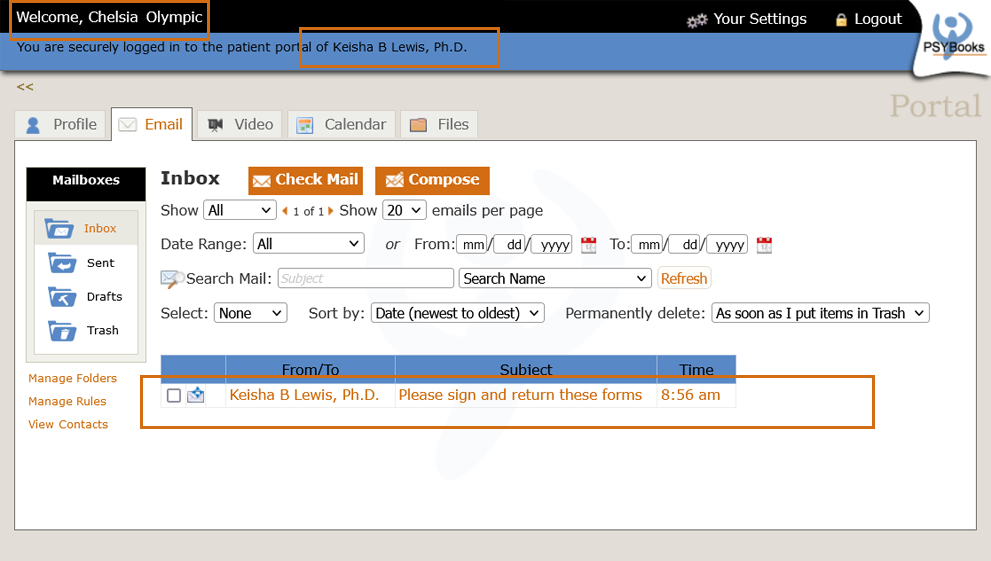
When the patient first signs in, they're on their email tab, which is the default page of PSYBooks patient portals. In the screenshot below, you can see that this is the portal of a client named Chelsia Olympic, whose therapist is named Keisha B Lewis, Ph.D. The top email in Chelsia's inbox is the one Dr. Lewis just sent Chelsia that has documents Dr. Lewis wants her to sign. Dr. Lewis gave the email a Subject of "Please sign and return these forms:"
When Chelsia opens her email, she sees this:
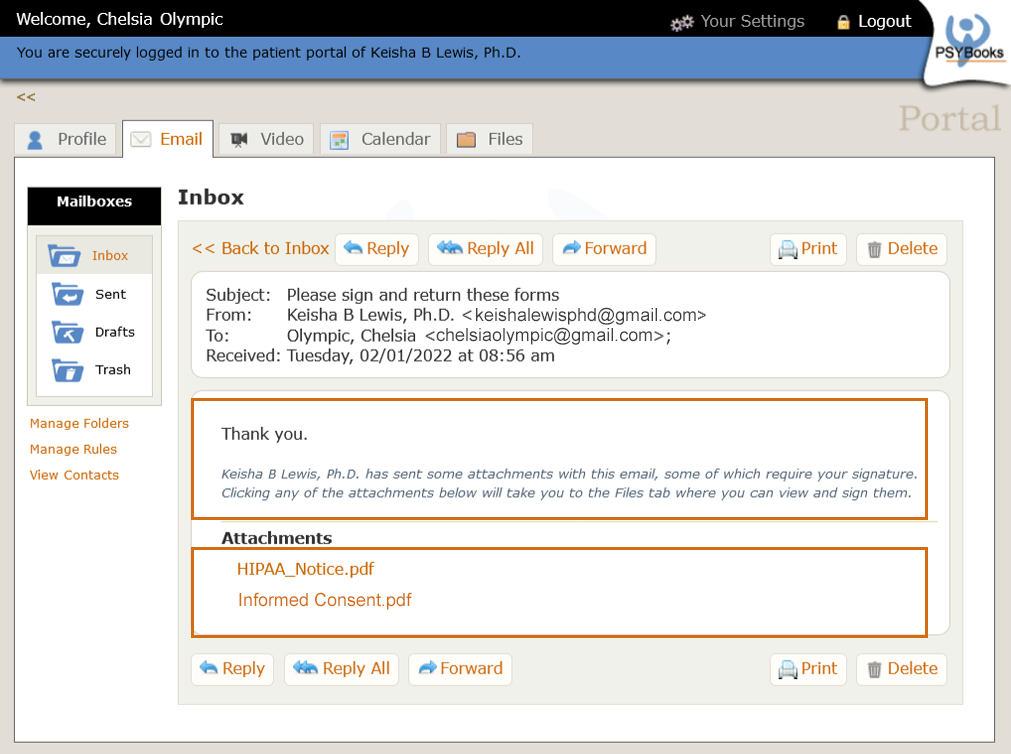
In the body of the email, Dr. Lewis wrote the top part ("Thank you"). Therapists (or their admins) are free to write anything they want on these emails. Remember - the entire eSign process begins with a regular PSYBooks email. However, unlike regular emails, there's a part at the bottom of an eSign request email that is added by PSYBooks. Even if the therapist hadn't written anything in the top part, the patient would be instructed about what they were supposed to do, i.e., click any of the attachments. At this point, the process diverges from a regular PSYBooks email. In regular emails, if you click an attachment it is either downloaded and/or opened, depending mostly on your browser settings. However, when a user clicks on an attachment for a document you've sent to be esigned, the user is taken to the Files tab of their portal, where all documents you've sent as attachments to this particular email are there waiting for them.
The Portal Files Tab
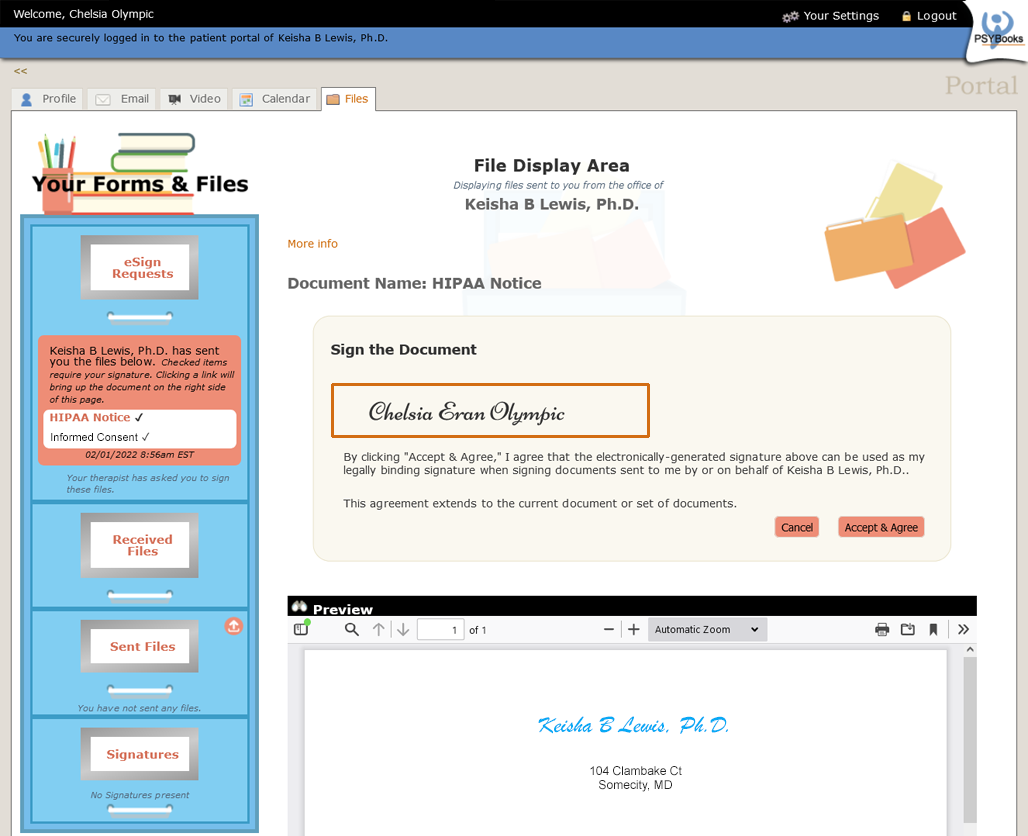
When our client above, Chelsia Olympic, clicks on either attachment in the email, she's taken to her Files Tab. As an aside, although therapists have a files repository page (Files, Forms & Templates), it's not part of their portal. Therapist portals don't have file tabs. However, Chelsia's Portal Files tab might look like the one below. The first document Dr. Lewis sent her, "HIPAA Notice", is all cued for Chelsia to read and eSign:

Ignore the filing cabinet for a moment - we'll discuss that later. The important things for eSigning are on the right side of the page. The gold box asks Chelsia to write her full, legal name in the box. Below that, the first file Dr. Lewis sent, "HIPAA Notice", is displayed for Chelsia to read. Notice that only PDFs can be displayed in the PDF Preview Tool. Non-PDF files require a download. Had Dr. Lewis sent other file types, instead of the PDF Preview tool, Chelsia would have a link so she could download the file. When Chelsia types her name in the textbox and clicks, "Accept and Submit," she'll see a page like this:
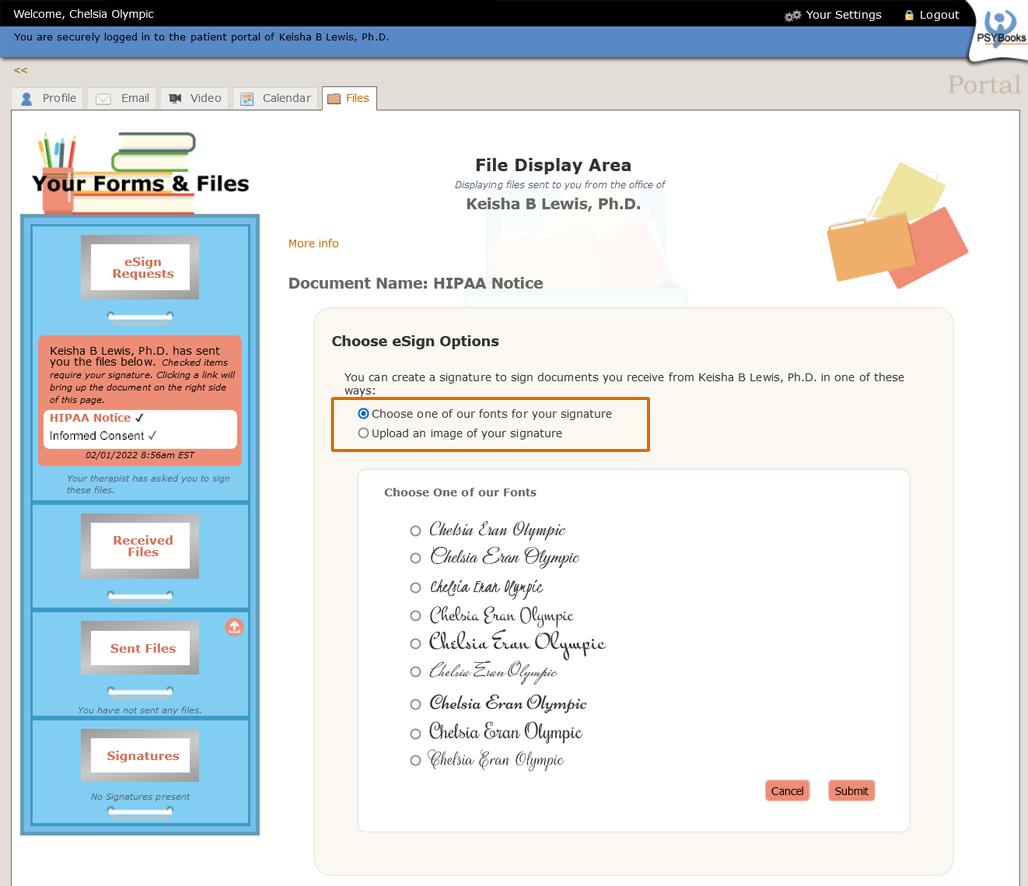
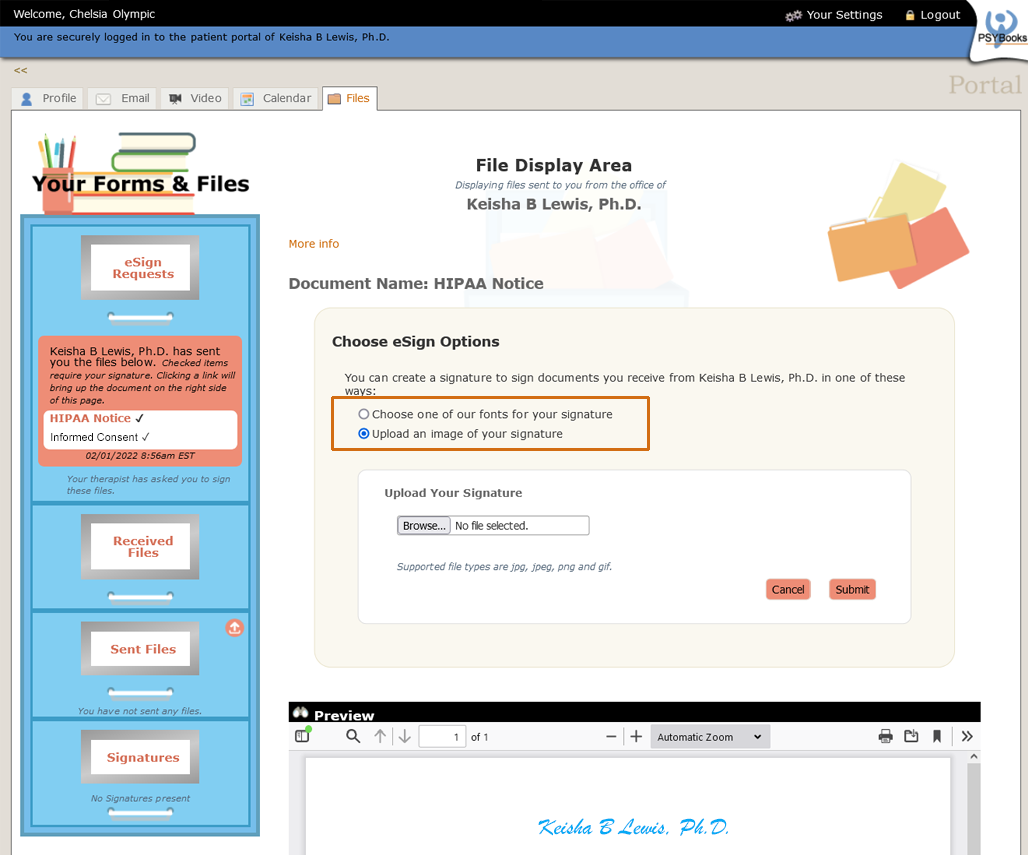
Chelsia typed "Chelsia Eran Olympic" as her full name. On this page, she can choose one of the scripts in the white box to represent her signature. Or, if she prefers, she can upload an image file of her signature and use that. If she'd rather do the upload option, she'll need to change the radio button that's outlined in orange above:

If Chelsia chooses the second radio button, she'll get this interface, which allows her to upload a file:
Let's assume Chelsia stuck with the default option and chose one of the scripts shown with the top radio button. When she makes her choice and clicks Submit, the page changes to this:
The wording in the gold box under the font she chose for her signature says:
By clicking "Accept & Agree," I agree that the electronically-generated signature above can be used as my legally binding signature when signing documents sent to me by or on behalf of Keisha B Lewis, Ph.D.
This agreement extends to the current document or set of documents.
Had Chelsia chosen to upload an image of her signature instead of choosing a font, the interface and acceptance text above would be the same, but the font would be replaced by the image she uploaded.
By agreeing to this, the signature Chelsia chose becomes her legal signature for both of the documents Dr. Lewis sent her. Clicking "Accept & Agree" will attach a signature to this first document (HIPAA Notice) and, assuming there are other documents, advances the program to the next one. Since Dr. Lewis also sent a document called "Informed Consent," that's the document that will be displayed when Chelsia "signs" this one and clicks "Accept & Agree:"
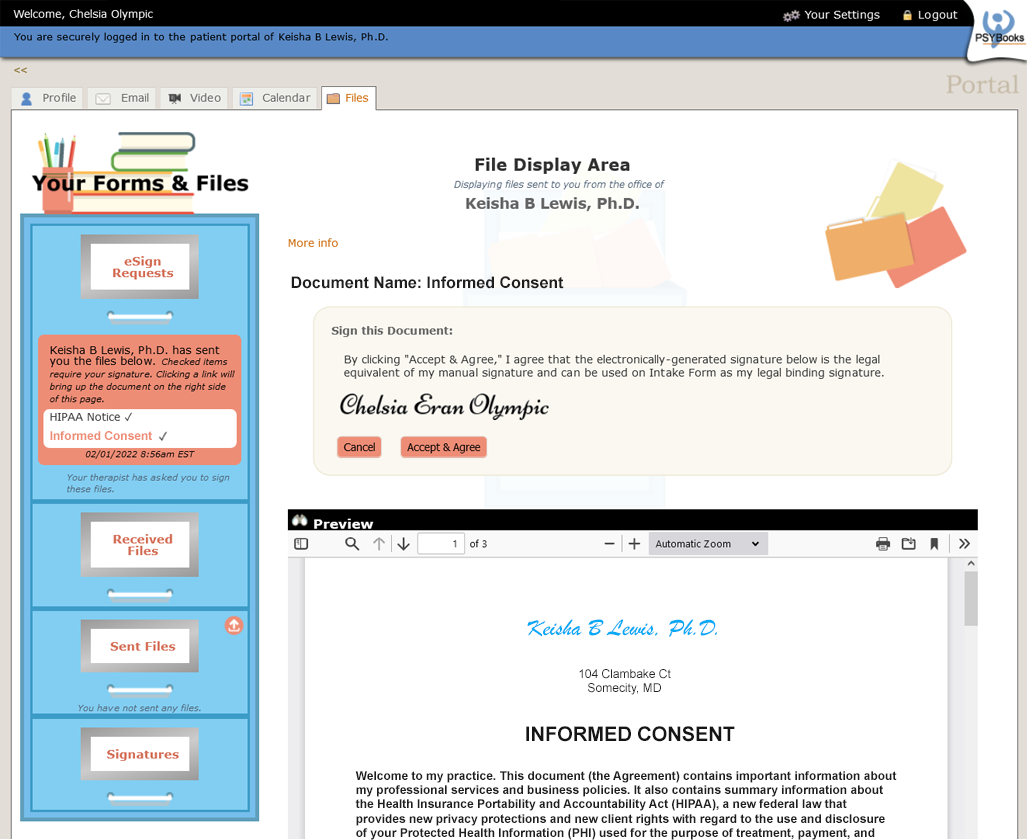
Notice that the gold box with signing instructions just says, "Sign this Document." She's already created her signature and agreed to use it on however many documents were submitted in this batch, so all she has to do with any remaining documents is just sign them.
When the last document has been signed, Chelsia is shown a preview of the signature page that will be attached to each of the documents. Her initials (ceo) have been attached to the end of the filename, making it easy for the therapist to differentiate the original, unsigned document from the signed one. The set of files also has a time/date stamp so each party has a legal indicator of when they were signed:
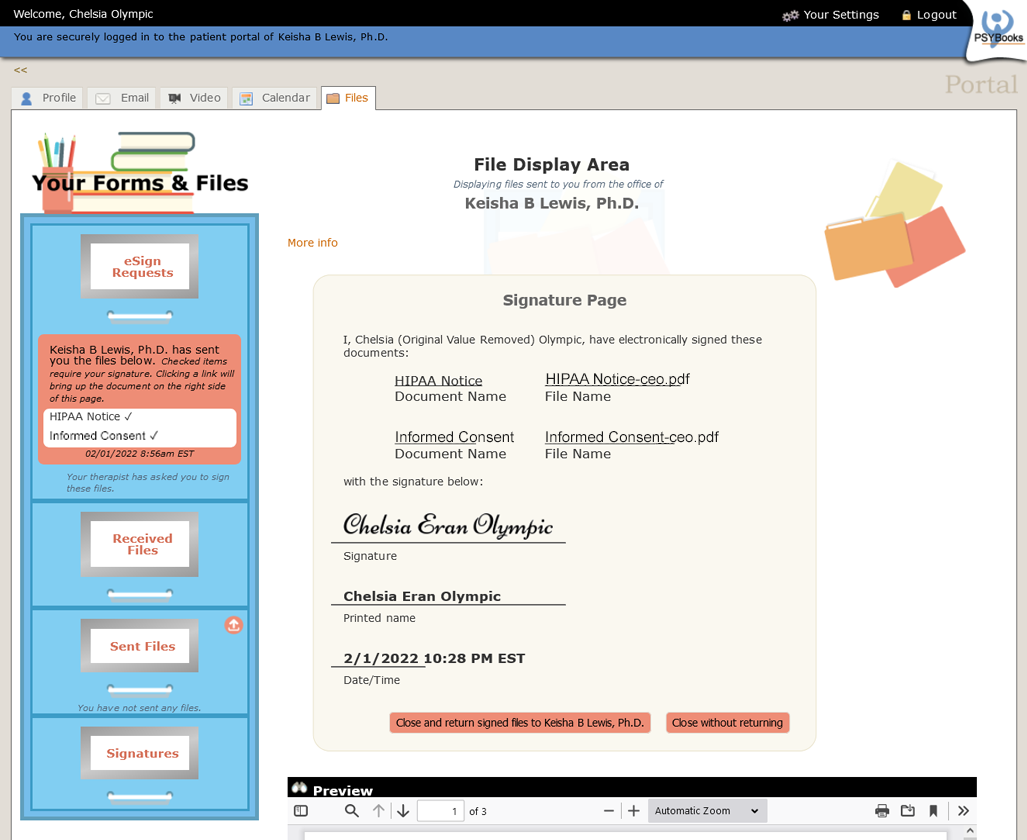
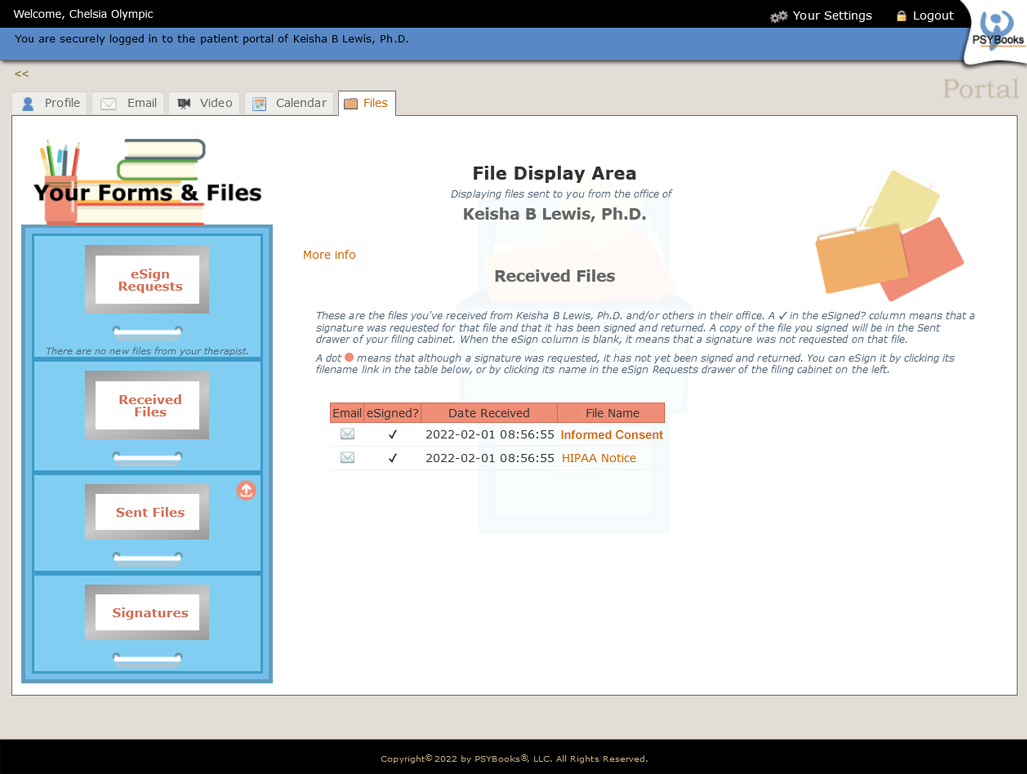
The only remaining thing for Chelsia to do is to return the signed documents to her therapist. She can do that by clicking the "Close and return signed files . . . " button from the signature page view above. When the documents have been returned, Chelsia's Files Tab changes to the default view of this page, which is Received Files. You can see the two files Chelsia originally received from Dr. Lewis, i.e., "Informed Consent" and "HIPAA Notice", are listed in the table in the middle:
It makes sense at this point to take a short detour and discuss the filing cabinet functionality.
The Filing Cabinet
Drawers in the filing cabinet on the left side of the Portal > Files tab are buttons. Most control what is seen on the center part of the Portal > Files page, but they only work if the Portal User has items of that type to display. Here's a description of each:
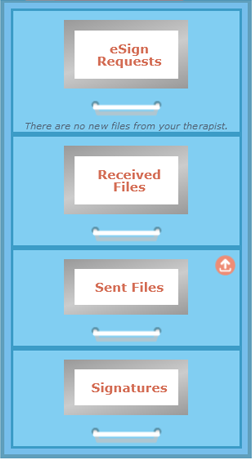
- eSign Requests. This drawer is only active when the therapist (or someone from their office) has sent the Portal User files that require their signature. When that happens, the files they need to sign will appear in the center portion of the page, guiding the user through the process of previewing and signing them, as we saw above.
- Received Files. This drawer holds files the Portal User has been sent from anyone in the therapist's office. In addition, if this particular Portal User is connected to other Portal Users in the same practice, files sent to you by your Portal User contacts would also be stored here. Most clients will NOT be connected to other Portal Users unless they are in groups which the therapist has set up. The Received Files view is the default view for this page unless there are files to sign, in which case, the eSign Requests view becomes the landing page.
- Sent Files. This drawer contains files the Portal User has sent to the therapist and others in their office (or, in rare cases, to other Portal Users with whom they're connected.) There's also a File Upload button on the "Sent Files" drawer that can be used at any time:
 . Allowed file types are: .gif, .jpg, .jpeg, .png, .pdf, .doc, .docx, .odf, and .rtf. Multi-file uploads can be sent by selecting the files with either shift+click or ctrl(cmd)+click. Uploads may not exceed 20MB. The therapist is notified of all files a Portal User may send in this way.
 - Signatures. This drawer does not work until the Portal User has had at least one eSign Request and created a signature. Once at least one signature has been created, clicking this drawer will open a window to display a list of available signatures. The list of signatures that gets displayed has a trash can by each in case the user wants to remove a signature from the list of available signatures.
The Therapist Experience
Picking up with the Chelsia/Dr. Lewis scenario discussed above, we left off with Chelsia submitting the signed documents back to Dr. Lewis. This section will discuss what happens on Dr. Lewis' end.
First, Dr. Lewis is notified via regular email, just as the patient was. The email the therapist receives looks something like this:
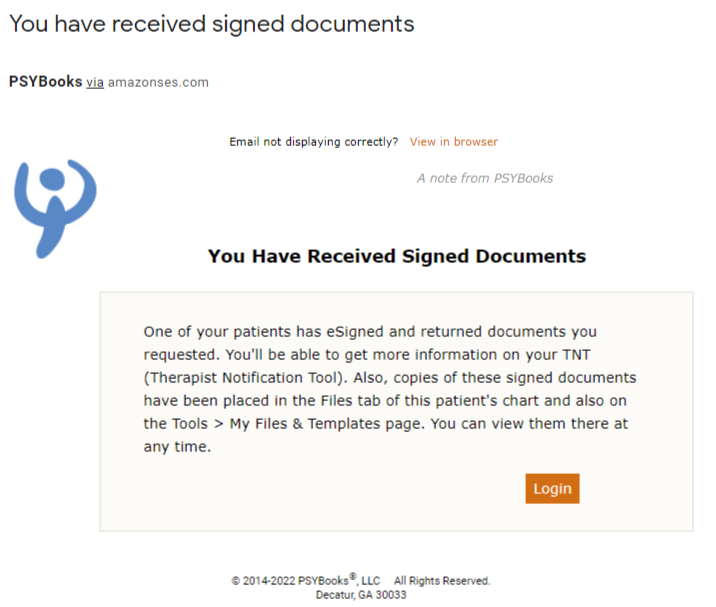
Again, no identifying information pertaining to the client is given on this email to protect confidentiality, in case the email should be hacked or otherwise intercepted. Instead, the therapist is instructed to log in and told where to find the signed documents. The email lists three places where the therapist might be able to view these files: the TNT, the files tab of the patient's chart, and the Files, Forms & Templates page. We'll look at each.
TNT Notification of Returned Documents
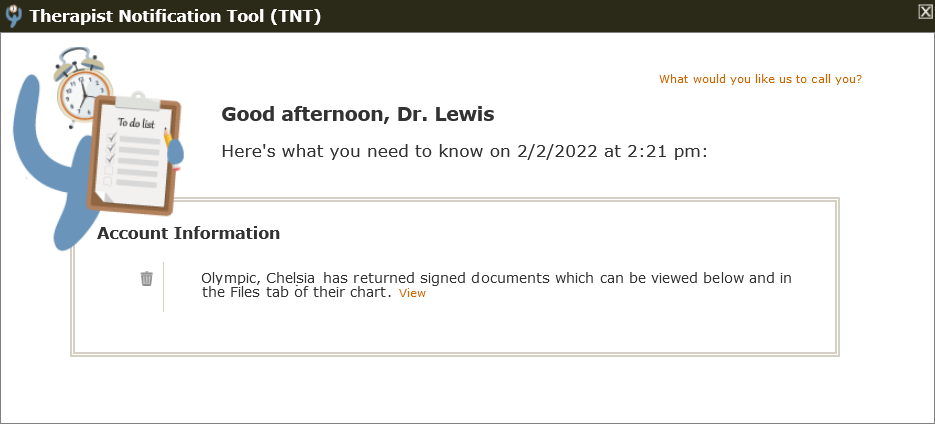
The next time Dr. Lewis signs in to her PSYBooks account, her TNT will show this:
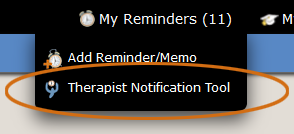
If Dr. Lewis is already signed in when she gets the email, and/or if she's changed her profile settings to prevent the TNT from automatically opening when she signs on, she can access it from My Reminders > Therapist Notifcation Tool:
If Dr. Lewis clicks "View" by the notification from Chelsia on the TNT, she'll be able to see which documents have been esigned and returned:
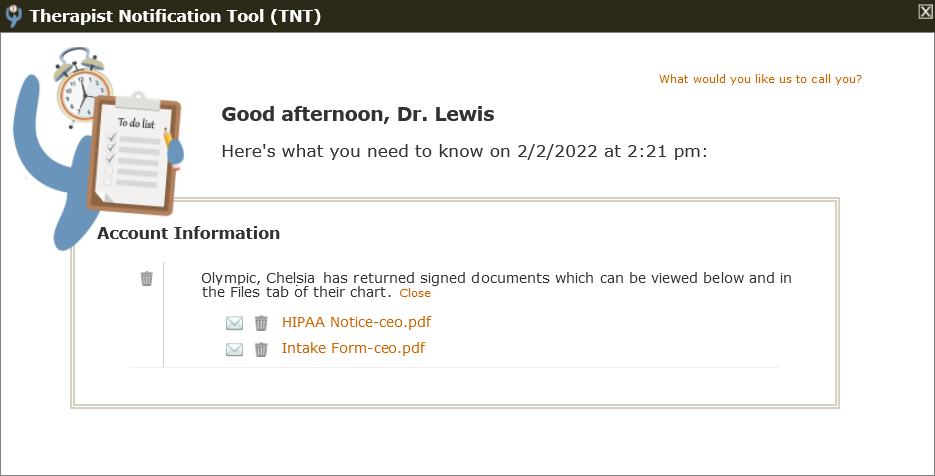
You can see the two documents Chelsia signed and returned. Her initials (ceo) have been appended to each file name, which is further evidence that these are the signed documents, not the originals. Dr. Lewis can click on one of the file names and open and/or download the signed document.
Returned Documents in Chart > Files
The Files tab in Chelsia's chart in Dr. Lewis' EHR will also show these two signed documents:
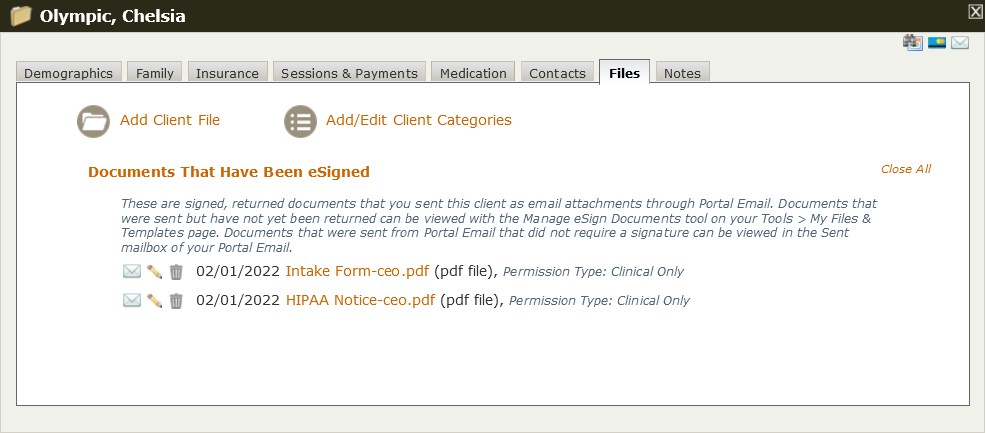
Keeping a copy in the patient's chart helps assure that the entire medical record can be located in one place.
Returned Documents on Files, Forms & Templates
There are actually two places on the Files, Forms & Templates page where returned documents that have been eSigned appear. An advantage of this page is that you can find documents from ALL portal users here, i.e., not just client Portal Users. (Clients have charts where such files can be stored, but non-client Portal Users do not.) Probably the best one is the Manage eSign Documents tool on the left nav. This tool has numerous filters to allow you to find the documents you're looking for, track their progress, etc.
Additionally, in the My Files > Files from Portal Users section of Files, Forms & Templates, there's a category called "Documents that Have Been eSigned." All eSigned documents from all Portal Users - client and non-client - will appear there.
That's it! If you've understood everything in this section, you should now be a master at sending and receiving encrypted email through PSYBooks.