
Manual Index
-
Chapters
The Portal Manual is currently divided into four chapters. Click a chapter title to display that chapter's content on the right.
Chapter Two
Portal Users
Manual for the PSYBooks Portal
Intro to Portal Users
The Portal Users tab is the admin page for those contacts (both patients and non-patients) whom you've added to your Portal. Over time, and especially with telehealth, portals are becoming increasingly important. The PSYBooks Portal currently has a threaded and encrypted email package, tools to allow Portal Users to eSign documents you send them, a Profile tab where patients can fill out their own demographic and insurance information (thus populating their own charts in your EHR), a calendar for scheduling and viewing upcoming appointments, and a video tab. Additionally, PSYBooks Portal Users have access to www.psybooks.mobi - the mobile version of PSYBooks. This means they can contact you when they're on the go, or even use their phones to log in to their video appointments with you. Everything that takes place under the umbrella of the Portal is 100% encrypted and HIPAA compliant.
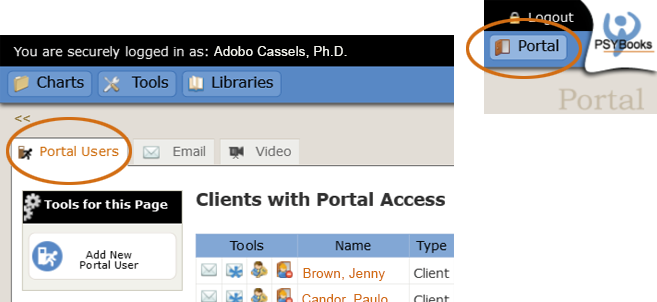
The Portal Users page is is where you invite users to join your Portal and also where you set their permissions, giving you control over what each Portal User can and can't do. This page also has the tool to reset a Portal User's password if they have forgotten it. To find the Portal Users page, click on the Portal button in the blue bar at the top right to open your Portal. Once the Portal is open, the Portal Users tab is the first one on the left:
Adding Portal Users
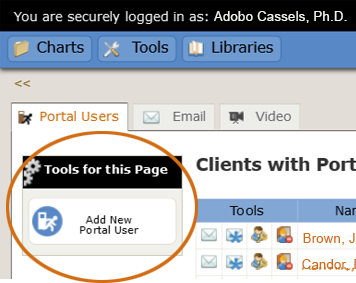
You can add users to your Portal in several ways. Perhaps the most straightforward is with the "Add New Portal User" tool on the Portal Users tab. Add New Portal User has ![]() Fast-Track It! capabilities. (Fast-Track It just means that the tool has the ability to enable other important features right from that tool, so you don't have to go to more than one place to get your Portal Users set up with a complete package of tools.) The Add New Portal User tool looks like this:
Fast-Track It! capabilities. (Fast-Track It just means that the tool has the ability to enable other important features right from that tool, so you don't have to go to more than one place to get your Portal Users set up with a complete package of tools.) The Add New Portal User tool looks like this:
When the form opens, it will look something like the one below. At first, this form can look a little intimidating, but if you break it down into sections, as indicated by the numbers in orange, it becomes much easier:
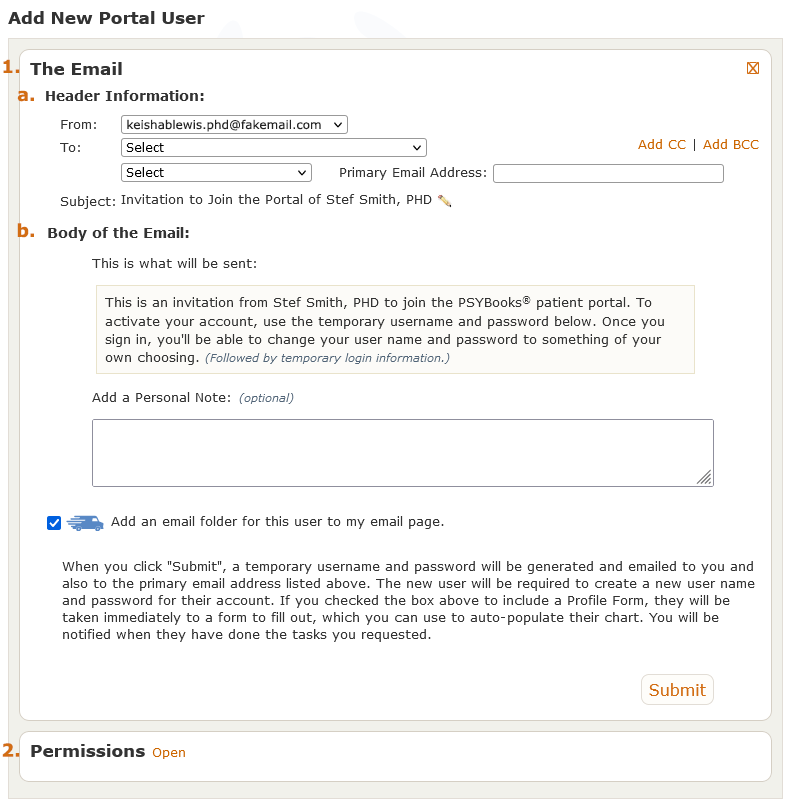
There are two main sections of this form, one open, one closed. They are labeled on the screenshot: 1. The Email (things pertaining to the email that will be sent to your new Portal User) and 2. Permissions (the default permissions the new Portal User will have). The Permissions section is primarily just for viewing. We'll discuss it later. However, the work you need to complete on this form is in the email section, so we'll look at that in detail.
The Header Section
Notice that the original screenshot has an "a." (for Header Information) and "b." (for Body of the Email). The Header Information is what you see in any email, i.e., the From, To, and Subject fields:

Notice that your email is already used to populate the From field, and in most cases, this is the only email address that will ever appear here, since any emails you send will be coming from your encrypted account.
The To field is a select box with these choices:
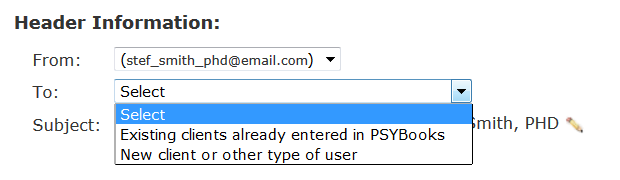
The "To" Field: Adding Existing Clients to the Portal
If you choose the top choice from the select options, i.e., "Existing clients . . . " you're presented with a dropdown list of all of your clients that are entered in PSYBooks. If you choose one that already has an email included in their account, that email will be pre-populated for you in the email box so you don't have to look it up:
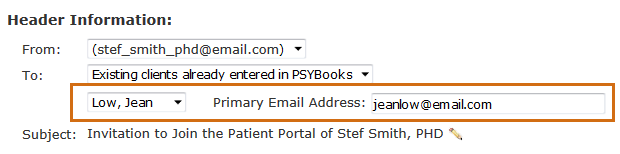
The email address that's used is the first email entered in the client's chart. If you need a different one, you can either type it in by hand or change their chart so that the email you want to use in the Portal is the first one listed in their chart.
By choosing a client as the recipient of the Portal User Invite, the Profile Form, which is one of the Fast-Track It! features, becomes available to you. We'll discuss that next.
Fast-Track It! on the Add Portal User Form
The Fast-Track It! feature is a package of three tools that are designed to make your life easier: The Add Portal User Form, the Profile Form, and adding a separate email folder for the Portal User. You can send Fast-Track It! packages from several places in the program making them easy to find. The Add Portal User Form is one of the three tools, and it also allows you to add the other two - thus allowing you to trigger a complete Fast-Track It! package at the same time you add the Portal User.
One of the Fast-Track It! tools - the Profile Form - is only available for clients. This is because the Profile Form is a corollary to the Demographics and Insurance tabs on a client's chart. Since non-client Portal Users do not have charts, this tool wouldn't apply to them. The way the Add Portal User form works illustrates this fact. As we saw above, when the blank form opens, it looks like the screenshot below.
Notice that you can see one Fast-Track It! icon (![]() ) with its checkbox checked by default:
) with its checkbox checked by default:
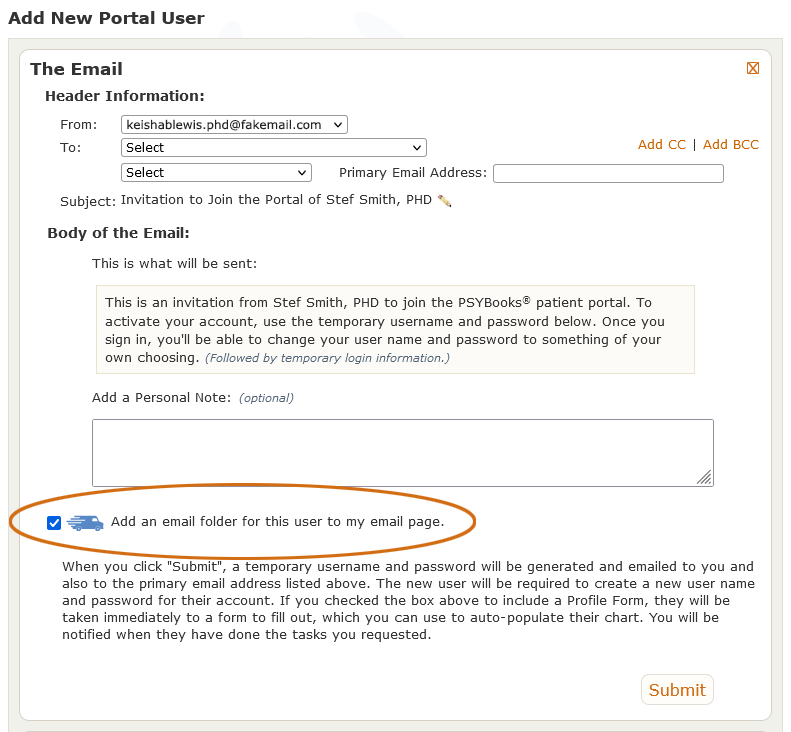
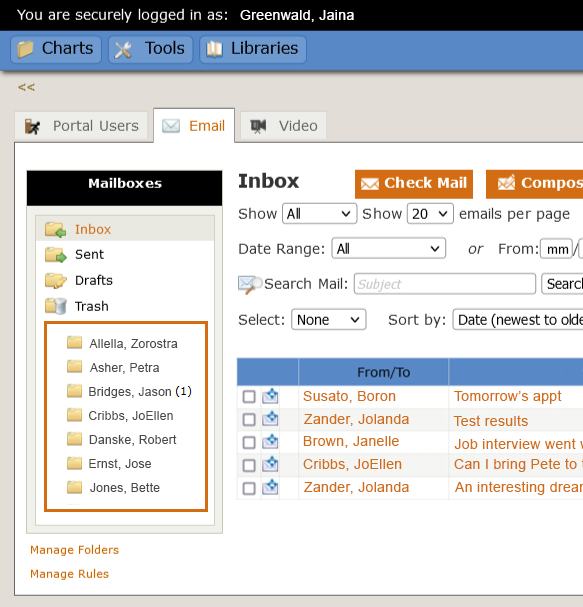
The default Fast-Track item is a request to add a separate email folder for this individual. It can be used with both client and non-client Portal Users. When this box is checked, PSYBooks creates a folder with that person's name and maintains a rule so that when you receive mail from them, it's automatically added to their folder. Otherwise, all incoming mail goes into your inbox sorted only by date. Folders can be handy because they allow you to keep emails from each Portal User in their own unique place. This is especially important for your client Portal Users since emails from clients are considered part of their medical record. The first folders listed in all PSYBooks' email pages are always Inbox, Sent, Drafts and Trash. Any Portal User folders you add are listed in alphabetical order after the initial PSYBooks folders. The screenshot below has several user-added folders, beginning with Allella, Zorostra. You can also see that the Portal User named Bridges, Jason contains one unread email:
Going back to the discussion of the "To" field, since the other Fast-Track It! tool - Profile Form - is only available for clients, it's not displayed yet. We need to wait and see whether the Portal User you're entering is a client. If you choose the top option, "Existing clients already entered in PSYBooks," the final Fast-Track item, Profile Form, appears beneath the one for email folder:
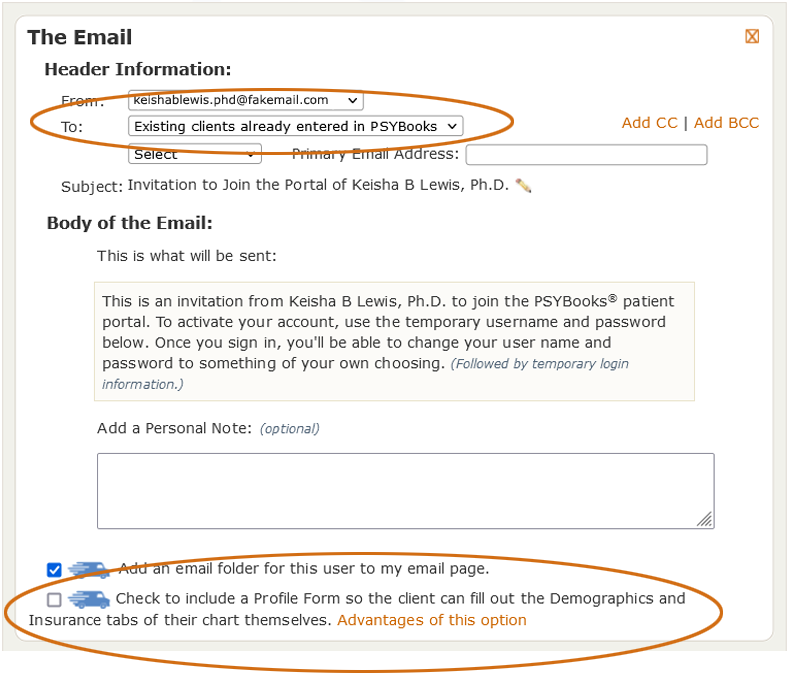
If you want the Profile Form to be sent along with the Portal User Invite, just check its box. Similarly, if you do NOT want a separate email folder created for this client, you can uncheck that box. Although it's recommended to use all three of the Fast-Track It! tools when possible, since some users may have different preferences, they're designed to be used independently.
The "To" Field: Adding New Clients or Other Types of Users to the Portal
Now let's look at the second option in the To select box, i.e., "New client or other type of user." When we select that option for the To field, nothing happens in the Fast-Track It! section. There's still just the option to add an email folder:
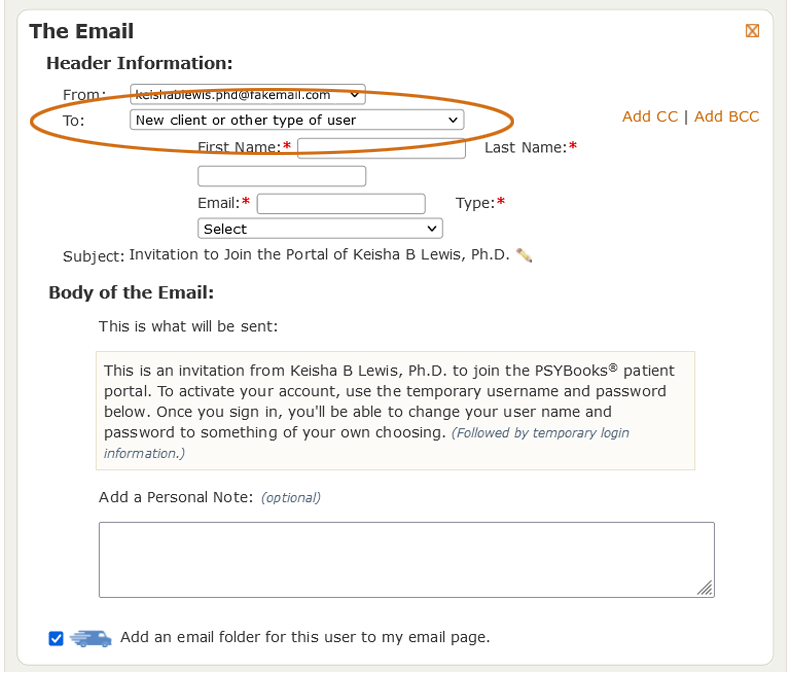
As you might have guessed, that's because although we know this entry MIGHT be a client, it could also be an "other type of user" so we have to wait and see.
If you choose the second choice from the To dropdown - "New client or other type of user" - you get something similar to the screenshot below, which lets you enter all of the pertinent information needed:
The "Type" field has these choices:
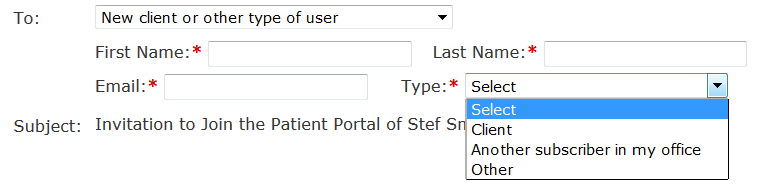
This information is necessary because clients and other PSYBooks' subscribers in your office are treated a bit differently in the Portal than are other Portal Users. Therapists in your office who do NOT subscribe to PSYBooks should be put in the "Other" category. "Other" can also be used for friends, colleagues, front office staff, accountants, billing personnel - anyone with whom you might have the need to exchange encrypted email.
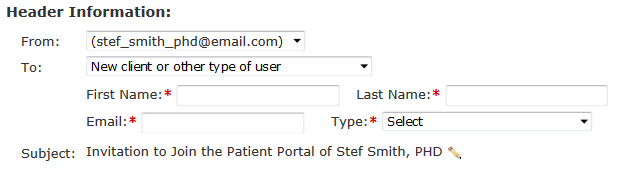
The last piece of information on the header is the Subject line. PSYBooks automatically populates the Subject line with this: "Invitation to Join the Patient Portal of (your name)". However if you click the pencil beside the subject line, you can edit it to anything you like.
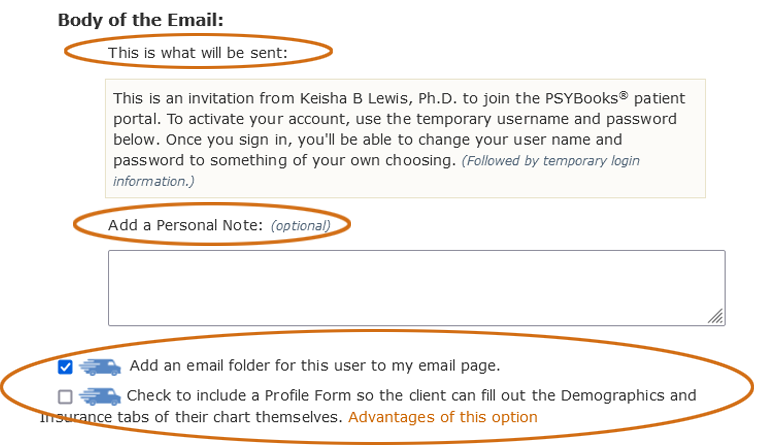
The Body of the Add Portal User Form
PSYBooks fills in the necessary parts of the body of the email so if you want, you can click "Submit" at the bottom of the form and go ahead and send the Portal User Invitation at this point. However, the middle section of the form - called "Body of the Email" - shows you what will be sent to the user and gives you the opportunity to add a note of your own. Additionally, as we've already discussed, you have the option of including Fast-Track items. Notice that this email will be sent by regular mail. It's not encrypted because, since the recipient is not yet a member of your Portal a secure channel has not yet been established between the two of you. For that reason, if you do decide to add a Personal Note, take care to not include any PHI (Protected Health Information) or other sensitive information with your Portal User Invitation:
Permissions
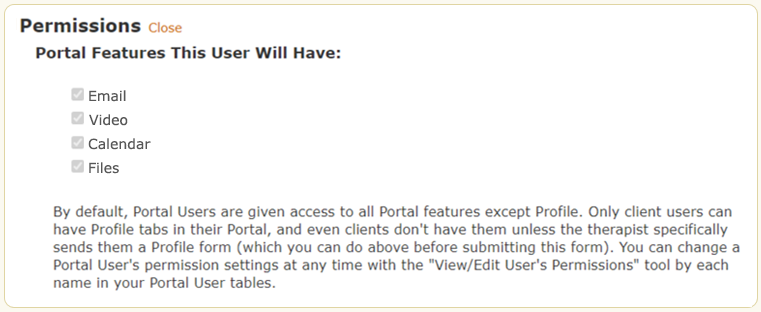
The last part of the Add New Portal User form is for permissions. By deafult, new Portal Users are given all current Portal features except for the Profile tab, which the therapist has to specifically request. Also, as mentioned above, the Profile tab is only for client Portal Users. The default premissions a Portal User might receive are:
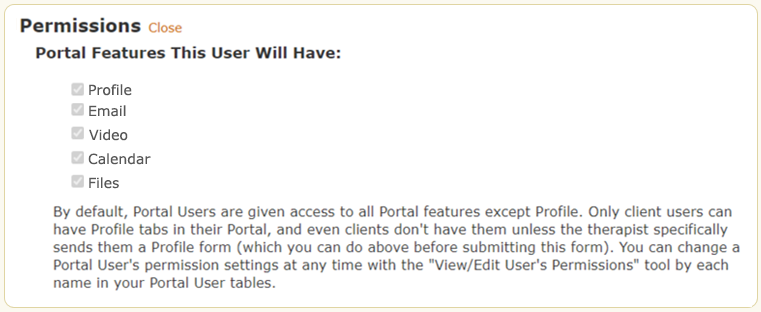
If the box to include a Profile Form with this Portal User invitation was checked, Profile will be added as one of the tabs you're giving this user permission to have in their Portal:
The Portal Users Page
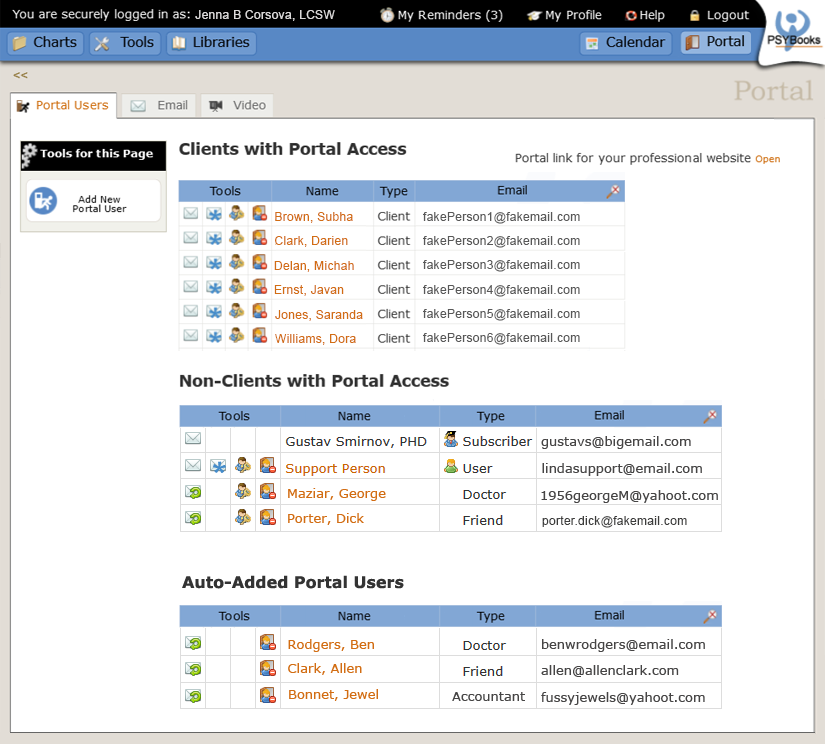
Portal Users to whom you've sent invites get added to one of two tables on the Portal Users Page. The top table is for Client Portal Users and the second table is for Non-Client Portal Users. In some cases, you may also have a few Portal Users who are added automatically by PSYBooks. For example, if you have your accountant listed as a Portal User, and you want to introduce your accountant to another PSYBooks' subscriber in your office, you might send all 3 of them an email through the Portal to introduce them. If the accountant isn't already be a Portal User for the other subscriber, PSYBooks would add him/her automatically to allow the 3 of you to continue to email one another. Your accountant would be listed in your Non-Client table, but the other subscriber would have them listed in their Auto-Added table. That means your Portal User page could look something like this:
Tools on the Portal Users Tables
There is a group of small tools at the left of the Portal Users' tables:
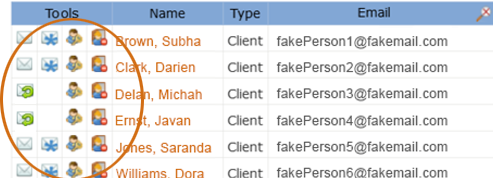
Going from left to right, the tools are:
- The first tool will either be an email icon (like in the first two rows), or an email icon with a "resend" arrow on it (like rows 3 and 4), depending on whether the person has already created their Portal account. If they have, the first tool will be the email icon and will be a quick way to securely email the user from this page. If they have NOT yet created their portal account, the email icon will have the green resend arrow. That tool allows you to resend the invitation to join the portal.
- If the user has already accepted the invitation to join the portal, the second column has an envelope with a blue asterisk, which is a tool to allow you to send the user a "reset password" email, should they tell you they've forgotten it. In cases where the user hasn't responded to the invitation, this column is blank because a reset password tool is not needed in this case.
- Column three has a tool for editing that user's permissions.
- The last column has a tool for removing the user from your portal.
What Your Portal Users See
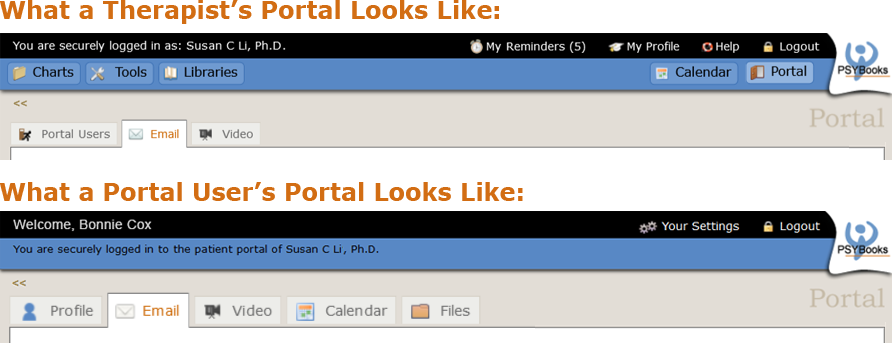
So far, we've only discussed what therapists see in their own portals. What the Portal User sees is similar, except that a therapist account has both the EHR and the Portal, whereas a Portal User account ONLY has a Portal. A Portal User with has full permissions might have a page that looks similar to this:
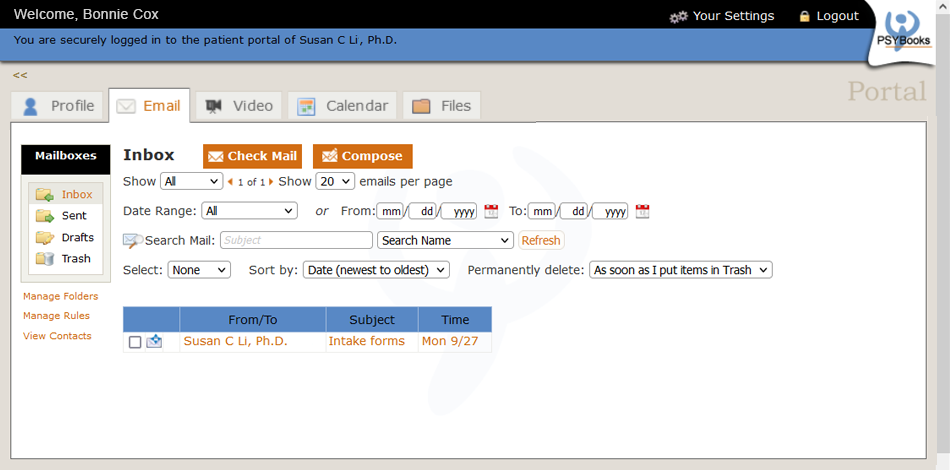
Although this page looks similar to your PSYBooks application, there are major differences. For example, in the blue bar, the therapist's app has their global navigation buttons, i.e., Charts, Tools, Libraries, Calendar and Portal. In contrast, a Portal User's blue bar just tells them that they are logged into your portal. Also, your Portal tabs are Portal Users, Email and Video, whereas a Portal User's tabs are Profile, Email, Video, Calendar and Files:
The Profile Tab of a Portal User's Portal has the data from the Demographics and Insurance tabs of their charts in the therapist's EHR. In other words, the therapist's EHR has that same data, but it's not in their Portal. The reason a therapist has a tab for Portal Users whereas a Portal User does not is obvious, i.e., only therapists have Portal Users - Portal Users don't have other Portal Users. Regarding the Calendar, a therapist's Calendar is a full-fledged set of tools which appears on their global nav and includes their entire schedule. Portal users have a streamlined version of the calendar accessed through their Portal that only has their own appointments (or possible appointments) they have with the therapist(s) in the practice. The Files tab in the patient's Portal roughly corresponds with the Files tab the therapist has in the patient's PSYBooks chart. The Portal Users' Files tab is also where the Portal Users are taken to eSign documents the therapist has sent them. In addition, the therapist has a place to store their own files that's not located in their Portal, but rather under Tools > Files, Forms & Templates.
Other Ways to Add Portal Users
Adding Portal Users to your account is so helpful for maximizing both ease and security in PSYBooks that we've added that ability to several additional places in the app.
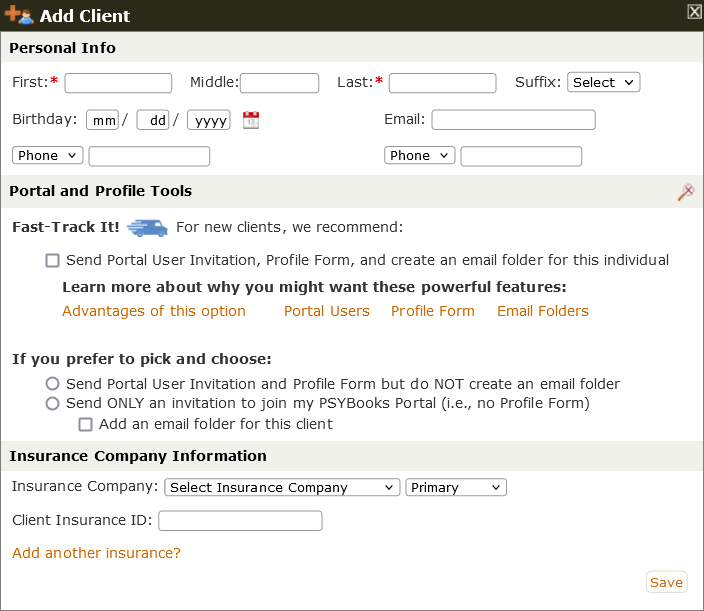
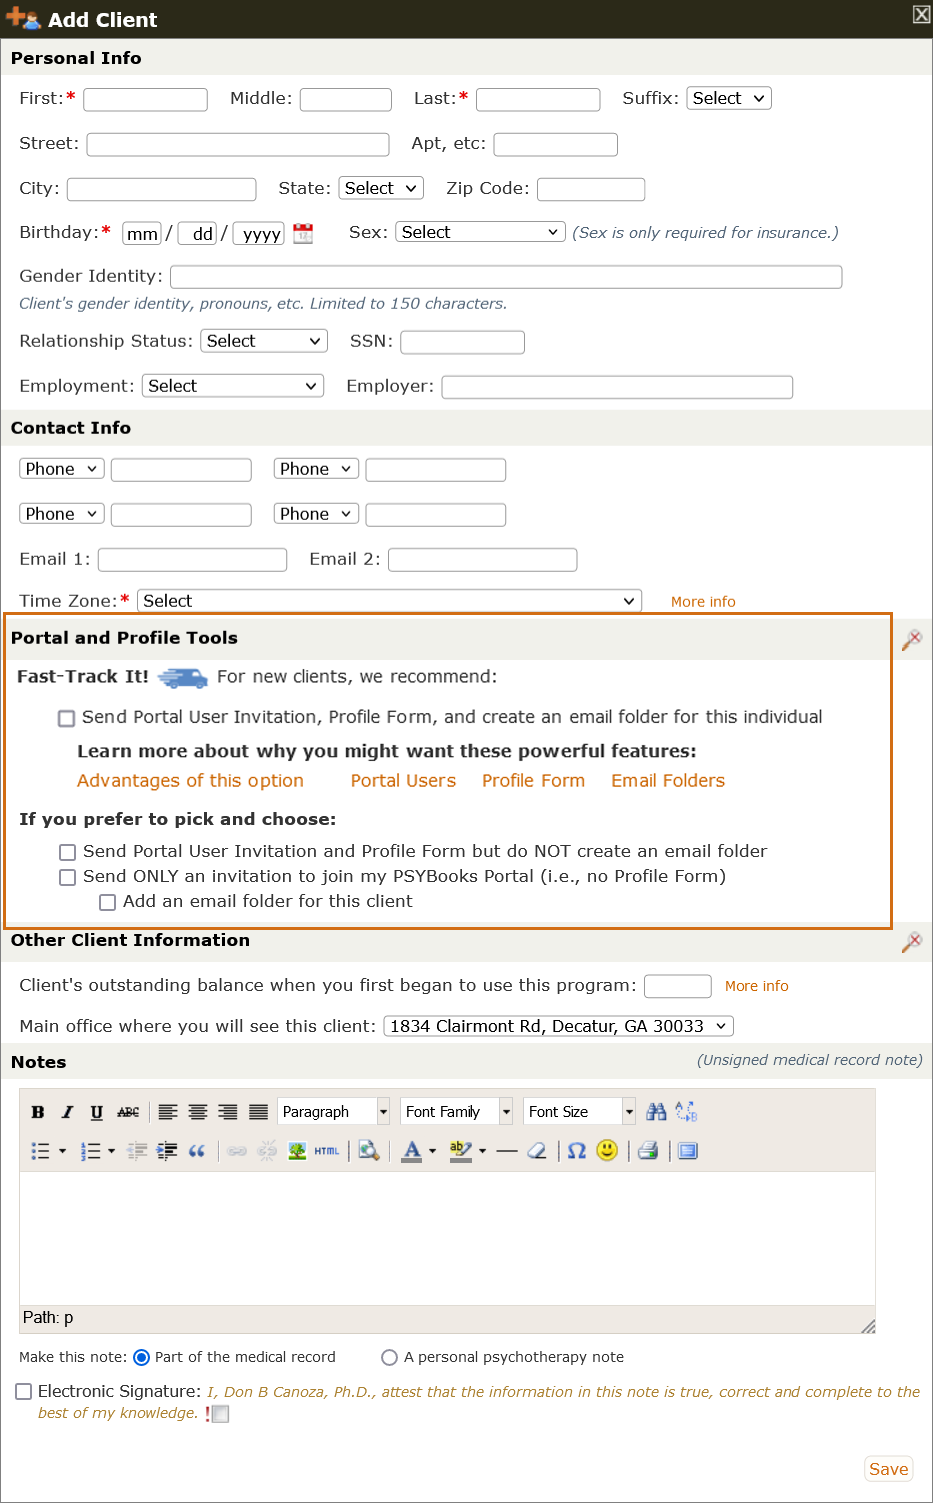
From the Add/Edit Client Form
The first is on the Add or Edit Client form. This form has an entire section called Portal and Profile Tools that's devoted to extra tools a therapist might want to include when adding a new client. The top checkbox on the form has the Fast-Track It! option we discussed above. This allows you to initiate three processes at the same time: a Portal User Invite, a Profile Form and a separate folder for the person's email. In other words, the user can take care of all tasks at the same time they add the client just by checking that top checkbox. However, if you'd prefer to pick and choose, you can select individual options with the other checkboxes below the Fast-Track option. Once the form is submitted, the requests you designated will be sent.
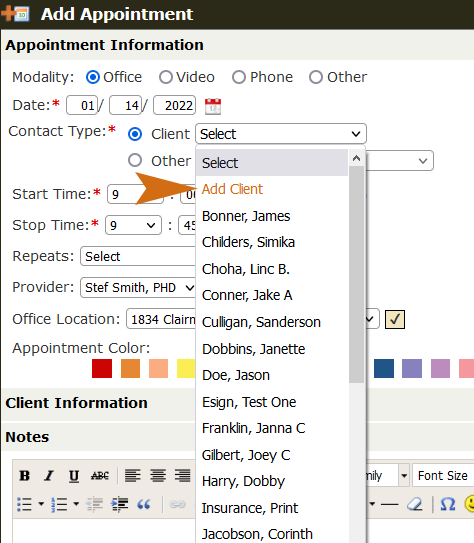
From the Add Appointment > Add Client Form
Some users like to add new clients as they schedule their initial appointment on the Calendar. There's a link to open an abbreviated form of the Add Client tool on the Add Appointment Tool:
The form for this calendar version of Add Client looks like this - again, notice that this form also has the section for Portal and Profile Tools that includes a Fast-Track It! option as the top checkbox: