

Manual Index
-
Chapters
The Manual is divided into seven chapters. Click a chapter title to display that chapter's table of contents in the area below.
Chapter Four
Tools
- Intro to Tools
- Files, Forms & Templates
- Reports
- My Notes & Reminders
PSYBooks Manual
Chapter Four
Intro to Tools
What this isTools is one of the sections of the global nav. The Tools section has three sub-sections: Files, Forms & Templates, Reports, and My Notes & RemindersWhat it looks like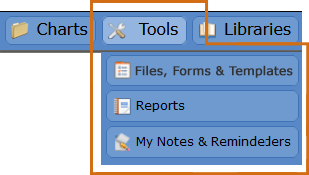 |
Where this isYou can access the Tools section from the global nav at the top of every page or from the Sitemap links at the bottom. |
The Tools section holds tools that pertain to your entire practice, as opposed to tools you might use with any one client. Tools has three local nav tabs: Files, Forms & Templates, Reports, and My Notes & Reminders:
Files, Forms & Templates has tools you can use to upload files from your computer so you'll have all of your practice documents in one secure location. This is equivalent to the Files tab of each client's chart, except that it holds the therapist's files. Also, when you've requested an eSignature on a document and your patient signs and sends it back to you, a copy of that file is automatically put on this page in a category called, "Documents That Have Been eSigned." Finally, when a patient uploads a file to you, those files are placed on this page in a category called, "Files Received from Portal Users." This is also where you create and send Custom Forms.
The Reports section allows you to create reports based on the data that's been entered throughout the program. Each report has a variety of filters which allow you to tailor the report to your specific needs. Once the report has been run, in most cases you can save a copy to the Files, Forms & Templates section if you need to keep a record of it.
In the same way that the Files, Forms & Templates section is like the Files tab of a client chart, My Notes & Reminders is similar to the Notes tab in a client chart. My Notes & Reminders serves as a repository and set of tools for your personal notes and reminders as well as for interoffice memos you've exchanged with others in your office.
Files, Forms & Templates
What this is"Files, Forms & Templates" is a tab in the Tools section of the app that allows you to create, send and receive both pre-formatted templates and also Custom Forms that you've made for your practice. There are two sections. The gold block at the top holds the PSYBooks built-in Templates plus any Custom Forms you've made. The gold section also holds the "Send Forms" tool to allow you to send forms and templates at any time. The white "My Files" section at the bottom holds files you've uploaded as well as a section for Files Received from Portal Users.What it looks likeReports > Files, Forms & Templates 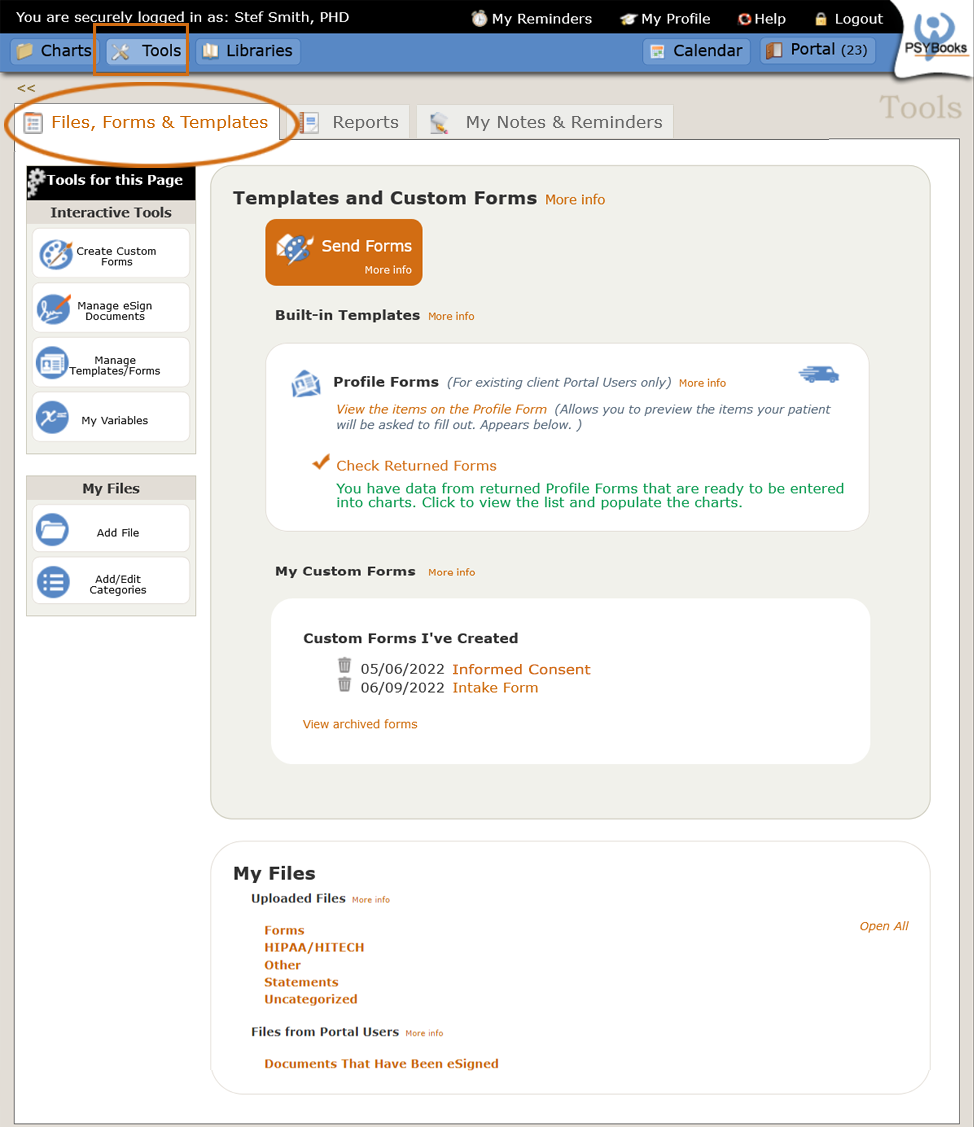 |
Where this isYou can access Tools from the global nav at the top of every page or from the Sitemap links at the bottom. Files, Forms & Templates is the second tab. |
"Files, Forms & Templates" is a secure area for creating, storing and sending the various kinds of forms and files you might use in your practice. It has two sections: "Templates and Custom Forms" are in the gold area at the top, "My Files" are in the white section at the bottom.
The "Templates and Custom Forms" section further subdivides into "Built-in Templates" and "My Custom Forms." Built-in templates are forms built in to PSYBooks that you can send your patients to allow them to fill out certain sections of their chart themselves. Currently, it holds the Profile Form, which allows patients to complete the Demographics and Insurance sections of their chart. The "My Custom Forms" section will not show until you have created at least one Custom Form.
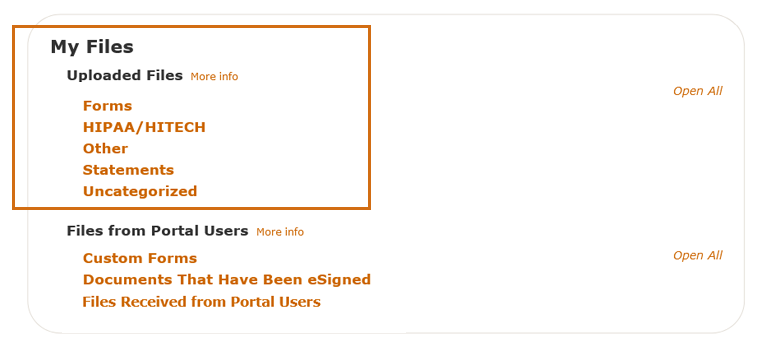
The bottom white area outlined in gold, called My Files, is further subdivided into two sections: "Uploaded Files" at the top and "Files from Portal Users" at the bottom. The main difference between those two sections is that Uploaded Files are files that only you (and your Admin staff, if you give them permission) can access. You or someone in your office has added the files that are in this section. In contrast, the bottom section lists files that have been sent to you by Portal Users. A copy of each of those files is also in the Portal of whichever Portal User sent them to you so those are shared files. Additionally, when the Portal User is a client, in most cases, a copy of the file will also be placed in the client's chart as part of their medical record.
The tools on the left nav of the Files, Forms & Templates page are similarly divided, with those tools in the top section being more interactive in nature. Though there's not a 1:1 correspondence, tools in the Interactive Tools section tend to pertain to the Templates and Custom Forms section on the right. In contrast, the bottom section of left nav tools, Add File and Add/Edit Categories, are ONLY used with the My Files section at the bottom right. Each of those two sections - with their respective tools - will be discussed below, following a discussion of the PDF Preview tool, which is inserted here because it's used extensively throughout the "Files, Forms & Templates" section.
PDF Preview Tool
What this isThe PDF Preview Tool allows you to preview PDF files you've previously uploaded so you can view them without having to download PHI onto your computer or other device.What it looks likeThe tool for previewing PDFs is just the link of the file's name. In a client chart, it looks like this: 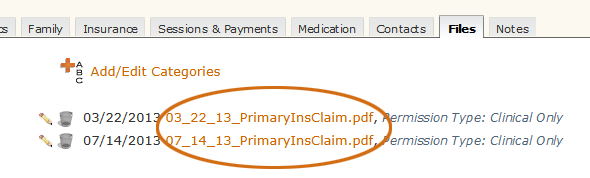 The presentation is similar in the therapist's "Files, Forms & Templates" area:  |
Where this isThe PDF Preview Tool is available on the Files tab of a client's chart and also in the Tools > Files, Forms & Templates section of the app.
|
Often, you may want to preview a file's contents without having to download it to your computer. If the file you've uploaded is a PDF, clicking the link on the Files page (either in a client's chart or in the Tools > Files, Forms & Templates section of the app) opens the PDF Preview tool, which allows you to do just that:
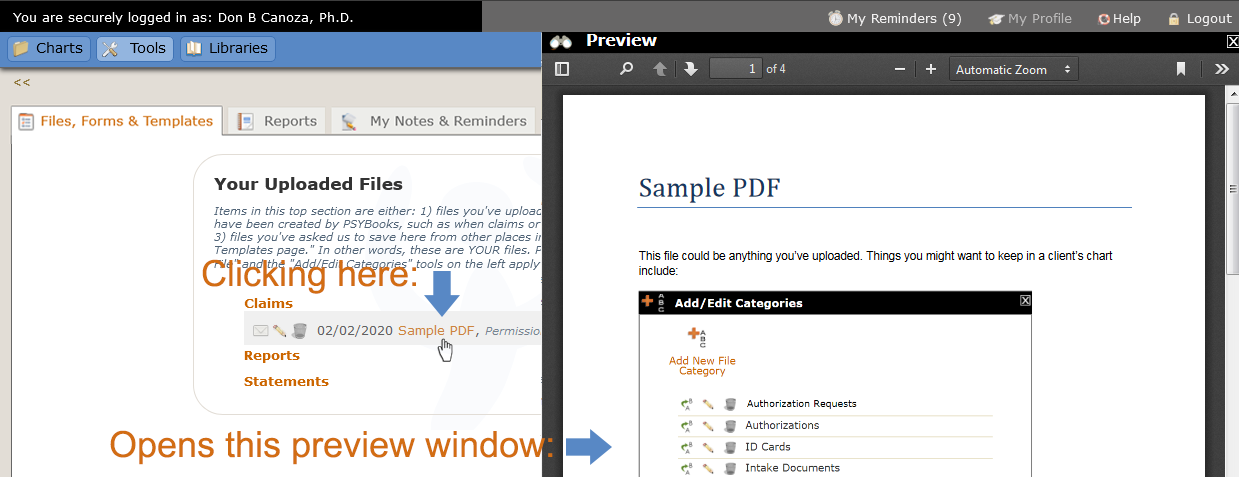
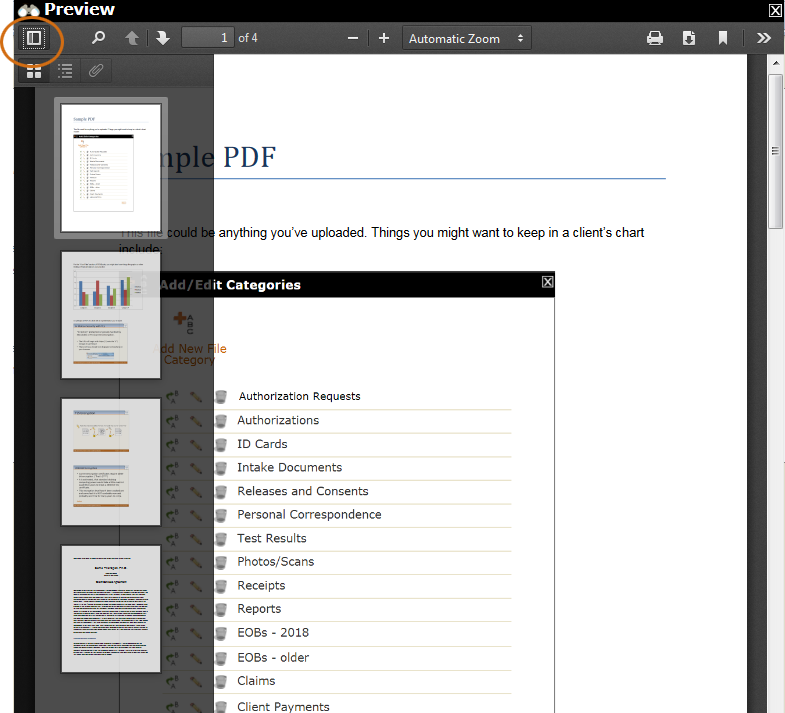
Being able to preview a file allows you to view it while keeping PHI off of your device for maximum, HIPAA-compliant security. The preview window opens in the middle of the screen, but you can move it by dragging the black bar at the top. The window can be resized by dragging any edge or the lower right corner.
The Preview Tool offers a large number of features. At the top left is a tool that allows you to show thumbnails when the PDF has more than one page:
Following that is a search tool with options to highlight all, match case, and find whole words:

Following search are tools to go to the Next and Previous pages in the PDF and also a textbox that will allow you to specify the page you want to visit:

Tools for zooming and also for viewing at preselected sizes are located in the center of the window:

A little farther over are tools that allow you to print the document, download it to your device or open the preview in a new tab:

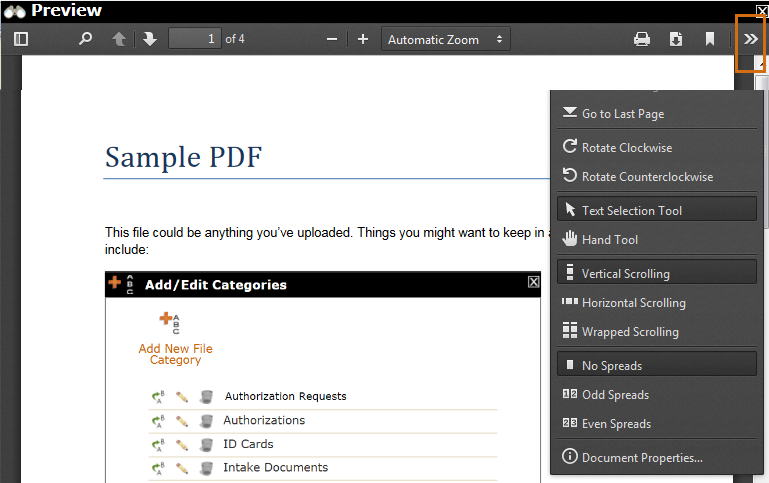
The double arrows on the far right open another whole menu of tools. You can easily navigate to the first or last page of the document and also rotate your view. The Text Selection Tool allows you to select text within the PDF, a feature that's often difficult or impossible to do. You can then right click to bring up the contextual menu and copy the text to your clipboard, which can then be pasted wherever you need it. If you use a mouse, the hand tool allows you to quickly scroll through the document. If you have a touchscreen you can use your finger to accomplish the same thing. There are also options for horizontal scrolling, wrapped scrolling and different types of spreads:
All in all, PSYBooks' PDF Preview Tool gives you both maximum security and a large set of features for working with your uploaded PDF files. Currently, if you click on the link for a file you've uploaded that is NOT in PDF format (e.g., an image file, Word doc, etc.), the file will be downloaded to your computer. We have future plans to add additional preview features for other common file types, similar to the current PDF Preview Tool.
PDF Preview Tool Troubleshooting
If your PDF Preview window is blank, the most likely cause is that your browser is set to download them instead of viewing them online. The solutions are either to use a different browser and/or to change the settings in your browser. Each browser has their own settings page, and each time a browser updates, the settings page may be a little different. Because of that, we can't give you exact directions on how to change the settings, but the image below was taken from a recent edition of Firefox:
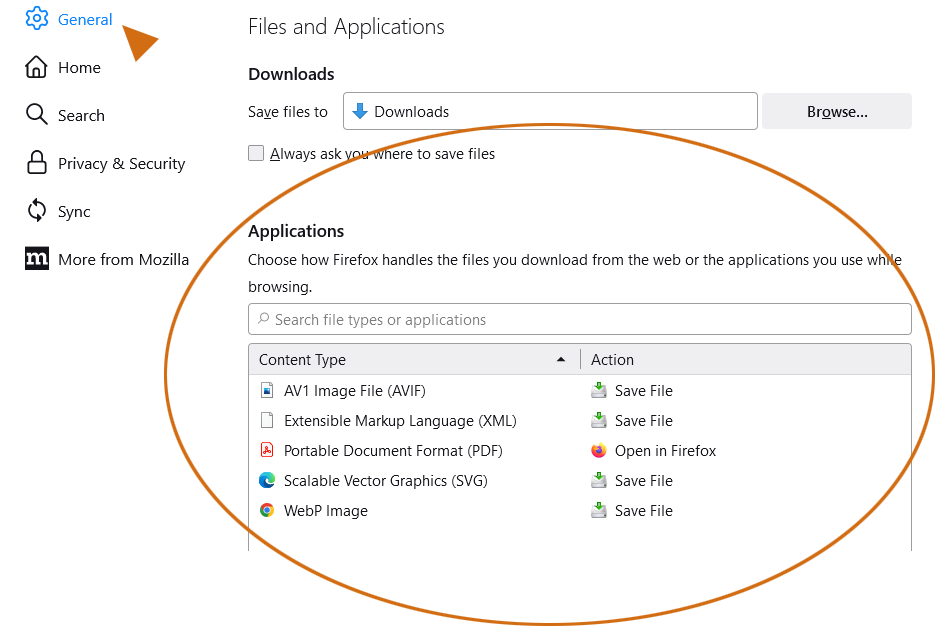
PDF is short for Portable Document Format. PDFs are created by an application (program) called Adobe Acrobat. Since they're made by an application, Firefox has them lumped in with other application files and asks you how you want Firefox to open them. The setting in the screenshot is correct, i.e., if you want to be able to use the PDF Preview Tool in PSYBooks, you would have to have Firefox set to open PDFs within Firefox.
Notice that it is not essential to change your browser's settings to open PDFs in this way. If you choose, you can continue to have your browser download them. The PDF Preview Tool is for those users who want to be able to view a PDF without downloading them.
Templates and Custom Forms
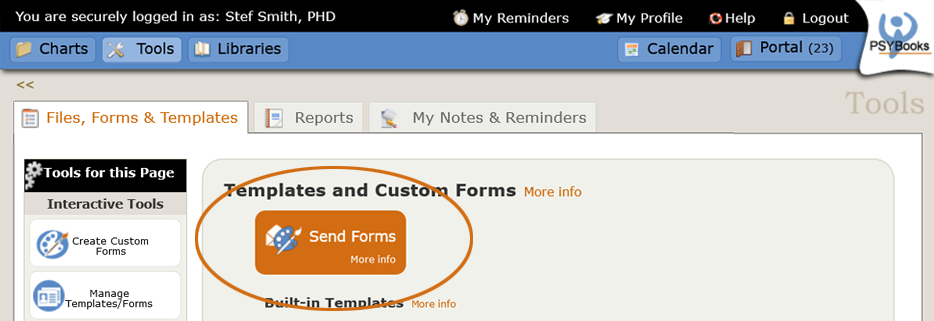
What this isTemplates and Custom Forms is the top section of the Files, Forms & Templates page. Currently, it holds the Send Forms tool and one Built-in templates, the "Profile Form." If you have created Custom Forms, they will also be displayed in this area.What it looks likeThe Templates and Custom Forms area looks like this: 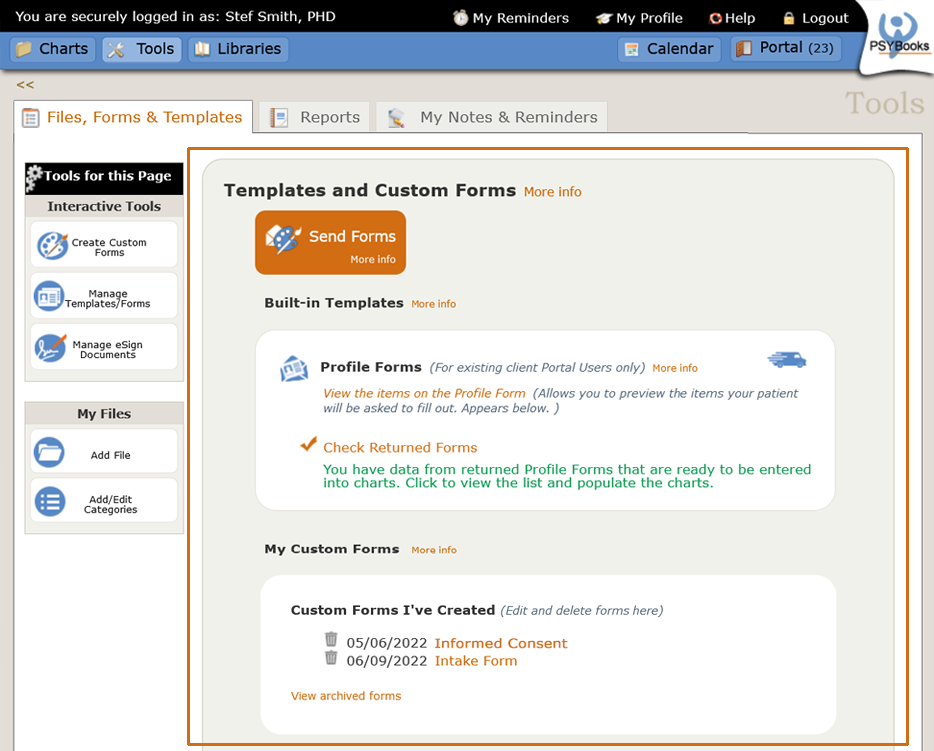 |
Where this isTemplates and Custom Forms is the top section of the Files, Forms & Templates page.
|
The word "template" can be defined as a pattern for processes - or even a pattern OF processes - to help make a task easier. This section of PSYBooks is designed to hold both built-in templates (i.e., templates provided by PSYBooks) and a section where you can build and store your own custom templates, which are called Custom Forms. Both Built-in templates and Custom Forms are sent with the same tool, the Send Forms tool.
Your Custom Forms
The Custom Forms tool allows you to convert your paper forms into digital. You can also convert existing digital forms into forms your patients will be able to fill out online. The advantage of this is that when you send your forms to patients or other Portal Users, they'll be able to fill them out and return them online. They won't have to download your forms, fill them out, scan the completed forms and send them back to you.
Your Custom Forms can be as simple or as complex as you like. For example, you could write a single paragraph, then add one checkbox that says, "I agree to these terms." If you send that to your client and they check the box and add an eSignature, you'll have a legally binding document, complete with time and date stamp. Similarly, your form could consist of a single Large Q & A Box with a sentence saying that your client gives permission for you to discuss their case with the persons below. When the client gets the form, they could list the names in the textarea provided for them, eSign the document, and you have a legally binding release of information. You can also create larger projects. For example, you could put your entire HIPAA Privacy Policy into a Custom Form. Or even your Telehealth Informed Consent, which could quite possibly have a variety of form elements in it. You can add custom styles to your forms, or just leave them as the default. It's all up to you.
Similarly, you can create forms that you only need to send out once for new patients, or you can create things like mood trackers, ways patients can track their progress on therapeutic goals, or anything else you can think of that you might want to send more frequently.
Another thing to notice about Custom Forms is that, although they're restricted to Portal Users, they are NOT restricted to clients. For example, you could create legally binding documents for your office personnel, other therapists in your office, or even other uses you might have outside of your therapy practice. Since anyone can be a Portal User, you can create Custom Forms within PSYBooks for any needs you may have that involve sending an online form that the recipient can fill out and return to you.
The first step in this process is for you to create your forms. You only have to do this once per form. Once you've created the digital version of your form, you can send it out as many times as you wish to as many different individuals as you need. It's also easy to make updates or changes to your existing Custom Forms.
The next sections will discuss how to create Custom Forms.
Create Custom Forms
We have a short video on our Custom Forms tool which you can watch below. It will give you an overview - but may be enough to help some of you get started. After that, we go into complete detail about all aspects of the Custom Forms tool.
The Create Custom Forms tool is at the top of the left nav tools on the Tools > Files, Forms & Templates page in your app:

When you click the Create Custom Forms tool, you get a window similar to this:

Think of this form as dividing in half vertically, with your tools on the left, in the Toolkit area, and the area where you'll build your form on the right, where it says "Build Your Form Here:"

Each of the blue buttons in the toolkit is draggable over into the edit area:

As can be seen above, once you drag a tool to the edit area, a window opens that has formatting options for that particular element. You can drag tools in any order. In other words, you can put all your paragraphs in your form and then go back and add headings and graphics. In the animation below, the user has created one paragraph and then decides they want to add a header. As they hover over the existing paragraph in the edit area, either orange bars (on the sides) or blue bars (for top and bottom) appear so they can see where the header will go. If they don't like where they position it, they can click the heading and move it:

The user can also delete, clone or edit any items they've placed in the edit area. To delete, just drag the item over to the gold area on the side where the trash can is. You don't have to hit the trash can itself. When you reach the gold area, the lid of the trash can will open, signaling that when you release the item, it will be deleted:

To clone an element, single click the item you want to clone. This will put a small blue circle with a + in it on the outer edge of the element:

Clicking the blue circle will create another item like the first:

To edit an element, double click it. For example, if we want to edit the item we just cloned, we would double click the second "[providerName]" heading in the graphic above and change the interface that opens to whatever we want:

When you click "Create" on the window you're editing, the changed heading will appear on your form:

Although you may opt to never use the Clone Tool, the advantage of it is that it can save you some time, especially in larger documents. For example, if you're creating your entire Telehealth Informed Consent, you may want all headers for the various sections to be formatted alike. Maybe you want all 5 of the headers in your document to be H2s (next to the largest header size) and center aligned. If you create one the way you want it and clone it 4 times for each of the others, they will all be center-aligned H2s. You just have to double click each of them to change the text.
Now that we've covered the basics of how to build a Custom Form, we'll look at each tool in your Toolkit separately.
Set Default Styles
The Set Default Styles tool is the top tool on the left nav under "Overall Look & Feel":

You may never want to use this tool. PSYBooks has chosen default styles for Custom Forms that will work for most users. However, we also provide the Default Styles tool for those who want more control over how their Custom Forms look. If you're in the latter category, here's how it works:
If you drag the Default Styles tool over to the Edit area, the tool that opens looks like the image below and allows you to change the font, font size, font color and/or background color for this entire form.

You may notice that the font names are not the standard Arial, Verdana, Helvetica, etc. that you're probably used to seeing in other programs. That's because PSYBooks has opted to use multilingual fonts, designed to provide the best experience for all users. These fonts have also been specifically designed to look good on the Web.
Default font size and color will affect all other features on your form that display text, i.e., all remaining tools except Upload Graphic. The Paragraph tool allows you to modify these, allowing you to format some paragraphs differently than others. However, any changes to font size and color you want to make to Heading, Radio Buttons, Checkboxes, Select, Q & A Short and Q & A Long will have to be made with the Default Styles tool.
At first glance, it may appear that font color and background color are limited to the 28 color swatches that are shown. However, this is not the case. You can change the hex code to the exact color you want and not use the swatches at all. So, for example, although clicking on the 4th color on the top row displays a hex code of #ebebeb, you can manually change the hex code to #eeeeee and that's what will be used on your form:

As was mentioned above, you do not need to use the Set Default Styles tool at all. For users who do not use this tool, the PSYBooks default styles for Custom forms are Font: Roboto; Font Size: 12; Font Color: Black (#000); Background Color: White (#FFF).
-
Upload Graphic
The Upload Graphic tool is the the first tool in the "Form Items" section of the left nav:

The Upload Graphic tool allows you to add your logo or any other graphics you'd like to add to your Custom Form. When you drag the Upload Graphic tool to the Edit panel, the tool that opens looks like this:

It has the standard upload tool at the top, and then the ability to change the horizontal alignment, percentage and background color. Percentages must be between 1 and 100.
-
Heading
The Heading tool is the the second tool down in the "Form Items" section of the left nav:

A common place to use a Heading is at the beginning of a form. However, you can use the differing heading sizes (h1 - h5, with h1 being the largest) to create subheadings throughout your form. All will be bold. This can be very helpful for forms that are several pages long. You can also align your headings left, right or center.

-
Paragraph
The Paragraph tool is the the third tool down in the "Form Items" section of the left nav:

When opened, the Paragraph tool looks like this:

The top two items, Font Family and Font Size, are determined either by PSYBooks' default styles or by the Set Default Styles tool, if you used that to modify the default styles. However, you may change either or both of those parameters here if you want this particular paragraph to be different. The next two, Font Weight and Font Style, allow you to choose Normal or Bold fonts and also to choose among Normal, Italic and Oblique. The last two settings work together. Alignment sets the overall alignment for this paragraph to left, center or right. The Margin setting puts a small, medium or large margin around your paragraph. If the paragraph is left-aligned, the margin will be on the left. If it's right-aligned, the margin will be on the right. If it's center-aligned, the margin will be on both sides.
The textarea at the bottom (where it says "Enter the text for your paragraph") is where you put the text you want in this paragraph. You can type it in or copy/paste it from another document. You will probably use the Paragraph tool more than any other when creating your Custom Forms. Although you can compose your paragraph as you create the form, if you have an existing digital copy of your form, it may be easiest to copy the paragraph from the existing form and paste it into the Paragraph tool. To do this, copy a paragraph from your existing form (using Ctrl/Cmd c or your preferred way of copying text) and pasting it (Ctrl/Cmd v) into the text area at the bottom of your Paragraph tool. Remember that you can expand textareas by grabbing the diagonal lines on the lower right corner and dragging it:
You will need to create a new paragraph in your Custom Form for each paragraph you want to add. If you make changes to the settings at the top of the Paragraph tool, you may want to clone a new paragraph from the previous one, and then edit the textarea of the clone so it has the text of the next paragraph in your form. That way, the styles you chose for the initial paragraph will be the same for all paragraphs you create and yet you don't have to change them each time.
A textarea can be used for any length paragraph, from a single sentence to very long paragraphs. Just know that this tool creates ONE paragraph. Although you can add line breaks as you type, they get stripped out when your paragraph is created and will be presented to your recipient as one single paragraph. On the other hand, you can add as many paragraphs as you like. You can also position paragraphs above or below other paragraphs, or even create a row of side-to-side paragraphs. Notice that you will not see the settings you chose for your paragraph until you actually create it. Once you've done that, you'll be able to view the paragraph, with the styles you gave it, both in the Edit Window of your Custom Form and also by using the Preview Tool. All elements on a Custom Form are easily editable, just by clicking the element in the "Custom Forms I've Created" table, which means you can go back and forth between creating and viewing as often as you wish.
Radio Buttons & Checkboxes
The Radio Button List and Checkboxes tools are the 4th and 5th ones down in the "Form Items" section of the left nav:

When you drag either the Radio Buttons or Checkboxes tools to the Edit Panel to open them, they look just alike. For both tools, you write your question in the top textarea and then put your choices for answers in the bottom portion.


The thing that distinguishes them is on the backend, i.e., how they work. If you create a Radio Button element, it will have circles for the user to make their choice. Checkboxes will have square boxes.
This was made with the Radio Buttons tool:
Which of these moods best describes your day?
This was made with the Checkboxes tool:
Which of these moods best describes your day?
More important than how it looks is the functionality associated with each. A Radio Button only allows the user to make one choice, whereas checkboxes allow them to select as many options as they need. The samples above could have been been part of a Custom Form. If you play with each of them, you'll see that you can only check one item in the list of radio buttons, but you can check as many of the checkboxes as you want. Keep this in mind as you use these two elements in your Custom Forms to prevent obtaining unexpected results.
An additional feature of the Checkbox tool is that you're not required to put anything in the top box, i.e., you don't need a question. That allows you to put something like this in your Custom Form:

That would produce the effect below on your form:
By contrast, the Radio Button List tool DOES reuire a question in the top box. You can achieve the same basic goal as above, by creating a Radio Button list like this:

When that entry appears in your form, it would look like this:
Do you agree to these terms?
-
Select (Dropdown)
The Select tool is 3rd from the bottom in the "Form Items" section of the left nav:
 Tool")
A select box (sometimes called a dropdown box) funtions like a list of radio buttons, in that the user can only choose one option from the list. When you need that type of functionality, it's up to you whether you want to use radio buttons or a select box. The Select tool both looks and functions like the Radio Buttons and Checkboxes tools in that you write your question or statement in the top box and then add the choices in the bottom box, using the "Enter" key between each choice:

Often, people will use select boxes when they want to save room on the page. For example, if you need someone to choose their state from a list of states, a select box is much tidier than a list of radio buttons:
Plese choose your state:
Plese choose your state:
Notice that the first item on your select boxes is always "Select." That's done on purpose for clarity. For example, in the states example above, if "Select" weren't there, if someone returned a form to you with the top choice (AL) selected, you wouldn't be able to tell whether that's the choice the user actually made or whether they didn't answer the question.
-
Q & A Short and Q & A Long
The Q & A tools are the last two in the "Form Items" section of the left nav:
 Tool")
The Q & A Short and Long tools are just alike from the therapist's perspective. There's nothing for the therapist to input except to write their question. The question can be short or long in either tool. The "Short" and "Long" on these tools refers to the length of the answer you want/expect from the recipient, not the length of the question. If you expect a short answer (e.g., "What city were you born in?") it would probably be better to use Q & A short. On the other hand, if you're asking more of an essay type question (e.g., "Describe your first year in elementary school."), you would want to use Q & A Long. The two tools look like this:


The difference between these two tools will be on the recipient's end. With Q & A Short, they will have a single textbox in which to write their answer. With Q & A Long, they'll have a textarea, which will allow them to write long answers. Each of the therapist's tools has a sample of what the recipient will see at the bottom of the form:

The words "User will type here" will not be on the recipient's form. The textbox and textarea at the bottom of each of the therapist's tools are just to give you a visual representation of the difference between the two tools.
Using Variables
The Variables feature on Custom Forms can be a big time-saver. There are three different categories of variables. The first two, Provider Variables and Recipient Variables, are taken directly from your database which means that their values are already available. You don't have to do anything to use them. The third type, Custom Variables, are variables you can create for your own use. In Custom Forms, variables are available in the Heading, Paragraph, and both the Short and Long Q & A tools as a link that says "Show Variables."

If you click the "Show Variables" link, it opens to show links for Provider Variables, Recipient Variables and Custom Variables. Clicking any of those links would open that section so you could see all variables available to you for your Custom Forms:

Once you decide which variable you want to use, just drag it to the textbox or textarea of the element you're creating. The example below is for a Custom Form that will begin with the greeting "Hi John," (or whatever the first name of the recipient is.) By using a variable, the therapist doesn't have to go back and customize each form with the person's name before sending it. It also allows a therapist to send the same Custom Form to several recipients at once, and yet have each one individualized with the recipient's first name:

We'll discuss each of the three types of variables below.
-
Provider Variables
If you open the Provider Variables link, it would look something like this (this one is on a Heading tool, but variables are the same wherever you encounter them in Custom Forms). The variable names are on the left in blue with [] around them. The part after the "=" is the value of that variable for this particular subscriber. So in the screenshot, [providerName] is the name of the variable and Stef Smith, PHD is its value:

Provider variables are taken from the "My Profile" section of your app. If you open "My Profile," you'll see where the data for Provider Variables comes from (not all are visible in this screenshot, but if you were to click any of the orange links in the Therapist Profiles table, you'd open the Edit Profile form where you'd find the others):

The two screenshots above - for the variables list and My Profile were taken from the same account. If you look, you'll see how the variables match up. To change any of the variables in your Custom Forms, you'd need to change them in your Profile. For exampel, if Stef Smith decides she wants her credentials from PHD to Ph.D., she could change it in her Profile and then the value of [providerName] in her Custom Forms would automatically repopulate.
-
Recipient Variables
The Recipient Variable list looks like this:

You might notice that the Recipient Variables list, unlike the Provider Variables list, only lists the variables themselves, i.e., there are no values listed for any of the variables. That's because we don't yet know who the recipient is. Some examples are given in parentheses (in gray italics) to give you an idea of what the recipient would see. But those are only meant as aids to the subscriber. They are not what would be sent. In other words, when the recipient opens the form, if you added [recipientFirstName] at the top, they would see the value of that variable in their account (e.g., John), not the tip for the provider (Recipient's first name, e.g., John). If you are not sure of some of these, one way to test them is to create a dummy client in your own account and send your Custom Form to that person. When the recipient is a client, these variables are taken from the Demographics page of the client chart. For non-client recipients, variables are taken from whatever data is available in the program for that individual.
-
Custom Variables
Custom Variables are the most powerful of all because you construct them yourself. Although they can be anything, a common use would be for text you are likely to want to use in more than one Custom Form. For example, you might want to create a Custom Variable telling your recipients how they can get help on the forms, should they need it. You're asked to give the variable a name and a value. The name can be anything that's meaningful to you. No need to add the "[]" - PSYBooks does that. When adding the value, remember that textareas can be stretched down to whatever size you need.
The example below is for a variable which the therapist named "help," that has the value they want the recipient to see when they add that variable to a form:

You can add as many Custom Variables as you need. There is no limit. A good rule of thumb is that if you find yourself adding the same text in more than one heading, paragraph or Q&A, you will probably be able to save yourself some time by turning that text into a Custom Variable. Once they're created, you can use them like any other variable.
Edit Custom Forms
Once you create a Custom Form, it will be saved in the "Custom Forms I've Created" table at the bottom of the page:

If you need to edit a Custom Form you've already built, clicking it's name in the "Custom Forms I've Created" table will open it back up in the form editor again - just like when you first made it. Once the form is open, double click the form element that you want to change to open it's editing window. In the example below, the user has decided they'd rather have the date left-aligned on the page, and they also want to add the word "HIPAA" to the "I agree" declaration:

If the user also wants to edit the Default Styles of the form, they can drag the "Set Default Styles" tool onto the edit pane:

You can make as many changes as you like. Notice that there are now 3 buttons at the bottom of the form: Preview Form, Update & Save as a New Version, and Update Only:

The Preview Form button allows you to see a copy of your form that will be similar to what your recipients will see. However, on the Web, much depends on the size and type of screen the recipient is using when they view your form, so although the text and form elements will always be the same, it's likely that the size of the window they see will not be. One use for the Preview Form button is that it will allow you to see how your Provider Variables and Custom Variables will look on the form. However, remember that since Recipient Variables cannot be understood until we know who the recipient is, they will still show as the variable name when you preview your form. If you want to actually see your Recipient Variables, you'll need to make a fake client in your account and send your form to them. Make sure the fake client has the information in their chart that the variable is asking for. For example, if you are using [recipientPhone], remember to add a phone number to the fake client you create.
The next two buttons are important to understand, although it's entirely up to you how you use them. When you are just making minor revisions to a form, you may prefer to use the "Update Only" button to save your changes. If you've made substantial changes to your form, you may want to save it as a new version. This will put a new version number following the form's name, like Intake Form, v2. However, once you create a new version, you will ONLY be able to send that particular version of the form. In other words, if you have an Intake Form, v2, you can no longer send Intake Form, v1.
Shared Group Forms
Group practice owners may want to create forms for the entire practice and disseminate them to their employees. This allows everyone in the practice to use the same form(s) and also, saves time because one person (the practice owner or their admin) creates forms for all to use. A form can be designated as a shared from from either the Create Custom Form tool or the Edit Custom Form tool. The tool looks like this:

Notice that this tool is ONLY available on the Master Clinical (MC) account of a Group Practice. It is not available on GOI accounts, nor is it available on non-MC account holders of Group accounts.
Using it is as easy as it looks: checking the "Make this available as a Group Form" checkbox on an Add or Edit Custom Form window, makes that form available to all. The checkbox works as a toggle, i.e., it can be toggled on or off. The only one who can edit or delete it is the Master Clinical account holder, but everyone can use it in the same way as if they had created the form themselves.
When a Group account has at least one shared form, the top part of the My Custom Forms area gets divided into two categories: Group Shared Forms and Custom Forms I've Created. The screenshot below is a Group Practice that has one Shared Form: Transitions, LLC Patient Intake Form. The top image is the practice owner's (Master Clinical) account. The bottom image is an employee's account:

Notice that in the MC's list, the shared form (Transitions, LLC Patient Intake Form) has a trash can whereas the employees' screenshot does not. This allows the practice owner to delete this shared form at any time. The MC has also created one personal, non-shared custom form which they've named "New Employee Questionnaire." Since this form is NOT shared, no one else in the practice can see it. In contrast, the employee's list at the bottom HAS the shared form "Transitions, LLC Patient Intake Form," but it cannot be deleted or edited. (They can click the link to view it, but they are not able to save any edits they might try to make.) Also, this particular employee has created their own custom form, "Mood Checklist," which is also not shared with anyone else in the practice. Notice that since this is a personal form, they can edit or delete it.
Built-in Templates
Currently, there is one very powerful built-in template, the Profile Form. The Profile form is only for clients, not other types of contacts or Users you may have. This is because it's designed to allow your clients to fill in and update the Demographics and Insurance tabs of their charts within PSYBooks.
The Profile Form
The Profile Form is a great way to ensure that you maintain the most current demographic, insurance and payment information on your clients, because it allows them to enter their own information and send it to you online. In other words, instead of your client telling you their new address, insurance info, etc. and then you entering it in their chart, when you send them the Profile Form, they can enter it themselves.
Because it's such a helpful tool, there's more than one way to send a Profile Form. The one we're discussing here is on the Files, Forms & Templates page. It's all the same tool - but you may find that you prefer one way to send it over the others. Some of the other ways to send it are extremely handy if you're adding new clients one at a time and/or if the recipient is not yet a Portal User. However, the Files, Forms & Templates Profile Form is the perfect tool to use if you want to send the Profile Form to multiple Portal Users at once, if you want to combine it with some of the Custom Forms you've created and/or if you want to write a note to the recipient(s) when you send the form. To send to multiple clients at once and maintain HIPAA compliance, put your own name in the To: field and BCC all others.
You can send the Profile Form from Files, Forms & Templates looks with the Send Forms tool at the top of the page:
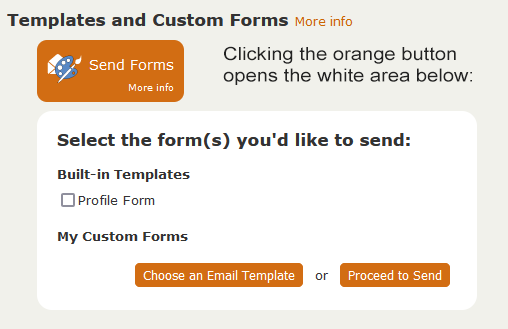
The majority of the Send Forms tool will be discussed as a separate item belowe. However, we do need to understand the options we have with the Profile form. If you click the Send Forms tool, it opens a window that has the Profile form listed at the top under a section called Built-in Templates. There are two options beneath the Profile Form checkbox - one to gather insurance information and the other to gather payment information:
If you check the box by Profile Form, you're shown the two optional Profile blocks you can send to your client, one to gather insurance information and the other to gather payment information:
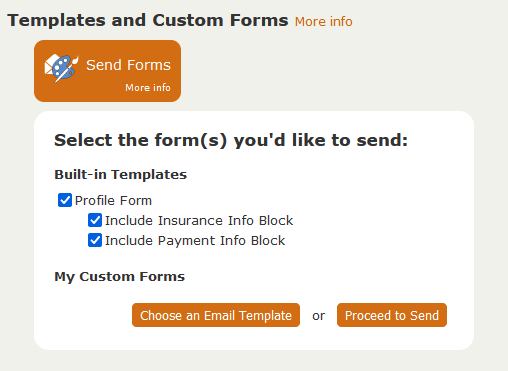
Both are checked by default, but you can uncheck either or both each time you send the Profile form. This allows you the flexibility to collect insurance and/or payment information from some clients but not others. It might also be useful to omit the insurance and/or payment sections if, for example, you know a client has a new address you'd like them to enter but you also know that neither their insurance nor their payment info has changed.
To see which items your patient will be sent on this form, you can click the "View the items on this form":
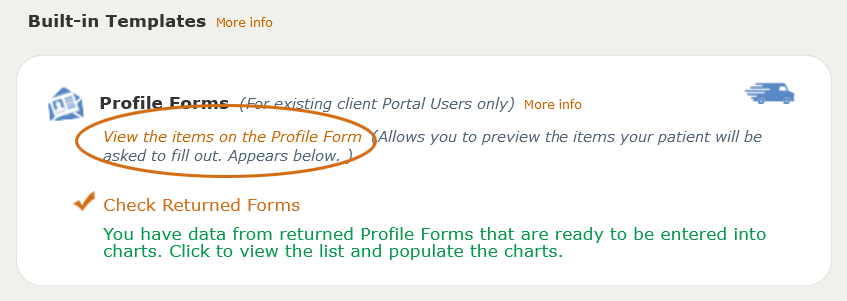
Clicking that link opens a table that looks like the one below. Although the form your patient will receive won't look like this, these are the fields they'll be asked to fill out. This is the complete form, i.e., as if the user has left both the Insurance Info and Payment Info checkboxes checked. With a couple of exceptions, the items are the same ones on the Demographics and Insurance tabs of a chart in the EHR:
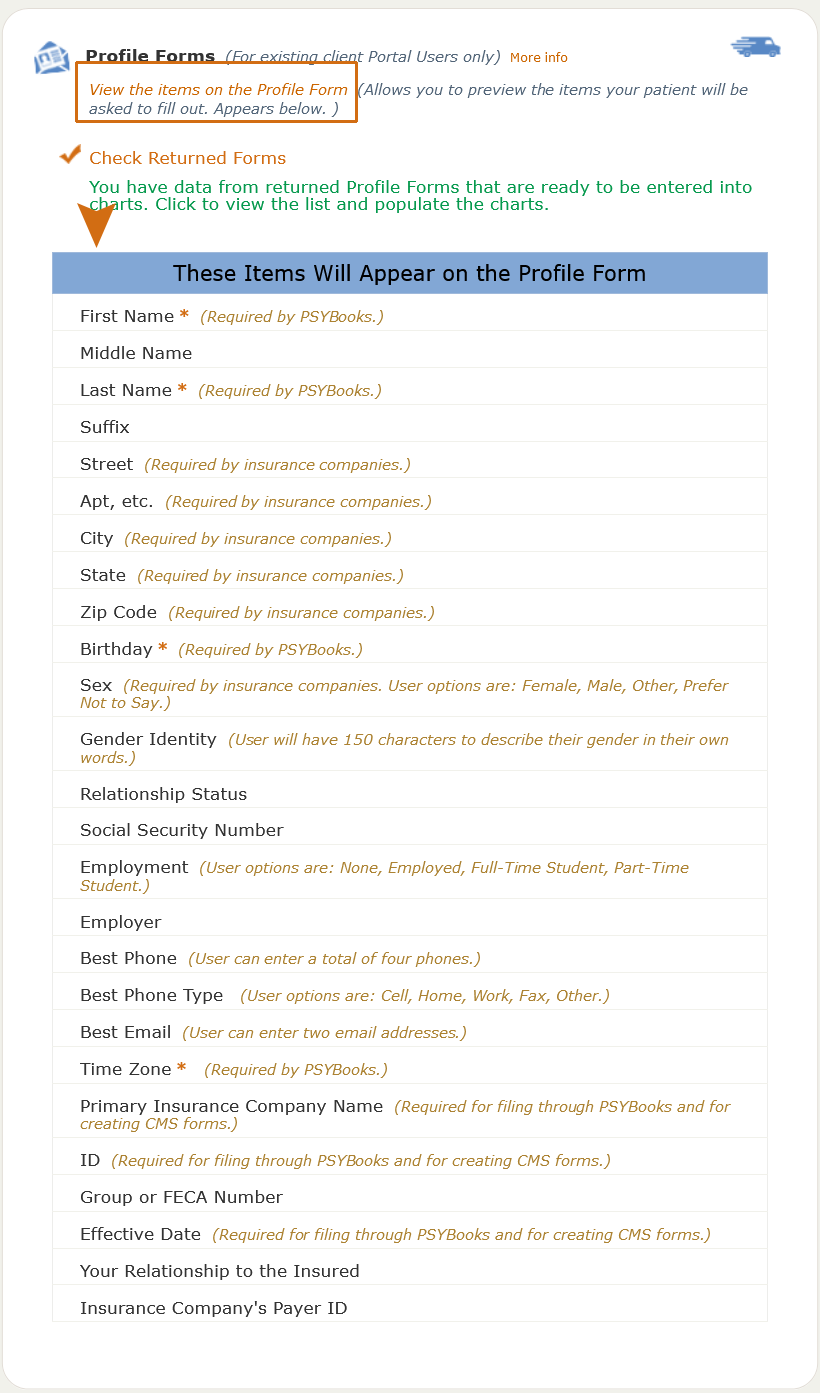
You may notice that, with the exception of the Payment Block, the only required fields on this form are the same ones required by the Demographics tab in your EHR, i.e., First Name, Last Name, Birthday and Timezone. However, since the form gets sent via email, you can write any additional instructions you want as you send the Profile Form. For example, some therapists might want to request their patients add more than one phone or email address if they have them. The client's experience of what happens when they get a Profile Request is discussed in detail elsewhere. For now, let's jump ahead to what happens on the therapist side when the client returns a Profile Form
Checking: What Happens When the Profile Form is Returned to You
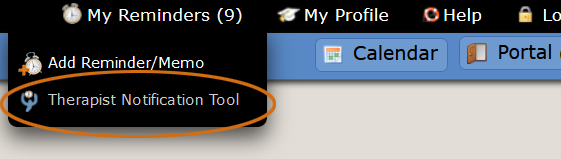
When a patient submits their Profile Form, the data is sent back to the therapist. The therapist is notified by email that they have a new Profile Form to check and a notification is also put on their TNT (Therapist Notification Tool):

It's important to note that the therapist (or their admin staff) serves as the gatekeeper for all data that's entered into their EHR. That means that despite the fact that the patient has submitted their data, nothing changes in their chart until the therapist "checks" the data. There are two ways the therapist can do this:
- The "home base" for the checking tools is at Tools > Files, Forms & Templates, so you can navigate there at any time and work through any new Profile Forms that have come in.
- However, especially if you just have one or two Profile Forms to check, it may be easiest to just click the "View" link on the TNT. That will open a window where you can check and submit the data right there. The advantage of this method is that you don't have to navigate away from where you've been working. You just click the link to access your TNT (Therapist Notification Tool) from anywhere in the program - and follow the instructions for viewing returned Profile Forms:
The top screenshot below shows Profile Forms secton on the Files, Forms & Templates page in its default state (i.e., when there are no new Profile Forms to check). The bottom screenshot shows what you can expect to see when new Profile Forms have come in and are ready to be checked. Notice the orange checkmark and green text under the Check Returned Profiles heading:
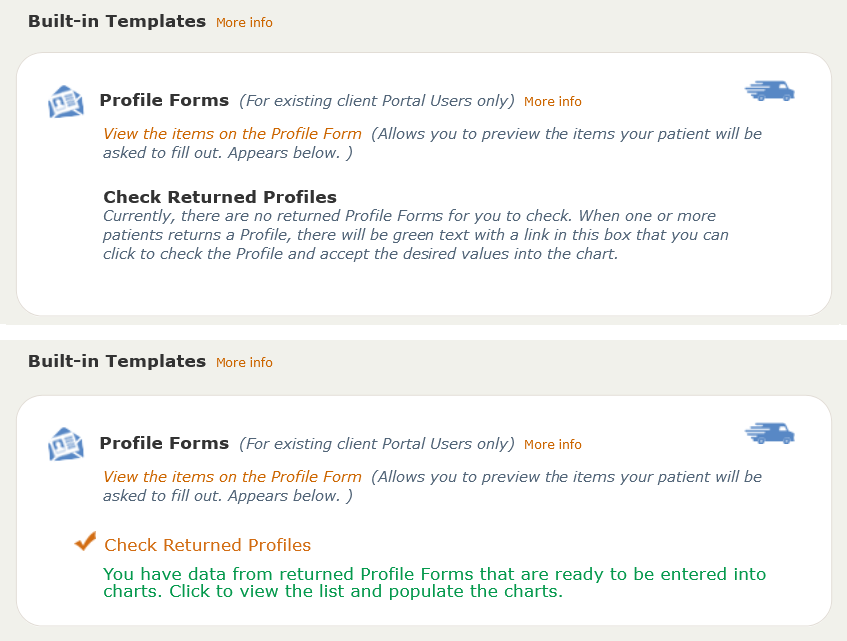
As you can see, in the top screenshot, the Check area is closed. By comparison, the bottom one is open, giving you access to the Check Returned Forms tool.
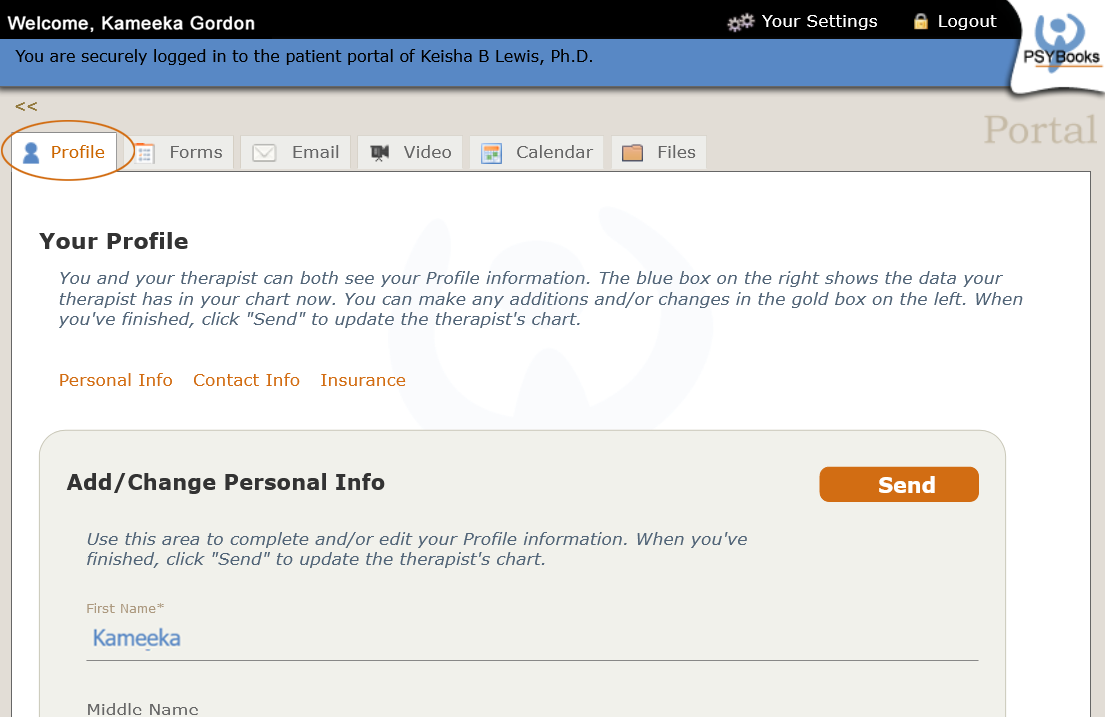
Clicking the green text under Check Returned Forms opens a window that shows a list of all patients who have returned Profile forms since the therapist last checked. If there's more than one, data from the earliest Profile will be shown in a table below the list. However, the therapist can click any name they want to view that patient's data. In the screenshot below, the therapist clicked Kameeka Gordon's name to view her data:
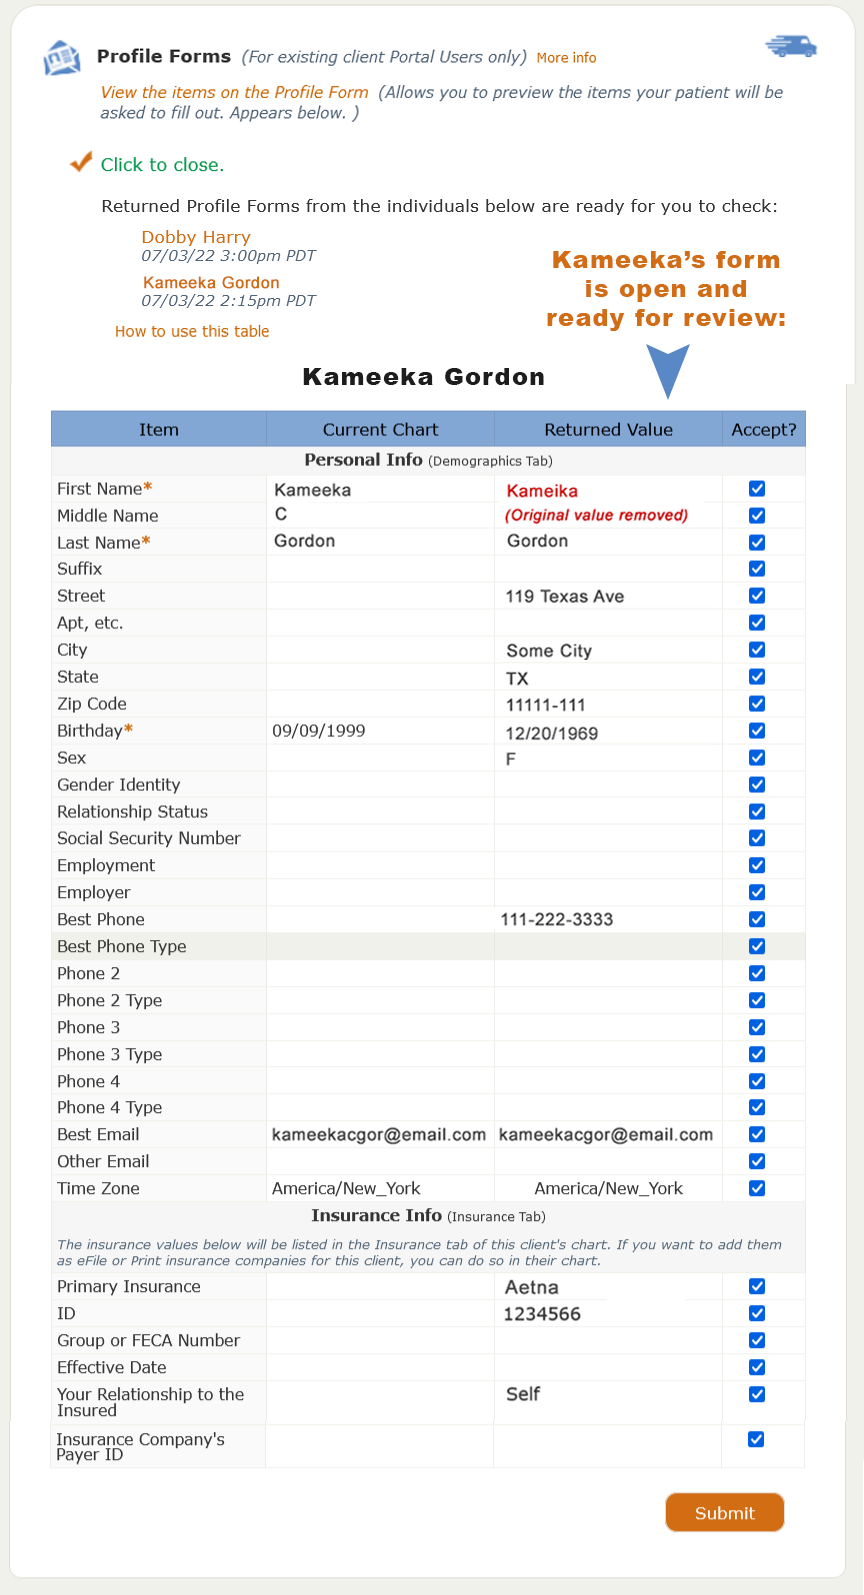
We'll look at a few of the entries at the top of the table as being representative of the types of changes a user might make:
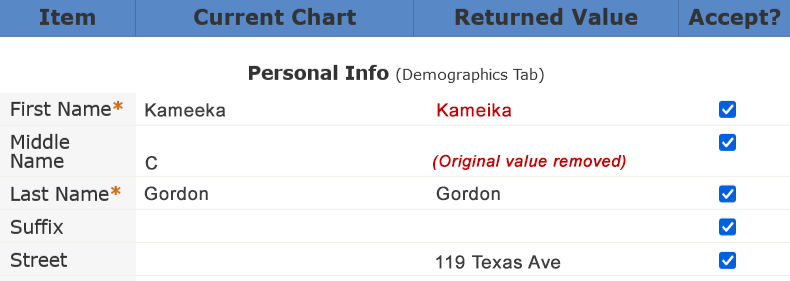
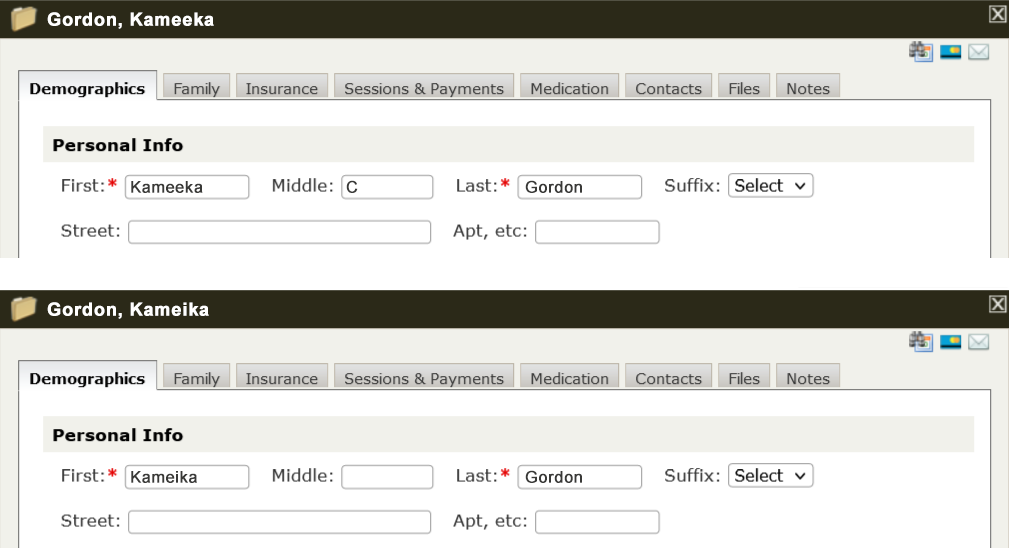
The table has 4 columns: Item, Current Chart, Returned Value and Accept? The values listed in the Current Chart column are what's on the Demographics page of this client's chart right now. In other words, her name is listed as Kameeka C Gordon and there's no Suffix or Street listed. The Returned Value column shows the corrections and additions the patient made. Red text items are things the user changed - places where the new value does not match the current value. For example, it looks like the patient's first name was misspelled. It's Kameika - not Kameeka. Also, the current chart has a middle initial of "C." Kameika removed the C. Kameika also added a street address. If you accept these new values into the chart, the current values will be overwritten by the new ones. The image below shows what the top part of this chart would look like before accepting the new values and the bottom one shows the new values:
However, you do not have to accept all changes a user sends you. The Accept? column has checkboxes for each item. By default, all boxes are checked. However, if there are items you do not want added to the chart, just uncheck the box beside that item before you submit:
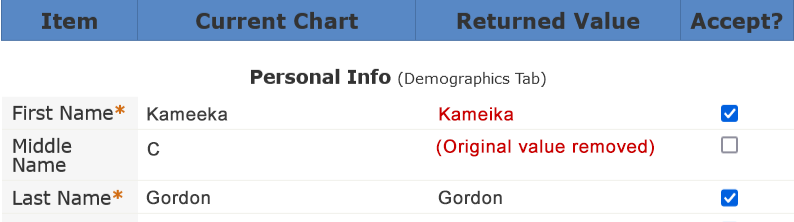
If the user submitted the above, the spelling of Kameika's first name would be updated, but the middle initial "C" would remain in the chart.
The Insurance Section
PSYBooks subscribers use the Insurance Tab differently. Some efile, others create paper forms, and others are strictly private pay and don't want insurance information in the chart at all. Also, even for therapists who are set up to efile, they may or may not have any given client's insurance company listed in their PSYBooks Insurance Library. For this reason, when you accept insurance information from a patient's Profile Form, we populate the insurance tab of their chart with a separate Profile table with the data ONLY, i.e., the company has not yet been added as an active insurance company in their chart. The screenshot below shows that the therapist accepted the patient's insurance data from their Profile Form, but you can also see the note at the top telling you that they do not yet have any insurance companies in their chart:
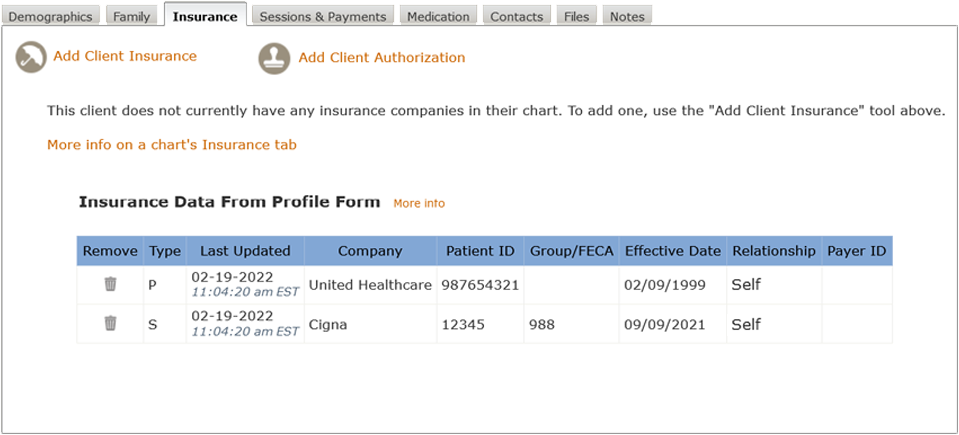
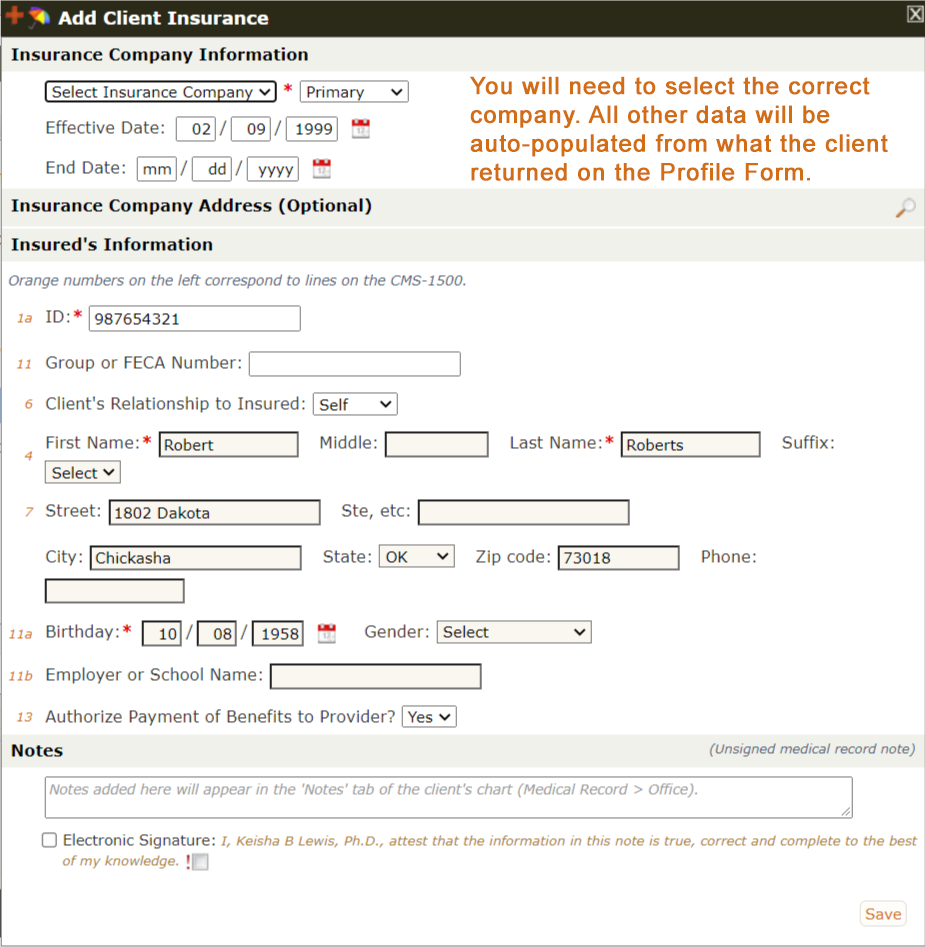
If you don't file insurance or need to create superbills or CMS forms to give the client, you can just leave this table exactly as it is, i.e., don't bother attaching the insurance company to the chart. However, if you do need to attach the insurance, when you click the Add Client Insurance tool, it will be populated with the data the client returned in their Profile Form. The screenshot below shows the same screen as above with the Add Client Insurance tool open. Notice that the form is pre-populated with all data the client returned in their Profile form - both the demographic data needed to file insurance and also the specific insurance information. However, although the client returned the name of the insurance company - and possibly even the payer ID, we leave selecting the correct company up to you:
The Payment Section
When you include the Payment Section with your Profile form, your client sees this at the bottom of the form they're asked to fill out:

When the client submits the Profile form, the information goes directly into the "Saved card" list for you to use in collecting their payments. The new saved card(s) will be available for you to use as soon as the client returns the Profile form and you accept it. Notice that this method of collecting credit card data will only be helpful if you are set up to use Stripe within PSYBooks. If you need to collect client credit/debit card information to use with a different payment processor, you can request it via your secure email and/or ask your client to upload images of the credit card into the Files section of their Portal.
The Send Forms Tool
There's a single tool for sending forms that's used for both Built-in Templates and also any Custom Forms you've created. The Send Forms tool is the large orange button at the very top of the "Templates & Custom Forms" section of the Tools > Files, Forms & Templates page:
When you click Send Forms, a white area opens beneath the orange tool that allows you to select any of the Built-in Templates and/or any Custom Forms you've created. It will look something like this:

This individual has created two Custom Forms - a HIPAA Privacy Policy and an Intake Form. They can send either or both of those, with or without the Profile Form. They can also request eSignatures on any Custom Form they send. When the user has made their choices, clicking "Proceed to Send" opens a special type of Compose Email form. (We'll cover the "Choose a Draft" button later. That's a "nice but not necessary" tool that not all users will want to use.)
The email that is sent with the Send Forms tool is programmed to do special things once it gets to the client's Portal. However, on the therapist side, it looks like a normal email that you would see in the Portal. A Send Forms email might looks something like this before it's sent:

This user has decided to send all three of the forms they had available, i.e., the Profile Form and both of the Custom Forms they've created. They are listed in the email under "Forms." The therapist's choices for requesting eSignatures have already been captured but can be changed here if desired. In addition, you can CC and BCC, request Read Receipts, include a signature and, if you wish, write in the body of the email. All you need to do at this point is select the individual(s) to whom you want to send the forms and then click Send. If you have additional attachments, you may attach them to this email, requesting eSignatures if you wish. If you want to send the same packet of forms to more than one client, you can put your own name in the To field, and list each of the clients as a BCC recipient. This will allow you to simplify your workflow in a way that is HIPAA compliant, since no client's email will be seen by any of the others.
As soon as you send the forms, a notice appears on your TNT (Therapist Notification Tool) alerting you to the fact that you have outstanding forms which have not yet been returned:

The therapist above has three outstanding forms - the Profile Form, plus the HIPAA Privacy Policy and also the Intake Form. They were all sent to a client named Jane Doe. Jane has not yet returned any of their forms. The three tools on the left allow the therapist to trash the notification, email the client, or remind the client to fill out the form (the green backwards arrow). Notice that the trash can is ONLY to remove the notification so it won't appear on the TNT. It does NOT "un-send" the form or tell the client they don't need to fill it out. (If you need to cancel the request, that can be done from the Manage Templates & Forms tool.)
As soon as a form is returned, the therapist is noticed via email and also on the TNT. In the screenshot below, we can see that Jane has returned their HIPAA Privacy Policy, but the Intake Form is still outstanding:

Copies of the returned forms can always be found in the My Files section of the Files, Forms & Templates page. There's a separate category in the Files from Portal Users section called "Custom Forms" where copies of all returned Custom Forms are held. In addition, when the Custom Form is from a patient, a copy will also be put in the Files tab of their chart.
Email Templates
(i.e., Save an Email So You Can Reuse It)
Another feature the Send Forms tool has is the ability to save and reuse email templates. This allows you to write an email you plan to use often and save it as a template, so you don't have to rewrite it each time you need it. A common usage might be to develop an email you routinely send to new patients. You can save the draft of that email and reuse it each time you have forms you want to send to a new patient. Note that you are NOT saving a Custom Form with this feature. Instead, you are saving the email you want to use to SEND one or more of your Custom Forms.
Add an Email Template
There's more than one way to add a Custom Forms email template. Perhaps the most straightforward is to click "Send Forms." That will open the Send Forms tool, as we saw above. There are two buttons at the bottom: Choose an Email Template and Proceed to Send:

Clicking the Choose an Email Template button opens another window that looks like this:

As you can see, the window above has two tools:
- A select box where you can choose among templates you've already saved if you're ready to send a form
- A link at the bottom that says "Add/Edit/Delete Email Templates"
If you're wanting to add a new template, click the Add/Edit/Delete Template link. That will open the bottom section of the form which looks like this:

Clicking the Add New Email Template button, opens this small window:

From this window, you can enter the Subject you want your email to have, plus the message you want in the body. Although you cannot add formatting here, the system will register line breaks. Let's assume you type this in the Message section of the Add New Draft window:

It will look like this when you actually use that draft to send forms:

At this juncture, you can use the formatting tools to style your email if you like, but it won't change the draft itself. In other words, you'll have to add the formatting each time you use the template. You can also make adjustments to the text here for specific cases. Again, those adjustments will be added to this particular email, but they will not affect the template itself.
Edit/Delete Templates
If you read the Add an Email Template section above, you probably noticed the section for both editing and deleting templates, which is right under the Add New Email Template button:

Clicking a link brings up a form that allows you to edit that draft; clicking the trash can will delete it.
Use a Template to Send Forms
To use a template that you've previously saved, click the Send Forms tool and then click the Choose a Draft button at the bottom. When that window opens, use the select box at the top to choose the template you want to use:

Let's assume the user chooses the "Welcome to my Practice" draft. When they click "Go" an email will open that has that draft inserted in both the subject and the body of the email:

Notice that the email above has forms attached (Profile Form and Intake Form) but does not yet have a recipient listed in the To box. This is because you can insert a draft at any point in the Send Forms process, i.e., before you add the recipients and also before or after you add the forms you want to include.
You do not have to use the Email Templates feature. It's optional. However, if you have one or more standard emails you routinely send, saving them as templates can be a real time-saver.
Client Experience
The Client Experience
When you send a Send Forms email, the recipient is notified via their regular email that they have received an email in PSYBooks. There's a button in the email they can click that will take them to their login page. When they log in, they'll be taken to the Email tab of their portal so they can view the portal email without having to search for it. Once they open the email, how it looks depends on what you sent them. The example below is from a therapist who wrote a brief note at the top, then attached a Profile Form, three Custom Forms, and one attachment:

If you've sent only a Profile Form, it will open the Profile tab:
If you've sent only Custom Forms, it will open the Forms tab:
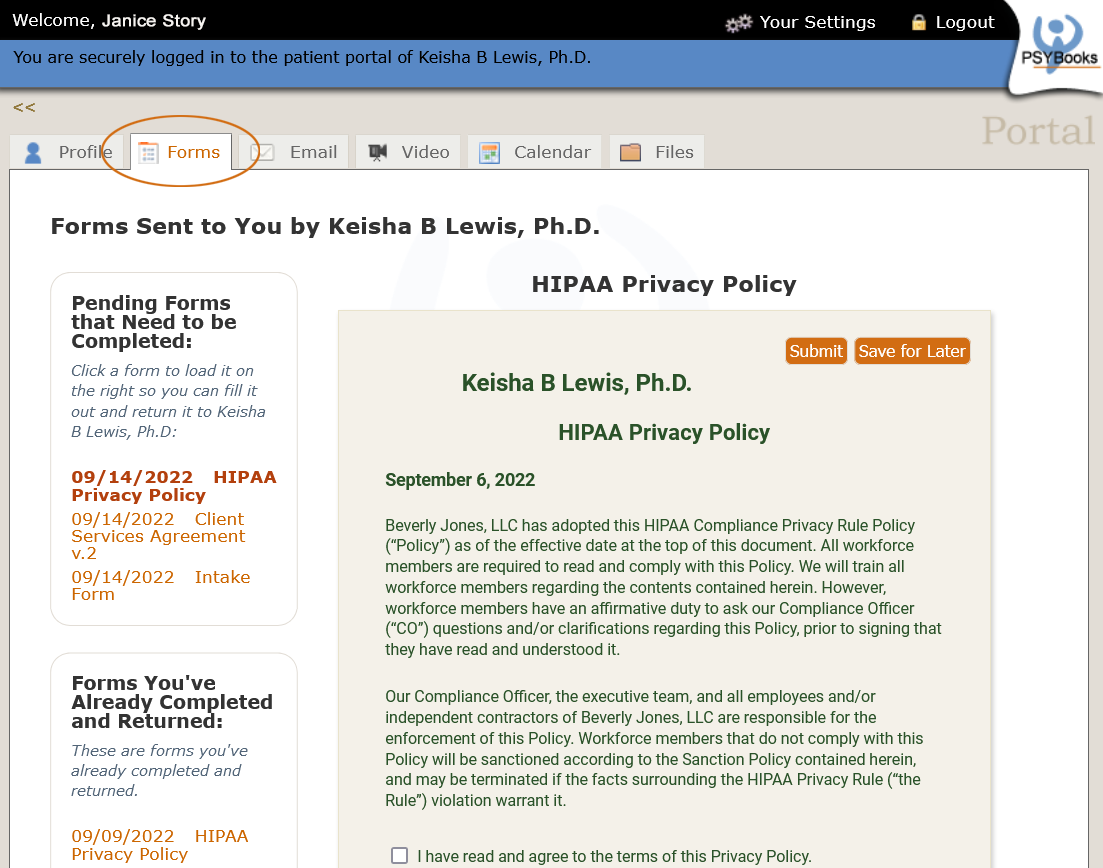
If you've sent both, the email they receive will have links to both the Profile and the Forms tabs and can complete them in any order. Finally, if the therapist sent some regular attachments with the Send Forms email, they will be on the Files tab of the patient's portal. If eSignatures have been requested on any of the forms or attachments, the recipient will be guided through that process.
My Files
What this isMy Files is the bottom part of the Tools > Files, Forms & Templates page. It's a secure holding/working environment for digital files pertaining to your practice.What it looks likeThe My Files section is at the bottom of this page. It looks like this: 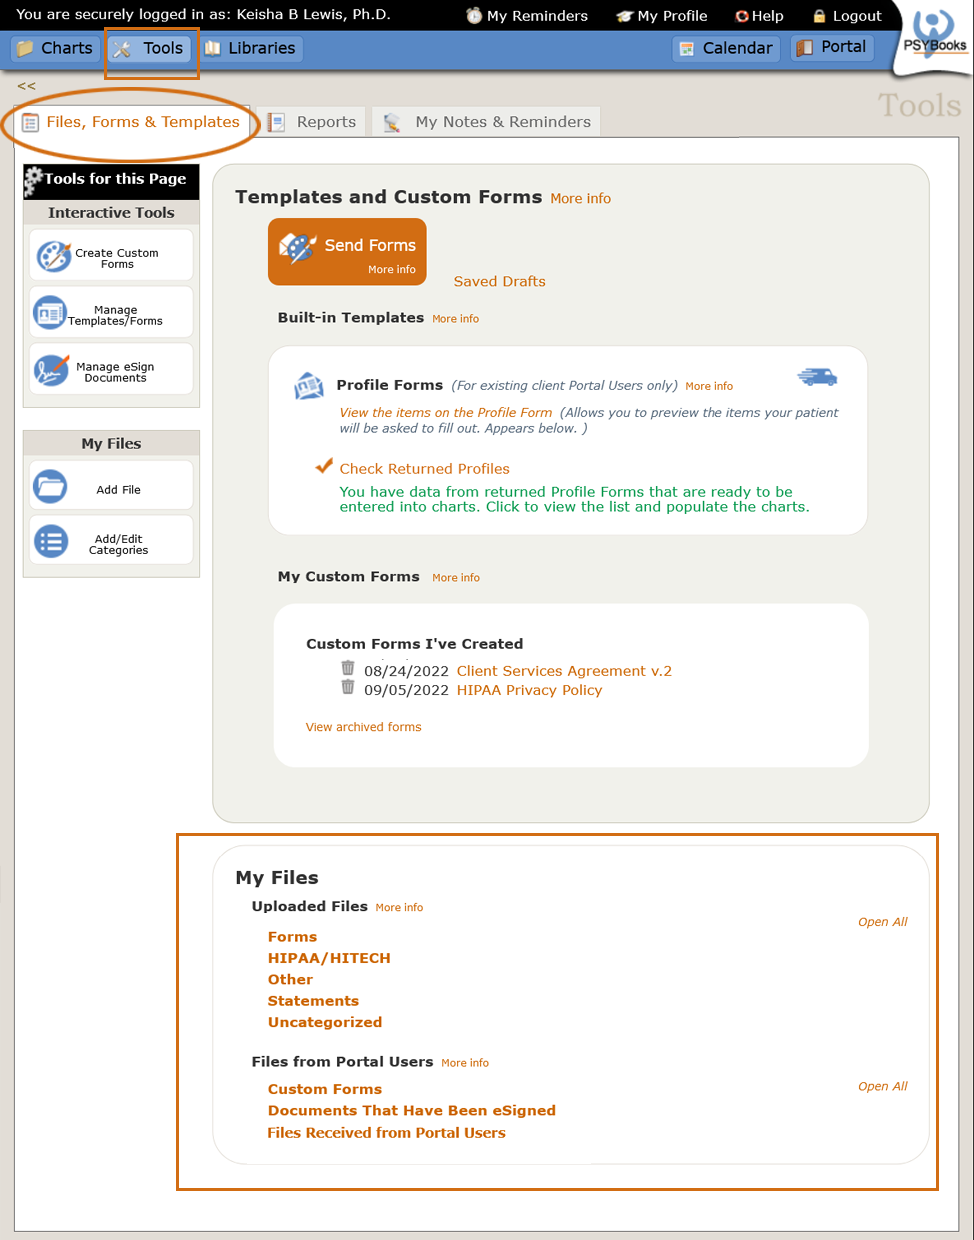 |
Where this isMy Files is the bottom section on the Tools > Files, Forms & Templates page.
|
Whereas the top part of this page, Templates and Custom Forms, holds tools that "do things" in the program, the bottom part of the page, i.e., My Files, is a secure storage area for digital files that are part of your practice. As with the top section, My Files is divided into two sections: Uploaded Files and Files Received From Portal Users. Each section will be discussed below.
My Files > Uploaded Files
As we discussed earlier, the Files, Forms & Templates page divides into two broad categories: Templates & Custom Forms at the top, and My Files at the bottom. My Files subdivides into Uploaded Files and Files from Portal Users. This section covers the first section in My Files, i.e., Uploaded Files:
The Uploaded Files section is analogous to the Files tab each of your patients has in their PSYBooks Chart. In both cases, the only files stored there are those belonging to that individual. For example, a client chart in PSYBooks only holds files belonging to that one client. Similarly, files stored in Uploaded Files only belong to YOU. No one else has access to them unless you have Admins of other PSYBooks subscribers in your practice to whom you've specifically granted permission.
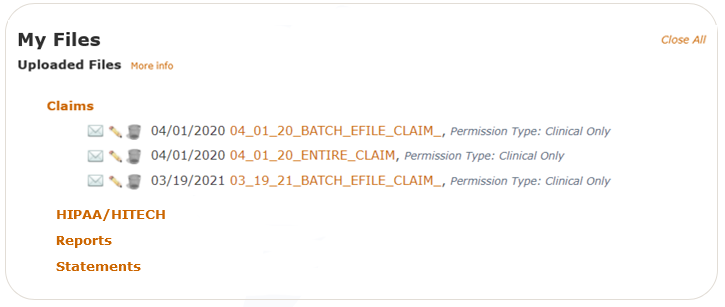
The orange titles in the screenshot above (Forms, HIPAA/HITECH, Other, Statements and Uncategorized) are Categories. PSYBooks provides you with some Categories and you can also make your own. In the screenshot, the Categories are closed, so you can't actually see the files each Category holds. Your Categories will likely be different from these - they're individualized to how you use the program. Clicking on a Category name opens it to reveal the files inside:
Files get added to this section in one of three ways:
- By directly uploading them with the "Add File" tool on the left;
- By requesting they be added here from other places in the app by using the 'Upload to My Files' tool:

- By PSYBooks, when certain conditions are met, e.g., when you run a statement report for a patient.
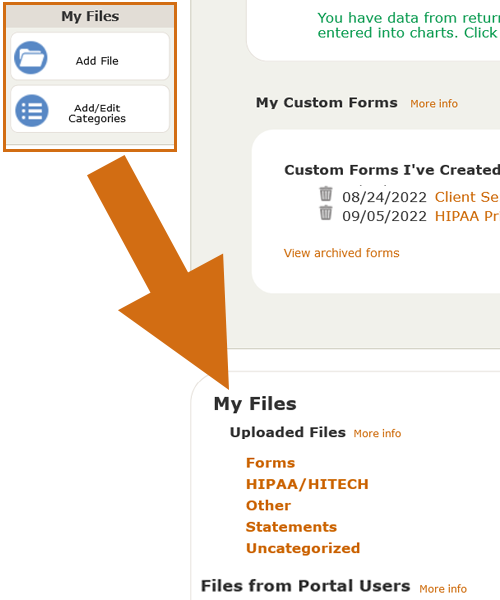
The left nav of Files, Forms & Templates is divided into two parts. The bottom part - which consists of the Add File and the Add/Edit Categories tools - feeds into the bottom part of the page, i.e., My Files:
My Files > Files from Portal Users
Whereas files in My Files are primarily files you've uploaded, files in the bottom section, as the name implies, have been uploaded by Portal Users. Files from Portal Users is the bottom half of the My Files section:
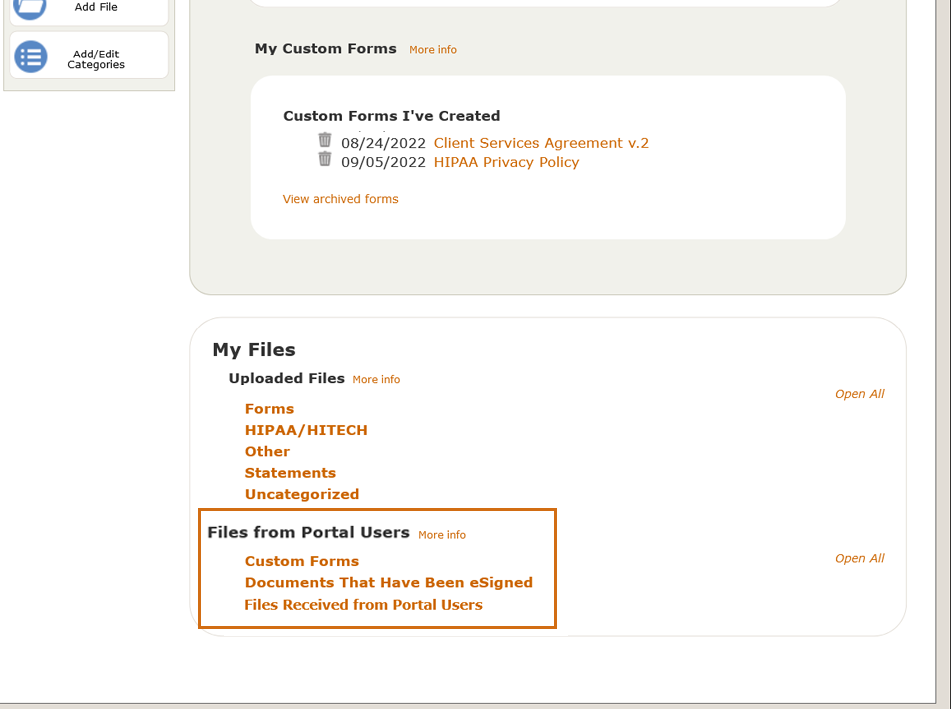
This whole category is for files you get from Portal Users. In other words, you cannot directly upload files into this section. Instead, Files from Portal Users holds files you may want to save for documentation purposes. For example, anytime a Portal User completes a Custom Form and returns it to you, a copy of that file will automatically be put into the "Custom Forms" category. Similarly, when a Portal User eSigns a document that is not a Custom Form and returns it to you, a copy of that file will automatically be put into the "Documents That Have Been eSigned" category. If the Portal User is a client, an additional copy of these types of files will also be placed in the Files tab of their chart. However, other Portal Users from whom you may want to request eSigned documents or Custom Forms don't have "charts" so their files are only stored here.
The Other Files from Portal Users sub-category is for times when a Portal User directly uploads a file to you - those files are stored here.
Tools for This Page(Files, Forms & Templates)
What this isThis is the left nav of the Tools > Files, Forms & Templates page.What it looks likeTools for This Page on Files, Forms & Templates looks like this: 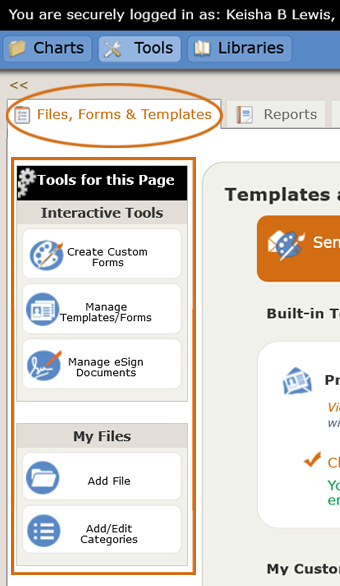 |
Where this isThis is the left nav of the Tools > Files, Forms & Templates page.
|
The left nav on the Files, Forms & Templates page is divided into two sections. The tools at the top are called "Interactive Tools" whereas the bottom tools are in a section called "My Files." The My Files tools correspond to the section on the right with the same name (My Files). In other words, the My Files tools ONLY affect things in the My Files section. The Interactive Tools are more varied and, although there's not a 1:1 correspondence, they tend to affect or reflect things in the Templates and Custom Forms section on the right.
Each tool will be discussed below.
Create Custom Forms
The Create Custom Forms tool was covered in detail in the Your Custom Forms section above so will not be covered here.
Manage Templates/Custom Forms
What this isManage Templates/Custom Forms Tool keeps track of the Profile Forms you've sent to your patients and also any Custom Forms you've sent to patients or other Portal Users. Additionally, there are tools allowing you to work with and track the progress of these documents.What it looks likeThe Manage Templates/Custom Forms Tool looks like this: 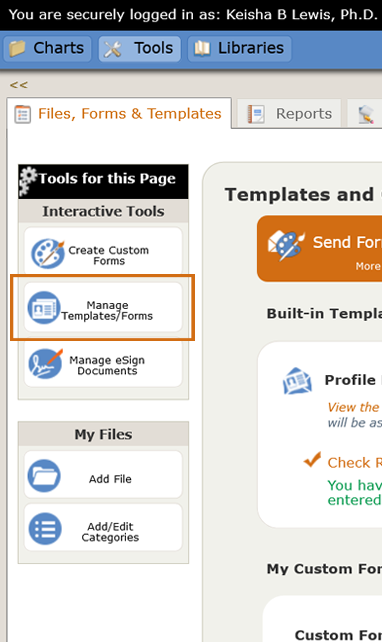 |
Where this isManage Templates/Custom Forms is available on the left nav of Tools > Files, Forms & Templates in the "Interactive Tools" section at the top.
|
The Manage Templates & Forms tool allows you to both track and manage Profile Forms (templates) and also any Custom Forms that you've sent. There are a variety of filters at the top of the page that allow you to view as broad or narrow a result as you need:

- Select how many items appear on the page. The default is 10, but you can change it to see more.
- Choose the specific page you want to view if you have more than one.
- Sort by Newest to Oldest (the default) or Oldest to Newest.
- Choose all, or a specific Portal User's documents to view.
The table itself has several tools on each row that you can use with that file:

With these tools, you can:
- Securely email the person who sent you this file.
- Reset the password to their Portal User account if they've forgotten it.
- Remind the Portal User to sign and return the documents.
Next, we'll look at a couple of actual rows in the table:

Manage eSign Documents
What this isThe Manage eSign Documents Tool keeps track of all stand-alone documents you've sent that have requested an eSignature. Notice that this tool does NOT include Custom Forms that have requested eSignatures.What it looks likeThe Manage eSign Documents tool looks like this: 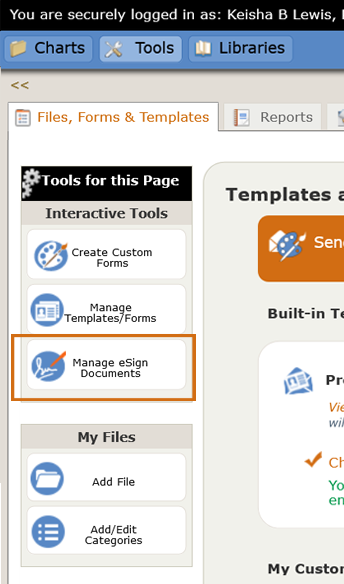 |
Where this isManage eSign Documents is available on the left nav of Tools > Files, Forms & Templates in the "Interactive Tools" section at the top.
|
Esignatures can be requested on standalone files that are sent as attachments to regular emails and also on Custom Forms. The Manage eSign Documents tool is only for tracking standalone documents requesting eSignatures. Managing Custom Forms, including those with eSignatures, can be done with the Manage Templates/Forms tool, above this one on the left nav.
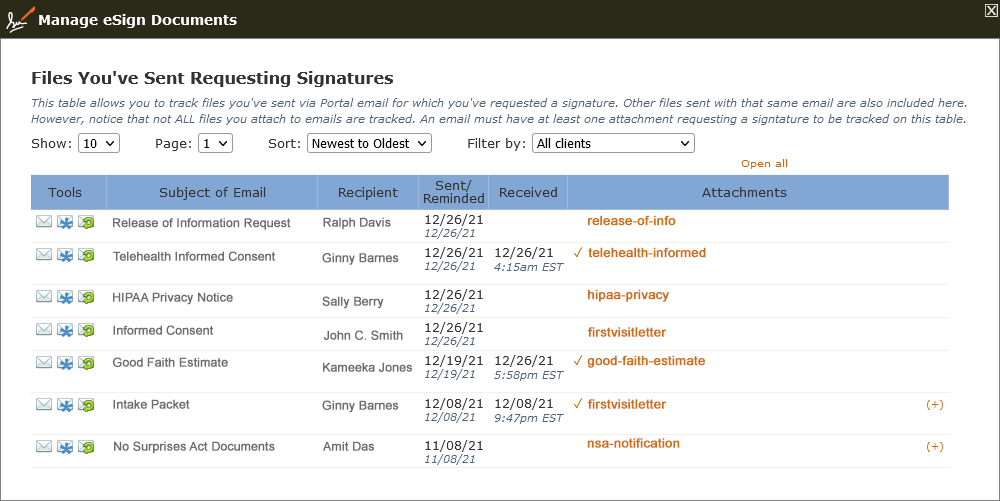
When you click the Manage eSign Documents tool shown in the screenshot above, the window that opens looks like this:
The top part of Manage eSign Documents has a set of filters that will allow you to find what you need if you don't see it right away:
With the filters, you can:
- Select how many items appear on the page. The default is 10, but you can change it to see more.
- Choose the specific page you want to view if you have more than one.
- Sort by Newest to Oldest (the default) or Oldest to Newest.
- Choose all, or a specific Portal User's documents to view.
The table itself has several tools on each row that you can use with that file:
With these tools, you can:
- Securely email the recipient of this file.
- Reset the password to their Portal User account if they've forgotten it.
- Remind the Portal User to sign and return the documents.
Next, we'll look at a couple of actual rows in the table:
The first column holds the Tools that we discussed above. The next column is the Subject line the therapist used when they sent the email, and the third column is the name of the person to whom it was sent. The Send/Receive column shows the time/date stamp for when you sent the request. Similarly, the Received column shows when you received the signed response back in your Portal.
The Received column has two possible tools - the orange link of the filename and, when present, the orange checkmark beside it, which is also a link. Clicking the filename link opens a copy of the file you sent in the PDF Preview tool. Once the file has been signed and returned, the checkmark appears. Clicking the checkmark allows you to see the signed document.
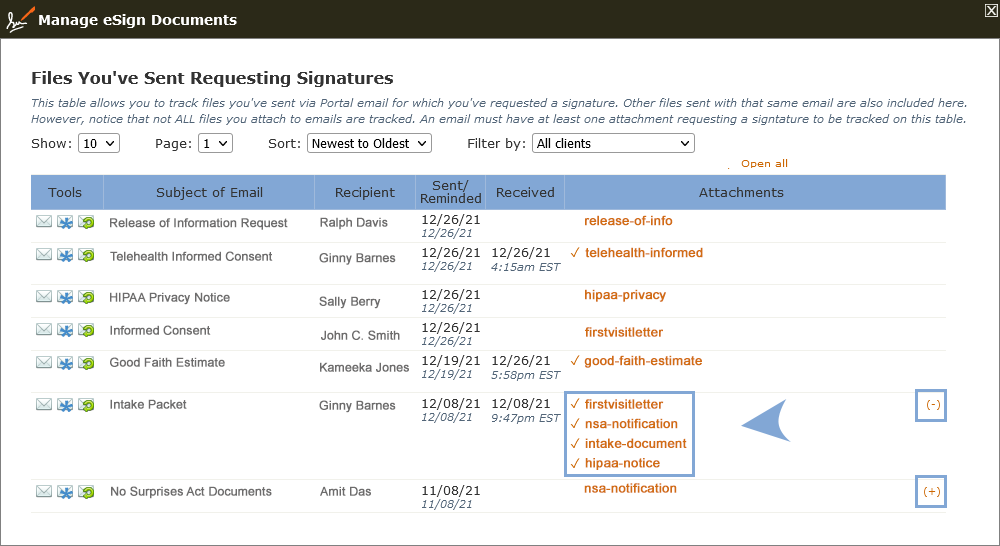
When you attach several files to a single email, those files are grouped together in a packet. Rows that include more than one eSigned document are indicated by an "Open" tool (+) on the far right side:

Clicking a (+) link opens the packet so you can see all files that were attached to that particular email:
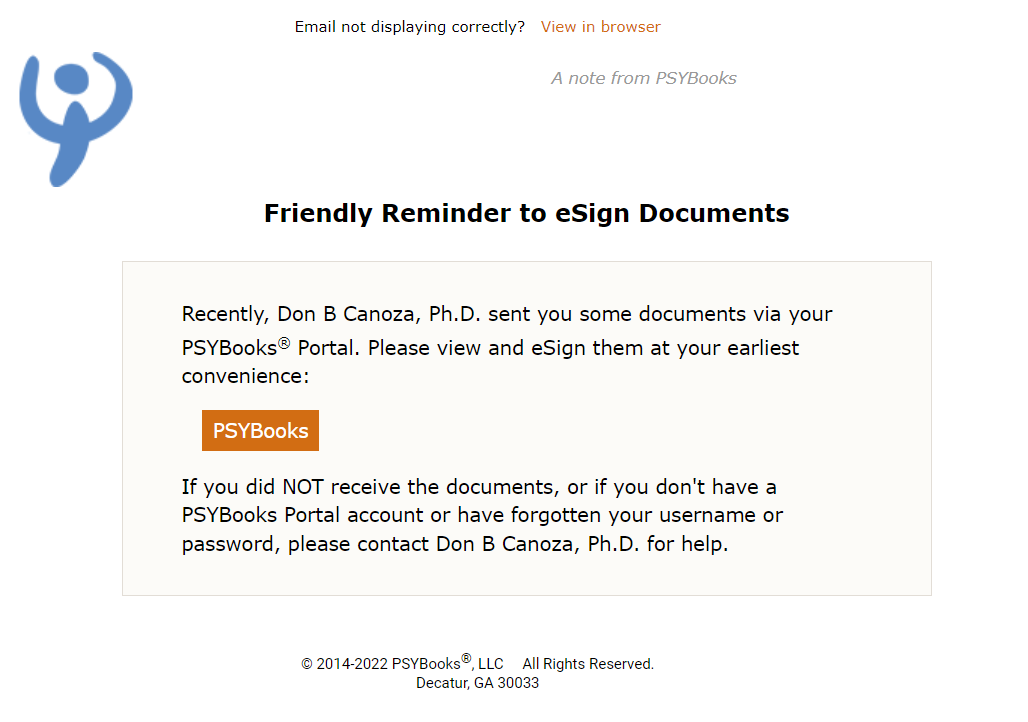
As we discussed above, the third tool on the left allows you to remind the Portal User to eSign and return the documents. Clicking this tool: sends this email, customized to display your name:
Add File
What this isThe Add File tool on the Files, Forms & Templates tab allows you to enter a Name, Category and Permission level of a file you're uploading to the therapist's file storage area.What it looks likeThe Add File tool looks like this: 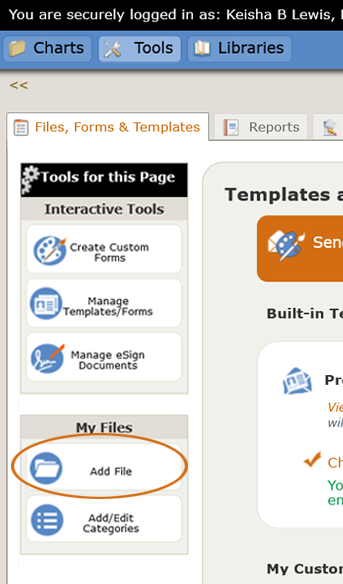 |
Where this isThe Add File tool is in the My Files section of the left nav of the Files, Forms & Templates tab in the Tools section. |
Clicking the Add File tool in the Files, Forms & Templates section opens a form exactly like the one in the Files tab of a client chart:
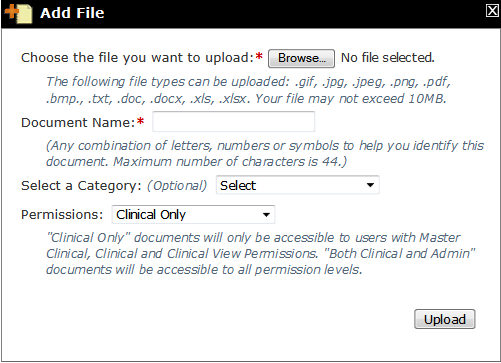
The first line lets you browse your computer for the file you want. Once you find your file, PSYBooks automatically populates the Document Name field with the name of your existing file. However, you can change the name to anything you want. The next line allows you to select a category for your file. This is an optional tool to help you keep your files organized. The last line allows you to set a permission level for the file (i.e., specify which types of users are allowed to view the file).
As noted above, Add File adds files to the bottom section of the page, i.e., the "My Files" section.
Add/Edit Categories
What this isThe Add/Edit Categories tool in the Files, Forms & Templates section allows you to add, edit, delete and reorder the categories you use to organize your own files. The categories in the therapist file section are totally different from the file categories in clients' charts so changes you make here will not affect any client chart.What it looks likeThe Add/Edit Categories tool in Files, Forms & Templates looks like this: 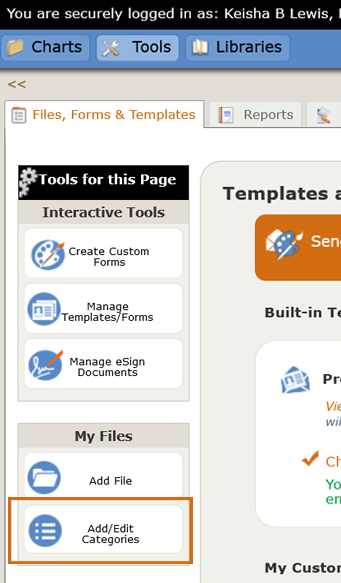 |
Where this isThe Add/Edit Categories tool is on the left nav of the Files, Forms & Templates tab in the Tools section. |
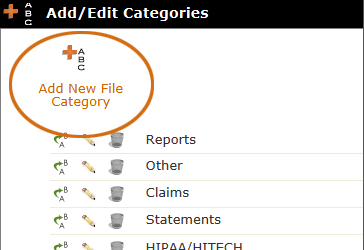
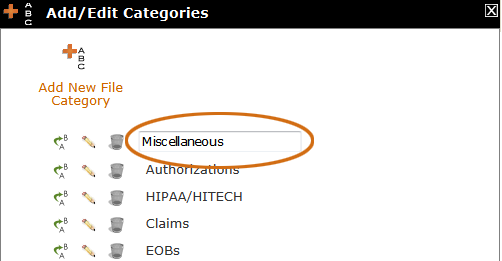
Any categories you add to Files, Forms & Templates will appear in the My Files > My Uploaded Files section, as discussed above. When you first click the Add/Edit Categories tool in the My Files section, the default form that opens looks like this:
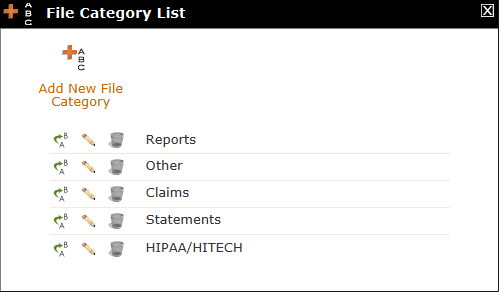
Notice that there are many fewer default categories in the therapist file storage area than are present in the client file storage area. However, you can change the categories in any way you want. As with client file categories, there are four separate tools for working with the categories: The Add New File Category tool at the top plus three small table tools: Reorder, Edit and Delete. Each will be discussed below:
Add New File Category tool
The Add New File Category tool looks like this:
Clicking the tool opens a textbox right on the form where you can add your new category:
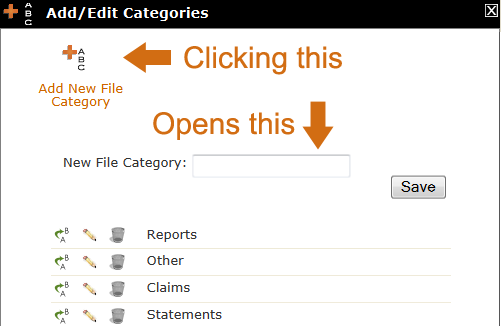
You can add your new category, click Save, and it will be added to the list below the tool.
Reorder File Categories tool
The Reorder File Categories tool is a small table tool beside the name of the category. It looks like this:
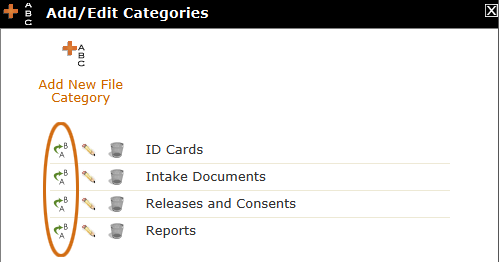
You can click and drag any category to another place in the list with this tool.
Edit File Category tool
The Edit File Category tool looks like this:
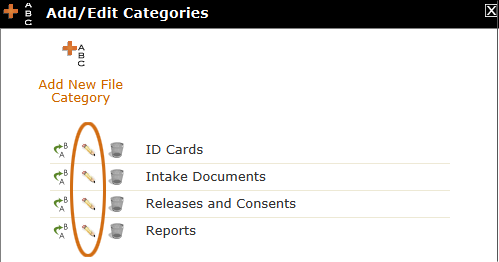
Clicking an Edit File Category tool puts the category name in that row in a textbox where it can be edited:
Delete File Category tool
The Delete File Category tool looks like this:

You can use this tool to delete file categories. You will be warned if a category contains files so you can decide whether you want to delete the files and the category or just the category. As with the Add File tool, any changes or additions you make with Add/Edit Categories only affects Categories in the "Your Uploaded Files" section.
Reports
What this isThis is a tab in the Tools section of the app which allows you to create reports from your practice data. All reports have filters so you can narrow what the report contains. In most cases, reports also provide tools for working with the report data. Reports you generate can be saved to a PDF format so you can print or save them to your computer. You can also save your reports to the My Files section so you can easily pull up that same data at any time.What it looks likeTools > Reports 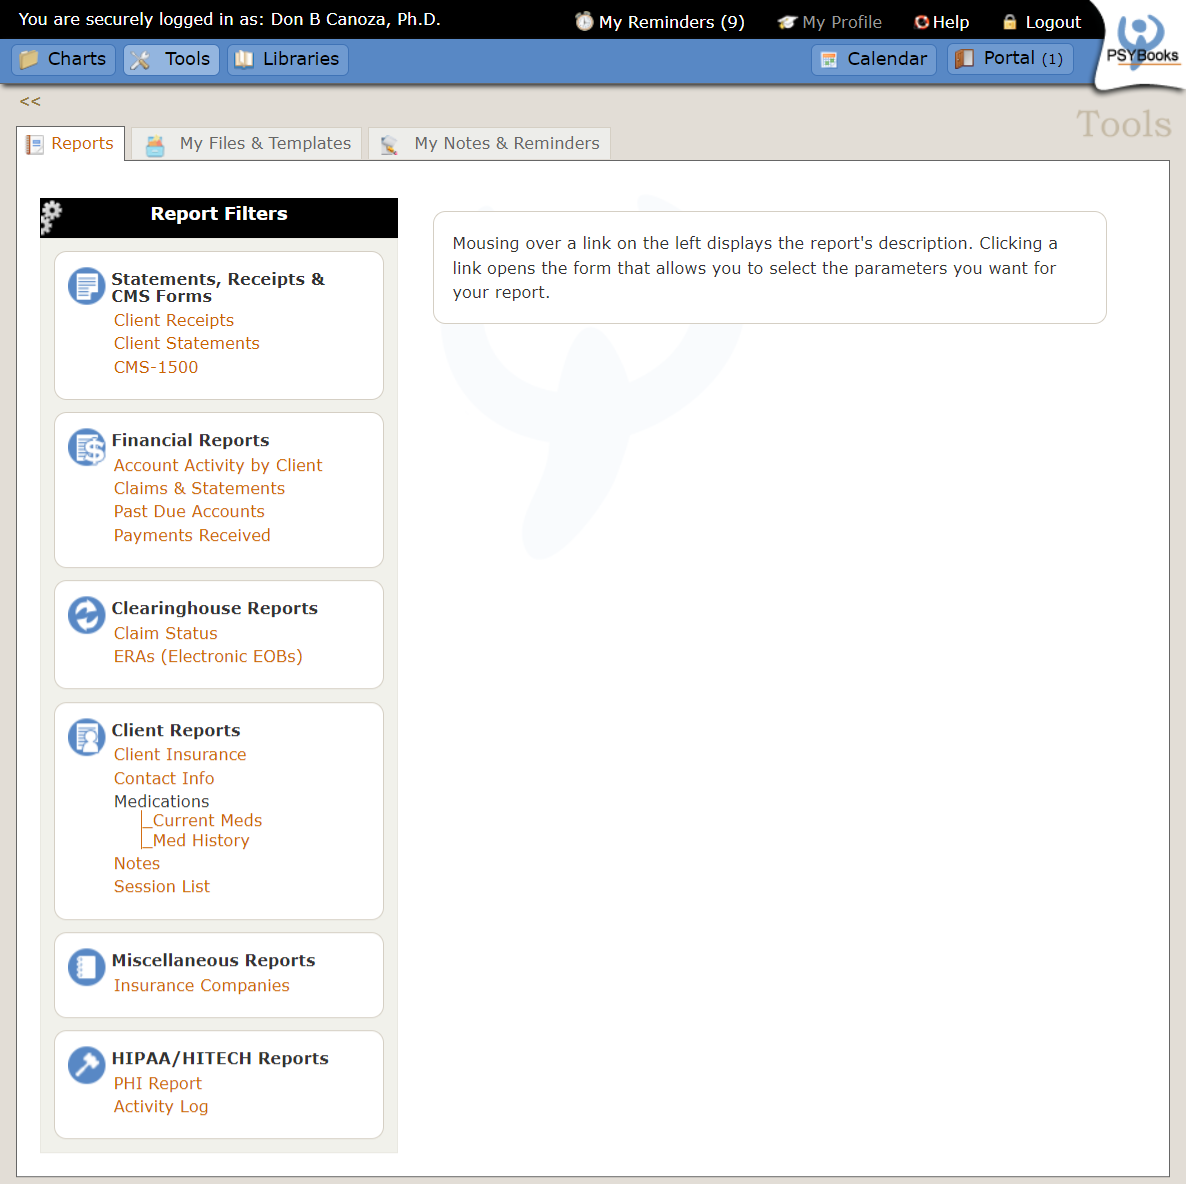 |
Where this isReports is the first tab in the Tools section of the app. |
The Reports section has links to various report filters on the left nav:
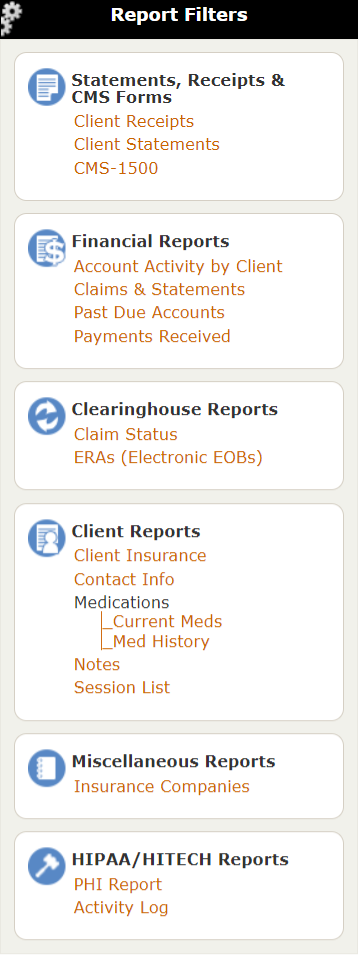
The reports are grouped by category: Statements, Receipts & CMS Forms, Financial Reports, Clearinghouse Reports, Client Reports, Miscellaneous Reports and HIPAA/HITECH Reports. Mousing over a link in one of the categories will give you more information about that specific report. Clicking a link will bring up a form that allows you to narrow the parameters of what you want to see in your report.
Statements, Receipts & CMS Forms
What this isThe Statements, Receipts & CMS Forms group of report filters allows you to generate some of the forms you may need in your practice. You can create statements, receipts and CMS-1500 forms to print and give to clients. There are also links to blank CMS forms you can fill out manually and save or print. (This feature only works with certain versions of Adobe Reader.)What it looks likeThe Statements, Receipts & CMS Forms section of the Reports filters looks like this: 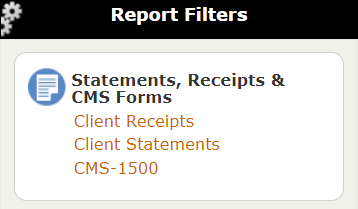 |
Where this isStatements, Receipts & CMS Forms is in Tools > Reports. |
Statements, Receipts & CMS Forms holds three reports: Client Receipts, Client Statements and CMS-1500. Each will be discussed separately below:
Client Receipts
Client Receipt filters allow you to generate receipts to give your clients for amounts they've paid. You can select one client or many, for a single date or a range of dates. You can also customize the items you have on your receipts by including or excluding these items:
- Diagnosis
- Client's Account#
- Provider's NPI
- Provider's Tax ID
- Provider's License#
Receipts will be generated in PDF format. Once they've been generated, they can be printed, saved to your computer and/or saved to the My Files section of PSYBooks.
Client Statements
Client Statement filters allow you to generate statements with itemized bills of the amounts each of your clients owes. You can select one client or many, for a single date or a range of dates. You can also create your own statement templates with the Manage Template tool and then select which template you want to use with each client.
The Manage Template Tool
When you first get your PSYBooks subscription, the Client Statement filter template area will look something like this:
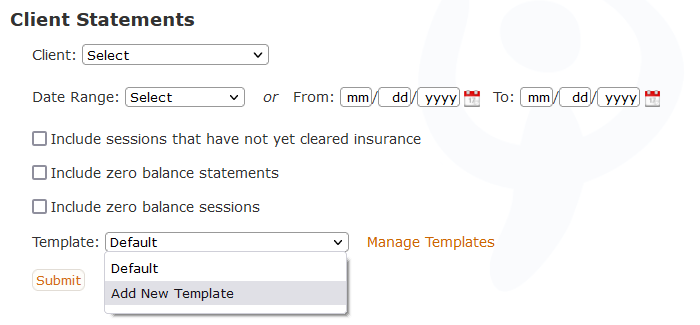
Notice that the Template select box box only has two options: you can use the Default template or you can add a new template. If you click the Manage Template link beside the select box, it's also pretty blank - the only thing in the window being a tool for adding a new template:
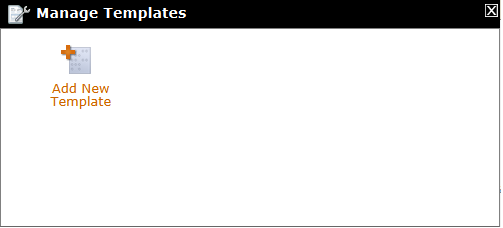
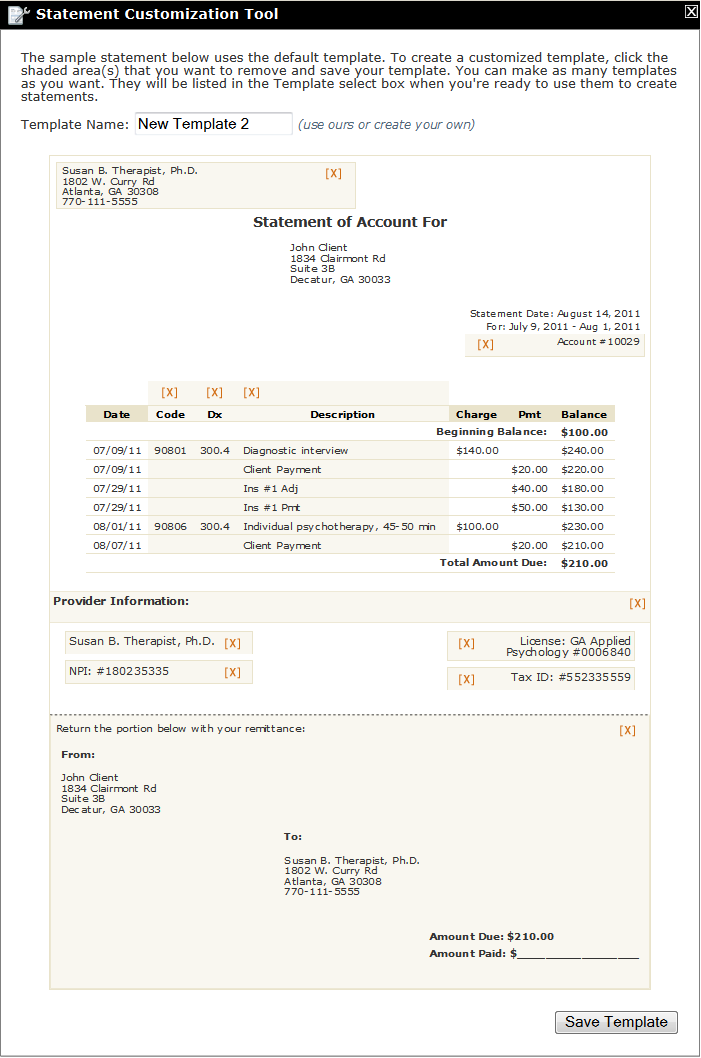
If you're happy with the Default statement, you never have to worry with adding new templates. However, if you would like to customize your statement a bit - or even if you just want to play - you can create a new template by clicking either the Add New Template option from the Template select box, or the Add New Template tool from the Manage Templates window. They both do exactly the same thing. Clicking either of the Add New Template links will open a window that looks like this:
There are only three things to do on this form - the first of which is optional:
- Give your new template a name (optional - although our names are pretty bland and boring)
- Make whatever changes you want in the template
- Click 'Save Template'
We'll look at each separately.
Name Template. To name your template, just write whatever you want in the Template Name textbox:
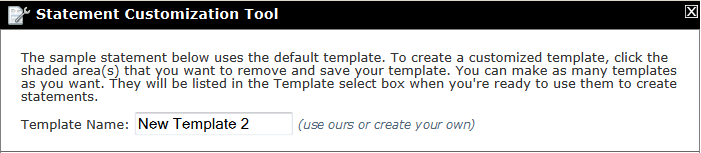
If you don't want to bother with this step, PSYBooks will generate new template names for you by adding an incremented number at the end (New Template 2, New Template 3, etc.) However, you might want to name your templates something that will be more meaningful to you such as 'No Remittance' for templates that don't include the remittance portion at the bottom, or 'Employer Template' for templates you might want to use for clients who need something to submit to their employer for reimbursement, etc.
Make Changes. The statement template you see below the Template Name area is the Default template. In other words, if you don't create any custom templates, this is the statement that will be generated whenever you run the Client Statement report. If there are some parts of the Default template that you want to remove, just click the light gold shaded area (removable areas also have an '[X]'). Sections you remove will turn a darker gold and may be toggled back on if you change your mind. This section of the Add New Template form looks like this:
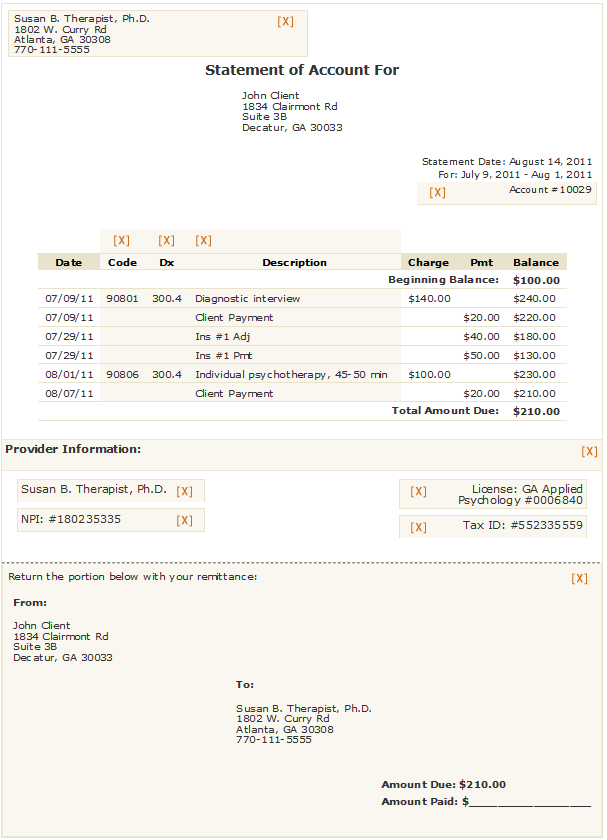
As you can see, there are very few items on the Default template that CAN'T be removed so you have quite a lot of flexibility in the type of statements you create. After you've made the changes you want, click Save Template and you're finished. From then on, your new template will appear in the Template select box in the Client Statements report filter and also on each client's Sessions & Payments tab. You can choose a different template each time you generate a statement. There are no restrictions.
CMS-1500
Before discussing the CMS-1500 report, it's important to understand how CMS forms are generated. PSYBooks only creates a CMS-1500 form when the client has insurance. If the chart doesn't have an active insurance company, a client statement is generated instead of a CMS form. When the client does have insurance, a completed CMS-1500 form is generated after a session in one of two ways depending on which option is chosen on this Confirm window:
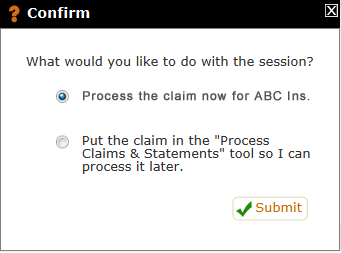
If the user chooses the top option (process the claim now), the CMS-1500 is generated immediately. If the second option is chosen (put the claim in the Process Claims & Statements tool for processing later), the CMS is not generated until the user processes it through the Process Claims & Statements tool.
The important thing here is to realize that CMS forms are ONLY generated after a session and ONLY when the client has insurance. When you run the CMS-1500 report from the Reports section, it will find and display any previously generated CMS forms that match the filters selected but it does not create new CMS forms. If the claim you want is still in the Process Claims & Statements tool waiting to be processed, the CMS-1500 report will not display it.
If you need to generate a PDF form from scratch, you can use one of the blank CMS form links at the top right:
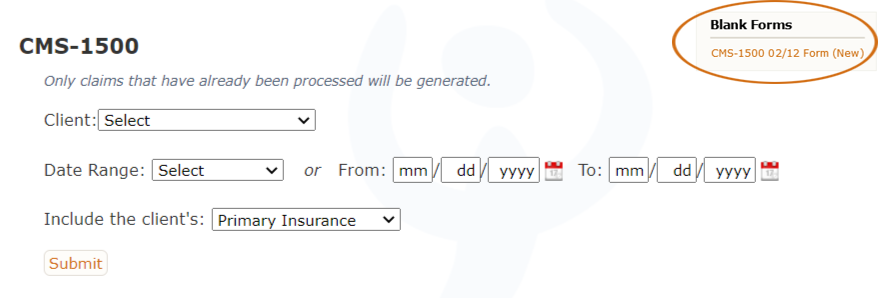
These links open CMS-1500 forms which you can fill in manually. Forms completed in this manner will not be able to be efiled. Also, insurance companies typically follow very strict standards on how CMS forms should be completed. Even if all you need is a CMS to print so you can fax or mail it, it's usually better to let PSYBooks generate your CMS forms whenever possible.
Financial Reports
What this isThe Financial Reports give you detailed financial information on individual clients as well as your practice as a whole. Reports in the Financial Reports section are: Account Activity by Client, Claims & Statements, Past Due Accounts and Payments Received.What it looks likeLinks to access Financial Reports look like this: 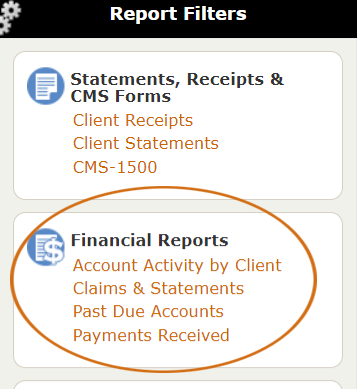 |
Where this isThe Financial Reports are listed in the left nav of the Reports tab in the Tools section. |
The Financial Reports can be useful for your practice's accounting needs and also for tasks such as when you want to see which client accounts are past due or whether a certain insurance payment has been posted. The Financial Reports section includes four different reports: Account Activity by Client, Claims & Statements, Past Due Accounts and Payments Received. Each will be discussed separately below:
Account Activity by Client
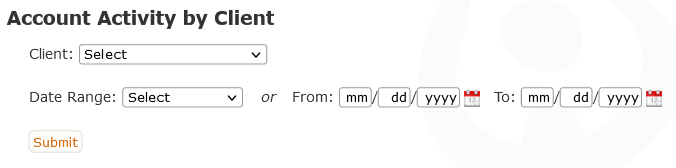
The filters for the Account Activity by Client allow you to select the client and date range for the transactions you want to see:
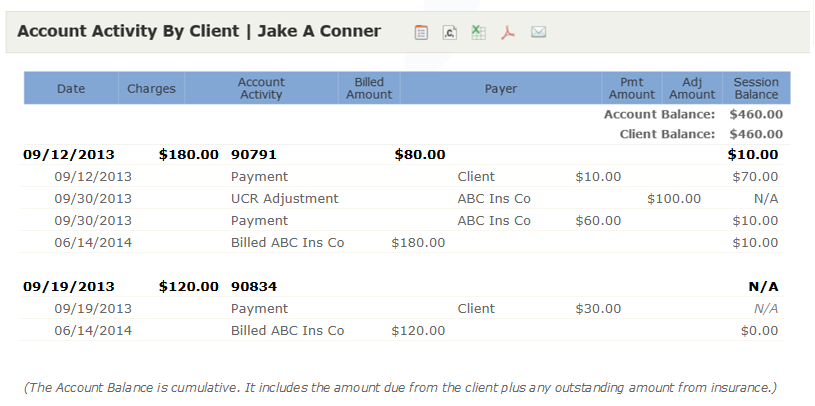
Once you've selected your client and date range that you want, the report you get shows all transactions on that client's account. In that way, this report is similar to the Sessions & Payments tab of the clients chart. A sample Account Activity by Client report might look like this:
Claims & Statements
The filter for the Claims & Statements report looks like this:

Options for the Payer dropdown box are: All Claims & Statements, Insurance Claims Only and Client Statements Only:

You can then use the Client(s) dropdown box beside it to further refine your choice. For example, the following screenshot was obtained by choosing Insurance Claims Only and then a fictitious client named Jake Conner:
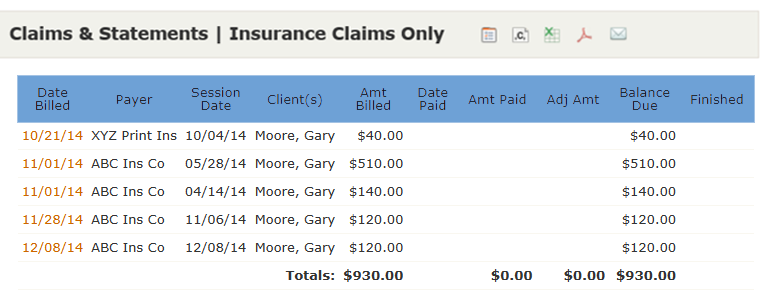
We can see at a glance that claims during this date range were sent to two different insurance companies (in this case, ABC is Gary's primary and XYZ is his secondary) and that so far, we have not received any insurance payments on any of these claims. (Or at least they haven't been entered in PSYBooks.) The Date Billed column contains links that will open the CMS form that was generated for that particular claim, allowing you to see the entire thing.
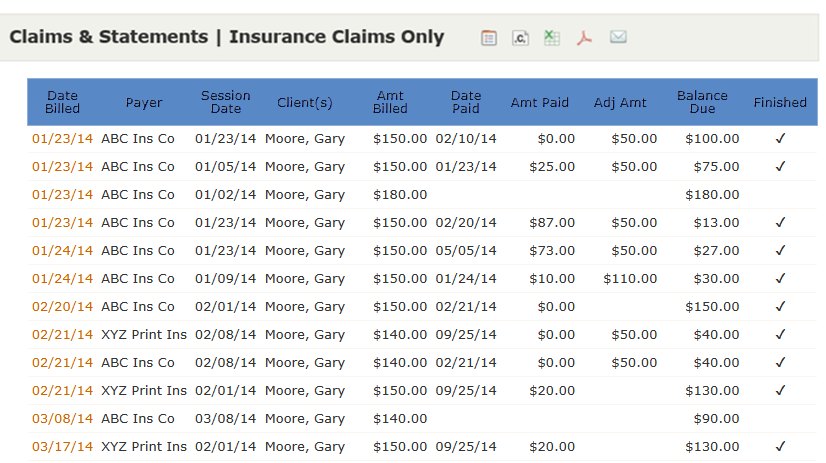
If we enter an older date range for the same client, we now see many claims that have been paid and a few that still have not. We can also see which claims have been finished:
We can refine this report even more by using the "Only show bills with outstanding balances" checkbox and/or the "Include" radio buttons in the report's filters:
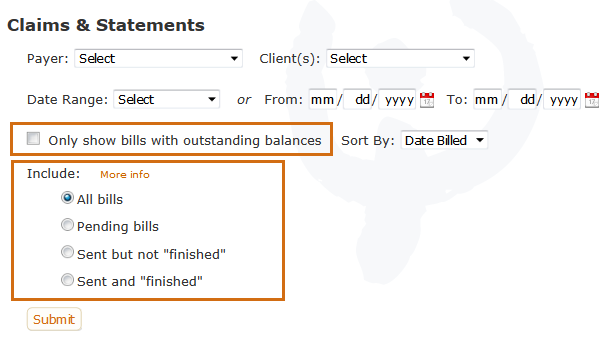
The "Only show bills with outstanding balances" checkbox brings up those claims that still have balances due. The balances might be expected from any payer, e.g., one or more of the client's insurance companies or from the client.
By using the "Include" radio buttons, we can get more specific. For example, we might want to see only those claims that still have outstanding balances from insurance. In that case, we could choose the "Sent but not "finished" radio button to see those claims that have been sent to an insurance company, but that have not yet been marked "finished". "Finished" means all expected payments from that payer have been entered and the claim has been processed to the next payer. If there is no next payer (i.e., the current payer is the client), "finished" means that the session now has a zero balance. Another way of thinking of it is that when we are "finished" with a payer, we don't expect any further payments from them. We've either processed the remainder of the balance to the next payer or written it off.
Past Due Accounts
The filters for the Past Due Accounts report look like this:
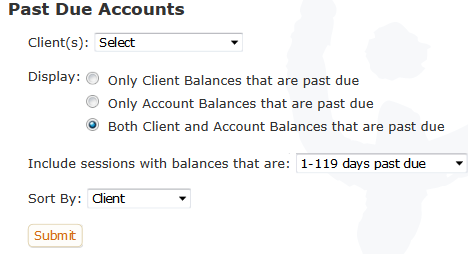
This report allows you to select all clients or just one. It also allows you to differentiate between displaying Client Balances and/or Account Balances. (The Client Balance is the amount the client owes whereas the Account Balance is the sum of the amount owed by the client plus any amount owed by insurance companies.)
The include dropdown gives you many options for the number of records that get displayed:
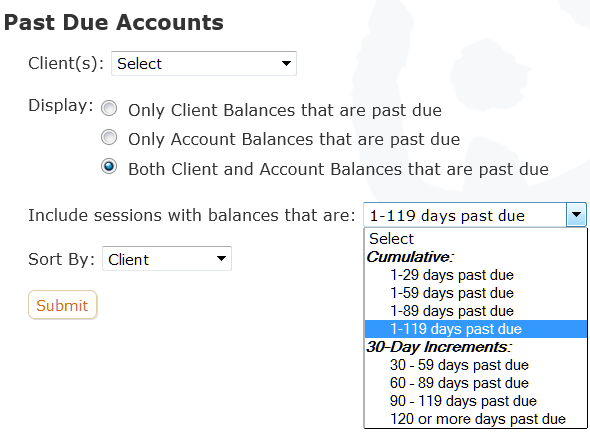
The following report was run for all clients, displaying only client balances for sessions that are 1-119 days past due and was sorted by client:
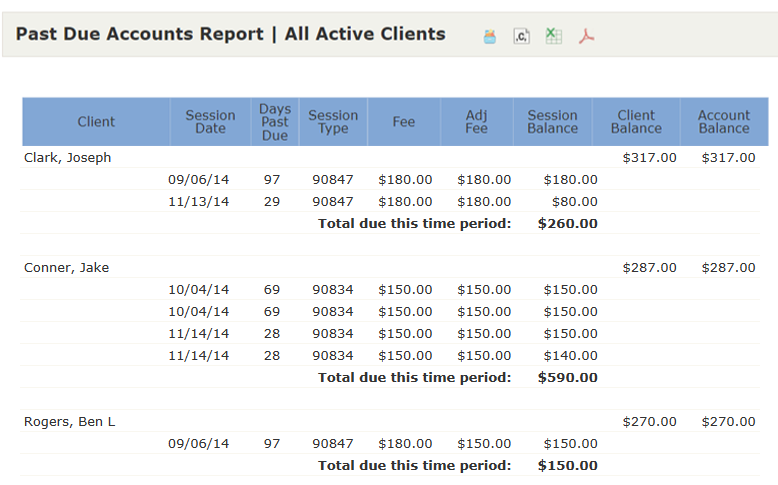
Notice that the table also displays both the Client Balance and the Account Balance for each client on the report. This allows you to see the complete totals due for each of these clients. In contrast, the "Total due this time period" only sums the balances of each of the sessions on this particular report. It may or may not match the complete Client and/or Account Balances owed on the account.
Payments Received
The Payments Received report gives you information on all payments you've received during the time period you specify. In the report filter, you can choose whether you want to see all payments, only payments from clients or only payments from insurance companies. Notice that this first screenshot has a filter for Providers. This filter is only available on accounts of the Master Clinical account holder of a Groups/Clinic account. This allows them to compute the amount of income each of their employees has brought in for the date range chosen. When the MC choose to sort by Provider, they're also given a checkbox to indicate whether they want to subtotal by Provider. All other fields are the same across all account types:
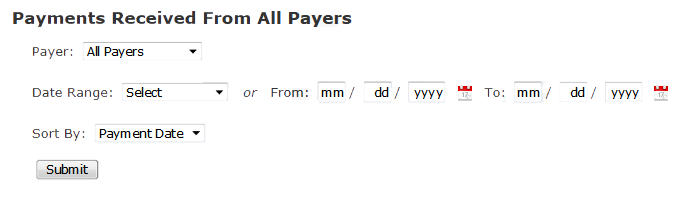
The actual report tells you the total amount of each payment and also, the amount of the payment that's been allocated plus any unallocated amount. This makes this report useful in finding payments you might have missed that need to be allocated. For subscribers using the Stripe payment processing that's built in to the program, the reference numbers are automaticlly listed. The report also has a tool that allows you to delete payments that may have been entered in error: (The report below was generated from an Individual account so it does not show the Group/Clinic features mentioned above.)
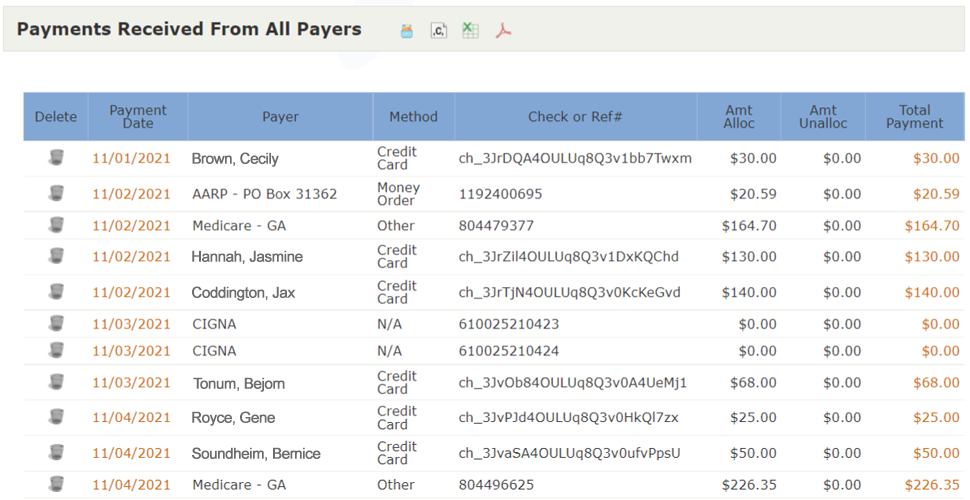
Clearinghouse Reports
What this isThe Clearinghouse Reports section holds those reports that provide feedback from the clearinghouse regarding claims you've efiled. There are also tools allowing you to work with this informtion. There are two reports in this section: Claim Status and ERAs (Electronic EOBs).What it looks likeThe Clearinghouse Reports are on the left nav of the Reports section about half way down: 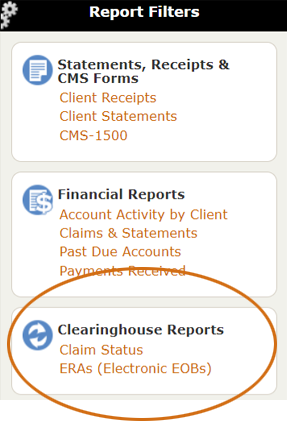 |
Where this isThe Clearinghouse Reports are on the left nav of the Reports tab of the Tools section. |
The Clearinghouse Reports section holds two report filters: Claim Status and ERAs (Electronic EOBs). Each will be discussed separately below:
Claim Status
When you first click the Claim Status report, the filters will look like this:
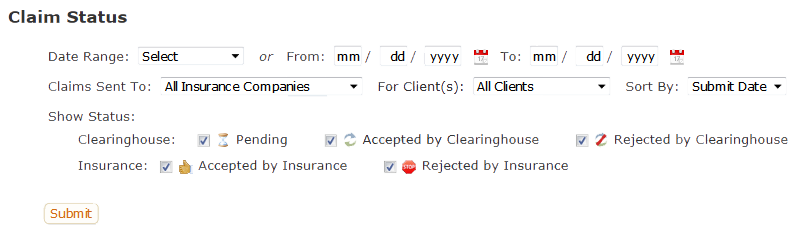
As you can see, you can filter by date range, insurance company, client and status. Also, although the first sort for this report is by insurance company, you can choose whether the second sort is by submit date or by client.
The status filters are divided into two rows - one for the status conditions that apply to the clearinghouse (Pending, Accepted by Clearinghouse, Rejected by Clearinghouse) and the other for the insurance company statuses (Accepted by Insurance, Rejected by Insurance). To understand what these mean, we need to understand the various stages a claim goes through as it's processed. Those stages are:
- The user sends a claim to the clearinghouse, either at the time the session is entered or by using the Process Claims & Statements tool. Between the time the claim is sent and the time the clearinghouse responds, PSYBooks displays the Pending icon:
 .
. - The clearinghouse receives the claim and checks it for obvious errors (e.g., the omission of something essenial such as a zip code or birthday.).
- The clearinghouse then sends the provider the results of its findings. If there are no obvious errors, the clearinghouse forwards the claim to the insurance company and simultaneously sends the user an acceptance message, represented in PSYBooks by this icon:
 . If there were errors, the claim is NOT sent to the insurance company and, instead, the user is sent a clearinghouse rejection message, represented by:
  . In most cases, the rejection messages will indicate what the specific errors are so the user can correct them and resubmit the claim. (Claims resubmitted at this juncture will NOT trigger a duplicate claim rejection from the insurance company since the claim hasn't yet made it to the insurance company.)
 - Assuming the clearinghouse accepts the claim and forwards it to the insurance company, the user will now receive either an acceptance or a rejection message from the insurance company. An acceptance message usually means that the provider can expect to receive an EOB or ERA and, if other conditions are met, a payment from the insurance company within a few days or weeks. The insurance acceptance icon is:
 . Conversely, if the insurance company rejects the claim, the provider may or may not receive an EOB or ERA but they will not receive a payment. The icon for an insurance rejection is a stop sign:
  . Rejection messages usually provide enough information about why the claim was rejected for the user to take appropriate action. At the insurance level, rejection messsages are usually for things like wrong patient ID, patient doesn't have coverage, a required authorization was not obtained, etc. Although claims rejected by insurance CAN be corrected and resent from PSYBooks, this will sometimes result in yet another rejection because the insurance company will treat it as if it's a duplicate claim. If you're in doubt, check with the insurance company for the correct protocol for resending a corrected claim once it's been rejected at the insurance level.
Once you've selected the report filters you want for the Claim Status report and clicked Submit, the actual report will look something like this:
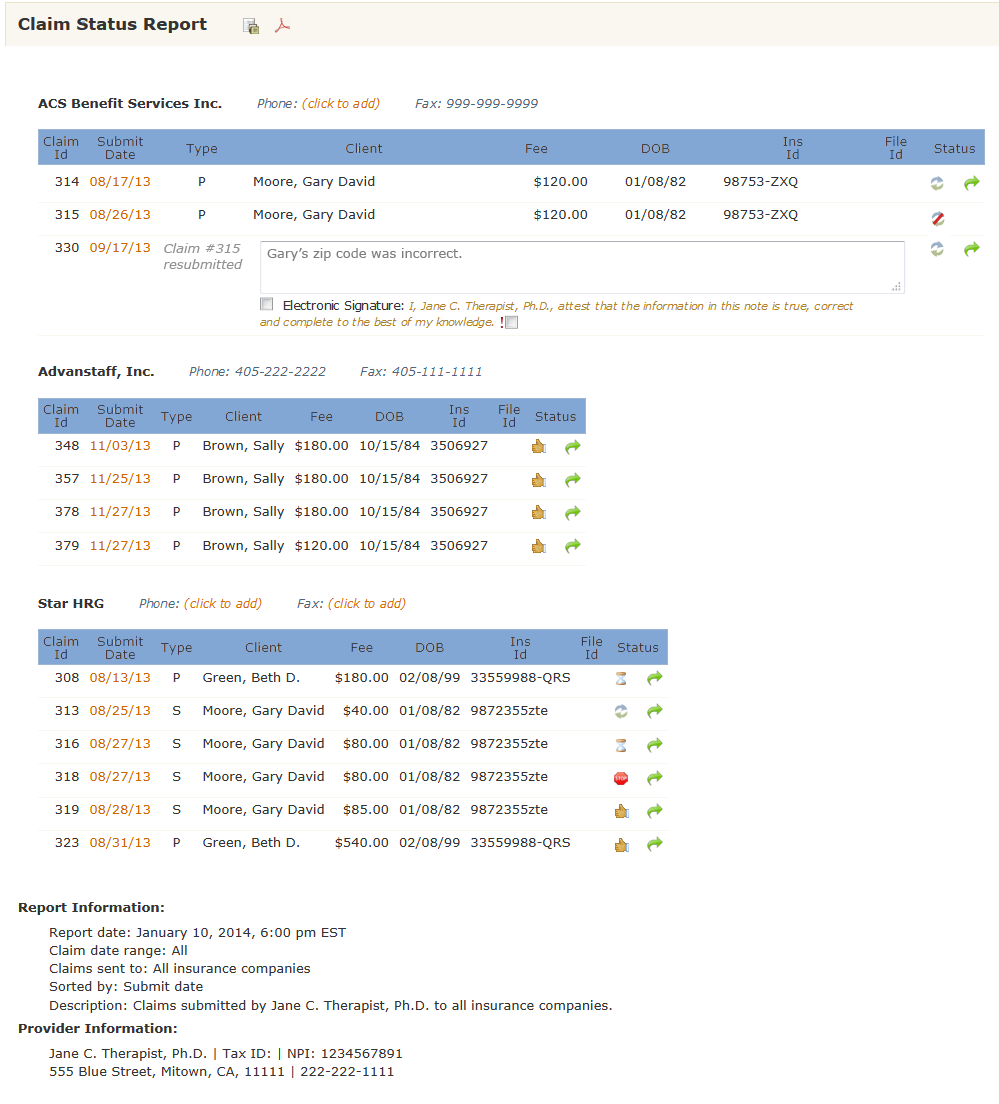
This report was designed to not only give you information about your claims, but also, to give you the information you might need in cases where you need to call the insurance company about a claim. Claims are grouped by insurance company and in the same row with the company name is a place for the insurance company's phone and fax numbers, if you've entered that information in the Library. If you haven't, PSYBooks allows you to enter it from this report. For example, the header row of the top insurance company from the report above looks like this:

If you click the "click to add" link beside Phone, a form similar to this one opens:
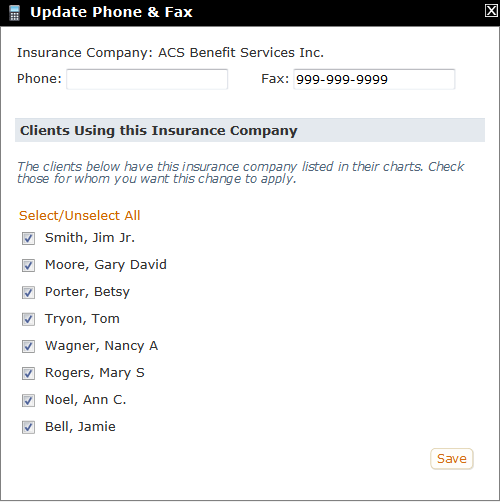
Adding or editing the phone or fax number is straightforward - you just make the changes in the appropriate textbox(es) at the top. Also, since insurance companies often have more than one phone number and these can vary from client to client, PSYBooks lists all clients in your app that use this insurance company so you can deselect those that you don't want to receive this update.
After the insurance company header row is the actual table of the report. Columns in the table along with a sample row would look something like this:

Starting from left to right, the Claim Id is an internal number assigned by PSYBooks. This is followed by the date you submitted the claim. The Submit Date is a link which will open a copy of your claim in case you need additional information such as the client's address. The Type column lets you know whether this is the client's primary (P) or secondary (S) insurance.
The next columns are the client's name, the fee you charged, the client's date of birth and the client's insurance ID - all information you may need if you're on the phone with an insurance company. After this is another internal reference number called the File ID.
The final column, Status, contains two tools: the Status Indicator and, when available, the Resubmit tool (the green arrow). The Status Indicator is a "hover tool", which means you can hover your mouse over a status indicator and usually receive some additional information about your claim. This information is delivered to PSYBooks from the clearinghouse and/or the insurance companies so we have no control over the content of the messsages, or even whether we get one. As you can see from the examples below, some of these messages are more helpful than others:
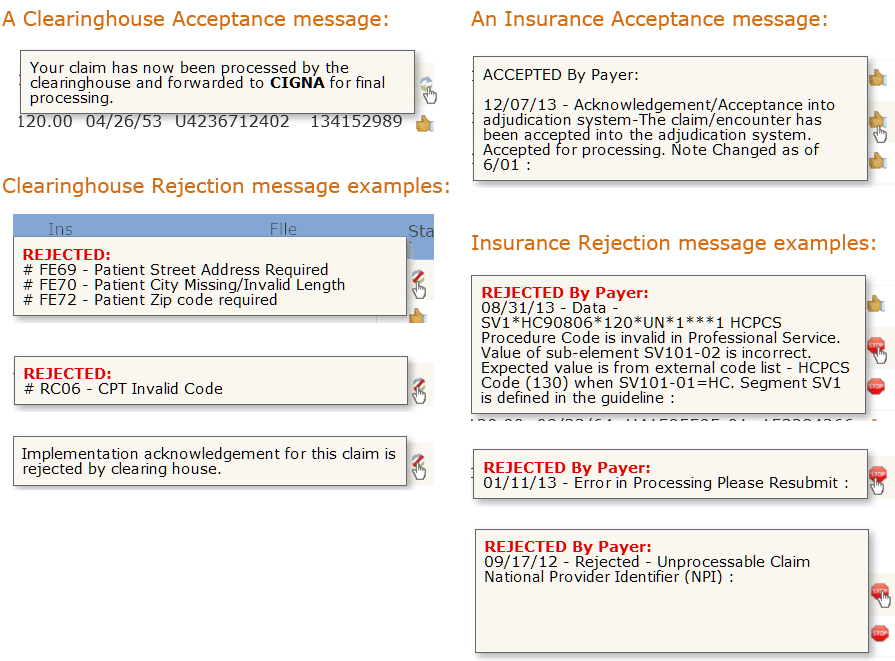
Clicking the last tool in the Status column, the green Resubmit tool, opens this small window:
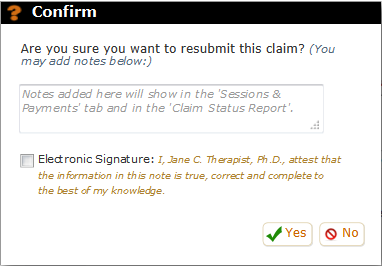
The purpose of this tool, in addition to making sure you didn't click the Resubmit button by mistake, is to give you a chance to write a note about why you're resubmitting the claim, what changes you made, etc. Notes written here do NOT get seen by the clearinghouse or the insurance company. They're for your records only.
- The user sends a claim to the clearinghouse, either at the time the session is entered or by using the Process Claims & Statements tool. Between the time the claim is sent and the time the clearinghouse responds, PSYBooks displays the Pending icon:
ERAs (Electronic EOBs)
The ERA Report is actually a report and a tool all built into one. As a tool, this report allows you to enter payment information from your Electronic Remittance Advice files (ERAs) into each client's chart - in most cases, just by clicking "Save". That function is discussed in the ERA Report Payment section above. In this section, we'll discuss some of the more advances features of the report, starting with the filters at the top:
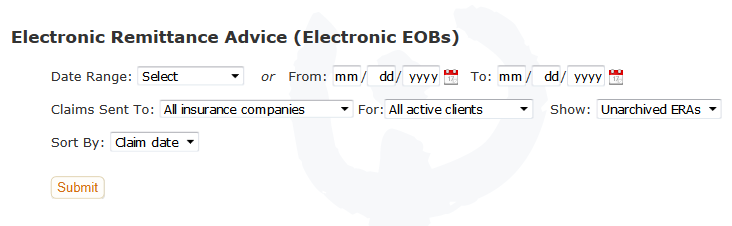
As you can see from the screenshot, the filters on the top row allow you to select the date range for the ERAs you want to view. In the middle row, you can select the insurance company (or leave it on "All insurance companies"), the client (or leave it on "All active clients") and whether you want to view all ERAs, only the unarchived ones or only the archived ones. Finally, on the bottom row you can choose whether you want to sort by claim date or by payer. Once you've run the report, additional tools appear on the report itself which will be discussed below.
Show/Hide All Sessions for All Claims. This is a global tool that appears as a link on the left above the table. It allows you to show or hide all sessions of all claims. By default, the session details for all claims are showing and the link says, "Hide sessions for all claims". Clicking that link makes the form look like this:
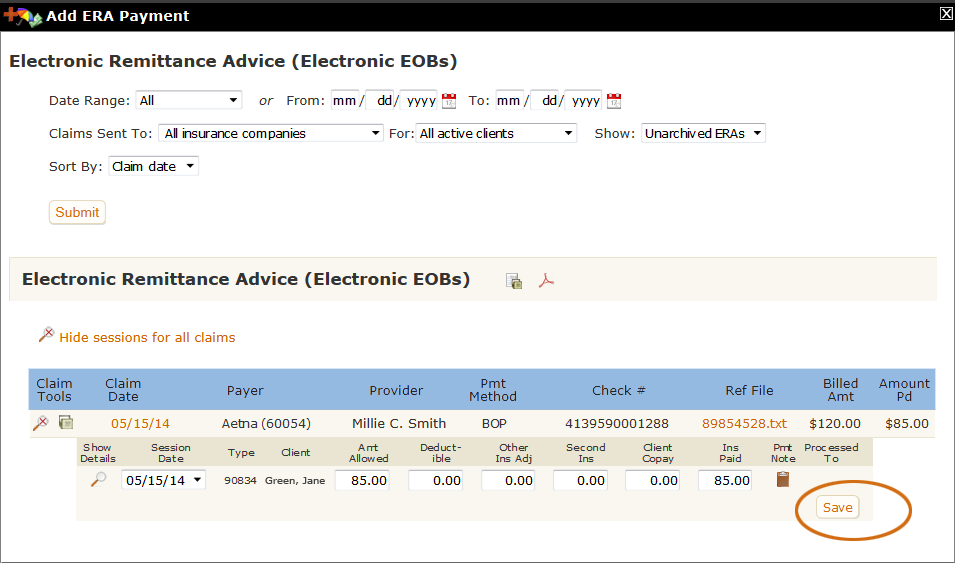
Notice that the link now says "Show sessions for all claims" and all rows under each claim have collapsed so that all we see are the parent rows. The magnifying glasses on each row no longer have the "x" over them, meaning that now if you click one, it will show you the sessions under that claim. You can also click the "Show sessions for all claims link" to open everything back up. This tool - like all show/hide toggles in PSYBooks - is only there to make your page easier to work with by allowing you to view more or less detail. Nothing else is happening behind the scenes.
ERA Report: Claim Level Local Tools
-
In addition to the filters and other global tools listed above, there are also four local claim level tools on the ERA Report - two in the Claim Tools column and two as links:

Claim Tools > Show/Hide Sessions. This is the local version of the "Show/Hide sessions for all claims" tool discussed above. You can use it to show or hide the detail on individual claims:
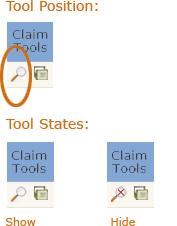
Claim Tools > Archive/Activate Claim. This tool allows you to archive claims that you've already processed so they don't clutter your workspace. Conversely, if you change the filters in the top part of the ERA Report to show your unarchived ERAs, you can then use the Activate state of this tool to bring a claim back to active status:
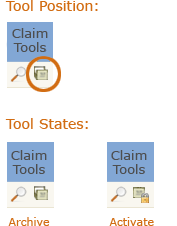
You may never need the Archive tool. Each time you save a session's ERA to your client's chart, you're given a confirm that asks you if you'd like to archive the ERA:

Clicking Yes will archive the claim so you don't have to use the Archive tool as a second step to keep your clients' accounts current.
There are two more claim level tools on the ERA report and they're both links that open files. Each is discussed below.
Link > View Claim. You can click the link in the Claim Date column to see a copy of the claim you sent to the insurance company that generated this ERA:

Link > View ERA. You can click the link in the Ref File column to see the actual ERA PSYBooks received from the insurance company. This is exactly the same thing you would have received from your insurance company had you gotten it any other way.

ERA Report: Session Level Local Tools
There are also quite a few tools for working with ERA data for individual sessions. Each will be discussed below.
Show Details. This is the magnifying glass icon to the left of the session date in the Show Details column. Clicking it opens some explanatory text from the insurance company explaining their decisions. For example, in the example below, we can see that the client has not yet met her deductible, thus the entire allowed amount of $85 can be billed to the client:
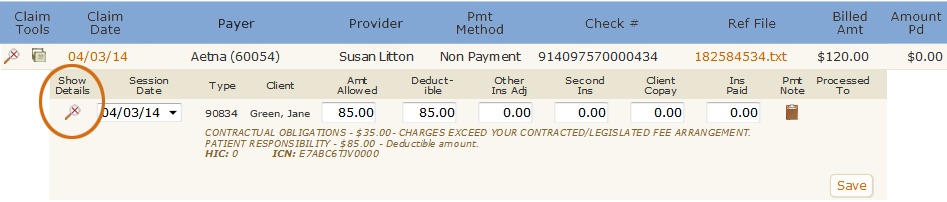

Everything else on the individual session row is pre-populated by PSYBooks. For example, in the screenshot above, $85.00 has been entered in the Amt Allowed column and Deductible columns, as per the instructions on the ERA. The amount paid by Aetna (the Ins Paid column) is entered as $0.00. Clicking Save will enter a $0.00 payment from Aetna in this client's chart and bill $85.00 to the client. However, if something looks amiss, you can click the Claim link and/or the ERA link discussed above to get additional information and make adjustments to any of the fields on this row. You can also click the clipboard if you want to attach a note to this claim.
The "Fix This ERA" Tools
Occasionally PSYBooks receives an ERA that can't be parsed automatically. When this happens, the "Save" button on the ERA is disabled, making it impossible to enter the ERA. There are many possible reasons for this, for example:
- The session may already have been processed to the client, which means it's not available to receive an insurance payment.
- The ERA payment might be a negative number, which isn't allowed. (Insurance companies sometimes send negative payments to adjust for a previous payment which was sent in error.)
- Entering the ERA might produce a negative balance for the session, which isn't allowed.
- The session may already have one or more ERA payments.
- The ERA may be for a session that does not exist in PSYBooks.
When PSYBooks receives an ERA that cannot be processed, a "Fix This ERA" button will appear beside the disabled "Save" button:
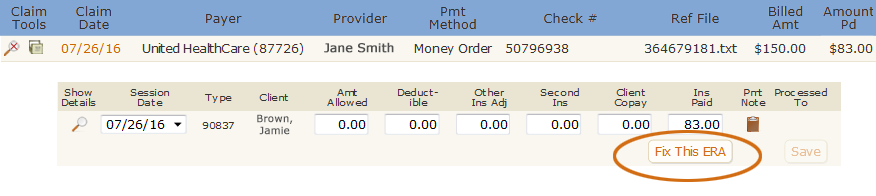
Clicking the button opens a set of tools that allow you to make changes to the ERA itself and/or to other payments that might have been allocated to the session. It looks like this:
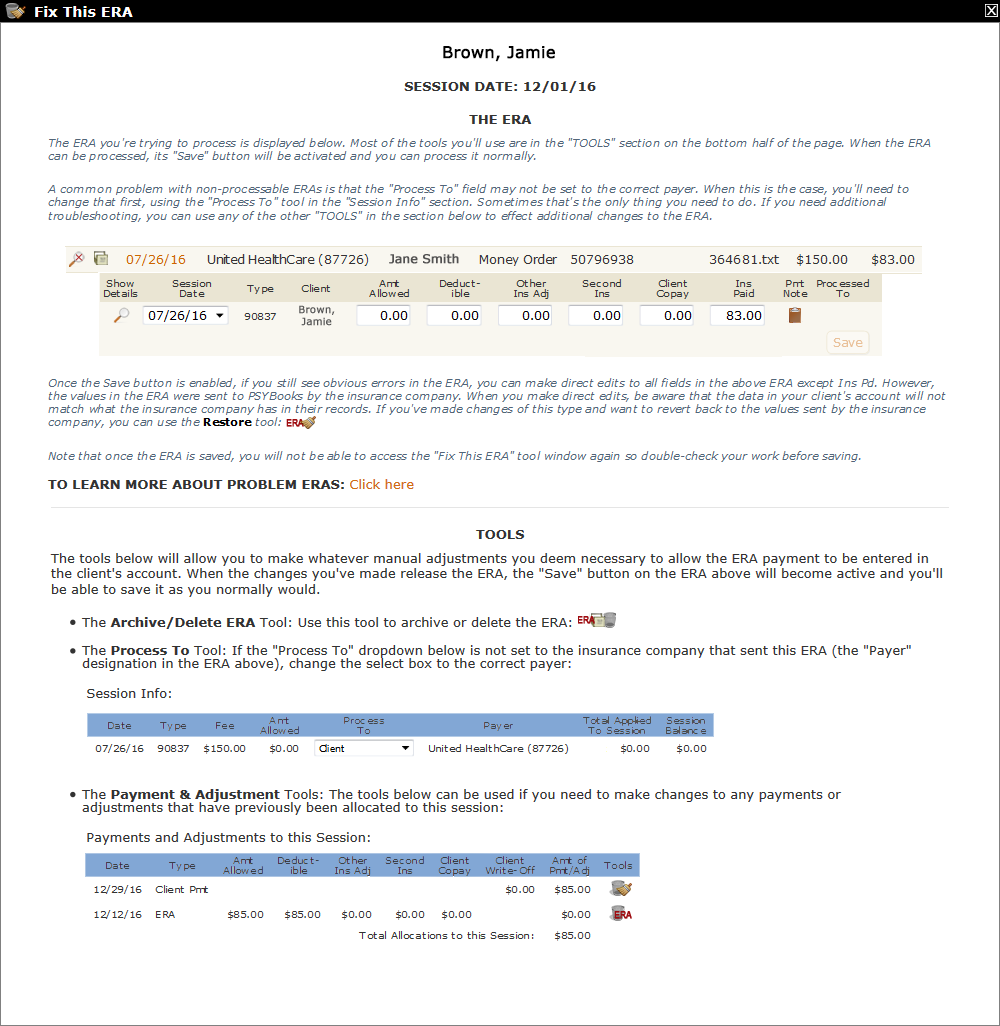
This interface may look intimidating at first, but breaking it down into its parts helps. Notice that there are two main sections: "THE ERA" at the top, followed by a line and then "TOOLS" in the bottom half. Each of these sections will be discussed below.
THE ERA. This section holds a copy of the actual ERA itself. The screenshot below is a detail from the Fix This ERA window above. Notice that the "Save" button is disabled just like it was on the regular ERA report because there are one or more issues that are preventing it from being processed:

As you use the tools to correct the issues with the ERA, the "Save" button will become enabled automatically when the ERA can be processed and you'll be able to save it like you normally would.
TOOLS. Despite the fact that the TOOLS section is the bottom half of the form, this is where you will need to begin when working with an ERA. There are three main tools in this section:
- The "Archive/Delete ERA" tool
- The "Process To" Tool
- The "Payment & Adjustment" Tools (there are several tools in this category)
Each will be discussed separately:
The "Archive/Delete ERA" Tool. This tool is probably the one you'd want to use if the ERA is a duplicate or some other type of erroneous ERA that you don't need. It offers two different methods for getting rid of the ERA without actually processing it. When you use this tool, none of the values of the ERA are added to your client's account or to your Payments Received report. The Archive/Delete ERA tool is the first one listed in the TOOLS section:
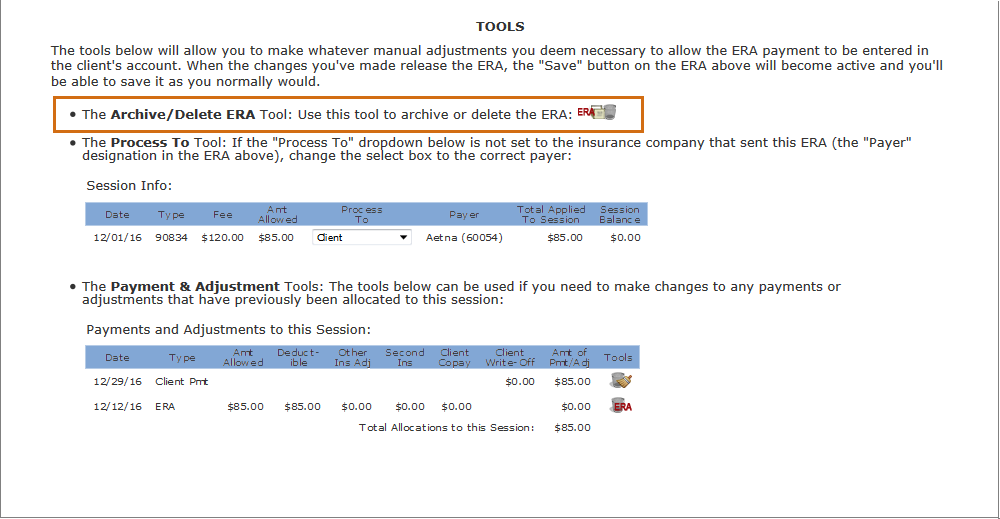
When you click the tool (the icon at the end of the line), this window opens:
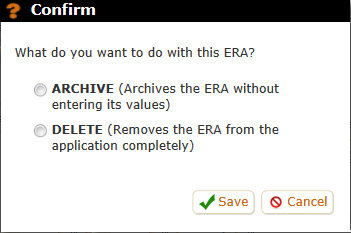
The difference between these two choices is that "Archive" will keep a copy of the ERA in your ERA report in case you want to maintain a record of having received it. It will be listed among your other archived ERAs. "Delete", on the other hand, will permanently delete the ERA from your account. You'd still be able to find it (with all its values) in your Activity Log as a deleted ERA, but it won't appear in any ERA reports you might run.
The "Process To" Tool. This is probably the tool you will use most often. The actual tool is the "Process To" dropdown box (i.e., the only thing you can change). Medical billing programs such as PSYBooks always process payments in this order: primary insurance company, secondary insurance company, client. Occasionally, for a variety of reasons, you need to be able to change that flow, i.e., to "process to" a different payer.
This situation can occur for a variety of reasons. For example, maybe an insurance payment comes in but is for the wrong amount. When you enter the insurance payment, the program will automatically send the remainder to the next payer on that client's list - either the next insurance company or the client. If you later receive some kind of adjusted payment from the initial insurance company, you wouldn't be able to enter it because the claim would have already been sent to the next payer.
This is the situation in the screenshot below. Notice that the "Payer" of the ERA is UnitedHealthCare, but the "Process To" box is set to Client.
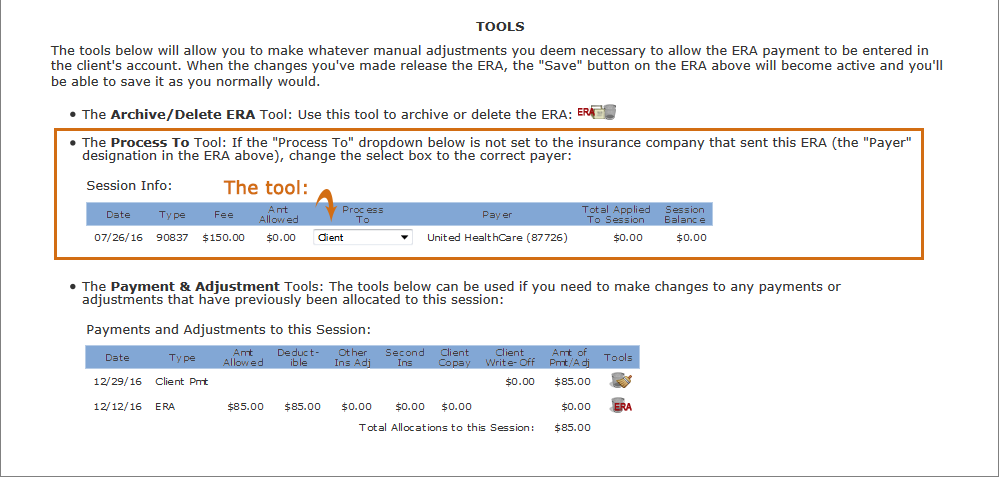
If we click the Process To tool (the dropdown), we'll get something like the screenshot below:
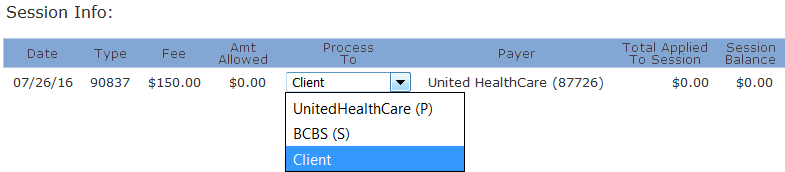
Notice that this client has two insurance companies listed. One of them, UnitedHealthCare, has a (P) beside it (indicating that it is the primary insurance company) and the other, BCBS, has an (S) (secondary). If we look at the Payer column, we see that this ERA is from the primary insurance - UnitedHealthCare. Once we change the dropdown to the correct payer, the Session Info section will look like this:

More importantly, the "Save" button on the ERA at the very top of the page will now be enabled:

The Payment & Adjustment Tools: These tools only appear if other payments of any kind - client, insurance or ERA - have already been allocated to the session. If the session does not have any other payments, this section will not be present on your form.
The reason this section is important is because PSYBooks does not allow negative session balances. Therefore, if the amount of the current ERA you're trying to enter would create a negative balance, it will not be able to be entered. The tools in this section allow you to clear or delete previous payments to "make room" for the ERA payment. This Payment & Adjustment Tools section looks like this:
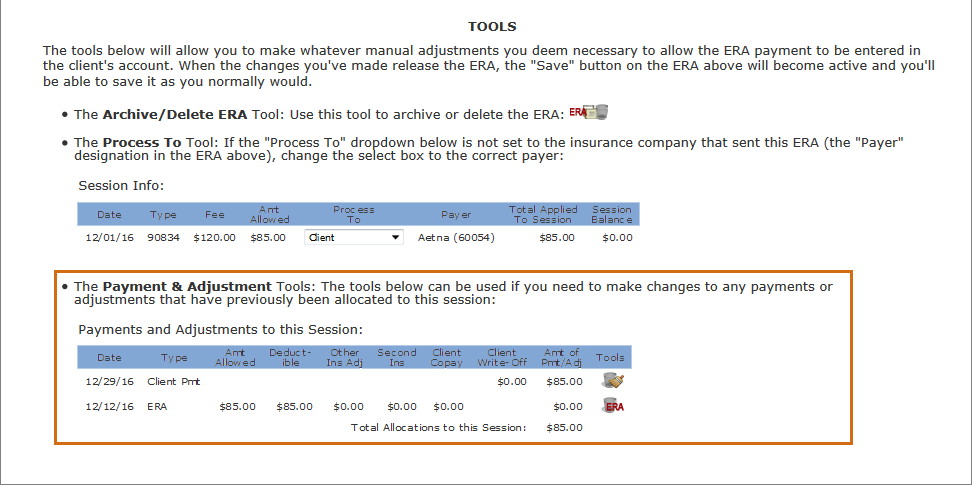
Looking at a close-up view of this particular table, the problem is readily apparent: the amount allowed, as set by a previously entered ERA, has been paid by the client since the ERA listed the full allowed amount as going toward the deductible:
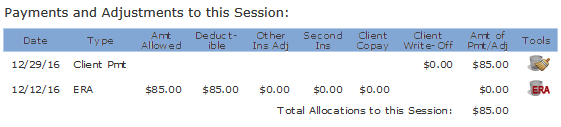
If the new ERA has a payment amount that's greater than zero, it will not be able to be entered. However, using the tools on the right-hand side of the table, the client payment can be removed and/or the previous ERA can be deleted, either of which might help, depending on the payment and allowed amounts of the new ERA. When client or insurance payment allocations are cleared from a session, they can be applied to other sessions. ERA payments can only be deleted - they cannot be allocated to a session other than the one to which they were assigned by the insurance company.
Making Direct Edits to the ERA: Once the Save button on the ERA at the top of the form has been enabled by working with one or more of the tools in the bottom section, there is one last set of tools you have available: you can directly edit all fields of the actual ERA except the Ins Pd field. For example, despite the fact the Save button of the ERA below is enabled, it's obvious from looking at it that we still can't enter it because the insurance payment amount (Ins Paid) is larger than the allowed amount (Amt Allowed):

In this kind of situation, the user may know what the correct allowed amount for this CPT code should be. Assuming it's larger than the paid amount, it is probably safe to go ahead and change the allowed amount so the ERA can be processed into the client's chart. However, values in ERAs are sent to PSYBooks by the insurance companies. When you make direct edits, be aware that the data in your client's account will not match what the insurance company has in their records for this claim. If you've made changes of this type and want to revert back to the values sent by the insurance company, you can use the final tool on this page:
The Restore Tool: This tool can be used to restore the ERA to the original amounts sent by the insurance company if you've made some direct edits you've decided you don't like. It's the small icon at the end of the text under the ERA:
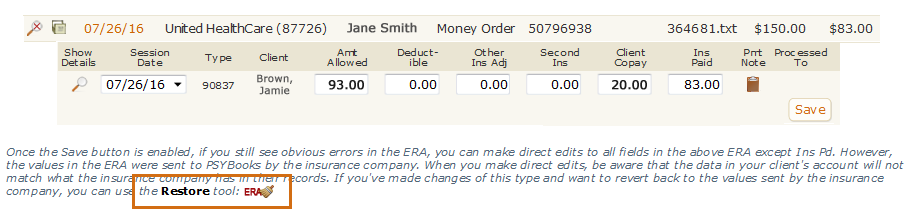
As an example of when you might use this tool, in the ERA above, the user has changed the Amt Allowed and also the Client Copay fields. However, this ERA still won't be able to be entered because the sum of (Ins Pd + Client Copay) is larger than Amt Allowed. In this situation, the user might want to use click the Restore Tool icon, which will open the window below, allowing them to start all over again:
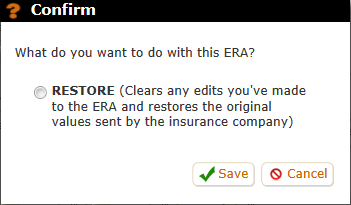
Although direct edits may seem intrinsically appealing and there are times when they're the best option, it's wise to use them sparingly. Once the ERA has been saved, you will not be able to access the tools in the Fix This ERA window again. This means you would not be able to restore the original values sent by the insurance company once an edited ERA has been saved. Because of this, if you do decide to make direct edits to the ERA, check your work carefully before saving.
Client Reports
What this isThe Client Reports category is for non-financial reports that specifically pertain to your clients. Reports in this category are: Client Insurance, Contact Info, Current Meds, Med History, Notes and Session List.What it looks likeYou can access the Client Reports from the left nav of the Reports section. It looks like this: 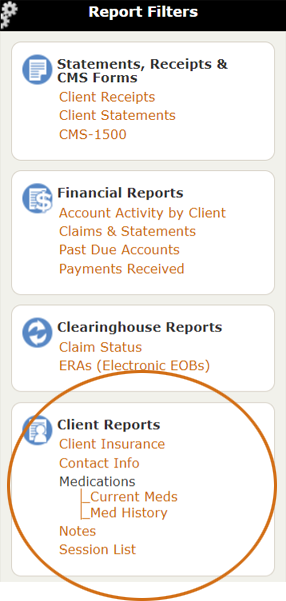 |
Where this isThe Client Reports section can be found mid-way down the left nav of the Reports tab of the Tools section. |
The Client Reports section holds six report filters: Client Insurance, Contact Info, Current Meds, Med History, Notes and Session List. Each will be discussed separately below:
Client Insurance
The Client Insurance report is designed to allow you to to see at a glance which clients have which insurance. The filter is relatively simple:
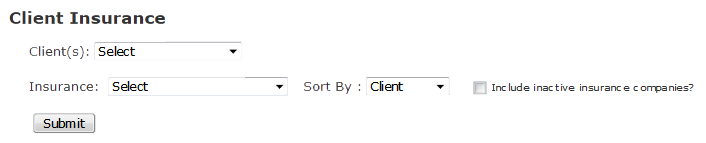
You can select all clients or just a specific one. Similarly, you can view all insurance companies (both efile and print) or only efile companies or only print companies. You can sort by client or by insurance company, which gives two very different kinds of reports. A Client Insurance report sorted by client looks like this (filters are all clients, all insurance):
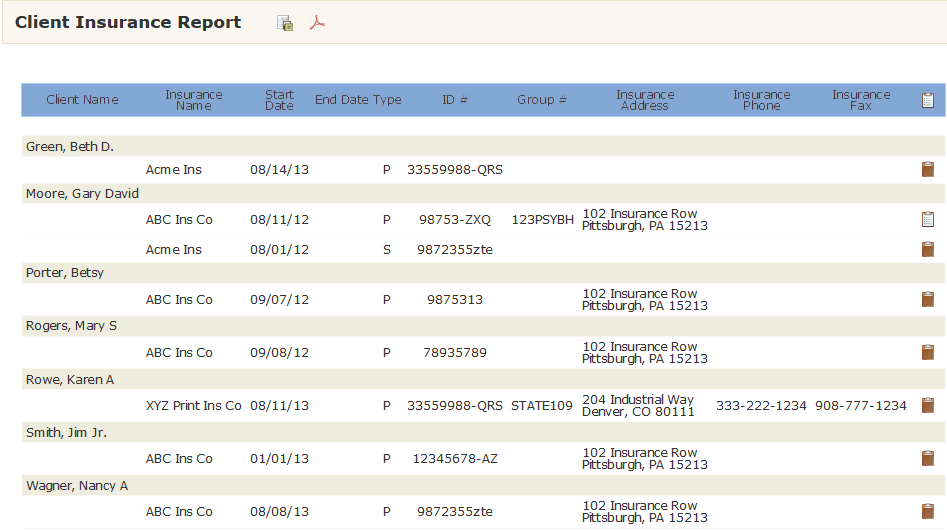
Using the same filters but sorting by insurance company produces a report similar to this:
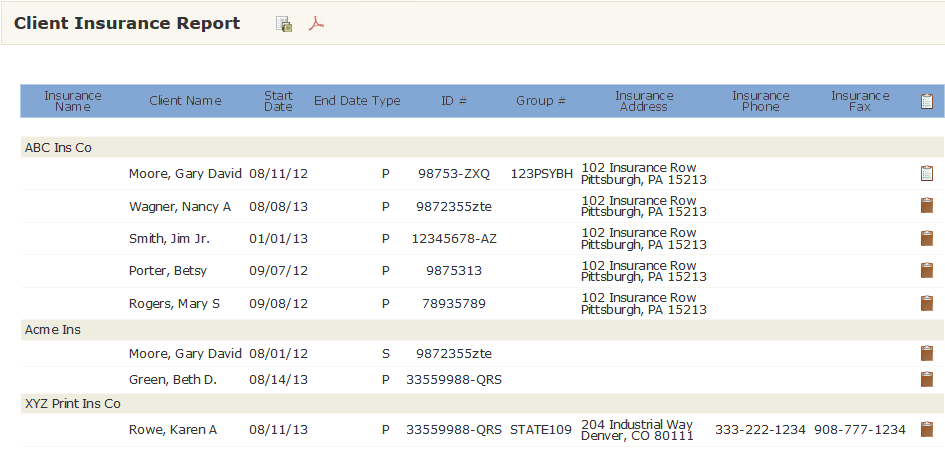
Contact Info
The Contact Info report allows you to extract all contact information you've entered for your clients, similar to having an address book. The filter just has a single select box which allows you to choose a single client or all clients:
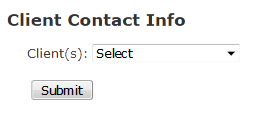
The report (for all clients) looks like this:
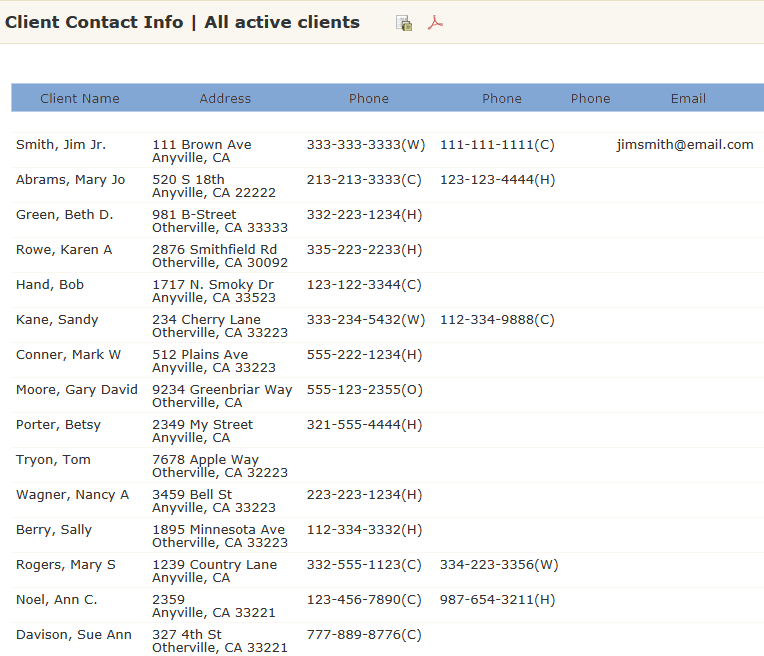
Current Meds
The Current Meds report lists the medications any one client, or all of your clients, are taking at the time the report is run. In other words, it's like a snapshot of what meds your clients are taking today or on another date of your choosing. The filter for the Current Meds report only has client and date. Notice that this report is for a single date only, not a range of dates:
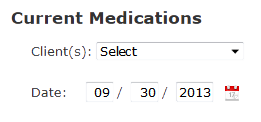
The sample report below was run on all clients:
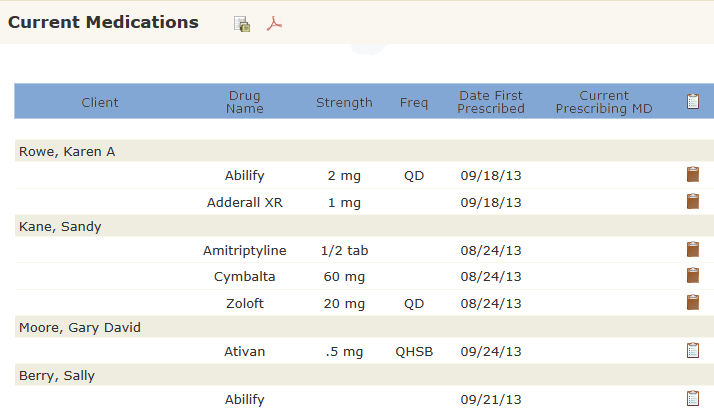
Med History
The Med History report allows you to see the medication history for a single client or for all of your clients within a date range of your choosing. You can select only one drug or all drugs that are in the Frequently Used Medications table in the Medications section of the Libraries. For example, if you want to see what Jane Smith's reaction to Prozac has been for the entire time you've worked with her, this report can give you that information. Alternatively, you can review Jane's entire medication history with all drugs.
The filter for the Med History report looks like this:
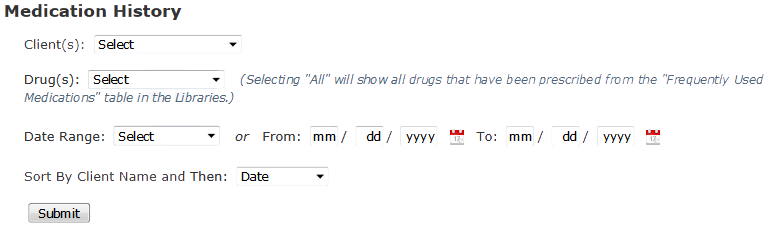
A Med History report for all clients, all drugs with the sort by client name and then date would look similar to this:
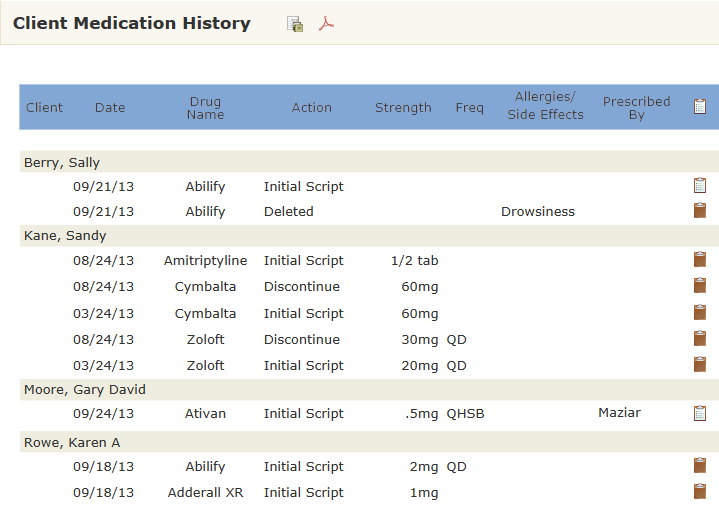
The same report sorted by client name and then drug name looks like this:

Notes
The Notes report is similar to the Notes tab in a client's chart in that it allows you to view any or all notes you've written for a specific client. Like the Notes tab, you can filter by date, by type of note and by whether the note has been marked as important:

Also like the Notes tab, if you select "Specific medical record notes" from the View select box, a new section opens that allows you to mix and match the specific notes you want to see:
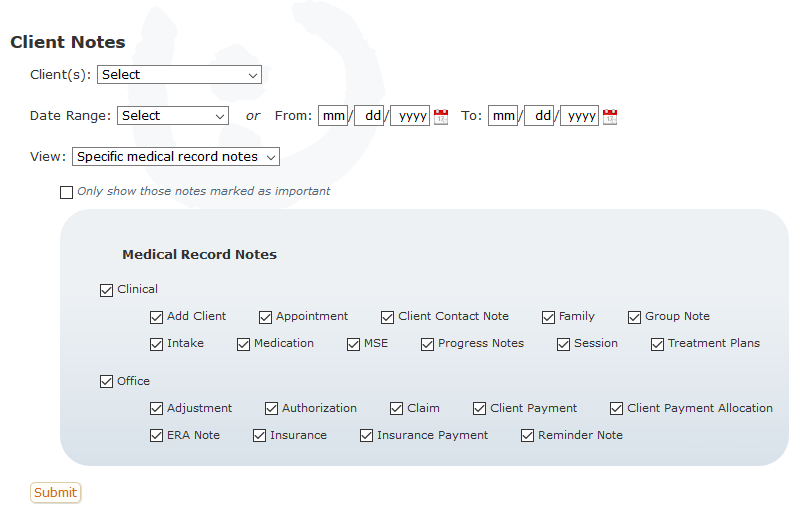
However, the Notes report has a different focus from the Notes tab. Whereas the Notes tab is the place to go when you want to find maximum information and/or tools for working with a note (edit, sign, mark important, create PDF, etc.), the Notes report is designed for easy readability. Notes in the Notes report are presented in the order you wrote them so you can read straight down the page. The other unique feature of the Notes report is that it has the ability to create a set of notes that includes all clients. This is not possible with the Notes tab.
The sample Notes report below was filtered to only list Intake Notes and Treatment Reports for this particular client (fake and/or dummy data is used):
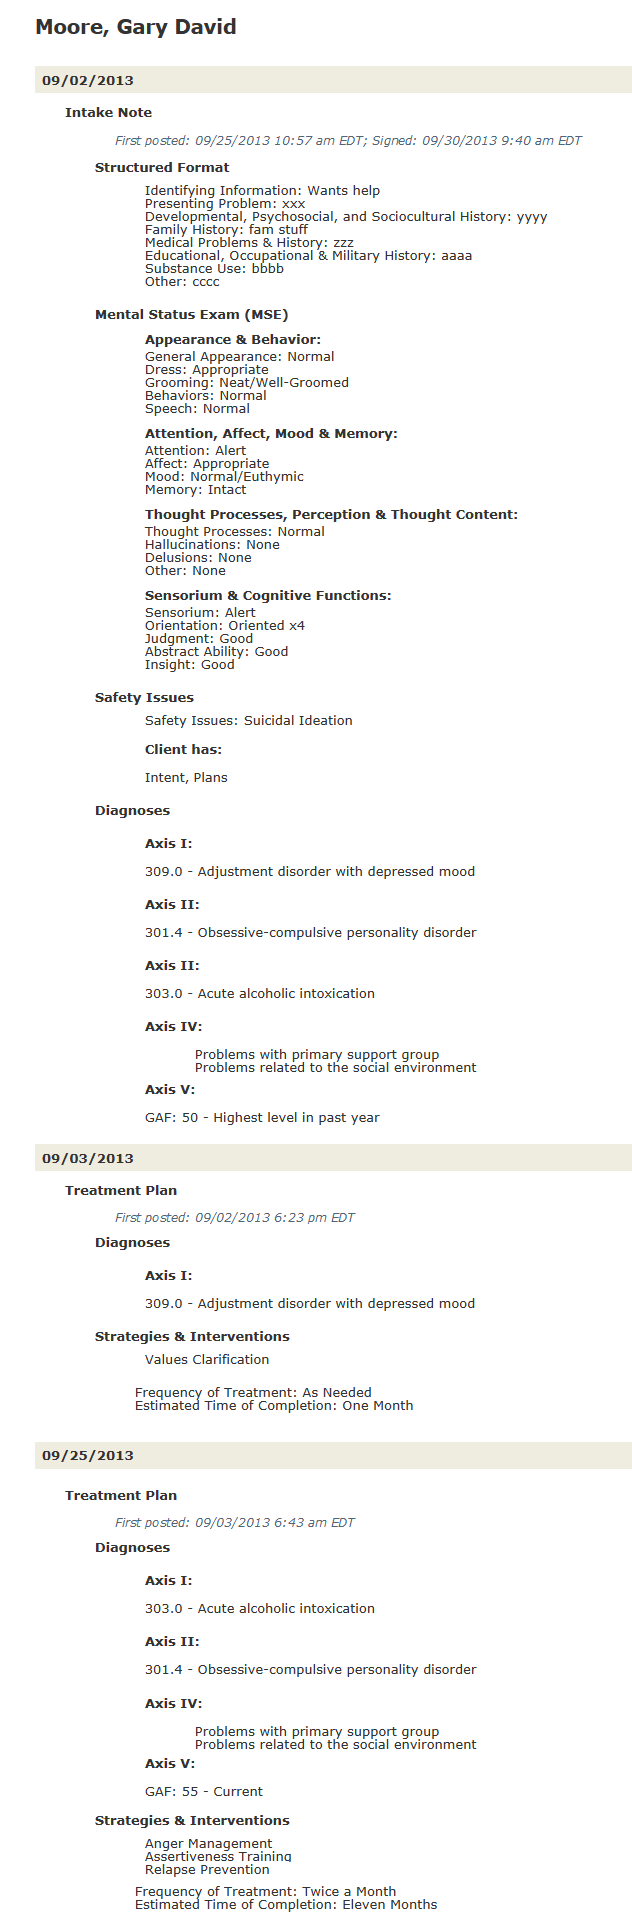
Session List
The Session List report allows you to see information on sessions with an individual client or with all clients. The filter for the Session List report looks like this:
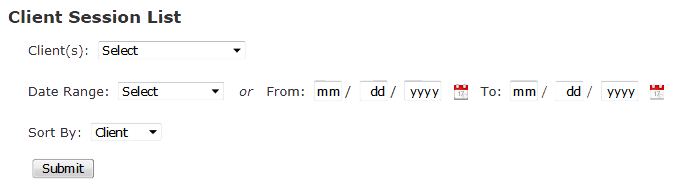
A Session List report for all clients sorted by client might look like this:
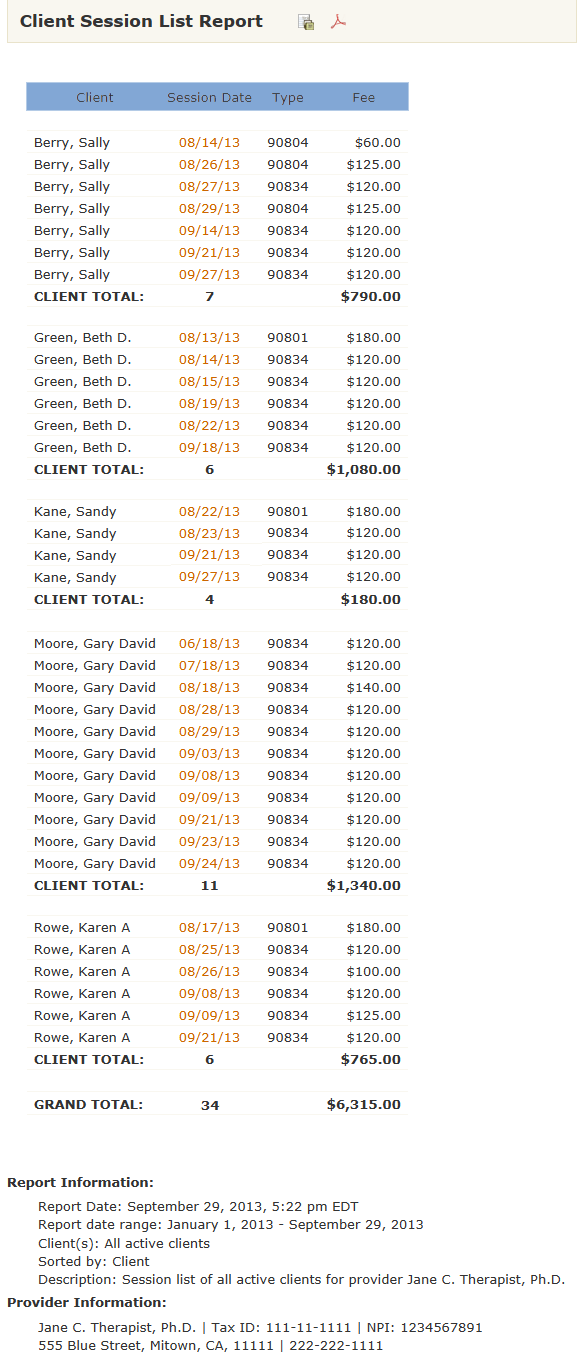
The links on this report allow you to view and/or edit the session, depending on whether it's already been processed to an insurance company. You can also sort this list by session date instead of client, which will give you sub-totals by month.
Miscellaneous Reports
What this isThe Miscellaneous Reports category is for those reports which don't fall into any of the other categories. Currently, there is one report, Insurance Companies, in the Miscellaneous category.What it looks likeYou can access the Miscellaneous Reports from the left nav of the Reports section, which looks like this: 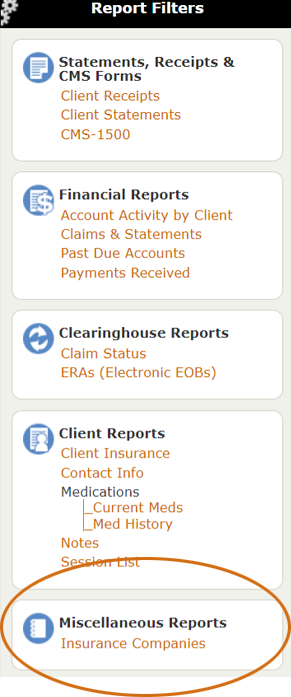 |
Where this isThe Miscellaneous Reports category is near the bottom of the left nav of the Reports tab of the Tools section. |
The Miscellaneous Reports section holds one report filter: Insurance Companies. It's discussed below:
Insurance Companies
The Insurance Companies report gives you information about the insurance companies you have in your Libraries > Insurance tables. The filter just has one select box and one checkbox:

The items in the select box are:
The checkbox let's you choose whether you want to view all insurance companies or only those that are currently being used by your active clients.
Once you make your selections and run the report, it will look similar to this (this user kept the "All Insurance Comapnies" option in the select box and checked the box to include companies that do not currently have clients):
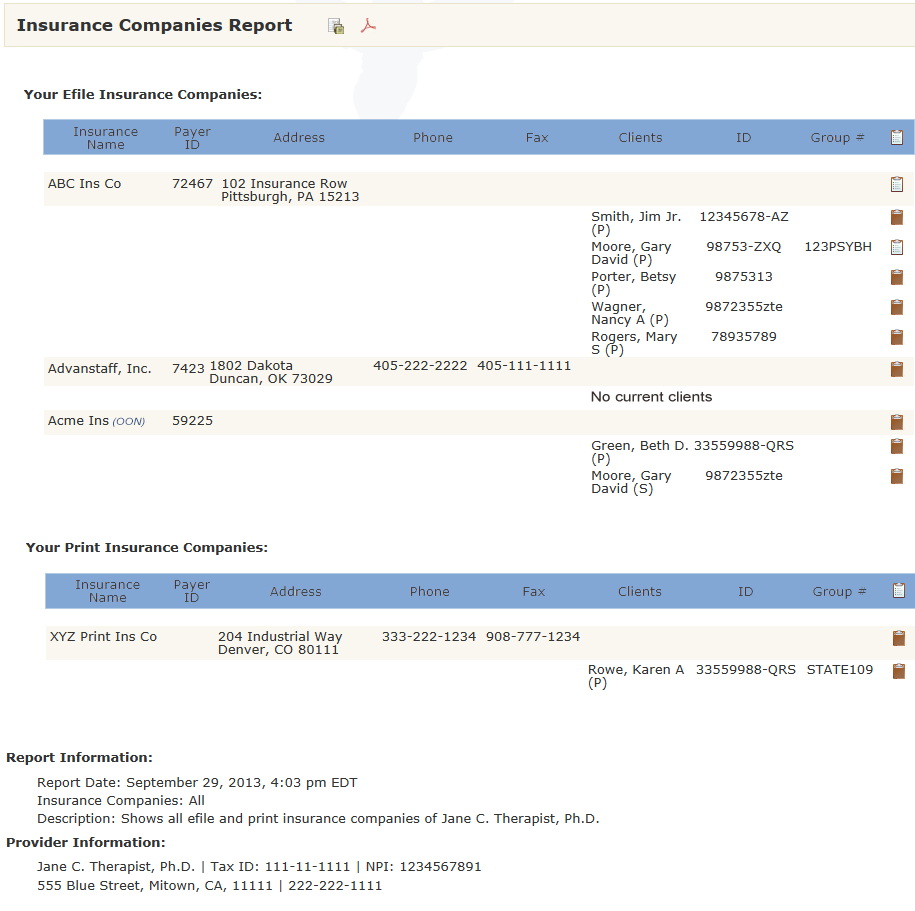
From this report, we can tell that Jane C. Therapist has four insurance companies in her Library: three efile companies and one print company. Jane does not currently have any clients who have Advanstaff, Inc. Additionally, one insurance company (Acme Ins) is out-of-network, as indicated by the (OON) following the insurance company's name.
The client sections in this report give specific information on each client that currently has that insurance. The capital P or S in parentheses following each client's name indicates whether that company is their primary or secondary insurance. The report also lists their ID and group ID.
The Insurance Companies Report also allows us to view any notes we've written pertaining to insurance companies. Both global notes (i.e., notes pertaining to the insurance company as a whole) and local notes (notes pertaining to a specific client) can be viewed in this one report. (Global notes will be on the shaded rows with the insurance company's name; local notes are on the white row with the individual client's name):
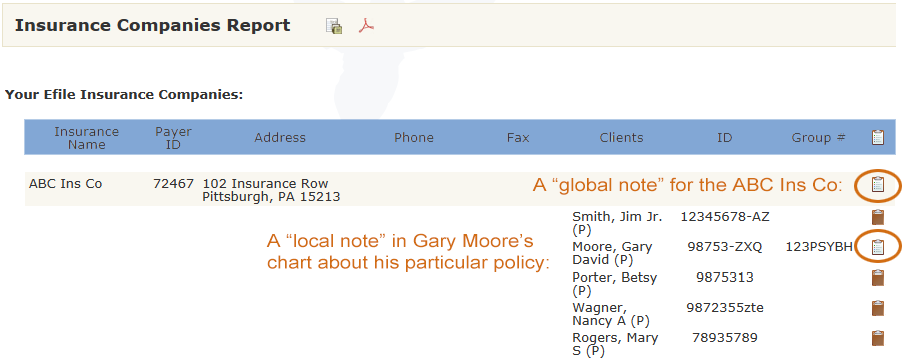
HIPAA/HITECH Reports
What this isThe HIPAA/HITECH reports are designed to make it easier for you to comply with the various HIPAA/HITECH rules and laws that govern mental health. Currently there are two reports in this category, the PHI Report and the Activity Log.What it looks likeYou can access the HIPAA/HITECH reports from the left nav of the Reports section, which looks like this:  |
Where this isThe HIPAA/HITECH group of reports are at the bottom of the left nav of the Reports tab in the Tools section. |
The HIPAA/HITECH Reports section holds two report filters: PHI Report and the Activity Log. Each will be discussed separately below:
PHI Report
The PHI Report is designed for those times when you need to produce a copy of your client's medical record. By default, these things are included in the report:
- Demographics
- Family
- Insurance Information
- Insurance Company
- Authorizations
- Sessions
- Payments
- Client Payments
- Insurance Payments
- Adjustments
- Claims & Statements
- Insurance Claims
- Client Statements
- Medications
- Current Medications
- Medication History
- Other Notes
- Uploaded Files
Additionally, the default PHI Report includes each medical record note presented in the context in which it was written. For example, a note marked as a medical record note written with a session would be presented with the rest of the information about that session, a medical record note included with a client payment would be included with the rest of the information about that payment, etc. Other types of medical record notes, such as Intake Notes, Treatment Plans, Progress Reports and Mental Status Exams appear in the "Other Notes" section. Notice, however, that ONLY medical record notes are included with a PHI Report. Your personal psychotherapy notes remain in a different section of the app and will never be part of a PHI report.
As usual, you do not have to accept the default version of the PHI report. The filter gives you many choices:
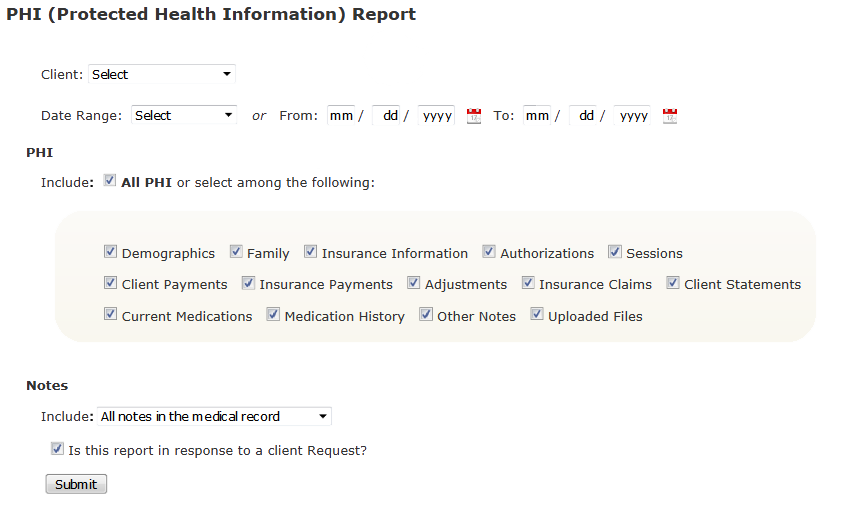
The checkboxes in the tan section marked PHI can be used to include or elimate entire sections of the PHI report (Demographics, Family, Insurance Information, etc.). In addition, the Notes section has these three options in the select box:
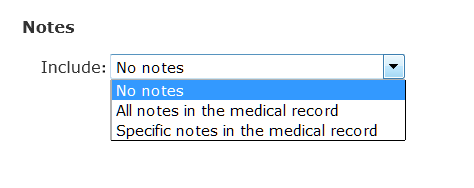
If you choose the last option, Specific notes in the medical record, you'll be given this list of possible notes to choose among:
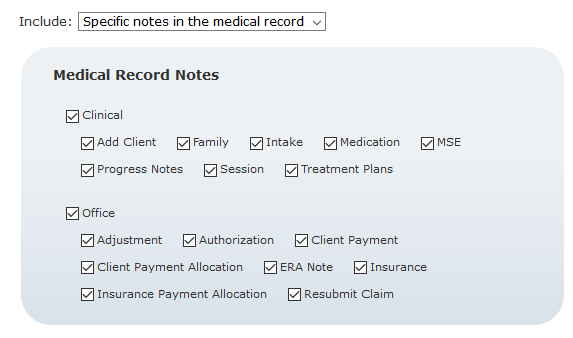
This box let's you eliminate all Clinical medical record notes, all Office medical record notes or specific notes from each category, depending on your specific needs and requirements.
Once you select your filters and click Submit, the PHI report appears on the page beneath the filters. Data you've previously entered in PSYBooks is extracted into the various categories of the PHI report, making it easy to locate what you need. PHI reports can be quite long, so typically there will be a scroll bar on the right to make it easier to use. However, if you create a PDF with the "Create PDF" tool (
 ), the PDF will be a continuous, multi-page report that you can print, save to your computer or save to the "My Files" section in PSYBooks ( ).
On the screen, the PHI report looks something like this:
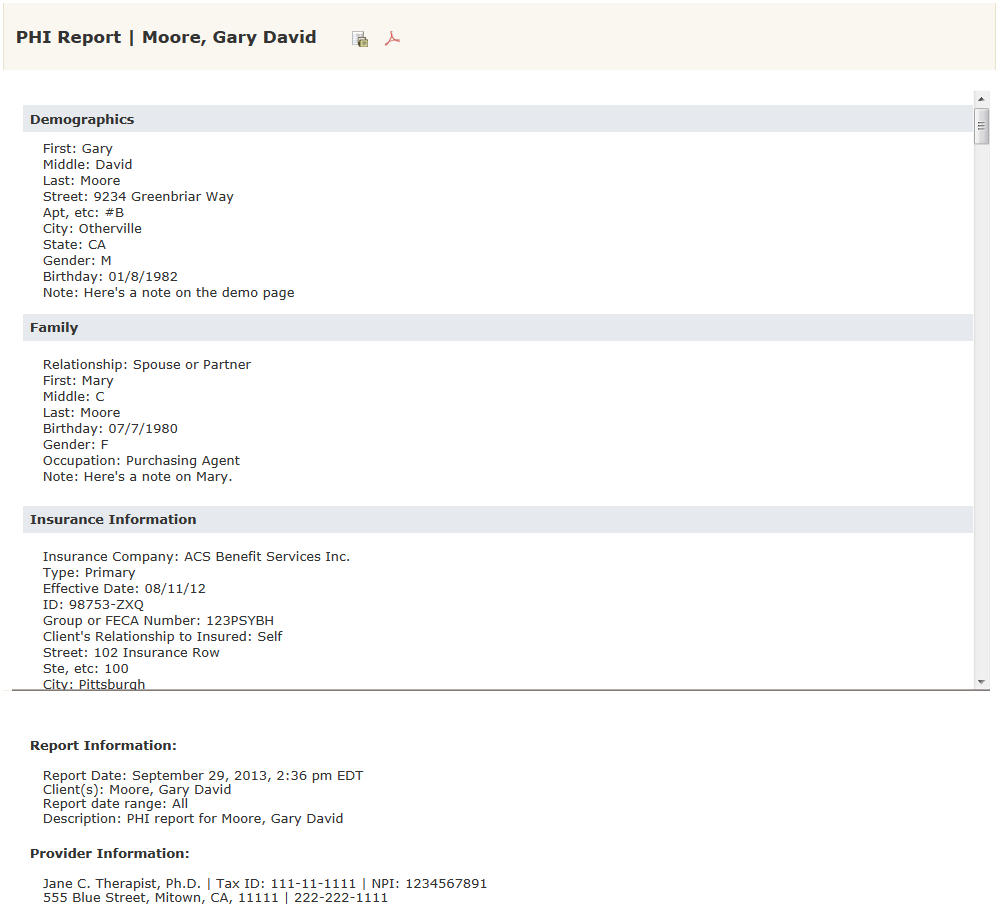
Activity Log
The Activity Log automatically keeps a record of virtually everything that happens in your app that pertains to PHI (protected health information). It allows you to see who has logged in, what they did and when they did it. It also creates a copy of anything that's been deleted so that no PHI is ever actually destroyed. The filter for the PHI Report allows you to make these choices:
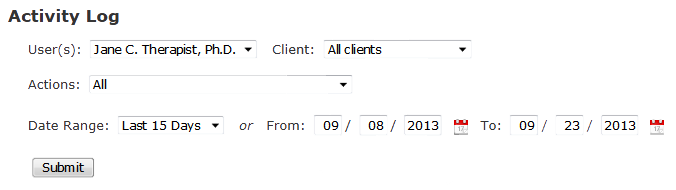
Unless you've added other users to your account, the User(s) select box would always just be you. If you have created other user accounts for staff or colleagues, you'll be able to track exactly what they did here in the Activity Log. The Client select box allows you to view just what's happened in a specific client's account or choose all clients and, as with most reports, you can limit the date range in a variety of different ways.
You can also choose the specific activity or activities you want to see. PSYBooks' activity list is quite long. The screenshot below is a partial list of the options to give you an idea:
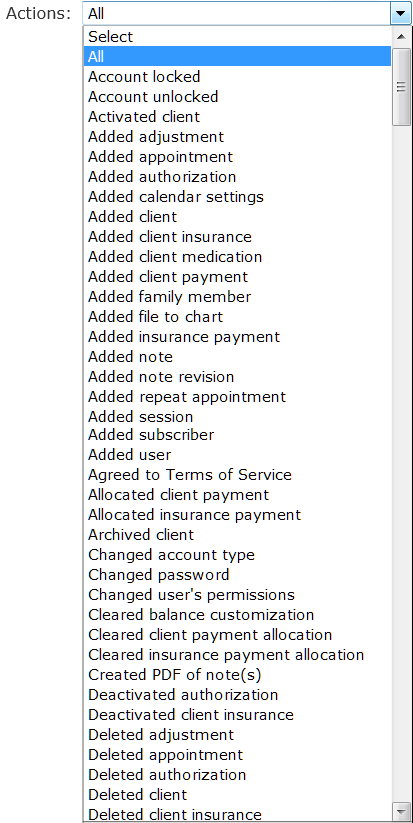
The report itself is quite thorough. You'll be able to see which client's charts have been viewed and what's been done to them. A sample report is below:
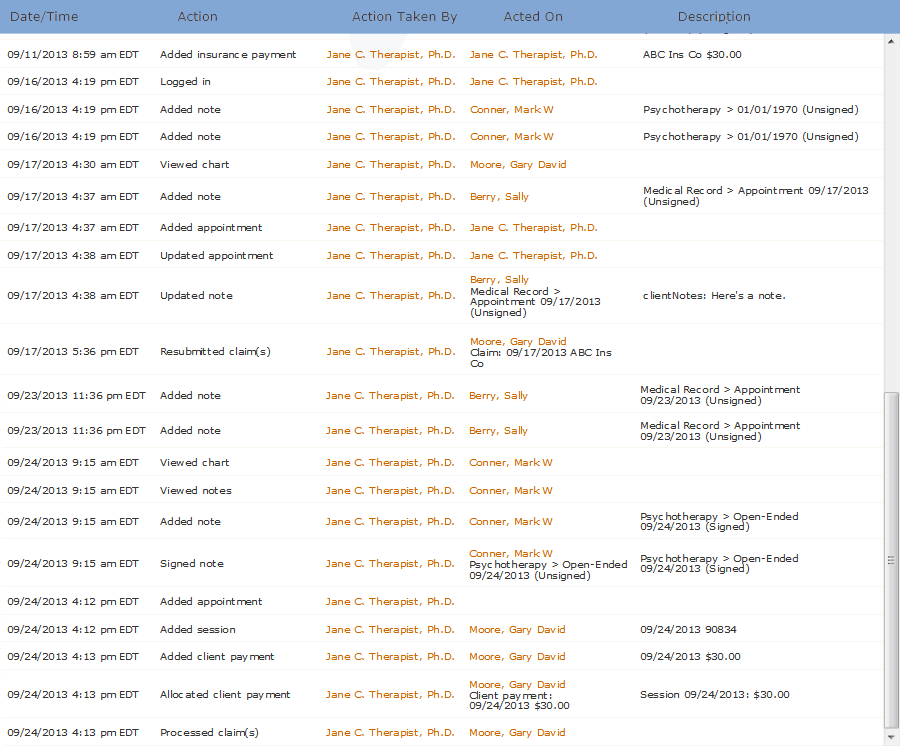
Notice that names in the Action Taken By and also the Acted On columns are orange, like links. However, these aren't links that go anywhere, but rather, are hover items that give you additional information. For example, mousing over the Action Taken By link in the screenshot below tells us that this user, Jane C. Therapist, Ph.D., is the account holder, that she is an individual subscriber with the Master Clinical permission level and that she performed this action from a computer with the IP address of 127.0.0.1:
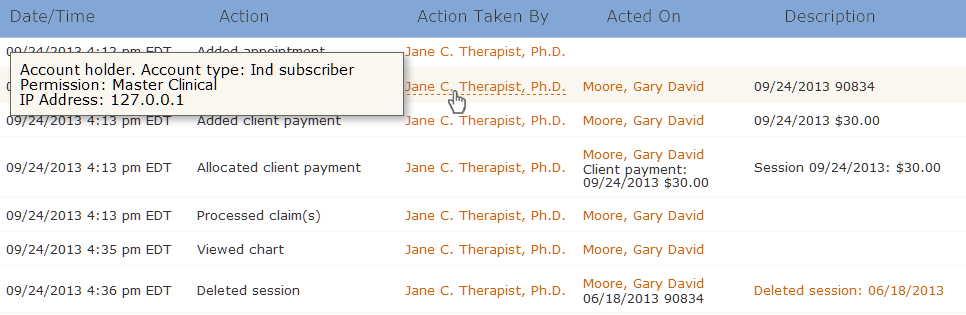
Similarly, we can determine a client's ID and birthday by hovering over their link in the Acted On column:
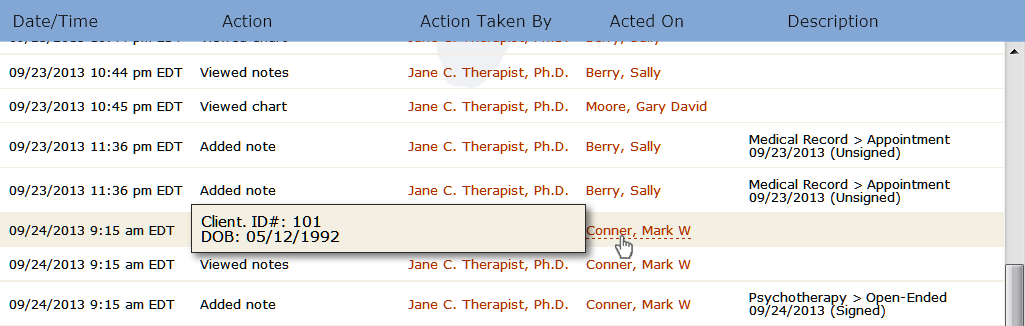
In addition, when an item (or an entire client) has been deleted, a link will appear in the Description column, similar to this:

Deleted items ARE links which, when clicked, open a new window that shows you the content of what was deleted plus any reason that was given for the deletion:
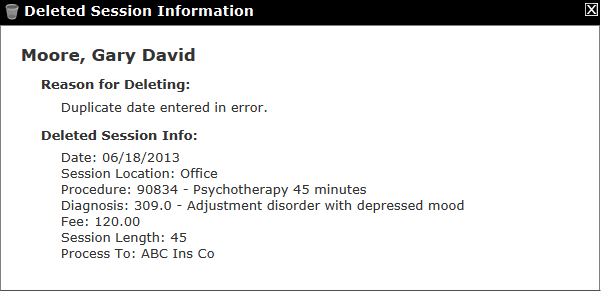
My Notes & Reminders
What this isMy Notes & Reminders is a page where you can keep personal notes you've made to yourself as well as reminders or interoffice memos you've saved.What it looks likeThe My Notes & Reminders tab in the Tools section looks like this: 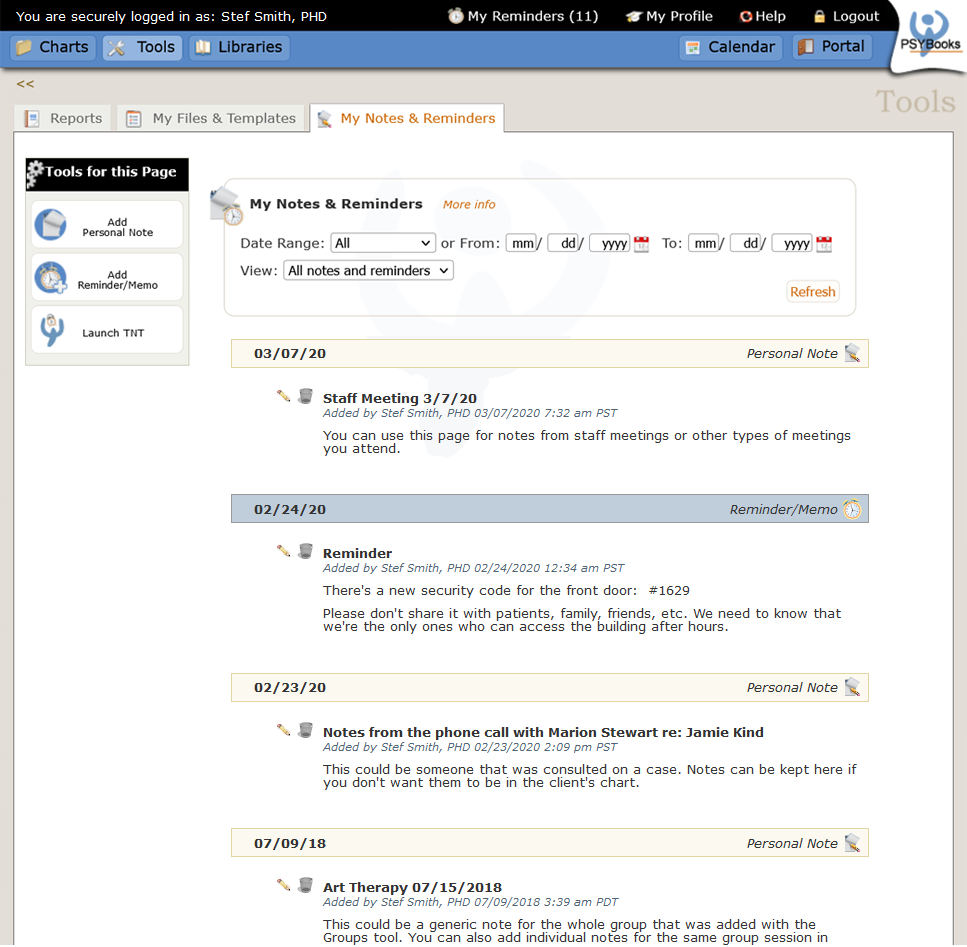 |
Where this isThe My Notes & Reminders tab is in the Tools section. It can also be accessed from the "My Reminders" link in the black bar at the top of any page in PSYBooks. |
How to Access the My Notes & Reminders Page
There are two ways to access the My Notes & Reminders page. The first is by going to Tools > My Notes & Reminders:
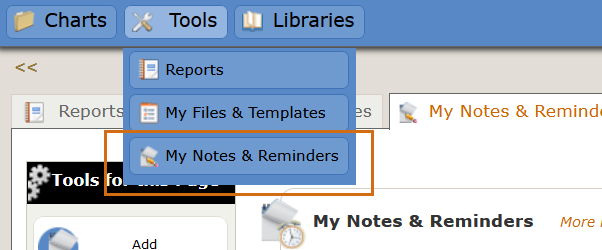
There's also a quick access button for the My Notes & Reminders page called "My Reminders." It's in the black status bar that appears at the top of each page:
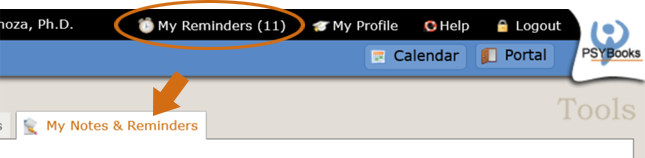
Clicking the "My Reminders" link on the status bar will open the My Notes & Reminders page, just as if you had accessed it via Tools > My Notes & Reminders.
The My Reminders link also has a dropdown menu with two additional links: Add Reminder/Memo and Therapist Notification Tool:
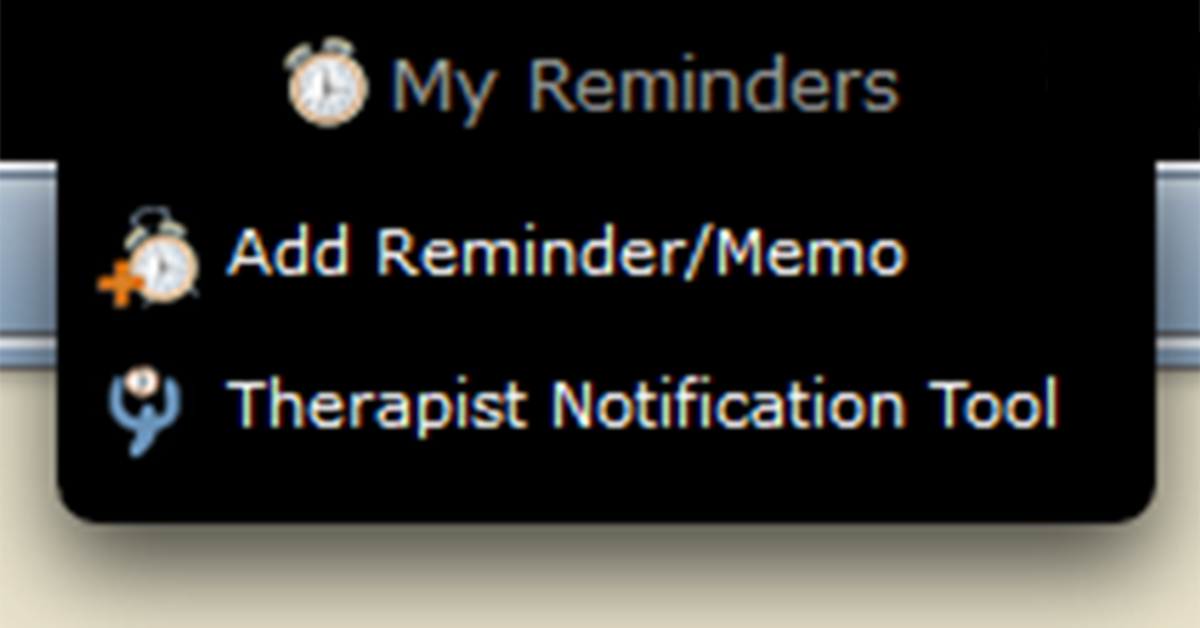
The Add Reminder/Memo and Therapist Notification Tool links are duplicates of two tools found on the My Notes & Reminders page, which are discussed below. The access point on the black status bar keeps all tools pertaining to reminders in one place and provides quick access to tools you may use frequently.
Description of the My Notes & Reminders Page
Going back to the discussion of My Notes & Reminders, this page is used to display both notes (from the Add Personal Note tool on the left of the page) and reminders/memos (from the Add Reminder/Memo tool on the left or from the Add Reminder/Memo link in the My Reminders dropdown as shown above). Notes created by the two types of entries are color-coded to help you find what you're looking for:
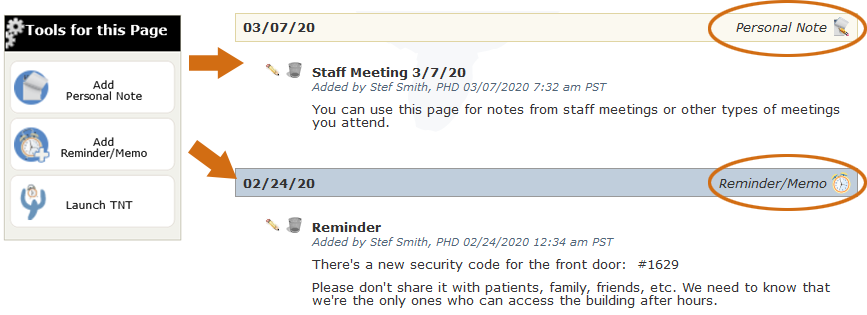
You can also use the filters at the top of the page to show only Personal Notes or only Reminders/Memos for any range of dates you select:
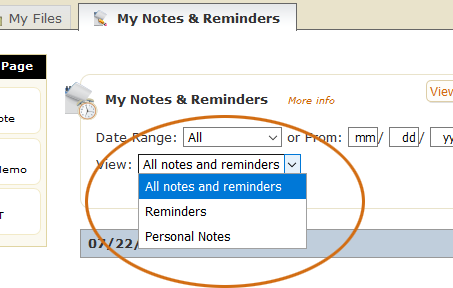
In the examples above, you can see that the Personal Note has a light gold bar along the top (and the label "Personal Note" with the note icon) whereas the Reminder or Memo has a blue bar at the top and the label "Reminder/Memo" and the alarm clock icon.
There are several important differences between a subscriber's notes and reminders in PSYBooks. Personal Notes are just that - they are notes for the subscriber's own personal use. The only thing they do is post to the My Notes & Reminders page. The subscriber is the only one who can add Personal Notes to the My Notes & Reminders page. No Users - Admin or non-Admin - have access to the subscriber's Add Personal Note tool, which means that all such notes are only added by the therapist.
In contrast, Reminders/Memos are much more dynamic and can be used in a variety of ways, either as reminders to yourself or as interoffice memos to other subscribers and/or Admins in your office. Each will be discussed separately below.
By default, Users can view your Notes & Reminders page. You can exclude the permission from any User you don't want to have access to this page. Some therapists may want to give their Admins access to their Notes & Reminders page. However, reasons why you may want to do that will make more sense after you understand the Therapist Notification tool. If you want to jump ahead, you can read about it here: TNT Admin Accounts.
Add Personal Note
What this isThe Add Personal Note tool allows you to add notes that will appear on the My Notes & Reminders tab.What it looks likeThe Add Personal Note tool on the My Notes & Reminders tab looks like this: 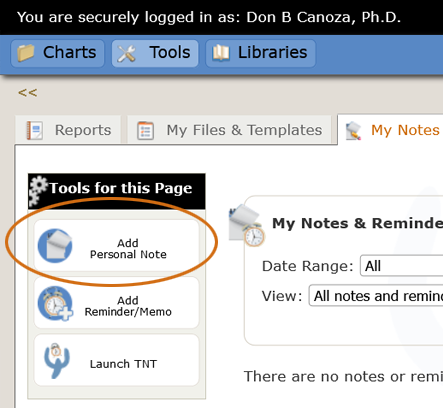 |
Where this isThe Add Personal Note tool is on the left nav of the My Notes & Reminders tab in the Tools section. |
When you click the Add Personal Note tool on the My Notes & Reminders page, the form that opens looks like this:
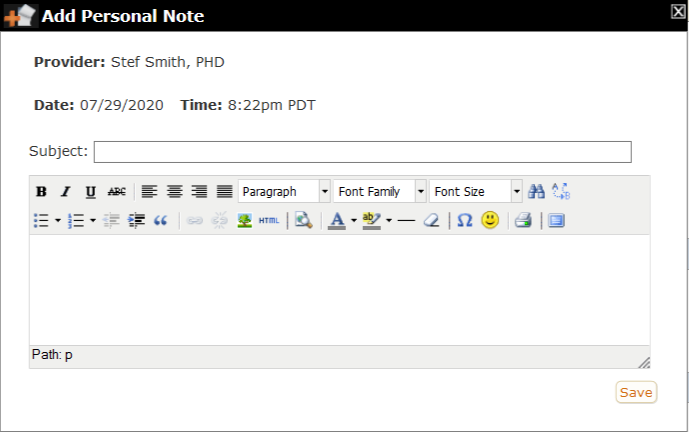
Notice that the therapist's name, date and time are already filled in. You can add a subject line if you want (not required but may be helpful) and then write your note and save it. Notice that the notes you write with this tool will only be displayed on this page (My Notes & Reminders). They will not appear in any client's chart. Also, the subscriber is the only one who has access to the Add Personal Note tool. No Users will be able to access this tool in the therapist's account.
Add Reminder/Memo
What this isThe Add Reminder/Memo tool allows you to create reminders for yourself (thus the "reminder" part of the name.) It also doubles as a tool for sending interoffice memos to staff and/or other subscribers in your office (i.e., the "memo" part of the name.)What it looks likeThere are two ways to access the Add Reminder/Memo tool - one in the dropdown list of the "My Reminders" link on the black bar at the top of every page in the app and the other as a tool on the left nav of the My Notes & Reminders page: 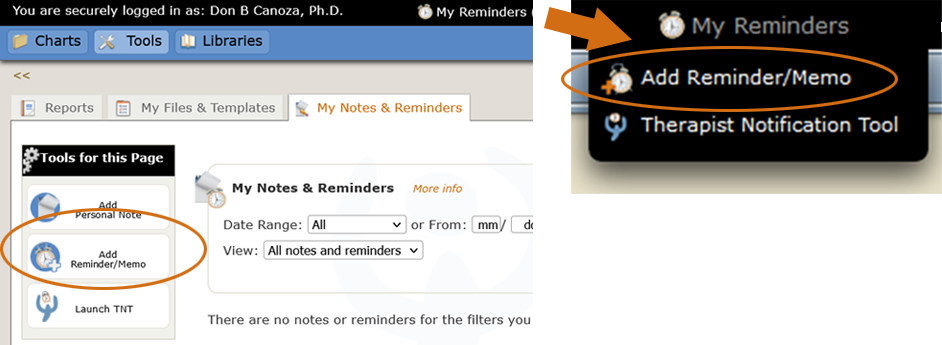 |
Where this isThe Add Reminder/Memo tool is on the left nav of the My Notes & Reminders tab in the Tools section and also in the dropdown menu of the "My Reminders" link in the black bar at the top of every page. |
No matter where you access the Add Reminder/Memo tool, it always opens this form:
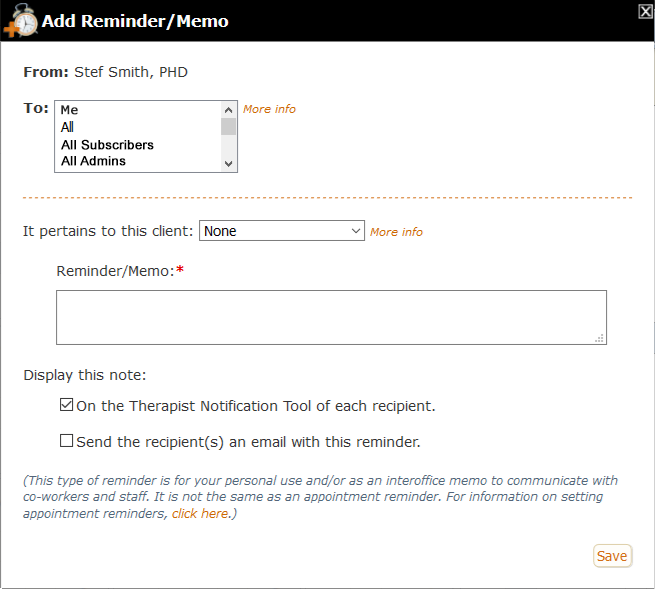
The only difference between a Reminder and a Memo is that Reminders are sent only to yourself whereas Memos are sent to others. They both use exactly the same tool, as shown above. If you select "Me" from the "To" multi-select box, you're sending yourself a Reminder. If you select any other option, you're sending a Memo to other professionals in your office. Another way to think about it is that Reminders are like Memos to yourself.
The Reminder/Memo tool is ONLY designed as an interoffice communication tool. Unlike PSYBooks email, you cannot add anyone you want to the list of potential recipients. If you're in practice by yourself and don't have office staff helping you, you can only use this tool to send yourself reminders. However, if you have other PSYBooks subscribers in your office and/or if you've added one or more Users and given them Admin status, those people will automatically be added to the multi-select dropdown for the "To" field. You don't have to add them manually or send them Portal User invitations. If you expand the To dropdown menu, it will show you a list of all other PSYBooks subscribers and Admins in your office. By selecting from the dropdown, you can now use this tool as interoffice memo. You can use the shortcuts at the top to send to "All" or just "All Subscribers" or "All Admins", or, if you only want your memo to go to certain other subscribers or Admins, you can use the multi-select box to select the specific ones you want by holding down the Ctrl (Cmd) key as you make your selections.
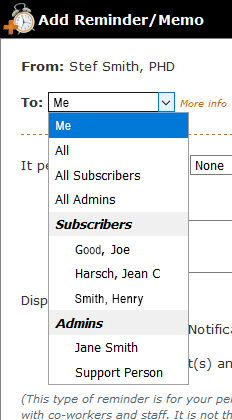
You add both Subscribers and Admins to your practice from your "My Profile" page with the "Manage Users & Subscribers tool:
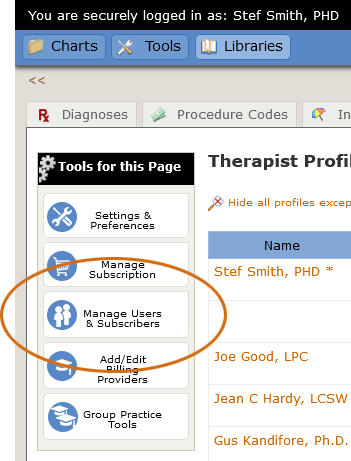
An Admin is just a regular User that you've added and checked the box to make that user an Admin:

The Admin user type is designed specifically for people you hire to help you manage your practice. They do not have to be physically present in your office. They can manage your PSYBooks account from their own computer or tablet at their homes - or anywhere else. Mostly, they're like any other PSYBooks user you might add except that they have a few extra permissions that only users who are actually helping to run your practice might need - such as being included on the list of people to whom you can send interoffice memos.
Notice that in Group or GOI types of PSYBooks subscriptions, only the Master Clinical account holder has the ability to create Admins. This is because Admin Users are shared by the entire practice. This does not prohibit individual subscribers from adding PSYBooks Users to their own accounts, either for their own purposes or to share with other subscribers in the office. However, if a non-Master Clinical subscriber adds a User that they want to convert to an Admin, they would have to share that User with the Master Clinical subscriber and have the Master Clinical convert the User to an Admin.
Going back to the Add Memo/Reminder form, after the "To" multi-select, there are three remaining sections of the tool:
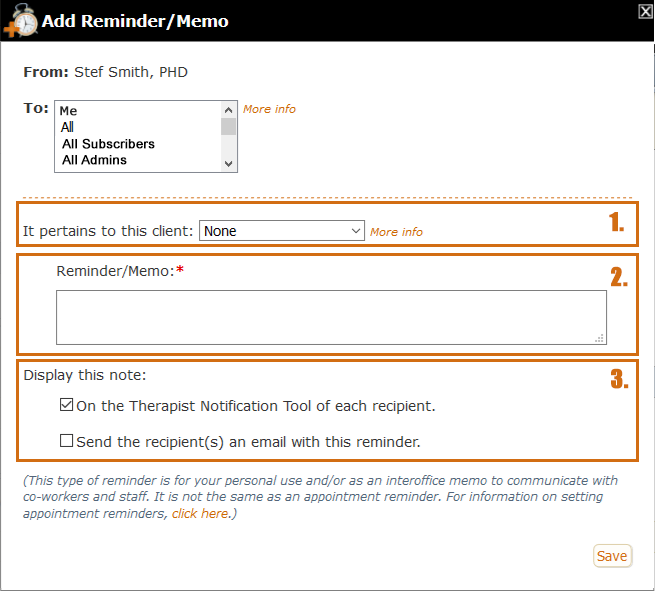
The first section allows you to choose a client, if the memo pertains to them. Although it is not necessary to select a client, there are times when it's helpful. For example, you might need to tell a co-therapist something about the client before that evening's couple's appointment. Or you might need to send an Admin a note to remind them to get the client's new insurance information when the client comes in. When a reminder only applies to one client, selecting them here will allow you to view the reminder when you open that client's chart and also to save the note in the Notes tab of that client's chart if you want. Reminder notes saved to a client's chart are assigned the Medical Record > Office type.
The next section down on the form - the textarea with the label "Reminder/Memo" - is where you write the body of your note or reminder. Notice, that like almost all textareas in PSYBooks, it has the dots in the lower right corner, indicating that the textarea can be expanded, allowing you space to write as much or as little as you want:
When you see those dots in the lower right corner of a textarea, just place your cursor over them, click and drag down. You can expand the box to whatever size you want:
The last section of the Add Reminder/Memo tool asks you what you want to do with your note:
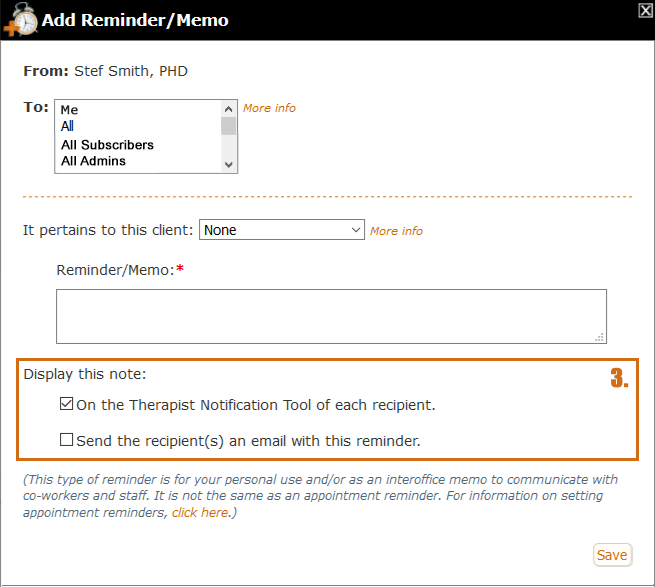
By default, the selected option is to display the note on the Therapist Notification Tool (TNT), which will be discussed next. However, you can also choose to have an email sent to the recipient(s) or you could do both: send emails and also add it to the TNT.
When you've indicated that your note pertains to a client, a third option is presented in the "Display this note" section:
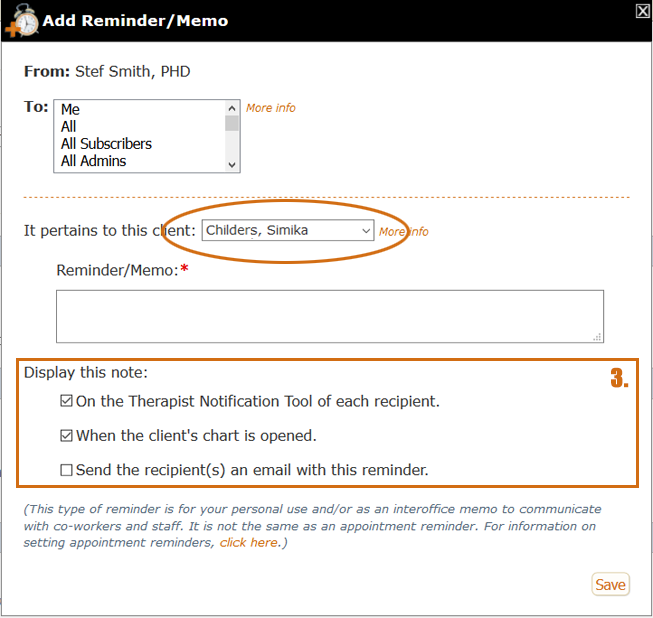
As you can see, the note above has been marked as pertaining to a client named Simika Childers. Now, in the "Display this note" section, we also have the option of having our Reminder/Memo displayed in a popup when we open the client's chart. Since the options in Display this note are checkboxes, you are not limited to a single choice. You can select as many as you want. It's important to note that the subscriber and also any Admins assigned to the account can add notes to a client's chart with the Add Reminder/Memo tool.
If you do choose the second option, i.e., to display the note "When the client's chart is opened," the next time you open that client's chart you'll see a popup like this:
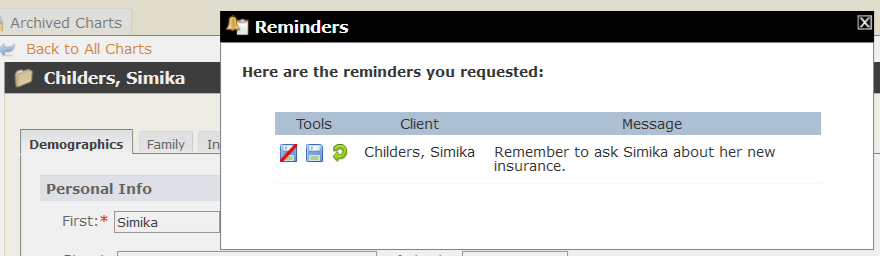
Notice that this reminder says that it's for a client named Simika Childers - and in the background, we can see that we are indeed in Simika Childers' chart. Notice also that there are three tools we can use with this reminder:
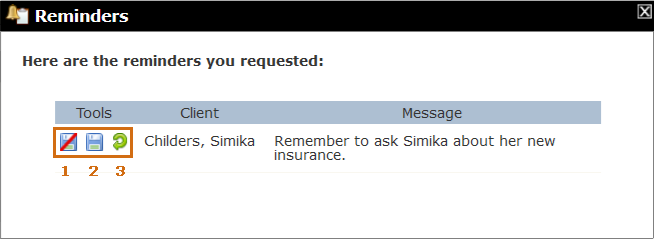
Here's what each tool does:
- Dismiss and Do Not Save: Clicking this option allows you to dismiss the reminder so it won't keep appearing when you open the client's chart. However, it won't be saved in the chart. (Note that if you had also chosen to display this reminder "On the Therapist Notification Tool of each recipient," when you delete the item from the TNT, you would be given an option to save it to your "My Notes & Reminders" page. In other words, the TNT allows you to save items to your OWN notes tab, i.e., My Notes & Reminders. If you want to save it to the client's chart, use the method described here.)
- Dismiss and Save to Chart: This option also dismisses the reminder, but it saves a copy of the reminder as a note in the Notes Tab of the client's chart.
- Remind me Again: This option allows the reminder to be displayed each time you open the client's chart. The popup will continue to be displayed until you dismiss it with one of the first two tools. Incidently, if you don't choose any of the tools, but just navigate away from this chart or close the app, it will have the same effect. In other words, the default choice for a chart reminder is that it's displayed in the chart until you dismiss it.
Notice that, unlike the "Add Personal Note" tool, items added with the "Add Reminder/Memo" tool will NEVER be directly displayed on the "My Notes & Reminders" page. They can be saved to "My Notes & Reminders," but only after they've been routed through the TNT:
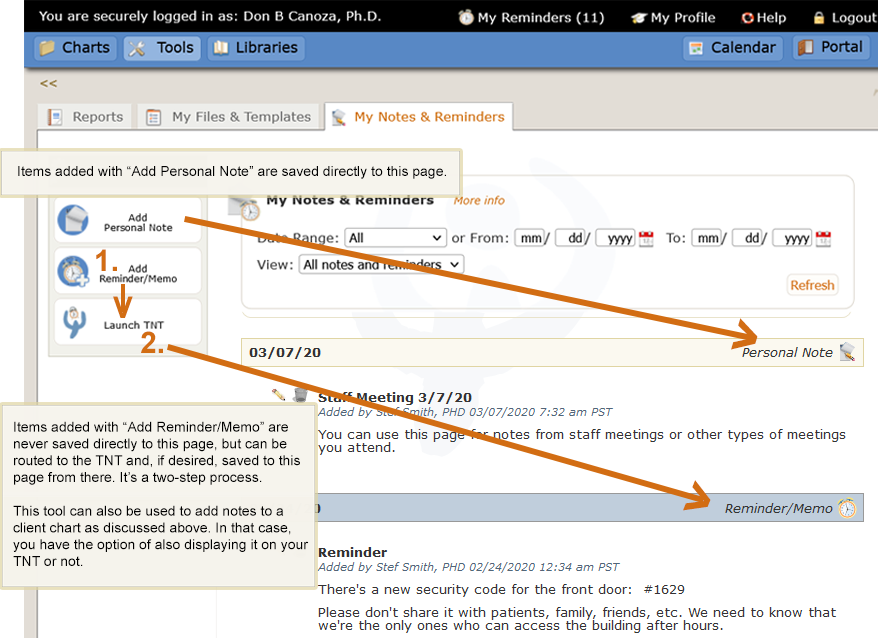
Therapist Notification Tool (TNT)
Like the Add Reminder/Memo tool, the Therapist Notification Tool, or TNT, can be launched from two different places: you can access it from the My Notes & Reminders page and also from the dropdown of the My Reminders link in the black status bar at the top of every page in the app:
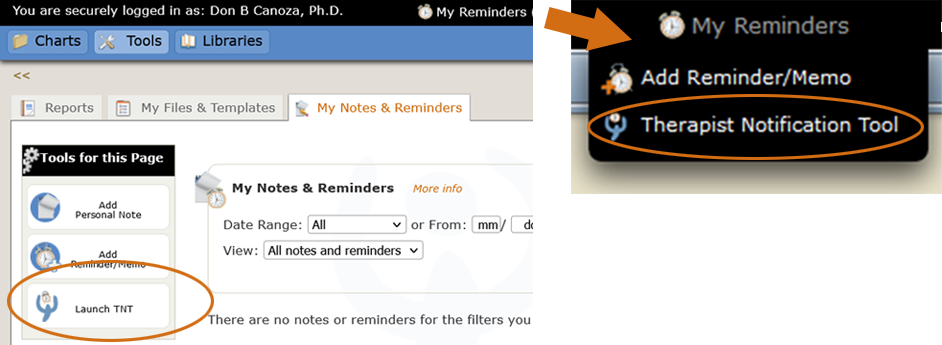
Also, by default, the TNT automatically opens each time you log in to your PSYBooks account unless you specifically indicate that you don't want it to. If you DON'T want it to open each time you log in, there are settings you can change in My Profile > Settings & Preferences.
Tools & Sections
As for what it is, the Therapist Notification Tool is really two sets of tools: 1) a "communication hub" for your office and 2) a dynamic to-do list to give you information to help you with practice management tasks. Each time your TNT opens, it will pull current information, enabling you to check for new information and/or unfinished tasks throughout your day. Furthermore, each task you're presented with will have tools right beside it that will allow you to either complete the task, save the task for later, or remove the task so it won't continue appearing on your TNTs.
Tools
There are two tools that are used throughout the TNT that have similar functions wherever they appear. They are the Put Off tool (which is just a checkbox): , and the Delete tool, symbolized by the trash can: ![]() . Both of these tools have the end result of taking an item off of your TNT, i.e., marking it off of your to-do list. However, there's an important difference between them. You can see it by comparing the messages you're shown if you hover over a Put Off tool vs hovering over the Delete tool:
. Both of these tools have the end result of taking an item off of your TNT, i.e., marking it off of your to-do list. However, there's an important difference between them. You can see it by comparing the messages you're shown if you hover over a Put Off tool vs hovering over the Delete tool:


The Put Off tool allows you to mark something off of this current to-do list, while maintaining the option of coming back to it later. If the condition that caused this task to appear on this current TNT is still present when you view the next TNT, the item will appear again.
In contrast, an item that you mark off of your to-do list with the Delete tool will never appear on subsequent TNTs. The Delete tool can be used when you know about the item, but, for whatever reason, you don't plan to change the condition that caused it to appear on the TNT. Using the Delete tool will tell us not to keep reminding you.
It's also important to note that you don't HAVE to use either of these tools. They are there for users who like a visual representation of tasks they need to complete. You can view a TNT and close it again without checking any items off the list. Doing that is the same as using the Put Off tool in that unchecked items will appear on subsequent TNTs as long as they still meet the condition that caused them to appear in the first place.
When present, the two tools we've been discussing - the Put Off tool and the Delete tool - are always placed as the first tools in a row. They are followed by a vertical gold line, which separates them from the other tools on the row. This is because the tools to the right of the gold line can vary, depending on the item. They are task-specific. The mockup below was taken from a row alerting the user that their claim had been rejected by the clearinghouse:
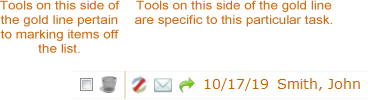
Notice that even links are tools, so the item in the example has the two "mark off" tools to the left of the gold line and then five additional tools on the right.
Sections
The TNT consists of a header (which is always present) and three additional sections that might or might not appear on your TNT. Those three sections, which form the meat of your TNT, are:
- My Reminders/Interoffice Memos
- Unfinished Tasks
- Account Information
A section only appears if you have notifications in that area. For example, if you never use the Add Reminder/Memo tool, the My Reminders/Interoffice Memos section of the TNT will never be present. In other words, the TNT is customized to reflect how YOU use PSYBooks.
A sample TNT with all areas present might look something like this:
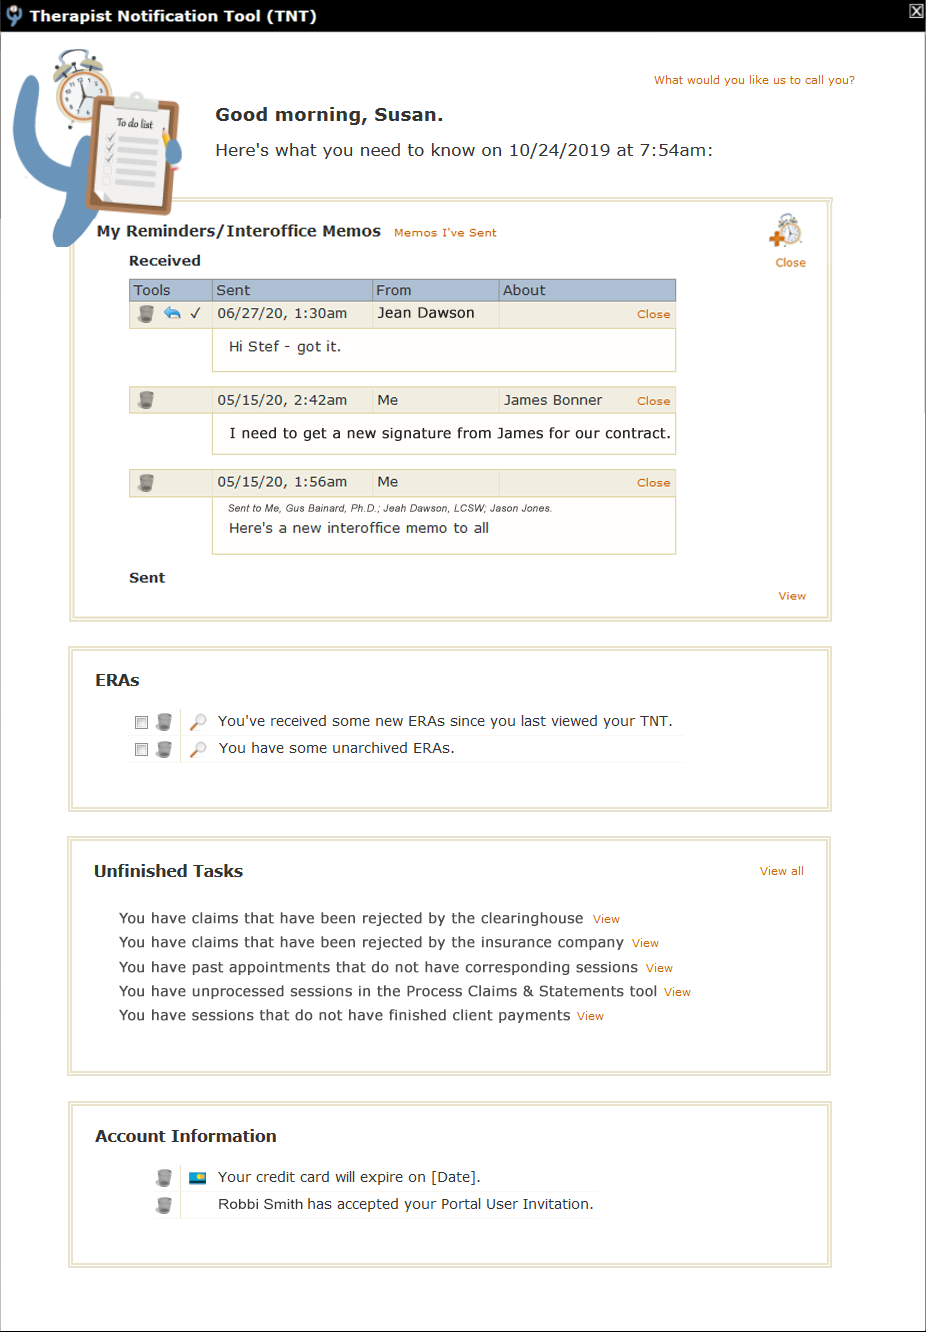
We'll look at each section separately:
Header
The header section has one tool: a way for you to personalize the page by telling us how you want to be greeted on the TNT. The default version is to use your first name, i.e., "Good morning, Susan."
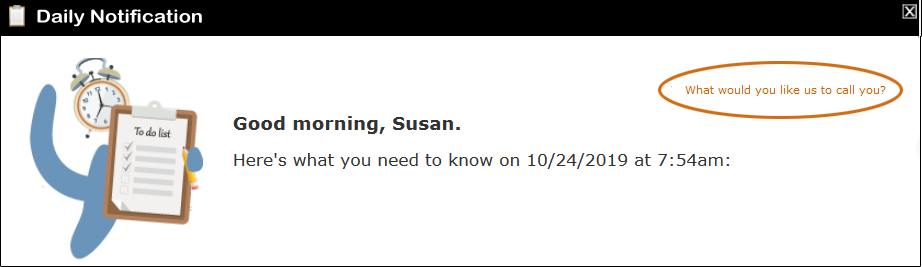
However, if you click the "What would you like us to call you?" link, you'll get a textbox where you can enter anything you want. You could say, "Dr. Smith," use a nickname or even get creative. What you write here will ONLY affect the TNT so unless you've given someone else access to your account, you're the only one who'll ever see it. This means you're free to play by leaving yourself fun or inspirational messages. Once you write your choice and click save, your greeting will change similar to the mockup below:

We'll remember your selection until you change it to something else.
My Reminders/Interoffice Memos
The "My Reminders/Interoffice Memos" section of the TNT is right below the header. This is a communication area for your office. For single practitioners without office staff, it will be a way for you to display reminders for yourself that you've set with the Add Reminder/Memo tool. Since the TNT as a whole is your designed to be a todo list, in a sense, the Reminders/Interoffice Memos section allows you to add your own todo items. If you have office staff, this section of the TNT becomes a way for you and your staff to leave messages for each other. Finally, in Group or GOI types of practices, this top section of the TNT becomes a full-fledged communication hub in that it allows you to exchange Interoffice Memos with all subscribers and/or Admin staff in your office. It looks something like this (numbers are to identify the tools, which will be discussed below):
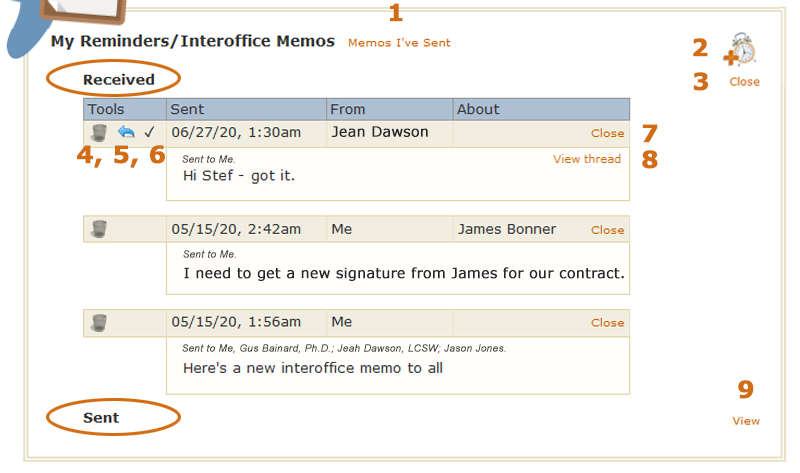
The first thing to notice about the Reminder/Memo part of the TNT is that it's divided into two areas: Received and Sent. When the TNT is first opened, your Received memos and reminders are visible, but Sent items are not. There are two ways to view Sent items. You can either click the "Memos I've Sent" link at the top of this section (tool #1 in the mockup) or you can use tool #9 - the "View" link in the Sent section. A discussion of all nine tools on the above mockup follows:
"Memos I've Sent" link. This link opens the Sent section and refocuses your page so the Sent section is easily visible.
 Opens the Add Reminder/Memo tool, so you can easily add new reminders from here.
"Close" link. This particular Close link closes the Received section. The Sent and Received sections work independently. If you leave the Sent section closed and also close the Received section, you'll get the configuration below (the Close link has toggled to become a View link):
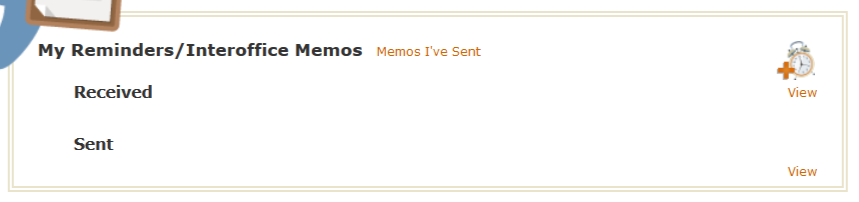
Notice that closing both sections does NOT remove the entire "My Reminders/Interoffice Memos" section from your TNT. That's because, in the example we're using, there are still reminders present that have not been marked off. If there were no Received or Sent reminders present, this section would not appear on your TNT.
Delete tool:
 The fourth tool in the mockup is the Delete tool:
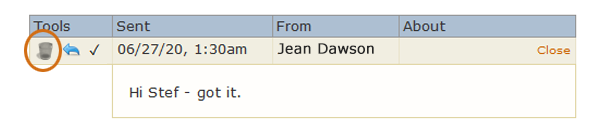
As mentioned above, the Delete tool is to mark an item off of the TNT in a way that's permanent. Items removed with the Delete tool will not appear on future TNTs. Hovering over a Delete tool on the TNT will produce a message similar to this, reminding you what the tool does:

However, you do have the option of saving your memos and reminders after you've removed them from your TNT. If you click a Delete tool beside a reminder, you'll get this alert:
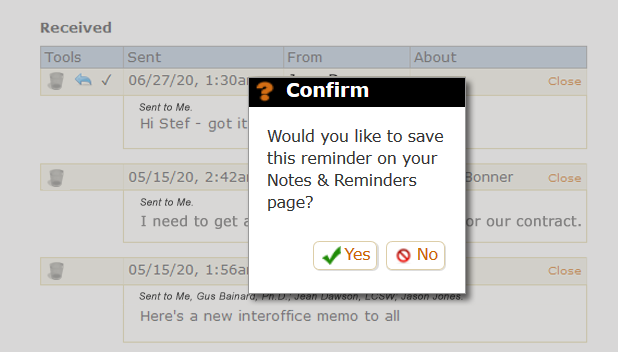
If the item you're removing is something you want to keep, you can save it to the My Notes & Reminders page. That page is designed to hold all of the personal notes you maintain for your practice as well as copies of any reminders and/or memos you've saved. However, whether you click Yes or No, the item will be removed from your TNT, thus taking it off of your to-do list.
You may have noticed that items in the "My Reminders/Interoffice Memos" section do NOT have the Put Off tool - the checkbox. If you want to keep a reminder or memo on your TNT, just don't use the Delete tool. This could be helpful, for example, if a colleague sent you a memo to which you want to reply, but you can't do it right then. Reminders and memos will appear on subsequent TNTs until you specifically remove them by clicking the Delete tool.
Reply tool:
 The fifth tool is only present on memos you've received from others in your office. It's a backwards facing arrow tool that allows you to reply to the memo:
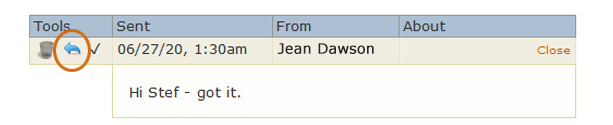
Mark Read tool: ✓The sixth tool is also only present on memos that you've received. It's a checkmark that allows you to mark the memo as read. Clicking the checkmark allows you to convey to the sender that you've read their message even if no response is necessary or if you intend to write a response later:
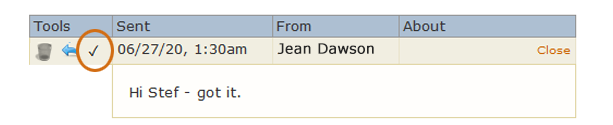
"Close" link. The seventh tool allows you to close individual messages. For example, you might have a really long message that you don't have time to deal with at the moment. You could close it, to get it out of your way while you work through the other items on your TNT:
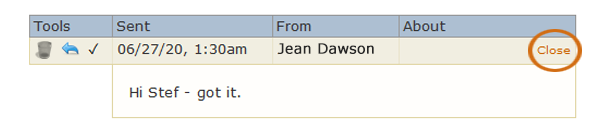
Here's an example of how this tool might help. Notice that once you use the Close tool, the link text changes to "View," meaning that you can open it again at any time:
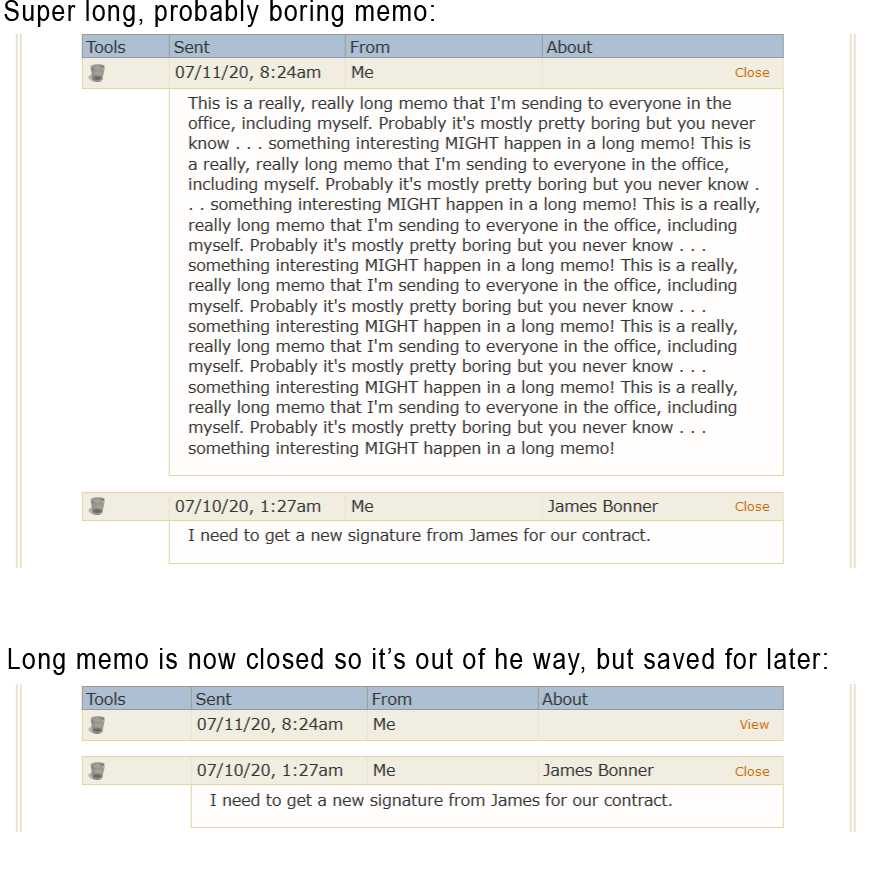
"View thread" link. When a memo has other replies that came before it, a View thread link appears in the top right corner. Clicking it allows you to see all the memos that are part of this thread:
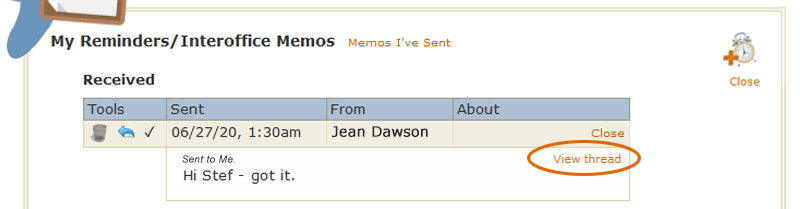
Clicking "View thread" will open a new area which will allow you to read any memos that are part of this thread. Notice that the text "View thread" changes to "Hide thread" which would allow you to close the threads again:

"View" link. As discussed above, clicking the View tool at the bottom of the form opens the Sent section. Once the Sent section is open, it might look something like this:
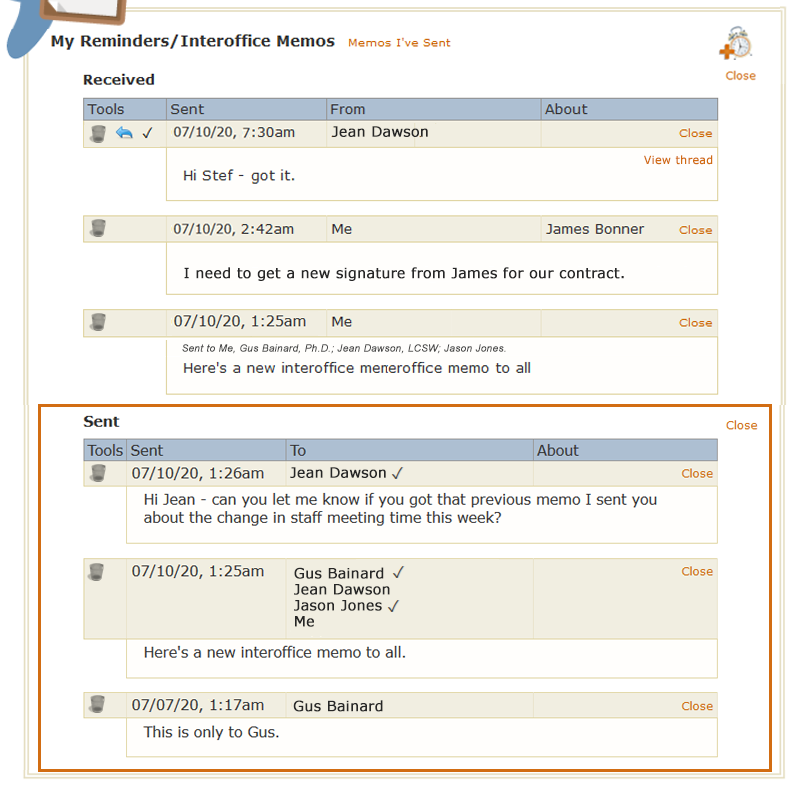
Notice that the original View tool has become a Close tool, which allows you to toggle between viewing states. Also, like Received items, Sent items have Delete tools, allowing you to clear them from your TNT. As with Received messages, Sent items will be retained on the TNT until you specifically delete them. When you click the Delete tool, you'll be shown the same confirm you get when deleting Received messages, asking you if you want to save the item on your Notes & Reminders page.
Notice that whereas Received items show you who a memo is from, Sent items show you the recipients, i.e., the "To" column. You can also see an indication of which ones have read the memo:
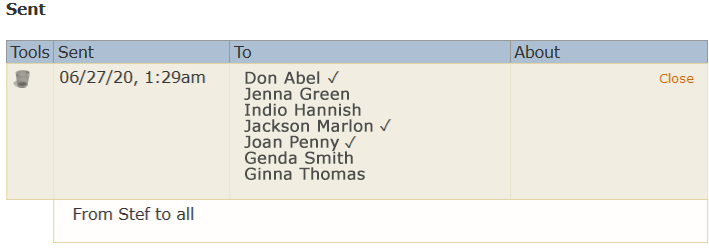
This concludes the discussion of the My Reminders/Memos portion of the TNT. After that top communication area, the rest of the TNT contains system-generated items designed to help you make sure you're not missing important information that may be coming into your account. There are two sections in this lower area:
- Unfinished Tasks
- Account Information
Each will be discussed separately.
Unfinished Tasks
Unfinished Tasks is one of the larger sections of the TNT. As with all other sections on the TNT, if you don't have any unfinished tasks, the Unfinished Tasks section will not be present. Currently, there are seven potential unfinished tasks. Only those that are applicable to you on any given TNT will be presented. An example of an account that has items in all seven unfinished tasks would look something like this:
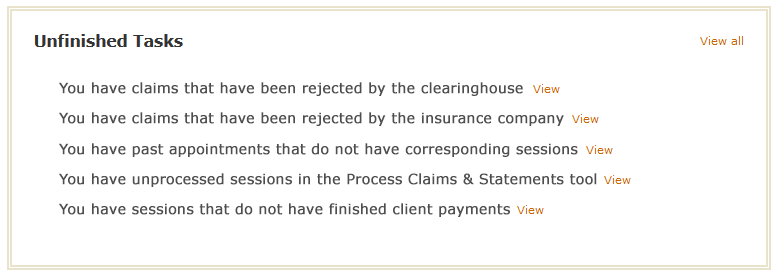
These are the seven Unfinished Tasks PSYBooks currently reports:
- You have claims that have been rejected by the clearinghouse
- You have claims that have been rejected by the insurance company
- You have past appointments that do not have corresponding sessions
- You have unprocessed sessions in the Process Claims & Statements tool
- You have sessions that do not have finished client payments
- You have sessions that do not have notes
- You have notes that have not been signed
Each of these tasks will be discussed below:
You have claims that have been rejected by the clearinghouse
If this task appears on your TNT and you open it to reveal the content, you'll see something like this:
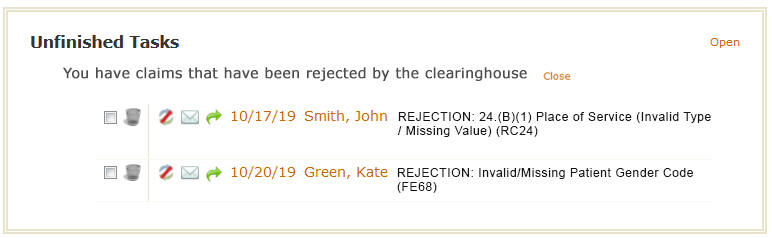
Items on this list will show you which claims have been rejected by Office Ally, the clearinghouse used by PSYBooks. This is the same basic information you can get with PSYBooks' Claim Status report in the Tools > Reports section. The advantage of having this information on the TNT is that it's sometimes hard to remember to check the Claim Status report to make sure all of your claims have gone through correctly. By having those that are rejected added automatically to your TNT, you're shown rejected claims each time you log in to PSYBooks (and/or each time you access the TNT manually). Also, as we'll discuss below, most of the tools you might need to make claim corrections appear right on the same line, allowing you to see the rejection, make necessary changes and resubmit - all in one place.
We'll discuss each of these tools separately by using the numbered mockup below:
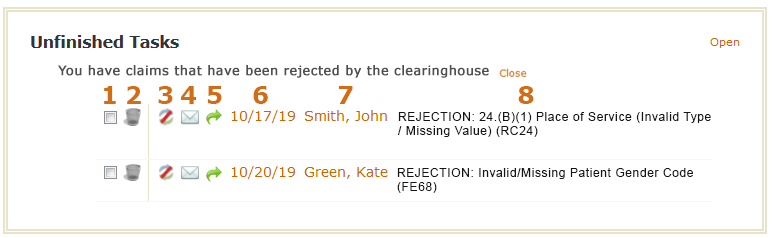
-
Put Off tool: The first tool is the Put Off tool. As described above, checking the checkbox allows you to mark an item off of this list if you don't want to address it now but plan to in the future. The Put Off tool removes the item from this current TNT but - assuming the conditions of being rejected by the clearinghouse still apply - it will appear again on subsequent TNTs. Hovering over it shows you a message explaining the functionality:
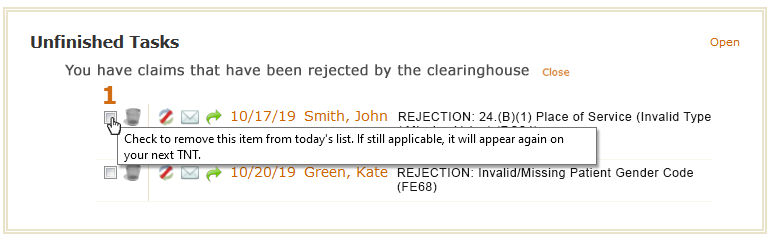
Delete tool:
In contrast, the second tool for clearinghouse-rejected claims is the Delete tool: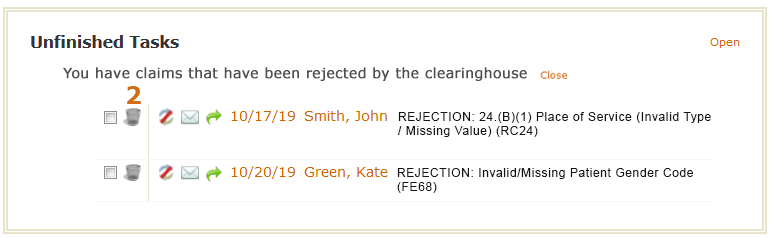
The Delete tool, symbolized by the trash can icon, is used throughout PSYBooks for permanent deletions. The hover message you're shown when your cursor is on a Delete tool indicates the same:
However, notice that what you're deleting is NOT the claim, but rather, its appearance on your TNT as being rejected by the clearinghouse. Let's say, for example, that you've seen the rejected claim and determined that you don't need to do anything further with it. There might be reasons you want to maintain a record of it in your app, but you would not want to be continually reminded of it on your TNT. The Delete tool gives you a way to take care of that.
Status Indicator tool:
 The first tool after the gold line is the Status Indicator tool. This is the same status icon used to indicate clearinghouse-rejections in the Reports > Claim Status tool. It has the same function here that it does there, i.e., you can hover over it to see the rejection code for the claim. However, in the TNT, the rejection code is written out for you in this table, so the main purpose of this tool is to give you a visual representation of where the claim is in the payment process, i.e., it's been rejected by the clearinghouse as opposed to being an insurance company rejection.
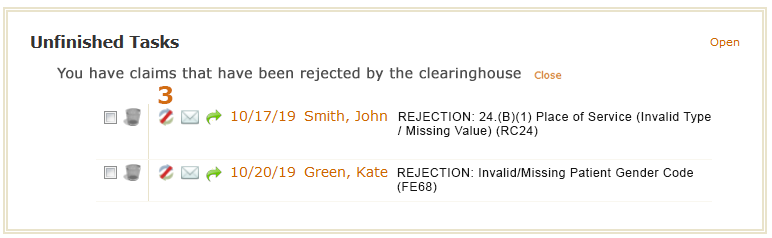
Send Mail tool:
 The fourth tool is to allow you to easily email the client to whom this claim pertains. This tool is put here because sometimes, when a claim is rejected, you need to contact your client to get additional information. Although there are other ways to email clients in the app, having this tool here makes it more convenient when you have a rejected claim. In the mockup, we can see that this particular claim is for John Smith, so clicking the Send Mail tool would allow you to email John right from the TNT.
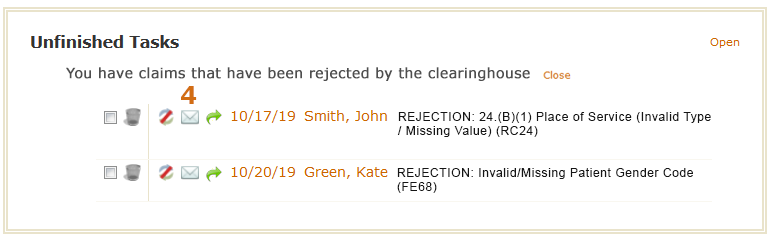
-
Resubmit tool:
 Once you've finished making all the edits you need to make on the form, you can resubmit the claim right from the TNT, using this Resubmit tool.
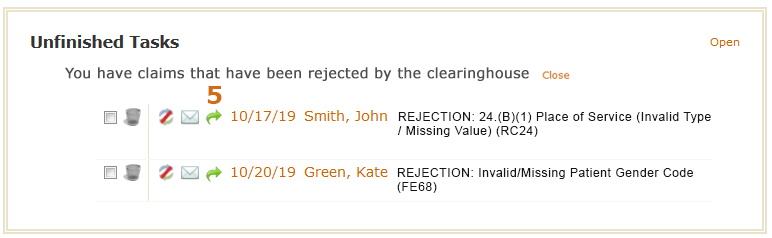
-
Date of Service link (Edit Session form): Another thing we sometimes need to change when we get a rejected claim is some field on the Edit Session form. For example, if our Rejection Code says "REJECTION: 24.(B)(1) Place of Service (Invalid Type / Missing Value) (RC24)," that likely means you need to choose a different option on the "Place of Service" dropdown on the Edit Session form. Clicking the Date of Service link opens the Edit Session form for this claim, allowing us to make the change here instead of having to go back to Charts to make the change.
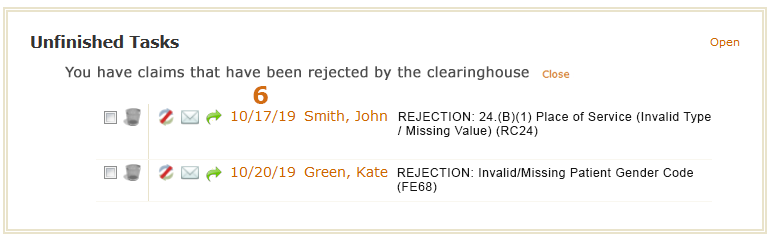
Client Name link: Similarly, another common tool you might need to correct a rejection from the clearinghouse is the Edit Client form. Maybe you forgot to enter their address - or maybe the address you entered isn't the one on file with the insurance company. You can make those kinds of changes by clicking the Client Name link on the TNT. That will bring up their Edit Client form.
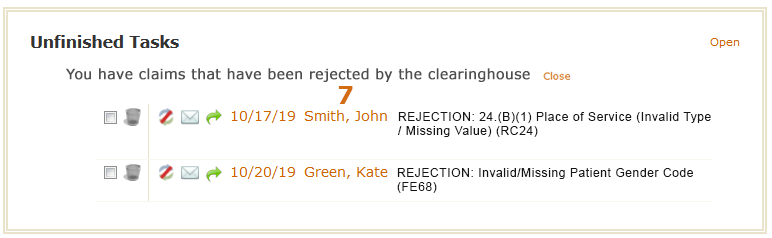
Rejection Code: The final tool is a copy of the rejection code PSYBooks received from Office Ally, our clearinghouse. Notice that Office Ally writes these rejection codes - not PSYBooks. Because of that, if you need to get more information about what's needed for the claim to go through, you can often Google a rejection code like this. Sometimes it helps to include "Office Ally" in your search string. For example, if you had the rejection code "Invalid/Missing Patient Gender Code (FE68)," you could Google "Office Ally Invalid/Missing Patient Gender Code (FE68)" and find more information about what you need to do to fix the error.
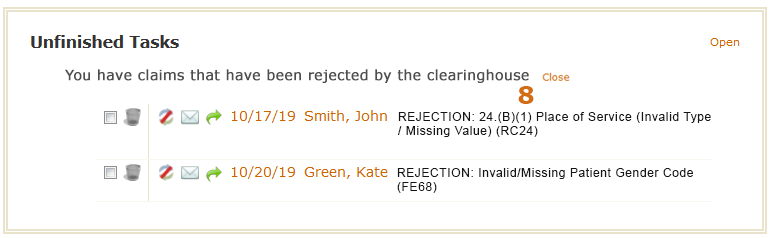
-
You have claims that have been rejected by the insurance company
The next category of items that could appear in the Unfinished Tasks section of your TNT are claims which made it through the clearinghouse, but were subsequently rejected by the insurance company. When this section is opened, the individual items inside look something like this:
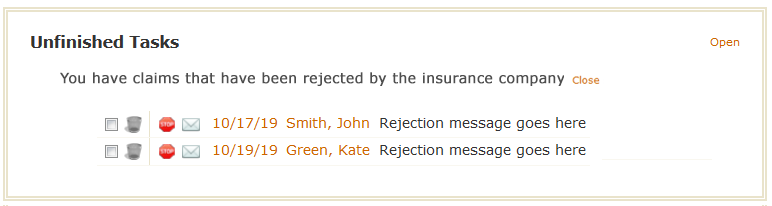
Although the tools for this type of task are almost identical to the ones described above for clearinghouse rejections, there are some minor differences, which will be discussed below, based on this mockup:
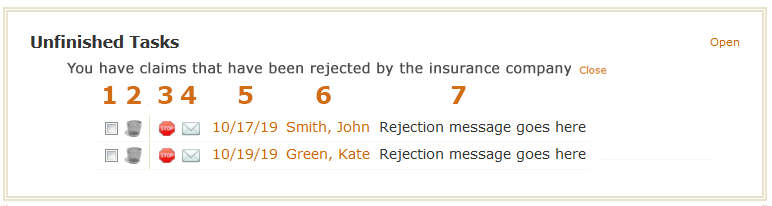
Put Off tool: Once again, this tool allows you to mark the item off of your TNT but have us save it so you can come back to it later.
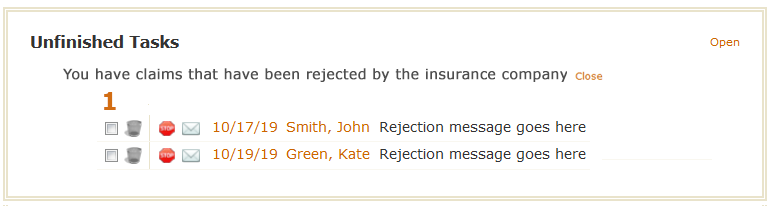
Delete tool:
As elsewhere, the Delete tool permanently removes the item from future TNTs - whether the claim is ever accepted by the insurance company or not.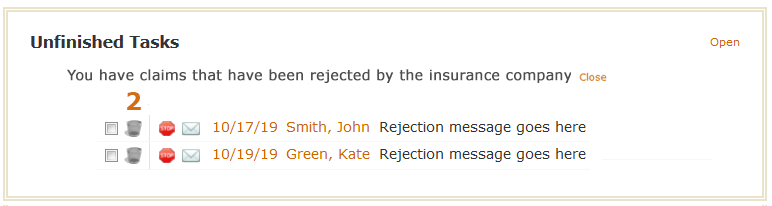
Status Indicator tool:
 The third tool is just a Status Indicator icon - the same one used on Reports > Claim Status - to indicate a rejection from the insurance company. Hovering over this icon will allow you to see the rejection code.
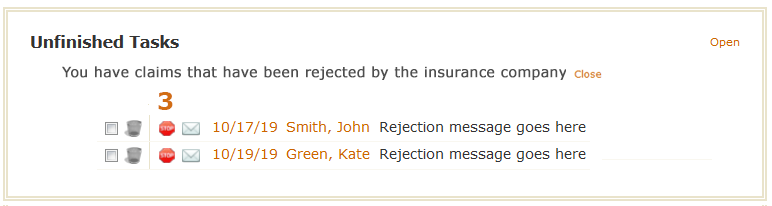
Send Mail tool:
The fourth tool allows you to email your client, e.g., you might need to get additional information from them about why the claim was rejected.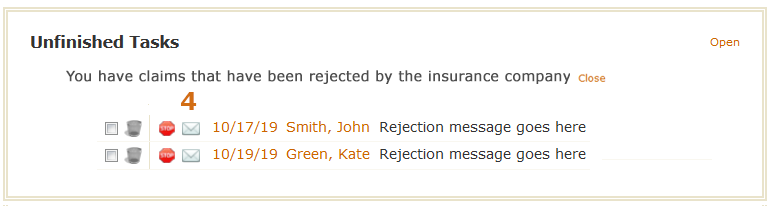
Date of Service link (Edit Claim tool): The fifth tool will open PSYBooks' Edit Claim tool. This tool is currently being beta tested but will launch soon. The Edit Claim tool is the main difference between dealing with a clearinghouse rejection vs a claim that has been rejected by the insurance company. Once a claim has been rejected by an insurance company, if you don't let them know that you're editing the claim and resubmitting it, the insurance company will most likely reject it, assuming it's a duplicate claim you made in error. The Edit Claim tool will allow you to make any edits to the claim that you might need - right on a copy of the CMS form - and then resubmit it to the insurance company in a way that lets them know it's an edited claim. By resubmitting with the Edit Claim tool, the insurance company knows this is a claim with new information you want them to consider instead of a duplicate claim.
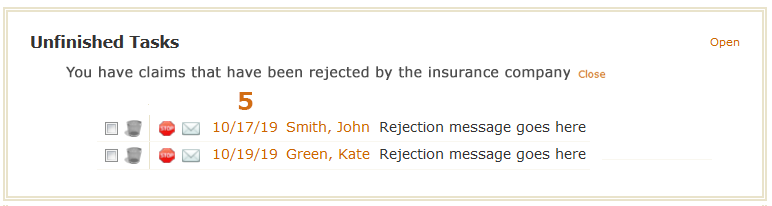
Client Name link: Clicking the client's name will open their chart, allowing you to make any changes you might need to make there.
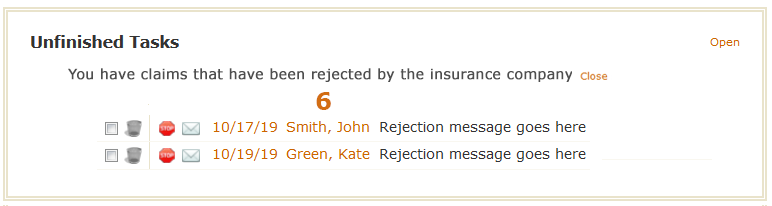
Rejection Code: The final tool is a copy of the rejection code the insurance company sends back to PSYBooks. Although the wording of these codes varies among insurance companies, often they will reference the exact line on the CMS form that contains the error. You can then use the Edit Claim tool (by clicking the date of service link on this row) to make the changes on the CMS and resubmit.
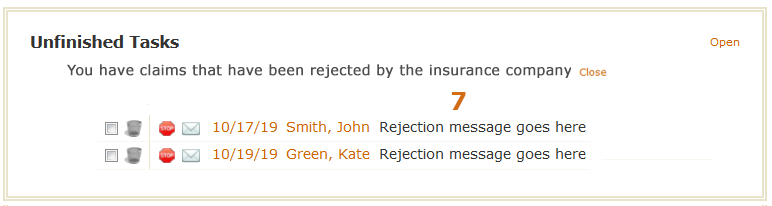
You have past appointments that do not have corresponding sessions
This unfinished task tells you that you have one or more client appointments on past dates on your PSYBooks calendar for which you have not yet entered a session. When you open this item, you might find entries similar to these:
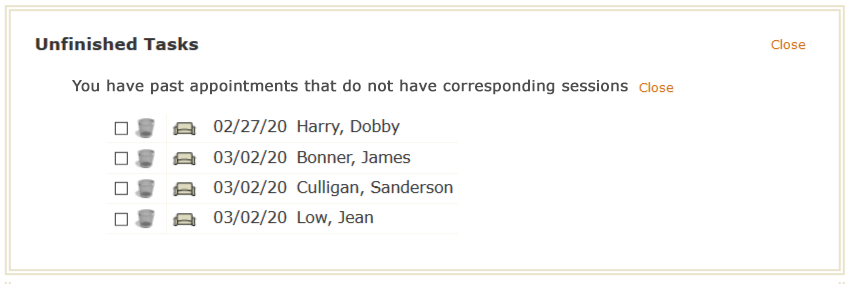
There are only three tools here: the familiar Put Off () and Delete (
) tools that we've seen elsewhere and the couch icon ( ) that's used on the PSYBooks calendar to open the Add Session tool. Here's what those tools do on this section of the TNT:
- Put Off tool: Checking the checkbox will mark that item off of this TNT. Unless you enter the session or delete the calendar appointment, this task will appear on the next TNT so you can be reminded of it again.
- Delete tool: The Delete tool will permanently remove this item from this and future TNTs, even if a session never gets added for this appointment.
- Add Session tool: Clicking the Add Session tool allows you to actually complete the task by adding the session for this appointment. This also removes the item from your TNT because it will no longer be an unfinished task.
You have unprocessed sessions in the Process Claims & Statements tool
People sometimes save claims in the Process Claims & Statements Tool and forget they're there. Obviously, they won't get paid for claims that are sitting in the Process Claims tool and haven't been filed. This TNT task will remind you when you have unprocessed claims or statements in the Process Claims & Statements tool. When you open it, it will look something like this:
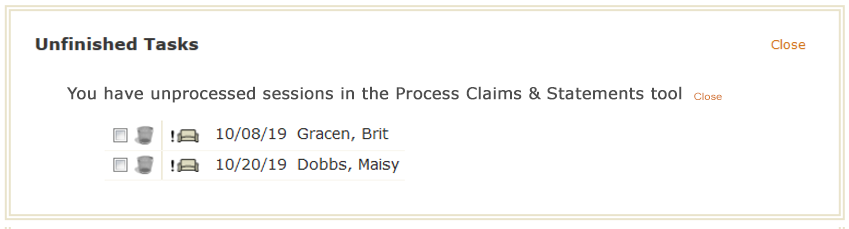
Again, there are only three tools here: the Put Off () and Delete (
) tools and the "pending" couch icon ( ) that's also used on the PSYBooks Calendar as an Add Session tool when a claim is in the Process Claims & Statements tool. Here's what those tools do here:
- Put Off tool: Again, the Mark Off tool removes the item from this TNT only. It will appear again on your next TNT if this session is still in the Process Claims & Statements tool.
- Delete tool: The Delete tool permanently removes the item from this and future TNTs, even if this item remains in the Process Claims & Statements tool.
- Add Session tool: The Add Session tool can be used to actually complete the task by adding the session for this appointment. This also removes the item from this and future TNTs because the claim will be out of the Process Claims & Statements tool.
You have sessions that do not have finished client payments
This task alerts you when you have entered a session and may have neglected to collect or enter the client's payment. Opening this item on the TNT will produce a screen similar to this:
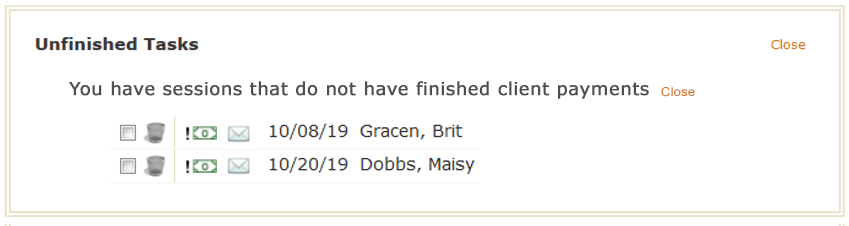
There are four tools to help you with this task: the Put Off () and Delete (
) tools plus the same Add/Finish Client Payment tool ( ) that's used on the PSYBooks Calendar. The fourth tool is the Mail tool () that allows you to email the client in case there might be issues you need to let them know about. The Put Off and Delete tools have the same uses we've seen elsewhere, i.e., the Put Off checkbox removes an item from this TNT only or the Delete tool removes an item from this and all subsequent TNTs. Clicking the Add/Finish Client Payment tool will open a window similar to this:
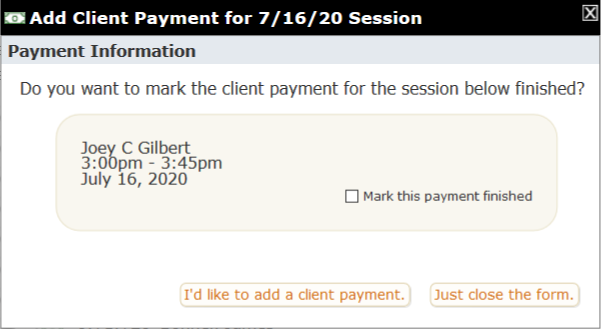
Notice that this form allows you to enter the client payment (the left button at the bottom) or to mark the payment as finished without actually entering a payment (the checkbox in the shaded gold area). If you choose to add a client payment, once you've allocated it, you'll be asked at that point if you want to mark the payment as finished. Until the payment is actually marked finished, it will continue to appear on your TNT. This will allow you to enter partial payments and have a way to be reminded via the TNT that there's still an outstanding balance.
You can read more about finishing client payments here.
You have sessions that do not have notes
PSYBooks tracks Session Notes, Open-Ended Notes, and all four of the special note types, i.e., Progress Notes, Treatment Plans, Intake Note and the Mental Status Exam (MSE) for this TNT entry. If you enter a session and include any of the notes above, the task will be considered complete and you will not get this TNT notification. However, if you do not, this notice will appear to remind you. As with other TNT entries, when you open it, you will not only get additional information about the item, but also tools to complete the task. Opening a session without notes entry will show something like this:

You can now see the session date (6/7/24) and client name (Simika Childers) that triggered this notification. After the familiar Put Off and Delete tools, is a note icon. Clicking the note icon opens a small window like this:
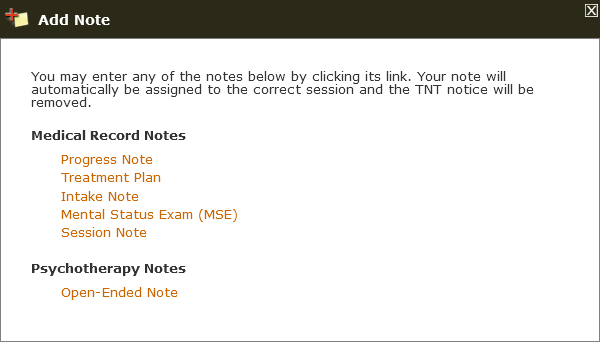
This window provides links to the six different note types you can enter to satisfy this requirement and indicates which ones are marked as Medical Record Notes and which are designated as Psychotherapy Notes, i.e., your personal notes about the session. Adding any one of these notes will remove the item from the TNT. If you want to add more than one note to any session, you can go to the Notes tab of the client's chart and add them there, attached to the session you need.
You have notes that have not been signed
This notification is similar to the one above except here, the note has been written but not signed. Opening it gives more detail:
Account Information
The final section of the TNT is called Account Information. You probably won't see this section on your TNT often, because its purpose is to alert you to things in your PSYBooks account that may not happen frequently. Currently, this section is used to notify you when Portal Users, Admins and other Subscribers have been added to your account. The Account Information section of the TNT is also very useful in tracking Custom Forms you've sent and received.
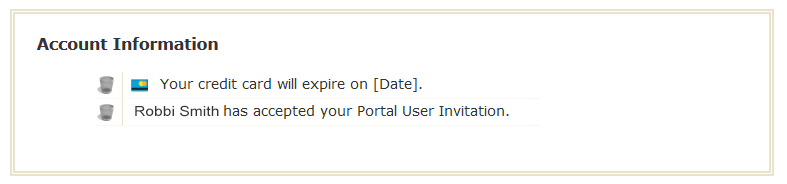
The TNT Counter
In addition to the tools discussed above, the TNT also has a Counter tool that appears by "My Reminders" in the black status bar when new items have been added to your TNT. This can help you stay on top of practice management tasks as they come in, without having to keep checking manually:

The Counter gets triggered by any type of TNT notification. In other words, although we can see from the screenshot above that we have five new notifications on our TNT, we don't know what they are. They could be interoffice memos, indications that we have a Custom Form to check, or any of the other potential items that are displayed on the TNT. Also, notice that the Counter is triggered by individual items, not sections or categories. For example, it could be that all five of the items listed in the Counter above are from unfinished client payments. When you open your TNT, it would look something like this - notice that it only has one section (Unfinished Tasks) and one category within that section (unfinished client payments):
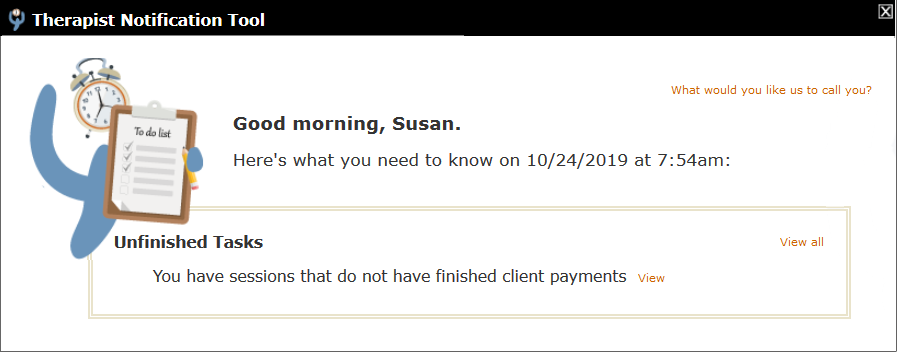
When you view the unfinished client payment category, you'd see the five individual items that the Counter is referencing:
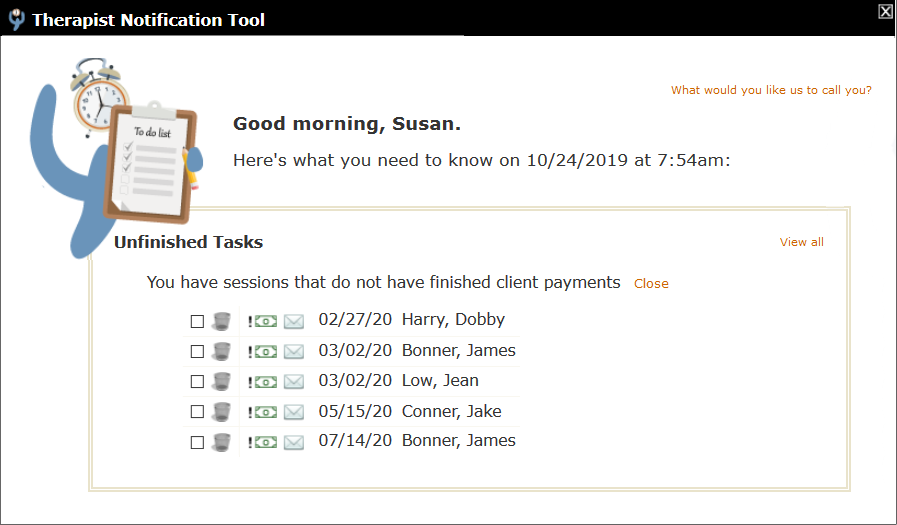
There are two possible ways you can cause the number in the Counter to decrease: by completing the items or by using the Delete tool to delete them. Using the Put Off tool does NOT decrease the Counter since technically, those items are still present in the TNT - they're just hidden from the current view. For example, in the sample above, you might look at each of the items and determine the following:
- Harry Dobby's insurance paid the full amount for the 2/27/20 session so no client payment is due.
- James Bonner paid you at his last session for both of the sessions listed here, but you haven't entered the payment yet.
- Jean Low has made a partial payment for the amount due on this session, but still has an outstanding balance.
- The Jake Conner session was entered in error, but you haven't deleted it.
Based on that information, you could:
- Click the Add/Finish Client Payment tool (
 ) to enable you to mark the client payment on Harry Dobby's 2/27/20 session as finished.
 - Enter the payment for James Bonner, allocate it and finish both of the sessions listed here. (Again, this can all be done here on this form with the Add/Finish Client Payment tool.)
- Use the Put Off tool () for the Jean Low session, since this client payment isn't finished and you may want to be reminded again.
- Use the Delete tool on Jake Conner's row, because you don't need to be reminded of it again. You may or may not also want to go back and delete the session, since it was entered in error.
By taking those steps, your TNT notification Counter would go from five to one - the one remaining item being for Jean Low's session, which we marked off.
Once Jean Low completes her payment for the 3/20 session, assuming no new items get added to the TNT, the user can mark that final item off. Any time there are no remaining items on the TNT, you'll get a congratulations message:
TNT Settings
PSYBooks gives you control over what appears on your TNT. You can access these settings by clicking My Profile in the black bar at the top, then Settings & Preferences on the left nav. The window that opens looks like this:
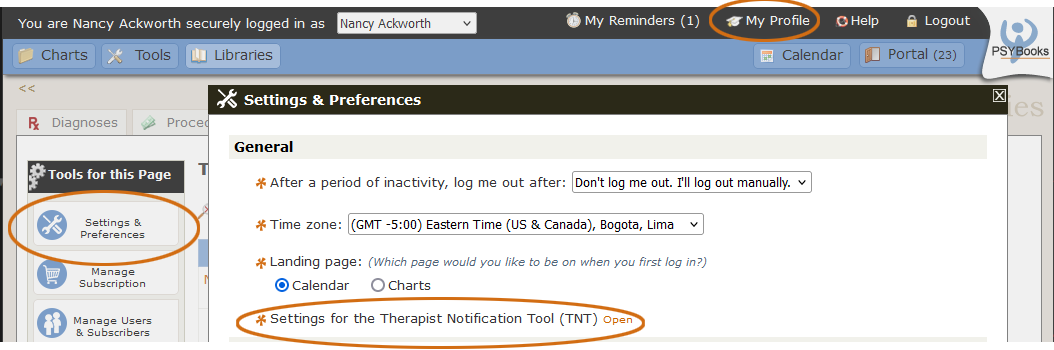
When you open the orange link by Settings for the Therapist Notification Tool (TNT), you'll see a list of choices you can make about this tool:
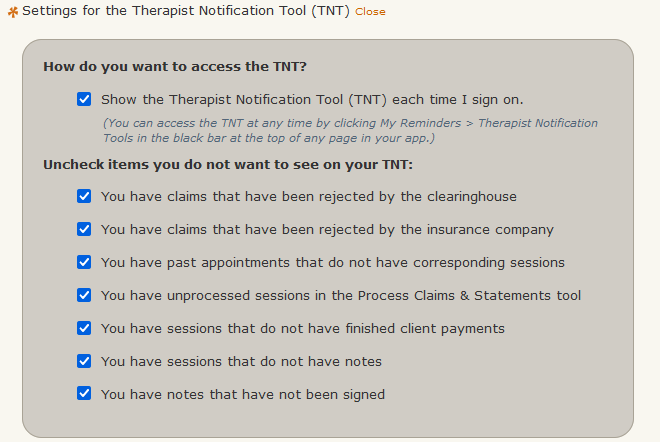
The top one addresses whether you want the TNT delivered each time you open the app. Each of the others is one of the Unfinished Tasks. There are also some "batch delete" tools that will allow you to clear all entries so you can start fresh:
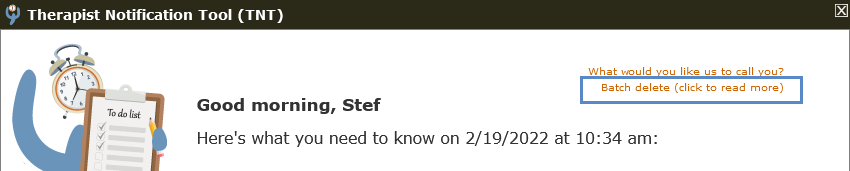
TNT Admin Accounts
It's important to know that the ONLY type of PSYBooks Users that have access to the TNT are those who have been marked as Admins on the Add/Edit User form: (Note: In GOI and Group accounts, only the Master Clinical account holder can create Admins for the practice.)

Users who are not marked as Admins will not see your TNT when they log in to your account, nor can they access it. The only way you can give a regular User access to your TNT is by making them an Admin. The TNT is designed to be a set of tools specifically for the therapists in your office and your staff. If you're in a solo practice without Admin Users, you'll be the only one who ever sees your TNT.
When an Admin logs in to their account, they're actually logging in to the subscriber's account. This allows office staff to do the work they need to do on the therapist's records. On the TNT, this is true for everything EXCEPT the "My Reminders/Interoffice Memos" section at the top. In some ways, the Reminders/Memos section of the TNT is like an email account. Each person in the office - all subscribers and also all Admins - will have their own separate Reminders/Memos section on the TNT. That allows Admins to set reminders for themselves and to send and receive memos in their own name to others in the office. Therefore, when an Admin first logs in, they'll be presented with the therapist's TNT but any items they have in the "My Reminders/Interoffice Memos" section will be their own:
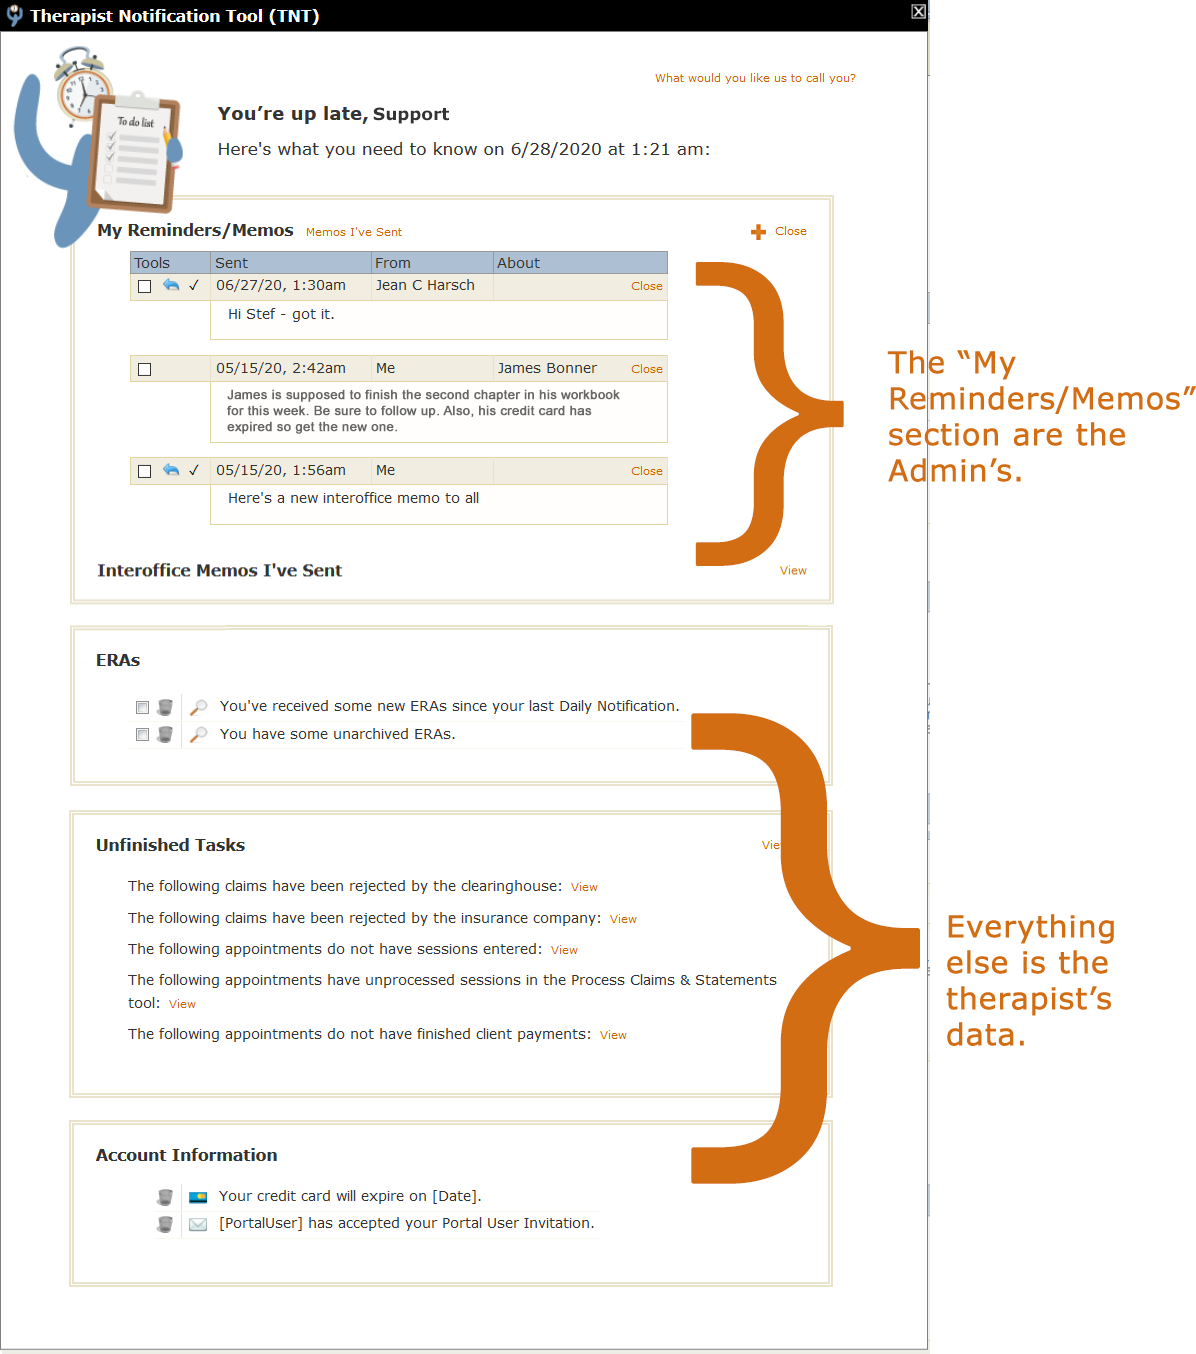
By default, an Admin can't view or work with the subscriber's Reminders and Memos. They have the type of setup shown above. However, there may be some subscribers who want certain members of their admin staff to be able to send and respond to Memos on their behalf. There are two related but separate permissions on the Add/Edit User form that address this: The screenshot was taken from the Associate Permission Level. Clinical Permissions also have the two highlighted items.
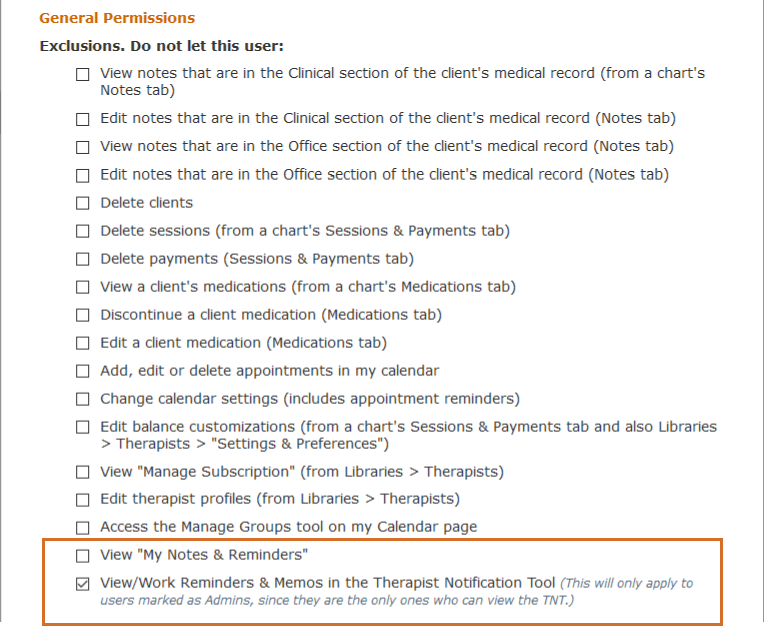
The first item determines whether or not the User can access your "My Notes & Reminders" page. Although this page is separate from the TNT, some parts are related in that it holds both the therapist's Personal Notes (which were never part of the TNT) as well as their Reminders and Memos (which were at one time saved from previous TNTs). The two types of items on this page are differentiated by the use of different colors as well as the labels and icons on the right of the color bars:
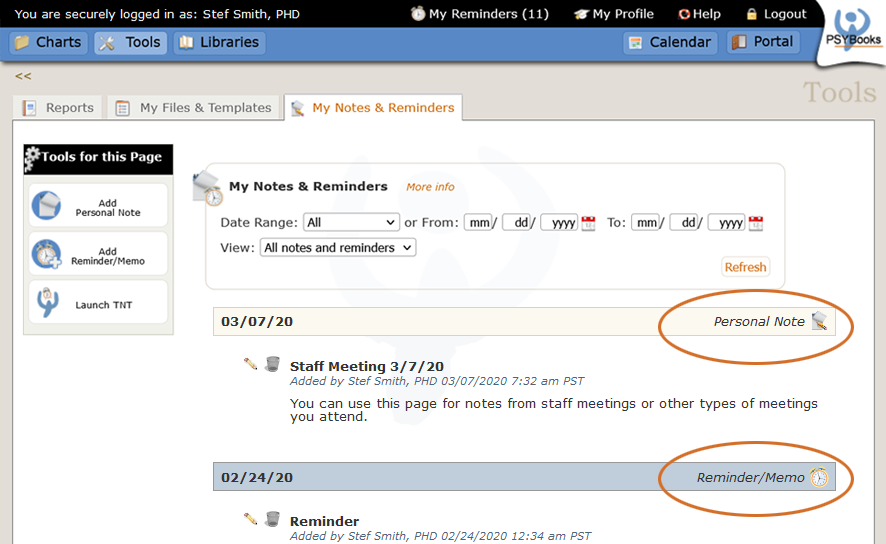
When Users - both Admin Users and regular Users - have permission to view "My Notes & Reminders," which is the default, they can view any Personal Notes and/or Reminders/Memos that the subscriber has saved to this page. (As discussed above, Admin Users will also be able to see their own version of this page.) If you do not want the User to be able to see those items, check the box beside the "View My Notes & Reminders" permission to exclude it:

The second permission that pertains to the TNT is:

Notice that this permission is excluded by default. In other words, Admin users do NOT have permission to view or work the "My Reminders/Interoffice Memos" section of your TNT unless you uncheck this box. This permission is very specific. It's not saying that Admins can't view and work your TNTs. They can. It's only saying that they can't work that top "My Reminders/Interoffice Memos" section of the TNT. This is the default scenario discussed earlier where all items in the My Reminders/Interoffice Memos section are those that the Admin has sent and received:
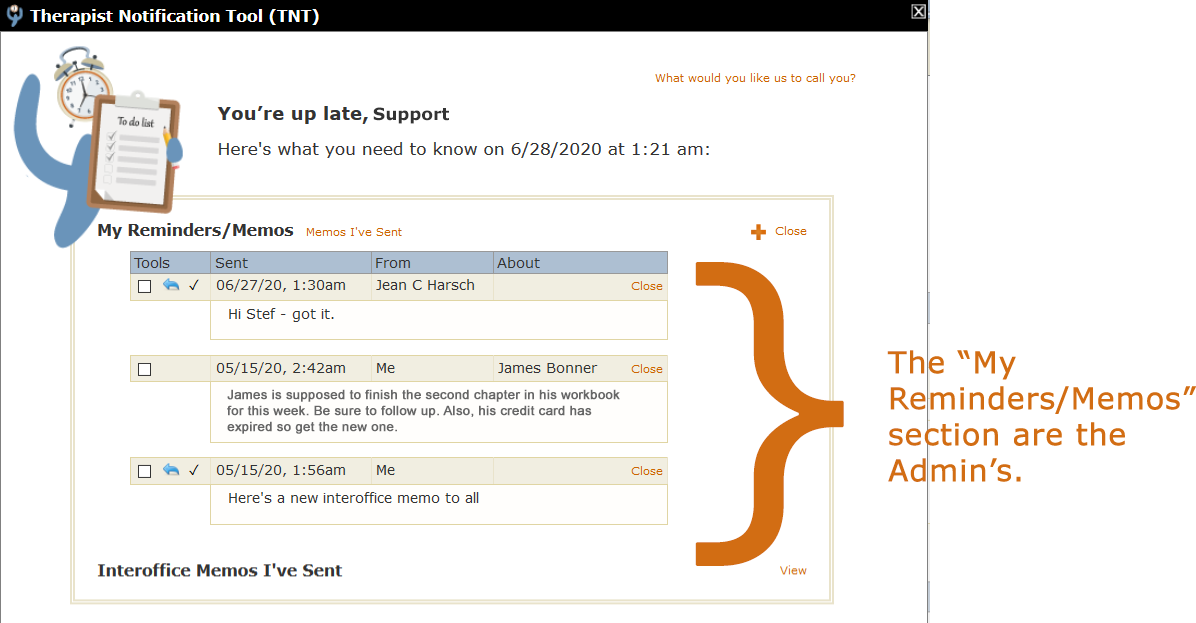
Since Reminders and Memos can be saved from the TNT to the "My Notes & Reminders" page, that means that for Admin accounts (not all Users), the "My Notes & Reminders" page also belongs to the Admin. When an Admin goes to the "My Notes & Reminders" page, they're seeing their own data that they've saved to that page - not the therapist's data. Also, once on the "My Notes & Reminders" page, the Admin can ALSO use both the "Add Personal Note" and "Add Reminder/Memo" tools as their own. This gives Admins the same full range to all tools used for interoffice reminder and communication purposes - just like the therapist has. Admins can set Reminders for themselves - or create Personal Notes for themselves - and no one but that Admin will be able to view them.
If you want an Admin to be able to work that section, uncheck the box. Notice that giving permission for this section of your TNT also allows access to the "My Notes & Reminders" page.
Admin users that DO have permission to view your Reminders and Memos will have a toggle button like this on their TNTs:
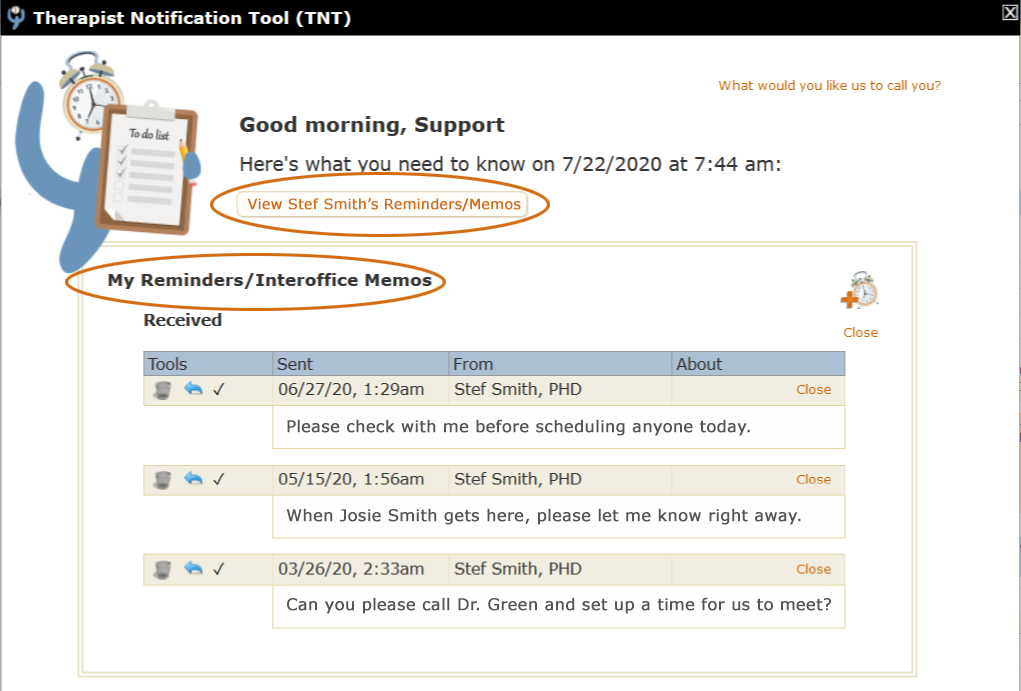
When the Admin first signs in, they're seeing their own reminders and memos in the top section. However, they can click the "View Stef Smith's Reminders/Memos" toggle button and view the therapist's reminders and memos instead of their own:
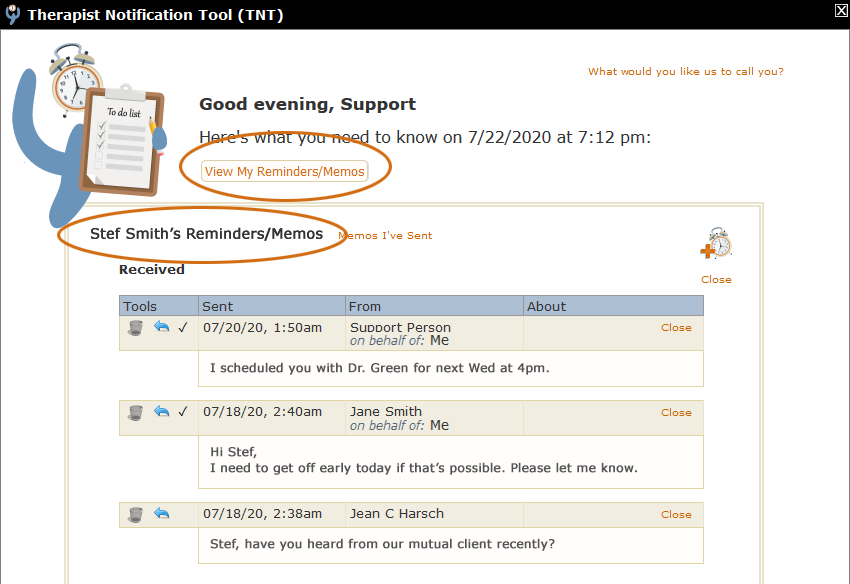
Now the Admin - in this case "Support Person" - is viewing the subscriber's memos. The text on the toggle button has changed from "View Stef Smith's Reminders/Memos" to "View My Reminders/Memos" and instead of "My Reminders/Interoffice Memos," the header for this section has changed to "Stef Smith's Reminders/Interoffice Memos."
Note also that this will allow the Admin to view memos they sent to the therapist (e.g., the top memo is from Support Person) and also any memos other Admins in the office may have sent Stef (e.g., the second memo is also from an Admin since it is designated as being sent "on behalf of: Me.") The third memo on this page is from another subscriber in the office.
Like the My Reminders/Interoffice Memos section of the TNT, the Notes & Reminders page also belongs to the person who has logged in, regardless of who actually owns the account. For example, when a therapist logs in, everything on their Notes & Reminders page belongs to them, e.g., they might have Personal Notes they've written to themselves and/or Reminders or Memos they've saved from their TNTs. Similarly, if an Admin logged in to the same therapist's account, they would see any Personal Notes, Reminders of Memos they (the Admin) have saved to the system.
However, in cases where the therapist has changed the Admin's permission from the default, thus giving the Admin the ability to see their Notes & Reminders page, the Admin's page would have toggle buttons, like we saw on the TNT, that would enable them to switch between the two accounts (the initial view the Admin sees when they first sign in is on top; the view where they've toggled to the therapist's view is on the bottom):
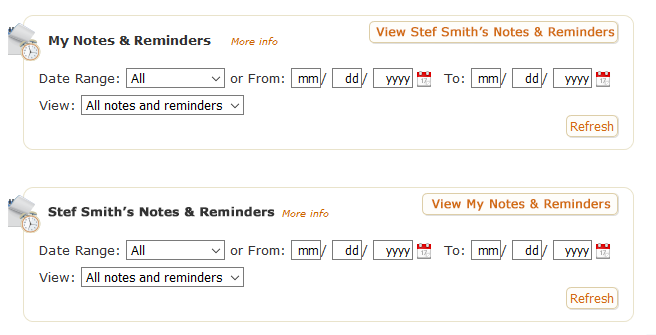
If you're confused about the two permissions that affect the TNT and My Notes & Reminders page, hopefully the following will help:
The 'View "My Notes & Reminders"' permission:
Default: All Users, Admin & Regular, can view the therapist's "My Notes & Reminders" page. Admins will have a toggle so they can go between their own Notes & Reminders and those of the therapist.

Checked: No Users, whether Admin or Regular, can view the therapist's "My Notes & Reminders" page. Admins will be able to see their own "My Notes & Reminders page but will not be able to toggle to see the therapist's account.
The 'View/Work Reminders & Memos in the Therapist Notification Tool' permission:
Default (checked): Admin Users will only see their own Reminders and Memos on the TNT. They will not have the toggle button to allow them to see the therapist's Reminders/Memos. Non-Admin Users cannot access the TNT so this permission doesn't apply to them.
Unchecked: Admin Users will have a toggle button to allow them to see and work with their own reminders, plus those of the therapist. Non-Admin Users cannot access the TNT so this permission doesn't apply to them.
