

Manual Index
-
Chapters
The Manual is divided into seven chapters. Click a chapter title to display that chapter's table of contents in the area below.
PSYBooks Manual
Chapter Two
Intro to Charts
What this isCharts is the first item on the global nav and is the main section for working with your clients. It holds all of your clients' charts and is where you will do most of your work. There are two sub-sections in Charts: one for your Active clients and another one for inactive (Archived) clients.What it looks like |
Where this isYou can get to this section from the link in the blue "global nav" bar across the top of each page in the site. Everything in the global nav is replicated in the sitemap located at the bottom of each page, so you can also find a link to Charts there. |
The Charts section of the app is where you will do much of your work. It holds all of your clients' charts (both active and inactive) and has the majority of the tools you will need for your client-related tasks. From here you can add, edit and delete clients, sessions, payments (both client and insurance), authorizations and adjustments. You can also process claims to insurance companies and statements for your clients.
Active Charts
What this isThis is a tab in the Charts section of the application. It's for working with your active (as opposed to inactive or archived) clients. A client's chart holds all the information on that client just like a paper chart would. To open a chart, click the client's name.What it looks likeCharts > Active Charts 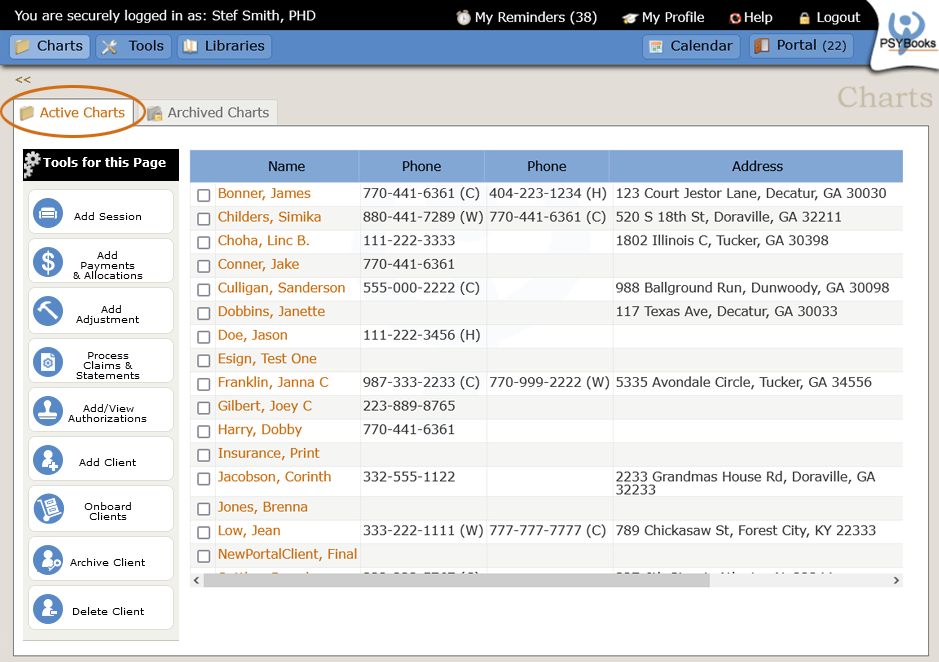 |
Where this isYou can get to this section by clicking on Charts in the global nav. Everything in the global nav is replicated in the sitemap located at the bottom of each page, so you can also find a link to the Active Charts tab there. |
The Active Charts page has all of your clients' charts listed on the right side of the page and the various tools for working with them on the left as shown below:
Tools for working with your clients are: Add Session, Add Payments & Allocations, Add Adjustment, Process Claims & Statements, Add/View Authorizations, Add Client, Archive Client and Delete Client.
An individual chart that's been opened looks like this:

The table on the Active Charts page displays common information on your clients that you might want to view quickly (e.g., phone numbers, address, birthday, balance). More detailed information is found inside a chart, by clicking the client's name. A PSYBooks chart keeps all of a client's PHI (protected health information) in one place. There are separate tabs in the chart for Demographics, Family, Insurance, Sessions & Payments, Medication, Contacts, Files and Notes, allowing you to find what you need quickly and easily.
Select Client
What this isEach client's name on the main charts page has a checkbox beside it. You can check a checkbox to select that client for various tools on the left nav.What it looks likeThe select client checkboxes look like this: 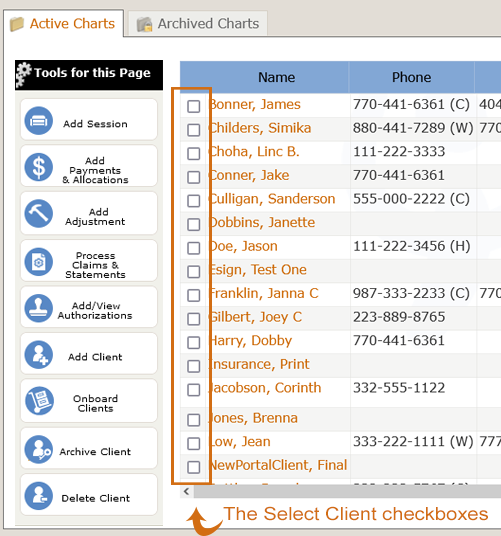 |
Where this isYour clients' charts are on the Charts page. The select client checkboxes are to the left side of each client's name. |
If you want to archive or delete an active client, you have to select the client first by checking the checkbox next to their name. With each of those tools, you are then given a confirm asking if that's what you want to do. Clicking "Yes" will perform the requested function.
If you like, you can also use the checkbox with the Add Session tool, the Add Payments & Allocations tool (for client payments) and the Add Adjustment tool. However, these three tools each have client select boxes once you open the tool so if you forget to (or don't want to) check the client select box, you can still use the tools.
Open Chart/Edit Client
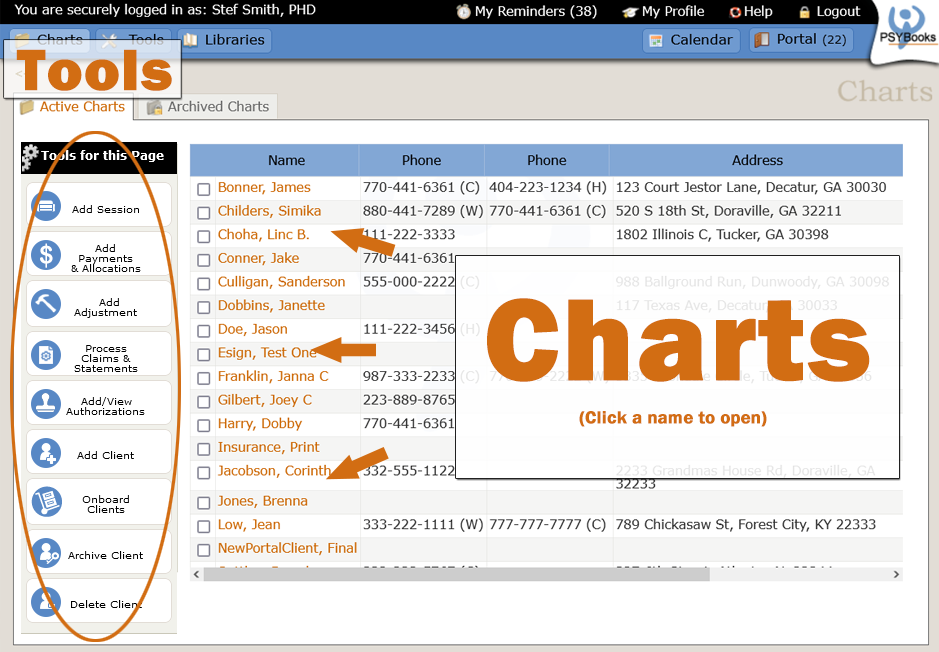
What this isYou can open a client's chart by clicking their name (the orange link) on the main Charts page. Once the chart is open, you can add or edit information in any of the tabs.What it looks likeThe main charts table looks like this:  |
Where this isYour clients' charts are on the Charts page. |
You can view and manually edit and update your clients' charts at any time. In addition, many changes happen behind the scenes. For example, if you add a session or payment, those items will be listed automatically on the "Sessions & Payments" tab of that client's chart. Similarly, the CMS forms of claims that have been efiled also appear on the Sessions & Payments tab.
Add Session
What this isThis tool allows you to add sessions for any active client.What it looks likeThe Add Session tool looks like this: 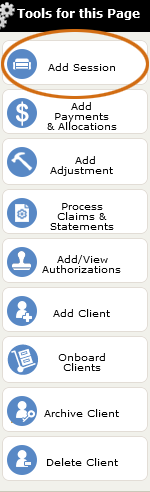
|
Where this isAdd Session is the top tool is on the left nav of the Charts page.
|
When you click the Add Session tool, the form that opens looks like this:
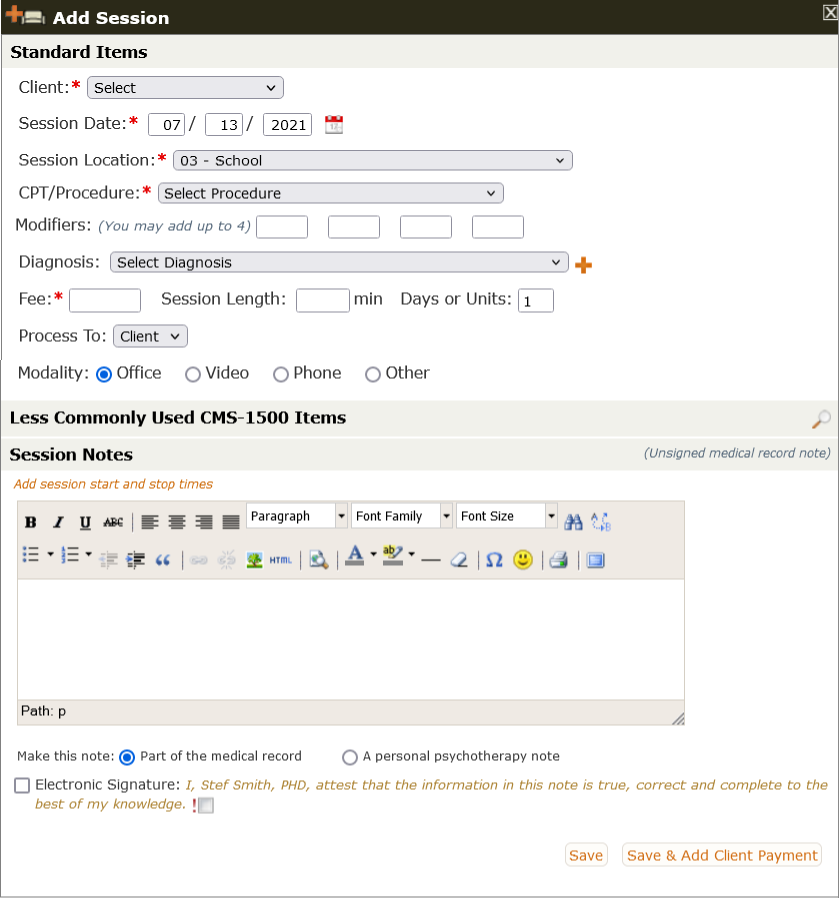
Much of this form will be automatically filled in for you - especially after you've already entered a client's first session. The screenshot above is a first session. Notice that even here, the Session Date and Session Location are filled in (but are changeable). Once you select the Procedure, Diagnosis, Fee and Session Length for this session, PSYBooks will remember those values for the next session you enter for this client. You can always change them but the "remember" feature is designed to save you time - often requiring only a few clicks to complete your task. Also, on the Add Session form, the remember feature is client-specific, so for example, if you have one or more sliding scale clients, PSYBooks will automatically fill in what you charged that client for a specific procedure on their last session - even if each client's fees are different.
Some of the specific sections and fields of the Add Session form are discussed below:
Procedure (Add Session form)

The Procedure select box comes pre-populated with common CPT codes needed by mental health practitioners. However, it's also possible to add your own codes, which you can do right from the Procedure select box and/or at Libraries > Procedures. In the Add Session form, when you open the Procedure select box, notice that there are orange links for Add CPT Code and also for Add Custom Procedure Code:
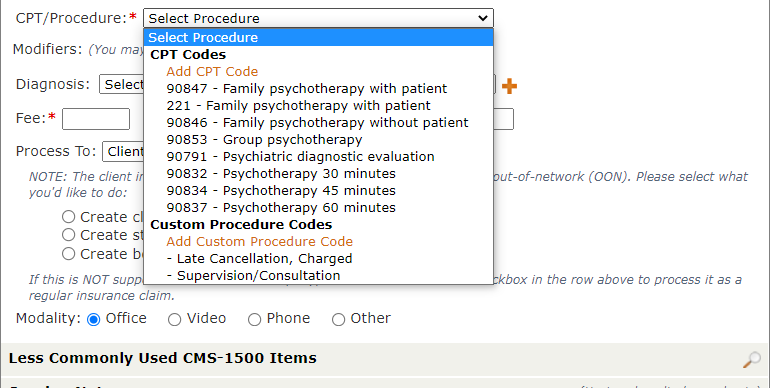
Clicking either of those links will open the same forms you would get with the corresponding tools at Libraries > Procedures. Adding a code here will not only populate the Add Session form with the new code, but it will also put the new code in your Library, which will make it more easily available in the future.
There are also boxes on the Add Session form to add any modifiers to the procedure you might need.
Custom Procedure Codes are personal codes you might want to create for your practice to designate a late cancellation, a no-show, etc. These codes do not get reimbursed by insurance companies but may be information you want to track.
Diagnosis (Add Session form)

The Diagnosis select box is similar to the Procedure box in that you can add new diagnoses here on the Add Session form, and by doing so, you're also adding them to your Library. (No need to make a separate trip to the Library!) You can also add more than one diagnosis to a session by clicking the orange plus to the right of the select box.
Process To (Add Session form)

Normally, you won't need to worry about the Process To box. What this box does is list all the payers you have entered for this client in the order they would normally be billed. In other words, for clients who have two insurance companies, the Process To box would list Insurance One, then Insurance Two and finally the client. If there is only one insurance company, Process To lists Insurance One then client, and if the client is private pay, only their name will be listed here. (Process To also helps you identify whether an insurance company is primary or secondary by putting a (P) or an (S) by the company's name.) Normally, you don't need to change this box because PSYBooks automatically bills payers in the normal billing cycle (all insurance companies first, then the client). However, if you need to bypass a certain payer, you can use the Process To box to do that. For example, if a client who normally uses insurance cancels a session at the last minute and your policy is to bill the client for such sessions, you can enter the session and use Process To to skip the insurance payer and, instead, send the session charge directly to the client. This will NOT send the claim to the insurance company and, instead, will bill the client for the Fee entered on the Add Session form.
Less Commonly Used CMS-1500 Items(Add Session form)
If you don't need to produce CMS-1500 forms with your sessions, you won't need this section. In fact, even if you do need CMS-1500 forms (for your own insurance billing or to give to your client), chances are you won't need this section. However, for those situations where a specific insurance company requires something different from the norm, you'll be able to manually find the extra fields you need in this section. To view this section, click the View icon on the right side of the gold bar:

Clicking the View icon opens the Less Commonly Used section of the Add Session form, allowing you to specify additional CMS items. The orange numbers in italics to the left of each item correspond to specific boxes or lines on the CMS-1500 form (notice that the View icon has become a Hide icon so you can close this section when you're finished):
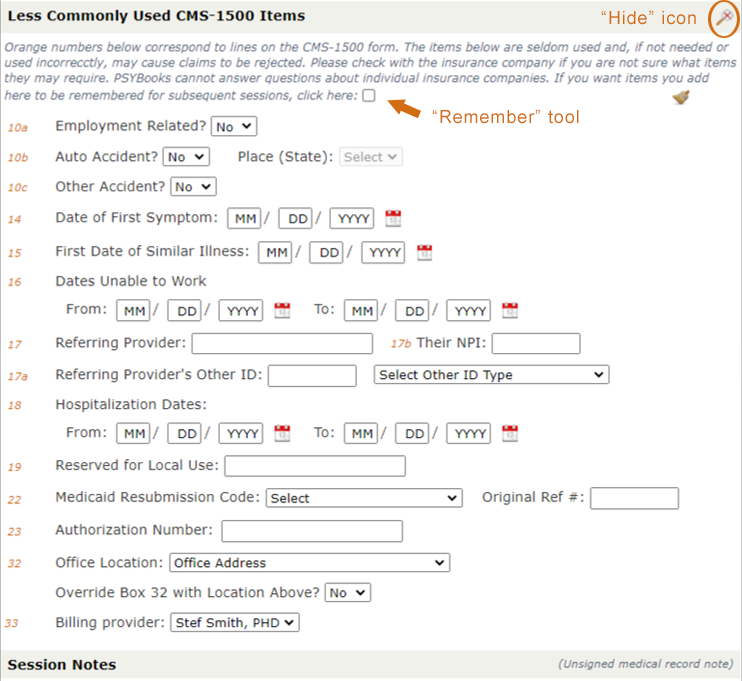
The checkbox at the top of this section is a Remember tool. Checking this box will cause subsequent Add Session forms for this client to be pre-populated with the same Less Commonly Used items. This can be helpful in ongoing circumstances because you will not have to reenter these items each time you enter a session. Providers with more than one office can use the Office Location select box to link clients with offices. If you almost always see a certain client in a specific location, the Remember tool on the Add Session form will automatically assign sessions for this client to the office you designate. Less Commonly Used settings do NOT transfer to other clients. When you no longer need the settings, just uncheck the box.
Create an Appointment for This Session (Appointment Info)(Add Session form)
The Add Session form correlates with appointments you may have entered in the Calendar. When you do not have an appointment for that client on the date of the session, the Add Session form will look like it does below, i.e., it will have a link that says, "Create an appointment for this session":

If you click the link it opens a new section of the form that allows you to enter session start and stop times:
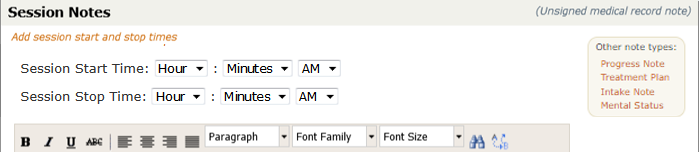
Session start and stop times filled in here will be transferred to the Calendar, allowing you to keep a record of all appointments.
If you've already entered an appointment for that client on that date in the PSYBooks calendar, when you open the Add Session form, the Session Start and Stop Time fields will be pre-populated and instead of saying "Create an appointment", the link text will say "Appointment info". If the times are incorrect, you change them on the either the Add Session form or the Calendar.
Session start and stop times are required by some insurance companies. PSYBooks allows you to track that via the calendar and also the Start and Stop time fields on each Add Session form.
Session Notes(Add Session form)
You can create a session note that is part of the client's medical record (thus, PHI) or, alternatively, designate a note as a psychotherapy note (i.e., not PHI) by changing the radio buttons at the bottom of the Session Notes section:
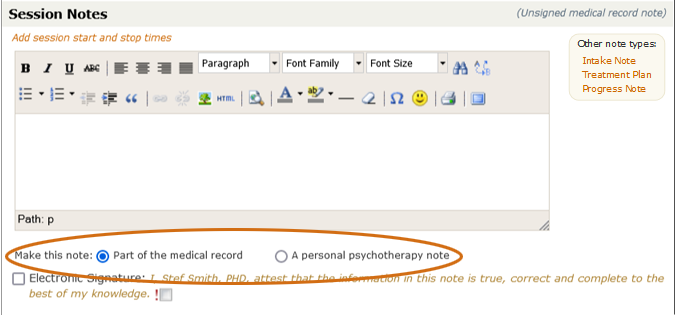
Psychotherapy notes are kept separate from everything else in the client's medical record and are meant to be for your own personal use.
You can also select some of PSYBooks' custom notes right from the Add Session form by clicking a link in the Other Note Types box:

These custom notes are all considered to be part of the medical record. It is possible to add both a note for the medical record and also a personal psychotherapy note for the same session by using one of the Other Note Types. For example, you could add an Intake Note, Treatment Plan or Progress Note (all medical record notes) before saving your session and then add a personal psychotherapy note by changing the radio button to "personal psychotherapy note" and typing a note in the notes textarea on the Add Session form.
You can electronically sign (or not sign) the notes you add with the Add Session form. Unsigned notes can be changed as many times as you want. However, once a note is signed, you may only make revisions to the original note - the original note will be kept in the client's chart unless you specifically delete it. Once you sign a note, it is given a time/date stamp that is displayed with the note on the client's Notes tab. If you're not ready to sign a note, you will be able to sign it at any time in the future on the Notes tab or the Sessions & Payments tab.
Processing (Saving) the Session With and Without a Client Payment(Add Session form)
The Add Session form has two ways to save - both with and without a client payment:
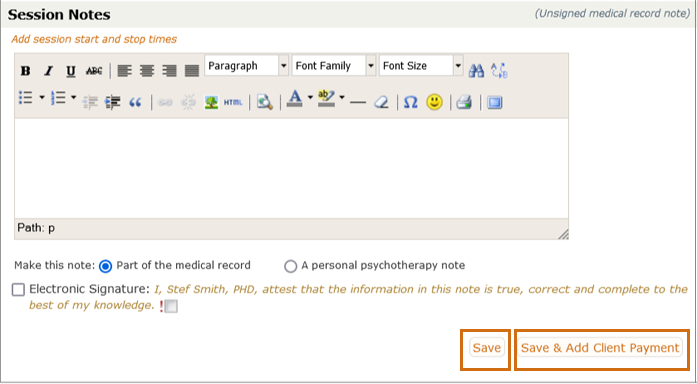
If your client pays you at the time of the session, you can click the "Save & Add Client Payment" button and be taken directly to the Add Client Payment form with the date and this client's name already filled in. The only thing you have to add is the amount. Payments added in this way can be allocated to the present session and/or any past session that still has a balance. Additionally, some or all of the client payment can remain unallocated, for clients who may wish to pay in advance.
Whether you save your session with or without a payment, there is a lot that happens behind the scenes. With either type of Save, you're given some or all of the following options:
- Create a receipt for your client
- Efile the claim
- Create a statement for your client
- Save copies of the claim and/or statement to the client's Files tab
- Email the claim and/or statement to the client (or anyone else)
PSYBooks only presents you with options that apply in this particular situation. For example, you're not asked if you want to create a receipt unless you've entered a client payment. Similarly, you're not asked if you want to efile the claim unless your client has an efile insurance company listed in their chart.
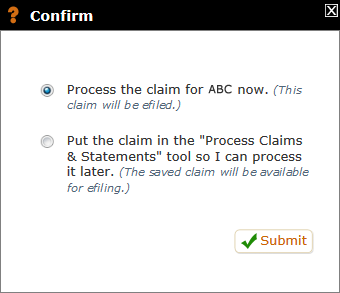
Most options are straightforward. For example, if your client has an efile insurance company as their primary insurance, when you click "Save" on the Add Session form (or "Save & Add Client Payment") PSYBooks remembers the name of the client's insurance and presents you with a popup similar to the one below. This popup asks if you're ready to efile the claim. If you're ready to efile, all you have to do is click "Submit" the claim to ABC Insurance Company will be sent immediately. If you prefer to save it for later, you can select the bottom radio button and process it later with the Process Claims & Statements Tool:
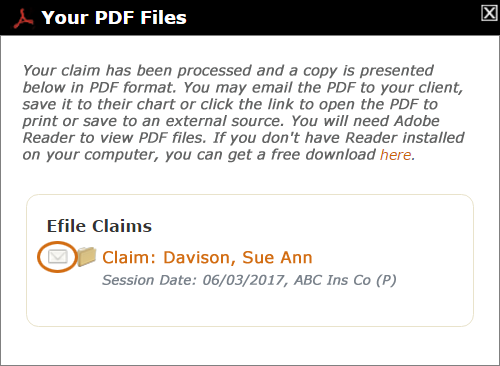
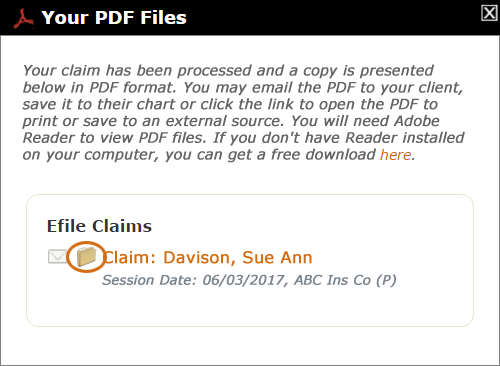
Assuming you leave the selection on the top radio button (Process now), when you click "Submit", you'll get a confirm with links and both email and file options for the CMS form. It will look something like this:
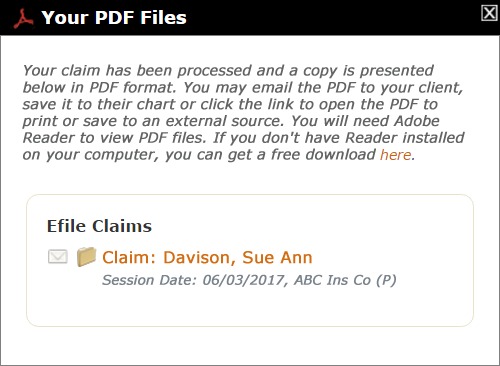
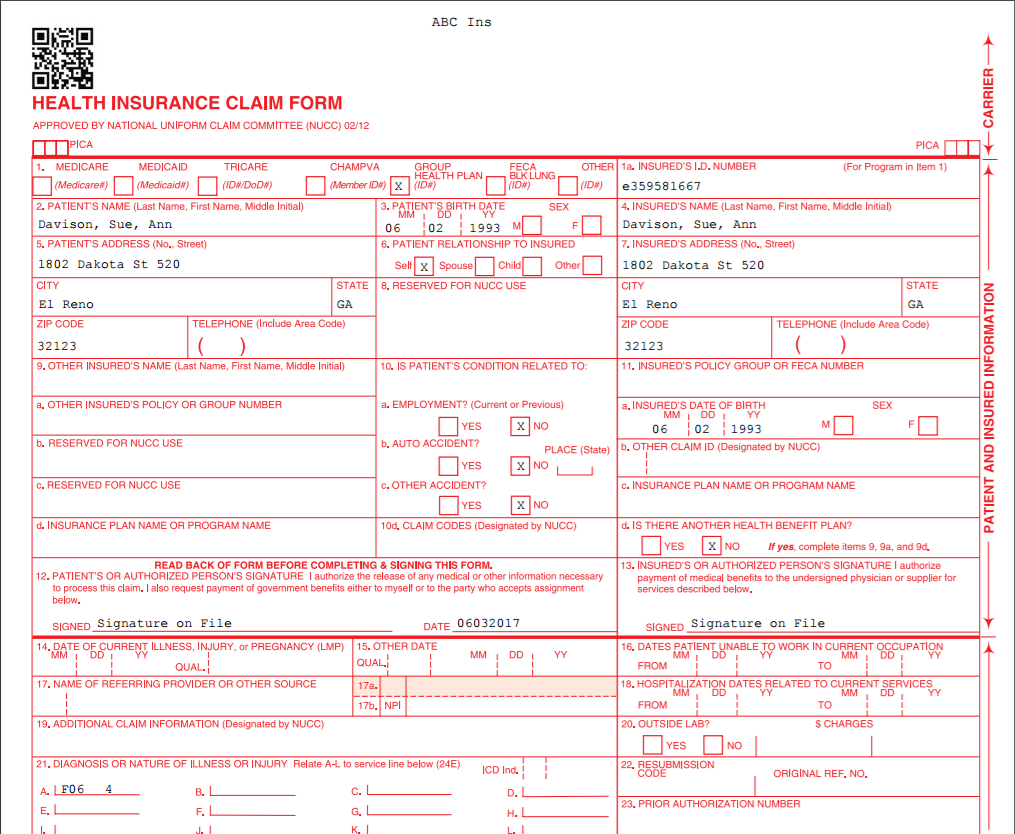
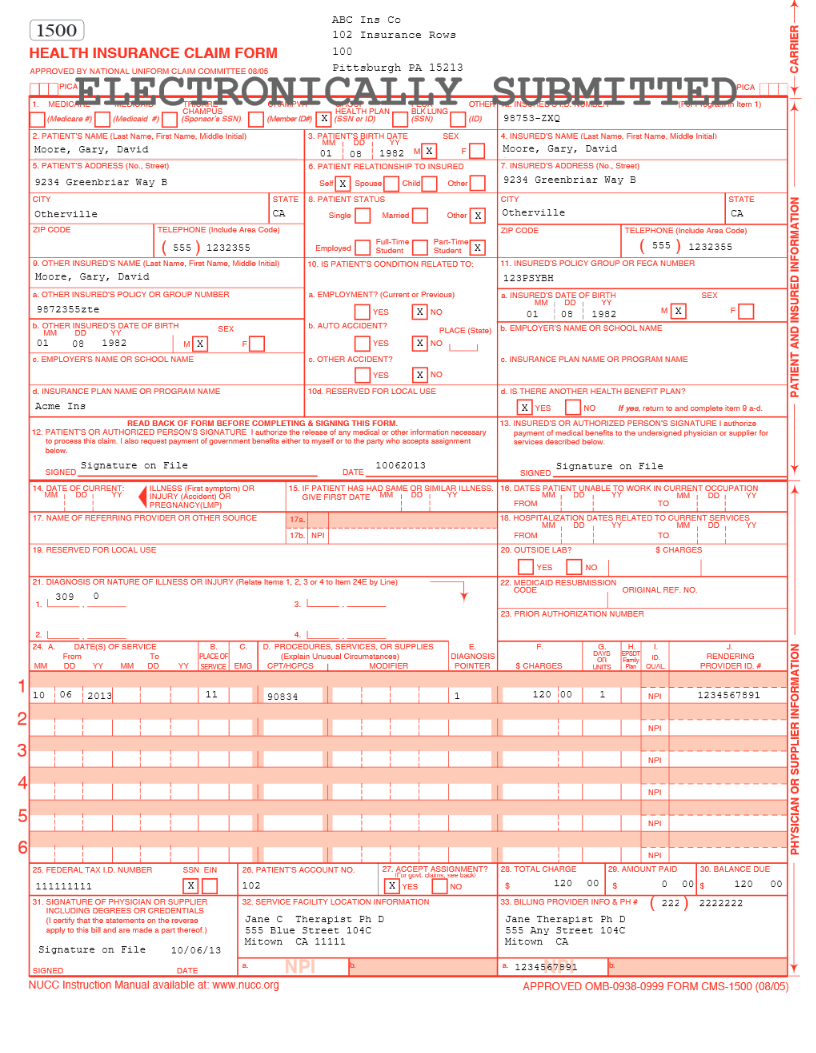
Even though this is a relatively small window, there's a lot you can do here. The top text just explains about Adobe PDF Reader and gives you a link so you can get Reader if you don't already have a way to view PDFs on your device. The section with the gold outline titled "Efile Claims" holds the tools. Notice that in the middle row, you have an email icon, then a folder icon, and then the words: "Claim: Davison, Sue Ann" as an orange link. If you click that link, the PDF of the CMS (HCFA) form for this particular session will open, already filled out with the information that was just sent to the insurance company. Since this is an efile claim, you don't need to open the CMS form unless you want to. However, if it were a Print Claim, you could open the link, save the HCFA as a PDF and fax it to the insurance company, or, alternatively, you could print it and mail it to them. The top portion of the CMS form for the claim we've been processing looks like this:
There may be times, especially with private pay therapists, when you want to give a copy of the HCFA to your client so they can file their own insurance. One way of doing this is to print it for them by opening the PDF with the link as described above. However, there's an alternative way and that's to use the email icon at the beginning of that row:
When you click the email icon, there are a lot of things that happen behind the scenes. Specifically, PSYBooks runs these checks:
- Does this client have an email address listed in their chart?
- If so, are they a Portal User?
- If they have an email address, but are not a Portal User, have you previously sent them a Portal invitation?
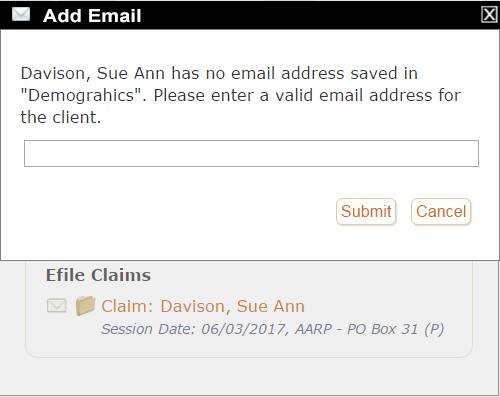
Looking at these one at a time, if the client does not have an email address listed in their chart, when you click the email icon, you'll see a window like this. This window will allow you to enter an email address for the client if you have one. An email address entered here will automatically be added to the Demographics page in their Chart:
The next check we run is to determine whether they're a Portal User. Obviously, if they didn't have an email address in their chart, they couldn't be a Portal User. However, there are also times when someone may have an email address in their Demographics page but not be Portal Users. Either way, when the therapist attempts to email a client who is not a Portal User, they will receive a screen similar to the one below:
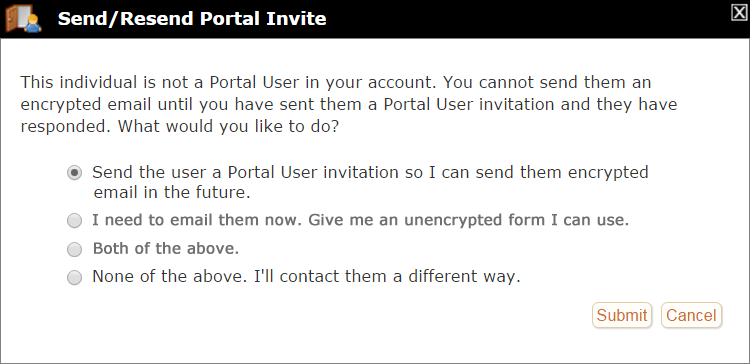
If you check the second or third radio buttons, both of which request that an unencrypted email be sent, the form that will open will look something like this:
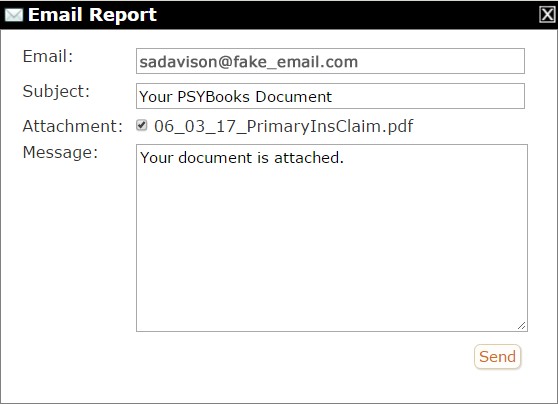
If you want, you can just click "Send" since this email form is already addressed to your client, has the document attached, and has a Subject line and some body text. However, especially since this email is unencrypted, you might want to put your HIPAA disclaimer at the bottom or something to encourage your client to fill out your Portal invite so you can send them encrypted email in the future. Notice that this mail form is very limited. You can change the Subject and Body but not the attachment or the email address. Also, since this type of email form isn't linked to the Portal, there will not be a copy of it or any record that you've sent it. When at all possible, it is much better to use Portal email for many reasons in addition to the added security.
When your client IS a Portal User and you click the email icon in the confirm above, an encrypted email form similar to this will open:
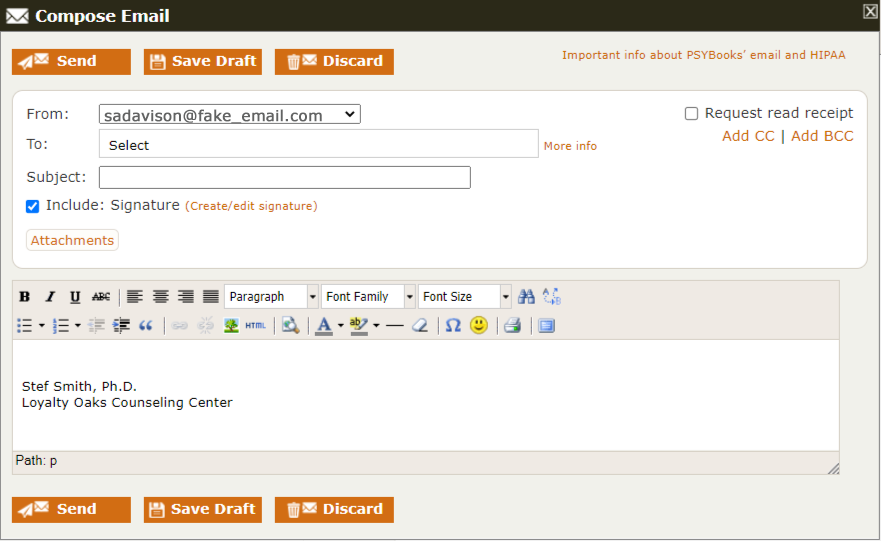
Notice that now, you not only have the safety of knowing that you're sending 100% encrypted email (both in motion and at rest), but you also have a full-fledged email form with which to work. For example, unlike the unencrypted email form, you can change the recipient of the email. This is handy, for example, if you client is a child and you need to send all documentation and billing items to a parent. You can also request a Read Receipt, include a signature, add additional attachments or delete this one, add some formatting, etc. In short, encrypted email through the Portal is not only safe, it has all the features you're used to seeing in a standard email program.
The PDF Session confirm box we've been discussing has one more tool - the "Save to Chart" folder icon in the middle:
Clicking that icon opens this kind of window, which allows you to upload a copy of the file to the client's chart:
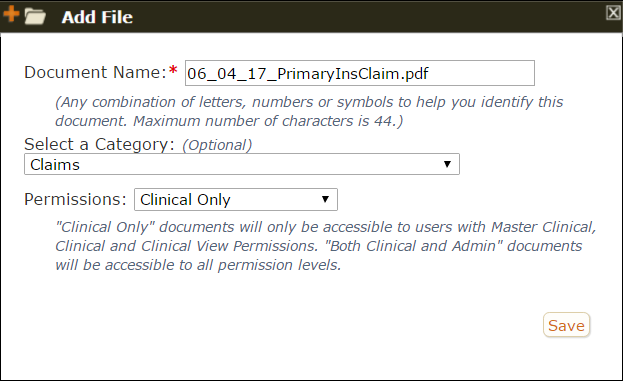
Once you've saved the file, it will appear in your client's File tab, in the Category you chose:

Private Pay Client Sessions
So far, we've discussed adding sessions when insurance is involved. We discussed times when the therapist would efile or create a print insurance document, and also times when the therapist may be private pay or out of network, but still wants to create an insurance claim so the client can file. Now we're going to turn our attention to situations that are 100% private pay. In other words, the client pays you directly for your services and does not need a form to submit to insurance.
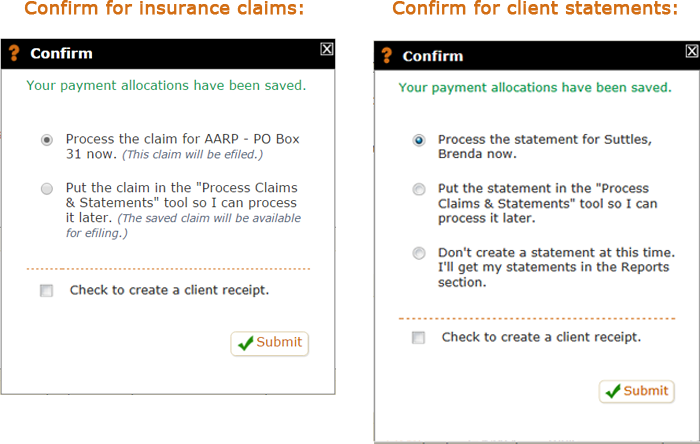
Basically, the concepts in private pay situations are the same as those used for insurance. The main difference is that the word "claims" (the terminology used for insurance claims) is now replaced by "statements". For example, the session confirms for private pay clients are similar to session confirms for insurance except that now, instead of being asked whether you want to process a claim for an insurance company, you're asked if you want to process a statement for the client. The mockup below shows the comparison for a claim confirm and a statement confirm. In both cases, the client has paid a copay at the session, since both confirms ask if you want to create a receipt:
You can always create statements and receipts in the Reports section of the app. The option to create them at the time you enter the session is just for times when you need them right away. When you click "Submit" on the window above, you'll get a confirm with links and email capability for the documents you requested. For example, if you had checked the "Would you like to print a client receipt?" checkbox, the confirm window would look like this:

Notice that, like with insurance confirm windows, you have the option of emailing, saving to the client's chart and/or viewing or downloading the statement or receipt.
Add Payments & Allocations
What this isThis tool allows you to add and allocate payments that you receive from a client or an insurance company. For insurance company payments, there are tools for adding the information from an EOB (Explanation of Benefits) as well as an automated way to enter ERA (Electronic Remittance Advice) payments.What it looks likeThe Add Payments & Allocations tool looks like this: 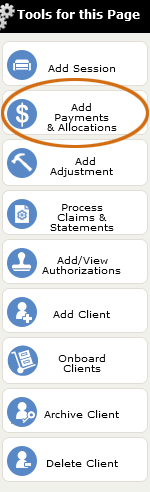
|
Where this isThe Add Payments & Allocations tool is on the left nav of the Charts page. |
When you're involved with medical billing, the tricky part about payments is not adding them - it's allocating them. In mental health, there are 3 possible allocation levels: 1) therapist, 2) client and 3) session (or other procedure). In other words, if the ABC Psychotherapy Practice receives a payment of $100.00, the person in charge of billing will want to make sure that $100.00 gets allocated to the therapist who provided the service, the client who received the service and the specific service dates or procedures that generated the income. And, of course, the billing person will also have to make sure the correct payer (usually a client or an insurance company) gets credit for making the payment.
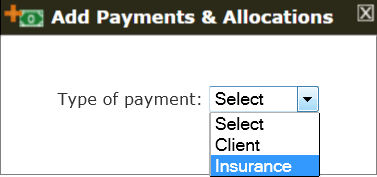
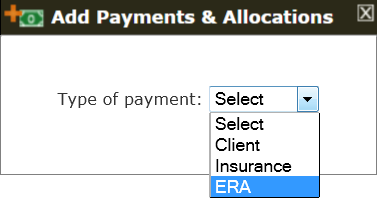
In PSYBooks, when you click the Add Payments & Allocations tool you get this small window:
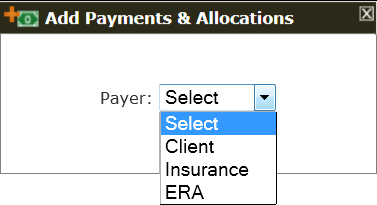
In the above popup, you're asked to specify whether the payment you want to enter is from a client, an insurance company (usually via a paper EOB) or is an insurance ERA payment. PSYBooks makes things easy for you by detecting whether you have ERAs waiting to be allocated. If you do, you'll see the popup above. If not, your select box will look like this:

Depending on your choice, the form that opens will either be the Add Client Payment form, the Add Insurance Payment form or the Add ERA form. Adding and allocating payments is probably the most complex part of the program so we'll discuss each form separately.
Add Client Payment
The Add Client Payment form can actually be accessed in two ways: 1) by choosing the Client option in the payer dropdown of the Add Payments & Allocations tool and 2) by clicking the Save & Add Client Payment button on the Add Session tool. The form is the same, no matter what your point of entry. It looks like this:
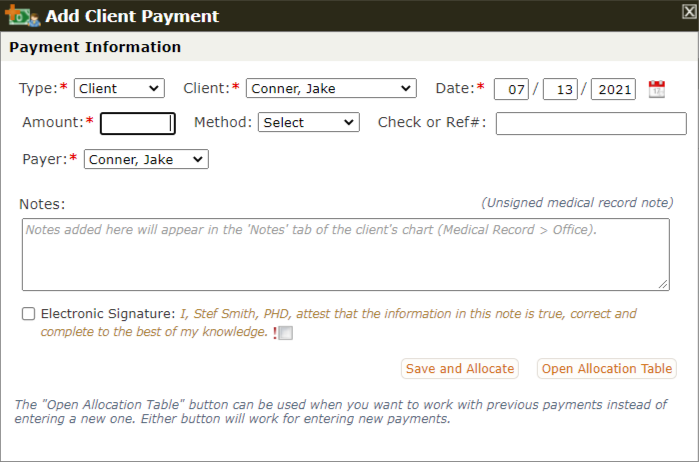
On the top row, notice that the Type (Client, Insurance or ERA) and Date select boxes are already pre-populated. If you had opened this form from a client chart, that client's name would also be listed in the Payer select box, making 3 of the 4 required fields on this form already done for you. If you need to change any of these fields, you can. The pre-selects are just included as a user-aid. However, if the fields are correct, all you have to do is enter a value in the Amount textbox and click either of the save buttons. Additional fields of "Method" and "Check or Ref#" are there only if you want to use them and, as with almost all forms in PSYBooks, you can attach a note.
Credit card processing is done right from the Add Client Payment form just by selecting Credit Card from the Method select box. That feature is discussed in detail below.
The Add Client Payment form has two buttons at the bottom: "Save and Allocate" and "Open Allocation Table". If you're entering a payment, you can use either one - they will do the same thing. However, there are times when, instead of entering a new payment, you want to work with payments you've already entered. Clicking the "Open Allocation Table" button allows you to do that. The only field required for that option is the client's name.
As mentioned above, entering a payment is not difficult. It's the allocation part that is more involved. The part of the form we've already covered completes the first part of the task: adding the payment. Once you click either "Save and Allocate" or "Open Allocation Table", the allocation part of the form opens and will look something like this:
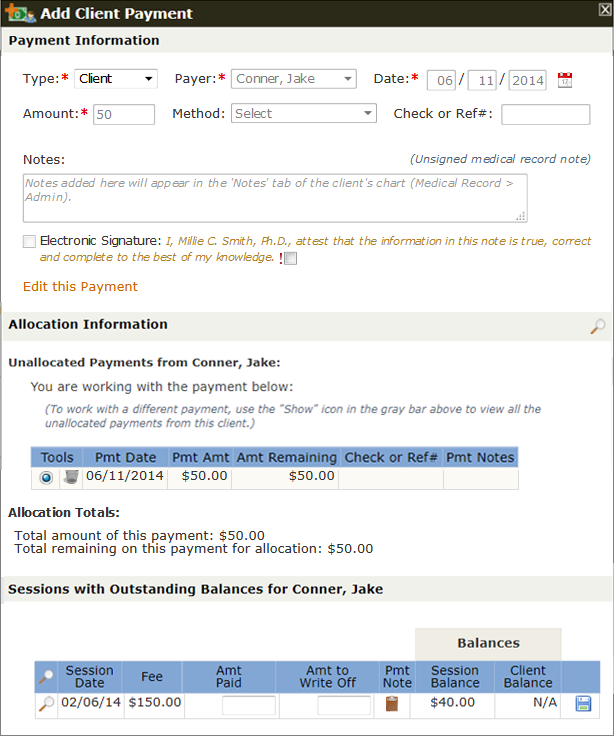
Notice that the top part of the form - the part in the "Payment Information" section - has stayed the same except for the addition of an "Edit this Payment" link that allows you to change the payment part of the form. But now there are two additional sections: "Allocation Information" and "Sessions with Outstanding Balances for (client's name)". The payment you're working with is listed in the "Allocation Information" section and all sessions of this client that have outstanding balances are listed for you in the "Sessions with Outstanding Balances" section. All you have to do is enter all or any portion of the $50.00 payment in the "Amt Pd" column by the appropriate session (in this case there's only one session) and click the "Save" icon at the end of the row (the blue disk).
You can also use this form for any client write-offs you want to enter. Notice, however, that if you're a provider and filed insurance for this session, this is NOT where you deduct the amount disallowed from insurance. That amount is written off when you enter the insurance payment with the Add Insurance Payment or Add ERA tools.
This form has some additional features you may want to use. For example, the "Allocation Information" section of the screenshot above has a "Show" icon (magnifying glass) on the gold bar, plus some text indicating there are additional payments from this client that have not been allocated:

If we click the magnifying glass, we are able to view all unallocated payments in this client's chart:
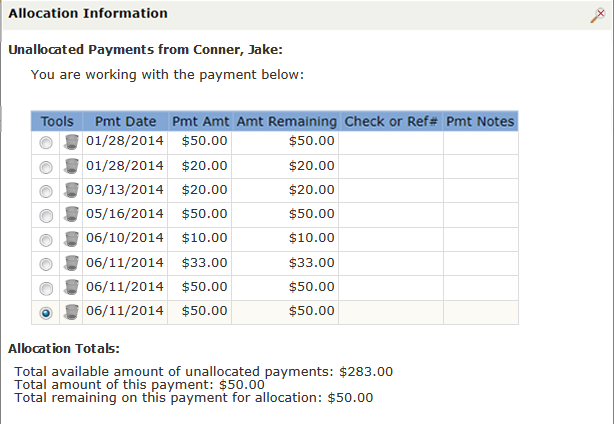
PSYBooks provides you with some additional info in this section, such as the total of all of this client's unallocated payments, the amount of the payment you're currently working with, etc. You can choose the payment you want to work with from this list or, if you don't want to choose, when you finish working with one payment, PSYBooks will automatically take you to the next unallocated payment in order until you're finished. You can store unallocated payments here until you're ready to allocate them. This allows you to enter payments when a client pays in advance and then allocate the portion of the payment that goes to each session as they occur. However, as a general rule it's best to keep payment allocations as up to date as possible.
Add Insurance Payment
The "Add Insurance Payment" tool is accessed from the "Add Payments & Allocations" tool. When you click "Add Payments & Allocations", select Insurance from the Payer dropdown box in the first popup:
The step above opens this form:
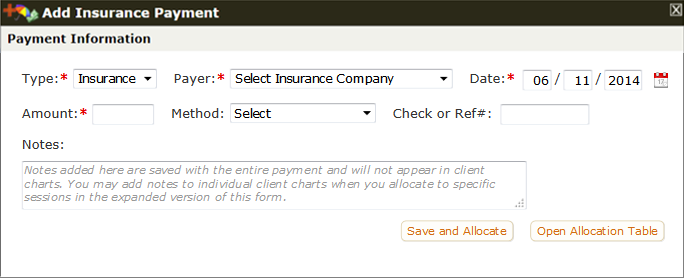
As with the Add Client Payment Tool, the Type and Date fields are already pre-populated when the form opens. If these values are correct, all you have to do is choose the insurance company and enter an amount. When choosing the insurance company, only those companies you've already added in your Libraries appear. Notice that they are grouped by Efile Companies and Print Companies:
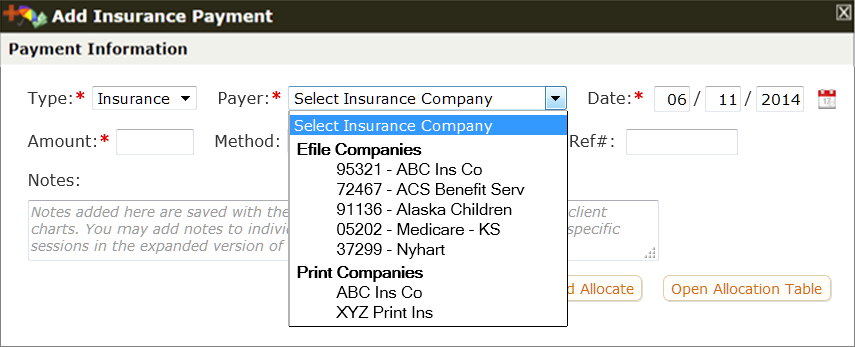
It's not uncommon to have the same insurance company listed in both places. For example, the screenshot above has ABC Ins Co listed both as an efile company and as a print company. This might occur if some clients have ABC Insurance as their primary and typically efile those claims, but other clients have the same company as a secondary and require print claims. A common mistake in entering insurance payments is to try to enter a print company payment as a payment from the efile company with the same name. Since PSYBooks lists the sessions that have outstanding balances based on type of insurance, you would not find sessions from the print company on the efile company's allocation list (or vice versa) and thus would not be able to allocate the payment.
Part of why this mistake is common is because when an insurance company sends a payment, they don't break it down by how the provider transmitted the claim (i.e., whether it was efiled or sent some other way). For example, the provider with the insurance companies listed above might receive a payment from ABC Ins Co for $500.00 where 5 sessions had been efiled and 4 sessions had been sent via print claims. To allocate this payment correctly, the user would need to enter it as two separate payments - one selecting ABC from the efile list for the total amount the efile payments, then a second payment selecting ABC from the print list for the remaining amount.
Once the insurance company has been selected and the amount entered, you're ready to save the payment and begin allocating. The bottom buttons on this form mirror those on the Add Client Payment Tool in that both "Save and Allocate" and "Open Allocation Table" can be used to enter a payment. However, if you don't want to enter a payment but need to work with payments you've already entered instead, the "Open Allocation Table" will allow you to open the allocation portion of the form without entering an amount.
Clicking either button opens the entire Add Insurance Payment form:
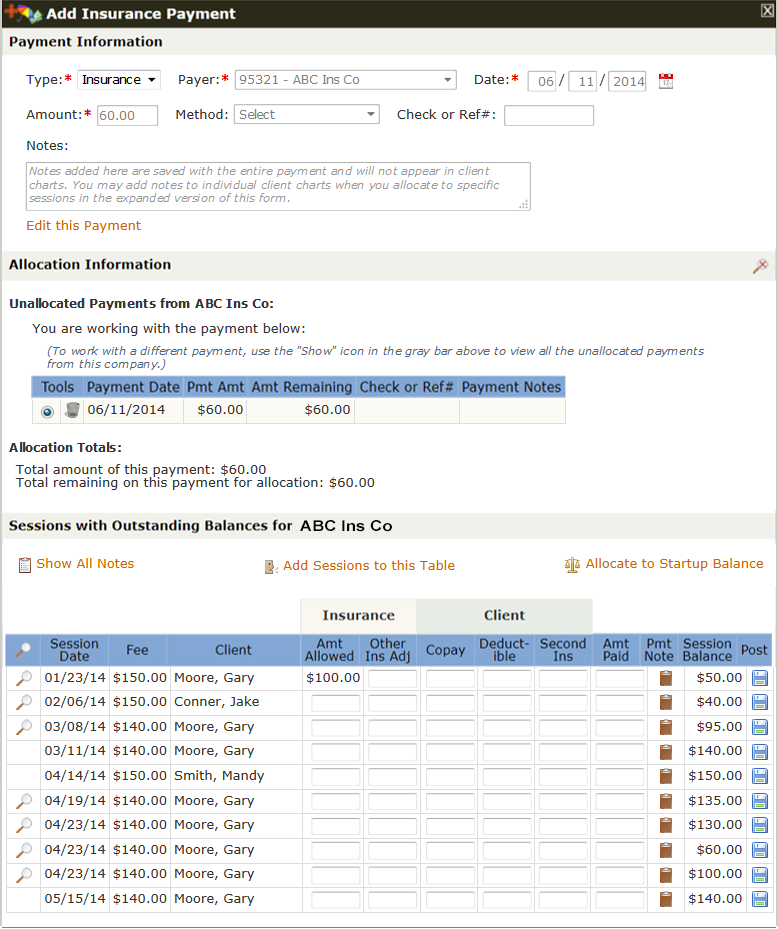
As with the Add Client Payment Tool, Add Insurance Payment is divided into 3 sections: Payment Information, Allocation Information and Sessions with Outstanding Balances for (insurance company). The Payment Information section is the original form where you entered the payment except that now it has a link that allows you to edit the payment if needed. The Allocation Information section gives you information about the payment you're currently working with and the Sessions with Outstanding Balances section is where you actually enter the payment allocations.
The table in the Sessions with Outstanding Balances section includes these columns: Amt Allowed, Other Ins Adj, Copay, Deductible, Second Ins, Amt Paid and Pmt Note. Most of these fields are not necessary for most payments but they're included in case you need them. An explanation of each is below:
- Amt Allowed. This is the Usual and Customary Rate allowed by the insurance company. If you're a provider, listing the insurance company's allowed amount here will allow PSYBooks to use this amount to calculate the amount(s) due from secondary insurance companies and/or the client to prevent you from overbilling. However, if you are not a provider for the insurance company, you may be able to leave this blank. EOBs report this amount differently. For example, some have it listed as the UCR or Allowed Amount and you can just copy that amount in the Amt Allowed field in PSYBooks. Other EOBs won't specify the amount they allow, but instead, will have calculated the difference between the amount you charged and the amount they allow and list it as some type of adjusted amount. In these cases, you'd have to subtract their adjusted amount from the amount you charged to obtain the correct value for the amount they allow.
- Other Ins Adj. This column is rarely needed but has been included in case the insurance company you're working with has their adjustments broken down into more than one type and you wish to enter them separately. Make sure you do NOT put the UCR adjustment here if you've accounted for it in the Amt Allowed field or you'll be deducting the same amount twice.
- Copay. This column is optional. Although most EOBs will have the client's copay or coinsurance amount broken out, PSYBooks calculates the amount the client owes by deducting the amount all insurance companies pay from the value you entered in the Amt Allowed field above. PSYBooks does not use amounts entered in the Copay field to determine the amount the client owes. However, if you want a record of what's listed on the EOB as the client's portion of the bill, you can enter it here.
- Deductible. Listing Deductible amounts in this field allows PSYBooks to know that this amount will not be paid by the primary insurance company and that you can bill it to a secondary company and/or the client.
- Second Ins. This is another optional field. If the client has a secondary insurance company and you want to list the amount the primary insurance's EOB specifies should come from the secondary company, you can list it. However, PSYBooks automatically bills the secondary company based on the amount entered in the Amt Allowed field minus what the primary company pays so PSYBooks does not use any amount you list here. It's only for your records.
- Amt Paid. This is the field you will use most often because it's where you list the amount the insurance company paid you. Even when the amount paid is $0.00, you will want to enter it here partly so you'll have a record of it but more importantly, so the claim can be sent to the next payer.
- Pmt Note. Clicking the clipboard will allow you to add new notes to this payment and/or to view notes you've written previously.
Most of the time, even if you're a provider, the only fields you may want to use in this section are Amt Allowed and Amt Paid. If the client's deductible hasn't been met, you'd probably also want to list those. The other fields can usually be skipped unless you need them for your own purposes.
Each allocation must be saved separately by clicking the blue disk icon at the end of the row. When you do so, you'll get a popup that looks something like this:
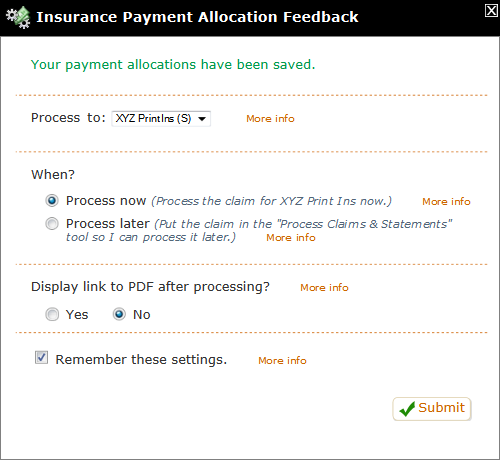
This window has 5 sections divided by orange dotted lines. Each will be discussed below:
- Feedback. The top section just gives you feedback about whether your allocations saved successfully.
- Process To.The second section allows you to choose the payer you want the claim to be sent to next. By default, PSYBooks pre-selects the next payer on this client's list and most of the time, that will be correct. However, there may be times when you want to change this. For example, if you believe the insurance company has made an error, you may want to hold this claim back until you've had a chance to investigate further and to rectify it.
- When? This section allows you to choose whether you want to process the claim now or whether you want to place it in the Process Claims & Statements tool to process later.
- Display link to PDF. If you want to view, save or print the PDF right away, you can select Yes here. However, a copy of the PDF will always be available in the Sessions & Payments tab of the client's chart if you don't need to see it right away.
- Remember these settings. This checkbox allows you to save your current settings on this form so that in the future, all you'll need to do in most situations is just click Submit.
Add ERA Payment
Payment explanations received via Electronic Remittance Advice are extremely easy to enter in PSYBooks. ERAs are sent to PSYBooks by your insurance company. If you have any new ones (i.e., ERAs you haven't yet processed), the ERA option will appear in the initial popup that opens when you click the Add Payments & Allocations button:
Selecting ERA actually takes you to the Reports section where there's a report you can run to see the specific ERAs you're interested in:
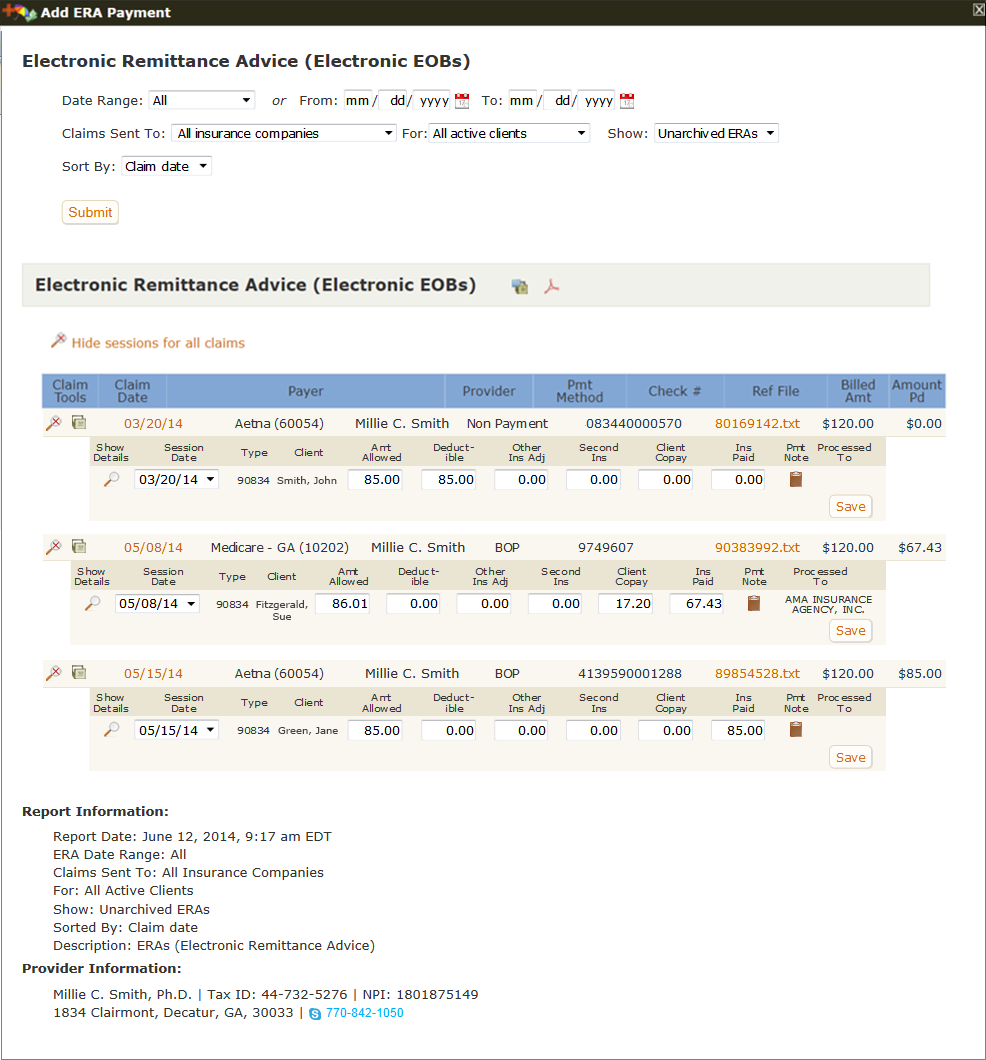
When the report opens, only the unallocated ERAs will be displayed since these are most likely the ones you'll want to work with. However, you can use the report filters at the top of the page to view and work with additional ERAs.
The ERA report might look a bit intimidating at first. However, PSYBooks has done most of the work for you which actually makes it extremely easy to use. For example, in the screenshot above, most likely all the user would need to do is click each of the three Save buttons that are about half way down on the right. Doing so would automatically enter that claim's information in the appropriate client's chart, update the client's balances and send the claim to the next payer. If you want to learn more, there is additional information about this tool in the Reports section under ERAs (Electronic EOBs).
Processing Credit Cards
The Method select box on the Add Client Payment form allows you to choose between Check, Cash, Credit Card and Other. If you choose Credit Card and have not yet signed up with Stripe (the payment processing company PSYBooks uses), the form will display some additional information:
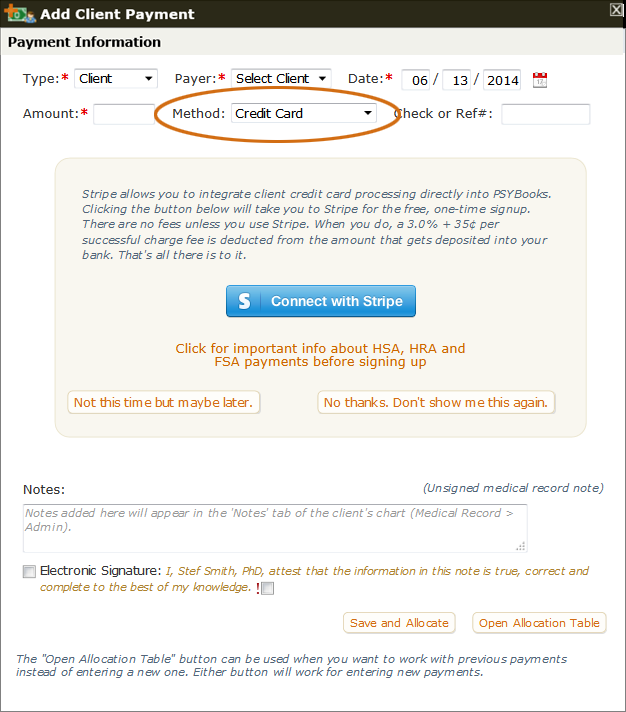
Clicking the blue "Connect with Stripe" button will take you to the one-time sign-up form for Stripe where they'll ask you things like the nature of your business and the routing and account number of the bank where you want your funds deposited. Note: the image above is just to show you what it looks like. Clicking the image will not connect with Stripe. You have to be on the Add Client Payment form in your app for the button to work.
Please note: Banks have certain guidelines and restrictions they must follow before allowing merchants to process cards from HSAs (Health Spending Accounts), HRAs (Health Reimubrsement Accounts) and FSAs (Flexible Spending Accounts). Unfortunately, neither PSYBooks nor Stripe has any control over whether the issuing companies will allow you to process these types of cards.
The best way to ensure success is to provide a brief, one or two sentence narrative of the services you provide as a healthcare professional on the Stripe sign-up form. This will allow the issuing companies to better determine whether your services fall within HSA and FSA rules and guidelines.
If you do sign up with Stripe, from that point on, if you change the Method select box to Credit Card, your Add Payment form will look something like the screenshot below:
Using and Creating Saved Credit Cards
You have several options here. If you've previously saved the client's credit card, it will appear in the first dropdown on the left that says "Saved cards". Selecting a card from the list produces a screenshot similar to this:
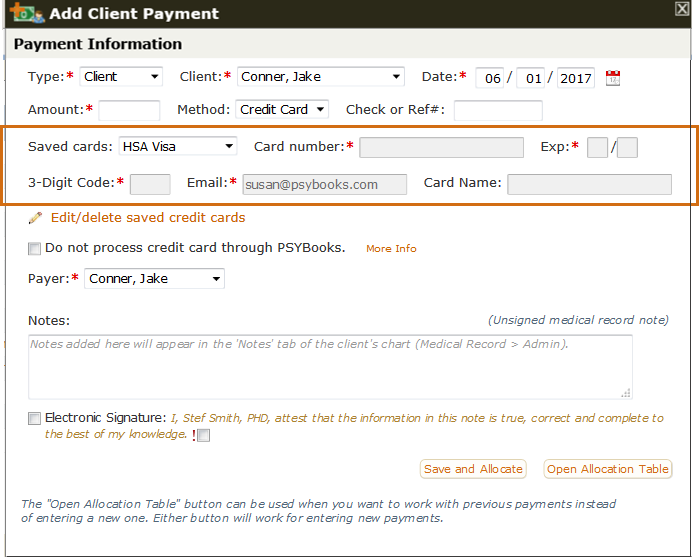
The name of the saved card - in this case, HSA Visa - now appears in the "Saved card" select box. The other fields are grayed out. This is to maintain the highest protection for the card in that none of the card details can be seen. However, since the card has been selected, all you have to do is to fill in the Amount of the payment and then click either the "Save and Allocate" or the "Open Allocation Table" and allocate it the way you would any other client payment.
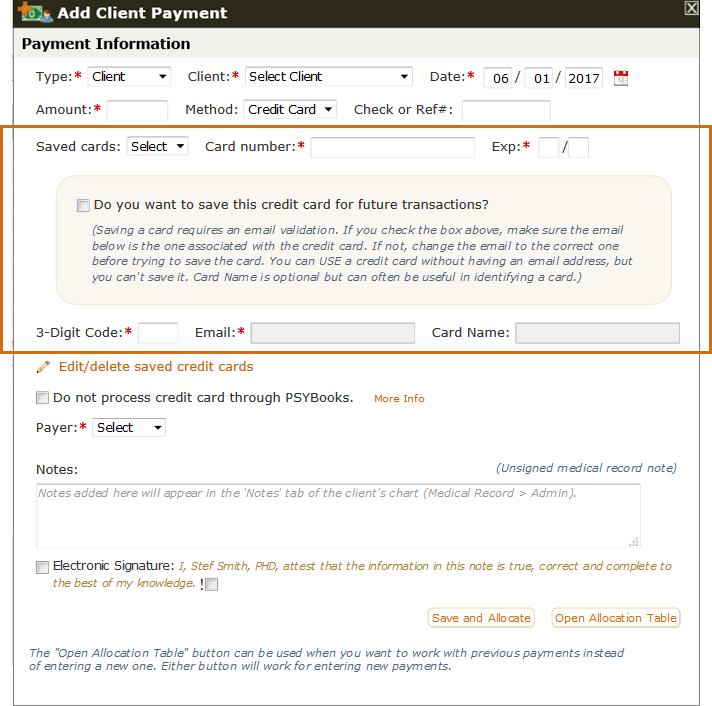
If you do not have any saved cards - or if you want to add a new card, you just fill in the normal fields you'd have for a credit card payment (card number, expiration date, 3-digit code) in this middle section of the form:
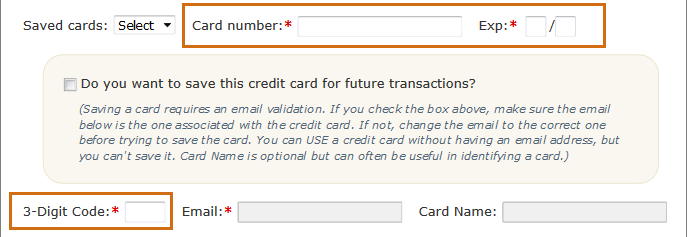
If you want to save this new card, there's a box to check that will allow you to do so. Notice that to save a card, you must also enter the email address that the client has on file with the credit card company as an extra validation. This is another step that helps protect the client's card. When you check the box to save the card, the Email and also the Card name fields become available for you to fill in. If you have an email entered in the client's chart, the email field will be populated with that email address to save you some steps. If it's the wrong email, you can change it.
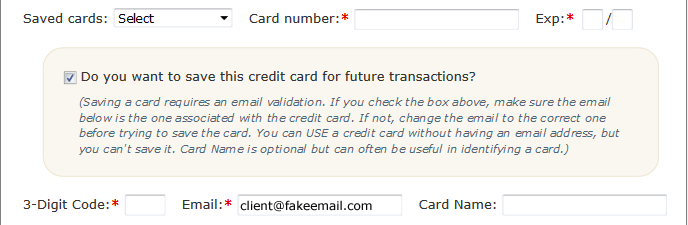
Notice that the Card name field is optional. If you don't fill it in, PSYBooks will create a name for you to help you identify the card.
If you do NOT want to save the card, don't check the checkbox and you will not be required to add an email address. You will still be able to process the payment normally, but if you want to use the same card again, you'll have to reenter it.
The Edit/Delete Saved Cards Tool
There's one more thing to discuss on this page: the Edit/delete saved cards tool:
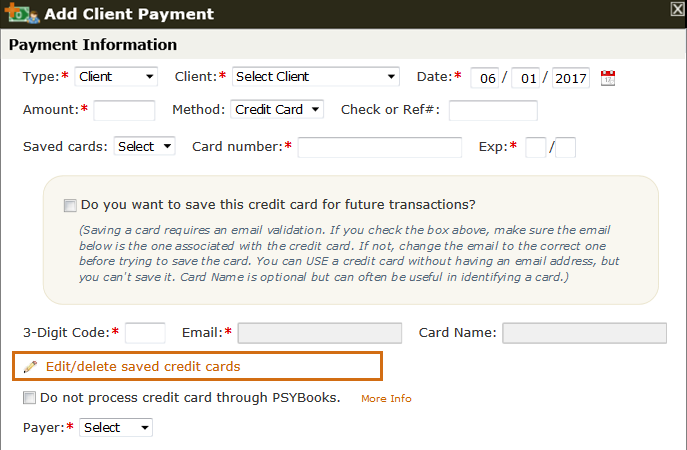
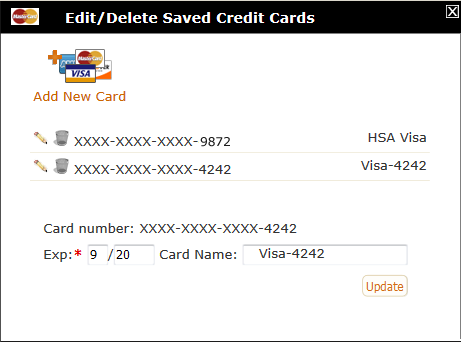
As the title indicates, this is to allow you to edit or delete any credit cards for this client that you have previously saved. Opening that form gives you a window like this:
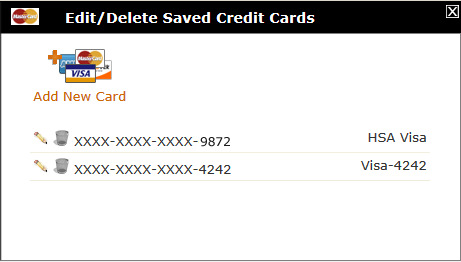
From this window, you can edit or delete any cards that have been saved. Notice, however, that you will never be able to edit - or even view - the complete credit card number. For safety reasons, PSYBooks does NOT store credit card numbers, which means that we can't display them for you to edit. If you need to change the card's number, you'll have to enter it again as a new card, which you can also do on this form. However, if you want to edit the expiration date or the card's name, clicking the Edit pencil at the beginning of that card's row will open some additional fields that will allow you to do so:
Add Adjustment
What this isThis tool allows you to add and allocate adjustments to a client's account. You can specify whether the payer of the adjustment is the client, an insurance company or 'other'.What it looks likeThe Add Adjustment tool looks like this: 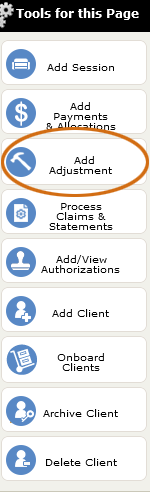
|
Where this isThe Add Adjustment tool is on the left nav of the Charts page. |
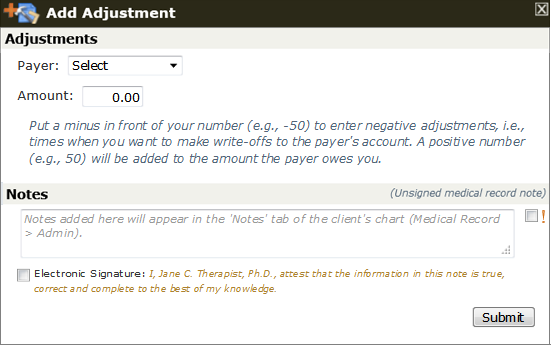
When you click the Add Adjustment tool you get this form:
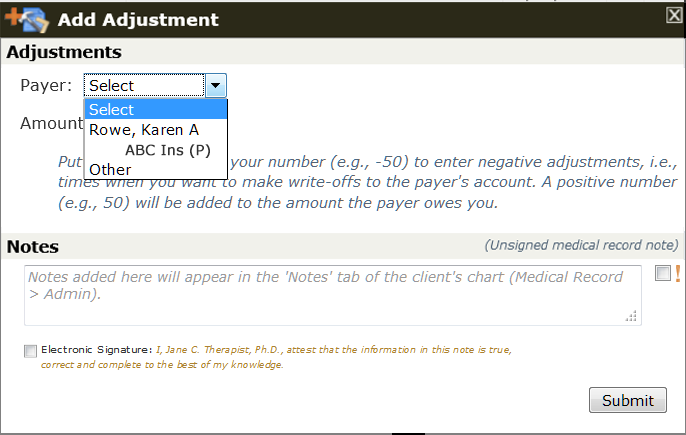
Notice that the possible payers to whom you might want to credit the adjustment are already listed for you in the Payer box. The '(P)' beside the insurance company's name indicates that it is a primary insurance company. If this client had a secondary insurance company, it would also be listed and would be signified by an (S).
The only other field that has to be filled in on an Add Adjustment form is the Amount. Notice that you can enter positive or negative adjustments and that a description of what each does appears right on the form:
Process Claims & Statements
What this isThis tool allows you to efile claims and to print CMS-1500 forms and client statements.What it looks likeThe Process Claims & Statements tool looks like this: 
|
Where this isThe Process Claims & Statements tool is on the left nav of the Charts page. |
What the Process Claims & Statements Tool Is
To understand this tool, we have to understand what the name "Process Claims & Statements" means. Let's look at how PSYBooks is defining each of the words:
- Process
In the vernacular, "process" is being used to mean:
To do whatever needs to be done with the information in a session to get it to where it needs to go so you can get paid.
"Whatever needs to be done" is determined by the payer. For example, if the payer is an efile insurance company, process would mean to efile the claim. If the payer is a print insurance company, process would mean to create a PDF of the CMS-1500 so you can print it, upload a digital copy to the company's website, etc. If the payer is the client, process means creating a statement you can give to the client.
- Claims
In general, PSYBooks uses the term "claim" to refer to a CMS-1500 form that is generated for insurance companies (either for an efile company or a print company).
- Statements
In contrast, the term "statement" is reserved for a statement you might generate to give or send to your client.
Putting everything together, "Process Claims & Statements" is a tool that allows you to process both claims (CMS forms for insurance companies) and statements (PDF forms to give your client). That being said, you may never use the Process Claims & Statements tool. In order to understand THAT statement, let's take a look at what the Process Claims & Statements Tool does.
What the Process Claims & Statements Tool Does
When you add a session, you're given a choice about whether to process it now or later. PSYBooks remembers whether the client has insurance so when you click Save on the Add Session form, you'll either see one of two confirms about processing. If your client does NOT have insurance, you'll see this confirm:
If they do have insurance, you'll see this confirm:
Notice that both confirms have "Process now" as the initial (and default) choice and "Save for later" (by putting it in the Process Claims & Statements tool) as the second choice. Much of the time, especially with insurance claims, independent practitioners will probably want to just accept the default and process as soon as the session is entered. However, there might be situations where you would want to chose the save for later feature. For example, if you have an office manager, you might want to put all of your claims and statements in the Process Claims & Statements tool so that person can run all of them through at one time. The save for later feature can also come in handy when you need to hold one certain claim or statement back for some reason.
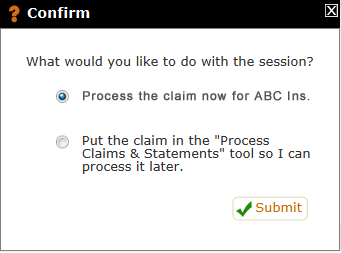
To learn more about the tool, let's assume that our client has insurance, we just got the claim confirm above and we changed it to the second option before clicking Submit:

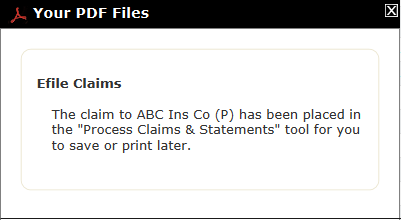
After clicking Submit, we get this confirm (the "P" after ABC Ins Co means that ABC is this person's primary insurance company.):
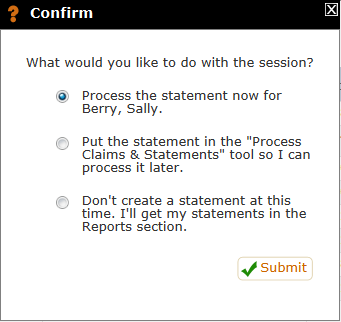
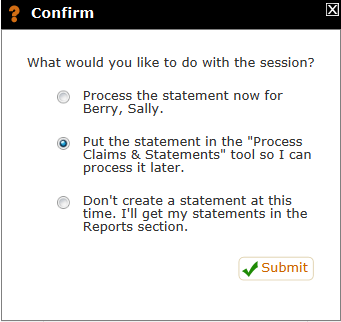
Similarly, we might have chosen to save Sally Berry's statement for later by choosing the second option on that confirm:
We've now put one claim and one statement in the Process Claims and Statements tool. Let's click the Process Claims & Statements tool (left nav of the Active tab of Charts) and see what happens:
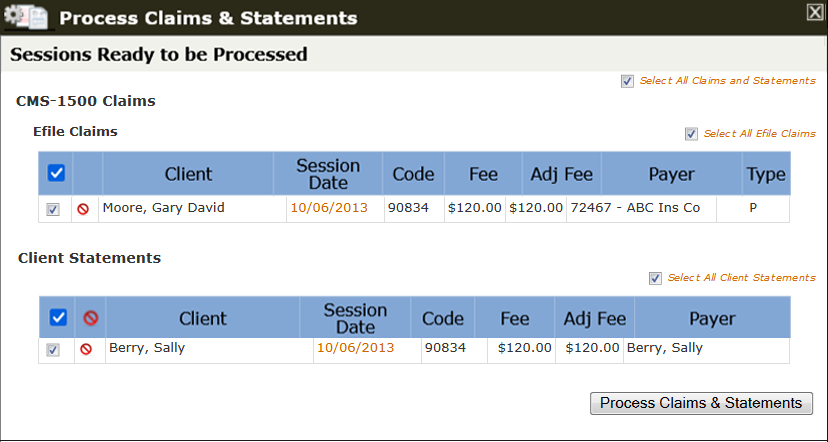
The tool shows us both sessions, ready to be processed whenever we want. Notice also that the session date for each is a link which is a view/edit session tool. Since neither of these sessions has been processed, you can make any changes you want on their Add Session forms. Thus, another excellent reason for using the Process Claims & Statements tool is if you think you might want to make changes to a session before you process it.
The tables on the Process Claims & Statements tool also have a tool that allows you to remove a session from the table:
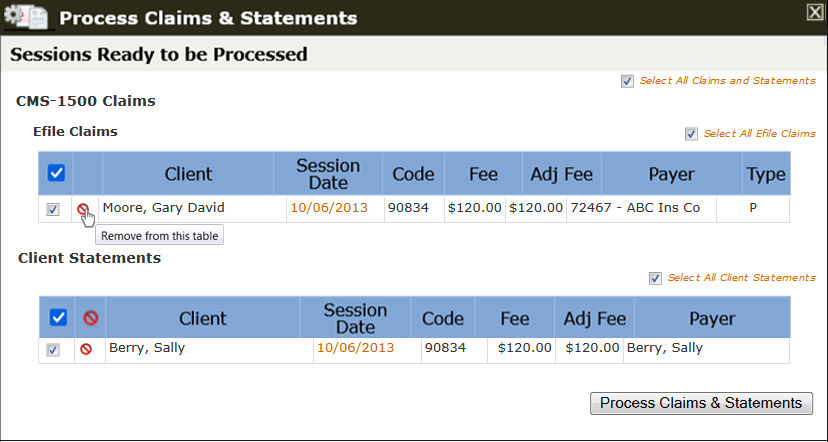
Notice that a Remove tool, which typically uses this icon: ![]() , is different from a Delete tool, which typically uses this icon:
, is different from a Delete tool, which typically uses this icon: ![]() . A Remove tool is for removing items from a table; it doesn't actually delete the item from the person's chart. The Remove tool is on this table to allow you to remove sessions that, for whatever reason, you never intend to process. You don't have to remove them but some users may want to declutter their tables. Sessions removed from this table will still be listed on the client's Sessions & Payments tab.
. A Remove tool is for removing items from a table; it doesn't actually delete the item from the person's chart. The Remove tool is on this table to allow you to remove sessions that, for whatever reason, you never intend to process. You don't have to remove them but some users may want to declutter their tables. Sessions removed from this table will still be listed on the client's Sessions & Payments tab.
Also notice that when you first open the Process Claims & Statements tool, all sessions in all tables are checked. This means that if you just open the tool then click the Process Claims & Statements button at the bottom of the page, all sessions on the page will be processed. If there are some sessions you want to hold back, uncheck the box beside those sessions. The Process Claims & Statements button only processes sessions that are checked.
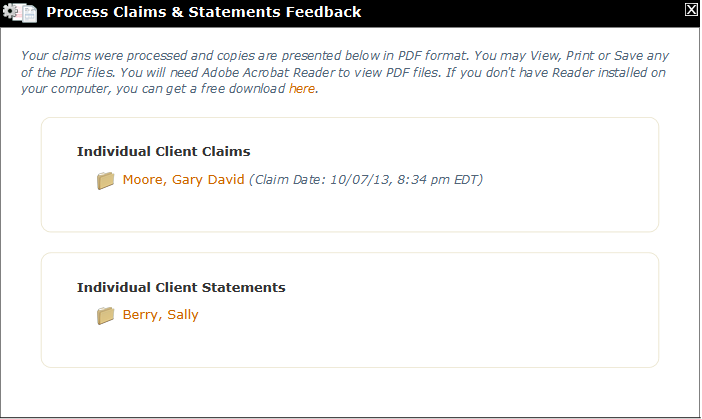
When you click the Process Claims & Statements button, all checked claims and statements are processed to their respective payers. In other words, efile claims are efiled and the appropriate PDFs are created for print insurance claims and statements. When all processing is finished, you're given a feedback window. Assuming you left both of the sessions above checked and clicked the Process Claims & Statements button, the feedback window would look like this:
Notice that each client's name has been turned into a link and also, that each name has a Save to Chart tool in front of it:
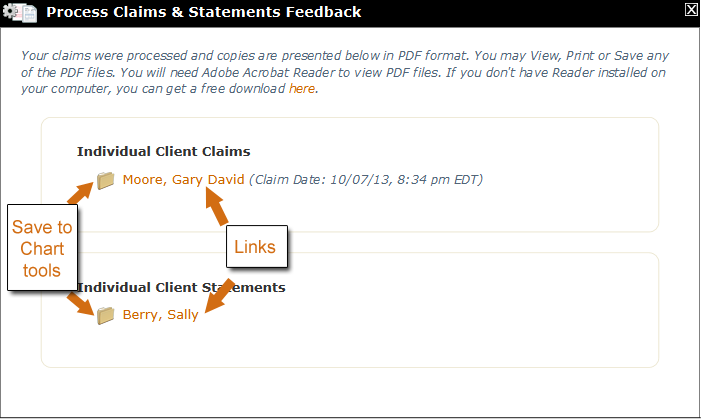
Clicking Save to Chart allows you to save this particular claim or statement to the Files tab of the client's chart. This step is not essential because copies of these same claims and statements will always be available on the client's Sessions & Payments tab. However, some users may wish to do this.
Clicking a link opens the claim or statement that was just created. Claims will be on CMS-1500 forms; statements will be on whichever statement template you've chosen. Clicking the link for Moore, Gary David, opens a copy of the claim that was just efiled for Gary:
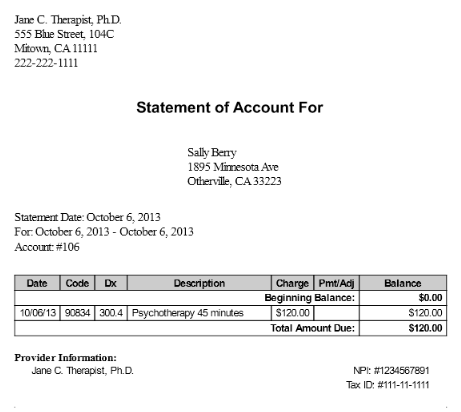
Similarly, clicking the orange link for Berry, Sally, opens the statement that was produced for this session:
An important thing to know is that claims and statements produced with the Process Claims & Statements tool ONLY compute totals for the sessions that were processed with that particular batch. The beginning balance is assumed to be $0.00. If you need a claim or statement that includes several sessions (or that includes any balance that's been carried forward), use the CMS-1500 and/or the Client Statement reports in the Tools > Reports section of the app. Those reports allow you to indicate the specific dates you want to include in your statement or claim.
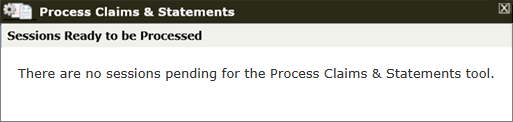
Since we processed all of the claims and statements that were in the Process Claims & Statements tool, once the feedback window is released, the tool is empty until the next time you save a claim or statement for later:
Add/View Authorizations
What this isThe Add/View Authorizations tool allows you to add new client authorizations and to keep track of those you already have.What it looks likeThe Add/View Authorizations tool looks like this: 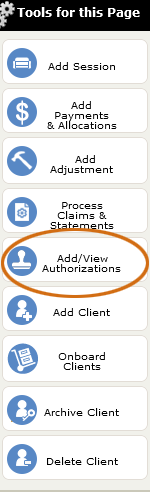
|
Where this isThe Add/View Authorizations tool is on the left nav of the Charts page. |
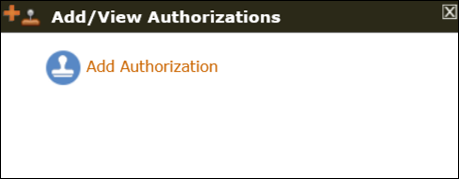
If there are no existing authorizations (precerts) in your account, clicking the Add/View Authorizations tool just opens a popup with a tool that allows you to add one:
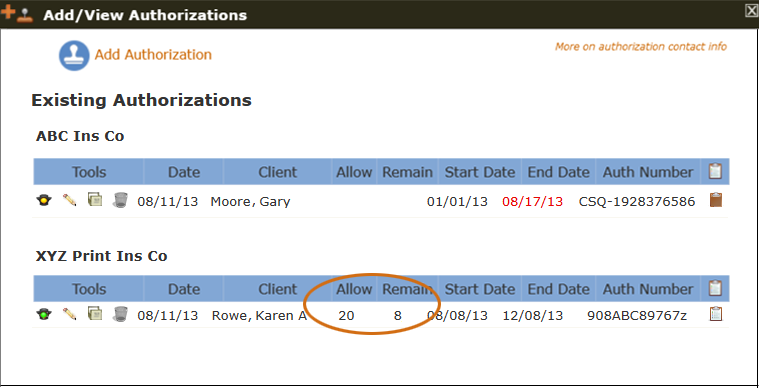
However, if you've already entered some authorizations, PSYBooks has several tools that help you work with them. An account with existing authorizations would look something like this:
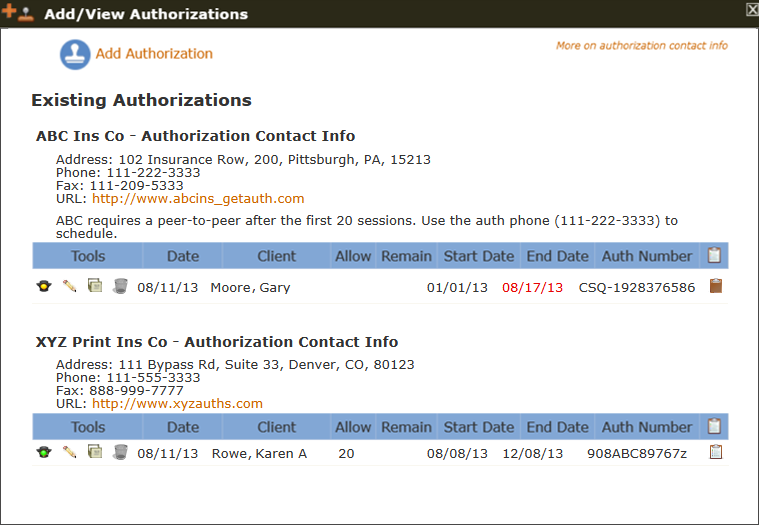
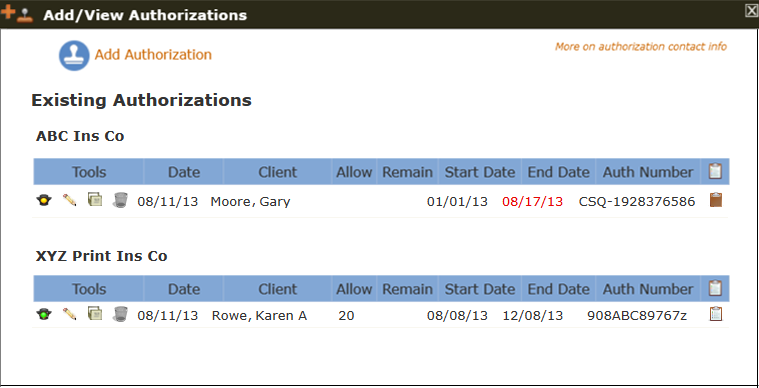
This user has two active authorizations in PSYBooks - one with the ABC Ins Co for a client named Gary Moore and another with the XYZ Print Ins Co for a client named Karen A Rowe. There is a lot of information on this page because it's meant to have all the information you might need to keep up with your precerts. Notice that each insurance company has their Authorization Contact Info listed. For that information to show up here, the user would have had to have entered it with one of the Add or Update Insurance Company tools (e.g., at Libraries > Insurance). The line on the screenshot that starts "ABC requires a peer-to-peer" is from a Note that the user wrote with an Add or Update Insurance Company tool. If the user had not entered any authorization contact info when they added or updated the insurance companies, the Add/View Authorization tool would look more like this:
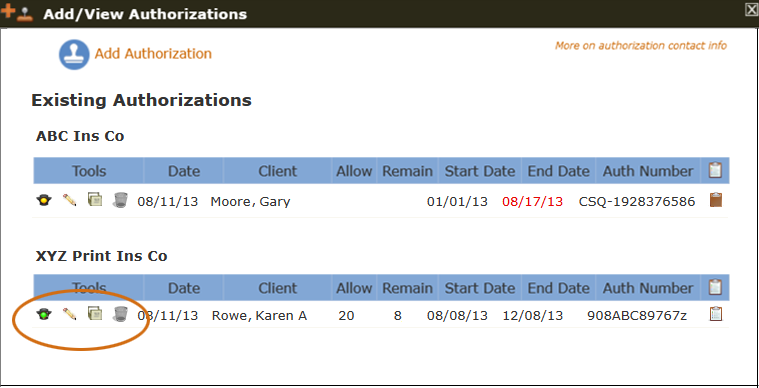
There are 4 tools in each of the authorization tables on the Add/View Authorization tool: Status, Edit, Deactivate and Delete:
Status(Add/View Authorization tool)
The first tool on this row - the traffic light icon - is the Status tool. It changes color to warn you if an authorization is close to expiring or if it's already expired. If you mouse over a status icon, it will give you additional information. For example, if this were a real page in the app instead of an image in the Help section, mousing over the yellow traffic light in Gary Moore's authorization shows this tooltip:

The tooltip for the green traffic light in Karen Rowe's auth says, "The authorization is current." And yes, there's a red traffic light to tell you when an authorization has expired. Notice also that on Gary Moore's auth, the text for the end date is red. This is because the end date is what triggered the status icon to change from green to yellow. (This screenshot was taken on 8/11/2013.) Gary's auth doesn't have anything in the Allow column - which means that the number of sessions is unlimited (or at least the user didn't enter an allowed number of sessions). However, in the screenshot below, Karen's auth has both a number of sessions and an end date so in her case, PSYBooks will keep track of both events and warn the user if either is close to expiring:
Edit(Add/View Authorization tool)
The Edit tool allows you to make changes to the authorization.
Deactivate(Add/View Authorization tool)
The Deactivate tool is similar in function to other archive functions in PSYBooks, i.e., it removes the auth from view but doesn't remove it from your application, which means you can view it at any time.
Delete(Add/View Authorization tool)
The Delete tool permanently deletes an authorization. You will not be able to reactivate it but a copy will be kept in the Activity Log Report.
Add Client
What this isThe Add Client tool allows you to add new clients/patients to your account. Like the Onboarding Tool, Add Client allows you to do a complete client set up, including sending your intake materials or custom forms, plus adding full Portal and secure email privileges. You can fill out parts that you know, then send the Profile Form to the client so they can complete the rest.What it looks likeThe Add Client tool looks like this: 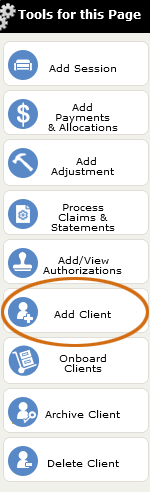
|
Where this isThe Add Client tool is on the left nav of the Charts page. |
Clicking the Add Client tool opens this form:

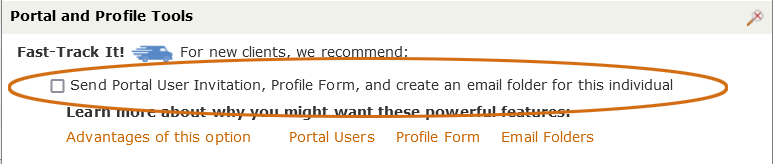
Portal and Profile Tools
The Portal and Profile section of this form is where you can do the full client setup. In it's default position, it looks like this:
If you select Complete Setup, several extra rows open, with most of them checked by default:
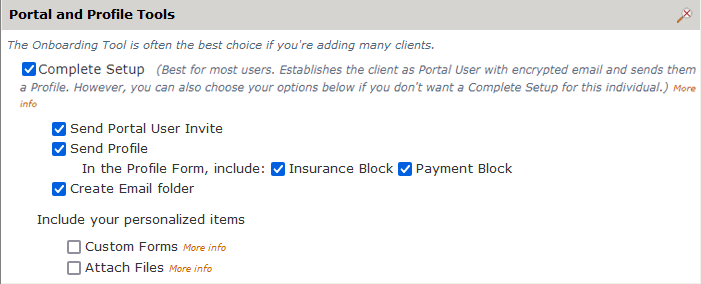
Checking Complete Setup and then submitting the Add Client form begins a process which starts by sending the new patient a Portal User invite. Once they log in to their Portal account, they will be on the Profile Tab, with instructions to fill this out and return it to you. (Their Profile Tab has most of the same fields as the Demographics.) If you've gotten any of the required items wrong, they can correct them, plus complete the rest of the form. If you leave the Insurance Block checked, you'll be collecting data for the Insurance tab in their chart. If you leave the Payment Block checked, you'll be asking the client to input their credit card info, which will allow you to use Stripe for any client charges.
When the new client logs in to their Portal, they have a Pending Tasks Widget that floats on the right edge of each page to guide them through the tasks you've sent them. Clicking it gives them more information about the specific tasks you've requested. The Widget, and an example of the type of window it opens, are shown below:
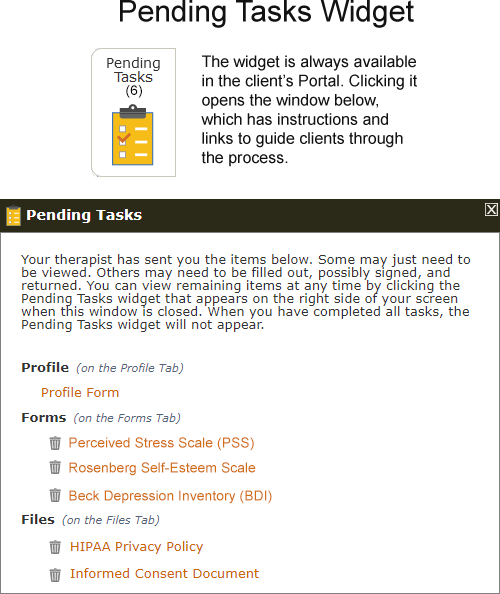
When the client completes all tasks, the Pending Tasks Widget disappears. In some ways, the Pending Tasks Widget on the client side is similar to the TNT on the therapist's side.
When they submit the data back to you, you'll be notified by email and also on the TNT and can approve or reject any of their entries. Once you've done that, their chart will be populated, saving you data entry time and also helping to ensure accuracy, since the client fills it out, but you're the actual gatekeeper.
Notice that checking Complete Setup also opens a section to allow you to upload any Custom Forms and/or other files you want to send to this client. That area isn't open by default, because to maintain maximum security and HIPAA compliance, the client must at least be a Portal User before you can send forms or files to them.
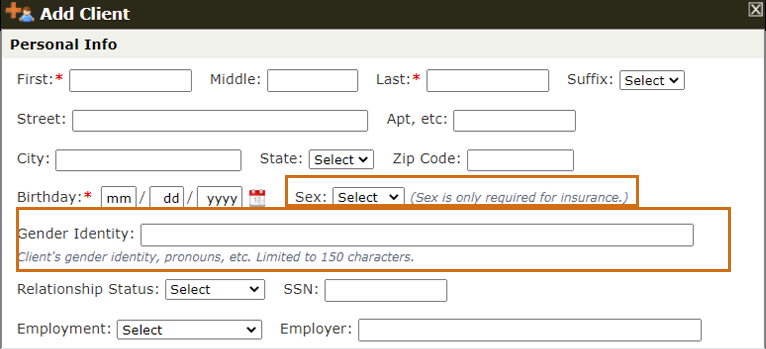
Sex & Gender Identity Fields (Add Client form)
The Add Client form has fields for both Sex and Gender Identity:
The Sex field is a select box with these options:
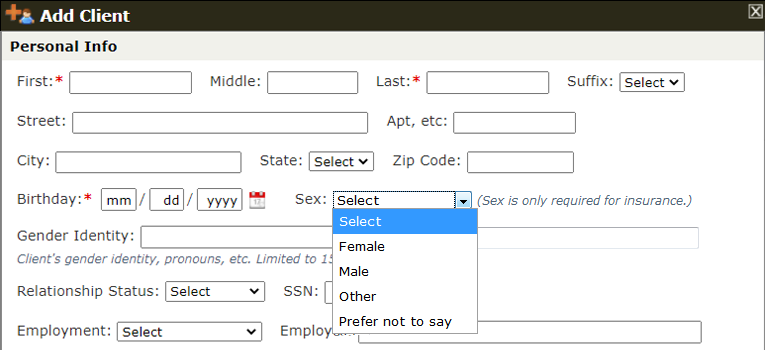
The options in the Sex select box are dictated by federal standards, so, with the exception of adding an option for "Prefer not to say," PSYBooks does not have control over which options can be listed here.
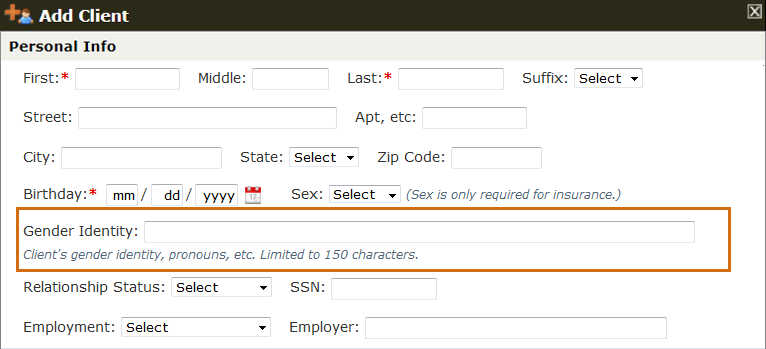
However, the Gender Identity field is a textbox, meaning that you (and/or your patient, if you Fast-Track It!) are free to write whatever best describes their gender identity and have that information maintained in their record. The textbox allows 150 characters to give room to describe their gender identity, including pronouns, if they choose. One of the nice things about using Fast-Track It! is that the patient will always have access to their Profile. Individuals who are questioning can change their Gender Identity field as often as they want. Therapists who choose NOT to Fast-Track It! can use the Edit Client form (available from the Demographics page of the client's chart) to change this (or other) data. Information in the Gender Identify field is not sent to insurance companies. The Gender Identity field looks like this:
Other Client Information (Add Client form)
The Other Client Information section of the Add Client form looks like this:

"Client's outstanding balance when you first began to use this program", is to help users who are new to PSYBooks and who are adding existing clients with outstanding balances. Although it is not necessary to put anything in this field, if you do so, PSYBooks will help you keep track of this opening balance so you'll know when it's been paid. If the client you're adding has an outstanding balance, it may be helpful to take advantage of this field. The data can be added later with Edit Client if you don't know the amount when you first enter the client. Also, this field does NOT appear on the client's Profile tab.
If you have more than one office, the last item in this section allows you to select the office where you'll see this client most frequently. You'll always be able to change the location for any given session on the Add Session form but setting it here may save you some time later.
Client Notes (Add Client form)
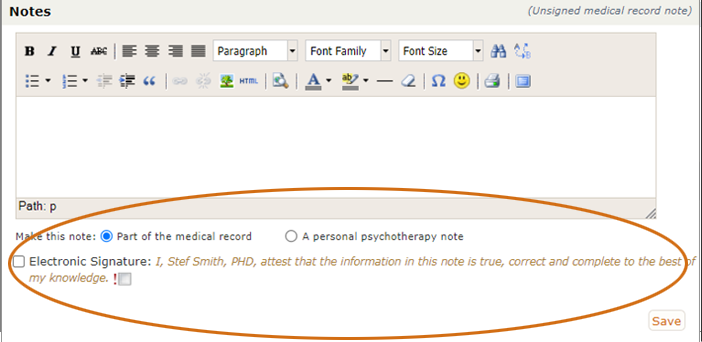
The Notes section of the Add Client form allows you to choose whether you want the client note to be part of the medical record (which makes it PHI) or a psychotherapy note (which is not PHI). It's important to know that, even when a client has filled out a Profile Form, they do not have access to this Notes field, even if it's marked as part of the medical record. As with all notes in PSYBooks, it also allows you to sign the note or leave it unsigned if you anticipate making changes later:
What happens when you click Save? (Add Client form)
The Add Client form becomes the Demographics tab of the client's chart. When you click Save, the entire chart opens in case you have other entries you want to make for this client.
Onboard Clients
What this isThis tool is the easiest way to get new clients completely set up in PSYBooks. Enter one, or a whole caseload.What it looks likeThe Onboard Clients tool looks like this: 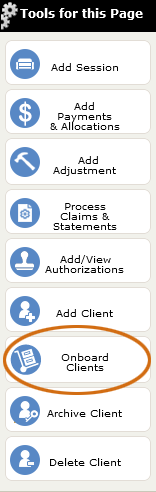
|
Where this isThe Onboard Clients tool is on the left nav of the Charts page. |
The Client Onboarding Tool
The Client Onboarding Tool is the easiest way to add new clients to PSYBooks and get them set up with the tools they'll need to facilitate and maximize their interactions with you. Client Onboarding is one of the Fast-Track It! tools ![]() and it includes all three Fast-Track features: the Portal User Invite, the Profile Form and a separate folder for each client in your encrypted email page. You can read about the Onboarding Tool below and/or watch this short video:
and it includes all three Fast-Track features: the Portal User Invite, the Profile Form and a separate folder for each client in your encrypted email page. You can read about the Onboarding Tool below and/or watch this short video:
The thing that makes the Client Onboarding Tool so easy is that you only have to enter the client's name and email address to launch all three of the processes above. As you can see in this closeup image, there are two ways to use the tool - either by manually entering each name and email address or by uploading a .csv file with the names and email addresses of your entire caseload:
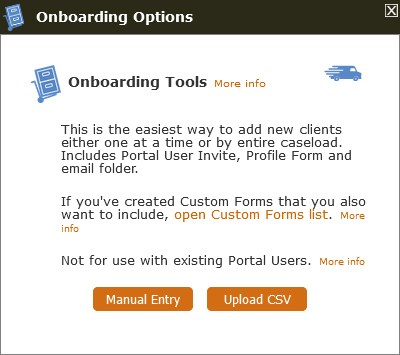
Although the Manual Entry tool is usually better when you only need to enter a small number of patients whereas the CSV tool may be faster when you need to enter many at once, there are other reasons why you might want to use one or the other. Both tools are easy to use and both accomplish exactly the same goal. Each will be discussed below.
Onboarding: Manual Entry
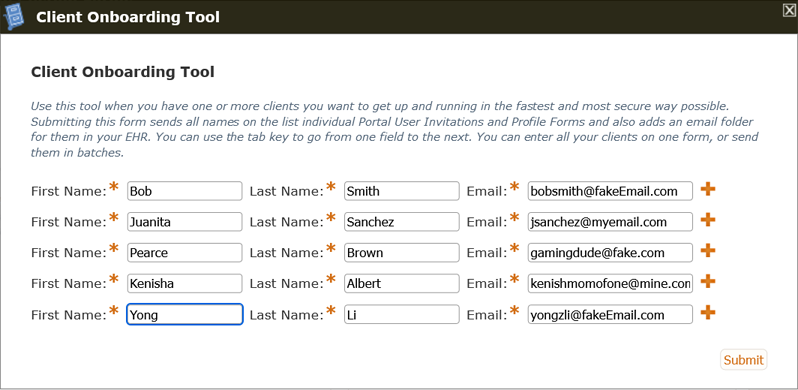
When you click the Manual Entry tool, you get a window that looks like this:
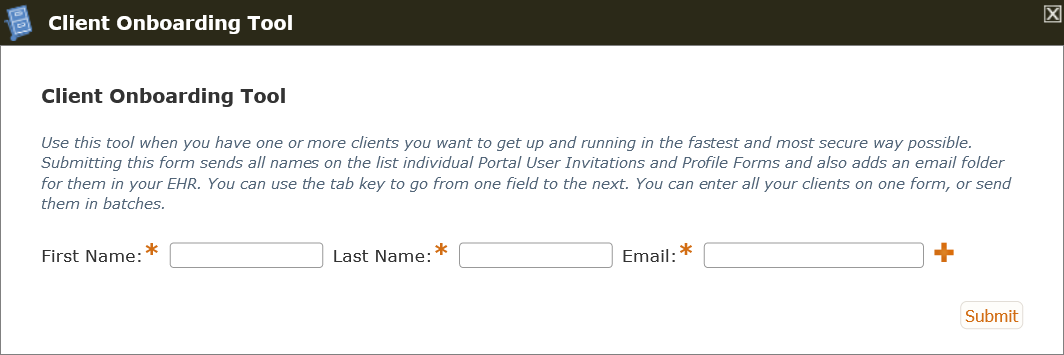
If you only need to onboard one new patient, just fill out this form and click Submit. However, you can also enter multiple clients with this tool. You can use the tab key to progress from one field to the next and get through even a fairly long list of names in a relatively short period of time. Or, if you have a large number of patients to input and you have access to a software program that can create a .csv file, you may want to use the Upload CSV tool instead.
Onboarding: Upload CSV
There are a lot of programs that can create a file with a .csv (comma-separated values) extension. Common ones are Excel, Google Sheets, OpenOffice Calc and simple word processing programs like Notepad. Also, if you are upgrading to PSYBooks from another practice management system, most companies have tools to allow you to download CSV files of your data before you leave. Although those files will usually have more columns than the three needed here (first and last names and email address), it may be faster for you to remove the columns you don't need and upload the required items into PSYBooks. A sample file might look something like this:
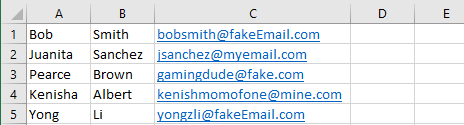
For best results, follow these guidelines:
- Don't give your columns headers or use any special formatting.
- Put only one value in each of the three columns.
- Order is important: first name, last name, email address.
- Don't skip rows.
- Sort order is not important. You don't have to alphabetize the list.
When you click the Upload CSV tool, a blue section appears below the buttons which allow you to upload your file:
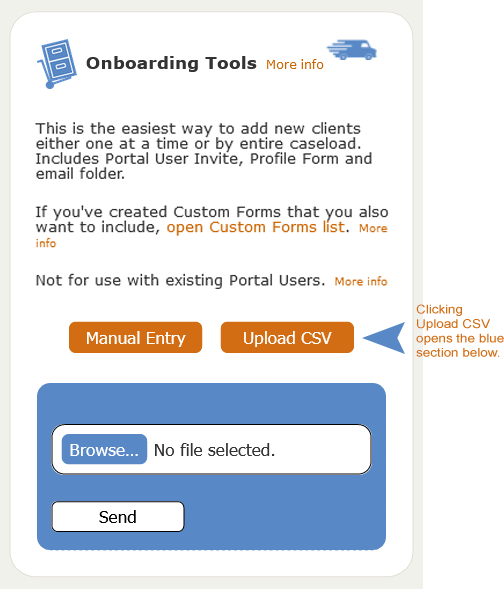
This is just a regular file upload tool, i.e., click "Browse," navigate to where your CSV file is located and click OK. The name of your file will appear in the white area that says "No file selected" in the screenshot. Then click Send. Had we entered the CSV file we created above, the next screen would show us a populated Manual Entry form, giving you a chance to double-check your entries:
No matter which method you use with the Client Uploading Tool, the results are the same. If you'd like to read more about each of the three features covered by this tool, you can do so with these links:
Portal UsersProfile FormIndividual Folder in Email
Sending Custom Forms as you Onboard
One especially nice feature of the Onboarding Tool is that you have the ability to attach Custom Forms at the same time you Onboard. Among other things, Custom Forms allow you to create an intake packet of all the forms you routinely use for new clients. The forms you create are interactive, meaning that your patients will fill them out and return them to you online instead of the less secure way of having to download forms, fill them out by hand and then upload copies of the completed forms.
You may have noticed this paragraph in the middle of the Onboarding Tool:
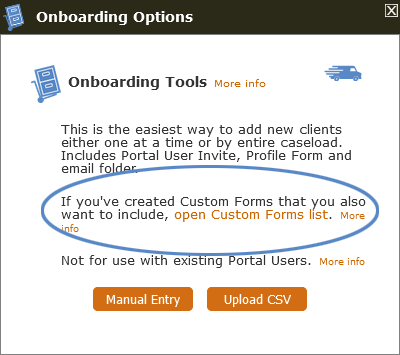
You have to have already created your Custom Forms before you can use them as you Onboard. However, once you've created them, you can click the "open Custom Forms list" link from the Onboarding Tool. The window that opens will look something like this:
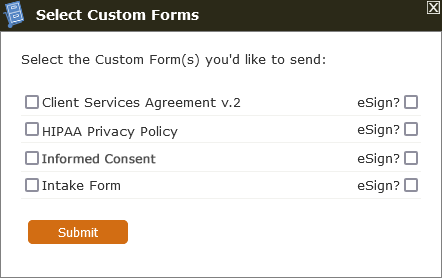
You can select the Custom Forms you want to send with this particular batch of Onboarding Requests - whether you're sending it to one new client or many - and each of those individuals will be sent your complete intake packet, along with the Portal User request and the Profile Form. To use the form above, you just select the form(s) you want with the boxes on the left and then indicate those you want to add eSign to with the checkboxes on the right.
Archive Client
What this isThis tool allows you to archive the charts of clients you no longer see. Archived charts may be reactivated at any time.What it looks likeThe Archive Client tool looks like this: 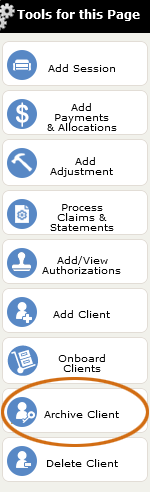
|
Where this isThe Archive Client tool is on the left nav of the Charts page. |
To use the Archive Client tool, just select the client whose chart you want to archive by checking the checkbox beside their name and then click the Archive Client tool. It's that easy. Archiving a client not only removes the chart from your Active Charts table, but it also removes their name from client select boxes through the application, making it easier to find the client you need. Once you've archived a client, you can always find their chart listed on the Archived Charts tab of PSYBooks and you can reactivate them at any time.
Delete Client
What this isThe Delete Client tool allows you to delete clients and will typically only be used for erroneous entries.What it looks likeThe Delete Client tool looks like this: 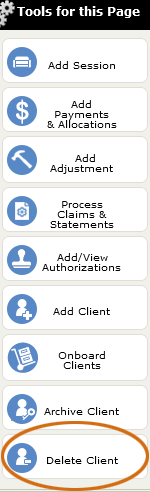
|
Where this isThe Delete Client tool is on the left nav of the Charts page. |
You may never use this tool. It totally removes a client's chart from your application and unlike an archived chart, a chart that's been deleted cannot be reactivated. However, some users may want to use this tool for removing an erroneous client entry from their application. Even though you cannot reactivate a deleted client, a PDF record of all the information that was in that chart will be available at Reports > Activity Log.
Archived Charts
What this isThis is a tab in the Charts section of the application. It's for working with your inactive (as opposed to active) clients.What it looks likeCharts > Archived Charts 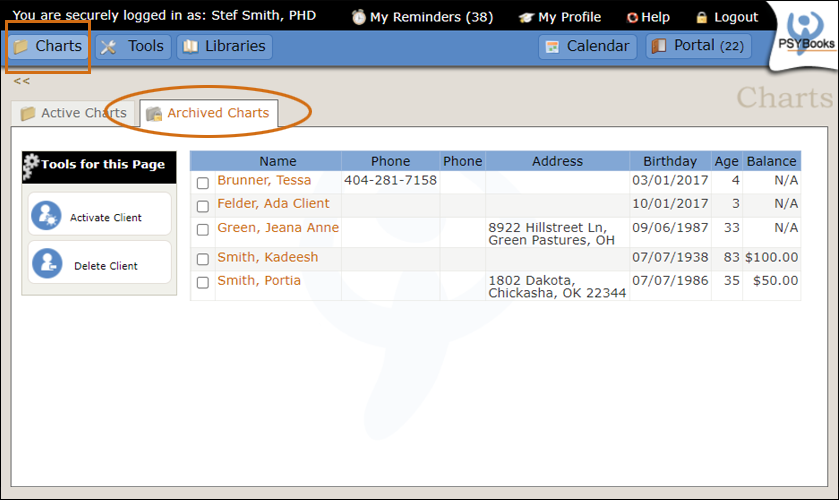 |
Where this isYou can get to this section by clicking on Charts in the global nav. Everything in the global nav is replicated in the sitemap located at the bottom of each page, so you can also find a link to Archived Charts there. |
The Archived tab holds information on clients you've archived - typically because you're no longer seeing them. The left nav tools for working with archived clients are different, but aside from that, this page is just like the Active Charts page. If you don't have a table in the Charts area, it's because you haven't archived any clients. If you want to try it, you can go to the Active Charts tab, select a client, click the Archive Client tool and then come back to the Archived tab section to view that chart here. Don't worry - you can always reactivate the client at any time.
Select Client (Archived Charts)
What this isThe checkboxes beside each client's name are used to select a client to activate or delete them with the tools on the left nav.What it looks likeThe select client checkboxes look like this: 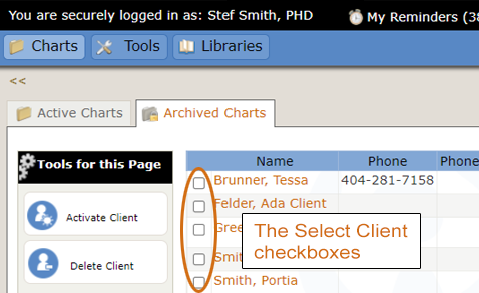
|
Where this isYour clients' charts are on the Charts page. The select client checkboxes are to the left of each client's name. |
There are only two tools on the Archived Charts page: Activate Client and Delete Client. Both tools require selecting the client first, then clicking the tool.
Open Chart/Edit Client (Archived Charts)
What this isThis tool allows you to view and/or edit charts of clients you no longer see.What it looks likeThe links on each client's name look like this: 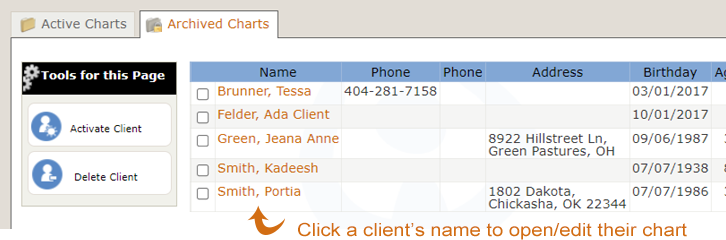
|
Where this isThe links that allow you to work with archived clients are in the table on the Archived tab of the Charts page. |
You can open an archived client's chart by clicking their name and make edits or additions to their file, just like you would with an active client.
Activate Client (Archived Charts)
What this isThis tool allows you to activate the charts of archived clients.What it looks likeThe Activate Client tool looks like this: 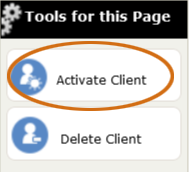
|
Where this isThe Activate Client tool is on the left nav of the Archived Charts tab of the Charts page. |
The Activate Client tool works exactly like the Archive Client tool that's on the Active Charts tab. To activate a client that's in your archived clients table, select the client whose chart you want to activate by checking the checkbox beside their name and then click the Activate Client tool. Voilà! A new/old active client!
Delete Client (Archived Charts)
What this isThis tool allows you to delete a chart that's in the Archived Charts table.What it looks likeThe Delete Client tool for archived clients looks like this: 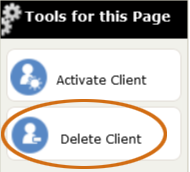
|
Where this isThe Delete Client tool for archived clients is on the left nav of the Archived Charts tab of the Charts page. |
The Delete Client tool for archived clients works exactly like the Delete Client tool for active clients and should be used with the same caution.