

Manual Index
-
Chapters
The Manual is divided into seven chapters. Click a chapter title to display that chapter's table of contents in the area below.
Chapter Six
Calendar
Jump to:
Intro
- Intro to the Calendar
- Appointment Blocks
- Search Calendar
- Add Appointment
- Repeating Appointments
- Edit Appointment
- Delete Appointment
- Cancel Appointment
- Print Calendar
- Manage Other Person/Events
- Manage Groups
- Manage Appt Requests
- Manage Duplicates
- Online Booking Calendar
- When Someone Books
Left Nav
Hamburger Menu
Online Booking Calendar
PSYBooks Manual
Chapter Six
Intro to the Calendar
What this isCalendar is one of the sections of the global nav. The Calendar section of the app allows you to keep track of all of your appointments and other events. You can schedule appointments (including repeating appointments), set reminders and choose different colors for different appointments to help you stay organized.What it looks like |
Where this isYou can access the Calendar from the global nav at the top of every page or from the Sitemap links at the bottom.
|
PSYBooks' Calendar is actually a collection of tools for therapists that goes beyond just scheduling appointments. For example, you can add both sessions and client payments right from the Calendar, making it an ideal way to keep track of daily tasks. Your Calendar is designed to allow you to see at a glance whether each appointment is for a client, a therapy group, a business meeting or some other kind of event. Additionally, appointments are coded so you can see which ones are to take place in your office and which are video or phone meetings. There are many ways you can customize the Calendar, i.e., by choosing how you want your clients' names to appear, by color-coding certain events, by deciding whether or not to set appointment reminders, etc. There are also tools that allow you to search and to print your calendar.
PSYBooks also includes an online Booking Calendar that you can share via a link posted on your professional website. This allows clients and others to book with you automatically. You’re always in full control of which days and times appear on your calendar, and who’s allowed to book. Some therapists choose to allow only their existing clients to schedule online, while others open their availability to anyone.
In short, the Calendar page in PSYBooks is so comprehensive that some days, it may be the only page in the app that you need to visit. 
Appointment Blocks
What this isAppointment Blocks are added to your Calendar automatically when you add an appointment. Depending on various choices made on the Add Appointment tool, the resulting Appointment Block on your Calendar will display a variety of tools to give you information about the appointment. Client Appointment Blocks also have tools that allow you to add sessions and client payments right from the calendar, helping to streamline your workflow.What it looks likeThe example below shows one day with six Appointment Blocks:  |
Where this isYou can access the Calendar from the global nav at the top of every page or from the Sitemap links at the bottom.
|
Appointment Block Structure & Tools
Appointment Blocks are designed to give you maximum feedback and functionality for each appointment you enter. The specific icons present on any given appointment vary and depend on several things but all Appointment Blocks have the same basic structure. The example below is what a repeating client appointment that takes place in the therapist's office might look like:
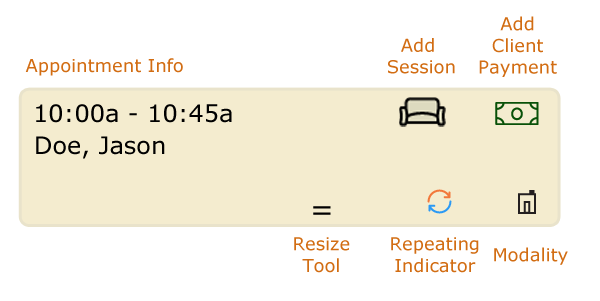
The Add Session and Add Client Payment tools are of particular interest. They do two things:
- They allow you to do most of your daily tasks right from your Calendar - no need to switch back and forth to other pages in the app.
- They serve as a quick visual checklist so you can see what tasks you've finished for the day and which ones still need to be completed.
Each of these tools will be discussed below.
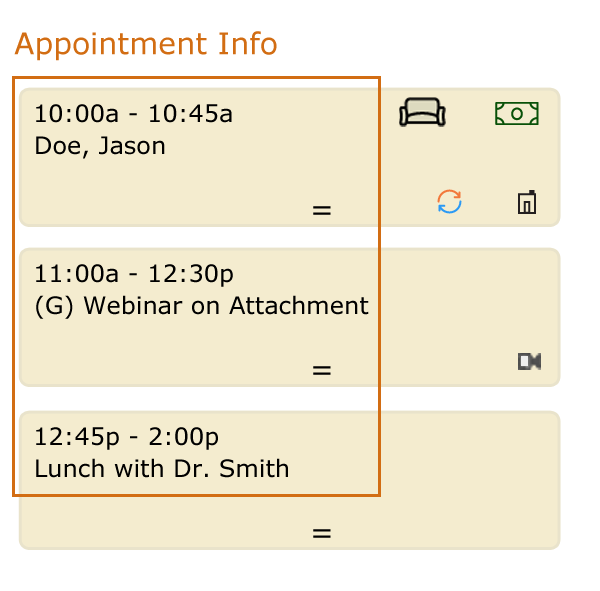
Appointment Info
On the left of each Appointment Block is the information you see on any online calendar, i.e., the start and stop times of the appointment and the name of the encounter. In addition to client appointments, PSYBooks also allows you to enter appointments for groups (both therapy and non-therapy), events, and meetings with non-client individuals:
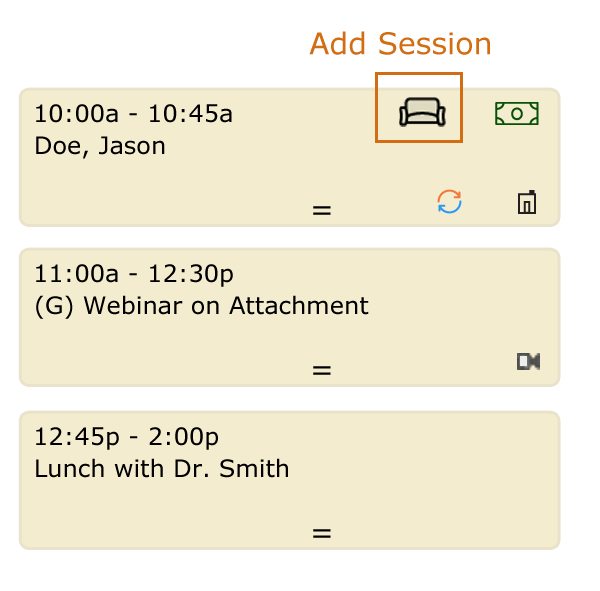
Add Session
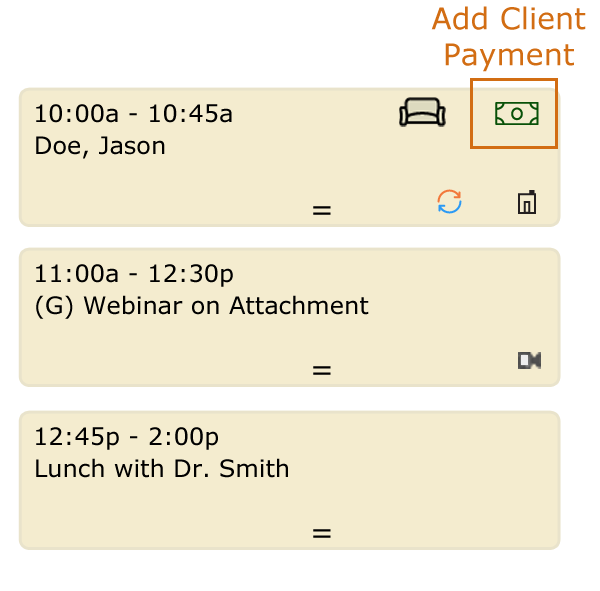
The Add Session tool - the couch icon - only appears on Appointment Blocks of clients and groups that are marked as therapy groups - in other words, appointment types where you are likely to want to enter one or more sessions after the encounter. In the screenshot below, the top appointment is the only one that's a client appointment so it's the only Appointment Block with the couch. The second appointment is a group (as indicated by the (G) in front of the event name), but the therapist has not marked it as a therapy group so it doesn't have the Add Session tool:
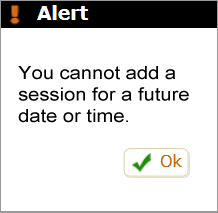
The Calendar form of Add Session is both a functional tool (i.e., you can add a session by clicking the couch icon) and a status tool, allowing you to see whether you've finished the session tasks for this appointment. As with the regular Add Session tool on the Charts page, you cannot add sessions for future times or dates. Sessions can only be added after the time of the encounter has passed. If you click the Add Session tool for a future appointment with an individual client, you get this alert:
If you click the couch icon for a future therapy group appointment, although you're still not allowed to enter sessions, a form opens that allows you to notate any cancellations you may have received from members of the group. This will be discussed in more detail below.
On the Appointment Block, there are three possible states of the Add Session tool: Default, Pending and Finished. Each state will be discussed separately:
Add Session: Default
The Default state of the Add Session tool appears on the Appointment Block when you first enter the appointment on your Calendar. It looks like this:

For individual appointments, assuming the time of the session has passed, clicking the Default state of the Calendar's Add Session icon opens the regular Add Session tool - exactly the same as if you had opened it from the Charts page. You will be able to do all the things you can normally do with the Add Session tool - add a client payment, efile, create a client statement and/or receipt, add your session notes, etc. All of those tasks can be done right from the Add Session tool on your Calendar.
For group therapy appointments, as mentioned above, if you click the Add Session tool for a future group appointment, you're allowed to enter cancellations but nothing else. The window for a future group therapy appointment will look something like this:
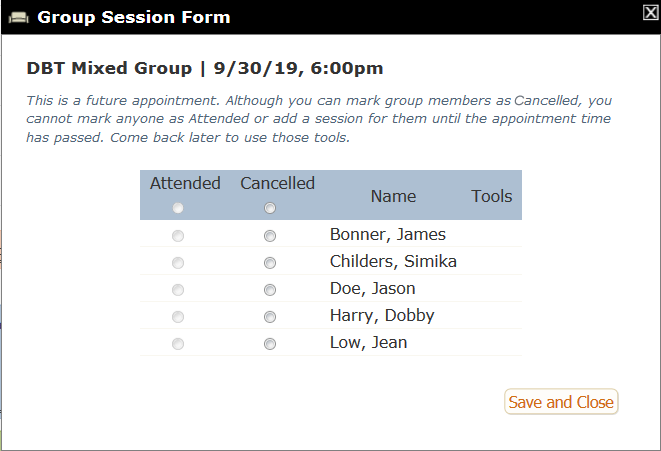
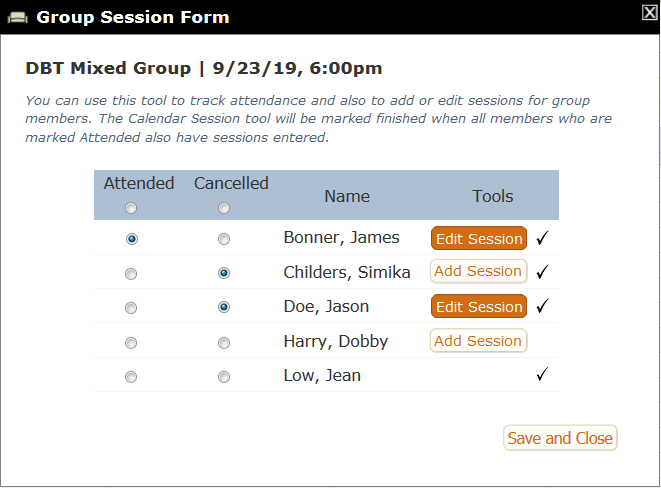
If the time for the group session has passed, you get the same window, but with the full set of tools, allowing you to complete the attendance roster and also to add sessions for those who attended.

The last person on the list, Jean Low, has a checkmark in the column where the other group members have Add Session tools. The only situation that could produce this is if Jean is not a client. Perhaps she's an admin who's been added to the group roster for some reason. She might also be a co-therapist, a supervisee, a presenter in the group, or any other non-client individual who has been added as a member of the group. You cannot enter sessions for non-clients so Jean's session task is marked finished by default. Her session is finished regardless of her attendance status.
Add Session: Pending
The goal of the Pending state is to alert you to the fact that although you've done some work on the session(s) for this encounter, you have unfinished tasks. It's triggered a bit differently for individual vs group therapy appointments, but it looks the same on both:

-
Individual Appointments
When you click the Add Session tool on an individual client appointment, the regular Add Session tool opens. This is exactly the same tool as is on the Charts page. Having it here just allows you to stay on your Calendar instead of having to switch back and forth. For individual appointments, the Pending state gets triggered when you place a session in the Process Claims & Statements tool awaiting further processing. In other words, although the session has been entered, the Pending state is a reminder that you're not finished with it. It hasn't been fully processed. Notice that not all sessions will pass through the Pending state. If you process the session completely when you first create it and don't use the Process Claims & Statements tool, the status symbol on individual appointments will go straight from Default to Finished.
-
Therapy Group Appointments
Unlike the functionality for individual appointments, when you click the Add Session tool on a group therapy appointment, you get a window that looks something like this:
Notice that this form allows you to indicate each group member's attendance. Any cancellations which were previously entered would show up here. The Add Session tool is present for all clients in the group. The group session task will be considered to be finished when sessions have been completely processed for all clients who were actually present.
Clicking Cancelled from this tool does exactly the same thing it does if you cancel an appointment with the Manage Groups tool, i.e., it opens a new area beneath that person's row for you to indicate whether this cancellation is for a single appointment or a series of appointments. It looks like this:
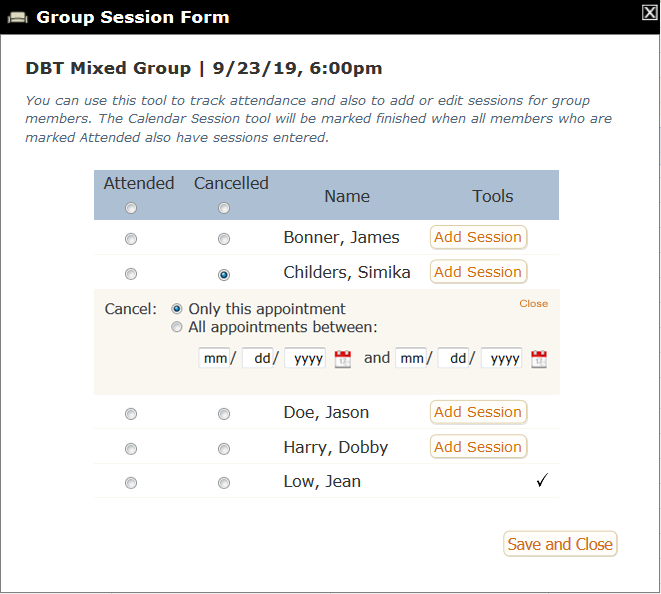
This allows you to mark just this one appointment as canceled or to cancel a block of appointments. Your choice is saved automatically. It's not necessary to use the "Save and Close" button at the bottom until you're totally finished with all tasks. When you close the gold cancellation section, the screen below now looks like this:
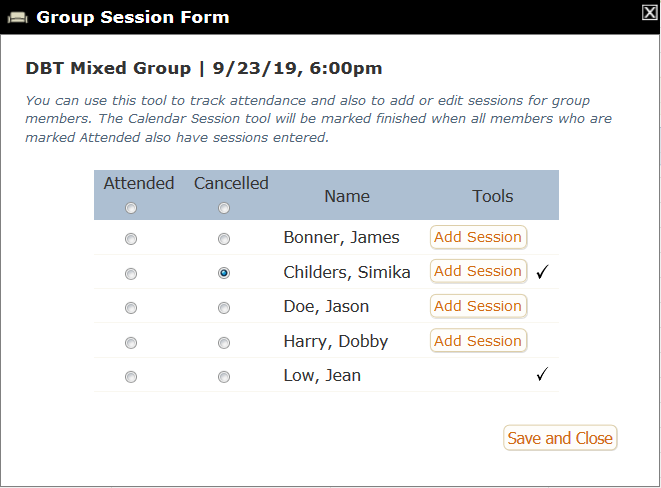
Notice that although the canceled appointment is now marked as Finished, it's still possible to enter a session. Although adding a session isn't necessary, users who like to enter sessions with custom procedure codes to designate no-shows and different kinds of cancellations may find it helpful. Being able to add a session also enables the therapist to charge for the missed appointment.
Let's assume that the therapist now wants to enter the session for the first person on the list. They click the Add Session button in James Bonner's row, fill out the Add Session form and submit it. Doing so would produce these changes on the Group Session Form:
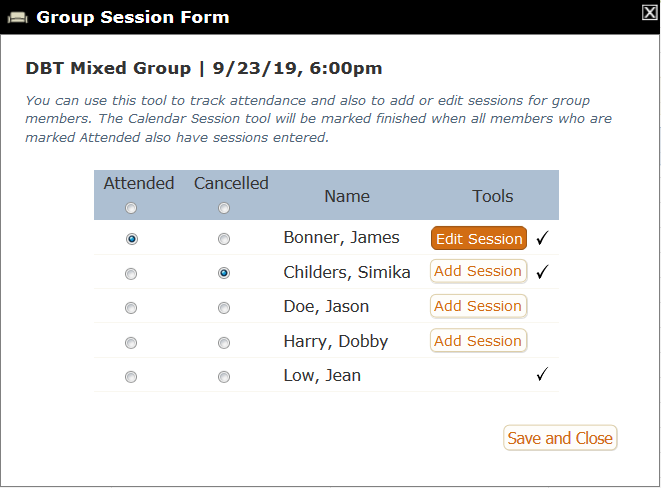
James Bonner's Add Session tool has become an Edit Session tool, indicating that the session has already been added. It can be viewed, or in some cases, edited by clicking the Edit Session button. There's also a checkmark on his row, indicating that the session has finished processing, i.e., the user did NOT put this session in the Process Claims & Statements tool. James is also now marked as having attended the group. The therapist may have done that manually when they entered the session, but also, by default PSYBooks marks all clients who have sessions entered as Attended. If this is not correct, the user can change the attendance to Cancelled and everything else will remain the same. The screenshot below shows that scenario, i.e., Jason Doe's row shows that he did NOT attend the group and yet a session has been entered:
Remember that since canceled appointments are always considered finished, the user didn't have to enter this session. They must have had a personal reason for doing so - perhaps to enable them to collect a payment for the session.
The screenshot above has one remaining client, Dobby Harry, whose session hasn't been begun. Let's assume the therapist enters Dobby's session but needs to put it in the Process Claims & Statements tool while they check on something. The resulting screenshot for that situation would look like this:

As you might have guessed, what's happened here is that although the session has been created (as can be seen by the presence of the Edit Session tool), there's no checkmark in the category where other sessions have been marked as Finished. This one session is still in the Pending state, which will keep the whole group in Pending (i.e., the couch icon on the Appointment Block will have the "!"). This alerts the user that there's at least one task they still need to complete before this group can be marked as Finished.
To summarize, for group therapy appointments, the couch icon on the Calendar stays in the Pending state until all available sessions for each member who attended the group have been completely processed. If there's at least one session that either hasn't been started or has been placed in the Process Claims & Statements tool, there are still tasks for you to do, so the session status remains in the Pending state on your Calendar.
-
Add Session: Finished
The session task is considered complete when it's been processed to a payer - usually either an insurance company or the client. The Finished state of the Add Session tool has a checkmark beside the couch, giving you a quick, visual confirmation that you've completed that task:

Notice that when you process a session directly to the client, it's not necessary to create a client statement. The session is considered "Finished" as soon as you process it. Creating a client statement is optional. However, to achieve a Finished status, no sessions can be in the Process Claims & Statements tool.
As discussed above, with therapy groups, all sessions for all clients who attended must be completely processed to achieve the Finished state.
Add Client Payment
The basic idea behind the Add Client Payment tool is the same as the session tool, i.e., to allow you to enter a client payment right from the Calendar and also to give you feedback to let you know when you've finished with those tasks. As with the session tool, the Add Client Payment tool only appears on appointments designated for clients and/or for therapy groups. They will not appear on non-clinical appointments such as those designated as Events, Other Person or non-therapy groups:
Insurance payments are not included with the Appointment Block tools since you would not receive the insurance payment for this appointment at the time of the actual encounter. Insurance payments come in later, so there's no need to track them here. You can add insurance payments with the Add Payments & Allocations tool on the Charts page.
As with the session tool, there are three states for the Add Client Payment tool: Default, Pending and Finished.
Also, since the Add Client Payment tool on the Calendar is meant to let you know the status for the payment on that particular appointment, if you try to add the payment before the session has been entered, you'll get this alert:

Add Client Payment: Default
The Default state of the Add Client Payment tool appears on individual client and group therapy Appointment Blocks when they are first created. The Default State looks like this:

Add Client Payment: Pending
Using the same symbol as was done with the Add Session tool, the Pending form of the Add Client Payment tool looks like this:

Also, as with the session tool, there are slightly different variations depending on whether you're entering client payments for an individual appointment or for a group.
-
Individual Appointments
There are many possibilities with client payments. For example, a client might pay for today's session plus add some for back payments. Some clients pay ahead. You may be billing the client for your standard rate but writing off some or all of it. In some cases, insurance covers the entire bill so there IS no client payment. Because of the number of variations, it would be hard for us to know when a client payment is finished unless you tell us. For that reason, the first screen you see when you click the Add Client Payment tool from the Appointment Block is a small screen asking if you want to mark this task finished:

Notice that this screen also has buttons allowing you to add a client payment if you choose. Marking the payment as finished and actually entering a payment are completely independent processes. PSYBooks does not require you to do either. The "Finished" feature is provided as a user-aid, allowing you to keep track of the remaining tasks you need to do. In cases where you don't expect a client payment for that session, you might want to mark the payment finished even though you don't enter a payment. Similarly, if the client makes a partial payment, you might want to leave the Finished checkbox unchecked even though you enter a payment - just to remind yourself that there's more to collect from the client. The Payment Finish Tool is reversible, i.e., if you mark it as finished and then change your mind, you can always uncheck the box.
If you do choose to add a client payment, clicking the first button will open the regular Add Client Payment form that you're used to seeing.
-
Therapy Group Appointments
There are two things to remember about entering payments for groups from your Calendar:
- You can't enter a payment for a group member until after you've entered a session for them.
- If you have non-client members in your group, since you won't be able to add sessions for them, you also will not be able to add payments.
Unlike sessions, client payments do NOT correlate directly with attendance. This allows you to enter payments (or not) for group members who were present as well as for those who weren't. Again, you're in charge of deciding which payments are finished - we don't automatically enter this value. When you click on the Add Client Payment tool of a group appointment, the window that opens might look something like this (continuing with the group we discussed in the section above on adding sessions for groups):
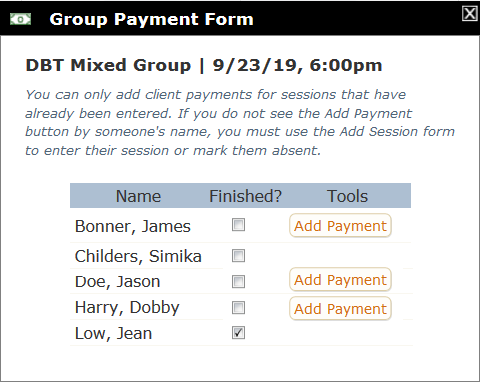
At first, this form is confusing because whereas some rows have one or more tools, others do not. It could be that sessions haven't been entered for everyone in the group yet. To understand the possible implications, we'll consider each row separately.
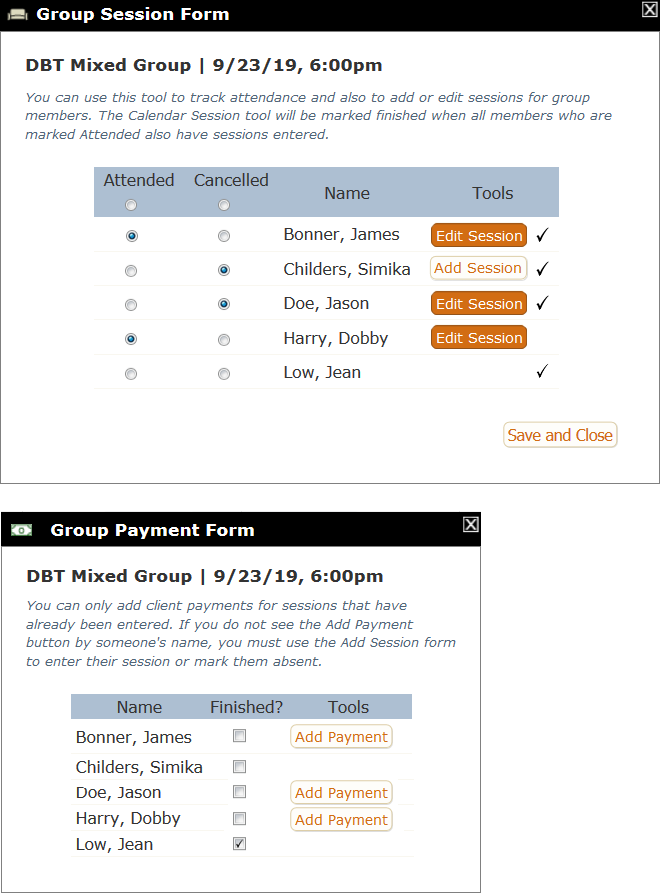
To begin, we need to learn a bit more about attendance. Even though client payments aren't directly correlated with attendance, there's an indirect way in which they are. The screenshot above was taken from the Group Session Form for the same date. The image below shows both forms:
Here's how the two work together:
Looking at the Group Session Form, we can see that the first person, James Bonner, is marked as having attended the group and his session for this group has been entered. (There's a checkmark and an Edit Session tool on his row instead of an Add Session tool.) Since a session has been entered, the user can add a client payment for that session, thus explaining why there's a checkbox to mark his payment finished and also an Add Payment tool on his row in the Group Payment Form.
The second person, Simika Childers, was marked as Cancelled on the Group Session Form. Although it's possible to add a session with a Cancelled attendance status, the user did not choose to do so. Since client payments entered from the Calendar depend on having the session entered first, the Add Payment tool will not appear on Simika's row on the Group Payment Form.
If the user needs to enter a client payment for Simika, they could go back to the Group Session tool and add a session for her. Since sessions can be entered with the Cancelled attendance type, entering a session would enable them to also enter a client payment. Another option is to add a client payment on the Charts page with the main Add Payments & Allocations tool. Since payments added from Charts aren't tied to a specific session, you have more leeway in what you can add.
Notice that even though you can't add a payment for Simika, you can mark the payment task as finished. Those are independent processes.
- The third member of the group, Jason Doe, was also marked as Cancelled, but unlike Simika, the user chose to add a session for Jason. For this reason, it's possible to add a client payment for Jason from the Calendar tool. Notice that his Finished box is not checked. Remember that it's up to you to tell us whether a client payment is finished. Unlike with sessions, the finished status on payments is not a value we enter automatically except in the case of non-clients.
- The fourth member is Dobby Harry. This is the client whose session is still in the Process Claims & Statements tool so they do not have a checkmark on the Group Session Form indicating that their session is finished. However, because the session has been started, the user can add payments to Dobby's account and/or mark his payment as finished. In this way, the session and payment tools work independently, i.e., it's possible for a payment to be finished before the session is.
- The final group member, Jean Low, is a non-client. Since it's not possible to enter sessions for non-clients and since payments can only be added after a session has been entered, that means it's also not possible to enter payments for non-clients. For this reason, Jean Low's Finished status has been automatically set and there's no Add Payment tool on her row.
Add Client Payment: Finished
Going back to the Add Payment tool on the Calendar, the Finished state of both individual and group appointments has a checkmark beside it like this:

To trigger the Finished state, all client payments for that appointment have to be marked as Finished.
-
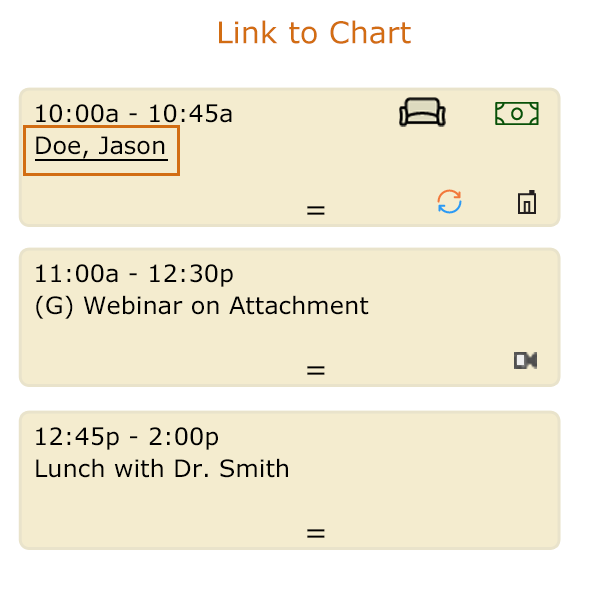
Link to Chart
Client appointment blocks have links to take you to the client's chart in case you want to check your notes, the client's balance, or anything else in the chart while you're on the Calendar. The client's name will have an underline to indicate that it's a link:
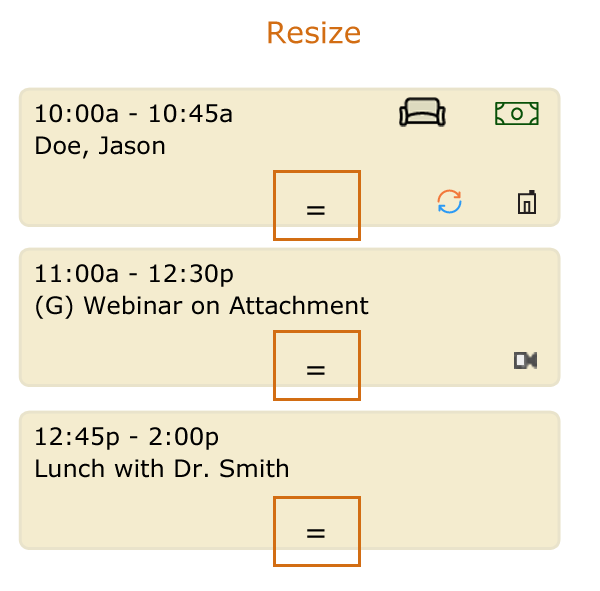
Resize
The Resize tool is a standard tool on online schedulers. It allows you to click and drag the bottom border of an Appointment Block to make the appointment shorter or longer. It appears on all appointment types in PSYBooks:
Repeating Status
The Repeating Indicator icons are status tools to tell you whether the appointment is a single event, a repeating event of some type, or part of a repeating event that's been changed for this particular appointment. They look like this:
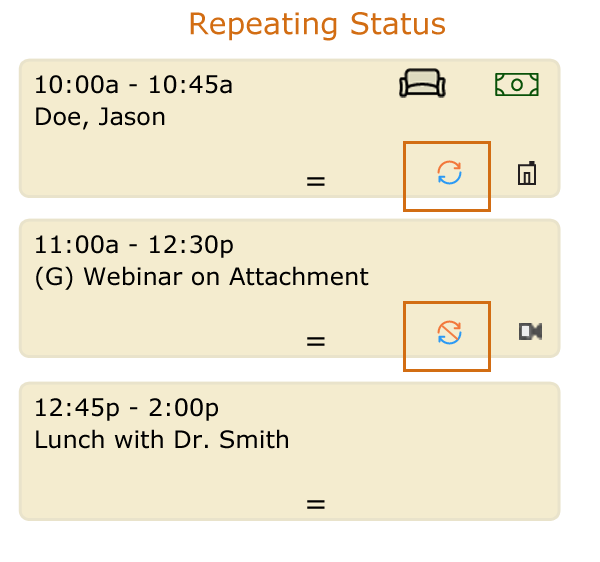
In the example above, the top appointment is a client and is part of some type of series of appointments. The client may come weekly, monthly, daily - whatever - we would have to actually open the appointment to see the exact nature of the series. However, the Repeating Indicator icon on the Appointment Block lets us know that the appointment does repeat.
The next Appointment Block down - the Webinar on Attachment - has an icon indicating that although this, too, is part of a series of Webinars, this particular appointment is different in some way. The "broken repeating" icon gives us that information. Maybe the webinars are normally on Tuesdays and this one is on Wednesday. Maybe they're normally two hours and this one is only 1 1/2 hours. We'd have to investigate further to find out exactly how this one appointment is different from the others, but the broken repeating icon lets us know that it is.
Notice that Repeating Indicators can appear on any appointment type that repeats: client appointments, therapy and non-therapy groups, events, and appointments with non-clients. For example, in the screenshot above, if the "Lunch with Dr. Smith" is part of a series, it would also have the Repeating Indicator.
Modality
There are four different appointment modalities supported by PSYBooks: you can have an appointment in your office, via video, by phone, or "other." This icon is the last one on the bottom row:
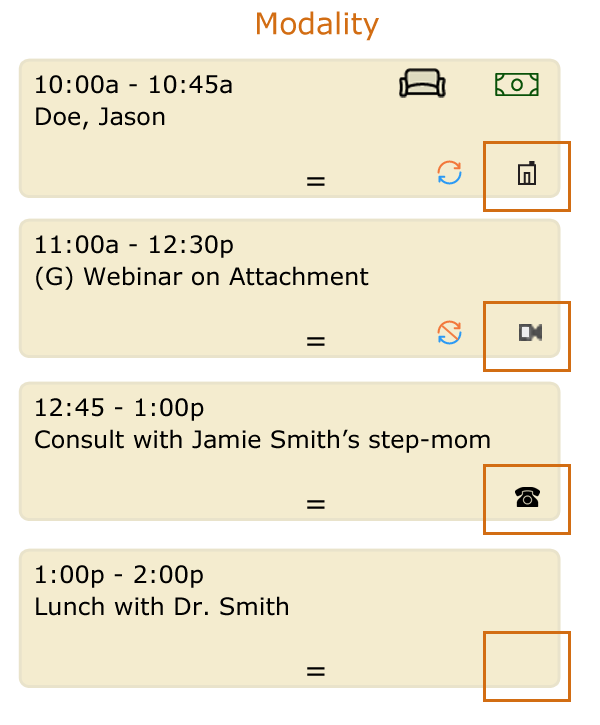
In the screenshot above, the top appointment is indicated as taking place in the therapist's office, the second one is a video session, third is a phone consult, and the last one is an "Other" (which has no icon).
There are actually three possible video icons - one for each of the two PSYBooks video products (Connect and SecureVideo), and a 3rd that will appear if you indicate that you're not using a PSYBooks video product. They look like this:
- PSYBooks Connect icon:

- SecureVideo icon:

- Non-PSYBooks video icon:

PSYBooks video icons are clickable, allowing you to start your video session right from your calendar. It is not necessary to go to a different page in the app to begin your session. In contrast, a solid video icon means that you indicated that you're using some other type of video (i.e., not PSYBooks) for this particular appointment. Solid video icons are not clickable. You'll need to open whatever program you intend to use to start your video session and afterwards, come back to PSYBooks to enter any other data pertaining to the session.
The Show/Hide Top Icons Toggle
The complete set of icons on each Appointment Block is visible in both the Daily and Weekly Calendar views. Depending on your screen size, there may be times when you want to hide the top row of icons (Add Session and Add Client Payment) if they are overlapping other parts of the Appointment Block. For that reason, there's a Show/Hide Top Icons link at the top of the Calendar that you can toggle on or off. It allows you to hide all Add Session and Add Client Payment icons if they are in your way.
The top screenshot below shows a portion of a PSYBooks Calendar with the Add Session and Add Client Payment icons visible. Notice that the link says "Hide Top Icons." The bottom screenshot shows the same Calendar with the top icons turned off. The link now says, "Show Top Icons," allowing you to make the icons visible again at any time:
![]()
Hiding the Add Session and Add Client Payment icons doesn't affect their functionality in any way. For example, if you've already completed some tasks with those tools but need to hide them momentarily, when you click "Show Top Icons" to make them visible again, all of the previously entered tasks will still be there.
Putting it all Together
For those of you wanting a quick overview of all of the possible tools in an Appointment Block, we'll consider the screenshot below. This was taken from a factitious PSYBooks subscriber we'll call Dr. Jones, who has a small private practice and also teaches at a university.
When Dr. Jones opens PSYBooks for the day, she can see her entire schedule at a glance. This particular day starts at 9am and ends at 6pm. Her 9am appointment is with someone named Julie Greenfield. We know right away that this is some type of clinical appointment because it has the Add Session (couch) and Add Client Payment (dollar) tools on it. Since there's no (G) by the appointment name, we know that this is an appointment with an individual client. We can also see that the appointment is to take place in Dr. Jones' office (because of the Modality icon) and that it's not part of a series. This is a stand-alone appointment Dr. Jones has with a client named Julie Greenfield.
The second appointment of the day is with Jake Conner. This is also a client appointment but this one has the video icon in the Modality area so we know that this must be a telehealth appointment. We can see that Dr. Jones is using PSYBooks video for this appointment (since there's a transparent area in the camera icon), so she'll be able to access her telehealth platform right from her PSYBooks app. We can also see that this is a broken repeating appointment. That means that although Jake seems to be a regular client - or at least has a series of appointments set up - this particular encounter has been altered in some way.
Dr. Jones' 11am appointment is listed as a Parenting Group. Since there's a "(G)" by the title, we know that this is indeed a group of some sort. Since the couch and dollar icons are present, we also know that this is a therapy group as opposed to some type of non-therapy group. Dr. Jones will be able to enter the sessions and also the client payments for each member of the group right from this Calendar page. The Parenting Group meets in Dr. Jones' office and is also a broken repeating appointment.
The 1pm appointment is also listed as a group but since the Add Session and Add Client Payment tools aren't present, we know that it is NOT a therapy group. The title of the encounter is Supervision with Edward so we can assume that perhaps Dr. Jones wanted to make this encounter into a group for some other reason. This is another appointment in Dr. Jones' office and is a repeating appointment.
The next appointment is the first non-clinical appointment of Dr. Jones' day. Since the title is "Teach Abnormal 365 Kell Hall" we can guess that this is a class that Dr. Jones is scheduled to teach. Notice that there's no Modality icon. This means that Dr. Jones has marked this as an "Other" modality. She has given herself a reminder of where the class meets in the way she wrote the appointment title (365 Kell Hall). As might be expected with classes, this appointment repeats.
Dr. Jones' final appointment of the day is a telephone consult with someone named Dr. Smith at 5:00pm. Dr. Jones could have followed her earlier precedent and used the appointment name to include Dr. Smith's telephone number, but perhaps she doesn't need that.
We also notice that Dr. Jones has color-coded each of her appointments differently. We're not sure why she chose the colors she did and in fact, this looks a bit random. Some users might have wanted to make all clinical appointments one color and everything else something different - or perhaps make all classes a specific color - or any other system that might help them differentiate their appointments. It almost looks like Dr. Jones just chose colors she liked - which is certainly another way to do it.
No matter how you use the PSYBooks Calendar, it's designed to be a "delighter" - something that not only makes your office tasks easier, but that also adds a little fun. 
As you can see, there's a wealth of information in PSYBooks' Appointment Blocks. In addition to providing information, Appointment Blocks for clinical appointments have tools that allow you to enter both sessions and client payments right from the Calendar, helping to streamline your workflow.
Search Calendar
What this isThe Search Calendar tool allows you to easily find client appointments and/or other events you've scheduled with your PSYBooks calendar.What it looks likeThe Search Calendar tool appears on all pages in the Calendar (Daily, Weekly and Monthly) and looks like this: 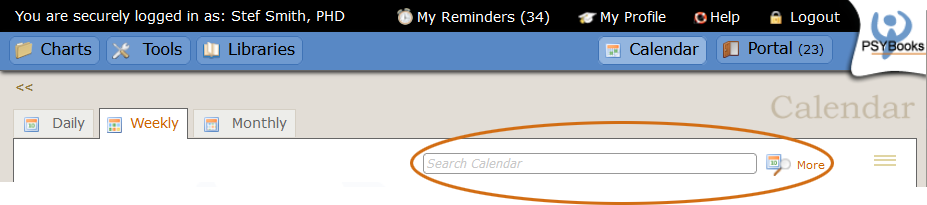 |
Where this isYou can access the Calendar from the global nav at the top of every page or from the Sitemap links at the bottom. The Search Calendar tool is at the top right of each page.
|
The Search Calendar tool has two sections:
- A textbox for your search string with a tool to click to begin the search
- A link for more options
Both are illustrated below:

If you click the "More" link, the window that opens looks like this:
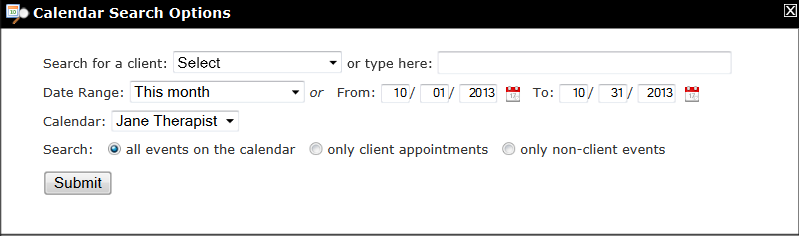
The options here allow you to:
- Use a client select box to look for a specific client
- Use the "or type here" textbox to write whatever you want
- Select a date range for the search
- Choose the calendar to search (only GOI accounts have the possibility of having more than one calendar)
- Choose whether you want to search all events on the calendar, only client appointments or only non-client events
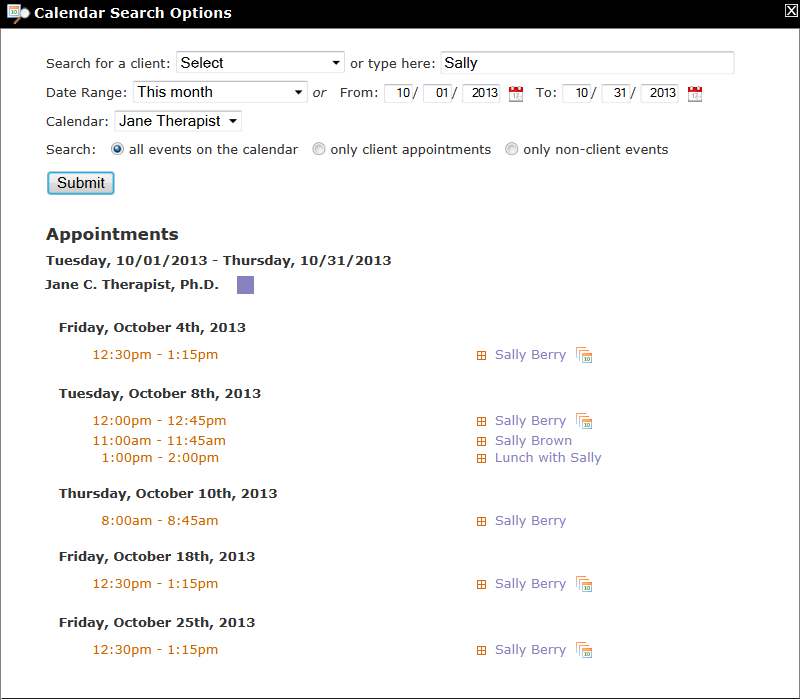
The "or type here" textbox on the top line will search both client appointments and events unless you've specifically limited your search to only clients or only non-client events. For example, if you type "Sally" in the textbox, it will bring up all client appointments for a client named "Sally Brown" just as if you had used the client select box to enter Sally Brown's name. However, by typing "Sally" in the "or type here" textbox, your search will not be limited to Sally Brown's appointments. It will also find appointments for ALL clients who have Sally in their name as well as an entry for an event you titled "Lunch with Sally".
Performing the search above, limited to the month of Oct, 2013, might produce results similar to this:
Clicking a time link on any appointment will take you to that page of the calendar. Also, clicking the little red box with a plus in the middle (![]() ) will give you some edit tools so you can make changes in the appointment right from the search results page such as shown below for Sally Berry's appointment on October 10, 2013:
) will give you some edit tools so you can make changes in the appointment right from the search results page such as shown below for Sally Berry's appointment on October 10, 2013:

You can change the appointment color simply by clicking a different swatch. The Edit and Delete buttons are also available should you need additional functions.
Calendar Settings (Left Nav)
What this isThe Calendar Settings tool allows you to change global settings to your calendar such as the name of your calendar, how your client names appear on the calendar, the default color of appointments, calendar sharing, etc.What it looks likeThe Edit Calendar Settings tool is the top tool of the left nav of the Calendar section: 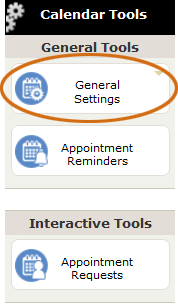 |
Where this isYou can access the Calendar from the global nav at the top of every page or from the Sitemap links at the bottom. The Calendar Settings tool is on the left nav in the Calendar Settings section.
|
Clicking on the tool above opens this form:
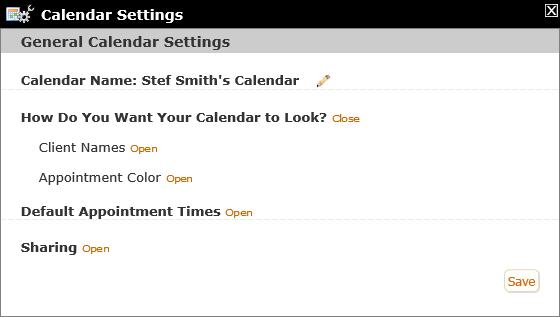
The Calendar Settings tool has four main sections: Calendar Name, How Do You Want Your Calendar to Look?, Default Appointment Times and Sharing. Each will be discussed below.
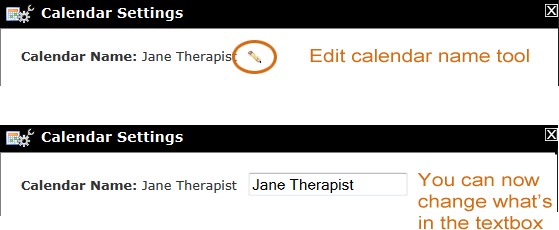
- Calendar Name
By default, your calendar is given the name listed in your Therapist Profile. However, you can change it to whatever you want by clicking the Edit Calendar Name tool. Clicking the tool will open a small textbox that's pre-populated with the current calendar name, making it easy to change it to whatever you wish:
- How Do You Want Your Calendar to Look?
This category is divided into two sub-categories: Client Names and Appointment Color.
- Client Names
PSYBooks gives you a lot of control over how your client names are displayed on the calendar with the following section of the Client Settings tool:
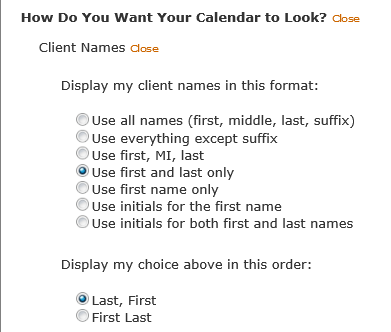
For example, if you have Jim Carl Brown, Jr listed as one of your clients, by changing the top group of settings above, you can have his name displayed as any of the following:
- Jim Carl Brown, Jr
- Jim Carl Brown
- Jim C. Brown
- Jim Brown
- Jim
- J. Brown
- J. B.
If you also change the order the names appear from the default (First Last) to Last, First, you have these additional possibilities:
- Brown, Jim Carl Jr
- Brown, Jim Carl
- Brown, Jim C.
- Brown, Jim
- Jim
- Brown, J.
- B., J.
The default setting is to use the first and last name only in the First Last order. If you don't change this setting, Jim Carl Brown, Jr's appointments would be displayed as Jim Brown.
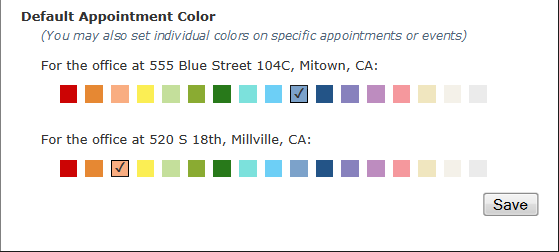
- Appointment Color
Your calendar has a base (default) color for your appointments. You may change the color of any specific appointment as you're adding or editing it, but there will always be a base color to fall back on. Calendar base colors are actually set on your office(s), not your name. That means that if you have more than one office location where you schedule appointments, each will have its own default color to make it easier for you to identify appointments.
You can always change any default color to a color of your choice. The sample below shows a therapist with two office locations. She could change the color on either or both location by clicking a different swatch for that location:
- Appointment Times
When you add an appointment, either by clicking the calendar or by using the Add Appointment tool, PSYBooks tries to make it easier for you by computing the Stop Time of the appointment from the Start Time. By default, client appointments are assumed to last 45 minutes and Other Events are an hour. This means that if you entered a session for Jane Smith with a start time of 9:00am, PSYBooks would automatically list the Stop Time as 9:45am.
Although you can't change the Other Event default setting, if your most common client appointment is not 45 minutes, you can change the client appointment default time to whatever you want with this textbox in the Appointment Times section of the Calendar Settings tool:

- Calendar Sharing
When two or more therapists share an office, there may be times when they want their office partners to be able to have access to their calendars. In the example below, two therapists are listed: Stef Smith and Gustav Smirnov:
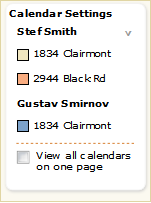
Stef is listed first because this is her account. She has shared her calendar with her office partner, Gustav. In this case, Stef has two office locations - one on Clairmont and the other on Black Rd. When Stef comes to her calendar, the appointments in both of her offices are visible, but she can not see any of Gustav's appointments. She can click either of her office addresses (Clairmont or Black) to toggle that address on or off. If she clicks Gustav's address on Clairmont, her own calendar(s) will disappear and Gustav's calendar will appear. If, however, she checks the View all Calendars on one page checkbox, she will be able to view her own calendars and Gustav's on one page. You can read more about sharing calendars in the section on setting up GOI accounts: Sharing Calendars in GOI Accounts
Appointment Reminders
What this isThe Appointment Reminders tool allows you to create and send email and/or text reminders for clients and any other person or event on your calendar.What it looks likeThe Appointment Reminders tool looks like this:  |
Where this isThe Appointment Reminders tool is on the left nav of the Calendar section of the app.
|
Differences Between Text and Email Appointment Reminders
Aside from the fact that many people have personal preferences about whether they'd rather receive a text or an email appointment reminder, there is another factor to consider: length. Most text reminders are limited to a total of 160 characters. What makes this a bit challenging is that it may be difficult to accurately determine the number of characters in your text ahead of time. For example, you may decide you want to include your client's name in the reminder - maybe something like "This is to remind John Doe of an appointment with Robert C. Brown, Ph.D. on 10/03/17 at 2pm. Please call 111-222-3333 with any changes within 24 hours."
The reminder above is 151 characters, which is well within the limits of what can be sent. However, in a situation like this, "John Doe" is most likely a variable, meaning that the name of the person receiving the reminder would be inserted there. If the person receiving the reminder happens to have a name that is significantly longer than John Doe, the reminder could end up being truncated. We do warn you when we THINK you might be at risk of having a truncated reminder, but since we don't know how long the names on your appointment reminders lists may be, we're only guessing. However, as long as you are aware of the issue, you will more than likely be able to find ways around it, e.g., by shortening the whole text a bit, or possibly by only using a client's first name instead of their whole name.
Email reminders, on the other hand, can be as long (or short) as you want them to be. They will be sent exactly the way you set them up and you'll never have to worry about anything being truncated.
Getting Started with Appointment Reminders
Appointment Reminders are turned off by default. However, if you want to turn them on, all you have to do is click the Appointment Reminders tool on the left nav of the Calendar page and then click the box beside "Turn on appointment reminders:"

If you don't want to do anything further, email appointment reminders will be sent to both therapist (account holder) and clients or others with appointments, at these times:
- When a new appointment is made
- When an appointment time is changed
- When an appointment is canceled
- 26 hours before the appointment
- 2 hours before the appointment
In addition, the therapist will receive the following email each morning:
- Daily schedule
Edit/View Global Reminders
If you want to view or make global changes to the default reminders, you can use the "Edit Global Reminders" tool, which is a link in the blue header area of the Appointment Reminders table:

Clicking that link opens a window that looks like this - the top portion of the form is for email reminders and the bottom portion below the orange double line is for text reminders:

The screenshot above is what this tool looks like with the default settings. In other words, email appointment reminders are being sent to everyone and they all use the default templates. The Template and Times columns only appear when the checkbox on that row is checked. Since no one is receiving text reminders, none of those checkboxes is checked, therefore you cannot see the Templates or Times columns on those rows.
In addition to the the two large mail vs. text horizontal "rows", this form also has three columns: the category or type of appointment (i.e., Everyone, Subscriber, Clients and "Other"), the template you want to use with that category, and the times you want their reminders to be sent. In other words, if this page had PSYBooks' typical blue table headers, it would look something like this:

An Overall Strategy for Working with Appointment Reminders
If you don't want to use the default appointment reminders, a good strategy is to use the "Edit Global Reminders" form to change the global settings, then make changes to any individual's appointment reminder settings using the table. To edit the global reminders, start by choosing the category of appointment type you want to change (e.g., Everyone, Subscriber, Clients and/or Others):
Editing Global Reminders: Category
The first column on this form shows the category of appointment reminder. You can choose to send email and/or text reminders to any category. For example, you might want to change your default settings to send text reminders to yourself, but continue to use email reminders for everyone else. Since the top part of this form is for email reminders and the bottom half is for texts, the changes just described would cause the form to look like this:

Once you've chosen the global category you want to work with, you can then change the template and/or the times on that category's row.
Editing Global Reminders: Templates
Clicking a template select box gives you options similar to these:

Notice that in addition to the Default template, you have the option of creating new custom reminder templates with the "Add email template" or "Add text template" links. Although adding a template is not difficult, many of the same principles are covered in viewing and/or editing existing templates, so we'll cover that first.
Viewing and Editing Global Templates
The binoculars beside the template select boxes allow you to view or edit any of your existing templates. When you first begin, the only option you'll have is the Default template, so we'll start there. If you click the binoculars beside the Default template in the Email section of the Clients row:

the window that opens would look something like this:

This form divides into two main sections: the Template section at the top and the Variables section at the bottom:

The shaded area in the Template section (i.e., the "Current Template") shows you the text of the reminder your clients would receive, for example:
Current Template:
This is to remind you of the appointment you have scheduled with Steff Smith, Ph.D. for:
[dayDateTime]
If you have any questions about this appointment or if you need to cancel, please contact Steff Smith, Ph.D. at 770-842-1050.
Your name and credentials (as they appear in your profile) would appear in place of "Steff Smith, Ph.D." and the first phone number listed in your profile would appear instead of 770-842-1050. The [dayDateTime] is a variable and would show the day, date and time of the appointment. If you have any questions about the variables used in the reminder - or if you want to make changes, you can use the "Variables" section, which appears below the "Current Template" section of the larger Edit Template form shown above:

Working with Variables
The Variables section is comprised of two sub-sections: "Variables Used in This Reminder" and "Other Variables You May Use." Each will be discussed below.
Variables Used in This Reminder
Looking first at the Variables Used in This Reminder, we see an explanation of the [dayDateTime] variable and also a sample so you can see the formatting (Fri, Aug 3, 8:00 AM, EDT):

We can also see that there are two more variables used in this reminder: [providerName] and [providerNumber1]. The values for both of these variables have been obtained from the subscriber's Profile, so they have already been filled in. Putting all of this information together, we now know that the complete default email reminder that would be sent to this therapist's client would read something like this:
This is to remind you of the appointment you have scheduled with Steff Smith, Ph.D. for:
Fri, Aug 3, 8:00 AM, EDT
If you have any questions about this appointment or if you need to cancel, please contact Steff Smith, Ph.D. at 770-842-1050.
When you open this form on your own account, [providerName] and [providerNumber1] would be filled in with the information in your PSYBooks Profile.
If you are satisfied with the variables in this reminder, you don't need to do anything else. However, if you'd like to make changes to any of the variables, there are two ways to do it. You can: 1) make global changes so they populate throughout PSYBooks or 2) make changes that only affect Appointment Reminders.
- Change the Variable Throughout PSYBooks. To understand the first possibility, let's say our fictitious therapist in the example, Steff Smith, has decided she wants to include her middle initial "A" in her appointment reminders. Or maybe that's not the phone number she wants to use on reminders. If Steff wants the variable changes to affect everything in her PSYBooks account, that should be done from clicking the "My Profile" link at the top of any page. Once the profile opens, she can click her name in the table and make any changes she wants on the Edit Therapist Profile form:

Changing the Profile will affect everything in PSYBooks, e.g., the information Steff sends to insurance companies, statements she prepare for clients, etc. Also, since the change was made globally, the next time she views a template in the Appointment Reminders section, she'll see that the variables have been changed to reflect the edits she made in her Profile.
- Make Variable Changes That Only Affect Appointment Reminders. On the other hand, if Steff wants to keep her Profile the way it is and only wants the changes to appear in her Appointment Reminders, she can make the changes in the "Variables Used in This Reminder" section of the "Edit Email (or Text) Reminder Template" by clicking the link of the variable she wants to change. The series of images below show how this works:

When you click "Save Variables" at the bottom of the form, you will have changed the Default email reminder template by changing one (or more) of the variables used in the template:

Other Variables You May Use
Below the "Variables Used in This Reminder" section, is a section of variables called "Other Variables You May Use." These will be different on each template but a sample of what you might see is below:

Notice that some variables in both sections are followed by an explanation of the variable and an example, whereas others are orange links that you can click and change:

As indicated in the above graphic, variables outlined in blue are set by the system and will be different in each reminder. This means that you can't see exactly what they will say on your template page. For example, the [dayDateTime] variable will give the day, date and time of the actual appointment. Similarly, [appointmentFirstName] will insert the first name of the person receiving the reminder. You cannot directly change these variables on the template form. However, if you change the day, date and/or time of the appointment in your calendar - or if you change the recipient's name in their profile or demographics page, the system will automatically insert the updated values in your reminders.
Conversely, the variables outlined in orange are ones you can change. Some of these, such as the various forms of your name, office address and/or phones, are taken from your profile. However, as indicated above, you can change them - either here or in your profile - to send out different values of these variables in your appointment reminders. Others, most notably the custom variables, which will be discussed later, can be used for anything you like.
Editing Templates
To make changes in your reminders, you begin by clicking the orange "Edit Reminder" button at the top of the form:

Clicking "Edit Reminder" opens a form that looks like this (the form below is an email template, but the principles are the same with text templates):

This form may look confusing at first, but if you look closely, you'll see that the original form has been collapsed to 50% of its width and appears on the left half of the window. The right half of the window is where you make your changes. This allows you to see both the current reminder plus all the variables you can use while you're modifying it.
To understand the form, it helps to compare the shaded area on the left with the shaded area on the right. The one on the left is the reminder with all variables already parsed. (The exception is the dayDateTime variable, since that can only be determined once the reminder is attached to an actual appointment.) The shaded area on the right has the unparsed version of the reminder in textarea fields, which will allow you to make changes. Notice also that the shaded area on the right has a way to add an initial paragraph and also a closing paragraph:

Before getting into the finer points of making template changes, the first thing you may want to do is give your new template a name. Even though we started this process by editing the Default email reminder, once you make changes to this form, you will be creating a brand new template - not overwriting the Default reminder. We will give it a name for you if you don't put anything in the Template Name box, but it will probably help you to identify your template if you name it yourself:

After that, you're free to make any modifications you might need. Notice that the variables on the left side of the page are blue in this edit version of the form. That's because they are now links that you can drag and drop to a textarea on the right side of the page where you want them to appear:

Changes you make on the right - including typing and/or dragging and dropping variables - will automatically show up in the "Current Template" section on the left.
In the sample below, the user has created both an opening and a closing paragraph and added some text (using the [officeAddressShort1] variable) to the 3rd paragraph:

Notice that the user has chosen to use some of the "Other Variables You May Use" in their template. Specifically, they used [appointmentFirstName] in the paragraph they added at the top; they added a sentence to the 3rd paragraph that included [officeAddressShort1], and instead of [providerNumber1], which is used in the Default template, they decided to use [providerNumber2] if people need to call about the appointment.
In the Preview section on the left, we can see a sample of the custom reminder that the user just created. Notice that there are two variables that have not been parsed: [appointmentFirstName] and [dayDateTime]. This is because these variables will change depending on the specific reminder being sent. For example, for a client named John Smith, instead of "Hi [appointmentFirstName]," it would say "Hi John," - for LaKeesha Jones, it would say "Hi LaKeesha," and so on. The [dayDateTime] variable would be replaced with the day, date and time of their particular appointment.
Clicking "Save Template" will create a new template in your dropdown box that you can then use with any clients and/or other appointment types.
Creating New Global Templates
So far, we created a new template by modifying an existing one. You can always use that method to create new templates if you want. However, you can also start from scratch by opening the Template select box in the Edit Global Reminders tool and clicking "Add template." We'll illustrate a text template this time (i.e., in the bottom half of the form), so the wording is "Add text template:"

Clicking that link will open a form like this:

Notice that this form is very similar to the Edit Email Template form we covered above. The main difference is that since it's a new template, both the preview area and the textarea on the right are blank. Also, because this is a text template instead of an email one, you can't add extra paragraphs and the number of characters you can send is limited to 160. The screenshot below shows one possibility of a custom text reminder our fictitious therapist might have created with this form:

Since we clicked the "Add text template" from the Edit Global Reminders tool, if the therapist clicks "Save Template", she will now have a new text template called "Location" that will appear in both the Clients and the Other template dropdowns.
Editing Global Reminders: Times Sent
Above, we've covered setting both the type (email and/or text) and the template for your appointment reminders. The final thing you might want to change is to tell us when you want them to be sent. These settings are in the "Times" links at the end of any row. If we open the "Times" link at the end of either the "Everyone" or the "Subscriber" rows, we'll get a window that looks like this:

Again, these are the times used for PSYBooks default appointment reminders. The "Times" link at the end of either the "Clients" or the "Other" rows opens a very similar window. The only difference is that the last two lines aren't present:

Since we're looking at forms with the default setting, the times on both forms are the same. Appointment reminders will be sent when a new appointment is made, when an appointment time is changed or canceled, 26 hours before the appointment and 2 hours before the appointment. The main difference between the two forms is that the first window is of categories that include the subscriber (i.e., Everyone and Subscriber). For that reason, they include some features that only apply to the subscriber, i.e., receiving a daily schedule, and making the selections chosen the default for all. For example, if you preferred your reminders to be sent 50 hours and 4 hours before appointments, you could open the "Times" window on either the Everyone or the Subscriber rows, make those changes, and check the "Make the selections above my default time settings" box. The subscriber, plus all clients and others would then receive appointment reminders at the new times. Conversely, you can choose one set of times for the subscriber, another for clients and another for your "Other" appointment types.
Custom Variables
You may have noticed that the "Other Variables You May Use" section of the template form has three "custom variables:"

Clicking one of these variables will open a textbox where you can enter any information you'd like:

Clicking "Change" will create your variable:

You can then use that custom variable - in this case, [customVariable1], in the edit template form:

Feel free to be creative with how you use your custom variables. For example, you might want to send out a quote each week. By making it into a custom variable, you can use it in any template you might create. Here's one example of how that might look:

One thing to be aware of is that when you change a variable, it overwrites the previous value of that variable. For example, in the screenshot above, both [customVariable1] and [customVariable2] have values (1 is "our receptionist, Mohab Ali, " and 2 is ""Follow your bliss." ~ Joseph Campbell). If, instead of using [customVariable2] for our quote, we had changed [customVariable1] into our quote, any templates we had created that were supposed to use "our receptionist, Mohab Ali," would now display the quote there instead.
This completes the discussion of adding, viewing and editing global appointment reminders. Next we'll look at how to fine tune your appointment reminders by making changes that are specific to a single individual.
Individual Appointment Reminders
So far, we've covered making changes to your global reminders. You can also make changes to any individual's appointment reminder settings. For example, maybe you want the majority of your clients to receive text reminders. However, if you have a couple of clients that don't have cell phones, you might want to specify email reminders for them. Another use for individual reminders might be with new clients. Their reminders could, for example, remind them to come early to fill out your intake forms. Perhaps you have two office locations and you need to remind a client to come to a different location for their next appointment. Or perhaps you want to include a note reminding a certain client to bring their homework assignment with them. You could even use the reminders to send out affirmations or individual notes or congratulations for special occasions. The possibilities of what you might want to include in a custom appointment reminder are almost endless. These kinds of individual changes are made in the Appointment Reminder table which takes up the majority of the Appointment Reminders form:

Looking at the blue table header area, there are 5 columns in this table: Type, Template, Name, Send To, and When Sent. Three of these - Type, Template and When Sent (Times) - work almost exactly like they did in the global reminders. The Name and Send To columns are present because we're now working with individuals. Each of the columns will be discussed separately.
- Type. The Type column is where you specify whether you want this individual to receive email or text appointment reminders. The top checkbox in each row is for email reminders - the bottom checkbox is for text reminders. The email and text icons are there just to let you know which row is which; clicking either the icon or the checkbox will select the checkbox on that row. You cannot directly email or text a client from this screen.
The screenshot below shows what the default Type setting looks like before any changes are made, i.e., each row in the table has a check in the email checkbox and no text (SMS) checkboxes are checked:

However, if you wanted a particular individual to receive text reminders either in addition to or instead of an email reminder, you could select or deselect the box or boxes you want on that individual's row.
- Template. The Template column is where you specify which template will be used for your reminders. Since we're currently looking at PSYBooks' default settings, all of the templates in the email rows are set to "Default." Since no text reminders are being sent, templates in the text rows are still on the "Select" option:

As was possible with global reminders, you can add new templates with the Template select box, edit old ones, and/or select a different one. In general, all the things about adding, editing and viewing global templates apply to individual templates as well. However, there is one difference and that is that there are two ways to save individual reminders. When we looked at global reminders, they only had a standard "Save Template" button at the bottom. But when you add or edit a template on an individual's row, you have two buttons:

The difference between these two types of save is that the first one, "Save Template", will allow you to use this reminder again with other clients or appointment types. In contrast, "Save for this Person/Event Only" allows you to create a reminder for a specific individual or other appointment type. For example, you might create a reminder that says, "Hi John, Our next appointment is: [dayDateTime]. I'll be thinking about you on Thursday for your interview." That's obviously not a reminder you'd want to use for everyone; it's personalized just for John. In this case, you'd want to save it with the "Save for this Person/Event Only" button. Also, since this reminder applies to one specific week, you'd need to change John's reminder for the following week. Another example might be if you've created an "other" appointment type called "Staff Meeting." You might want to include the agenda for the upcoming meeting. Again, that information would be a customized reminder just for the Staff Meeting entry.
- Name. The Name column lists the name of the person to whom you'll be sending appointment reminders. Names in this table are sub-divided into three categories: the subscriber is listed in the first row (Steff Smith, PHD, in our example), followed by row(s) for "Other" appointments, if any, and finally clients are listed in the bottom rows of the table:

As a reminder, "Other" appointment types are those that have been added as an "Other" - instead of a client - on the Add Appointment form:

Notice that all appointments you make in PSYBooks will either be a client or an "Other" appointment type.
- Send To. The Send To column contains PSYBooks' best guess about the email address and/or phone number you might want to use for your reminders. You can change any of the email addresses and/or phone numbers with the Send To dropdown if they are not the best choices:

Again, since we're looking at the Default setting, only email reminders are being sent, which is why no phone numbers are shown in the Send To column. However, if we selected text reminders, the other fields in that row would automatically change, changing the Template select box to Default and revealing the phone numbers we have on file in the Send To column:

Note that neither Jake Conner nor Janette Dobbins has phone numbers listed in their charts, so they have a "NONE LISTED" designation in the Send To select. Similarly, their text checkboxes aren't checked - because until we have a cell phone number on file for them, we can't send them text reminders. If you want, you can add additional emails or phones right from the Send To select box by clicking the "Add new" link:

However, it's important to note that adding email addresses and/or phone numbers to the Appointment Reminder table does NOT add them anywhere else in the program. If you want to be able to use a client's email addresses and/or phone numbers throughout the application, add them to the Demographics page of the client's chart. If you want to add new emails or phones for the subscriber, do that on their Profile page.
PSYBooks programming rules for determining default email and phones
- When Sent. "When Sent" is the final column in the table:

Notice that there's a "Times" link in the top of each row for setting the times email reminders will be sent, and another "Times" link in the bottom for text reminders.

Both will open some version of this form:

These windows allow you to choose when you want your reminders sent. In the top one, the options "Send me my schedule each day" and also the option to make your selections the default only apply to the subscriber. For that reason, those last two items only appear on the subscriber's row. The window at the bottom is what opens when you click the "Times" links for Client and Other appointment types.
When you hover over any of the Times links, you'll be able to see a summary of when appointment reminders will be sent for that type of reminder for that person. In the screenshot below, the cursor in the top window is hovering over an email reminder; the one on the bottom shows a text reminder:

These hover windows just enable you to see at a glance when any of your reminders will be sent. If you want to make changes, you would click the Times link you need, make the changes you want, and click Save.

The Set Appointment Reminder Tool
Some forms in PSYBooks have a special tool called, "Set Appointment Reminder." For example, there's one on the Add Appointment form:

Clicking this tool opens the Appointment Reminder tool we've been discussing, and highlights the person for whom the appointment was set - in this case, a fictitious client named Jake Conner:

The Set Appointment Reminder tool is most helpful for new clients, for whom you do not already have an appointment reminder set. In fact, if you're using the default reminders, you will not even need it for new clients. When you have not made any changes to PSYBooks' default reminders, all new clients you enter will automatically be signed up for the default appointment reminders.
However, with new clients when you HAVE made changes to the default reminders, and/or for existing clients when you want to make changes to their appointment reminders, the Set Appointment Reminder tool can be helpful. When you click it, you'll be able to change and/or set any of the individual's appointment reminder settings as has been discussed above.
The Send Reminder Now Tool
Occasionally you might want to manually send an appointment reminder. The tool for doing that is on the Edit Appointment form directly under the Set Appointment Reminder Tool discussed above:

Clicking the link will use the type and template you already have set for that person to send them an appointment reminder for this particular session.
If you're not sure how to access the Edit Appointment form, you can read about it here: Edit Appointment.
Appointment Requests
What this isThe Appointment Requests tool allows you to offer appointment times to individuals in a dynamic way, i.e., if a time slot is filled before the recipient selects a time, that slot will no longer appear as a possible time.What it looks likeThe Appointment Requests tool looks like this: 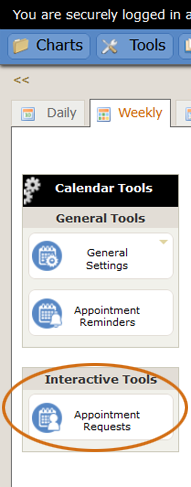 |
Where this isThe Appointment Requests tool is on the left nav of the Calendar section of the app.
|
The Appointment Requests tool is primarily for therapists who may not want to put their entire schedule online, but would like to be able to use the interactive portion of the calendar to send available appointment times to specific clients or other Portal Users. It might be used, for example, with new clients, or when a current client needs to reschedule or requests an additional appointment. When you fill out and submit an Appointment Request, the recipient will receive a link to the calendar page of their portal, which will display the times you designated. They can then select the time(s) they want and their choice will automatically be added to your calendar as well as theirs. If you have filled one or more of the times since sending the link, those times will not appear on the recipient's calendar so you don't have to worry about double-booking. Recipients must be Portal Users to view their calendar. However, if they're not, you can send them a Portal User Invite at the same time you submit the Appointment Requests form.
When you click the Appointment Requests tool, the window that opens looks like this:
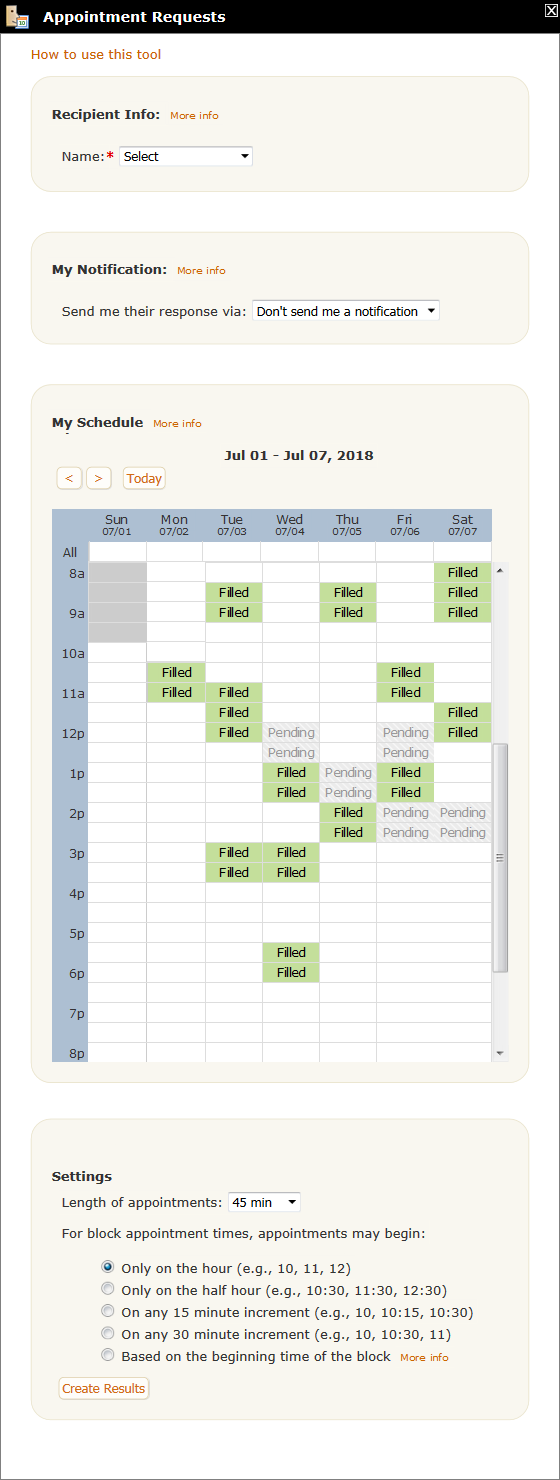
Although this tool is long, it's divided into sections - Recipient Info, My Notification, My Schedule, and Settings - to make it easier to use and understand. We'll discuss each section separately below:
- Recipient Info
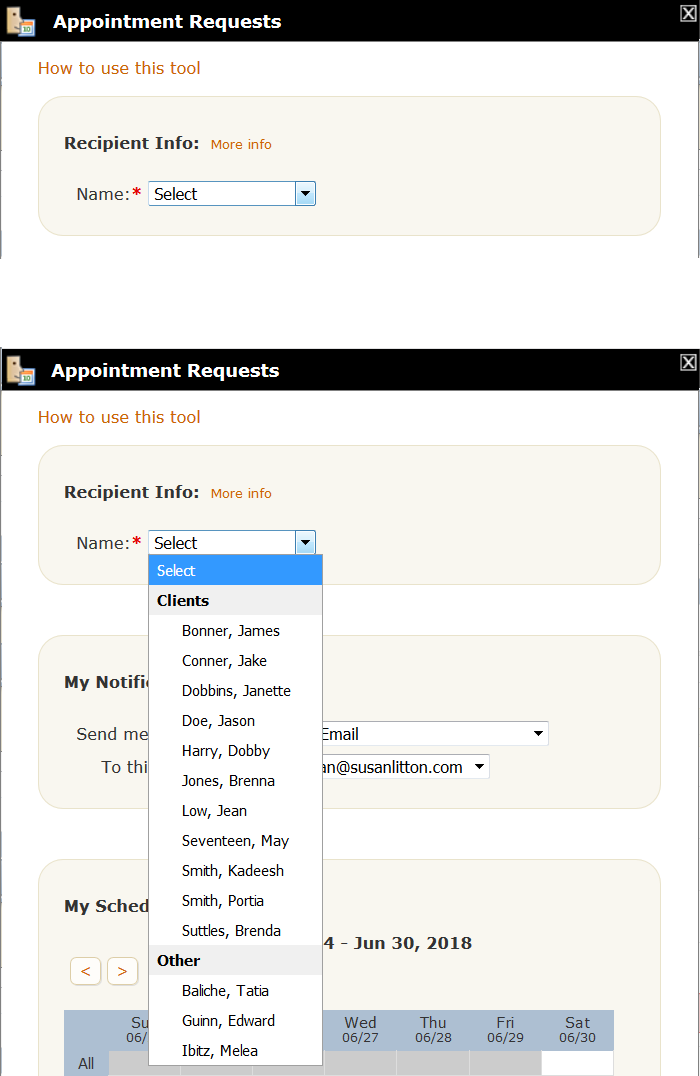
When you first open the Appointment Requests tool, the select box in the Recipient Info section is closed - as in the top portion of the image above. When you open the select box, the dropdown list includes all your clients at the top followed by any "Other > Person" appointment type entries you've made.
As soon as the user makes a choice in the "Name" dropdown of the Recipient Info section, an additional row appears. It also has a default state (top portion of the image below) and a final state that's dependant on the choice you make in the select box:

The "Send them my available times via" select box allows you to choose whether you want the recipient to be notified via text or email or both. Once you make a choice, the field(s) become populated with the phone numbers and/or email addresses that are associated with that individual. If the individual is signed up for PSYBooks Appointment Reminders, the email and/or phone number used to send appointment reminders will be selected by default, but can be changed. As with other places in PSYBooks, your choice here is remembered for the next time you send this individual an Appointment Request. However, changes made here do NOT affect the recipient's Appointment Reminder delivery. In other words, an individual may be signed up to receive texts for their PSYBooks Appointment Reminders but you might prefer to send their Appointment Requests via email. PSYBooks will remember each choice separately.
The "Restrict this individual to selecting one appointment" checkbox is checked by default. However, if you'd like the recipient to be able to select more than one of the times you send them, you can uncheck the box.
- My Notification
The next part of the Appointment Requests form is the "My Notification" section. When the client or other individual reserves one (or more) of the times they were sent, your calendar will automatically be updated. However, the My Notification section gives you the option of also being notified via text and/or email. The default state of this form depends on whether or you are already signed up to receive PSYBooks Appointment Reminders. If you have NOT signed up for Appointment Reminders, the "My Notification" part of the Appointment Requests form will look like the top portion of the image below. However, you can open the select box and choose how you want to be notified about this particular Appointment Request, as illustrated in the bottom screenshot:
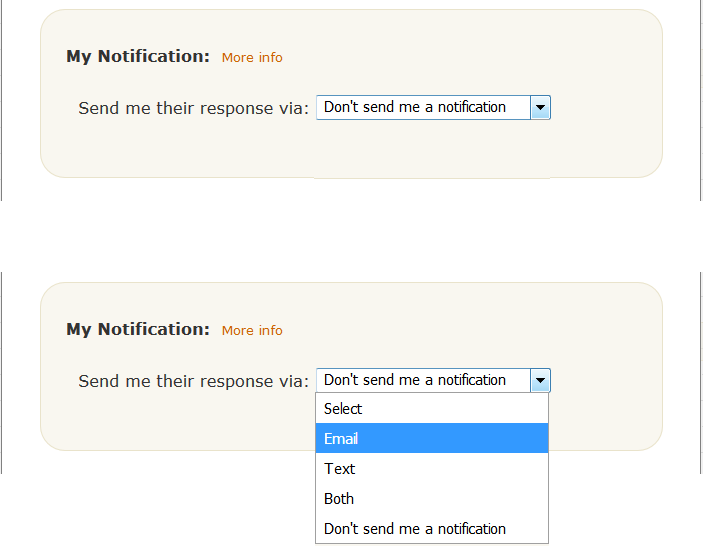
Once you make a choice (Email, Text or Both), additional rows will open which will allow you to choose which email and/or phone number you want PSYBooks to use.
- My Schedule
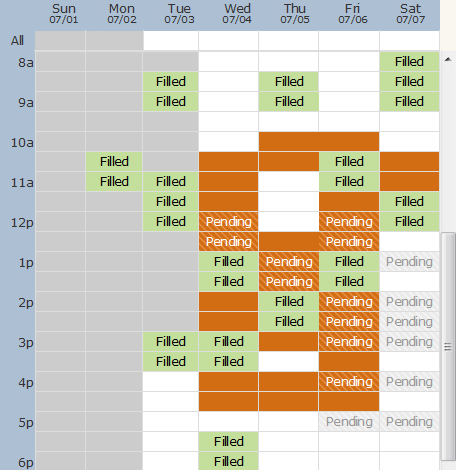
The My Schedule portion of the Appointment Requests form shows your existing calendar and also allows you to select times you'd like to send the recipient.
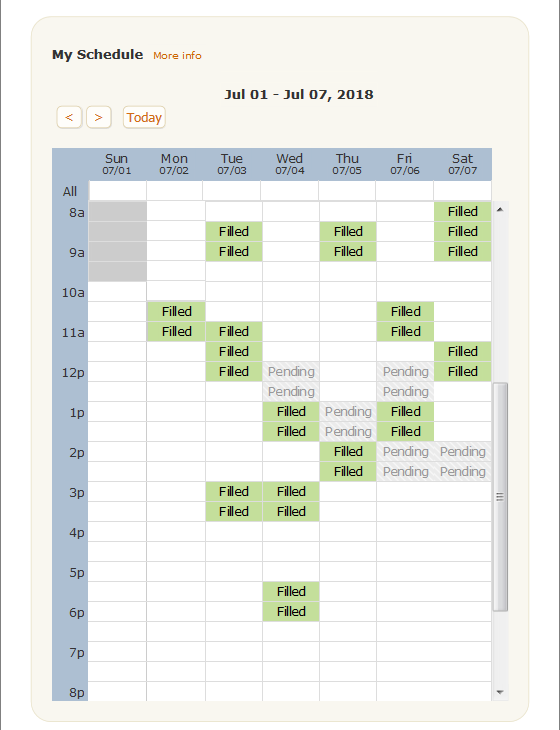
There are several things to notice about the screenshot above:
- Appointment Color
There are 4 colors of interest in this calendar: 1) the darker gray (on the screenshot above it appears only on Sunday until 9:30am) (
 ), 2) the green appointment slots that typically have the word "Filled" written in them (
 ), 3) the lighter gray with diagonal lines and the word "Pending" (
 ) and 4) the default white background (
 ). Each of these is important because they give you information about times you can send the person with the Appointment Request. We'll discuss each separately:
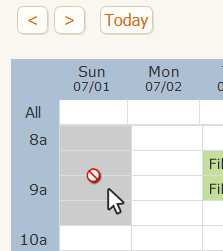
- The screenshot for this photo was obtained at around 9:30am on Sunday morning, July 1, 2018. That explains the dark gray color on Sunday morning until 9:30. (If we were to scroll up, everything from 12:00am - 9:30am on Sunday would be the dark gray.) In other words, dark gray represents times that have already passed - which, of course, also means that you would not be able to send your client those times for possible appointments. Also, if you were to move your cursor over the dark gray portion, it would change into a circle with a line through it like in the screenshot below, indicating that you cannot select any times in that area for your Appointment Request:
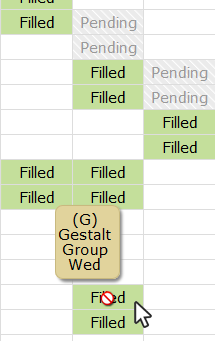
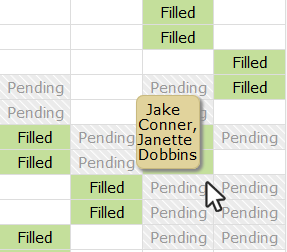
- The green color with the word "Filled" represents appointments that are already on your calendar. Displaying them here allows you to see your whole calendar at a glance which can be useful when deciding which appointment slots you have free for the person needing the new appointment. If you mouseover a "Filled" cell, you will not only see the "no" icon - indicating that this is not a time slot you can use - but there's also a gold tooltip that will display the name of the person, group or event that's currently filling that time slot:
- The "Pending" appointment slots indicate times you've sent to other recipients through the Appointment Requests tool. Like with "Filled" appointments, when you mouseover a Pending slot, you'll get a tooltip that shows the names of the people to whom that time has been sent. In the screenshot below, the time has been sent to two clients - neither of whom has yet claimed it:
Notice that you CAN use Pending time slots for a new Appointment Request, i.e., there's not a "no" icon when you hover over the cell. For example, say Client A, Client B and Client C all contact you and want an appointment in the next couple of weeks. You see that you have four times available, so you send all four times to each of the three clients. The client who checks first will be able to choose among all 4 times. The time slot that person chooses will no longer say "Pending" on your calendar. Instead, it would appear as a regular appointment time with that person's name on it. Also, that time slot will no longer be available on the remaining two clients' Portal Calendars. When the next client checks their Portal Calendar, they will only have three possible times and so forth.
- Finally, any white space on the calendar can also be filled with possible appointment times on the Appointment Request form.
- Appointment Color
- How to Use the Calendar
To recap, you can send any of the white appointment slots and/or any of the Pending appointment slots to the person needing the appointment. The times you select in the My Schedule section of the Appointment Requests form will be sent to the recipient as the times you have available.
To select times, you can either click the table cell you want or you can also click and drag your cursor to select several slots at one time. Chosen times turn a dark orange. The image below shows a calendar on the Appointment Requests tool where the therapist has already made their selections. If you make mistakes or need to remove some slots, right click the orange cell(s) you want to remove. Notice that any "Pending" slots that are selected turn the same dark orange as other selected slots but maintain the diagonal lines and the word "Pending":
The last section of the Manage Appointment tool is the Settings section. It looks like this:
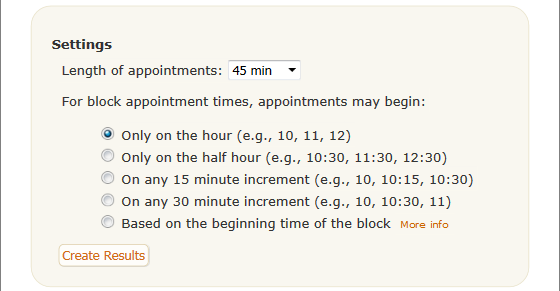
The Settings section is important because the choices you make here determine the exact times that are sent to the client or other recipient. There are only two variables - appointment length and appointment start time - but the ultimate results can vary widely depending on their values:
- Length of Appointment
The default appointment length is 45 minutes but you can change it. However, although straightforward by itself, this variable interacts with the next variable - "appointments may begin" - in important ways.
- "Appointments may begin"
The options here are not as easy to understand so we'll discuss each separately:
- Only on the hour
This choice will only produce appointment times that begin on the hour, regardless of the actual time slots you might choose. For example, if you chose a timeblock between 12:30 and 2:00, the only appointment time that could be created would be one starting at 1:00. Also, had you chosen a length of appointment that was greater than 60 minutes, no appointments would be able to be created because the timeblock ends at 2:00.
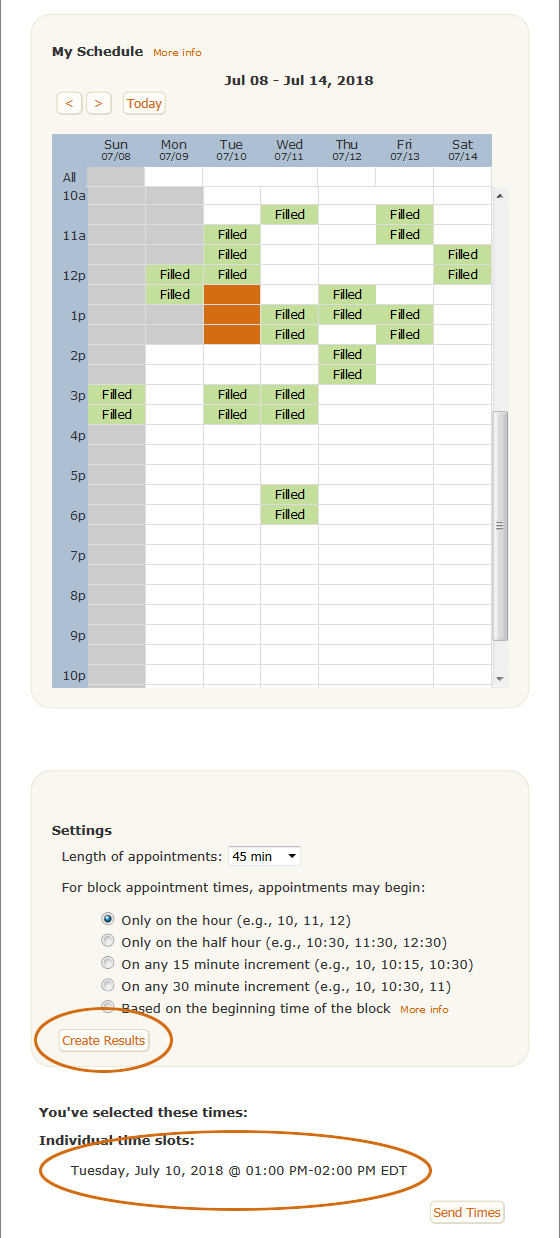
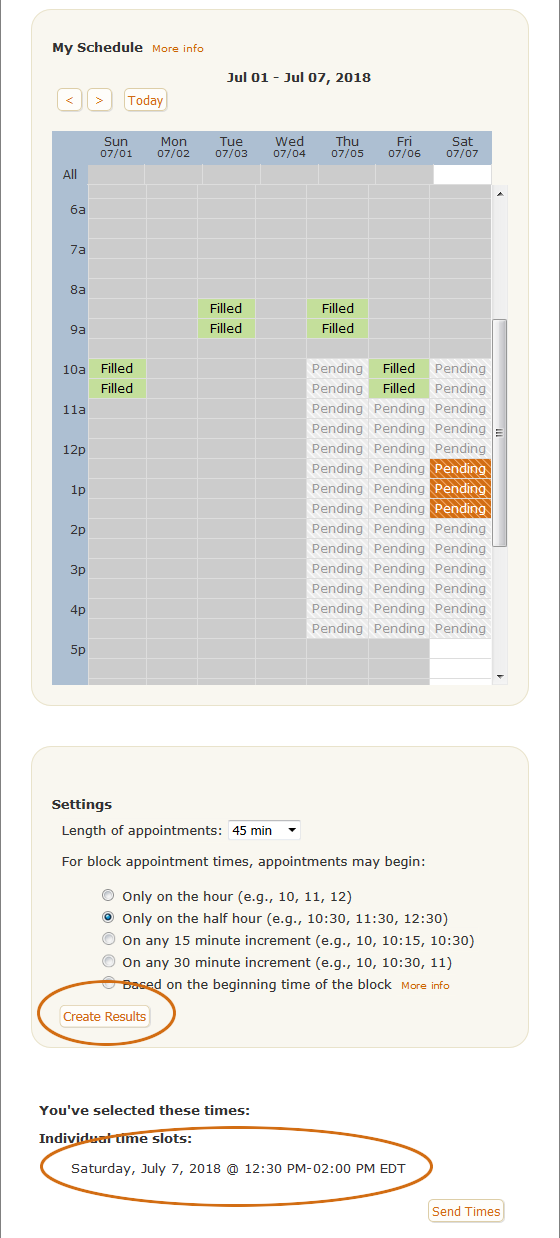
Once you've selected your times, clicking "Create Results" displays the possible appointment times that can be created with the variables you selected. For example, the screenshot below is for a time block of 12:30pm - 2pm, an appointment length of 45 minutes and an indication that any appointments created should start on the hour:
- Only on the half hour
This is like the one above except that appointments can only start on the half hour. Again, though, length of appointment plays a big role in the appointments that are created. For example, sticking with the example above with a time block of 12:30 - 2:00, if the appointment length is 30 minutes or less, two appointments could be created - one beginning at 12:30 and the other beginning at 1:30. However, if the appointment length is greater than 30 minutes and less than 90 minutes, only one appointment could be created - beginning at 12:30.
The screenshot below uses the variables 45 min and starts on the half hour, producing one result:
- On any 15 minute increment (e.g., 10, 10:15, 10:30)
Using the same time block as above, this setting would allow appointments to begin at 12:30, 12:45, 1:00, 1:15 and so on - again, depending on the length of the appointment.
- On any 30 minute increment (e.g., 10, 10:30, 11)
This would allow appointments to begin at 12:30, 1:00 and 1:30 - again, depending on the length of the appointment.
- Based on the beginning time of the block
This one is a little more difficult to understand but very handy. Let's say that you routinely see clients for 45 minute appointments and on Monday, Wednesday and Friday, you generally start on the hour, whereas on Tuesdays and Thursdays appointments begin on the half hour. When filling out an Appointment Request form, you could drag across all times from 8am - 5pm on M, W, F and from 8:30 - 5:30 on T and Th. Since times that are already filled would never be sent as available times, this would effectively send all available 45 minute slots for your whole week. In other words, times on Monday, Wednesday and Friday would only begin on the hour and times on Tuesday and Thursday would only begin on the half hour.
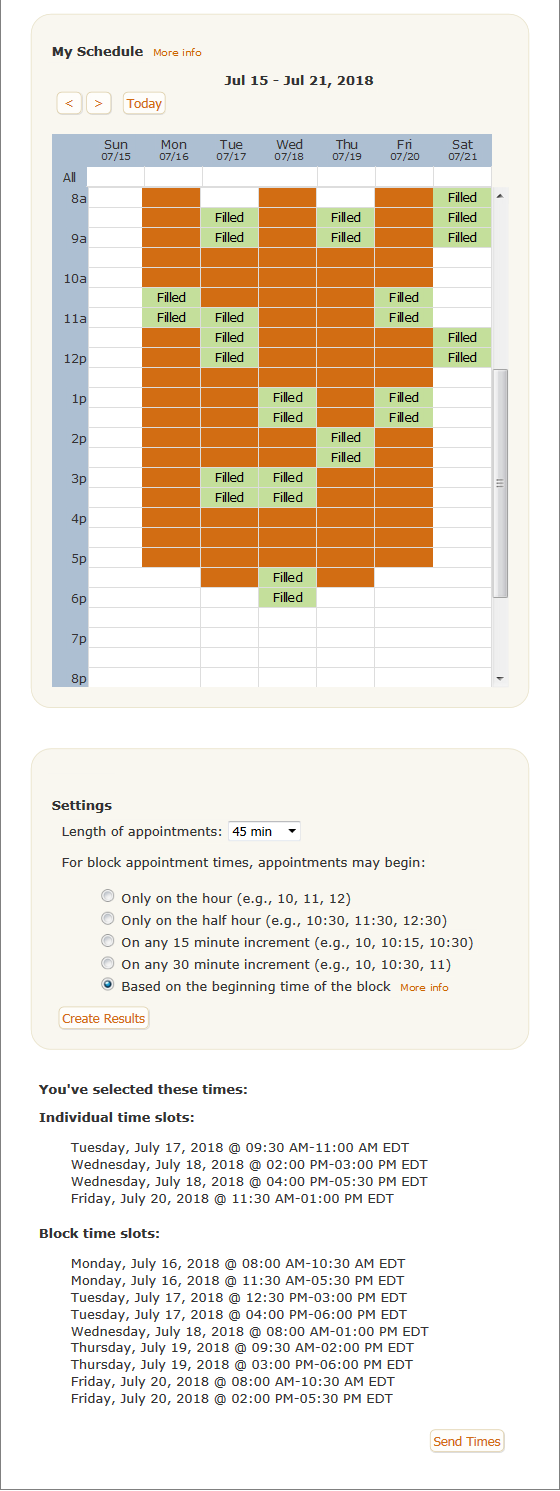
- Only on the hour
Overlapping Appointment Times
Notice that when a client is NOT restricted to choosing only one time, depending on the other variables the therapist chooses, it might be possible for the Portal User to select two or more times that overlap. For example, consider the situation where the therapist does these things:
- Unchecked the "Restrict this individual to selecting one appointment" checkbox in the Recipient Info section of the Appointment Request form.
- Selected a time block from 9am - 3pm in the My Schedule section.
- Selected an appointment length of 45 minutes and a begin time of "On any 30 minute increment" in the Settings Section.
When the user clicks Create Results, they are given a red warning, alerting them that the user will be able to check overlapping times. For example, you can see in the screenshot below that this Portal User could schedule times for 9:00 - 9:45 and also 9:30 - 10:15. That would essentially mean that they'd have one long session from 9:00 to 10:15. Or alternately, they could check ALL the boxes and end up with a super long appointment from 9:00am - 3pm. These possibilities may or may not be what the user intended. If they are NOT what the therapist intended to do, they can change one or more of the variables they previously set and click "Create Results" again until they get the times they want to send:
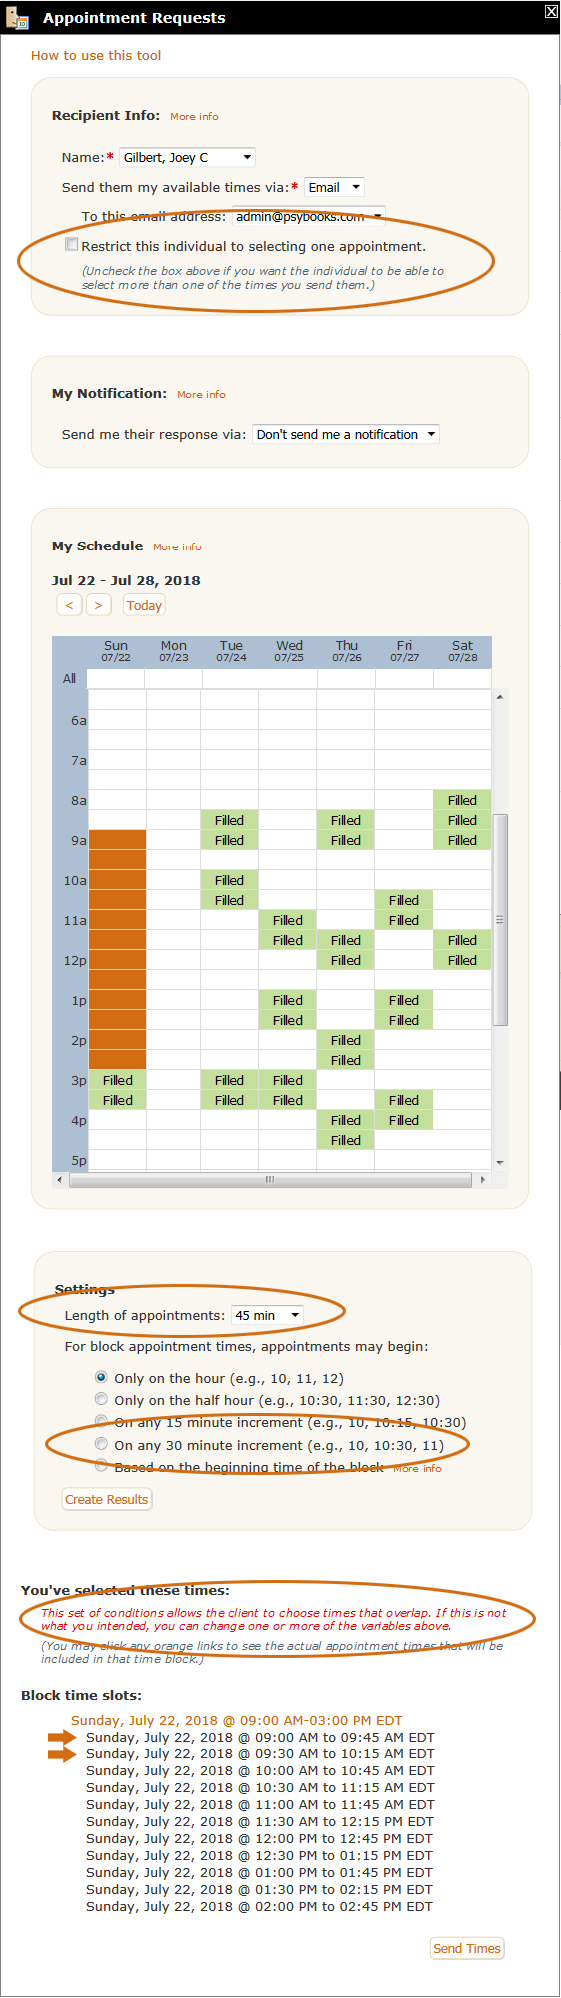
If this result is NOT what the therapist intended, there are a lot of things they can do, depending on the desired result. In addition to changing the "Restrict" checkbox, the possible appointment times, the appointment length and the starting time option, the therapist can also send more than one Appointment Request to the same Portal User. When a recipient receives more than one Appointment Request, they can choose one or more times from each Appointment Request they receive, depending on whether the "Restrict" checkbox is checked.
The next section will discuss what happens when you send your Appointment Request, i.e., what your client or other Portal User sees. To do this, we have to understand what Portal Calendars are and how they work.
Portal Calendars
What this isPortal Calendars allow clients and other Portal Users to see all appointments they have with the therapist and also to view and respond to any Appointment Requests the therapist might send.What it looks likePortal Calendars are very similar to the therapist's calendar except since Portal Users don't need the same tools the therapist does, there's no left nav and no hamburger menu:  |
Where this isPortal Calendars are a tab in a client's Portal. Therapists do not have Portal Calendars. 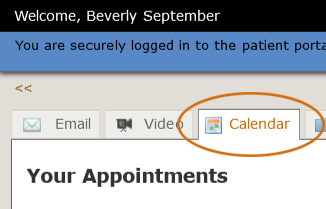 |
Therapists don't need Portal Calendars. All tools for working with their appointments are on their regular Calendar page. In contrast, since a client's version of PSYBooks IS their Portal, their calendar appears there. Additionally, all other non-client Portal Users will also have Portal Calendars. A Portal Calendar displays all of the Portal User's appointments with the PSYBooks account holder. For clients, this would likely mean their therapy or testing appointments whereas for other Portal Users, this could include professional and/or social meetings the subscriber has with them. Unlike the therapist's calendar, however, Portal Users cannot use their PSYBooks calendar as their regular calendar. Their Portal Calendar is only for keeping track of appointments or other scheduled meetings with the PSYBooks subscriber.
Portal Calendars have both Calendar and List views that can be toggled. Links to the two views appear at the top of each page. PSYBooks remembers the user's last choice and will open to that view the next time the client accesses their Portal Calendar. The List View of a Portal Calendar looks similar to this:
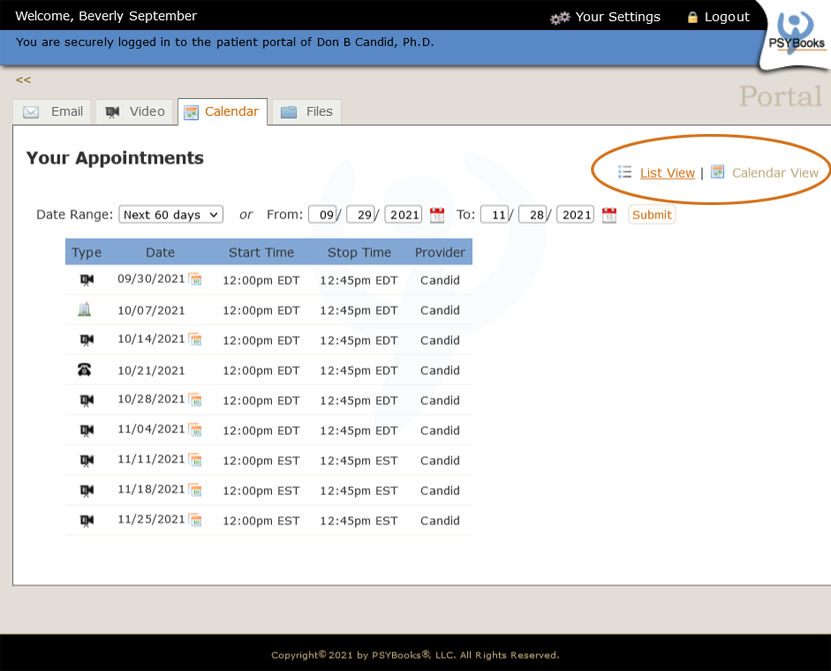
In contrast, the Calendar View looks like a regular calendar:
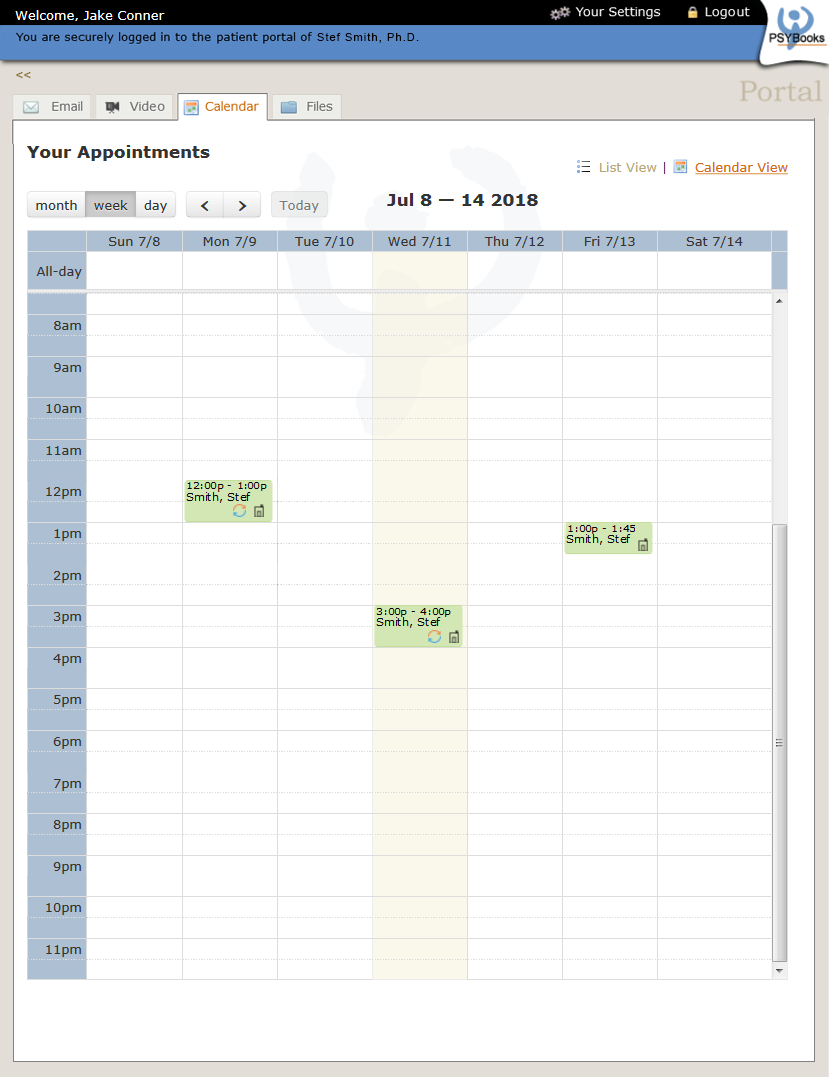
Portal Calendars play a huge role in the Appointment Requests tool. When a therapist sends a client (or other Portal User) a notification from the Appointment Request tool, that person receives either an email or a text - whichever was specified - telling them that the therapist has sent them some possible appointment times. The email or text has a link that takes them to their PSYBooks Portal, where they can log in and view the times that were sent on their Portal Calendar.
To demonstrate, let's say the therapist selects a time block of 12:30 - 3:30 on a Monday for a client named Brenna Jones:
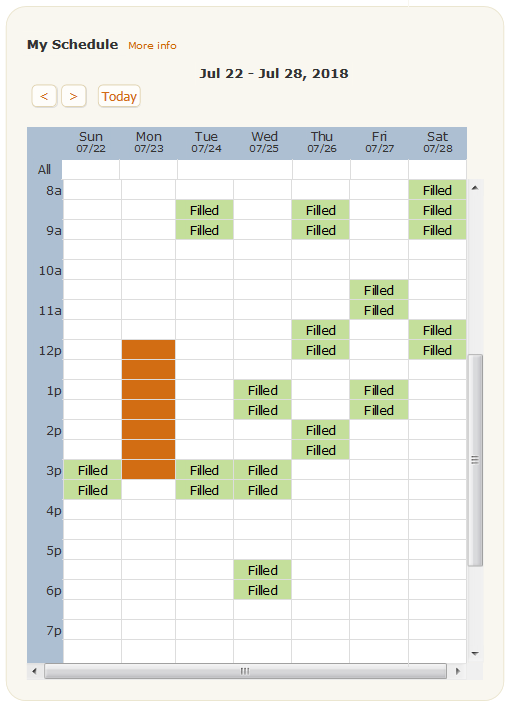
The length of appointment is 45 minutes and it's to start on the hour. When the results are created, notice in the "You've Selected These Times" section at the bottom that only three actual appointments can be created because of the variables chosen in "Settings", i.e., a 45 minute length and only able to start on the hour:
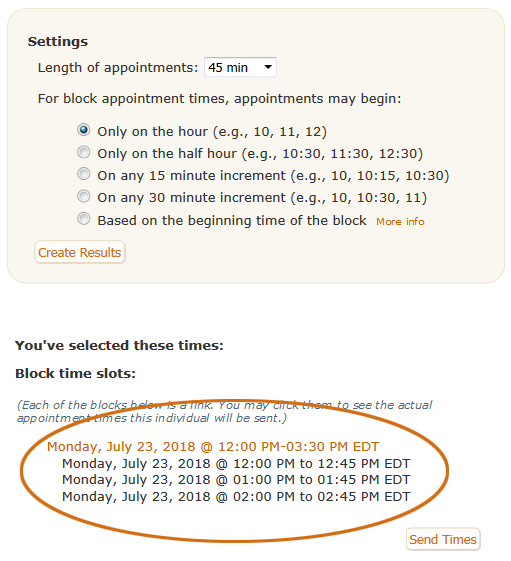
After the therapist sends those times to the client, their own calendar displays that entire time block as "Pending" with the client's name in it. Pending time blocks have a distinctive gray background with diagonal stripes, enabling both therapist and Portal Calendar users to easily see which appointments are set and which are only pending:
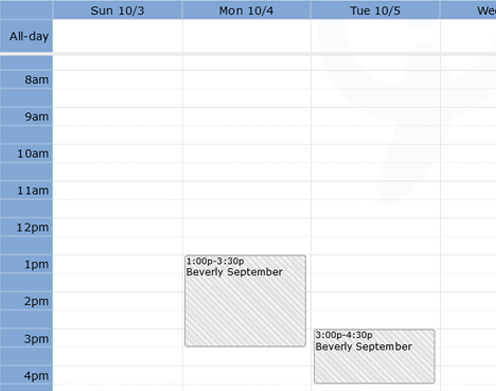
On the recipient's end, if they are already a Portal User, they'll simply receive an email or text, telling them to sign in to their Portal and check their calendars for possible appointment times. Non-portal users first receive a Portal User invitation, allowing them to create a Portal User account and then sign in to their calendar. In either case, once they log in, the List View of their Portal Calendar would look something like the screenshot below. Notice that the new possible appointment times the therapist sent are displayed at the top of the form in the colored block, whereas their existing appointments or meetings are listed in the table at the bottom:

Assuming at least one of the appointment times works for the recipient, when they select the checkbox they want, the "Book Appointment" button becomes enabled, allowing them to actually book the time. When they click "Book Appointment", the therapist's calendar updates accordingly, i.e., the pending block is removed and the time the client selected will be listed as a regular appointment. If the therapist requested to be notified of the client's choices, they will also receive an email and/or text telling them what the client chose.
If none of the appointment times work for the client, they can click the "Cancel all Appointments" button at the top. If they do, a small confirmation window with a note field opens:
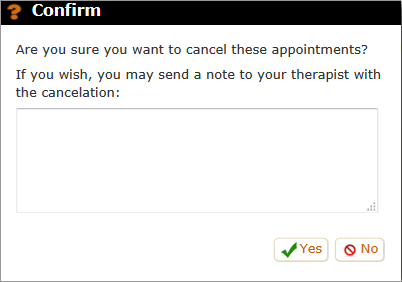
If the client chooses to include a note with the cancellation, it will be sent via PSYBooks Email to protect any PHI the client might include in the note. However, if the client cancels without sending a note, the therapist will be notified by regular email and/or text, depending on what they chose in the "My Notification" section of the original Appointment Request. Whether or not the therapist asked to be notified, when the client cancels all appointments, the entire pending block on the therapist's calendar is removed. In other words, the therapist's calendar will stay up to date whether or not they chose to be notified by text or email.
One more thing to discuss in the List View of the Portal Calendar is the Type column in the Existing Appointment section. In the screenshot of Brenna Jones' Portal Calendar above, the Type column looked like this:
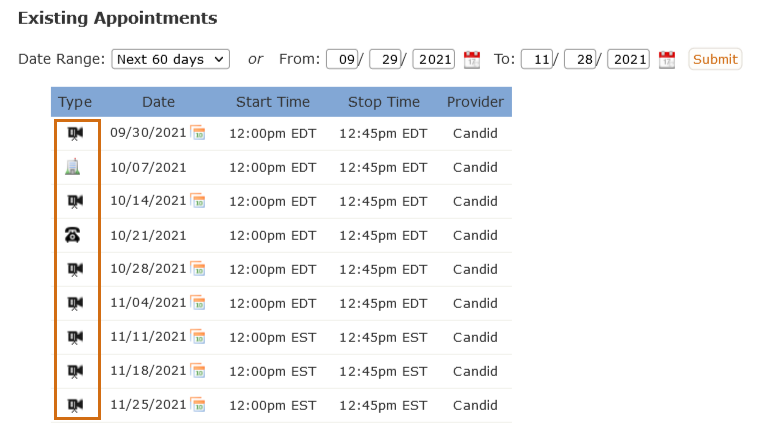
Notice that both of Brenna's appointments have an office building icon in the Type column, indicating that those appointments are in the therapist's office. However, there are other options.
The Type designation comes from the Add Appointment form, which has a place on the form to indicate whether the appointment is in the Office, a Video session, or over the phone. The default is "Office" but it can be changed:
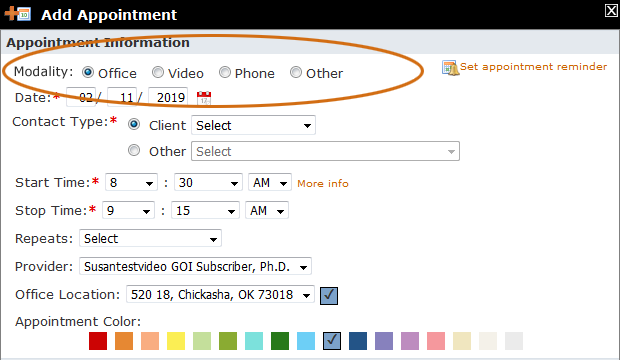
When appointments are displayed in the List View of the Portal Calendar, the Type column is used to designate which radio button was selected on the Add Appointment form. To illustrate a little more variety, the Type column on a client's existing appointment table with appointments of all three types might look like this:
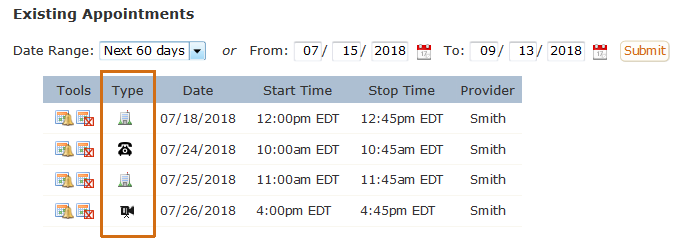
The Calendar View of the Portal Calendar
Toggling from the List View to the Calendar View for that same client shows this page:
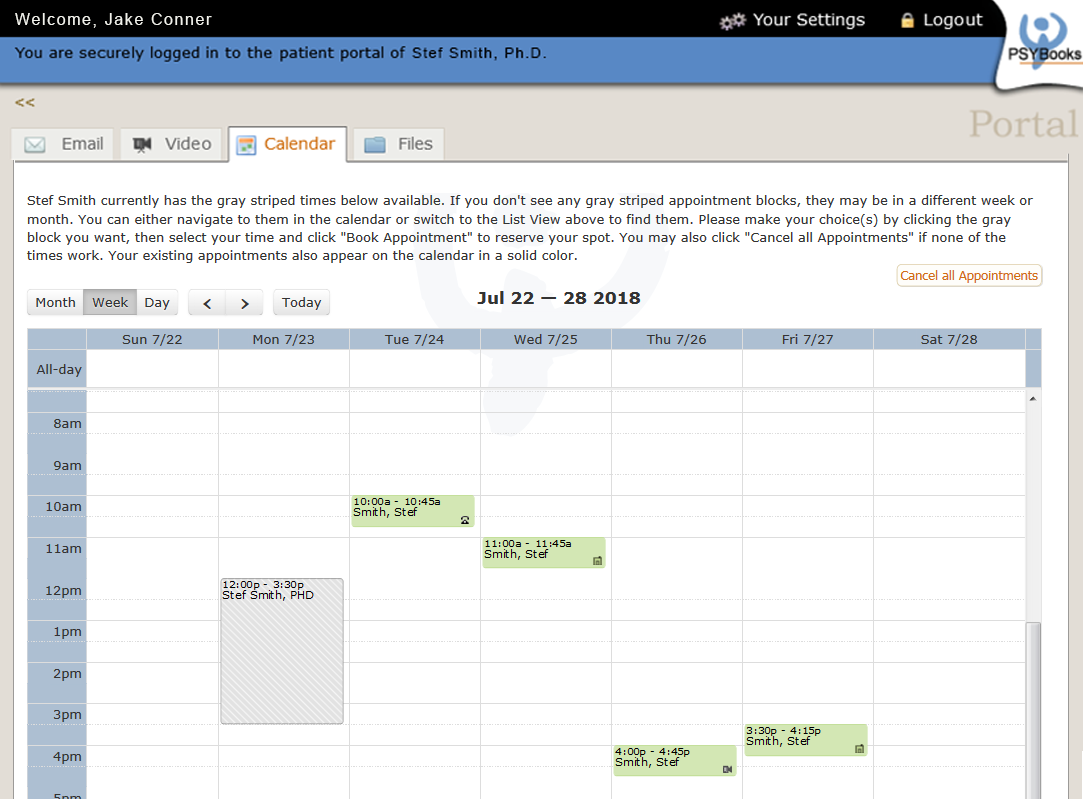
Again, both the existing and the possible (pending) times are displayed although this time, they're appointment blocks like on a regular online calendar. The client's existing appointments are marked with the type icons discussed above, allowing them to easily see what kind of appointment each is:
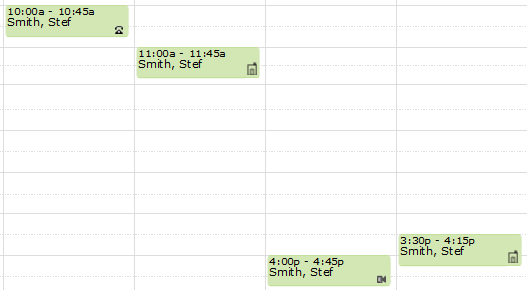
If the user clicks a striped "pending" block, a separate window will open allowing them to specify which time within the block they'd like:
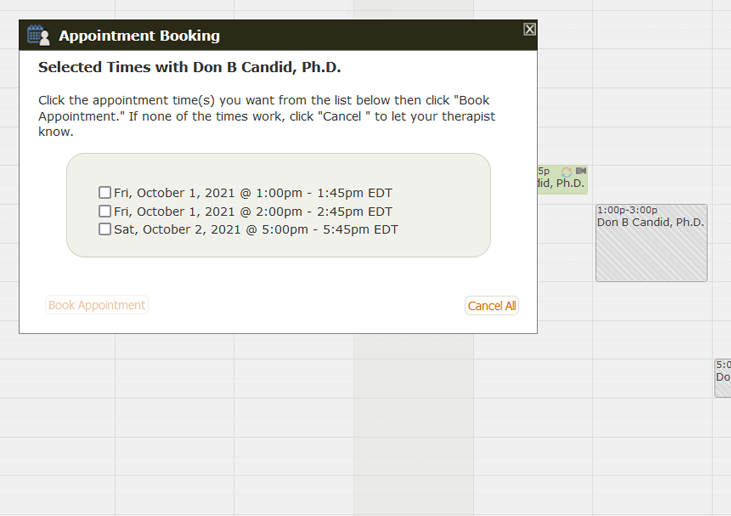
As with the List View, the recipient can either Book an Appointment from this window or cancel all appointments in this time block. The therapist's calendar will be updated accordingly and, if requested, the therapist will also be notified of the action.
Add Appointment
What this isThe Add Appointment tool is used to add both client appointments and other events to the calendar.What it looks likeThe best way to access the Add Appointment tool is by clicking the calendar. However, there's also an Add Appointment tool under the hamburger menu on the right that looks like this: 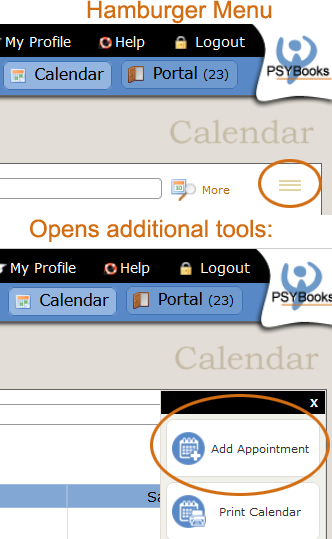 |
Where this isYou can access the Calendar from the global nav at the top of every page or from the Sitemap links at the bottom. The Add Appointment tool is on the left nav or can also be accessed by clicking the calendar.
|
There are two ways to access the Add Appointment tool: 1) by clicking the correct time slot on the calendar or 2) by using the Add Appointment tool, which is one of the hamburger menu tools. The form that opens is identical, but accessing it via the calendar can save you some clicks because the date and time will already be filled in. For example, the Add Appointment form below was accessed by clicking on the 10:30am time slot on December 29, 2018. The items with orange arrows were pre-populated:
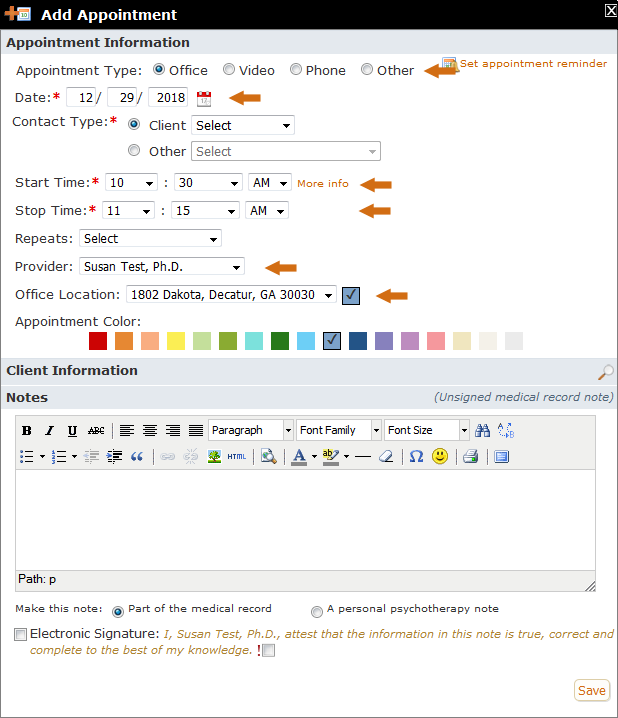
Notice that since the default Contact Type is "Client" (i.e., a client appointment), the Stop Time is automatically set for 45 minutes later than the start time. However, the Stop Time (and/or the Start Time) can be changed on this form. The defaults are just PSYBooks' best guess about what you might want. If you change the Contact Type to Other Event, the Stop Time would change to 12:00pm, i.e., one hour after the Start Time.
If you had opened this tool from the hamburger menu, you'd have to fill in the Date, Start Time and Stop Time fields manually. However, by clicking on the calendar, in many cases, all you'll have to do is select the client's name from the Client Select box and click Save since the most commonly used items will already be filled in.
Types of Appointments
PSYBooks allows you to enter different types of appointments. The two broad categories of appointment types are "Client" and "Other." The Other category subdivides further into Person, Event and Group Appointments. The Client appointment type is for individual client appointments. The Other appointment type - with the possible exception of Group Appointments - is for people and/or events who are NOT clients. Each appointment type has features that are specific to that type, giving you a variety of tools and maximum flexibility in working with appointments.
Client Appointments
The default appointment type is for adding clients. All of your existing clients will be listed in the dropdown box, allowing you to easily select the one you want.
In addition, you can also add new clients from the Add Appointment tool. If you open the Client select box on Add Appointment, you'll see an orange link for Add Client:
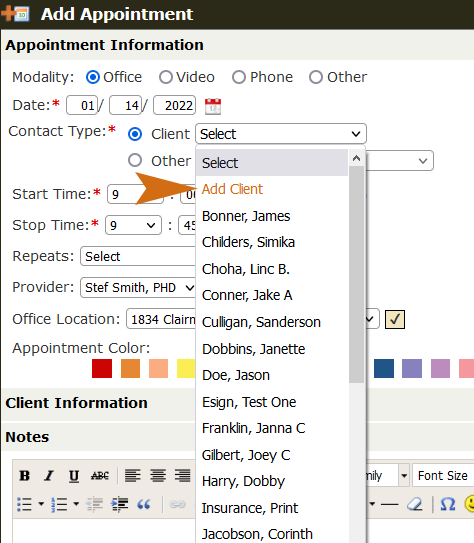
Clicking the Add Client link opens an abbreviated version of the regular Add Client form. This abbreviated version is specifically designed to allow you to quickly add a minimal amount of client information you might need to schedule an initial appointment. This abbreviated Add Client form looks like this:
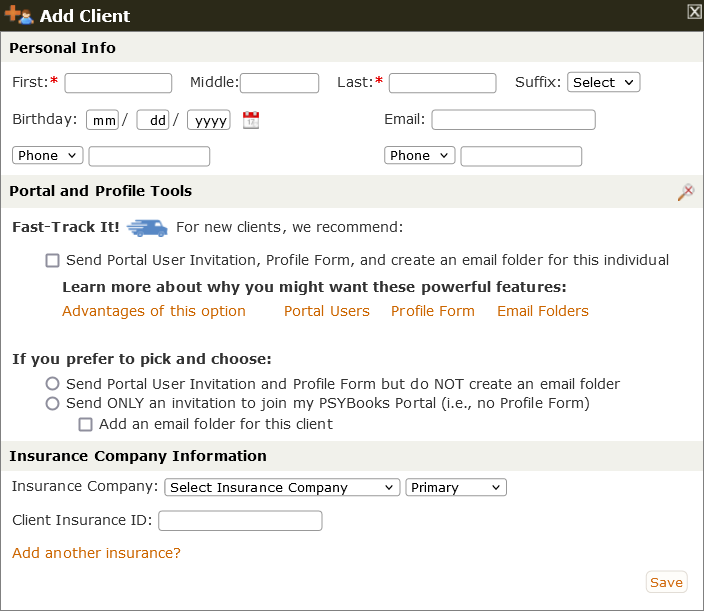
If you click Complete Setup in the Portal and Profile tools section, it will allow you to get this new client completely set up, including being able to send any Custom Forms and/or files you typically send to new clients.
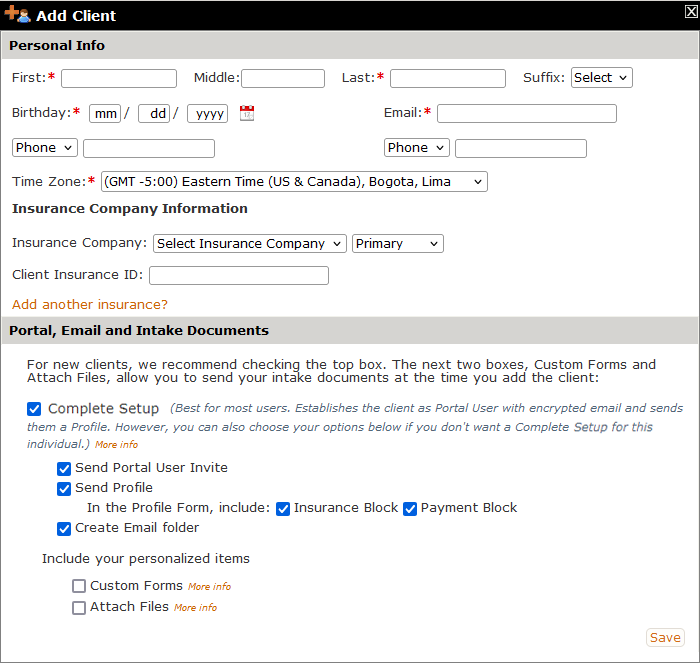
For more information on the Portal and Profile part of the form, check the Add Client section of this Manual.
Once you click Save on the Add Client form, you're taken back to the Add Appointment form which is now populated with the information you just entered:

You can now click Save and the appointment will be added to your calendar or you can make additional changes to the Add Appointment form.
Other Appointments
In contrast, Other appointment types are often NOT clients. When you select the "Other" appointment type and then click the dropdown box, you'll see something that looks like this:

Notice at the top are three links where you can add any of the three "other" appointment types: Person, Event and/or Group. Below the links, you see lists of those other appointments that you've previously saved, arranged by category.
Each of the Other appointment types - Person, Event and Group - will be discussed below:
Add New Person
The Person appointment type is for other individuals who are NOT clients with whom you somewhat regularly schedule appointments or meetings. By saving them to your other appointment contact list, you'll be able to enter them from a dropdown list instead of having to type their name each time. The other advantage of saving an Other > Person appointment is that you can send them appointment reminders. Even for one-time appointments, you might choose to save the contact if you want to send them an appointment reminder. You can always delete them later with the Manage Other Person/Events tool, if you choose. Your Person contacts could be personal and/or professional contacts. For group practices and/or practices with admin staff, it may be helpful to add other subscribers and staff as Person contacts.
The "Add New Person" form looks like this:

Notice that the only two required fields are first and last name. However, if you might want to send appointment reminders to this person, you'll need to fill in the Email and/or Cell fields. The Time Zone select has been pre-selected with your time zone, but you can change it if that's not correct.
If you look at the buttons at the bottom of this form, you'll see that there are two ways to save a Person contact: "Save for Future Use" and "Save for this Appointment Only." Both buttons will allow you to schedule the appointment. If you choose "Save for Future Use," the contact will be added to your dropdown list for Other appointment types so you can easily schedule appointments for them in the future. Also, by saving the contact, you'll be able to send this new person an appointment reminder if you so choose. The other button - Save for this Appointment Only - does neither of those things but does allow you to enter a one-time appointment.
Add New Event
As the name implies, the Event appointment type is for an event as opposed to an individual person. It could be an event with another person (e.g., Dinner with Josie), but what you're listing in the calendar is the event itself. For example, if Josie is someone with whom you do a lot of things, you might want to be able to distinguish between whether you're getting together with her for dinner, a meeting, or something else. The Event appointment type lets you do this. A distinguishing feature of events, is that, although they will be listed on your Daily Schedule appointment reminder, no one else will receive appointment reminders for events. So in the example just given, if you want to be able to send Josie an appointment reminder, you'd want to list her as an Other > Person contact instead.
The "Add New Event" form looks like this:

The only field on this form is the name of the event. You can make event names fairly long. For example, if you wanted, you could list the name of the venue plus its address and phone number. That way, you'll have all the info in one place.
As with Person contacts, you can save Events for future use or just for this single appointment.
Add New Group
The Group appointment type allows you to schedule appointments for two or more people at one time. You might want to create a Group contact for therapy-related groups such as couple's therapy, family or group therapy sessions or even for non-therapy appointments such as staff meetings, supervision, webinars, courses you're teaching or even some social occasions. When you create a group appointment type, you have access to a set of tools in the "Manage Groups" supertool (discussed below) that are not available with any other appointment type. Learning more about the features of this tool will help you decide whether to designate an appointment as a Group as opposed to a Person, Event or possibly just a single client appointment.
The "Add New Group" tool looks like this:

Each of the fields on this tool will be discussed below:
- Name your group
Give your group a name you'll recognize. This is the name that will appear on your calendar when you schedule appointments for the group.
- Is this a video group?
Clicking this box will give you a confirm which asks if you'll be using PSYBooks video. If you are, any appointments you enter for the group will sync with SecureVideo. You'll be able to work with tools on either your PSYBooks video tab and/or your SecureVideo dashboard.
- Privacy setting
For participants who have a Portal calendar, such as clients and "Other" appointment types, this setting determines whether they see only their own name in this group (Private) or whether they see the names of all group members (Public).
- Select
When you click the Select dropdown, a list will open that's been pre-populated with the names of your PSYBooks contacts you might want to add to your groups. This includes your clients, other subscribers in your practice who use PSYBooks, any users you've added, plus your "Other People" individuals. You can use the search or just check the boxes beside the names you want to add to your group. Clicking Save will create the group with your group members in it:

- Therapy or Non-Therapy
If you add at least one client to your group, you'll get an option on the form that will allow you to mark it as a therapy group or a non-therapy group:

If you mark a group as a therapy group, you'll be able to write group notes which can automatically be entered in each client's chart, and also to add sessions for all group members from the Manage Groups tool, which is discussed below. Both therapy and non-therapy groups also allow you to track attendance and to add group notes for yourself on your "Tools > My Notes & Reminders" page
Appointment Features
The Add Appointment form has some additional tools you can use if needed. Each will be discussed below:
- Appointment Modality
The Modality tool allows you to select whether the appointment will be in your office (the default) or whether it's to be a video or a telephone appointment:
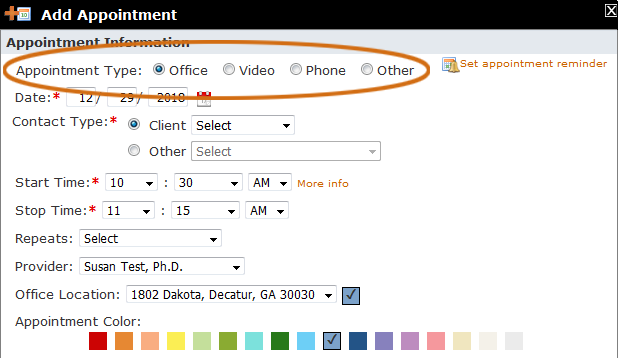
Depending on your choice, the appointment will be marked with the corresponding identifying Modality icon on your calendar (the "Other" Modality does not have an icon):
Office:

Video:

Phone:

The screenshot below shows three appointments, each with a different appointment modality, as can be identified by looking at the icons on the top right of each appointment block:
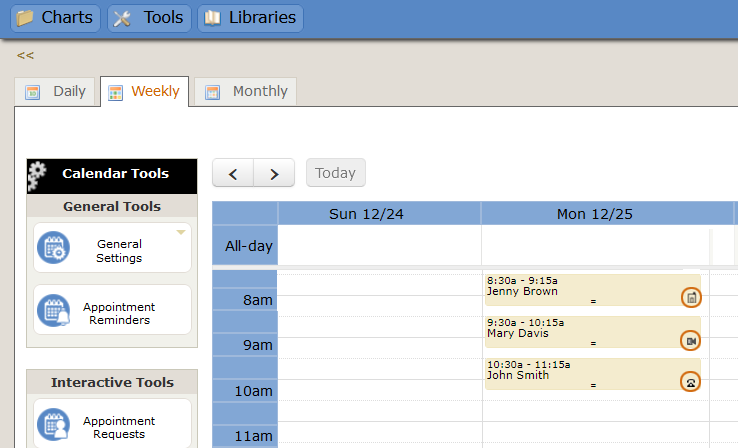
— Video Sync
The Office and Phone appointment types on the Add Appointment tool are just informational. Designating an appointment as an Office or Phone appointment type does nothing except add the corresponding icon to your calendar. However, marking the appointment type as Video has some important implications. When you select Video as the appointment type, you'll get a confirm box asking you if you plan to use PSYBooks video for this appointment:
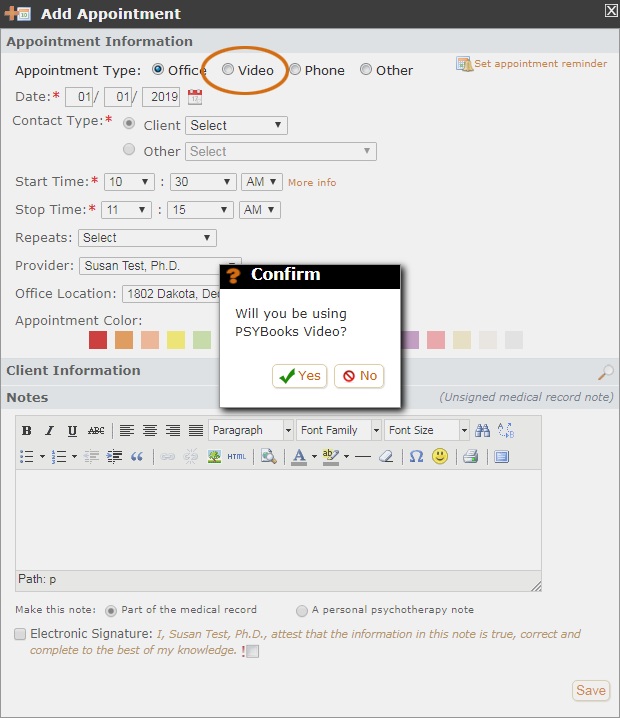
If you are not using PSYBooks video and select "No", the Video appointment type is treated like Office and Phone appointment types, i.e., the only thing that happens is the addition of the appointment type icon on the calendar. However, if you ARE using PSYBooks video and select "Yes," it triggers the video sync feature of the program. That means that anything you enter here will also appear on your Secure Video dashboard. You will not have to enter appointments in both places. Just entering them on your PSYBooks calendar will automatically tell SecureVideo to schedule the appointment with the person or persons you indicated. SecureVideo will then send their normal invitations and reminders so the recipients will get links to join the session, just as if you had entered it on SecureVideo.
If you answer "Yes" to the confirm box above, your Add Appointment form will change slightly, to allow you to enter the additional information that's necessary to schedule a video appointment:
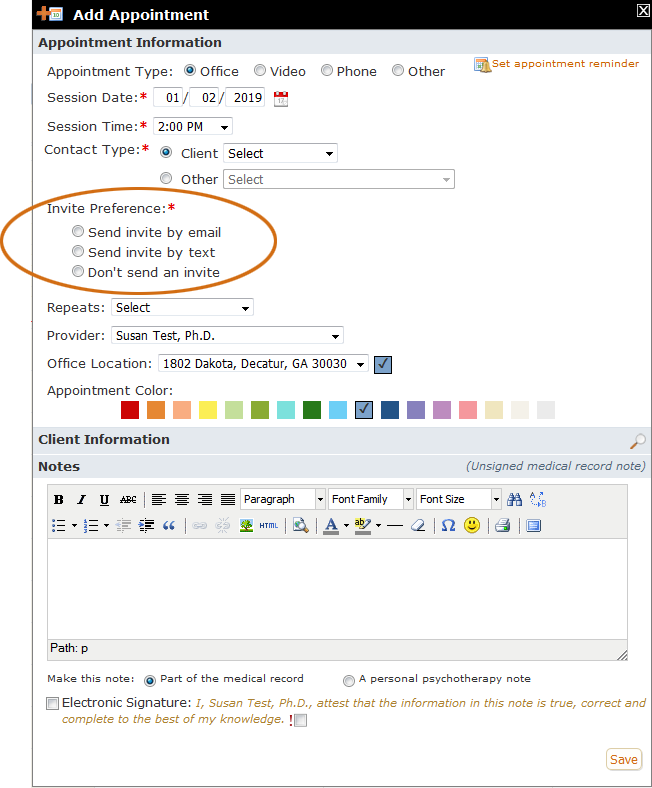
Notice that you still have access to the other features on the Add Appointment form, which means you can change the Contact Type to a non-client type or a group, you can make this a repeating appointment, add an appointment note, etc. Being able to schedule your SecureVideo appointments on your PSYBooks calendar gives you access to all of the regular features of the Add Appointment tool which gives you much more flexibility.
- Repeats (Create a Repeating Appointment)
Repeating appointments are extremely common among mental health practitioners so PSYBooks makes them easy to enter. The Repeats select box is right on the Add Appointment form as can be seen below:
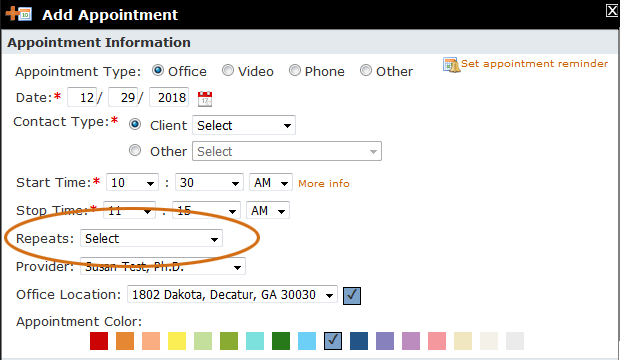
Repeating appointments will be discussed in detail in a separate section below.
- Provider Select Box
In GOI accounts (GOI = Groups of Individuals, i.e., more than one subscriber at the same address), therapists may choose to share their calendar with one or more therapists in their office and/or with their office manager. In these situations, assuming those individuals have been given both read and write permissions, they can select the calendar you need with the Provider Select Box. Individual subscribers will not have this feature. Only one name will be listed in an individual subscriber's Provider Select Box:
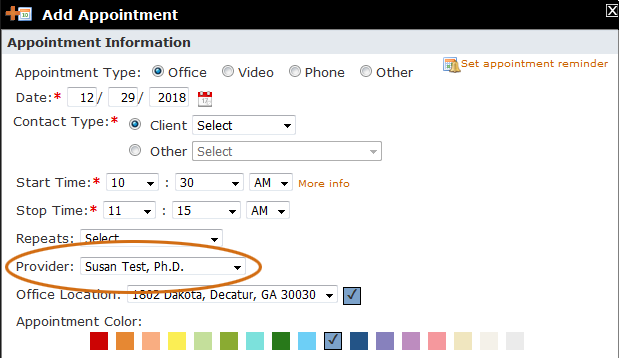
- Office Location Select Box
The Office Location select box looks like this:
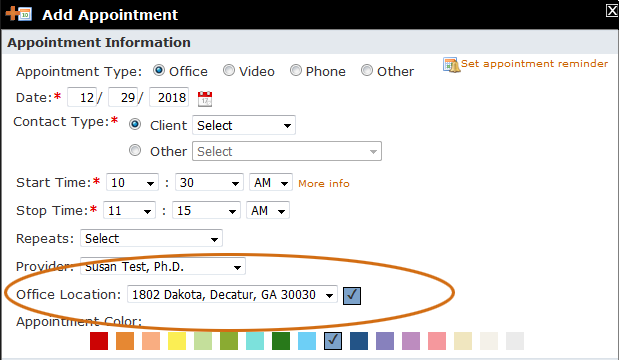
If you only have one office, you will never need this tool. However, if you entered more than one office address in PSYBooks, each one is given a different color by default to help you keep your appointments straight. (You can change your default office color(s) at any time in the Calendar Settings tool.) Assuming you have not changed the default colors, watch what happens when we change this therapist's Office Location in the Add Appointment tool:
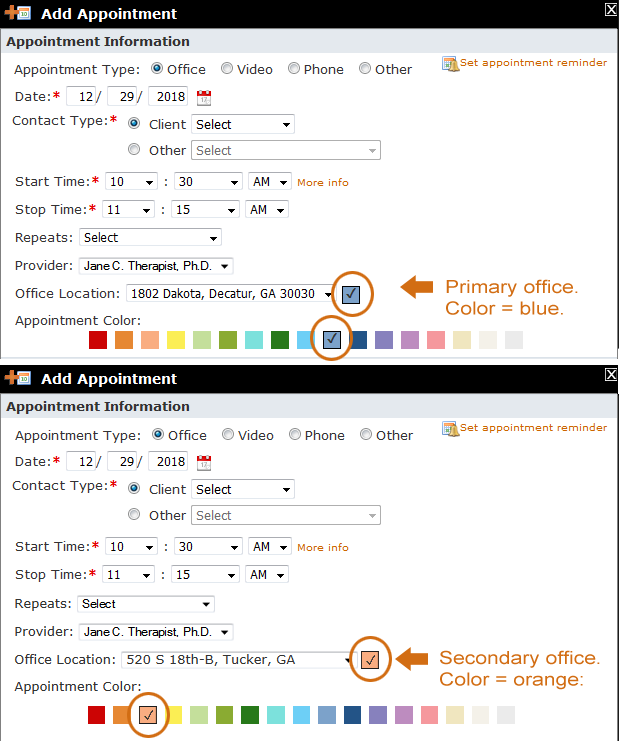
In other words, when Jane Therapist adds appointments to her first office address, they'll all be in blue (unless she changes the color for a specific appointment). If she changes the Office Location setting to her second office address, the appointments will be listed in orange. Assuming she doesn't change any specific appointment colors, her calendar for the week might end up looking like this:
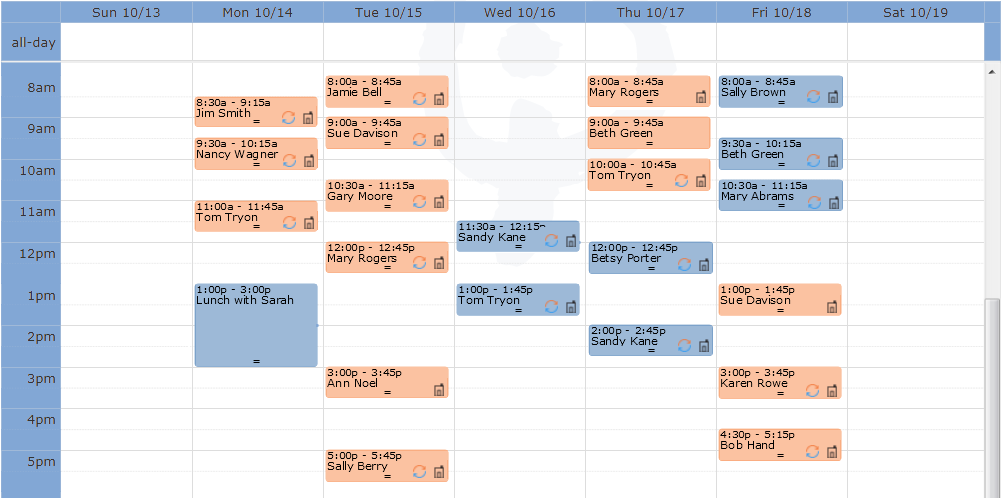
It's also possible to toggle certain office locations on or off. If you click the gold down arrow on the General Settings tool on the left nav, you'll see each of Jane's office calendars listed separately:
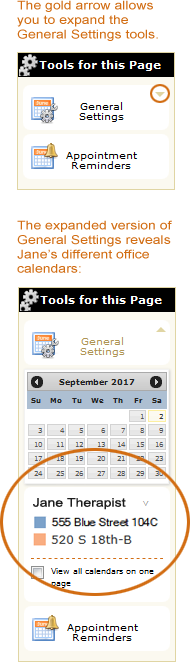
If you click Jane's name, all of her appointments will toggle off or on. Similarly, if you click either of the addresses, that office's appointments will toggle off or on. For example, if Jane clicked the 555 Blue St address to toggle all of those appointments off, only the orange appointments would be visible on the calendar:
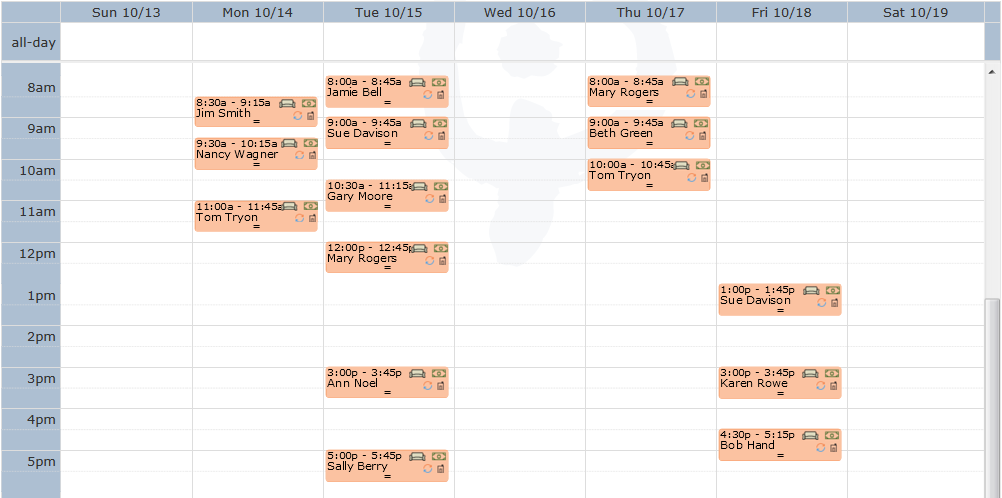
- Appointment Color Coding
Each subscriber has a default base color for their calendar appointments. Also, as discussed above, if the subscriber has more than one office, each office will be given its own default color. Although any of the default colors can be changed at any time in the General Settings on the Calendar page, all client appointments and other events added to the calendar will be created in that office's base color unless otherwise specified.
The Add Appointment form has a series of color swatches that can be used to create a different colored background for any particular appointment. This feature can be useful in making some appointments stand out from others.
In the screenshot below, you can see that Jane C. Therapist's base color is purple (the purple swatch beside her office location and also, purple is checked as the default color in the row of swatches in the Appointment Color section):
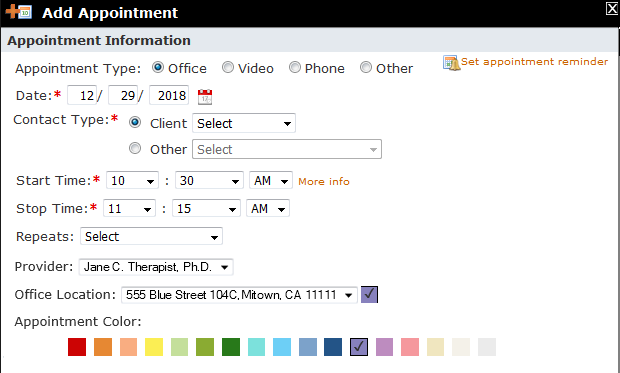
If nothing is changed, this appointment will be created with a purple background. However, Jane is free to change the color of this particular appointment by clicking a different swatch in the Appointment Color row. Changing an appointment color will NOT change the office's default color. To change the default color, you have to use the General Settings tool on the Calendar left nav. That tool is discussed elsewhere.
- Client Information Section
The Client Information Section of the Add Appointment form is just there to give you easy access to information that you may need when you're scheduling and/or changing client appointments. It's closed by default, but you can open it by clicking the magnifying glass on the right side of the gold bar that has the words "Client Information":
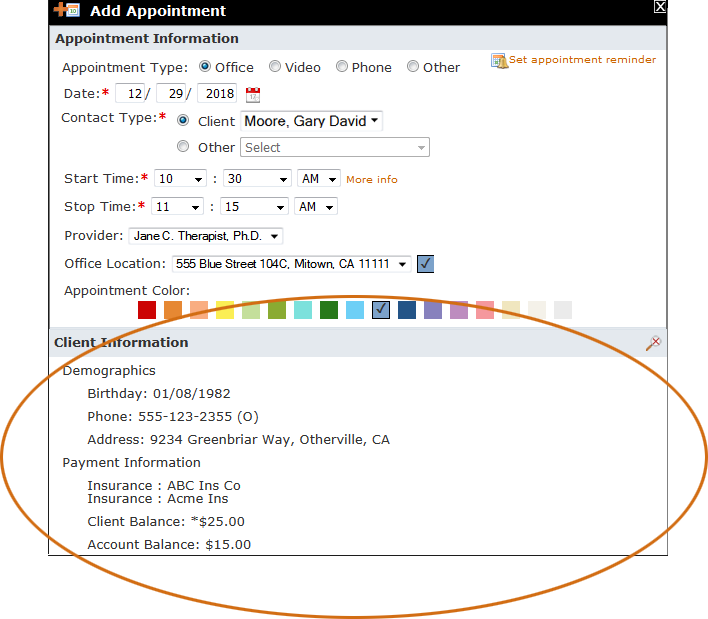
Repeating Appointments
What this isThe Repeat Appointment tool is triggered by a select box on the Add Appointment tool. It allows you to create weekly, bi-monthly, or any other type of repeated appointment that you'd like.What it looks likeThe select box that allows you to mark an appointment as a repeating appointment looks like this: |
Where this isYou can access the Calendar from the global nav at the top of every page or from the Sitemap links at the bottom. The Repeat Appointment tool is part of the Add Appointment tool, which can be accessed on the left.
|
Clicking the Repeating Appointments select box opens these options:
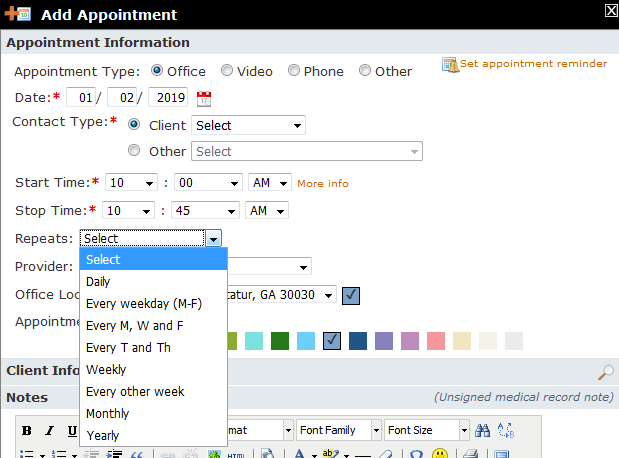
Depending on which value you select, a new section of the form will open allowing you to further refine your choice. For example, clicking "Weekly" reveals these additional options:

Each of the other "Repeats" selections also gives you additional filters which should allow you optimum flexibility in scheduling your repeat appointments.
Notice that you can also enter repeating video appointments. These will show up on your PSYBooks calendar like any other repeating appointment. However, on your SecureVideo dashboard, you will only see one appointment at a time. The subsequent one will not appear until the current one has passed. This is done to prevent SecureVideo from sending out reminders for more than one appointment at a time. Once one appointment in a series has come and gone, the next one will appear in your SecureVideo dashboard and the appropriate invitations and reminders will be sent. You do not need to do anything further once you've entered the repeating video appointment.
Edit Appointment
What this isThe Edit Appointment window allows you to make changes to existing appointments or events. What it looks likeThe tool to access the Edit Appointment form looks like this: 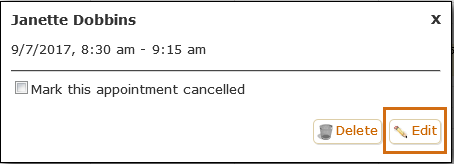 You can open this window by clicking any appointment or event on the calendar. |
Where this isYou can access the Calendar from the global nav at the top of every page or from the Sitemap links at the bottom. Clicking on any appointment or event will open a small window that allows you to edit the appointment.
|
Accessing the Edit Appointment tool is a two-step process. First, you have to access the Edit Appointment Multi-Tool by clicking any appointment or event on the calendar. Once you've clicked the appointment, the Edit Appointment Multi-Tool pops open like this:
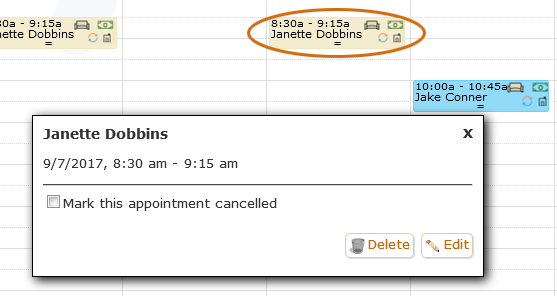
Clicking the "Edit" button on the right opens the Edit version of the Add Appointment Tool - in other words, it's the Add Appointment form but with your data already in place:

From here, you can make any changes you want to your appointment. If you change from an Office or Phone Appointment Type, you'll be asked if you intend to use PSYBooks Video, which will engage the video sync features. When you save the change, SecureVideo will send the appropriate invitation and reminder emails or texts. If the appointment is part of a series of repeated appointments, when you save it, you'll get this popup which will allow you to select which appointments you want to change:
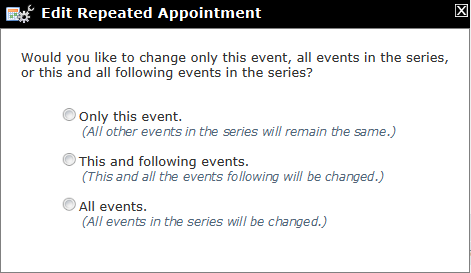
Delete Appointment
What this isThe Delete Appointment window allows you to delete an existing appointment or event. When the appointment is part of a repeating appointment series, you can delete a single appointment or a series of appointments.What it looks likeThe tool to access the Delete Appointment form looks like this: 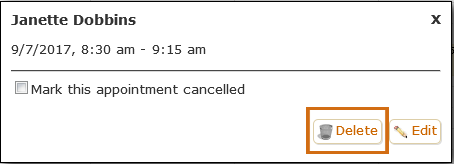 You can open this window by clicking any appointment or event on the calendar. |
Where this isYou can access the Calendar from the global nav at the top of every page or from the Sitemap links at the bottom. Clicking on any appointment or event will open a small window that allows you to delete the appointment.
|
As with the Edit Appointment tool, accessing the Delete Appointment tool is a two-step process. The first step is to access the Edit Appointment Multi-Tool by clicking any appointment or event on the calendar. Once you've clicked the appointment, the Edit Appointment Multi-Tool pops open like this:
Clicking the Delete button will delete the appointment. If the appointment was a PSYBooks video session, it will also be deleted from SecureVideo and the participant will be notified of the cancellation. If the appointment is part of a series, when you click delete, you'll get this window, which allows you to choose which appointments you want to delete:
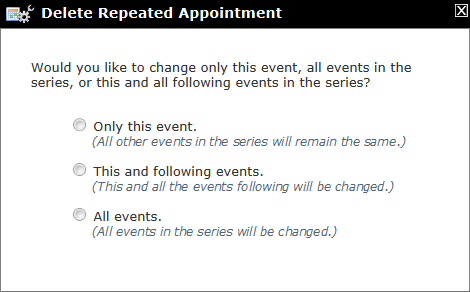
Cancel Appointment
What this isThe Cancel Appointment tool allows you to keep an appointment on your calendar, but mark it as canceled.What it looks likeThe tool to access the Cancel Appointment tool looks like this: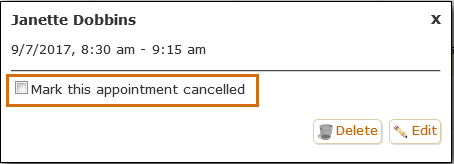 You can open this window by clicking any appointment or event on the calendar. |
Where this isYou can access the Calendar from the global nav at the top of every page or from the Sitemap links at the bottom. Clicking on any appointment or event will open a small window that allows you to cancel the appointment.
|
Canceling an appointment is a way to maintain the appointment on your calendar while also visually cueing you that the appointment has been canceled. To cancel an appointment, click the appointment or event on the calendar, then check "Mark this appointment canceled." This action will expand the Edit Appointment Multi-Tool to allow you to make additional choices:
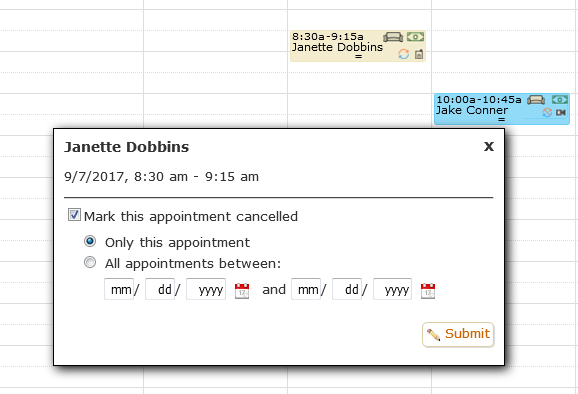
Once you've made your selection and clicked "Submit", the Edit Appointment Multi-Tool window will close and you'll notice that your appointment now has a line through it and the opacity has been reduced, making it stand out from your regular appointments:
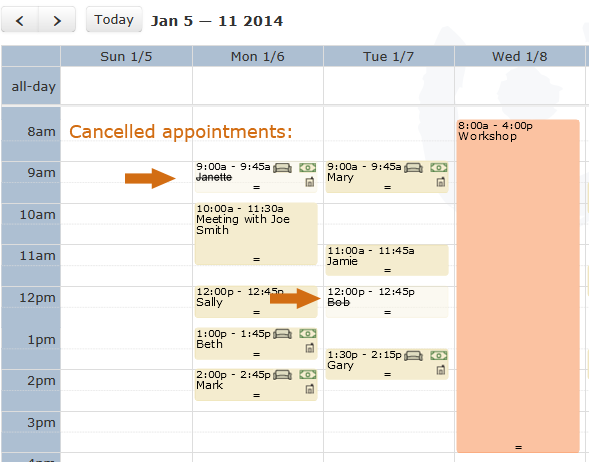
If the appointment you canceled was part of a series, only the appointment(s) you designate will be marked. If the session was a PSYBooks video session, Secure Video will get the information that the session has been canceled, will remove it from their dashboard and send the recipient a notification of the cancellation.
Print Calendar
What this isThe Print Calendar tool allows you to print out a list of the client and/or other events on your calendar.What it looks likeThe Print Calendar tool is under the Hamburger Tool on the top right side of all pages in the Calendar (Daily, Weekly and Monthly). It looks like this: 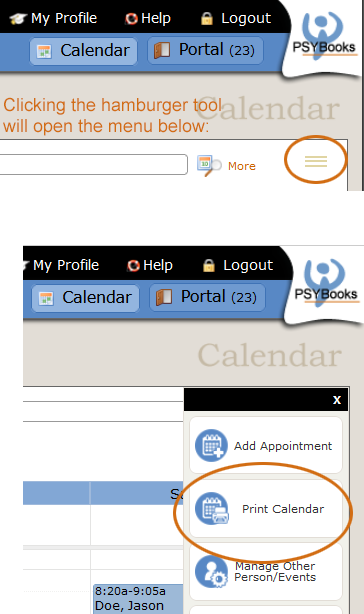 |
Where this isYou can access the Calendar from the global nav at the top of every page or from the Sitemap links at the bottom. The Print Calendar tool is in the Hamburger menu.
|
When you open the Print Calendar tool, it looks like this:
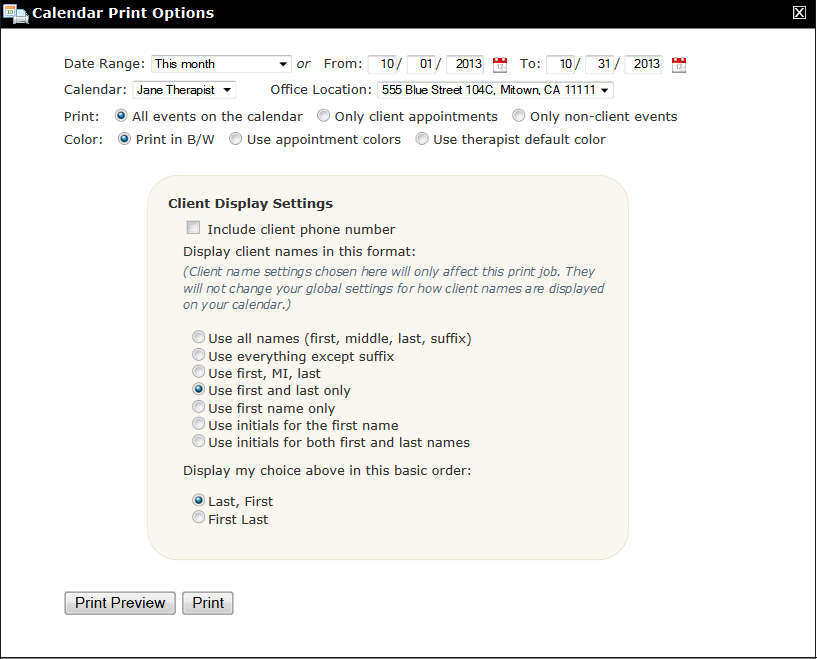
There are many filters here to allow you to select the items you want as well as the color and format you'd like them to be in. Of particular interest is the area with the gold background called Client Display Settings. This feature can be used to help keep printed copies of your schedule a little more secure by not using the full names of your clients if you feel that might be a concern.
Although it's not necessary to use the print preview function, clicking Print Preview displays an HTML version of your calendar beneath the filter like this:
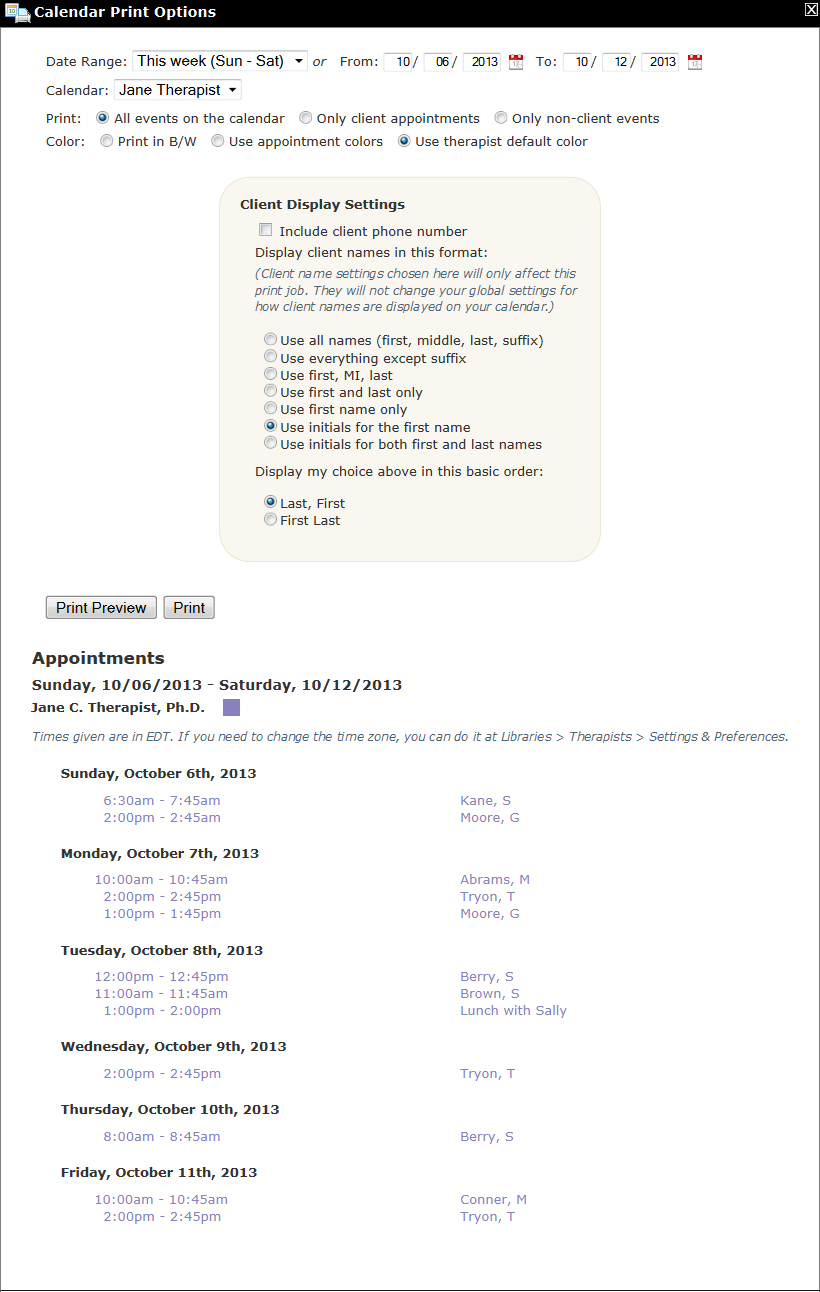
Notice that days that don't have appointments will not appear. For example, the sample above used a date range filter of Sun, Oct 6 - Sat, Oct 12. However, there were no appointments on Saturday so that day isn't listed on the calendar. Your calendar will be printed using the time zone you have listed in the Settings & Preferences section of Libraries > Therapists. On the screenshot above, it says "Times given are in EDT" because that's the time zone this particular therapist was using.
When you're ready to print, clicking the Print button will create a PDF form which you can then send to your printer.
Manage Other Person/Events
What this isThe Manage Other Person/Events tool allows you to edit and delete contacts that you've added with either the Add Appointment > Other > Add New Person tool or the Add Appointment > Other > Add New Event tool.What it looks likeThe Manage Other Person/Events tool looks like this (dropdown appears after you click the hamburger menu on the Calendar page):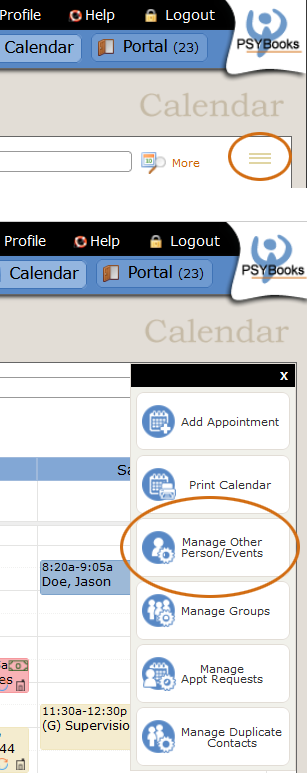 |
Where this isThe Manage Other Person/Events tool is accessed by clicking the hamburger menu at the top right corner of the Calendar page. The hamburger menu looks like this:
|
When you click the Manage Other Person/Events tool, the window that opens looks something like this, depending on what Person and/or Event Contacts you've entered:
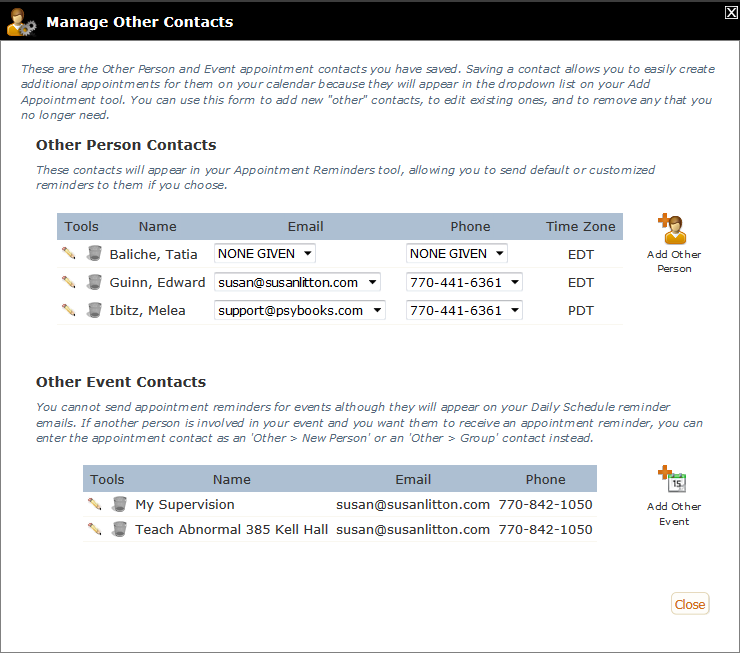
This tool allows you to add new contacts of either type, remove contacts you no longer need and edit existing contacts. Notice that Other Person Contacts can be scheduled for appointment reminders, whereas Other Event Contacts cannot. If you're scheduling an event with one or more individuals and you'd like to be able to send them appointment reminders, enter them as an Other > Person or an Other > Group contact instead.
Manage Groups
What this isThe Manage Groups tool allows you to add, edit and delete both therapy and non-therapy groups that you've added with the Add Appointment > Other > Add New Group tool.What it looks likeThe Manage Groups tool looks like this (dropdown appears after you click the hamburger menu on the top right of the Calendar page):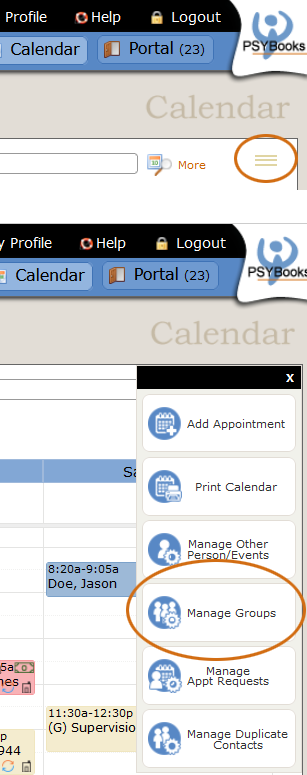 |
Where this isThe Manage Groups tool is accessed by clicking the hamburger menu at the top right corner of the Calendar page. The hamburger menu looks like this:
|
When used with therapy groups, the Manage Groups tool allows you to schedule appointments for all clients at once, send appointment reminders, track group attendance, post a generic group note to each client's chart and enter sessions with individualized group notes. As you enter the session, you can also enter client payments and file insurance - all from the Manage Groups tool. You don't need to go to each client's chart separately for these tasks. Non-therapy groups are ideal for staff meetings, supervision, classes or other meetings where you might want to take notes, keep track of attendance and/or send appointment reminders to each person in the group.
When you click the Manage Groups tool, the window that opens looks like this (notice that video groups have a camera by their names so you can recognize them easily):
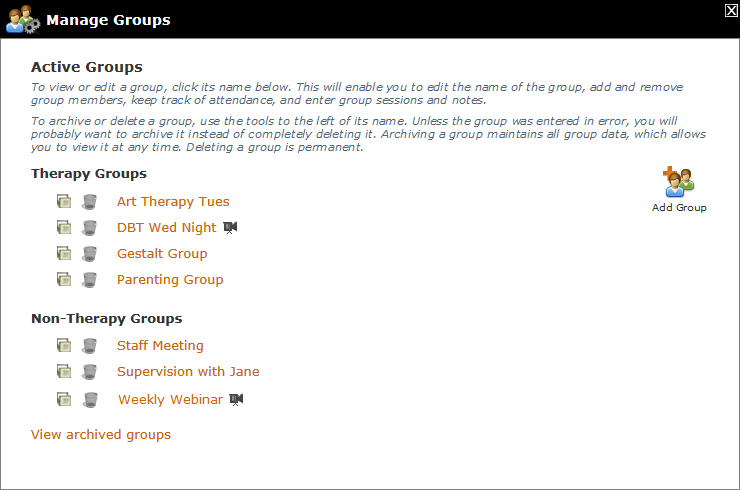
Although at first glance, this tool looks like it's primarily for archiving or deleting groups, it's actually a multi-tool for doing all tasks pertaining to your groups. Each of the separate tools will be discussed below:
- Add Group
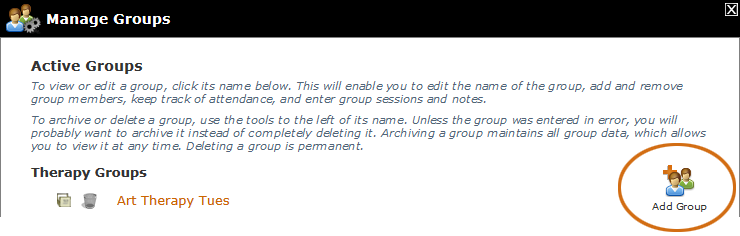
The Add Group tool on the right of the form is another access point to the Add New Group link that's on the Add Appointment tool, i.e., Add Appointment > Other > Add New Group. No matter which access point you use, the tool looks like this:
More information on using the Add Group tool can be found above.
- Archive Group
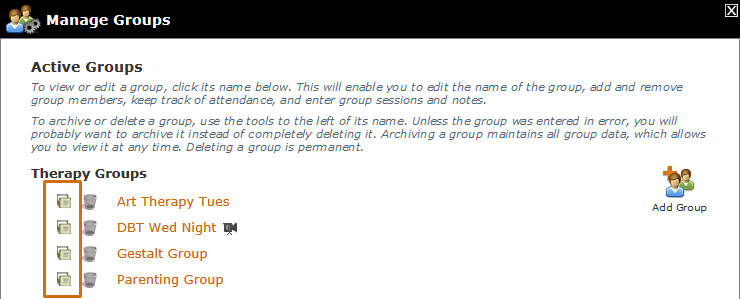
The Archive Group tool is the filing cabinet icon at the beginning of each group's row. It's used when you want to remove a group from your Active Groups list and yet keep all the records that are contained within the group. You can view or reactivate archived groups at any time.
- Delete Group
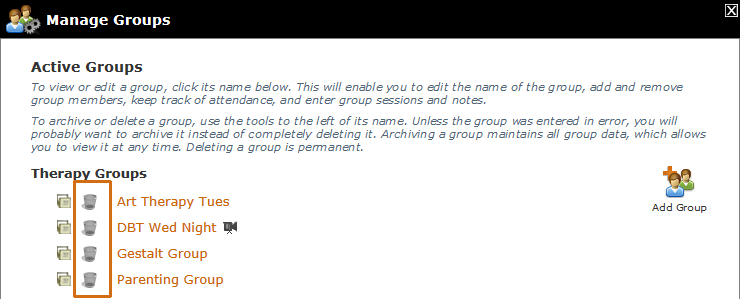
The Delete Group tool is the trash can icon next to the Archive Group tool. Delete Group should be used sparingly since deleting a group will permanently remove all records associated with the group. The Archive Group tool is often a better choice if you want to remove a group from your Active Groups page but maintain a copy of your records.
- Edit/Manage Individual Group
The Manage Individual Group tool is where you'll do most of the work for each group individually. You can access it by clicking the link of the group you want to open:
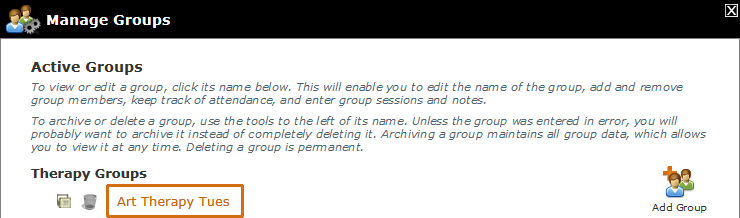
When the form opens, it looks like this - this is the tool you'll use for all functions needed for this particular group:
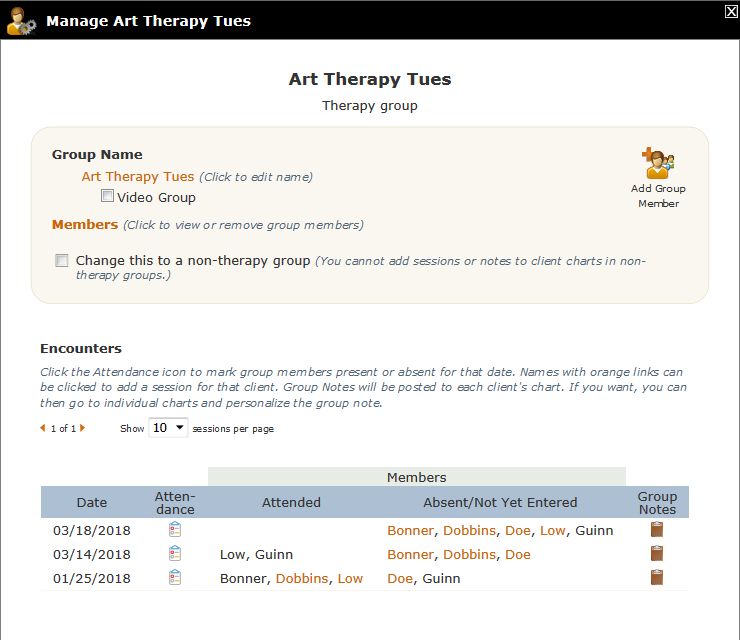
This multi-tool is comprised of several individual tools. You should be able to do most, if not all, of the tasks you need to do with your groups from this one tool. Each of the individual tools will be discussed below.
- Add Group Member
On the upper right is a tool for adding additional group members to your group:
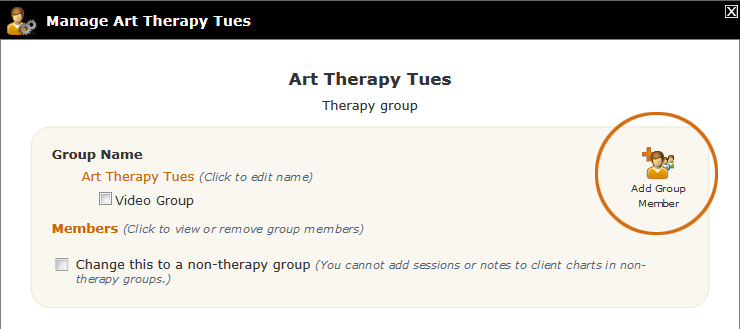
This tool differs from the tool you used when you created your group in that it adds members to this specific group. The group has already been created - you're just adding one or more new members to it. The tool looks like this:
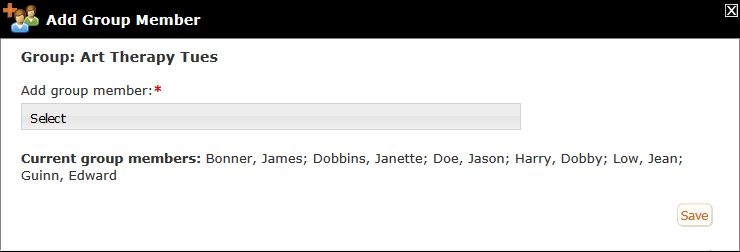
The current members of the group are listed at the bottom and are not included in the select box options.
- Edit Group Name
The name of the group can be edited by clicking the link under "Group Name":
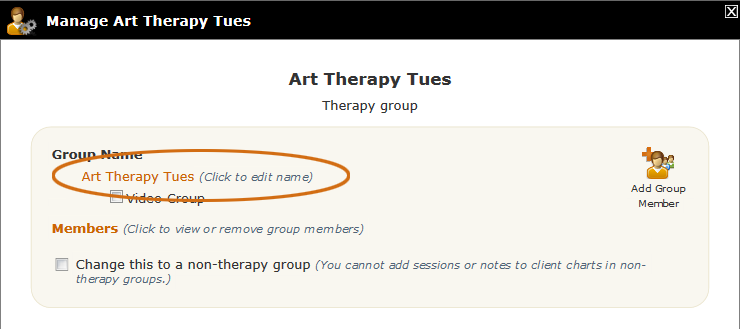
Clicking the name gives you a text input field where you can change it's name:
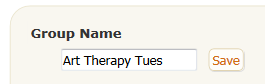
- Convert To/From Video
Beneath the group name is a checkbox where you can change this session to a video session. Or, if it's already designated as a video session (i.e., if the box is checked), you can uncheck the box and it will no longer be scheduled as a video session. Changes made here will sync with your SecureVideo account:
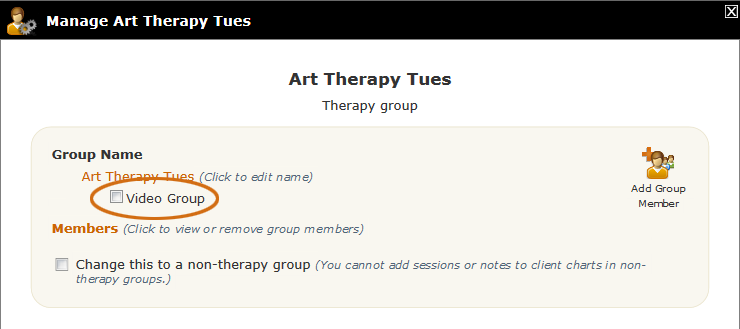
- View/Remove Group Members
You can view and remove current members of the group by clicking the "Members" link:
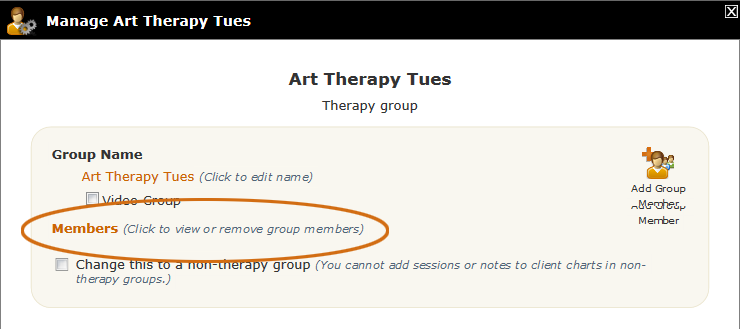
Clicking the link slides open a section that looks like this:

From this window, you can see all the members that are currently in your group and remove any that no longer belong. Clicking the trash can icon ONLY removes the person from your group. It does not delete them from anywhere else in the app.
- Change to Therapy/Non-therapy Group
The last tool in the shaded section of the Manage Groups tool is a checkbox that allows you to convert therapy groups to non-therapy groups and vice versa:
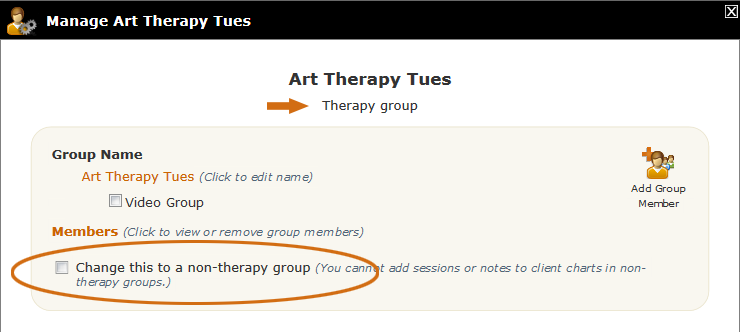
At the top of the form, right under the group's name, it will tell you whether this group is currently designated as a therapy group or a non-therapy group. You can check the checkbox and convert it to the other type. If a group doesn't have any clients, there is no difference between a therapy group and a non-therapy group. However, when one or more clients are in the group, designating it as a therapy group will allow you to enter sessions (with client payments), file insurance claims, and also add group notes to each group member's chart right from this tool.
The rest of the tools on this form pertain to the actual sessions or encounters the group may have had. Those tools are in the non-shaded section of the tool at the bottom and will be discussed below:
- Track Group Attendance
The table in the Encounters section at the bottom of the Manage Groups tool lists each scheduled group whose date has already past as well as the next upcoming group. (The upcoming group is a shaded row at the top to help you keep it separate from the others.) The first column in the green "Members" section of the table lists the group members that were marked as having attended the session. The second column in the Members section shows those who either didn't attend or who perhaps just haven't been entered yet.
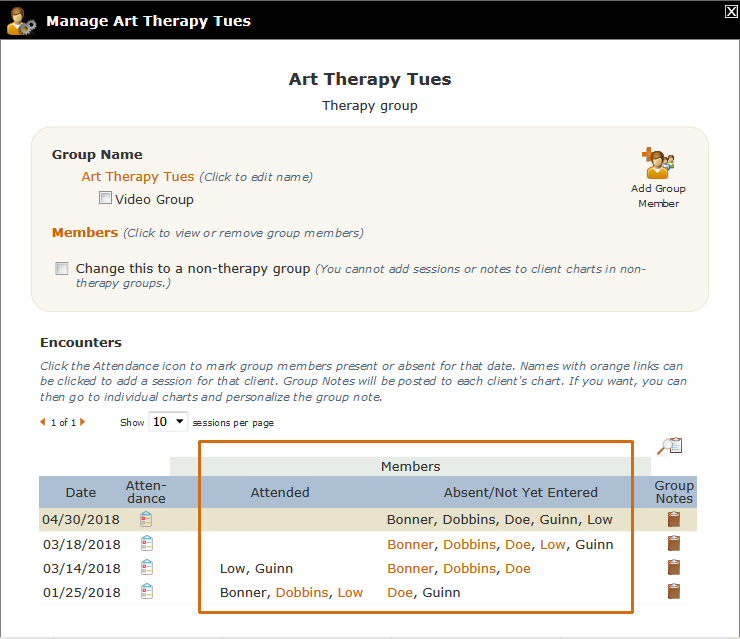
In the screenshot above, we can see that this group has met three times: 01/25/2018, 03/14/2018 and 03/18/2018. The next upcoming group, 04/30/2018, is listed in the shaded row. By looking at the two "Members" columns, we can see that Bonner, Dobbins and Low all attended the group on 1/25/2018; Low and Guinn attended on 3/14, and so far, either no one attended or no one has been entered for the 3/18 group.
To enter attendance, you use the Attendance tool, which appears on each row of the table to the left of the Members columns:
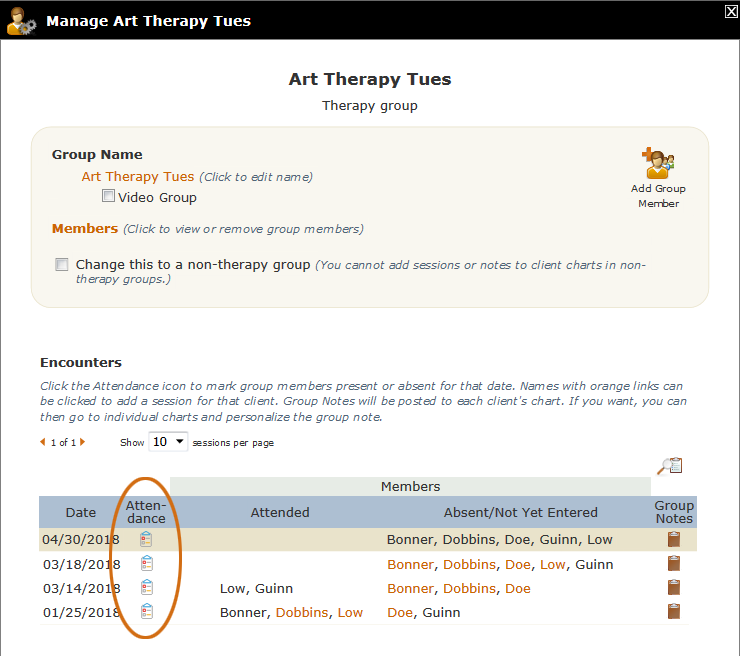
Clicking the Attendance Tool beside a session will open the attendance section for that particular date where you'll be able to see each group member's name beside a checkbox. You can mark which members were present - including using the checkbox in the blue header to select "All". The Attendance icon for the 3/18/18 group was clicked to produce the screenshot below:
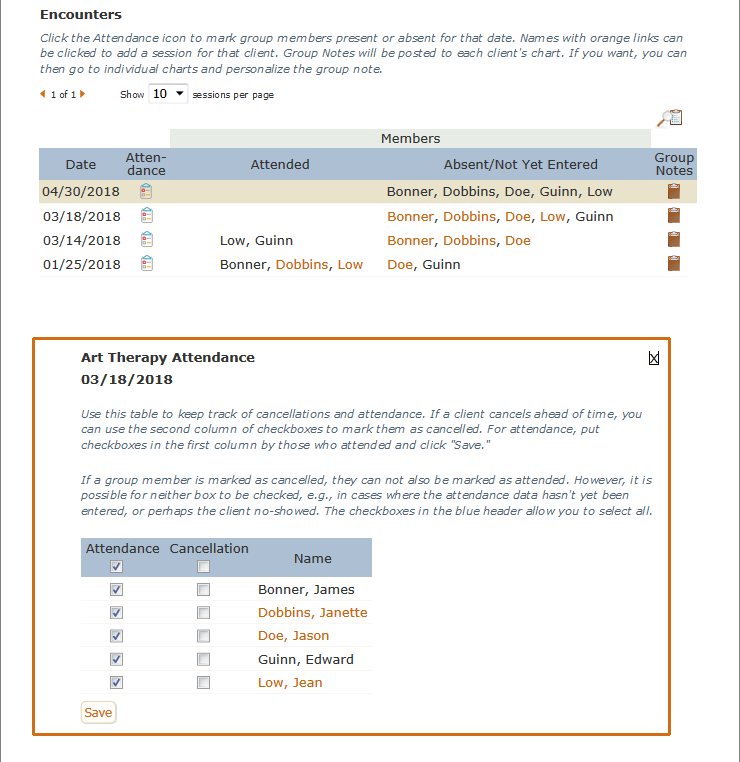
When you click "Save," names of the members who had checkboxes by their names will be moved to the "Attended" column. For example, from the screenshot above, if we had clicked the "Select All" checkbox at the top and then clicked "Save," the Encounters table would now look like this:
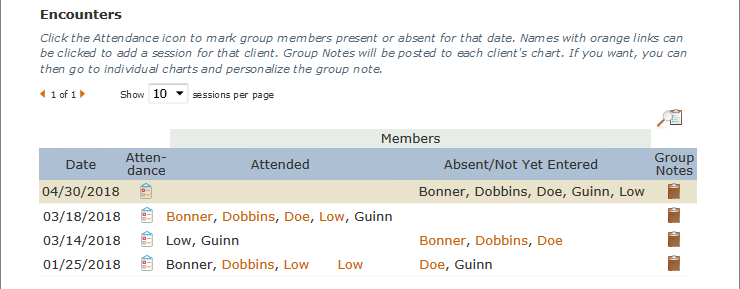
Notice that the Group Attendance form also has a way to mark cancellations for individual members with the second column of checkboxes on the form:
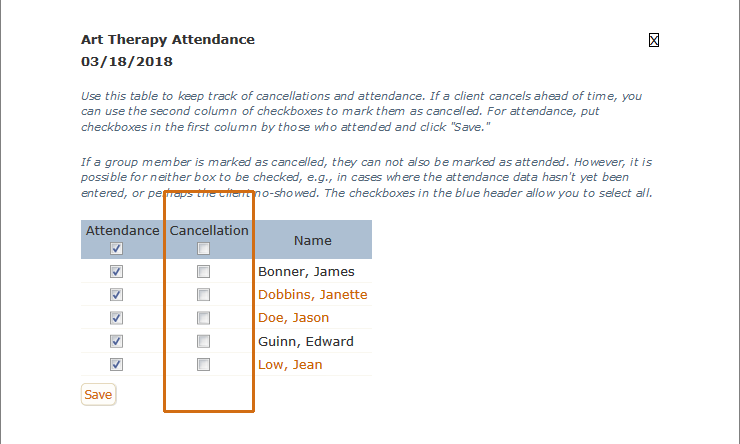
You can cancel sessions ahead of time or, if a member canceled and you forgot to mark it, you can also cancel them after the fact. When you click a checkbox in the cancel column, you get the kind of date range options you're used to seeing on a regular appointment cancel. This allows you to mark cancellations for individuals that need to miss several appointments in a row so you don't have to enter each one separately. In the screenshot below, we've marked James Bonner as canceled for the 3/18 Art Therapy group. Notice that an individual can't be marked BOTH as having attended and canceled, so by marking him canceled, the checkbox was automatically removed from the attended checkbox:
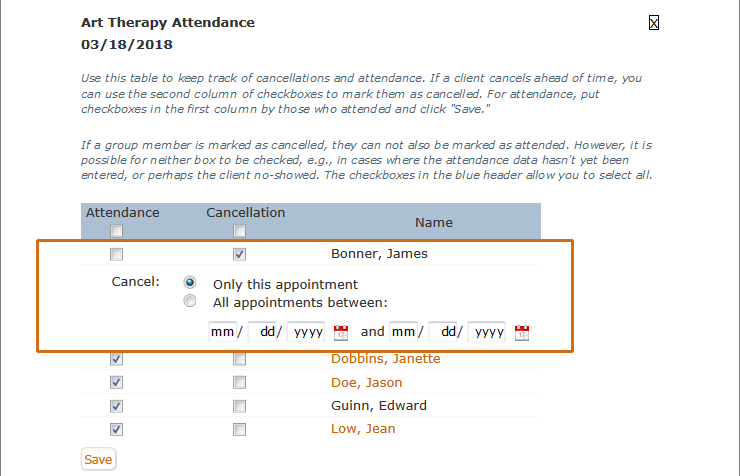
One of the values for having the upcoming group displayed is that it allows you to mark cancellations ahead of time. For example, during a group if a member tells you they'll be out of town and have to miss the next two groups, you can mark it right then so you don't forget. Because of the date range feature, you'll be able to mark the individual as canceled in both groups, even though only one group is visible in the Attendance Table.
- Add Sessions (Therapy Groups Only)
You may have noticed that some members' names in the Encounters tables use regular black fonts whereas others are orange - indicating that they are links. You will only see links in groups that have been designated as therapy groups, and only for clients - because the links are what allow you to add sessions right from the Manage Groups tool. For example, in the screenshot above, if we click Bonner's name for the 3/18 session, the Add Session form, pre-populated with his information, will open right from this tool. You don't have to leave the Manage Groups tool and go back to the Charts area to enter the client's session:
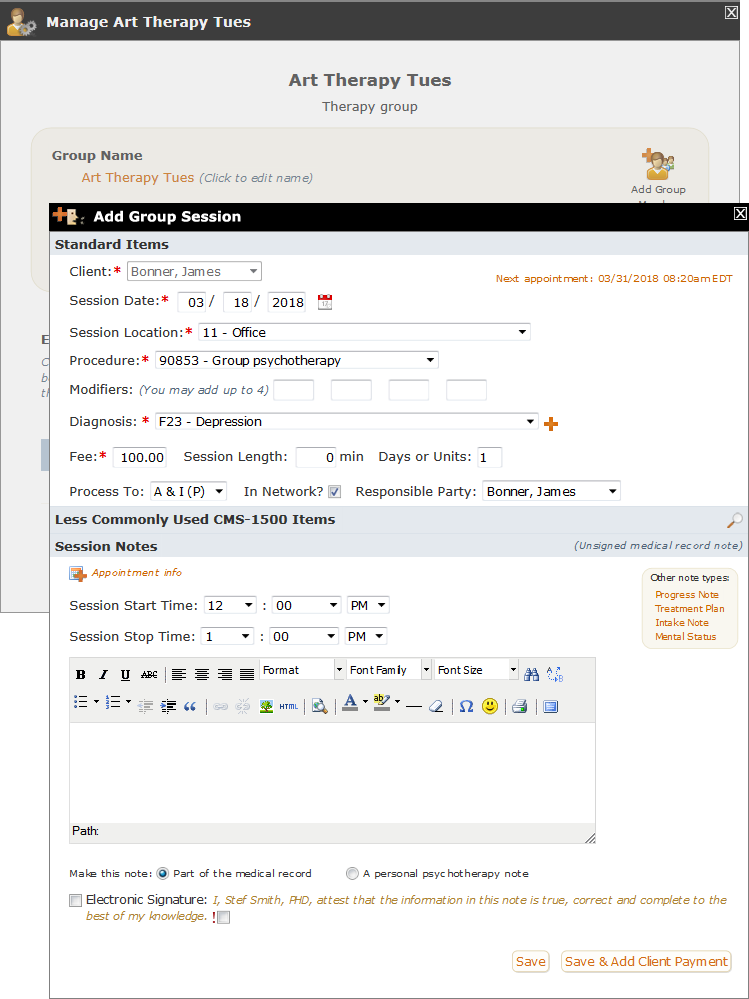
Notice in the black bar at the top, it now says "Add Group Session" instead of just "Add Session." Also, although you can add Group Notes to each client's chart (covered in the next section), if you want to add an individual group note for this client that would not be appropriate to post in everyone's chart, you can do it here as you regularly would with the Add Session tool. When added from the Manage Groups tool, a note written on the Add Group Session form will be listed in the Notes tab of the client's chart as an Individual Group Note.
Once you have saved the client's session, their name in the Encounters table for this session date will no longer be a link. This will allow you to use the Encounters table to visually keep track of which sessions you've entered and which you haven't. For example, after we save James Bonner's session above, the session form would close and the Encounters table would look like the screenshot below. Notice for the 3/18 group, the name "Bonner" is now just a regular black font, indicating that his session has already been added. However, Dobbins, Doe and Low still need to have their 3/18 sessions added.:
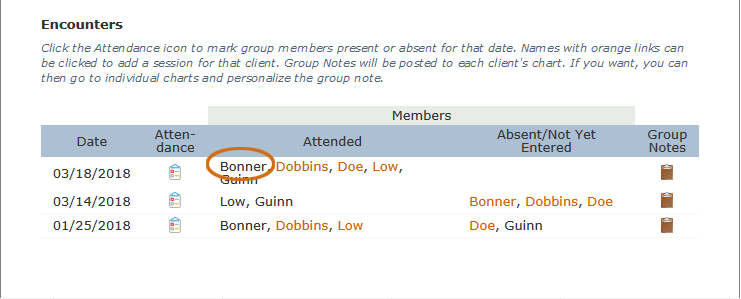
- Add Group Note
The Add Group Note feature can be found in the last column of the Encounters table:
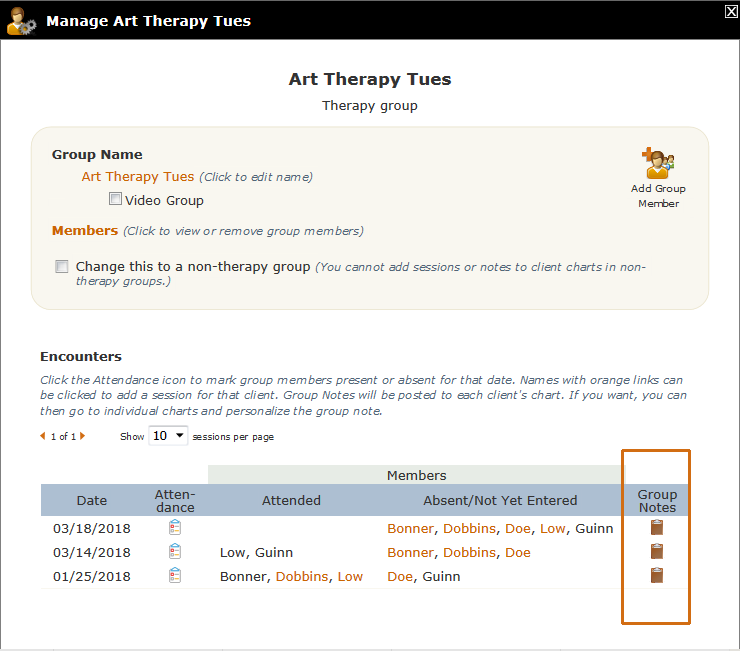
When you click a group note - let's say the one for the 3/18 group - the form that opens looks like this:
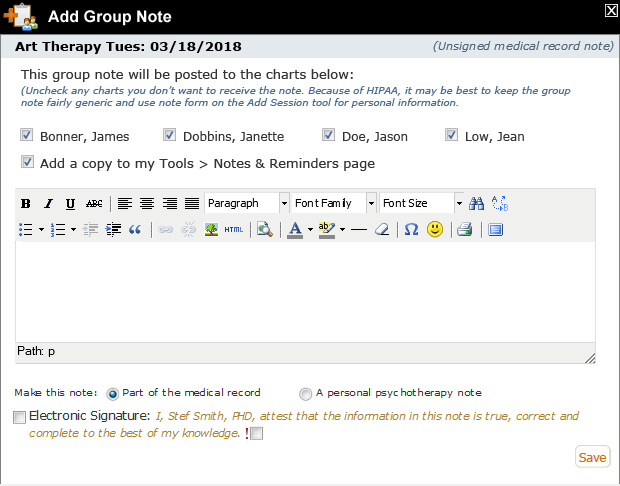
Notice at the top of the note, the four clients in this group - Bonner, Dobbins, Doe and Low - are listed, with checkboxes by each of their names. Although this group has another individual, Guinn, listed in the Encounters table, Guinn may be the facilitator or some other non-client group member, since their name is never presented as a link. Because of this, group notes cannot be posted for them so they are not included in this list. All client group member names are selected by default, but you can deselect any that didn't attend the group, or for whom you don't want to post the group note for some other reason.
Notice that there's also a checkbox that allows you to post a copy of the note to your "Tools > My Notes & Reminders" page if you wish. Doing this puts all of your notes for the group in one place so you don't have to open each group note separately to read them.
Write your note as you normally would, including any of the extras you want at the bottom (i.e, indicating whether the note is part of the medical record or your personal note, signing the note, and/or marking it as important.)
When you click "Save," the group note will post to the chart of each client whose checkbox was checked. This is unlike any other note in PSYBooks in that the same note gets posted to more than one client's chart. For this reason, although PSYBooks cannot offer legal advice, there may be HIPAA laws that govern what should and shouldn't be included in a group note. If you need to write specific information about certain individuals, you may want to write a somewhat generic group note for all, and then use the individual notes on the Add Group Session form discussed above for any more personal information you want to write. The screenshot below shows a client chart that has both a Group Note and an Individual Group Note posted. Following those, you can see a plain session note that was added with the regular Add Session tool, i.e., NOT the Add Session tool that's part of the Manage Groups tool:
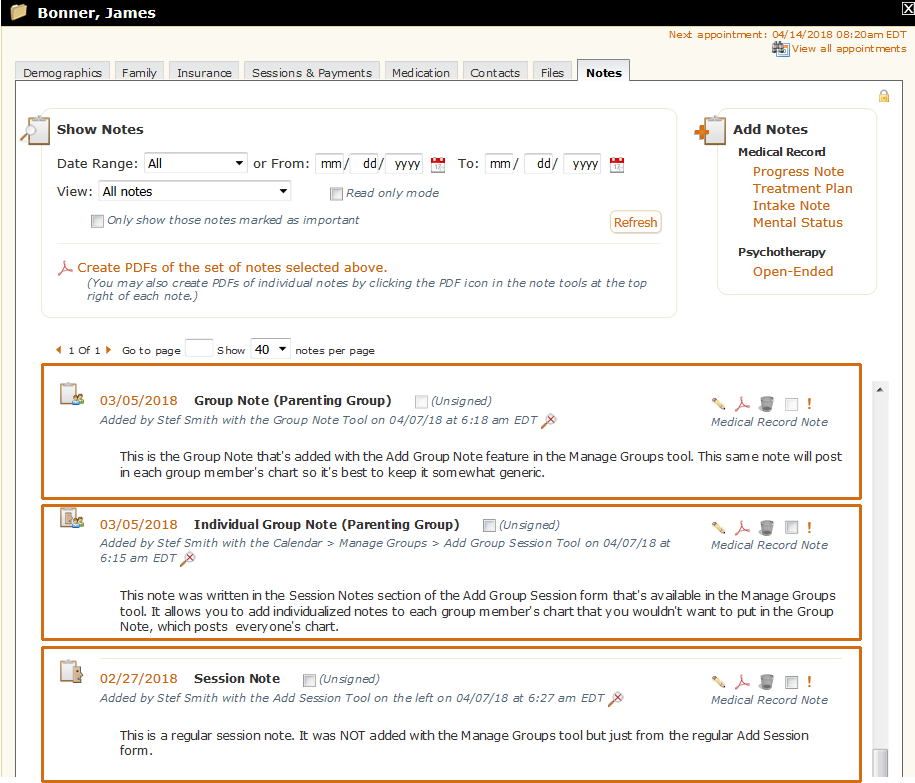
Most of what's been written so far about group notes pertains only to therapy groups. Group notes can also be useful for staff meetings, group or individual supervision appointments or other kinds of non-therapy groups where you may want or need to take notes. Group notes for non-therapy groups will only post to your Tools > My Notes & Reminders page and might look something like this:
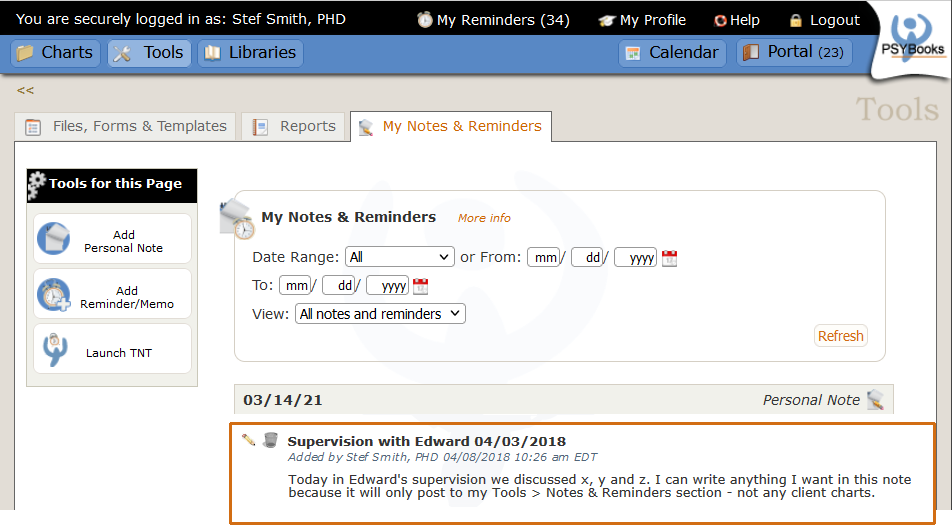
- Add Group Member
Manage Appointment Requests
What this isThe Manage Appointment Requests tool allows you to edit or delete any outstanding Appointment Requests to which the recipient has not replied.What it looks likeThe Manage Appointment Requests tool looks like this (dropdown appears after you click the hamburger menu on the top right of the Calendar page):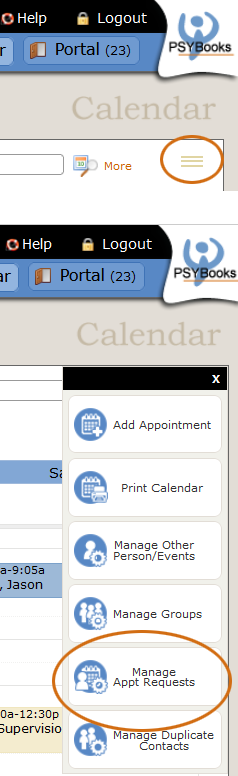 |
Where this isThe Manage Appointment Requests tool is accessed by clicking the hamburger menu at the top right corner of the Calendar page. The hamburger menu looks like this:
|
When you click the Manage Appointment Requests tool, the window that opens looks like this:
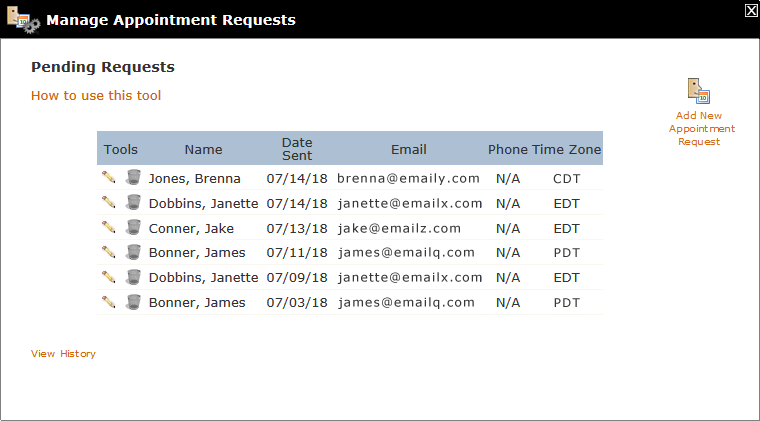
Notice that your Pending Requests are available in a table for you to see, but there's also a "View History" link at the bottom left that will allow you to see Archived Appointment Requests. For convenience, there's also a tool for adding a completely new Appointment Request at the top left. However, the more important parts of this tool are the two tables.
With the Pending Requests table, you can view, edit and delete any of your outstanding Appointment Requests. To be listed in this table, the Appointment Request must have at least one pending appointment time that the recipient would be able to choose. If the recipient has already chosen a time from that request, if the request has been canceled (by either recipient or therapist), if all times have been booked by others, or if the dates for all pending appointment times have passed, the Appointment Request will fall off of the Pending table and be moved to the Archived Requests table which can be found by clicking the "View History" link.
Each row in the Pending Requests table represents an entire request, which means it could include one time or many. If you click the Edit tool from one of the pending requests, it will open, allowing you to see exactly what was sent with that particular request. Notice that you may need to scroll forward in the calendar to find all of the times you sent:
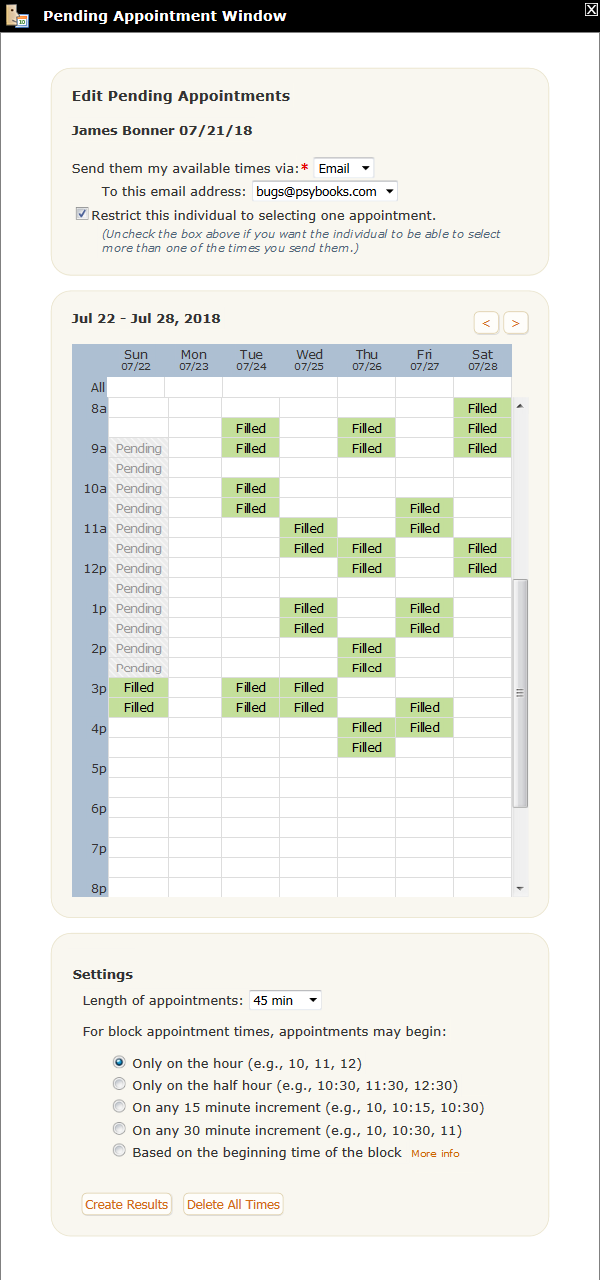
You can make any changes you want in the Edit window, then click "Create Results" to generate a new Appointment Request. Notice that by editing a Request, it will overwrite the original, not create a new one. If you'd rather send a new Appointment Request, you can use the "Add New Appointment Request" tool.
View History
All previous Appointment Requests can be found by opening the View History link. The Appointment Requests in this table allow you to view older Appointment Requests. When you click the View History link, the table that opens would look something like this:
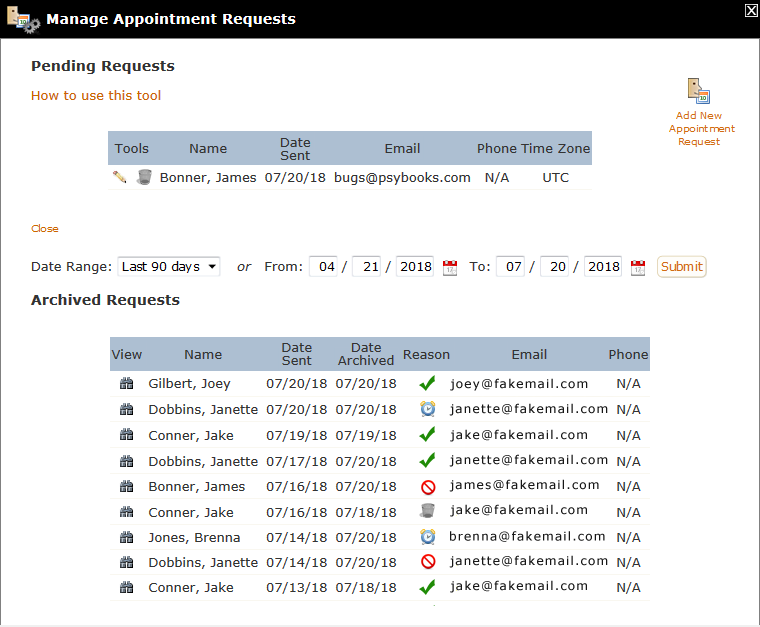
By default, archived Appointment Requests from the last 90 days are displayed. However, you can change the dates to whatever you want. You can click the binoculars to see the details of any original Request.
The Reason column lets you see at a glance the final disposition of that particular Appointment Request. The Reason column will have one of four different icons:
 A green check indicates that this Appointment Request was fulfilled, i.e., the recipient chose an appointment.
 The clock icon means that the Appointment Request timed out before the recipient chose a time.
 The "No" icon means that all of the times sent were claimed by others before the recipient could choose one. This might mean that the therapist booked over the times and/or that other Portal Users did.
 The trash icon means that the request was canceled. It could have been canceled by the therapist or the client.
Manage Duplicate Contacts
What this isThe Manage Duplicates tool allows you to edit or delete duplicate contacts that may have inadvertantly been added to your account.What it looks likeThe Manage Duplicates tool looks like this (dropdown appears after you click the hamburger menu on the top right of the Calendar page):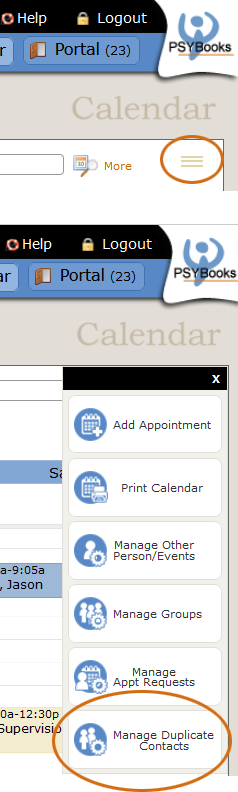 |
Where this isThe Manage Duplicates tool is accessed by clicking the hamburger menu at the top right corner of the Calendar page. The hamburger menu looks like this:
|
When you click the Manage Duplicates tool, the window that opens looks like this:
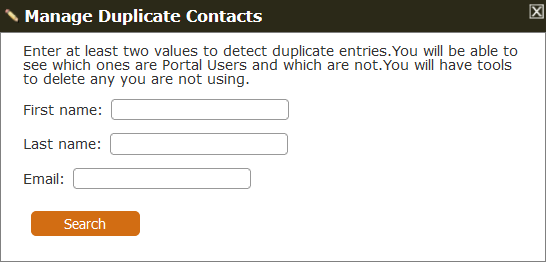
Enter at least two fields to check to see if you have more than one contact with those two values and then click "Search." Assuming you find matches, you'll get a window that looks something like this:
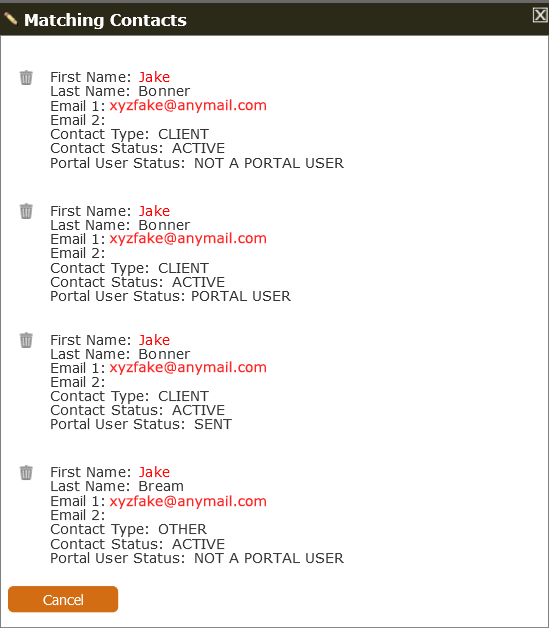
The user had entered two values - a first name of Jake and an email of xyzfake@anyemail.com. The Duplicates tool found 4 matches - 3 of them are for Jake Bonner. If the user had entered a last name of Bonner with the other two values, the tool would have provided this:
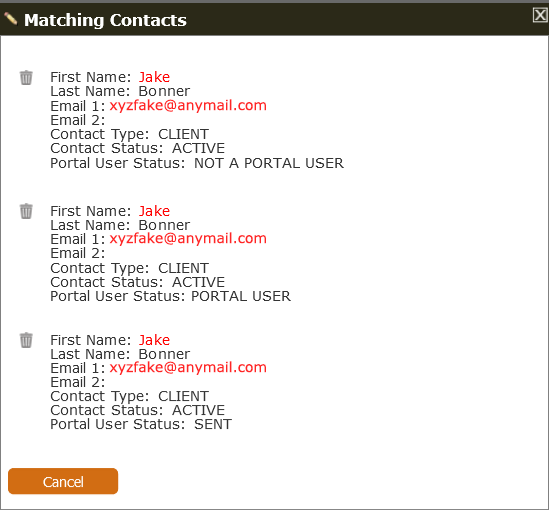
Here we can see that all 3 of these entries are for Jake Bonner and that the main difference between them is their portal user status. In one case, the client is a Portal User. In another, the invitation to join the portal has been sent, but the client has yet to respond. The remaining one has not yet received a Portal User invite. If you determine that these are all meant to be one person, you can delete the ones you don't need with this tool. If you're not sure which one you need to keep, you can go to the Charts page and change the last name a bit - like Jake Bonner1, Jake Bonner2, etc. Then, with the Duplicates tool, enter just first name and email and delete the ones you don't need.
There is a similar tool that appears if you're adding a new client or a new Person (Other > Person) and the program detects at least two fields in the new contact that matches an existing contact. You are shown the potential duplicates to ensure the duplications are intended. This tool allows you to add family members who share a last name and email address, e.g., for parents with small children who both want to be notified of all PSYBooks correspondence via a single email address.
Onine Booking Calendar
What this isThe PSYBooks Booking Calendar is a powerful tool that lets you offer online scheduling on your terms. Whether you’re a solo practitioner or part of a group practice, it gives you complete control over when, how, and by whom appointments can be booked. You decide which days and times to offer, who can see your calendar, and what types of services are available — all with flexible options for cancellations, exceptions, and more. It’s designed to save time, reduce back-and-forth communication, and give your clients (or anyone you choose) a smooth, professional scheduling experience. What it looks likeThe last tool on the bottom allows you to add and edit your Booking Calendar: 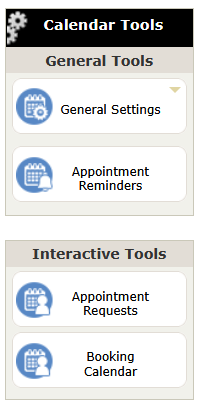 
|
Where this isYou can access the tools to setup or edit your Booking Calendar with the last tool on the Calendar page.
|
Booking Calendar Setup: Rules & Settings
When you first open the Booking Calendar, it looks like this:
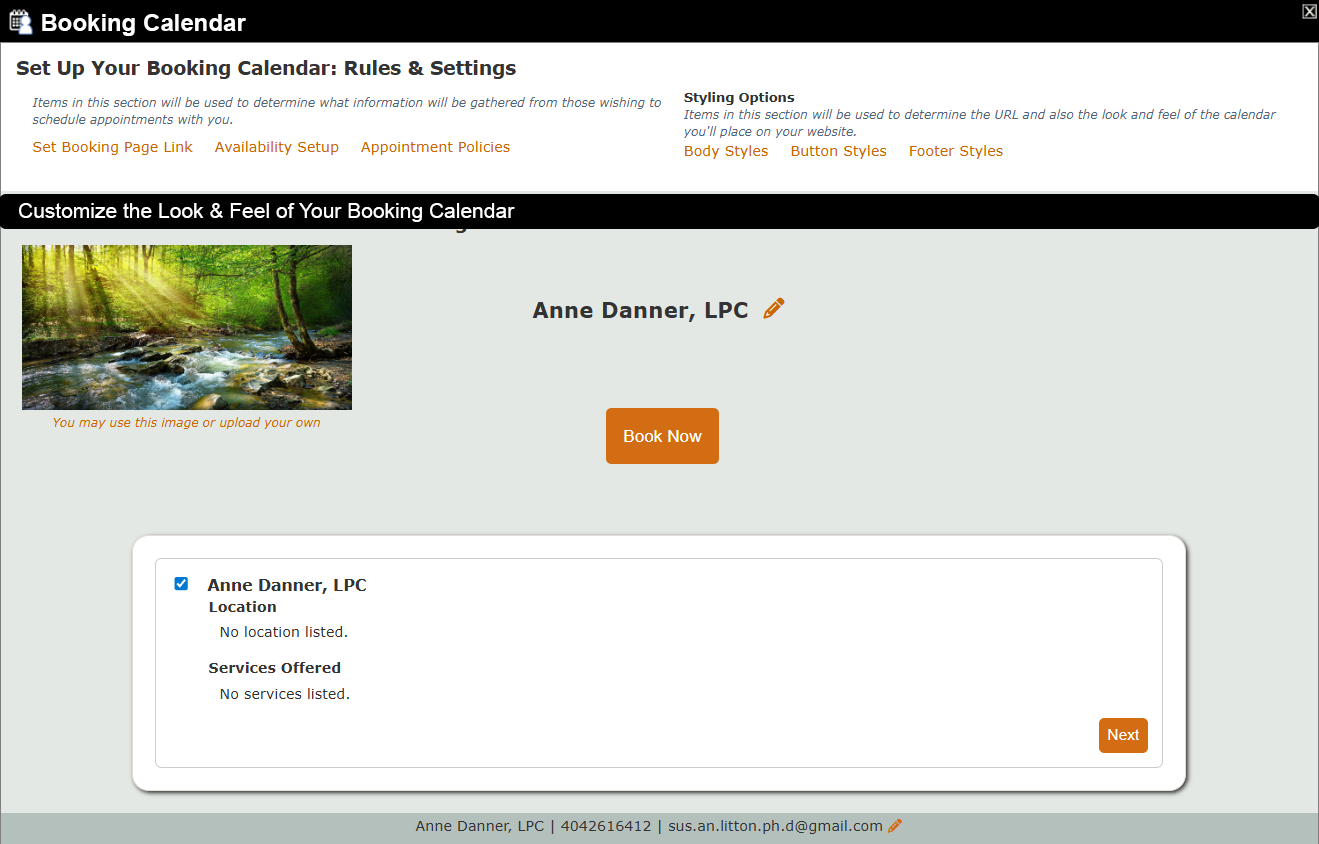
There are two main sections: "Set Up Your Booking Calendar: Rules & Settings" (the part at the top with the white background) and "Customize the Look & Feel of Your Booking Calendar", the green bottom half. Each has numerous tools as part of it, so we'll discuss each below.
The Booking Calendar is divided into two main sections:
- Set Up Your Booking Calendar: Rules & Settings — the upper section with a white background
- Customize the Look & Feel of Your Booking Calendar — the lower section with a green background
Each section contains several tools, so we’ll walk through them one at a time below.
In the top section, you’ll find three functional links on the left:
- Set Booking Page Link
- Availability Setup
- Appointment Policies
On the right side of the top section are the Styling Options, which include:
- Body Styles
- Button Styles
- Footer Styles
The Functional Links
The three functional links on the left look like this:
We'll discuss each one below.
Set Booking Page Link/URL
This link does one thing: it allows you to create the URL you’ll use to let clients book appointments with you.
When you click it, it looks like this:
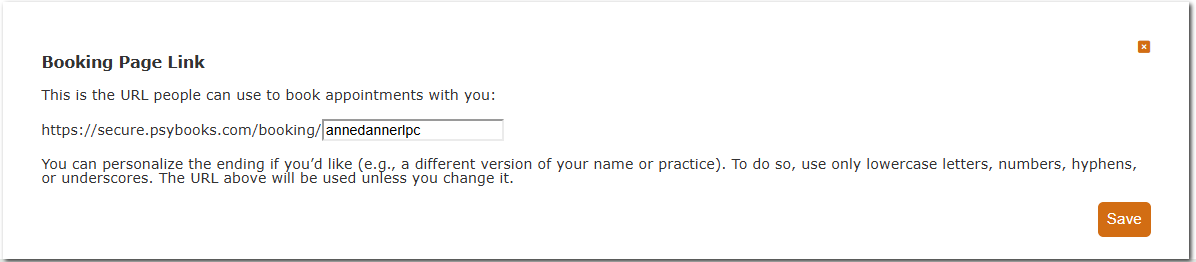
Notice that there's only one field to fill out - the name at the very end of the https://secure.psybooks.com/booking URL. PSYBooks makes its best initial guess at what you might want by following these rules:
- If you entered a practice name when you signed up (or later in your Profile), PSYBooks uses that.
- If there’s no practice name, PSYBooks uses your first, middle, and last name along with your credentials.
- If a booking URL with that name already exists, PSYBooks adds numbers, starting with 1.
If you don’t like the default, you can change it to anything you feel will be easy for your users to remember. However, once it’s saved and you begin using it, the Booking Page URL cannot be changed.
Availability Setup
The Availability Setup section defines the framework of your schedule. Think of it as creating “containers” for when, where, and how you’re available to meet with clients.
Each Availability combines three parts:
- Set Availabilities – your regular business hours.
- Exceptions – adjustments to those hours, such as holidays or recurring personal events.
- Services – the types of appointments users can book with you.
Together, these determine what users actually see on your public Booking Calendar. Let's take a high level look at each one:
Set Availabilities: Your Availabilities are the backbone of your Booking Calendar. They describe the standard days and times you’re generally open. For some practices, this may be as simple as “Monday through Friday, 9:00–5:00.”
For larger or group practices — or practices with multiple locations, therapists, or special programs — you may need to create multiple Availabilities to reflect those differences.
At this stage, it’s enough to know that each Availability includes:
- A name (to help you tell them apart)
- A location (office or telehealth)
- The therapist(s) it applies to
- The services offered
We’ll cover each of these in detail shortly.
Exceptions: Exceptions fine-tune your schedule without changing your core Availabilities. They allow your Booking Calendar to reflect the real rhythm of your practice year after year.
There are three types:
- Holidays – days your office is closed (you can choose which ones to observe)
- Other Exceptions – recurring personal or professional events, such as birthdays, anniversaries, or religious observances
- Out of Office - short-term or one-time absences, such as a vacation, sick day, or mid-day break
Instead of editing your base schedule, you layer Exceptions on top of it — keeping your availability accurate, consistent, and easy to manage.
Services: Services define what a user is actually booking. Each service has details such as:
- The name (for example, “Individual Therapy 50 minutes”)
- The duration (plus optional setup and cleanup times)
- Whether it’s individual or group-based
- The fee (if you choose to collect payment during booking)
You can create as many Services as you need — from standard sessions to workshops, assessments, or groups. All Services use the same form, and you’ll connect them to your Availabilities so clients always see exactly what’s being offered.
Now that you know the building blocks of Availability Setup, let’s look at how they come together in your Current Availabilities list.
Current Availabilities
Once you create an Availability, it will appear in your Current Availabilities list (inside the Set Availabilities section of Availability Setup):
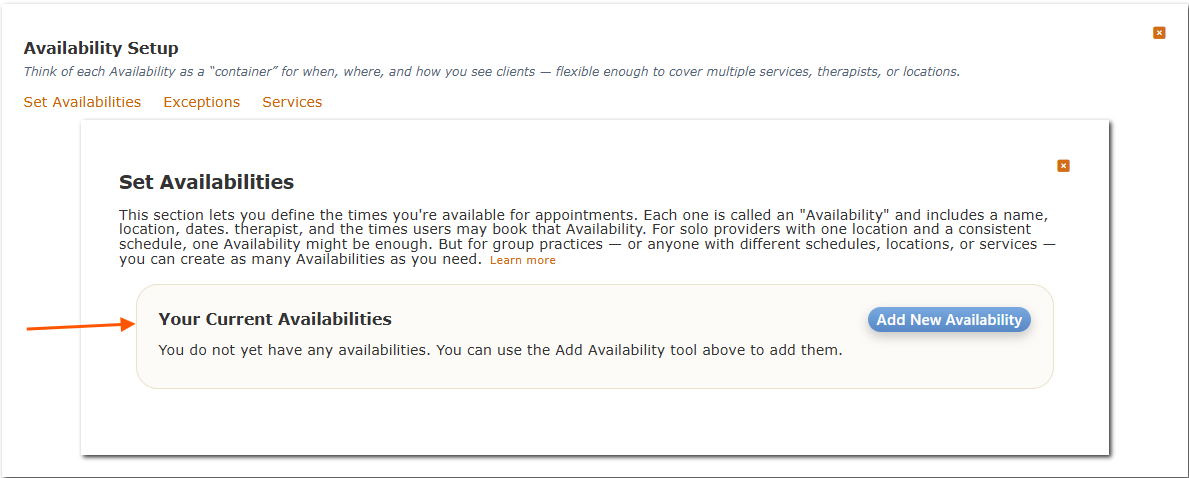
This list shows all of the Availability “containers” you’ve created so far. From here, you can quickly see what schedules exist and add new ones as needed.
An Availability describes when — and for what — you’re open to booking. Think of it as the backbone of your schedule.
- If your practice is straightforward (for example, one location, one service, and consistent weekly hours), you may only need one Availability.
- If your schedule is more varied — different services on different days, special programs, workshops, or separate telehealth hours — you’ll want to create multiple Availabilities to reflect that complexity.
Don’t assume a group or clinic practice automatically needs more Availabilities than a solo practitioner. The number depends on the variety of schedules, not the number of people in the practice.
Each Availability combines these parts: Name, Location, Dates, Business Hours, Therapist(s), and Services. Since Anne Danner’s new account currently shows no entries in Current Availabilities, let’s create her very first one together.
Adding a New Availability
Clicking Add New Availability opens a form with the five main sections:
- Name for this Availability
- Location for this Availability
- Date(s) for this Availability
- Business Hours
- Therapist(s) and Services
We’ll walk through each section using Anne’s example.
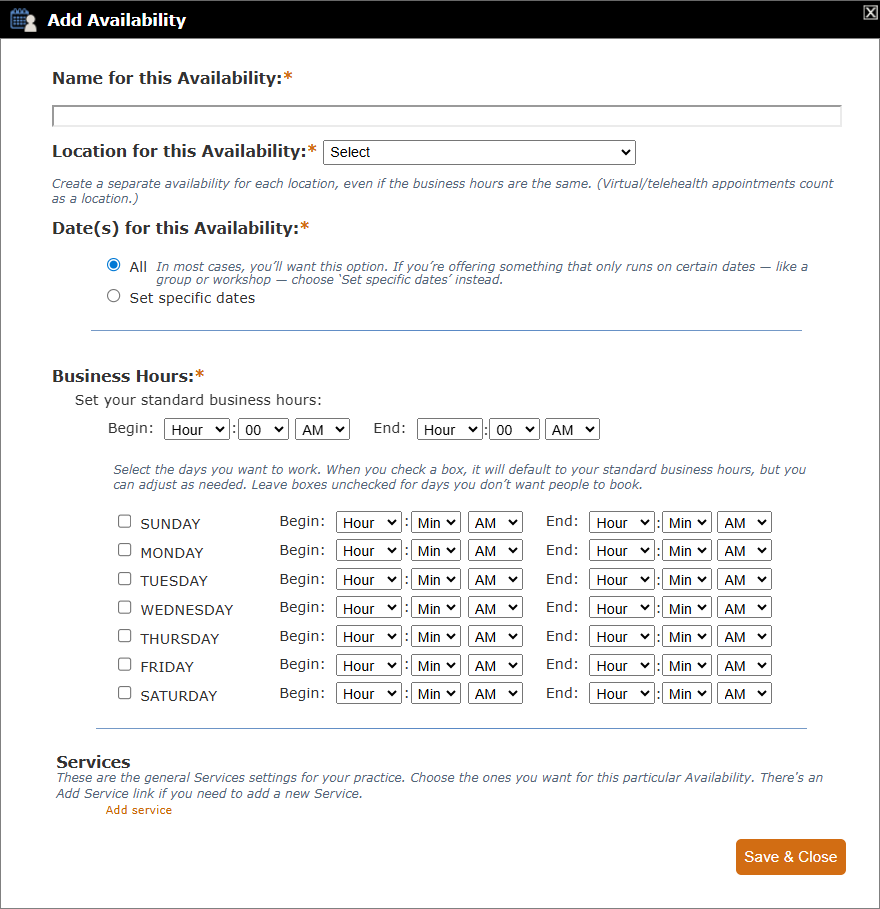
Name for this Availability
This is just for you — clients never see it. Choose a name you’ll recognize later when editing or deleting this Availability.Examples include: General Business Hours, Wed Night Grief Group, Telehealth Only.
- Anne enters: General In Office Business Hours.
- Other examples she might have entered are things like: Mom's Night Out, Telehealth, In-Person Hours for Blackwood Trace.
Location for this Availability
This dropdown is filled automatically from your Profile. It includes any addresses you listed in your Profile, plus Telehealth.- Anne has one office location and Telehealth, so both appear in the list.

Since she's available for either in office and Telehealth appointments, she'll create one Availability for each. Note that if you use Telehealth, set it up as its own Availability (or as your only Availability, if your entire practice is virtual).
Since Anne offers both in-office and Telehealth appointments, she’ll eventually create one Availability for each. For now, she’s starting with her in-office schedule.
- Anne has one office location and Telehealth, so both appear in the list.
Date(s) for this Availability
An Availability defines when one or more Services can be booked. Every Availability must include at least one Service. Most Availabilities are ongoing and apply to all dates. This is the most common choice for regular clinical schedules.However, you can also limit an Availability to specific start and end dates — which is especially useful for time-limited offerings such as workshops, classes, or short-term groups.

For this first Availability, Anne leaves the setting at All dates. Later, she’ll add a separate Availability for a Pickleball Performance Enhancement group. That Availability will use specific start and end dates, because the group runs for a defined series of sessions.

- At this point, Anne's first Availability looks like this:
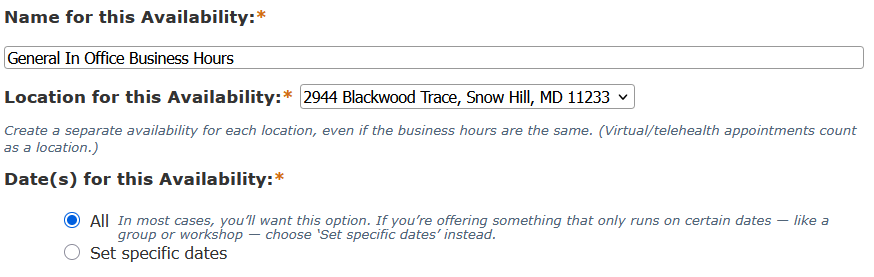
Next, she needs to set the times when this Availability will occur.
-
Important Distinction: Group Practices vs. Group Sessions
PSYBooks uses the word group in two different ways, and it’s important not to confuse them.
- Group / Clinic practices describe who is providing services (multiple clinicians vs. a solo practice).
- Group sessions describe what is being offered (one clinician meeting with multiple participants at the same time).
A Note About Group Sessions with Fixed Dates
Some Services offered within an Availability may be group sessions with different booking rules than individual appointments.
For example, Anne’s Pickleball Performance Enhancement Group will meet for six sessions total. Because this is a defined series:
- Clients sign up for the group, not individual dates
- Enrollment is for the start date only, even if they already know they'll need to miss the first session
- Clients may miss an individual session and still remain enrolled
- Anne may require payment for the entire series upfront, rather than per session
Business Hours
Business Hours define the time blocks during which the Services in this Availability can be scheduled.- Anne enters: Mon–Fri, 9:00 am–6:00 pm.
- If she were creating one for a group, she’d enter only that group’s day and time.
Therapist(s)
For Anne’s solo account, this section doesn’t appear. In a group or clinic practice, you would choose All if clinicians share the same schedule, or create separate Availabilities if schedules differ. This select box for a group account might look like this.
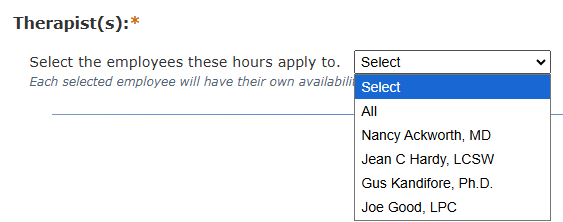
Services
Services are a required component of every Availability. They define what is offered during the time blocks you’ve just set. If no Services exist yet, click Add Service. Anne clicks Add Service and enters her first service: Psychotherapy, 50 minutes. She sets the Fee, Length (50 minutes), Setup (10 minutes), and Cleanup (5 minutes). PSYBooks calculates this as a 65-minute block, so if Anne starts at 1:00 pm, her next opening shows at 2:05 pm.
Services also allow:
- Groups (max participants, pricing, billing terms).
- Description (client-facing, the most important field).
- Confirm message (optional; nice for telehealth instructions).
- Category (e.g., Psychotherapy, Coaching; optional).
- When can this service be booked? (either Any available time or specific dates/times).
Edit or Remove Availabilities
Before editing an Availability, it’s important to remember how Exceptions work.
Exceptions—such as Holidays, Other Exceptions, and Out of Office—carve time out of your Availability schedule. If something isn’t showing the way you expect, it’s usually best to check Exceptions first.
Where Exceptions are managed:
- Holidays and Other Exceptions – created/edited from the Availability Calendar.
- Out of Office Exceptions – created/edited from your regular calendar (Add Appointment → Out of Office).
Once your Exceptions look right, you can edit or remove the Availability itself using either method below.
Option 1: Edit Directly from the Calendar (Visual, Card-Based)
When you click an Availability block on the calendar, an Availability card opens showing its details. Each Availability card includes three tools:
- Open your calendar and click Show availability to display your Availability Calendar:

When the Availability Calendar opens, it might look something like this:

In this example, the practice is available Monday–Friday from 9:00 am to 6:00 pm, with an earlier end time on Friday (noon).
Each of the green Availability Blocks represents one or more individual Availabilities. When you click a block, one or more Availability Cards “pop out”—one card for each Availability that makes up that block.

Each Availability card includes three tools:
Availability Card Tools
- View – Opens the Availability in a read-only format. This displays all Availability details—such as dates, times, locations, providers, and services—but does not allow changes.
Use View when you want to:
- Confirm details without editing
- Double-check dates, times, or services
- Safely review an Availability before making changes
(img here)
- Edit – Opens the full Availability form, allowing you to update dates, times, services, locations, and other settings.
- Delete – removes the Availability entirely.
Working with Availability Cards
On smaller screens—or when clicking near the edge of the calendar—the card stack opens close to your click point so it stays readable. The cards are also draggable, making it easy to move them out of the way while you decide which one to work on.
If you don’t see an expected opening after editing, try toggling Show / Hide Availability or refreshing the page. This forces the calendar to redraw and apply any active Exceptions.
- View – Opens the Availability in a read-only format. This displays all Availability details—such as dates, times, locations, providers, and services—but does not allow changes.
Option 2: Edit from Booking Calendar (Structured, List-Based)
Go to Booking Calendar Setup → Availability Setup → Set Availabilities. In Your Current Availabilities, locate the Availability you want to change. Each entry appears as a single-line summary showing key details such as location, date range, days, times, provider, and services.

Each Availability in the list includes the same three tools described in Option 1:
- View – Opens the Availability in read-only mode (see Option 1 for details)
- Edit – Opens the full Availability form for changes
- Delete – Removes the Availability entirely
This path is ideal when you:
- Prefer a structured list view
- Want to scan or compare multiple Availabilities at once
- Are working outside the calendar itself
In summary, both options for editing Availabilities have the same tools. The one you choose is a matter of personal preference.
Exceptions
Once you’ve defined your general Availabilities and Services, the next step is to fine-tune when you’re not available. That’s where Exceptions come in.
Exceptions temporarily override your normal business hours — without deleting or changing them — ensuring your Booking Calendar always reflects your real-world schedule. You might use them for standard holidays, recurring personal dates, or one-off situations like an unexpected day off.
PSYBooks supports three types of Exceptions, each designed for a different kind of scheduling need:
- Holidays — pre-defined, commonly observed dates.
- Other Exceptions — Personal or professional dates that repeat each year.
- Out of Office — One-time or short-notice absences managed directly from your calendar.
Each type builds on your base Availabilities, giving you flexibility and control—even when plans change.
Holidays
Holidays are pre-defined calendar events (such as Christmas, Thanksgiving, or Memorial Day) that you typically observe.
Best for: National or widely-recognized dates when your office will be closed.
- Holidays come pre-loaded; just select the ones you want to apply.
- If you decide to work on a holiday, you can uncheck it at any time.
- Selected holidays automatically block availability on your Booking Calendar.
-
Other Exceptions
Other Exceptions are recurring personal or practice-specific dates that you know you’ll want off every year—such as birthdays, anniversaries, or religious observances.
Best for: Recurring personal or practice-specific dates that you plan to take off annually.
- You can add as many as you need.
- These exceptions repeat automatically each year, so you don’t have to re-enter them.
- They can be edited or deleted at any time.
Out of Office
Out of Office Exceptions are designed for quick, flexible changes to your schedule—such as a sick day, vacation, or a temporary break in your day.
Unlike Holidays or Other Exceptions (which are edited from the Availability Calendar), Out of Office Exceptions are created and managed directly from your regular calendar. This makes them fast and familiar to use, since they behave much like appointments.
Creating Out of Office Exceptions
From your regular PSYBooks calendar, click Add Appointment, then select Out of Office in the Booking Calendar row:

When it opens, the Out of Office form looks like this:

With the Out of Office form, you can:
- Name and describe the exception (optional, but helpful)
- Choose the date, date range, or timeframe it applies to.
- Specify whether it applies all day or only during certain hours
- Select how often it applies (Current year, Every year, or a custom range)
- Optionally allow PSYBooks to automatically cancel affected appointments, so you don’t have to track them down manually.
Once saved, the blocked time appears on your calendar as an Out of Office entry—clearly visible and visually distinct from regular appointments.

Viewing, Editing, and Hiding Exceptions
Out of Office entries behave like appointments:
- Clicking one opens a detail view where you can edit or delete it
- Any changes take effect immediately, preventing new bookings during that time
- Cancellations and updates can be handled from the same screen
If your calendar becomes visually crowded, you can temporarily hide these entries using the Show / Hide Exceptions control. Hiding exceptions does not remove them—it simply makes the calendar easier to read while you work.

Because Out of Office entries are stored directly on your regular calendar:
- They can be edited or deleted just like any other appointment.
- Any changes take effect immediately on your Availability Calendar, automatically preventing bookings during those times.
- You can handle cancellations directly from the same screen, ensuring no double-booking or client confusion.
As stated above, clicking the Out of Office appointment allows you to edit or delete it just like you would any other appointment:

Choosing the Right Exception Type
The chart below summarizes the differences between Holidays, Other Exceptions, and Out of Office entries to help you decide which option fits your needs best.
Exception Type Created / Edited From Repeats Automatically Best For Editing & Deleting Special Features Holidays Availability Calendar ✅ Every Year Practice-wide holidays (e.g., Thanksgiving, July 4) Managed from the Availability Calendar Applies automatically each year; visible to all relevant staff Other Exceptions Availability Calendar ✅ Every Year Recurring personal/practice dates (birthdays, anniversaries, religious observances) Managed from the Availability Calendar Repeats annually without re-entry; easy to edit or delete Out of Office Exceptions Regular Calendar (via Add Appointment) ⚙️ Optional (choose date, range, or “Every year”) One-time or flexible absences (vacations, breaks, last-minute changes) Managed directly from the Regular Calendar Editable like appointments; can auto-cancel affected sessions; “Hide Out of Office” toggle reduces clutter Exceptions are designed to be flexible and reversible. You can adjust them at any time—without risking your underlying Availabilities—so your calendar stays accurate, professional, and stress-free.
Services
Services define what your clients can book with you. They appear directly on your public Booking Calendar, so clear names, accurate durations, and helpful descriptions are essential for a smooth booking experience—for both you and your clients.
When you open the Add Services form, it looks like this:
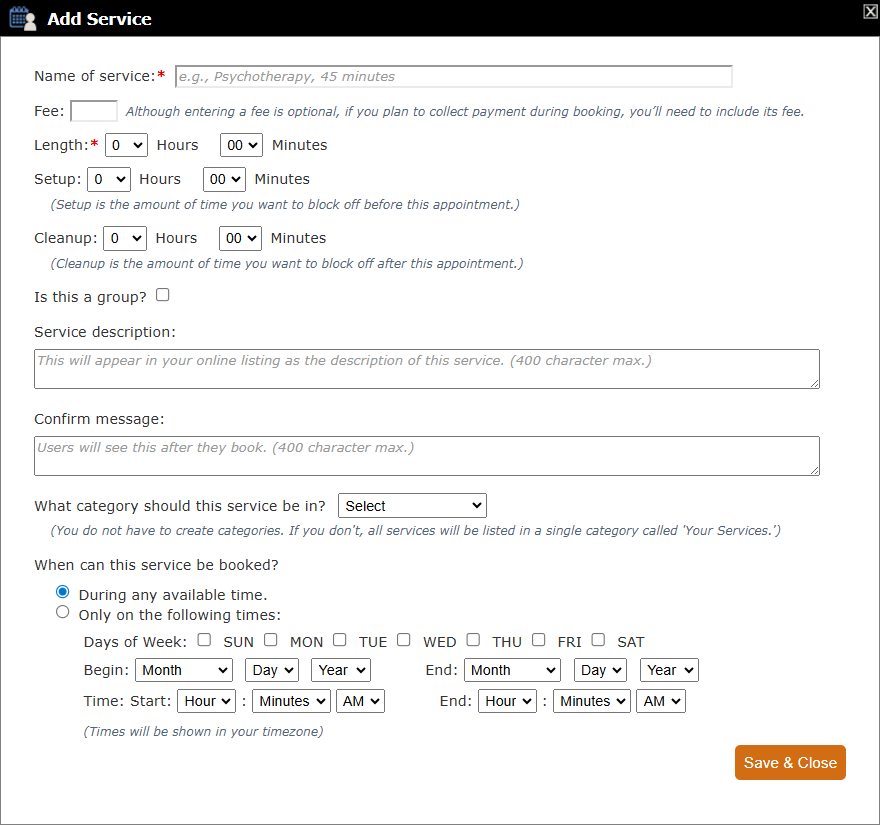
- Name of service
This is client-facing, so keep it simple and professional (avoid insurance jargon). Examples are:
- Psychotherapy (50 minutes)
- Initial Assessment
- Couples Session
- Group Therapy.
- Fee
Optional, but if you plan to collect payment during booking, a fee must be entered here.
- Length, Setup, and Cleanup
Together, these fields determine how much total time PSYBooks blocks on your calendar.
- Example 1: 50-minute session + 10 min setup + 5 min cleanup = 65 minutes blocked
- Example 2: 90-minute group + 30 setup + 20 cleanup = 140 minutes blocked
- Example 3: 20-minute check-in + 0 setup + 5 cleanup = 25 minutes blocked
Using setup and cleanup time helps prevent back-to-back scheduling and gives you realistic buffers between appointments.
Check this box if the service is a group offering. Group services unlock additional options such as participant limits, pricing structure, and billing behavior.
This is one of the most important fields. Clients see this description when choosing what to book.
- Optional. This appears immediately after a client books. It’s a great place to include:
- Telehealth links
- Office directions
- Intake reminders
- What to expect next
-
Optional. Categories help organize your services when you offer more than a few (e.g., Psychotherapy, Testing, Coaching).
- During any available time — most common
- Only on the following times — useful for workshops, classes, or limited-hour offerings
- Keep names consistent.
Use a clear, recognizable format like “Psychotherapy (50 minutes)” rather than “Session 1” or “Short Visit.” This helps both you and your clients stay oriented.
- Use plain language.
Clients don’t need to see “CPT 90837.” Say what the session is, not how it’s billed.
- Include setup and cleanup time.
Even 5–10 minutes between appointments helps prevent overlap and burnout.
- Write strong descriptions.
Use the Description field to clarify who the service is for, what’s included, and how to prepare.
- Leverage categories.
Grouping related services (e.g., “Therapy,” “Testing,” “Coaching”) keeps your offerings neat and intuitive.
- Add confirm messages for clarity.
They’re a simple way to provide telehealth links, office directions, or first-session details automatically.
- Review durations regularly.
If you adjust session lengths or workflows, update your Services so your calendar always reflects your real availability.
Fields on the Add Service Form
Is this a group?
Service description
Confirm message
Category
When can this service be booked?
Once saved, each Service becomes part of your Booking Calendar’s foundation. Services are then tied to one or more Availabilities, allowing clients to see exactly when and how that service can be scheduled.
Best Practices for Creating Services
Appointment Policies
Your Appointment Policies define the rules for how clients can book, cancel, and manage appointments through your Booking Calendar. Think of these settings as your built-in office policies — they control who can book, how far in advance appointments may be scheduled, how cancellations are handled, and what additional information you’d like to collect at booking.
These settings fall into three categories:
- Booking Preferences — How and when appointments can be scheduled
- Cancellation Preferences — Who can cancel and under what conditions
- Additional Booking Preferences — Extra details you want to request or customize
Once saved, these rules apply automatically every time someone schedules through your Booking Calendar.
Booking Preferences
Booking Preferences set the boundaries for how appointments are requested.
Who can schedule appointments?
This setting determines who is allowed to request appointments through your Booking Calendar.
You have three options:
- All
Anyone with your booking link can request an appointment.
- No one
Temporarily disables online booking (helpful when you’re updating your calendar or not accepting new clients).
- Only the categories I choose below
Lets you control access more precisely.
When you choose this third option, additional categories appear:
- General public
- Active clients
- Archived clients
- Admin staff
- Other subscribers in my office

You can select any combination of these categories. If all categories are checked, this option behaves the same as choosing All. The real benefit is selective access — for example, allowing only active clients to book while preventing new or archived clients from scheduling.
- All
When can appointments start?
This setting controls which start times are available on your Booking Calendar — for example, only on the hour, only on the half hour, both, or every 15 minutes.
Important: This setting does not control how long an appointment lasts. Appointment length is determined when you create your Services.
How this works in practice
Let’s say you’ve created a 15-minute Med Check service with no Setup or Cleanup time, and you’re available from 3:00 to 4:00 on a given day:
Your selection here determines which start times appear:
- Only on the hour
clients can book at 3:00 only.
- Only on the half hour
they can book at 3:30 only.
- On the hour or half hour
they can book at 3:00 or 3:30.
- Every 15 minutes
they can book at 3:00, 3:15, 3:30, or 3:45.
Creating space between appointments
This setting simply controls when appointments may begin — not how tightly they’re scheduled.
If you want built-in breathing room between sessions, add it directly to the Service by using Setup and/or Cleanup time. That way, your calendar remains accurate without restricting start times more than necessary.
- Only on the hour
What's the minimum amount of notice before someone can book an appointment.
This setting defines how much advance notice you require before someone can book an appointment through your Booking Calendar. It helps prevent last-minute scheduling surprises and gives you time to prepare, review records, or adjust your day if needed.
The available options are:
- At least 1 hour
- At least 2 hours
- At least 4 hours
- At least 8 hours
- At least 12 hours
- At least 1 day
- At least 2 days
- At least 1 week

How this works
The minimum notice is calculated from the current time, not from the start of the day. For example:
- If it’s Tuesday at 10:00 AM and your minimum notice is 4 hours, the earliest available booking time would be 2:00 PM.
- If your minimum notice is 1 day, clients won’t see any times available until tomorrow.
- If your minimum notice is 1 week, only appointments at least seven days out will appear as bookable.
This rule applies automatically to all online bookings, regardless of service type.
- Use shorter notice (1–4 hours) if you offer same-day check-ins or urgent visits.
- Use longer notice (1–2 days or more) if you need preparation time or want to protect your schedule.
Best practices
Pair this setting with Setup and Cleanup time in Services for the most realistic calendar flow.
Once saved, this policy works behind the scenes to ensure your Booking Calendar reflects the lead time you actually need — without requiring manual oversight.
Appointment confirmation.
This rule controls whether appointments are confirmed automatically or require your approval after a client submits a booking request.
Important: This setting appears only for Individual and GOI accounts. In Group/Clinic accounts, all booking requests are always sent to the practice owner for review, approval, modification, or rejection — so this option is not shown.
When you’re using an Individual or GOI account, the Appointment Confirmation section looks like this:

Confirmation Options
You can choose one of the following:
- Automatically, as soon as they're requested
- Manually - I'll review and approve each one
Regardless of which confirmation method you choose, you’ll always be notified when someone submits a booking request.
Choose automatic confirmation if you want frictionless scheduling and trust your availability rules.
Choose manual confirmation if you need to screen requests, coordinate care, or protect certain time blocks.
Best practices
Once saved, this setting applies to all future bookings made through your calendar.
-
These settings control who can cancel appointments and what happens when they do. When you first open this section, you’ll see this:
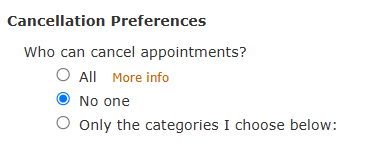
- All – anyone can cancel their own bookings.
- No one (default) – only you or your staff can cancel.
- Only the categories I choose below – Limit cancellations to specific groups (e.g., Active clients, Admin staff).
- No (default) – Users cannot cancel appointments through the Portal. If they need to cancel, they must contact you directly using another method.
- Yes – Users can cancel appointments directly from their Portal. You’ll receive a notification each time a cancellation occurs.
- No (default)
No reminder is shown.
- Yes
Choose when the reminder appears (48 hours, 24 hours, 4 hours, or 1 hour before the appointment), and enter the message users will see.
Who can cancel?
If you select All or Only the categories I choose below, an additional option appears:

Would you like to allow users to cancel via their Portal?
This setting controls whether clients can cancel their own appointments from their Portal.

Allowing Portal cancellations gives clients flexibility while still keeping you informed in real time.
Cancellation reminder for last-minute changes
If Portal cancellations are enabled, you can optionally display a reminder when a user tries to cancel close to the appointment time.
Would you like us to remind users of your cancellation policy if they attempt to cancel too close to their appointment?

Users can still cancel after seeing the reminder, but this prompt often reduces last-minute cancellations and helps set clear expectations.
Example reminder text:
“Our cancellation window is 24 hours. Cancellations inside 24 hours may be charged a fee as outlined in our practice policies.”
Now you’ve defined the core rules for who can cancel and how close to the appointment cancellations are allowed.
The next section, Additional Booking Preferences, lets you fine-tune how your calendar works behind the scenes — including notifications, client information, and additional booking conditions that help your scheduling run smoothly and automatically.
Cancellation Preferences
Additional Booking Preferences
This section lets you fine-tune what happens during and after the booking process.
Notifications for incomplete bookings:
Sometimes users start booking an appointment but don’t finish — they may get interrupted, close the browser, or decide not to proceed. This setting lets you choose whether (and when) you’d like to be notified about those incomplete booking attempts.:

The options are:
- Yes, for all incomplete bookings
You’ll receive a notification each time someone begins a booking but doesn’t complete it.
- No (default)
No notifications are sent for unfinished bookings.
These notifications can be helpful if you want visibility into potential scheduling issues or want to follow up with clients who may have run into trouble. If you prefer fewer alerts, leaving this set to No keeps your inbox quieter while still allowing bookings to function normally.
Collecting Additional Information
When a new user books with you for the first time, PSYBooks automatically collects the essentials — name, email address, and time zone — so you know who they are and when they’re available. You can also choose to gather additional information that may streamline scheduling, billing, or clinical workflows.
Check the boxes for the items you want:

- Birthday
Essential if you file insurance or plan to provide a superbill. It can also help verify age or add a personal touch, like sending birthday greetings.
- Credit Card Information
Required if you plan to accept payment at the time of booking. Collecting this information at booking can save time and streamline your billing process.
- Insurance Information
Collect this if you plan to efile or if you want to prepare superbills for your clientsRecommended if you plan to eFile or prepare superbills for your clients.
You can select any combination of these options — or none at all — depending on how you prefer to run your practice and billing.
Session Attendance — Who and How Many
The Session Attendance — Who and How Many section lets you control who may attend a session together and whether multiple people are allowed in a single booking. These settings determine whether your Booking Calendar supports only individual appointments or also allows couples, families, or other multi-person sessions.
By default, this setting is No, meaning sessions are limited to a single individual.
If you’d like to allow more than one person to attend a session, select Yes next to “Do you want to allow more than one individual to attend the appointment?” When enabled, additional options appear that let you define which types of relationships may be included in the same session.

For example, some clinicians may allow sessions with:
A spouse or partner
A parent and child
- Multiple family members
Others may choose to limit multi-person sessions to very specific relationships. You can select as many options as apply to your practice.
These choices directly control what users see during scheduling, ensuring that appointments align with your clinical boundaries, comfort level, and practice policies.
Together, these settings give you flexibility to support individual, couple, family, or group-style sessions — while maintaining full control over how and when multi-person appointments can be booked.
Collecting Fees When Booking
The Collecting Fees When Booking setting lets you decide whether PSYBooks should process payment at the time an appointment is scheduled.
If you select Yes beside “Would you like us to collect your fees when booking?”, PSYBooks will collect the user’s credit card information during scheduling.
Note: A connected Stripe account is required. Stripe securely processes payments and deposits funds directly into your bank account.
How and when the card is charged depends on your appointment confirmation settings:
- Automatic booking approval (available in Individual and GOI accounts):
The user’s card is charged immediately when the booking is submitted.
- Manual approval required:
The card is charged only after you review and approve the appointment.
Once you select Yes, an additional option appears asking how much you’d like to collect at booking time:
How much to collect

You can choose:
- The entire fee of the service they’re booking
Charges the full session amount when the appointment is confirmed.
- Another amount
Allows you to collect a specific amount (such as a deposit) at booking, with the remaining balance due later.
If you select No, users can book appointments without paying during scheduling. You can then collect payment separately — for example, through invoices, client checkout, or in-session processing.
Providing Directions for Users Booking Appointments
Provide optional written directions for both Telehealth and In-Office appointments. These directions appear automatically when clients book and are included in their confirmation details.
The Provide Directions section lets you share clear, practical instructions that help users know exactly what to expect. This is especially useful for telehealth sessions and for first-time in-office visits:

If you’d like to include directions, check one or both of the following options:
- Telehealth appointments
Use this field to enter instructions for online sessions. You might include information such as how to access your video link, what device to use, or any steps to take before the session begins.
- In-office appointments
Use this field to enter directions for clients coming to your physical location. This is a good place for parking information, suite numbers, building access notes, or arrival instructions (for example, “Please wait in the reception area until your appointment time.”)
The text you enter will be displayed to users during the booking process and again in their confirmation details.
This setting gives you a convenient way to communicate key details proactively—helping reduce confusion, no-shows, and “Where do I go?” messages from new users.
Providing directions upfront helps reduce confusion, no-shows, and last-minute “Where do I go?” messages—making the booking experience smoother for both you and your clients.
Clinician Profiles on the Booking Page
Once your appointment and location details are set, you can customize how you and your team appear on the booking page.
The Clinician Profiles section lets you control how your information — or your staff’s information — appears on your public Booking Calendar. Whether you’re a solo practitioner or part of a group, this is where you personalize the details users see when choosing whom to book with.
Each clinician listed in your account will appear in this section. To make updates, check the box beside the practitioner’s name and edit the fields provided.

You can:
- Upload a staff image
Click Choose File to upload a photo or logo for the practitioner. If you prefer not to display an image, you can leave this blank.
- Select an image shape
Choose whether you’d like the image to display as a rectangle or circle. This allows you to match the look of your practice branding or personal preference.
- Add focus areas or specialties
Provide a few key areas of practice (about 10 words or fewer), such as Trauma, EMDR, or Couples Work. These appear as brief highlights to help users identify the right fit.
- Add a short description
Use this optional field (up to about 100 words) to describe the clinician’s background, training, or approach. This is your opportunity to share your style, philosophy, or areas of focus in your own words.
Changes made here are saved along with the rest of your Booking Calendar settings. Depending on your setup, updates may appear immediately on your live site or after you save the entire form.
This section ensures that your Booking Calendar accurately reflects the tone and professionalism of your practice — whether that means highlighting a full team or simply presenting your own credentials in a way that feels personal and inviting.
Tip: Clinician profiles typically only need to be set up once, but you can update them at any time. If you’re testing your Booking Calendar, try booking a mock appointment through your public link to confirm everything appears and behaves as expected.
Styling Options (Look & Feel)
Now that you’ve completed all of the functional setup tools — including setting your Booking Link, Availabilities, and Appointment Policies — the next step is to customize how your Booking Calendar looks to clients.
The Styling Options are located on the right side of the top section and control the visual presentation of your public Booking Calendar. These tools do not affect scheduling logic or booking rules. Instead, they let you adjust colors, fonts, and layout details so your calendar aligns with your practice’s branding and feels cohesive with the rest of your website.
The Styling Options include three tools:
- Body Styles
Controls background colors, fonts, and overall text appearance
- Button Styles
Controls the look of action buttons (such as Book, Continue, or Submit)
- Footer Styles
Controls the appearance of the footer area shown at the bottom of the booking page
Together, these tools affect what users see in the live preview area below and on your actual public Booking Calendar page.
We’ll walk through each styling option below, starting with Body Styles.

You can customize three main areas:
Body Styles
Body Styles control the overall look and readability of your Booking Calendar. These settings affect the main background and text that clients see when they visit your booking page, making them an important foundation for your calendar’s appearance.

When you click Body Styles, you’ll see the following options:
Background Color
Choose the background color for the main booking page.
- You can select a color directly from the preset swatches, or
- Enter a specific hex color code if you want to match your website or brand colors exactly.
This background appears behind all booking content, so lighter, neutral colors tend to work best for readability.
Font
Select the font used throughout the Booking Calendar body text.
- Default is designed to be clean, professional, and easy to read across devices.
- You can preview alternatives by clicking View Sample Fonts before making a selection.
Changing the font here updates the overall tone of the page, from more traditional to more modern.
Font Size
- Adjust the base text size used across the booking page.
- A size of 14 is the default and works well for most practices.
Increasing the font size can improve accessibility and readability, especially for clients viewing the calendar on smaller screens.
Font Color
Choose the primary text color for your Booking Calendar.
- As with background color, you can select from the swatches or enter a hex code.
- For best contrast and accessibility, darker text on a light background is recommended.
Saving Your Changes
Changes you make here are reflected immediately in the live preview of your Booking Calendar. Once you’re satisfied, click Save to apply them.
Tip: If you’re unsure where to start, keep the background light, text dark, and font size at the default. You can always come back and refine these settings later.
Button Styles
Button Styles control how action buttons appear on your Booking Calendar — including buttons like Book, Next, Save, and Confirm. These are some of the most important visual elements on the page, since they guide users through the booking process.

Most of the options here work the same way as Body Styles, but apply specifically to buttons instead of page text.
Button Background Color
Choose the color used for all buttons.
- Select from the color swatches, or
- Enter a hex code to match your website or brand colors.
For best usability, choose a color that clearly stands out from the page background.
Button Font, Size, and Color
These settings control how text appears inside buttons.
- Font – Defaults to a clean, readable style that matches the rest of the calendar.
- Font Size – 14 works well for most practices.
- Font Color – Make sure there’s strong contrast between the text and the button background.
Button Shape
Choose how your buttons are styled visually:
- Rectangle – A more traditional, squared-off look
- Rounded Corner – A softer, more modern appearance (default)
Saving Your Changes
As with Body Styles, changes appear immediately in the live preview. Click Save to apply them.
Tip: If you’re unsure what to choose, stick with the default rounded buttons and pick a background color that matches your site’s primary accent color.
Footer Styles
Footer Styles control the appearance of the footer area at the bottom of your public Booking Calendar. This area typically contains small, informational text and is meant to be present but unobtrusive.
Like Body Styles and Button Styles, these settings update the live preview as you make changes.

Footer Background Color
Choose the background color for the footer area.
- Select from the color swatches, or
- Enter a hex code to match your branding.
Most practices choose a subtle or neutral color so the footer doesn’t compete with booking content.
Footer Font, Size, and Color
These settings control how text appears in the footer.
- Font – Defaults to the same font used elsewhere on the calendar for consistency.
- Font Size – The default smaller size (often 9) keeps footer text readable without drawing attention away from booking actions.
- Font Color – Choose a color with enough contrast to remain legible against the footer background.
Saving Your Changes
As with the other styling tools, changes appear immediately in the preview. Click Save to apply them.
Tip: Footer styles work best when they’re subtle. Clear contrast and simple colors help keep the focus on scheduling — not the fine print.
Booking Page Identity
The following video illustrates how to customize your logo:
The Booking Page Identity section lets you define who your Booking Calendar represents. While the Styling Options control colors, fonts, and layout, this section focuses on the information that helps users recognize your practice and feel confident they’re in the right place.
Here you’ll customize the visible identifiers that appear on your public Booking Calendar — such as your logo, practice or provider name, and footer text. These elements work together to reinforce your professional identity and create a consistent, welcoming experience for clients as they schedule appointments.
Changes made in this section update the live preview, allowing you to see exactly how your Booking Calendar will appear before you publish or share the link.
Logo
Located in the top left corner of your Booking Page, the logo serves as the visual anchor for your calendar. You may keep the default PSYBooks image or upload your own custom image.

Most practices choose to upload a practice logo, clinician photo, or a brand-aligned image such as an office photo, nature scene, or calming graphic. As soon as you upload an image, the preview updates instantly so you can see exactly how it will appear to users.
Cropping and Positioning Your Logo
After you upload an image, PSYBooks opens a built-in image editor (Croppie) to help you fine-tune how your logo displays. This ensures your image looks polished and professional, regardless of its original size or proportions.
Using the cropping tool, you can:
- Drag the image to reposition it within the frame
- Zoom in or out to adjust the size
- Ensure the most important part of the image stays visible
The cropping frame represents exactly what will appear on your Booking Page. Nothing outside the frame will be shown.
Once you’re satisfied with the placement, simply save your changes. If you ever want to adjust the image later, you can reopen the editor and refine it at any time.
Tips for Best Results
- Use a simple, uncluttered image for best visual balance
- Logos with transparent backgrounds work well but are not required
- If text is included in your logo, make sure it remains readable at smaller sizes
Your logo helps set the tone for your Booking Page and gives users immediate visual reassurance that they’re in the right place.
Name of Practice / Provider

Displayed prominently near the center of your Booking Page, this name identifies who the calendar belongs to and helps users confirm they’re booking with the correct practice or provider.

By default, the name is pulled directly from your PSYBooks profile. You can edit the text here if you prefer a different display name — for example, showing your practice name (“Dragonfly Cove Psychotherapy”) instead of an individual provider name (“Anne Danner, LPC”), or vice versa.
Any changes you make are reflected immediately in the live preview, so you can experiment with wording and formatting until it feels just right.
Tips
- Solo practitioners often choose either their full professional name or a practice name, depending on how they market their services
- Group practices typically use the practice name, with individual clinicians shown below in the Provider Preview section
- This setting affects display only and does not change your legal or billing information elsewhere in PSYBooks
This name, together with your logo, forms the primary identity of your Booking Page — giving clients a clear, professional first impression before they choose an appointment.
Footer

The Footer appears at the bottom of your Booking Page and gives you a simple way to share additional information with users.
You’ll see three editable fields that you can use however you like. Many practices enter contact details such as a name, phone number, and email address, but you’re not limited to those. You may leave any or all fields blank for a cleaner look, or use the space for something else entirely — such as a brief note or favorite short quote.

As with the rest of the Booking Page, changes appear instantly in the live preview.
Tip: In group practices, owners often include a shared office phone number or administrative email rather than individual clinician contact information.
-
Provider Display (Preview Area)
The white preview area in the center of the page shows exactly what users will see when choosing a provider or service on your Booking Calendar.
For solo practices, this section displays your name, location(s), and available services.

For group practices, the owner can choose which clinicians appear by checking or unchecking them in the list. Each provider may also have a profile photo displayed next to their name. Photos can be uploaded either by the practice owner or by the individual provider. If no image is uploaded, the space is simply left blank.
This area also lists each provider’s available locations and services exactly as defined in Availability Setup, ensuring that what users see here always matches your scheduling rules.
Group Practice: “First Available” Booking
Group practices have an additional option in the preview area. Because all group booking requests are sent to the Master Clinical provider (MC) for approval, some users may prefer to book the first available appointment rather than selecting a specific provider.

When this option is available, users are prompted to provide a bit more information, including:
- Which location they prefer (including Telehealth, if offered)
- Which service they are requesting
- Optional additional notes (for example, therapist preferences or limited availability such as weekends only)
All of this information is sent to the Master Clinical subscriber to help them match the request as accurately and efficiently as possible.
Tip: Use professional, friendly headshots whenever possible. Clients often feel more comfortable booking when they can put a face with a name.
Group practices have an additional features in the Preview area. Since all group practice requests go to the MC (group owner) to pprove or reject, some users may just wish to book the First available appointment. In such cases, the user may need to give a bit more info, i.e., which Location they want to use (including Telehealth, if offered) and which Service. The form we provide for that gives those things and also a textarea where the user can provide additional info (e.g., maybe they prefer a certain therapist or maybe they can ONLY come on weekends). This info is all sent to the MC to help them best satisfy this customer.

Tip: Use professional, friendly headshots — clients often feel more comfortable when they can put a face with the name.
In summary: The Customize the Look & Feel section is your opportunity to make your Booking Calendar reflect your professional personality. Every change is visible instantly, so you can experiment until it feels just right.
- Body Styles
- What Users See — the screens, confirmations, and messages clients encounter as they schedule.
- What Therapists See — how booking requests, confirmations, and follow-up actions appear inside PSYBooks.
- Automatically approved (solid color): If the therapist is set to auto-accept bookings, the appointment displays as a solid green block on the Portal calendar.

- Pending approval (striped): If the therapist reviews bookings manually, the appointment displays as striped to show it’s pending approval.

- Client name
- Date and time
- Service selected
- Location (in-office or telehealth)
- Session length and fee
- Assigning the therapist (for group practices)
- Confirming or changing the service or location
- Verifying the date and time
- The appointment becomes a solid green block on your calendar
- The appointment also becomes solid on the client’s portal calendar
- The client is automatically notified by email
- Any applicable appointment reminders you’ve configured begin their normal delivery process
- The pending appointment is removed from both calendars
- The client is notified that the request was not accepted. Your optional message is included in the notification, helping keep communication clear and professional:

- You receive an email notification indicating that payment information was collected
- The payment appears in the client’s chart under Sessions & Payments
- The appointment remains pending or confirmed based on your approval settings — payment collection does not bypass your control
What Happens When Someone Books
Once a user begins scheduling through your Booking Calendar, PSYBooks guides both the user and the therapist through a clear, structured process designed to reduce confusion, prevent errors, and keep everyone informed at each step.
What happens next depends on your Booking Calendar settings — including whether appointments are confirmed automatically or require manual approval, whether payment is collected at booking, and which notifications you’ve enabled. Some steps happen immediately, while others occur behind the scenes.
In the sections below, we’ll walk through the experience from both perspectives:
Together, these views help you understand exactly how information flows from the moment someone clicks “Book” to when an appointment is confirmed, pending, or declined.
What Users See
After a user finishes booking, PSYBooks takes them to their Portal Calendar, where they can immediately confirm the appointment is on the schedule.
Confirmed vs. Pending appointments
How the appointment looks depends on whether the therapist has Automatic Approval turned on in their Appointment Policies:
This gives users quick visual confirmation of whether their appointment is fully confirmed or still awaiting therapist approval. If the therapist DOES accept the appointment, the striped block will turn solid. Notice also, that the user's portal also has a large "Book Now" button that allows them to book any time from their portal, without having to go to the therapist's website for the link to the Booking Calendar and without having to sign in again.
What Therapists See
When a client schedules an appointment through your Booking Calendar, the request appears directly on your calendar. What happens next depends on whether you enabled Automatic Booking Approval in the Appointment Policies.
Pending Booking Requests
If Automatic Booking Approval is not enabled, new appointments appear on your calendar as green striped blocks, just like what your users see, indicating that the request is pending your review.
To review a pending request, simply click the striped appointment on your calendar. This opens the Accept Booking Request window, which shows all of the key details at a glance, including:
It looks like this:

At this point, you can choose to Accept or Reject the request.
When you click Accept, you’re taken to a second screen where you can confirm or adjust important details before finalizing the appointment. This includes:

Once accepted:
This ensures that both you and the client are fully aligned and notified the moment the appointment is confirmed.
Rejecting a Booking Request
If you choose Reject, an additional area opens that allows you to write a message to the client explaining why the request wasn’t accepted or providing next steps:

When a booking request is rejected:
This gives you full control to manage your schedule while still offering thoughtful, transparent communication to clients.
When Fees Are Collected at Booking
If you’ve chosen to collect fees at the time of booking, that information is immediately available to you when a client schedules an appointment.
When a booking request is submitted:
Once you accept the appointment (or immediately, if Automatic Booking Approval is enabled), the payment is processed according to your settings.
If you need to issue a refund for any reason, you can do so directly from the Sessions & Payments tab in the client’s chart using the built-in Refund Tool. This allows you to handle changes or exceptions without leaving PSYBooks. The Refund Tool will correctly change s the balance and refunds the money from your Stripe account.
