
Manual Index
-
Chapters
The Manual is divided into seven chapters. Click a chapter title to display that chapter's table of contents in the area below.
PSYBooks Manual
Chapter Five
Intro to Libraries
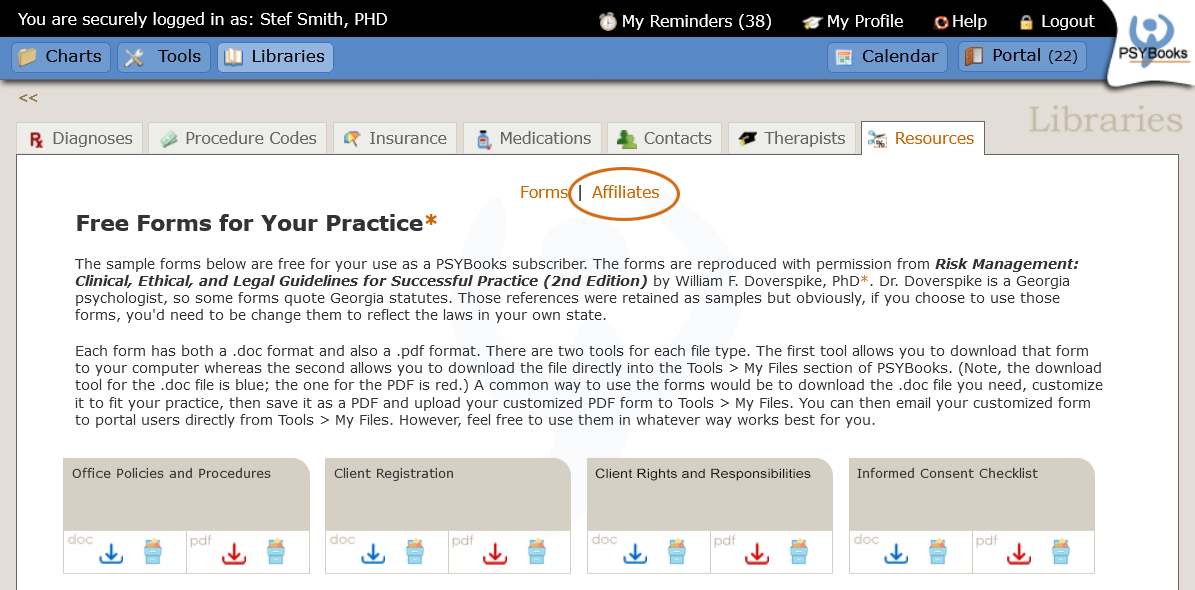
What this isThe Libraries hold reference material for use in your practice. Some sections come pre-populated with items and information mental health therapists are likely to need. You'll also be adding things to the Libraries as you use PSYBooks, sometimes without even being aware of it. Your Profile, along with the various settings you choose for your practice are in the Libraries > Therapists section.What it looks like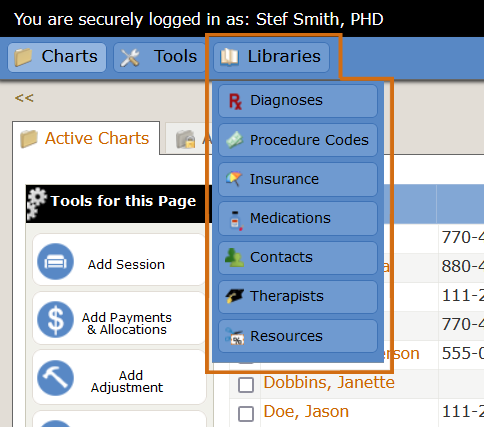 |
Where this isYou can get to this section from the link in the blue "global nav" bar across the top of each page in the site. Everything in the global nav is replicated in the sitemap located at the bottom of each page, so you can also find a link to the Libraries there. |
You may or may not actually visit the Libraries section of PSYBooks that often, but they're a very important behind-the-scenes part of the program. Items from various sections in the Libraries are used to populate various select and text boxes that appear in forms throughout the application. For example, in the Add Session form alone, the Procedure, Diagnosis, Fee and Session Length can all be automatically pre-populated from items in the Libraries, which means you have very little to fill in each time you want to add a session.
The Therapists section of the Libraries holds your profile and also the Settings & Preferences and Manage Subscription tools. Tasks such as changing your office address, adding other subscribers or users, updating your PSYBooks account or changing your password are all housed in the Therapists Library.
Diagnoses
What this isThis is a tab in the Libraries section of the app that's for keeping track of and allowing you to work with the diagnoses you use most often.What it looks likeLibraries > Diagnoses 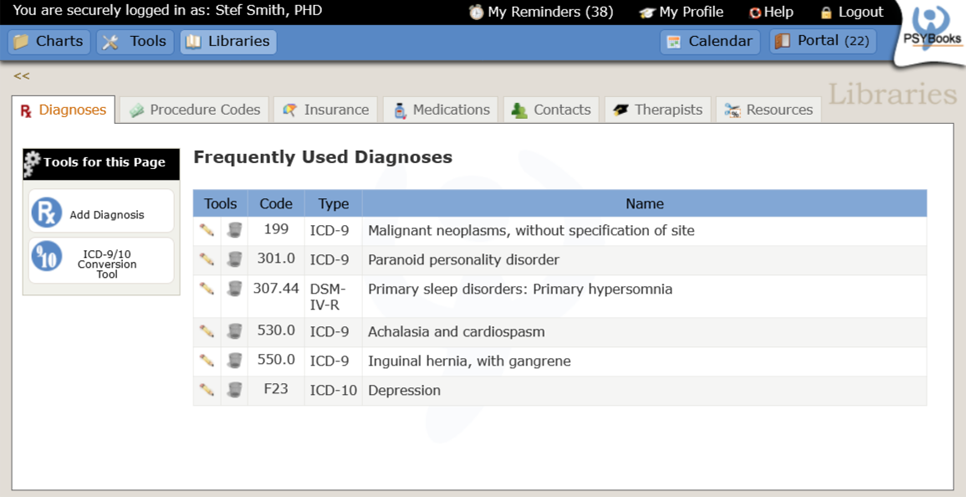 |
Where this isYou can get to this section by clicking on Libraries in the global nav. Everything in the global nav is replicated in the sitemap located at the bottom of each page, so you can also find a link to the Diagnoses Library there. |
The Libraries > Diagnoses section of PSYBooks is where you can add, edit and delete the diagnoses you use most often. Several other places in the app allow you to add diagnoses (e.g., the Add Session tool as well as Treatment Plans, Progress Notes and Intake Notes). Regardless of where you enter them, all diagnoses will automatically be put in this table, so you may seldom need to actually visit Libraries > Diagnoses. Once a diagnosis is in your Frequently Used Diagnosis table, it will be used to populate various diagnosis select boxes throughout the app. This saves you time so you don't need to manually enter a diagnosis every time you have a form that requires one.
Frequently Used Diagnoses
What this isThis is the main table on the Libraries > Diagnoses page that allows you to edit the diagnoses you use most often.What it looks like |
Where this isYou can get to this section by clicking on Libraries in the global nav. Everything in the global nav is replicated in the sitemap located at the bottom of each page, so you can also find a link to the Diagnoses Library there. |
Edit Diagnosis
What this isThis is a tool in the Libraries section of the application. It allows you to edit the diagnoses you use most often.What it looks like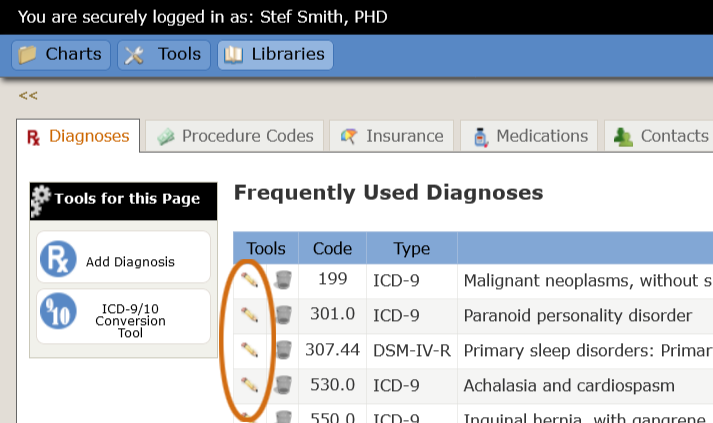 |
Where this isYou can get to this section by clicking on Libraries in the global nav. The Edit Diagnosis tool is on each row of the Frequently Used Diagnosis table. (You will not be able to see this tool if you don't have any diagnoses in your table.) |
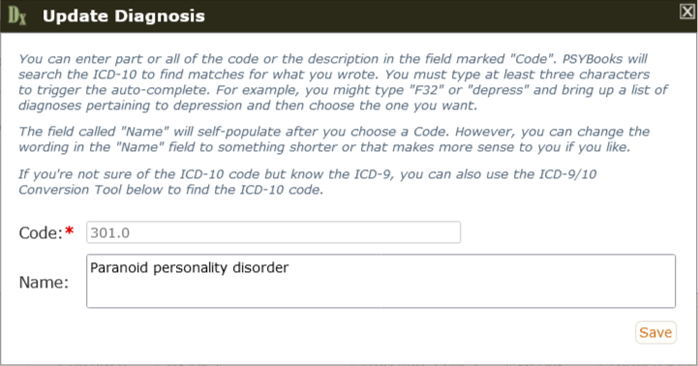
For the most part, PSYBooks enters the name of a diagnosis automatically so there's no need to edit. However, occasionally you may want to modify the automatic name to something that's easier to recognize, shorter, etc. Clicking the edit tool opens a window like the one below where you can make the desired changes:
Delete Diagnosis
What this isThis is a tool in the Libraries section of the application. It's for removing diagnoses that you no longer need from the Frequently Used Diagnosis table.What it looks like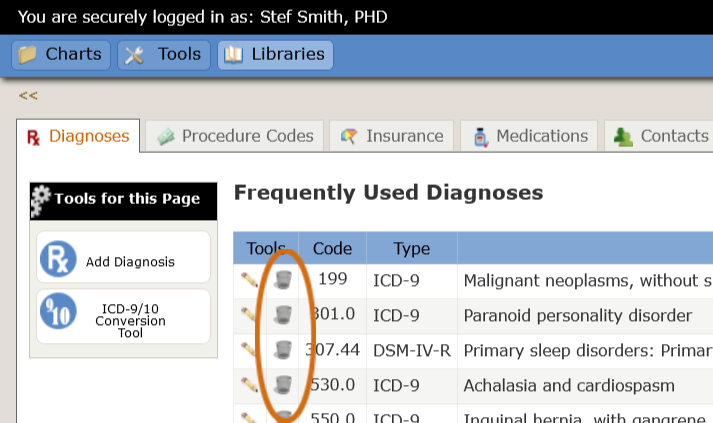 |
Where this isYou can get to this section by clicking on Libraries in the global nav. The Delete Diagnosis tool is on each row of the Frequently Used Diagnosis table. (You will not be able to see this tool if you don't have any diagnoses in your table.) |
Since items in the Libraries are not PHI, you are free to delete any diagnoses you're not using. However, you are not allowed to delete diagnoses that already appear in a client's chart since those are still needed. Deleting a diagnosis from the Frequently Used Diagnoses table removes it from the various diagnoses select boxes throughout the app.
Add Diagnosis
What this isThis is a tool in the Libraries section of the application. It's for adding diagnoses that you work with frequently.What it looks like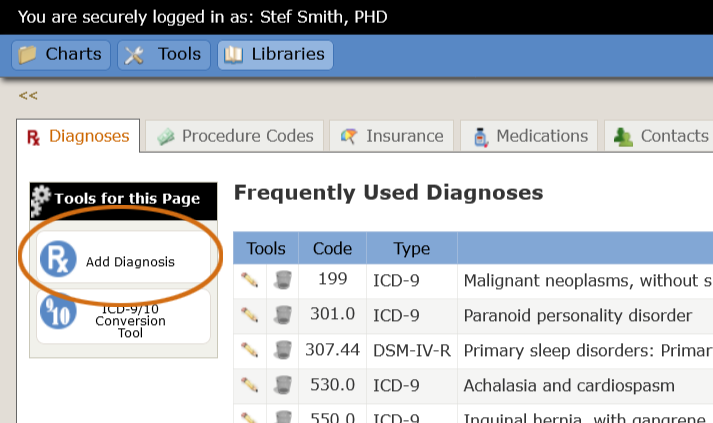 |
Where this isYou can get to this tool by clicking on Libraries in the global nav. The Add Diagnosis tool is on the left nav of the Diagnoses section. |
Adding a diagnosis is easy. PSYBooks keeps track of the latest diagnostic codes needed by mental health providers and provides a list of codes in the Add Diagnosis tool in case you don't remember the specific code or name of the diagnosis you want.
When you first click the Add Diagnosis tool you'll get a screen that looks something like this:
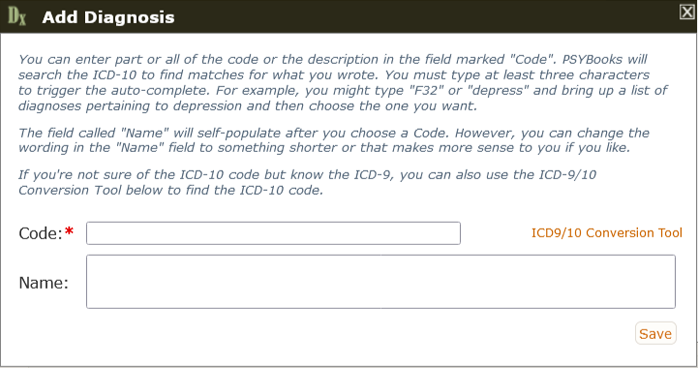
These boxes have auto-complete ability, so just start typing in the Code and/or Name boxes at the top until you see the one you want. When you find it, highlight it and click Save. (Code is for the number, like 309.0; Name is the name of the diagnosis.)
Clicking Save puts the diagnosis in the Frequently Used Diagnosis table:
Add ICD-10 Diagnosis
What this isThis is a link on the Add Diagnosis tool in the Diagnoses Library. It's for adding ICD-10 codes to your Frequently Used Diagnoses table when you already know the ICD-9 code.What it looks like |
Where this isYou can get to this tool by clicking the Add Diagnosis tool in the Diagnoses Library. The tool for finding ICD-10 diagnoses and adding them to your table is a link at the top of that form. |
If you already know the ICD-10 code you need, you can enter the code and name in the top portion of the Add Diagnosis tool, like you would with any other diagnosis. However, if you don't know the ICD-10 code, you can click the link at the top of the Add Diagnosis tool that says "ICD9-ICD10 Conversion Tool". The tool that opens looks something like this:
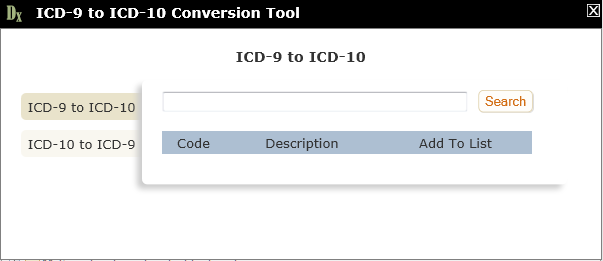
The two tabs on the side allow you to select whether you know the ICD-9 code and want to learn the ICD-10 equivalent (ICD-9 to ICD-10 tab) or vice versa (ICD-10 to ICD-9 tab). The default assumes that you know the ICD-9 code and need to look up the ICD-10.
In this mode, when you enter an ICD-9 code, PSYBooks will begin searching the database right away to try to find the code you need. The list of possibilities (which gets smaller as you enter more digits) will appear and look something like this:
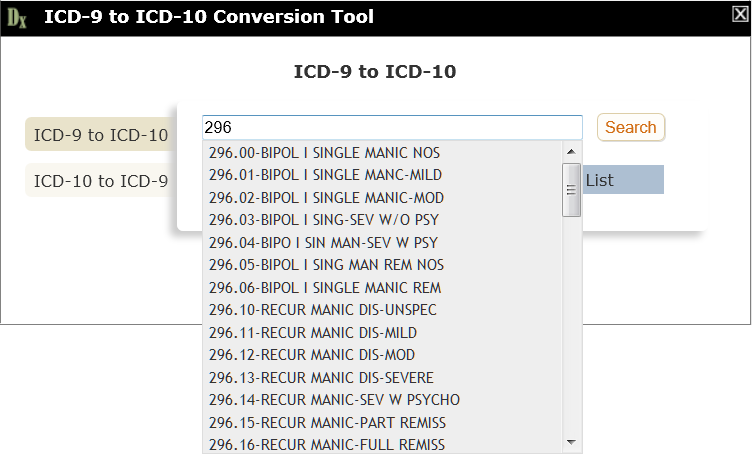
As soon as you see the diagnosis you want, you can click it in the generated list. Selecting it will place that ICD-9 diagnosis in the text field:
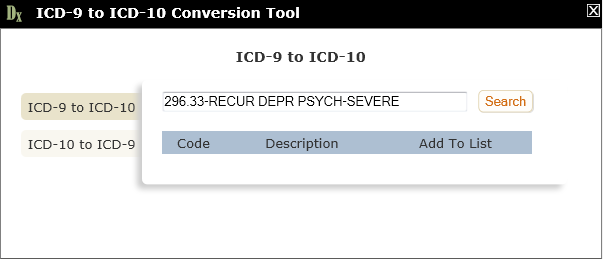
Once that step is done, click "Search" to see the equivalent ICD-10 code:
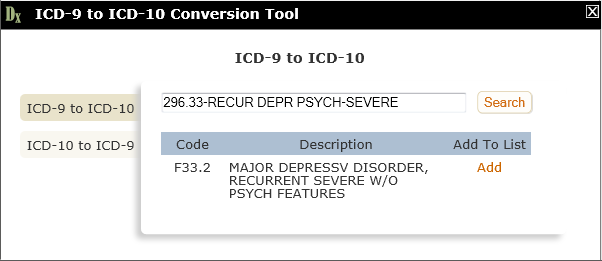
If you want to add the ICD-10 code to the Add Diagnosis Tool so you can add it to your table, just click "Add". Occasionally, there may be more than one new code to replace the old one. In that case, just select the one you want.
As with any diagnosis, you can change the name to something shorter or easier to remember if you wish. Clicking "Save" will place the new diagnosis in your Frequently Used Diagnoses table.
ICD-9/10 Conversion Tool
What this isThis is a crosswalk/conversion tool in the Diagnoses Library to enable you to quickly find equivalent ICD-9 and ICD-10 diagnostic codes.What it looks like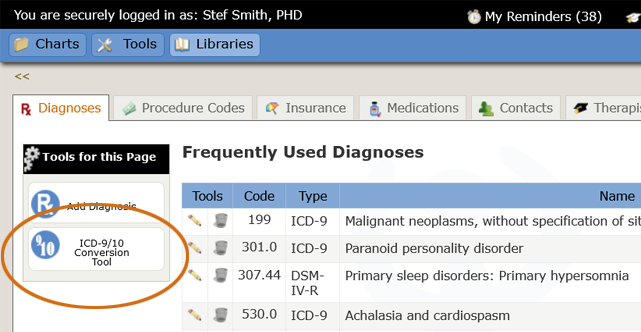 |
Where this isThis tool is on the left nav of the Diagnoses Library. |
The ICD-9/10 Conversion Tool allows you to look up ICD-10 codes if you know the ICD-9 code, and vice versa. When you click it, it looks like this:
Notice that The ICD-9/10 Conversion Tool is similar to the Add ICD-10 Diagnosis tool discussed above, except that although the conversion tool allows you to search for a diagnosis, it does not offer the additional feature of adding the new diagnosis to your library - it's just a look-up tool. If you want to add an ICD 10 diagnosis to your Frequently Used Diagnoses table, you should use the Add ICD-10 tool instead. The Add ICD-10 tool can be found by clicking the Add Diagnosis Tool (right above the ICD-9/10 Conversion Tool) and then click the link at the top that says ICD9-ICD10 Conversion Tool.
Procedure Codes
What this isThis is a tab in the Libraries section of the app that allows you to work with the CPT and Custom Procedure Codes you use most often.What it looks likeLibraries > Procedure Codes  |
Where this isYou can get to this section by using the Libraries > Procedure Codes link in the global nav. Everything in the global nav is replicated in the sitemap located at the bottom of each page, so you can also find a link to the Procedure Codes Library there. |
The Procedure Codes section holds the tables for your frequently used procedure codes - both CPT codes and Custom Procedure Codes. (Custom Procedure Codes are personal codes you might want to create for your practice's record-keeping that are not usually billable to insurance companies, e.g., consulation or supervision you provide, missed client appointments, etc.)
In addition, there are tools for adding both CPT and Custom Procedure Codes on the left nav and tools for editing and deleting the codes on each of the tables. As with other sections in the Libraries, your frequently used procedure codes (both CPT and Other) are used to populate select boxes in forms that ask for a procedure (e.g., the Add Session form).
Frequently Used CPT Codes
What this isThis is the top table on the Libraries > Procedure Codes page that keeps track of the CPT codes you use most often.What it looks like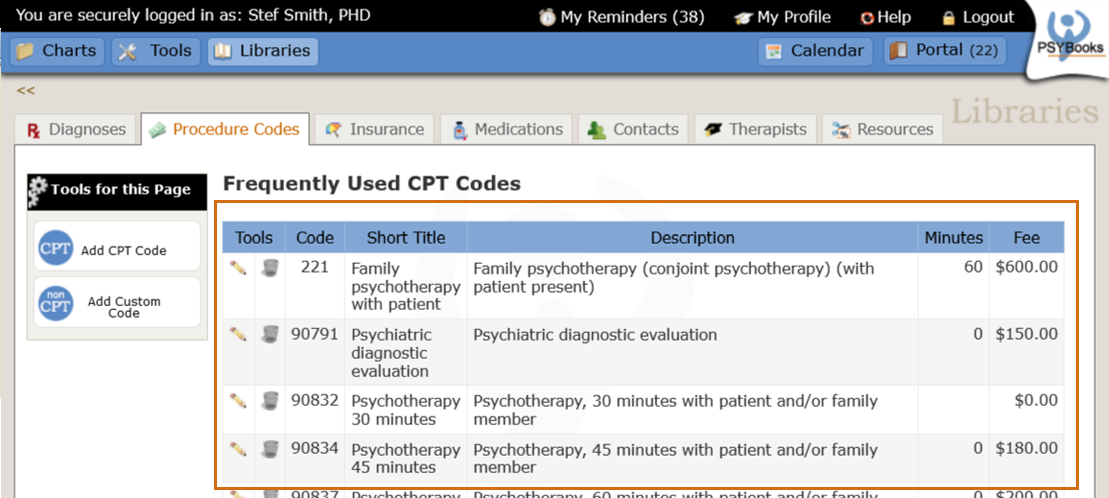 |
Where this isYou can get to this table by using the Libraries > Procedure Codes link in the global nav. The Frequently Used CPT Codes will be the top table on that page. |
When you first subscribe to PSYBooks, The Frequently Used CPT Codes table will be pre-populated with a few of the CPT Codes psychotherapists use most often so you won't have to enter everything yourself. However, you may edit or delete any of the default codes and also add new ones of your own. Forms that ask for a CPT code allow you to add new ones as you go so you may seldom need to actually visit the Procedure Codes section of the Libraries.
Edit CPT Code
What this isThis is a small icon on each row of the Frequently Used CPT Codes table that allows you to edit the CPT codes you use most often.What it looks like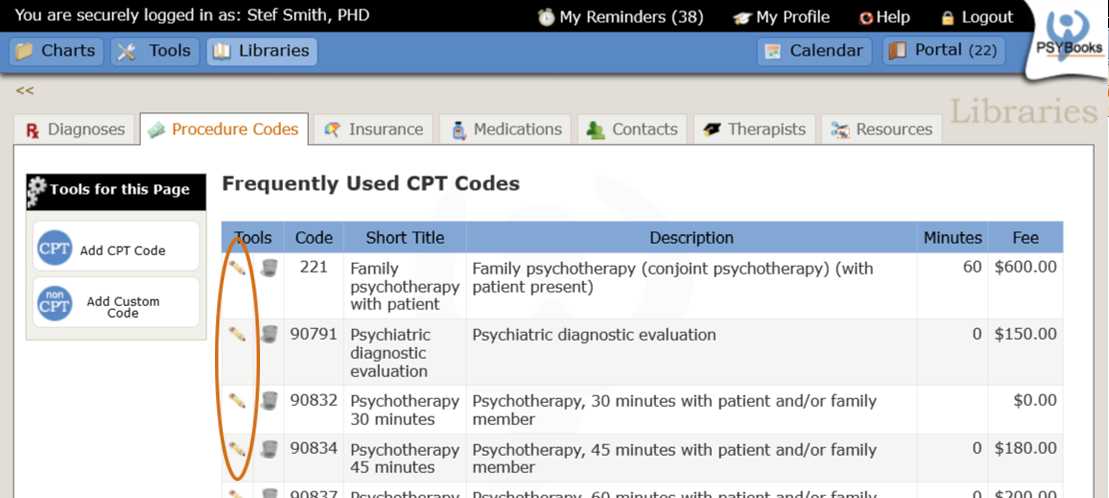 |
Where this isYou can get to this tool by clicking on Libraries > Procedure Codes in the global nav. The Edit CPT Code tool will be at the beginning of each of the rows in the table. |
When you click the Edit CPT Code icon, the form that opens looks like this:
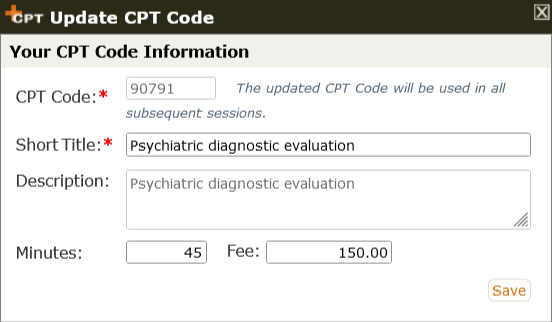
Notice that the CPT Code and the Description fields are not editable since those are from the official lists. However, the Short Title field is the one that will appear in select boxes throughout the site and can be changed to whatever you want. Also, when you include your Fee, anytime you choose this particular CPT code in any form throughout the site, PSYBooks will also fill in the fee on that form. You are always free to change the fee for any particular client, but keeping a default fee in the Libraries may save you some time.
Delete CPT Code
What this isThis is a small icon on each row of the Frequently Used CPT Codes table that allows you to remove a CPT code from the Frequently Used CPT Codes table.What it looks like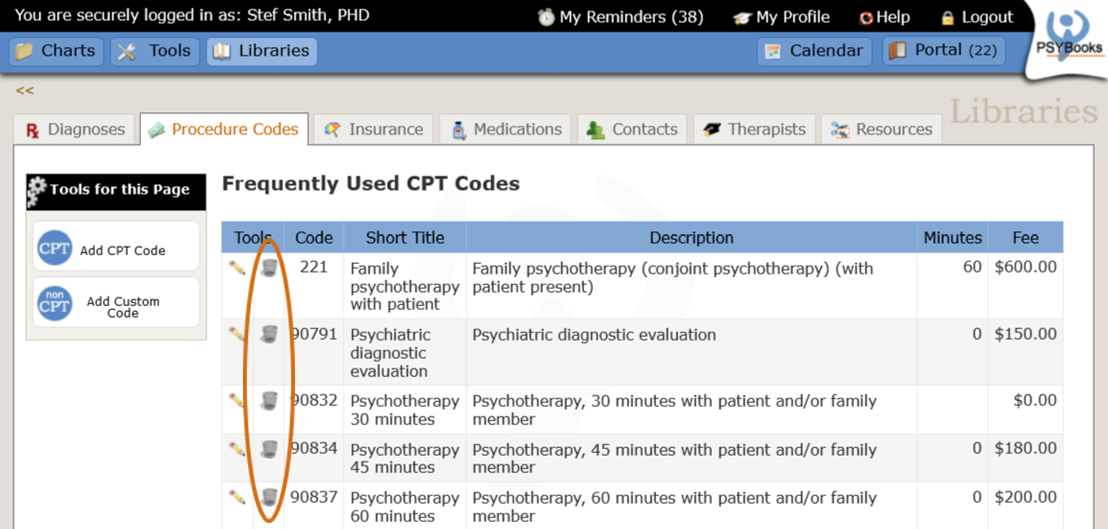 |
Where this isYou can get to this tool by clicking on Libraries > Procedure Codes in the global nav. The Delete CPT Code tool will be at the beginning of each of the rows in the table. |
For the official CPT codes, the Delete CPT Code tool is actually more of a "remove" tool than a delete tool in that although clicking the tool removes the CPT Code from the Frequently Used CPT Codes table, you can easily get it back again by using the Add CPT Code tool. This is because PSYBooks always keeps an updated list of the official CPT codes which you can add to your Frequently Used table at any time. However, if you've added a CPT Code that's not on the list provided by PSYBooks, deleting that code WOULD be permanent.
Custom Procedure Codes
What this isThis is the table on the Libraries > Procedure Codes page that keeps track of the Custom Procedure Codes (i.e., non-CPT codes) you use most often.What it looks like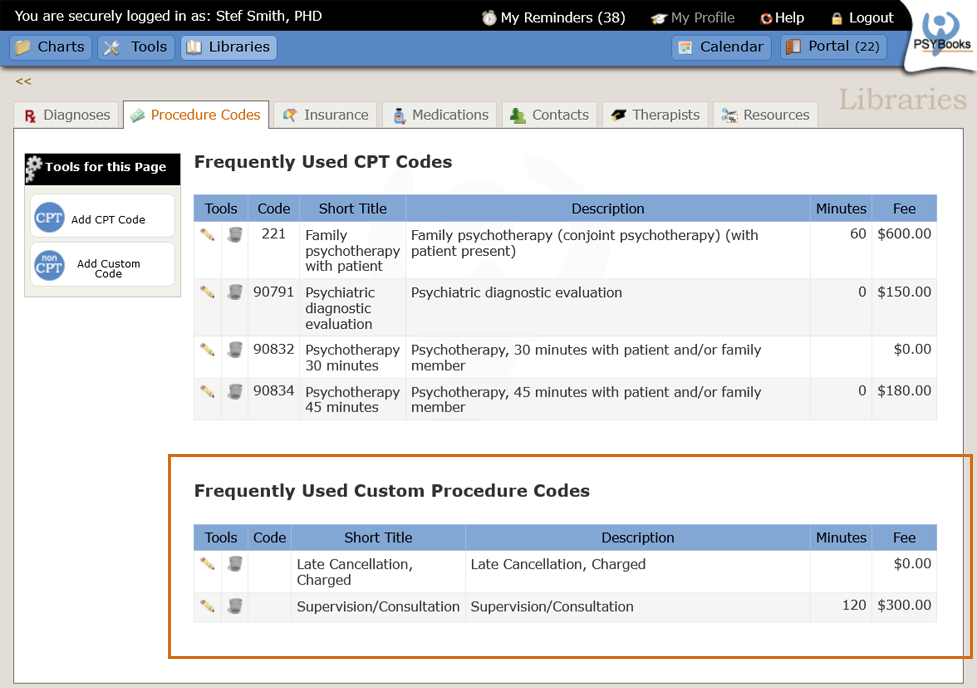 |
Where this isYou can get to this table by using the Libraries > Procedure Codes link in the global nav. Custom Procedure Codes will be the bottom table on that page. |
Custom Procedure Codes are personal codes you might want to create for your practice for things like missed client appointments and other services you may provide such as supervision or psychotherapy.
Edit Custom Procedure Code
What this isThis is a small icon on each row of the Other Procedures Codes table that allows you to edit the other procedures codes you use in your practice.What it looks like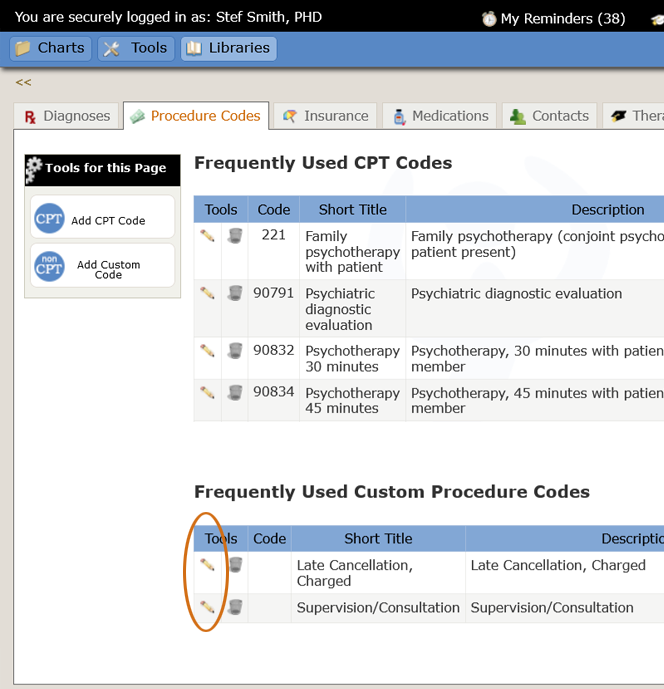 |
Where this isYou can get to this tool by clicking on Libraries > Procedure Codes in the global nav. The Edit Procedure Code tool will be at the beginning of each of the rows in the Custom Procedure Codes table. |
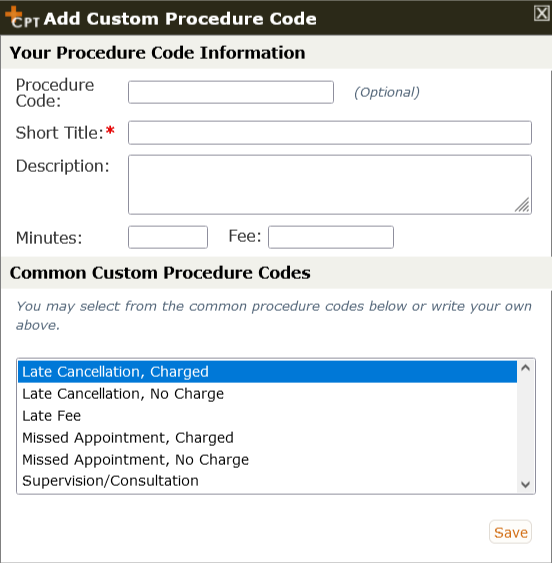
You can edit any of the fields in a Custom Procedure Code entry. The form you get when you click an Edit icon looks like this:
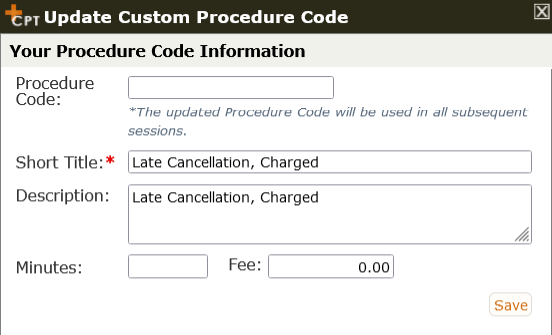
Notice that the only required field on this form is Short Title, since that is what's used to populate procedure select boxes throughout the site. PSYBooks uses $0.00 as the default fee on all procedure codes. Although it's not necessary for you to change it, putting the amount you charge for a particular service in the Fee field is often helpful since it will allow PSYBooks to pre-populate Fee fields on other forms any time you enter this particular procedure code. Although you'll always be able to override the amount of the fee, including it here may save you some time. In the example above, $0.00 may be appropriate since the procedure is listed "no charge".
Delete Custom Procedure Code
What this isThis is a small icon on each row of the Other Procedures Codes table that allows you to delete the other procedures codes you use in your practice.What it looks like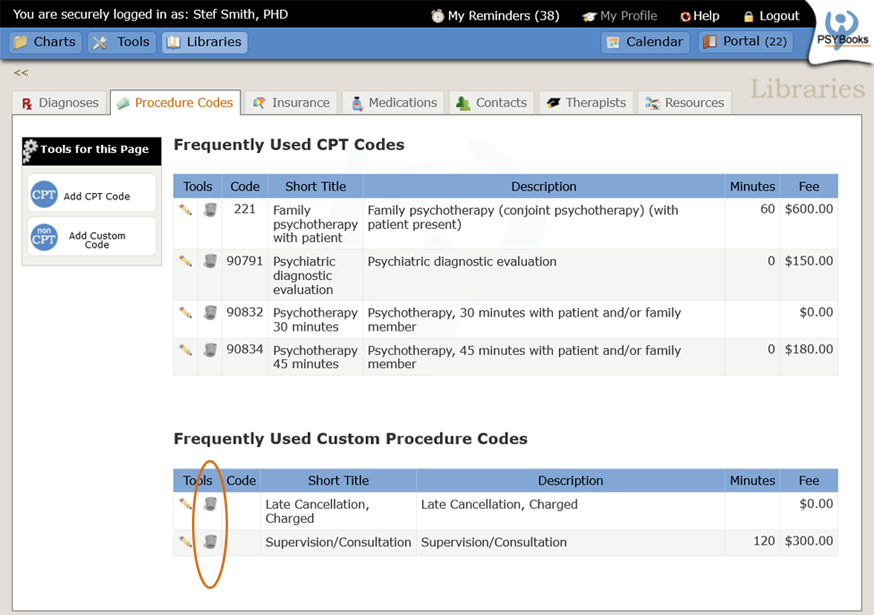 |
Where this isYou can get to this tool by clicking on Libraries > Procedure Codes in the global nav. The Delete Procedure Code tool will be at the beginning of each of the rows in the Custom Procedure Codes table. |
As with CPT Codes, if you delete a Custom Procedure Code that was in PSYBooks' pre-populated select box, you can put it back at any time. However, the new version won't include any changes you might have made to the code (e.g., any amount you might have put in the Fee box). If the code you remove was one you had added from scratch, the deletion will be permanent.
Add CPT Code
What this isThis is the top tool on the left nav of the Libraries > Procedure Codes page. It allows you to enter the CPT codes you use most often.What it looks like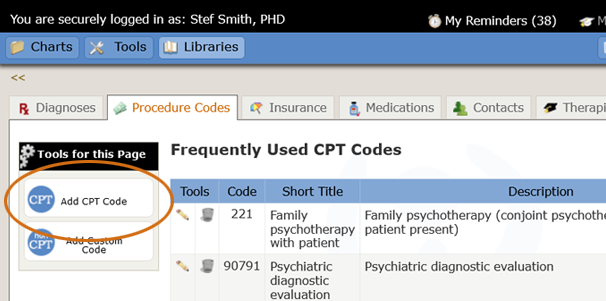 |
Where this isYou can get to this tool by clicking Libraries > Procedure Codes in the global nav. The Add CPT Code tool is on the left nav. |
When you click the Add CPT Code tool, the form that opens looks like this:
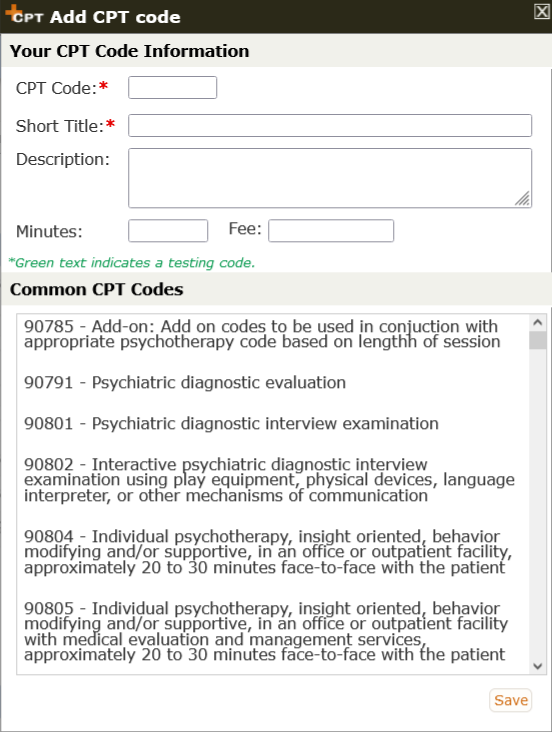
This form can be used in two ways: you can enter all items manually in the top portion of the form, or you can use the bottom portion of the form, scroll down until you find the CPT code you want and click it. Using this second method will pre-populate all of the fields above except Fee. (In cases where the CPT code doesn't specify the number of minutes, PSYBooks pre-populates with a zero, but you can change this if you wish.)
Add Custom Code
What this isThis is a tool on the left nav of the Libraries > Procedure Codes page. It allows you to enter the Custom Procedure Codes (i.e., non-CPT codes) you use most often.What it looks like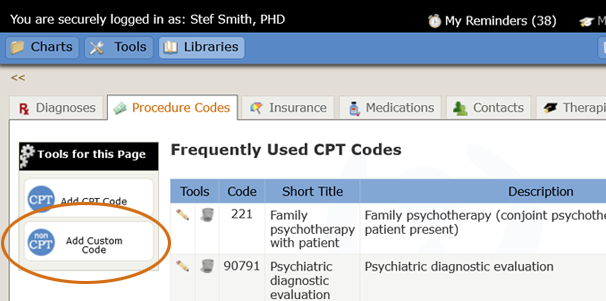 |
Where this isYou can get to this tool by clicking Libraries > Procedure Codes in the global nav. The Add Custom Procedure Code tool is on the left nav. |
When you click the Add Custom Code tool, the form that opens looks like this:
As with adding CPT codes, you have the option of filling in the top part of the form manually or choosing one of the options in the select box. If you include a fee, PSYBooks will automatically populate fee boxes with this amount on forms where you enter this procedure code.
Insurance Companies
What this isThis is a tab in the Libraries section of the app. It allows you to manage information about the insurance companies you work with in your practice. You can enter companies you efile as well as those for whom you want to print a CMS form.What it looks likeLibraries > Insurance Companies 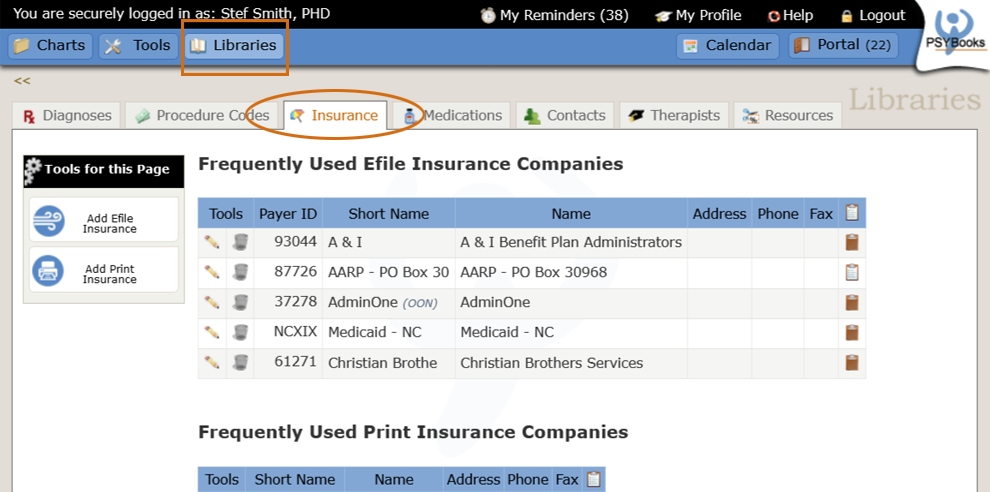 |
Where this isYou can get to this tool by clicking Libraries > Insurance Companies in the global nav. |
The Insurance Companies section of the Library holds the tables for your frequently used insurance companies - both your efile companies as well as those that are "print" insurance companies. Technically, you can print the CMS forms for claims to all of your insurance companies. However, those that have been efiled will have a watermark on them letting you know that claim was efiled whereas a company you've designated as a Print Insurance Company cannot be efiled and will produce a CMS form that is ready to mail or fax to the company.
As with other sections in the Libraries, there are tools on the left nav for adding items to each of the tables (e.g., Frequently Used Efile Insurance Companies and Frequently Used Print Insurance Companies) and tools on each of the tables to edit and delete those items.
Each insurance company you use with a client must be in the Library. However, you don't HAVE to add them here. Many prefer to use the "Add New" links on the Add Client Insurance tool. Client insurances added there will automatically get added to your Library so it actually saves you a step to do it that way. That's also the best way to do it if you've checked the Insurance Block on the Profile Form.
Frequently Used Efile Companies
What this isThis is the top table on the Libraries > Insurance Companies page. There are tools on the left side of the table that allow you to work with entries in the table.What it looks like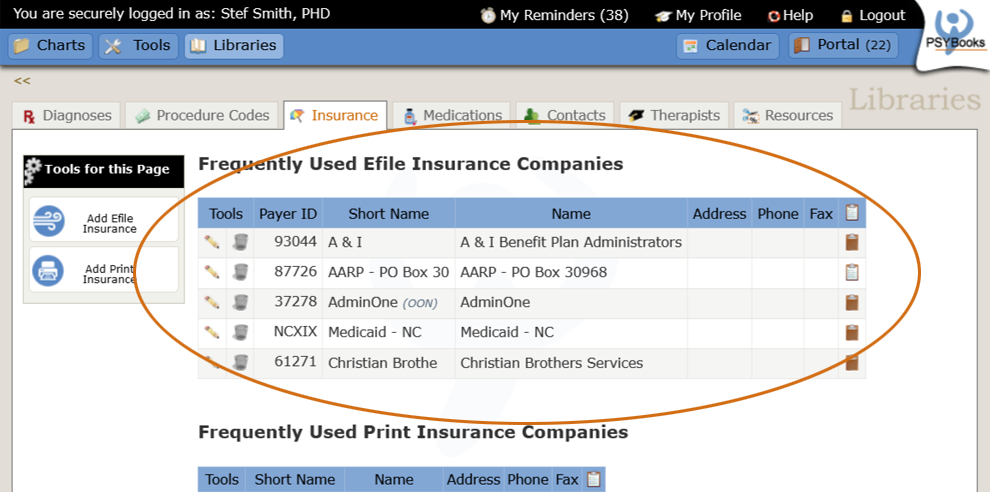 |
Where this isYou can get to this table by clicking Libraries > Insurance Companies in the global nav. |
If you plan to efile, your efile companies will have to be listed in this table. To enter them, you can use the Add Efile Insurance tool on this page or you can enter them as you need them with the Add Session tool. The tools in the left columns of the Frequently Used Efile Companies table allow you to edit or remove companies from the table.
Edit Efile Insurance
What this isThis is a tool in the Frequently Used Efile Companies table that allows you to edit companies that are listed in the table.What it looks like |
Where this isYou can get to this tool by clicking Libraries > Insurance Companies in the global nav. The Edit Efile Insurance tool is in the table beside the insurance company name. |
When you click the Edit Efile Insurance tool, the form that opens looks like this:
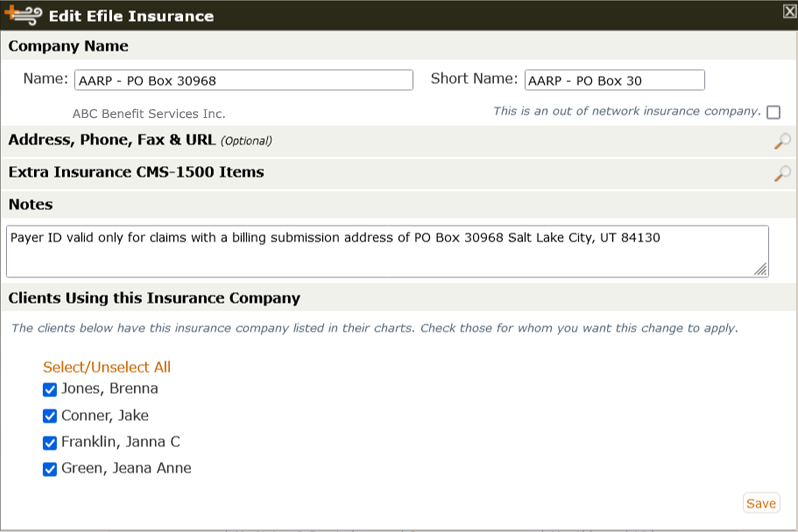
Although there are several sections on this form, most of them are closed because they're not used that often. We'll discuss items in the open sections first and come back to the sections that are less frequently used.
Fields in the Company Name Section
Name
The Name of the insurance company cannot be edited. That's because this is the official company name that is recognized for efiling. If it's changed, your claims might not be delivered properly.
Short Name
The Short Name field on the form CAN be changed. Throughout PSYBooks, if there's both a Name and a Short Name, it's the Short Name that's used to populate select boxes. Short Names are for your own use so feel free to change an efile company's name to something you recognize more easily, something shorter, etc.
Out of Network Checkbox
Checking the out of network checkbox allows you to choose whether your session will be efiled and/or whether you want to bill the client directly for the session. This option allows you to efile claims for your clients even if you're not a provider and still bill your client the way you normally would.
Notes
Notes that you enter here should be for the insurance company as a whole, not for a specific client. These notes will not appear in any client's chart. If you have notes for a specific client's insurance company, you can enter them on either the Add or Edit Client Insurance forms.
Clients Using this Insurance Company
There may be times when you want to make a change to one client's insurance company but not all. PSYBooks shows you which clients have the efile company you're editing so you can apply your changes to only certain clients.
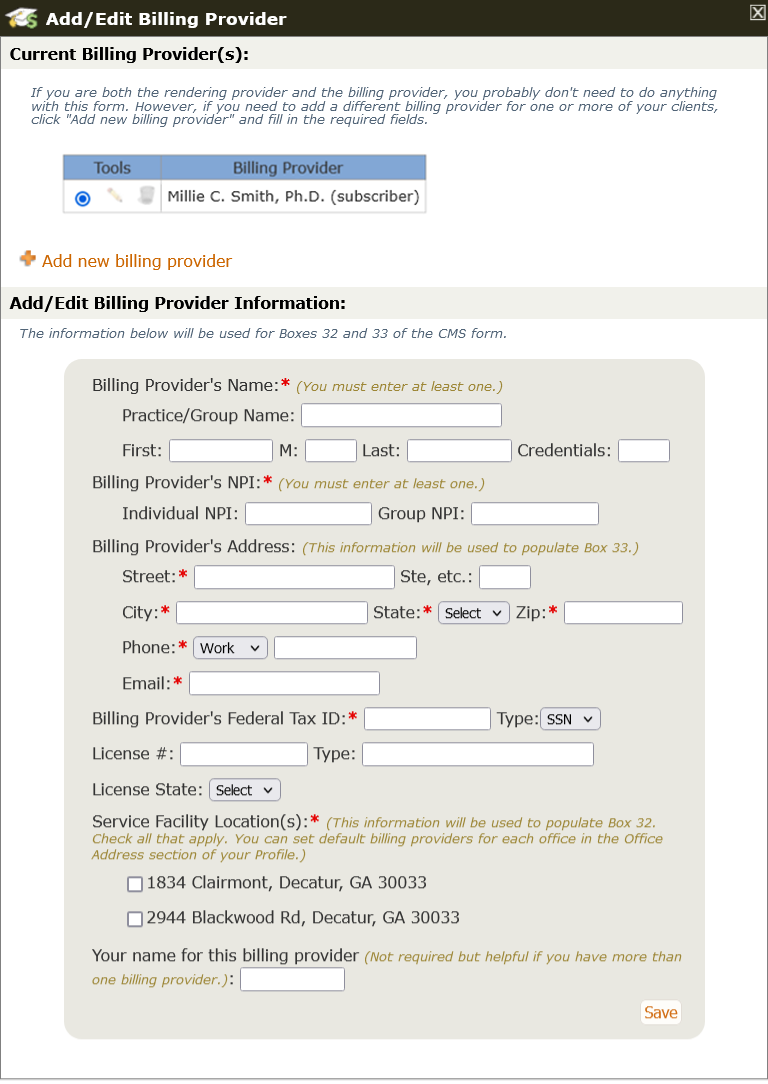
The Address, Phone, Fax & URL Section
When you open the Address, Phone, Fax & URL section of the Edit Efile Insurance tool, the part of the form that opens looks like this:
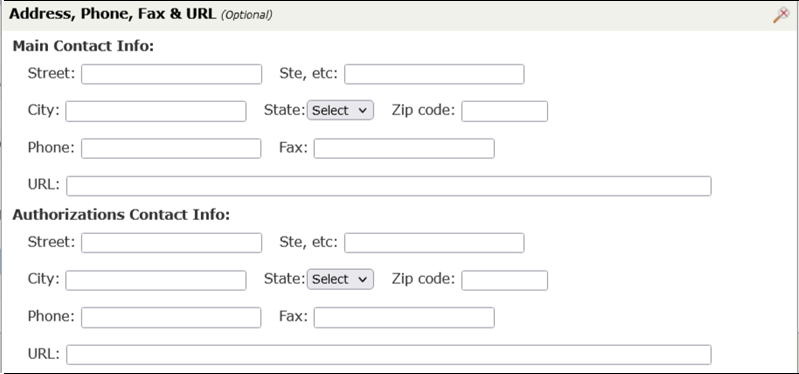
You do not have to fill in any of this information. It's all optional with efile companies. If you do want to use this section, notice that there is one place for listing main office information and another place for listing authorization contact info. Information you enter here will carry to the Add/View Authorizations tool on the main Charts page. All URLs you list will be turned into links. Clicking a link will open the URL in a new window or tab, making it possible to access pages on the insurance company's site right from PSYBooks.
The Extra Insurance CMS-1500 Items Section
When you open the Extra Insurance CMS-1500 section of the Edit Efile Insurance tool, the part of the form that opens looks like this:
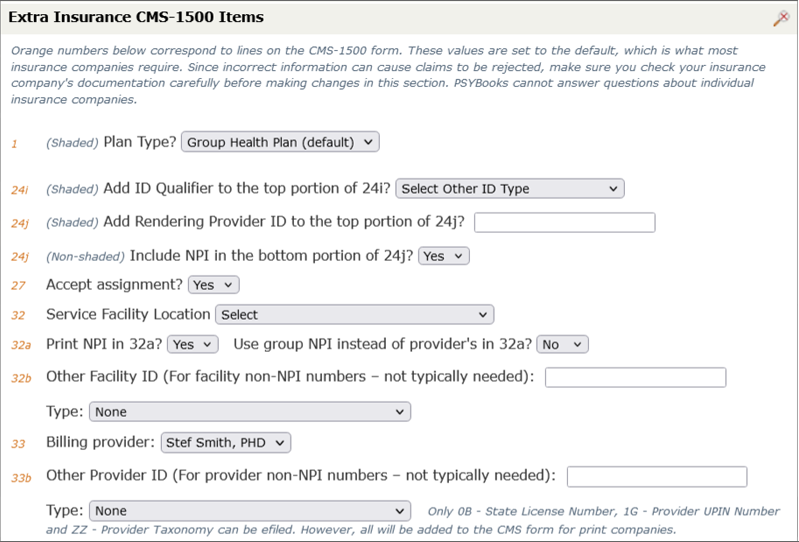
You may never need this section - especially since this is an efile company. However, if the company you're editing does require any of these fields to be different from the normal defaults, you can change them here.
Delete Efile Insurance
What this isThis is a tool in the Frequently Used Efile Companies table that allows you to remove efile companies from your Frequently Used table.What it looks like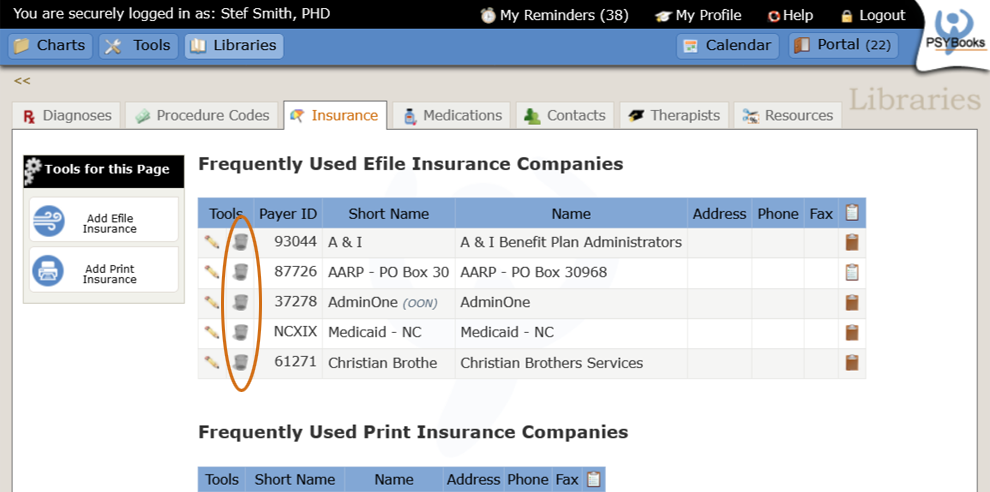 |
Where this isYou can get to this tool by clicking Libraries > Insurance Companies in the global nav. The Delete Efile Insurance tool is in the table beside the insurance company name. |
Deleting an Efile company merely removes it from your Frequently Used Efile Insurance Companies table. You may add it again at any time.
Frequently Used Print Companies
What this isThis is a table on the Libraries > Insurance Companies page. It holds information on "print" insurance companies (i.e., those companies to whom you send claims via fax or regular mail as opposed to efiling). Therapists who do not file insurance but who want to be able to provide CMS-1500 forms for their clients would also use this table.What it looks like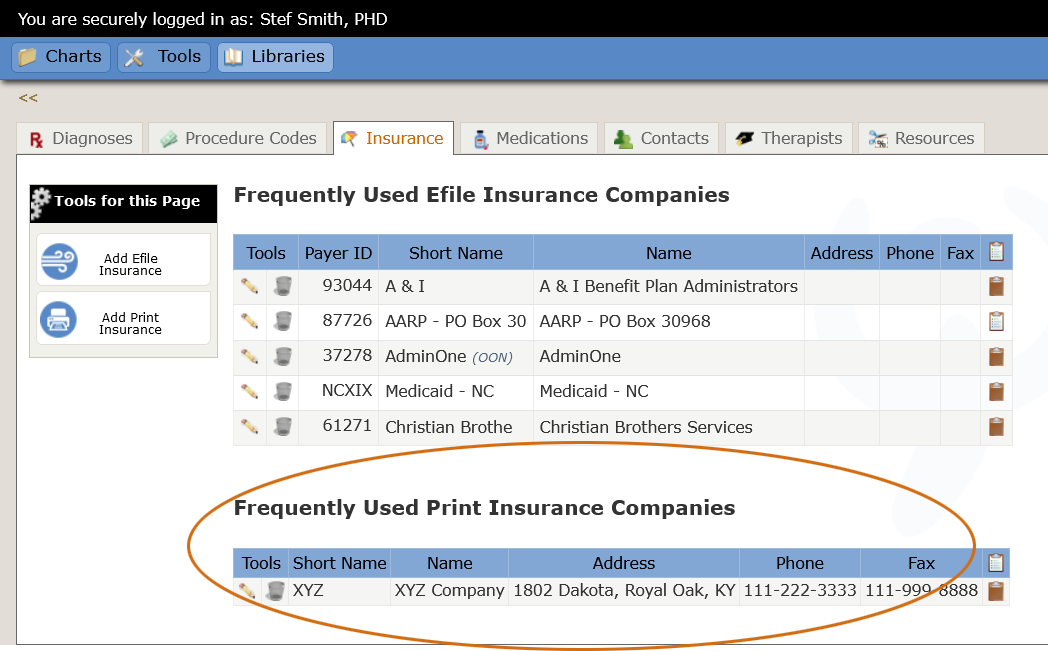 |
Where this isYou can get to this tool by clicking Libraries > Insurance Companies in the global nav. This is the bottom table. |
"Print" insurance companies are those for whom you want to be able to generate a CMS-1500 form that you can fax or send via regular mail. Some situations where you might need print insurance companies are:
- If you don't do any efiling
- If you efile most claims but have some secondary insurance companies that require you to submit claims via fax or regular mail
- If you don't file insurance but would like to be able to print CMS-1500 forms so your clients can file
PSYBooks makes two distinctions between an efile insurance company and a print insurance company. The obvious one is that processing a claim to an efile company efiles the claim whereas process a print company claim does not. The other distinction is that a CMS claim to an efile company will have a watermark on it indicating that it's been efiled. A CMS claim to a print company does not have the watermark. It's ready to be printed so it can be sent via regular mail or fax.
Edit Print Insurance
What this isThis is a tool that allows you to edit companies that are listed in the Frequently Used Print Insurance Companies table.What it looks like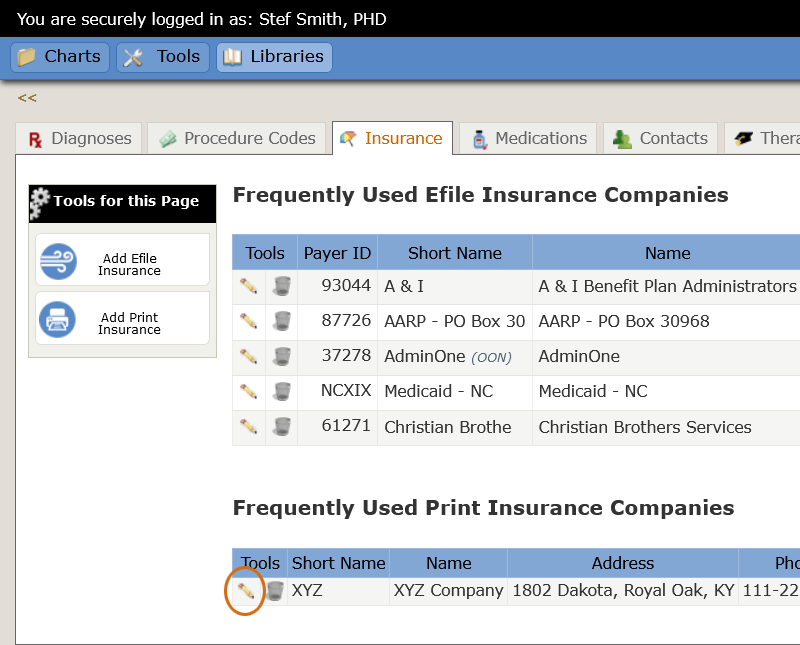 |
Where this isYou can get to this tool by clicking Libraries > Insurance Companies in the global nav. The Edit Print Insurance tool is in the table beside the insurance company name. |
When you click the Edit Print Insurance tool, the form that opens looks like this:
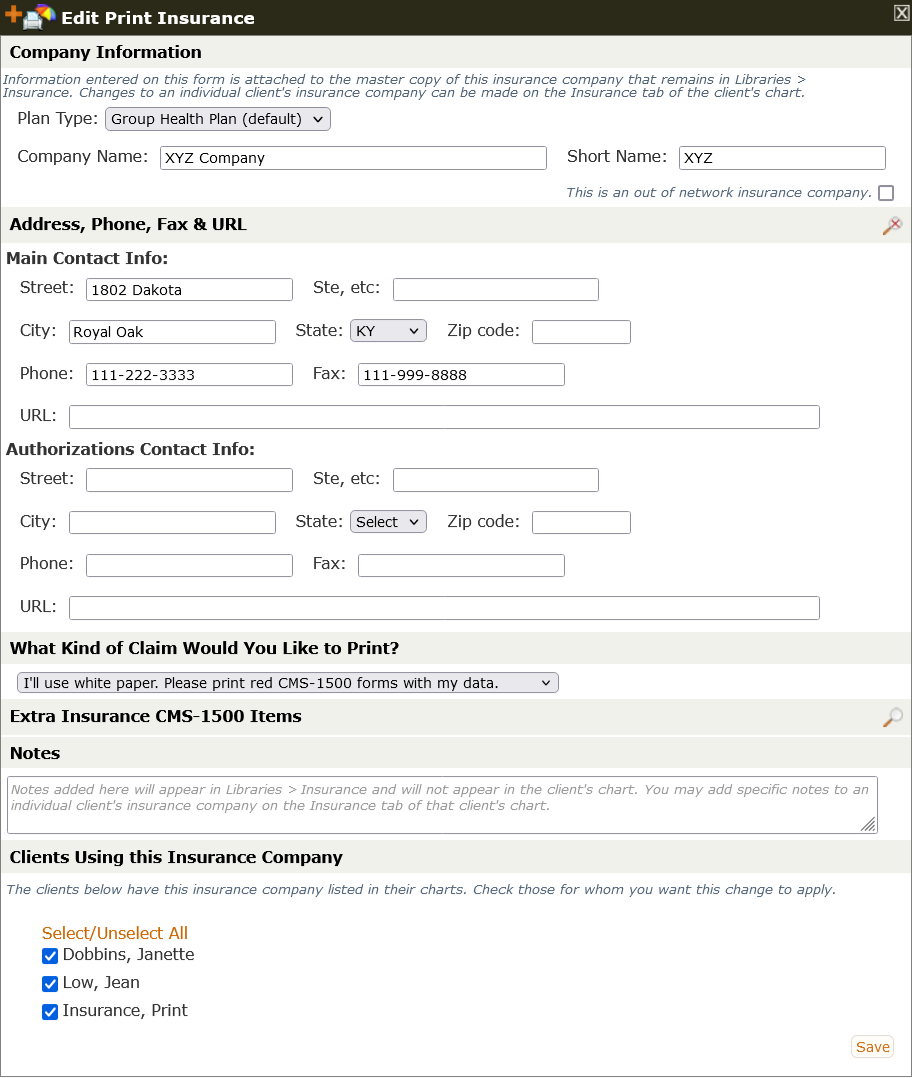
Various fields on this form that might need explanation will be discussed below, working from the top of the form down:
"This is an out of network insurance company" checkbox
Checking the out of network checkbox causes your session fees to be billed directly to the client instead of the insurance company. This option allows you to print CMS-1500 forms for your clients, even if you're not a provider, and still bill your client the way you normally would.
Company Name
You're free to edit the Company Name field but remember that this is the name that's used on the CMS form so the name you put here should be the company's official name.
Short Name
Throughout PSYBooks, if there's both a Name (in this case, called a "Company Name") and a Short Name, it's the Short Name that's used to populate select boxes. Short Names are for your own use so feel free to write whatever you want in this field. Usually shorter is better (i.e., the name "Short Name") since what you write will populate select boxes.
Contact Info
The contact info fields for a print insurance company are more important than they are for an efile company. Information from the Main Contact Info section of a print insurance form will be used for the insurance company's "Address Block" at the top of CMS-1500 forms. The Authorizations Contact Info (as well as the Main Contact Info) will be used on the Add/View Authorizations tool on the main Charts page. All URLs you list will be turned into links. Clicking a link will open the URL in a new window or tab, making it possible to access pages on the insurance company's site right from PSYBooks.
What Kind of Claim Would You Like to Print?
The choices here are whether you want to use regular paper in your printer (in which case, PSYBooks will print the pre-populated CMS-1500 form for you) or whether you have CMS forms for your printer and want to print a "data-only" CMS form. With the first option, you can choose whether to print a red or black CMS form.
Notes
Notes you enter here should be for the insurance company as a whole, not a specific client. These notes will not appear in any client's chart. If you'd like to add notes for a specific client's insurance company, you can enter them on either the Add or Edit Client Insurance forms.
Clients Using this Insurance Company
There may be times when you want to make a change to one client's insurance company but not all. PSYBooks shows you which clients have the efile company you're editing so you can apply your changes to only certain clients.
The Extra Insurance CMS-1500 Items Section
When you open the Extra Insurance CMS-1500 section of the Edit Print Insurance tool, the part of the form that opens looks like this:
In the rare cases where an insurance company requires any of these fields to be different from the normal defaults, you can change them here.
Delete Print Insurance
What this isThis is a tool in the Frequently Used Print Insurance Companies table that allows you to delete print companies from the table.What it looks like |
Where this isYou can get to this tool by clicking Libraries > Insurance Companies in the global nav. The Delete Print Insurance tool is in the table beside the insurance company name. |
Deleting a print insurance company is permanent. If you should need to use it at any time in the future, you'd have to enter it from scratch.
Add Efile Insurance
What this isThis is a tool on the left nav of the Libraries > Insurance Companies page. It allows you to enter the insurance companies to whom you want to efile claims.What it looks like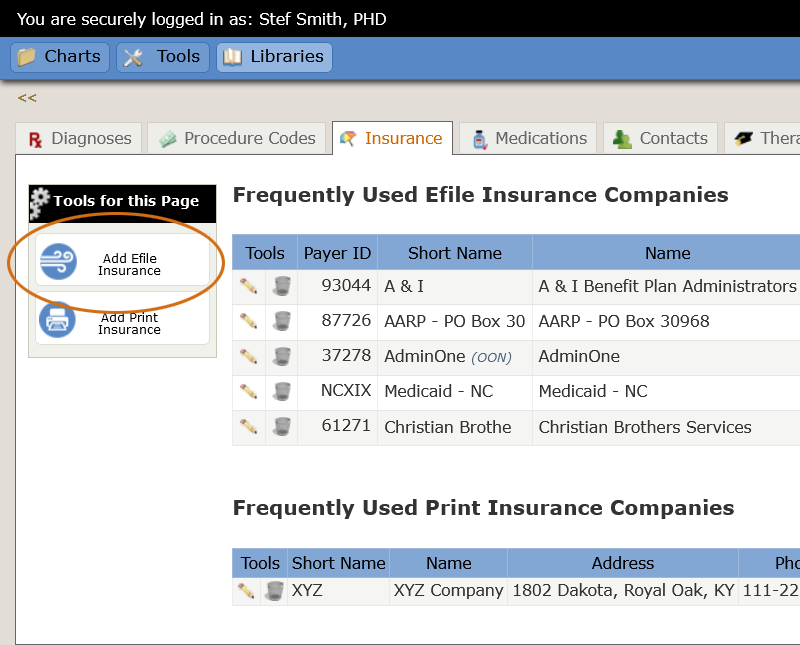 |
Where this isYou can get to this tool by clicking Libraries > Insurance Companies in the global nav. This tool is the top tool on the left nav. |
When you click the Add Efile Insurance tool, the form that opens looks like this:
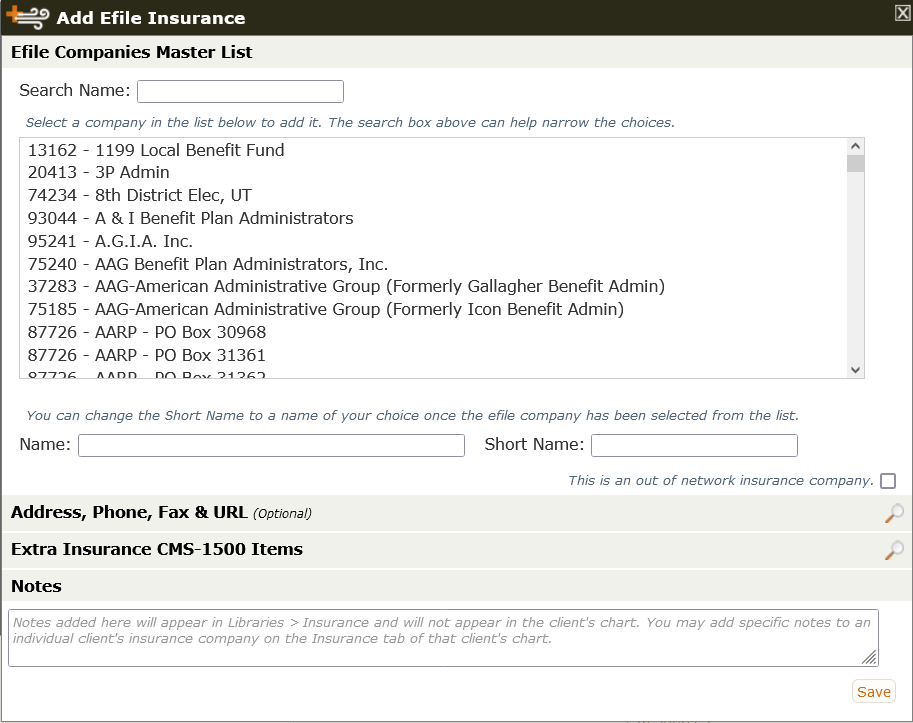
The only required thing here is to select your insurance company from the list and click Save. However, if you don't like the Short Name that is pre-populated, you can change it. The Short Name will be used to populate insurance company select boxes throughout the site. Additional fields you may want to use are discussed below:
-
"This is an out of network insurance company" checkbox
Checking the out of network checkbox causes your session fees to be billed directly to the client instead of the insurance company. This option allows you to print CMS-1500 forms for your clients, even if you're not a provider, and still bill your client the way you normally would.
-
The Address, Phone, Fax & URL Section
When you open the Address, Phone, Fax & URL section of the Add Efile Insurance tool, the part of the form that opens looks like this:
You do not have to fill in any of this information. It's all optional with efile companies. If you do want to use this section, notice that there is one place for listing main office information and another place for listing authorization contact info. Information you enter here will carry to the Add/View Authorizations tool on the main Charts page. All URLs you list will be turned into links. Clicking a link will open the URL in a new window or tab, making it possible to access pages on the insurance company's site right from PSYBooks.
-
The Extra Insurance CMS-1500 Items Section
When you open the Extra Insurance CMS-1500 section of the Add Efile Insurance tool, the part of the form that opens looks like this:
You may never need this section. However, if the company you're editing does require any of these fields to be different from the defaults, you can change them here.
-
Notes
Notes you enter here should be for the insurance company as a whole, not a specific client. These notes will not appear in any client's chart. If you'd like to add notes for a specific client's insurance company, you can enter them with the Add or Edit Client Insurance tools on the Insurance tab in the client's chart.
Add Print Insurance
What this isThis is a tool on the left nav of the Libraries > Insurance Companies page. It allows you to add the print insurance companies you use most often. (Print companies are those insurance companies that you do not efile, i.e., where you might want to print a CMS-1500 form.)What it looks like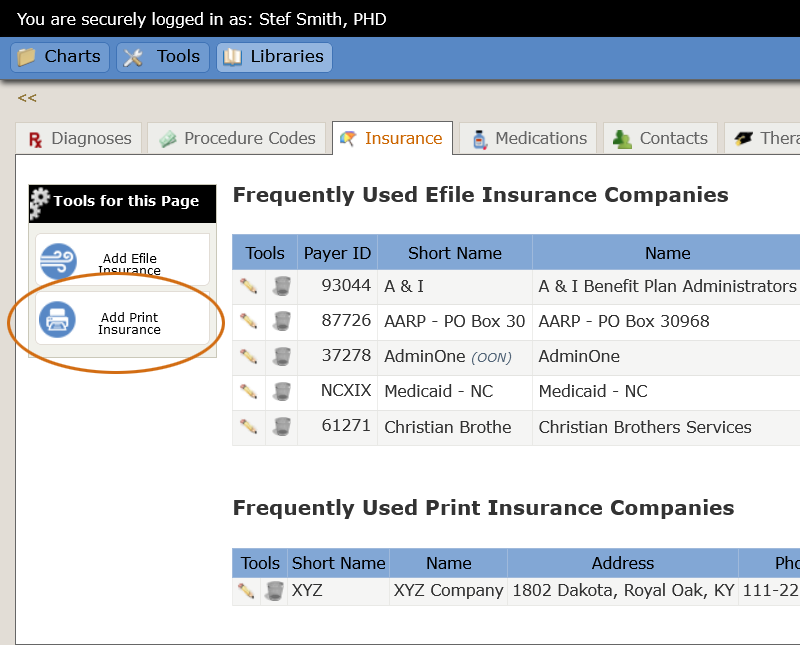 |
Where this isYou can get to this tool by clicking Libraries > Insurance Companies in the global nav. This tool is on the left nav. |
When you click the Add Print Insurance tool, the form that opens looks like this:
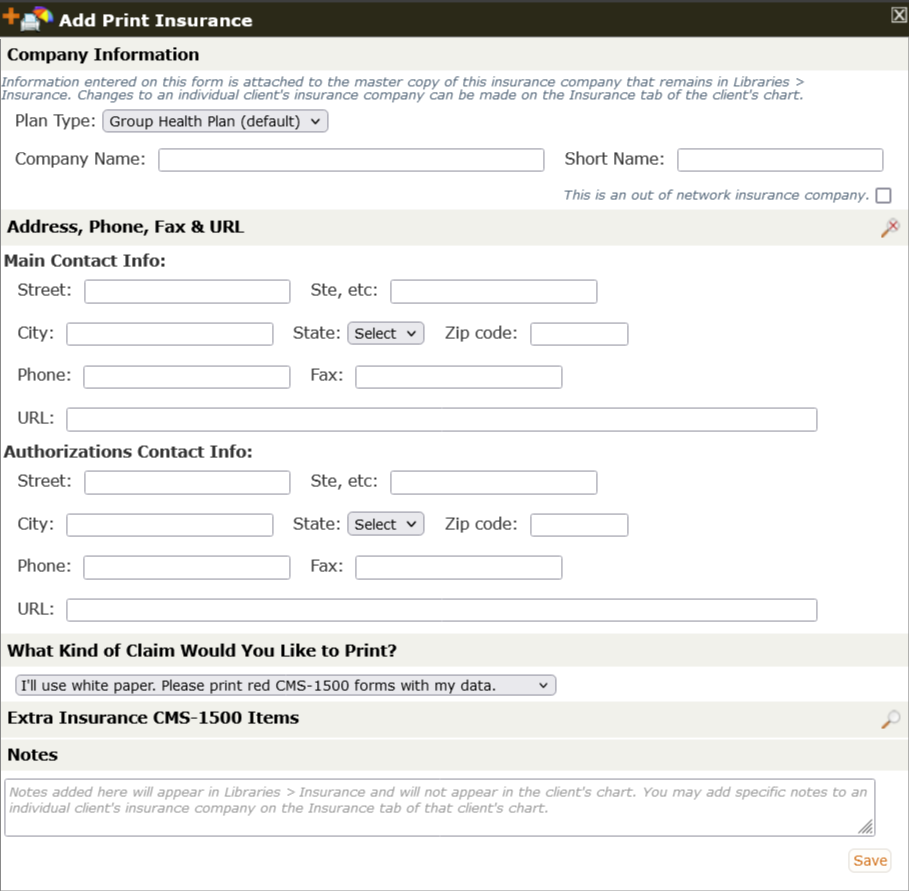
Various fields on this form that might need explanation will be discussed below, working from the top of the form down:
"This is an out of network insurance company" checkbox
Checking the out of network checkbox causes your session fees to be billed directly to the client instead of the insurance company. This option allows you to print CMS-1500 forms for your clients, even if you're not a provider, and still bill your client the way you normally would.
Company Name
This is where you enter the complete name of the insurance company. This is the insurance company name that will be used on the CMS-1500 form so it should be their legal or "official" name. In most cases, copying the name from the client's insurance card will be sufficient.
Short Name
Throughout PSYBooks, if there's both a Name (in this case, called a "Company Name") and a Short Name, it's the Short Name that's used to populate select boxes. Short Names are for your own use so feel free to write whatever you want in this field.
Contact Info
The contact info fields for a print insurance company are more important than they are for an efile company. Information from the Main Contact Info section of a print insurance form will be used for the insurance company's "Address Block" at the top of CMS-1500 forms. The Authorizations Contact Info (as well as the Main Contact Info) will be used on the Add/View Authorizations tool on the main Charts page. All URLs you list will be turned into links. Clicking a link will open the URL in a new window or tab, making it possible to access pages on the insurance company's site right from PSYBooks.
What Kind of Claim Would You Like to Print?
The choices here are whether you want to use regular paper in your printer (in which case, PSYBooks will print the pre-populated CMS-1500 form for you) or whether you have CMS forms for your printer and want to print a "data-only" CMS form. With the first option, you can choose whether to print a red or black CMS form.
-
Extra Insurance CMS-1500 Items
When you open the Extra Insurance CMS-1500 section of the Add Print Insurance tool, the part of the form that opens looks like this:
In the rare cases where an insurance company requires any of these fields to be different from the normal defaults, you can change them here.
-
Notes
Notes you enter here should be for the insurance company as a whole, not a specific client since these notes will not appear in any client's chart. If you'd like to add notes for a specific client's insurance company, you can enter them on either the Add or Edit Client Insurance forms.
Medications
What this isThis is a tab in the Libraries section of the app. It's for entering information on medications your clients use most often.What it looks likeLibraries > Medications 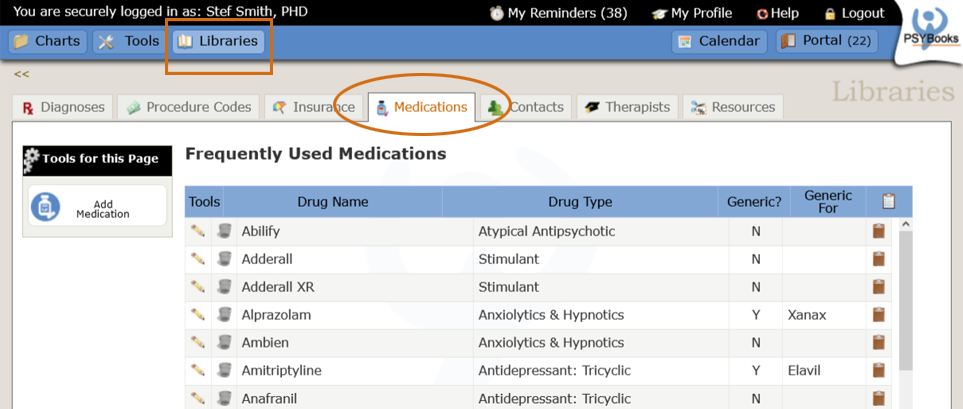 |
Where this isYou can get to this tool by clicking Libraries > Medications in the global nav. Everything in the global nav is replicated in the sitemap located at the bottom of each page, so you can also find a link to the Medications Library there. |
The PSYBooks Medications Library comes already stocked with many psych meds that are commonly used. Having them listed in the Library allows you to work with them more easily because the Library list is used to populate medication select boxes in other parts of the application. In addition, there are tools which allow you to add, edit and delete so you can customize the list to your liking.
Frequently Used Medications
What this isThis is the table on the Medications tab of the Libraries.What it looks like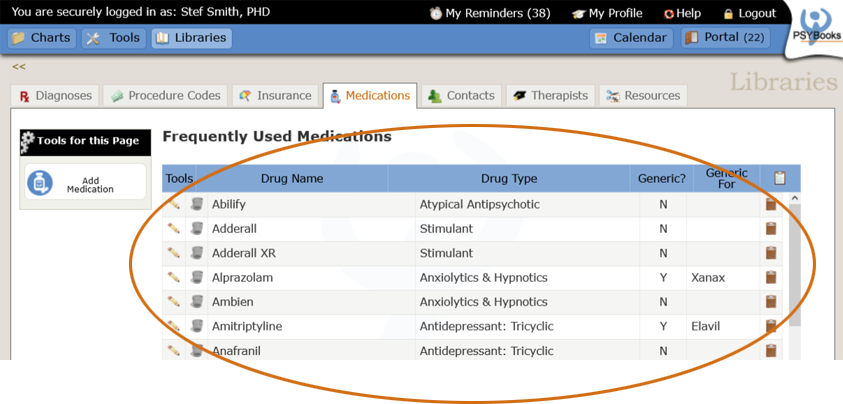 |
Where this isYou can get to this table by clicking Libraries > Medications in the global nav. |
Medications listed in the Frequently Used Medications table are used to populate medication select boxes throughout the app. PSYBooks has done some of the work for you by pre-populating the table with commonly used psych meds. However, each medication listed has edit and delete tools, allowing you to alter the list so it suits your particular practice.
Edit Medication
What this isThis is a tool in the Frequently Used Medications table that allows you to edit medications that are listed in the table.What it looks like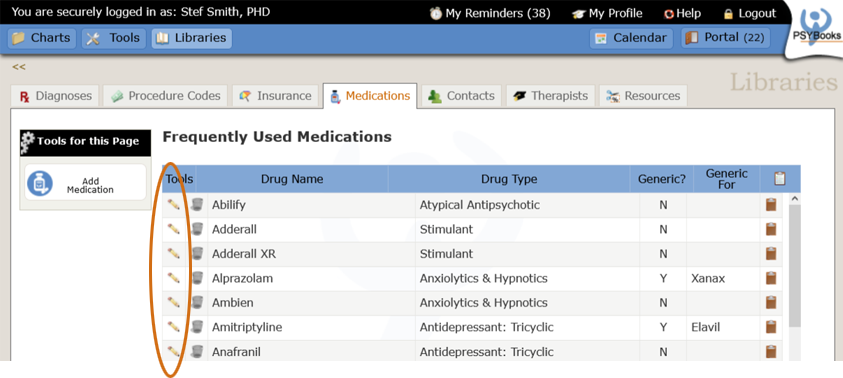 |
Where this isYou can get to this tool by clicking Libraries > Medications in the global nav. The Edit Medication tool is in the table beside the medication. |
When you click an Edit Medication tool, the form that opens looks like this:
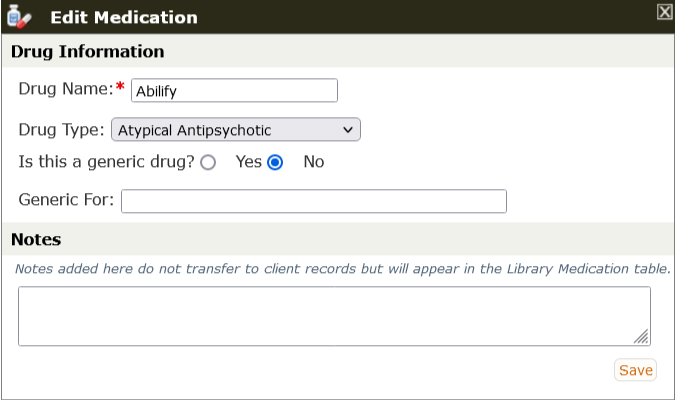
You can change anything you want on this form. The only requirement is that the Drug Name field cannot be left blank since the value of that field is used to populate medication select boxes throughout the app.
Delete Medication
What this isThis is a tool in the Frequently Used Medications table that allows you to remove medications from the table.What it looks like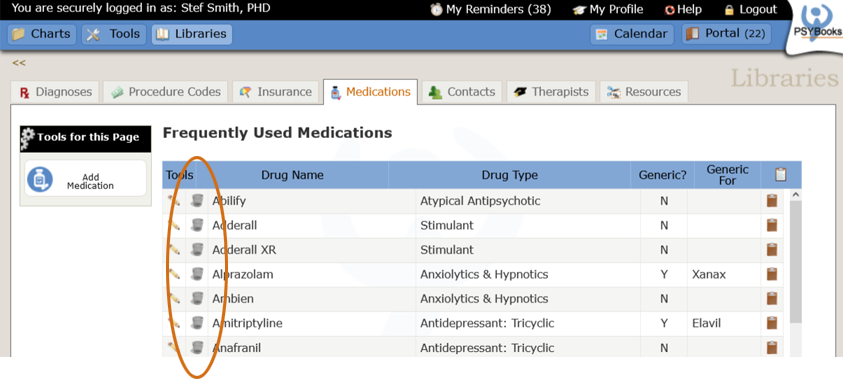 |
Where this isYou can get to this tool by clicking Libraries > Medications in the global nav. The Delete Medication tool is in the table beside the name of the medication. |
Deleting a medication is permanent. If you decide you want it back, you'll have to re-enter it from scratch. Similar to other places in the app, you cannot delete medications that are already being used in a client's chart.
Contacts
What this isThis is a tab in the Libraries that allows you to keep track of professional contacts your clients might need.What it looks like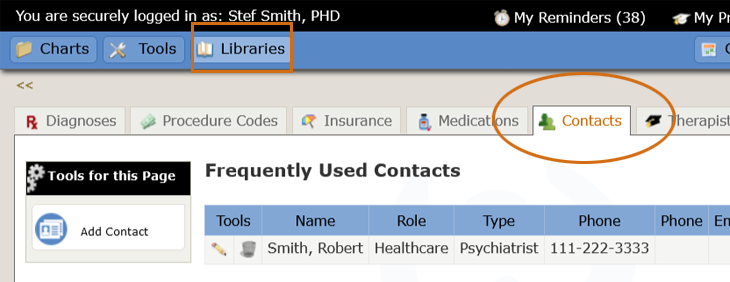 |
Where this isYou can get to this section by clicking on Libraries in the global nav. Everything in the global nav is replicated in the sitemap located at the bottom of each page, so you can also find a link to the Contacts Library there. |
The Contacts Library is a place for you to enter contact information for other professionals to whom you may want to refer your clients. For example, if you cannot dispense medication yourself, you may want to enter the psychiatrists you like to use in the Contacts Library. Once a contact is listed in your Library, it is very easy to attach them to a client's chart. In addition, there are tools in this Library which allow you to add, edit and delete so you can customize your list of contacts to your liking.
Frequently Used Contacts
What this isThis is the table on the Libraries > Contacts tab that allows you to store contacts you may want to use with your clients.What it looks like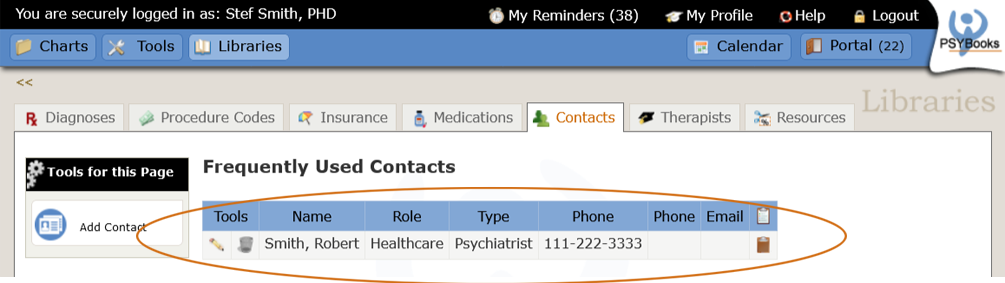 |
Where this isYou can get to this table by clicking Libraries > Contacts in the global nav. |
The Frequently Used Contacts table allows you to see contact information on other professionals at a glance. Also, once a name is listed here, it will also appear in other helpful dropdown boxes in the app, based on the Role assigned to the contact. For example, contacts with a Role of Healthcare appear in the Prescribing Physician dropdown box on the Add Client Medication form. That makes it easy to assign the provider to your client without having to retype their contact information in the client's chart.
As with the other "Frequently Used" tables in your Libraries, the Contacts table has both edit and delete tools, enabling you to make changes anytime you wish. Each of those tools is discussed below.
Edit Contact
What this isThis is a tool on the Frequently Used Contacts table that allows you to edit a contact.What it looks like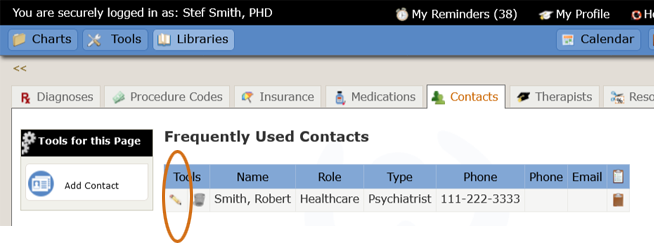 |
Where this isYou can get to this tool by clicking Libraries > Contacts in the global nav. The Edit Contact tool is the pencil on each row in the table. |
If you click on an Edit Contact tool, the form that opens looks like this:
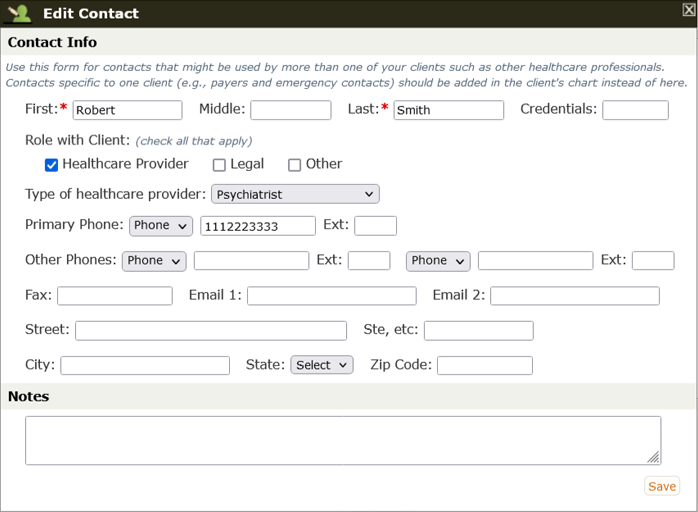
As with all edit tools in the Libraries, you can make any changes you want and then click Save.
Delete Contact
What this isThis is a tool on the Frequently Used Contacts table that allows you to delete a contact.What it looks like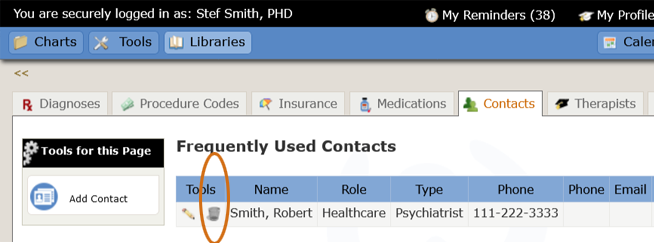 |
Where this isYou can get to this tool by clicking Libraries > Contacts in the global nav. The Delete Contact tool is the trash can on each row in the table. |
You can delete contacts from the Library at any time. However, if a contact is being used in a client chart, you'll get an alert telling you the contact has to be removed from all charts before it can be deleted from the Library. This will prevent you from deleting contacts that are currently being used.
Add Contact
What this isThis is a tool on the left nav of Libraries > Contacts that allows you to enter contacts into your Frequently Used Contacts table.What it looks like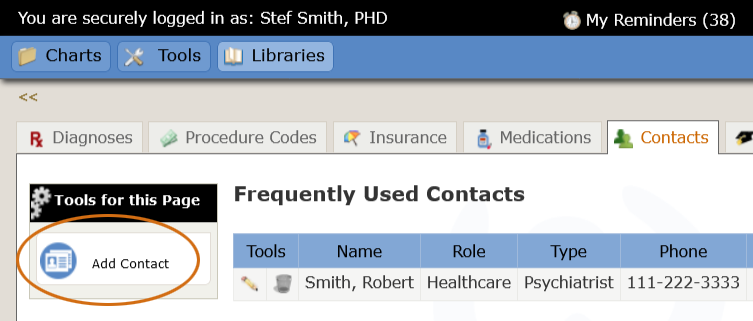 |
Where this isYou can get to this tool by clicking Libraries > Contacts in the global nav. The Add Contacts tool is on the left nav. |
If you click on the Add Contact tool, the form that opens looks like this:
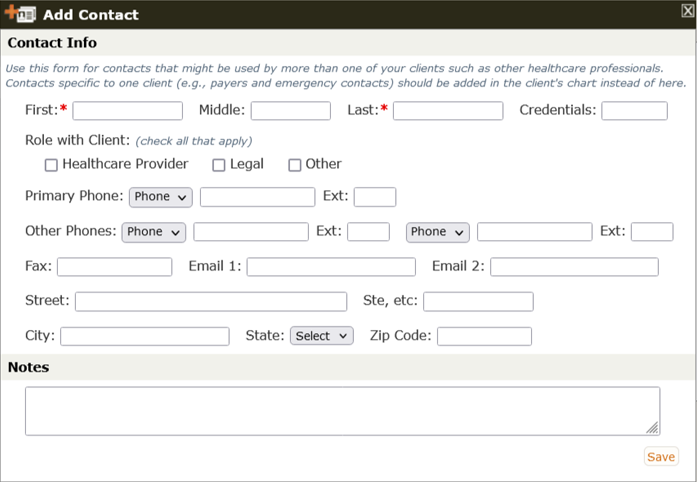
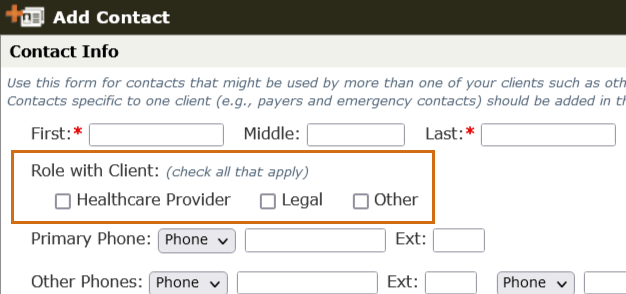
Notice that although you can fill in quite a bit of contact information on the individual, the only fields that are required are first and last name and Role. The reason that Role is required is because this field has implications for other areas of the app.
The choices in Role (at the Library level) are Healthcare, Legal and Other:
Depending on which one you select, some additional fields will open that allow you to fill in a Type for the Role:
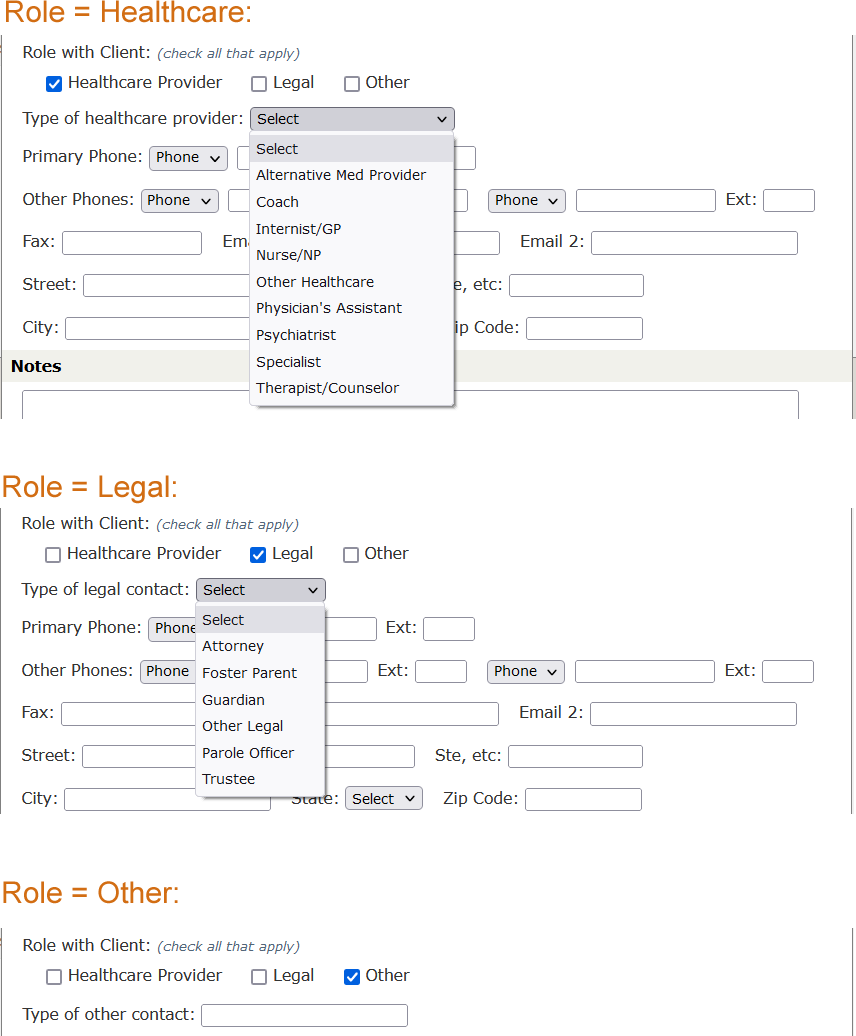
Any contact with a Role of Healthcare is automatically used to populate the Prescribing Physician select box in both the Add Client Medication and also the Add Script tools.
Therapists
What this isThis is a tab in the Libraries section of the app. Tools on this page allow you to manage your profile, add other users and subscribers and manage your settings and preferences.What it looks likeLibraries > Therapists 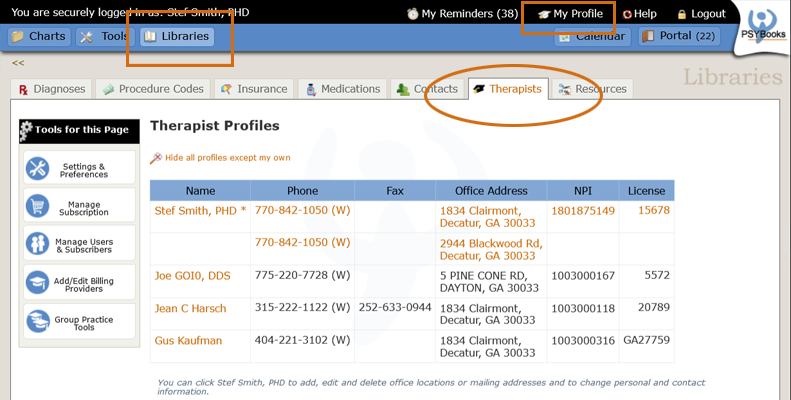 |
Where this isYou can get to this tool by clicking Libraries > Therapists in the global nav or by clicking "My Profile" in the black bar at the top of each page. Everything in the global nav is replicated in the sitemap located at the bottom of each page, so you can also find a link to the Therapists Library there. |
The Therapists section of PSYBooks (which can also be accessed through the "My Profile" link at the top) is your admin area for the behind-the-scenes tools to manage and run your practice. You can add other users (front office staff, billing personnel, etc.) and, if you have other therapists in your office, you can add them as PSYBooks subscribers so your accounts are all linked. If your practice has billing providers that are different from the therapists rendering services, there's a tool here to set that up. This is also where you come to change your password, update your billing method, add or delete account features and set certain preference. If the PSYBooks task you want to do involves the administrative end of your practice, the tools for accomplishing it will most likely be at Libraries > Therapists.
Tools on this page are "Settings & Preferences", "Manage Subscription", "Manage Users & Subscribers" and "Add/Edit Billing Providers".
Therapist Profiles
What this isThis is the table at Libraries > Therapists that holds your own profile as well as profiles of other therapists in your practice who are also PSYBooks subscribers.What it looks like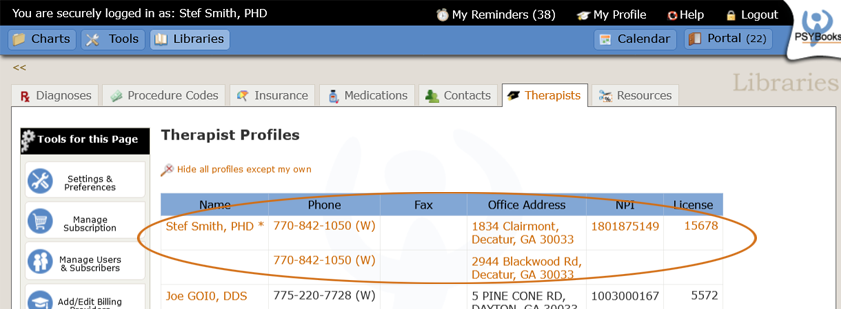 |
Where this isYou can get to this table by clicking Libraries > Therapists in the global nav or by clicking "My Profile" in the black bar at the top of each page. If the Libraries section is already open, you can also access this area just by clicking the Therapists tab. |
This table displays your own profile and, if you are a Group/Clinic or GOI subscriber, the profiles of the other therapists in your practice. The table displays the main info and you can view your complete profile by clicking your name. You can edit/update your own profile at any time but you cannot delete it. If you want to deactivate your PSYBooks account, that feature is in the Manage Subscription tool on this same page. You are not allowed to edit profiles of the other therapists in your practice. However, when any therapist makes changes in their profile, the updated version will automatically appear in all other accounts.
Edit Therapist Profile
What this isThis is a tool on the Therapist Profiles table that allows you to make changes to your profile.What it looks likeThe Edit Therapist Profile tool is just a link created with your name: 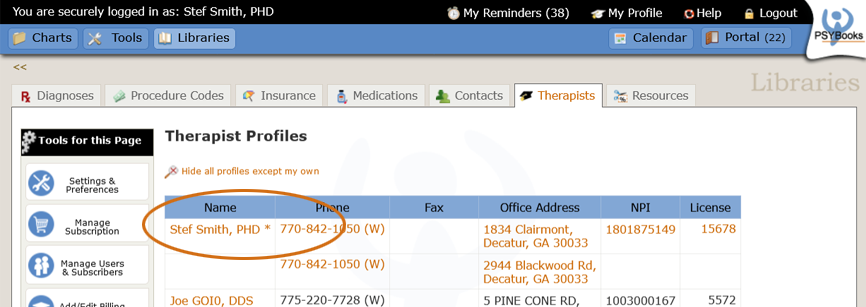 |
Where this isYou can get to this tool by clicking Libraries > Therapists in the global nav or by clicking "My Profile" in the black bar at the top of each page. |
When you click your name (i.e., the Edit Therapist Profile tool), the form that opens looks like this:
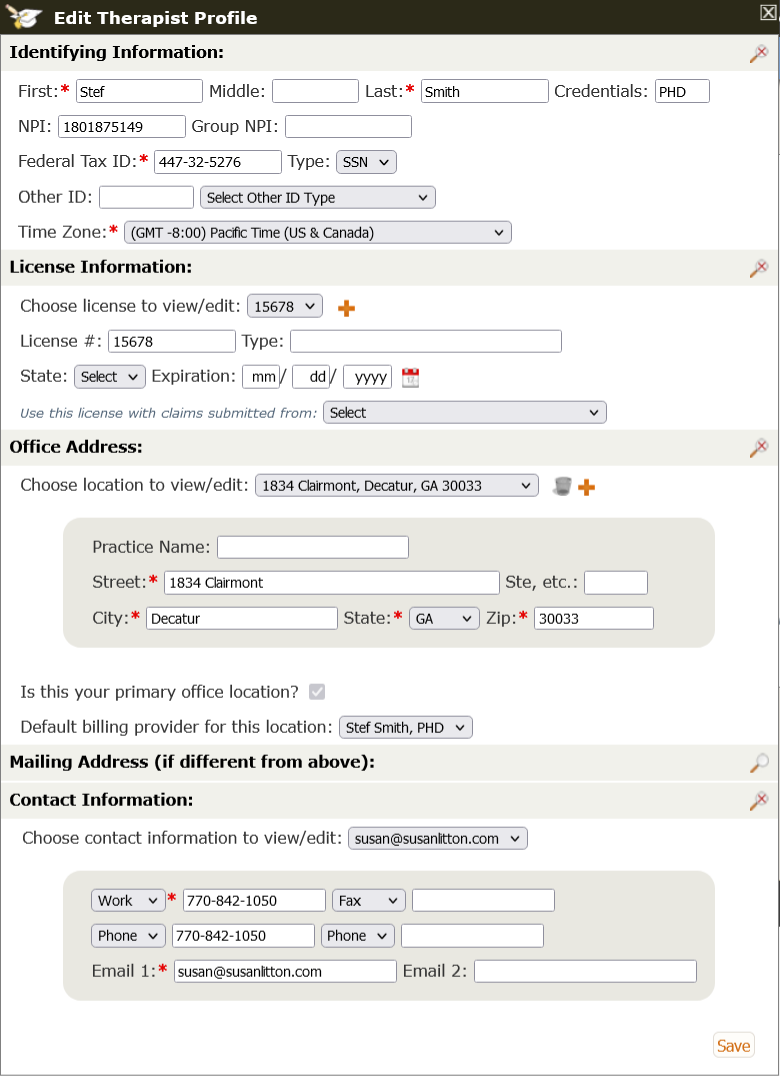
If you notice, there is no Add Profile tool. That's because most of the information in your profile is filled in when you subscribe to PSYBooks. As a result, you may rarely, if ever, need to change anything with the Edit Therapist Profile tool. However, a few items may need some explanation and will be discussed below:
Office Address and Mailing Address
Unless you've entered billing providers (discussed below), PSYBooks uses your Office Address for Box 32 of the CMS-1500 form (e.g., "Service Facility Location Information") and your Mailing Address for Box 33 ("Billing Provider Info"). It is assumed that your mailing address and your office address are the same unless you specifically change your Mailing Address. If you have not made changes to your Mailing Address, this section is closed when you visit the Edit Therapist Profile form. If you want to make changes, you can open it.
Delete Office Address
The Delete Office Address tool looks like this:
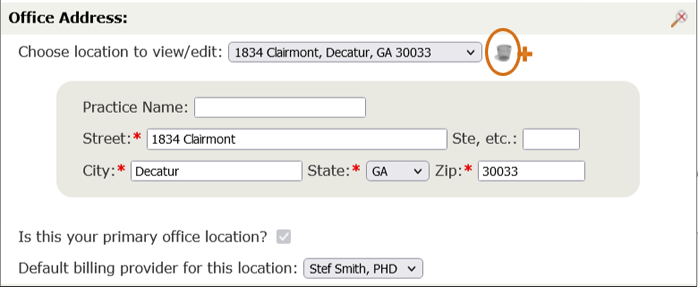
You cannot delete your primary (or only) office address. However, if you have more than one office address listed, you can remove non-primary addresses. If you've moved your office, add your new office address first, mark it as primary, and then you'll be able to delete your original address. Deleting an office address is permanent.
Add Office Address
The Add Office Address tool looks like this:
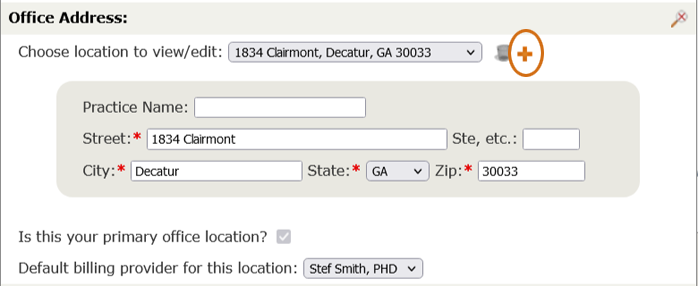
Clicking the Add Office Address tool opens a form that looks like this:

PSYBooks allows you to list as many different office locations as you like and to associate a mailing address and contact information with each. Notice that the form above has three sections: Office Address, Mailing Address and Contact Information. When you enter new values in the Office Address section, the Mailing Address is assumed to be the same as the new Office Address unless you fill in new Mailing Address values. The Contact Information section lets you choose between adding new contact info (the default setting) or choosing contact information from another office, by changing the value in the Choose Contact Information select box.
Contact Information
The Contact Information section of the Edit Therapist Profile tool is at the bottom:
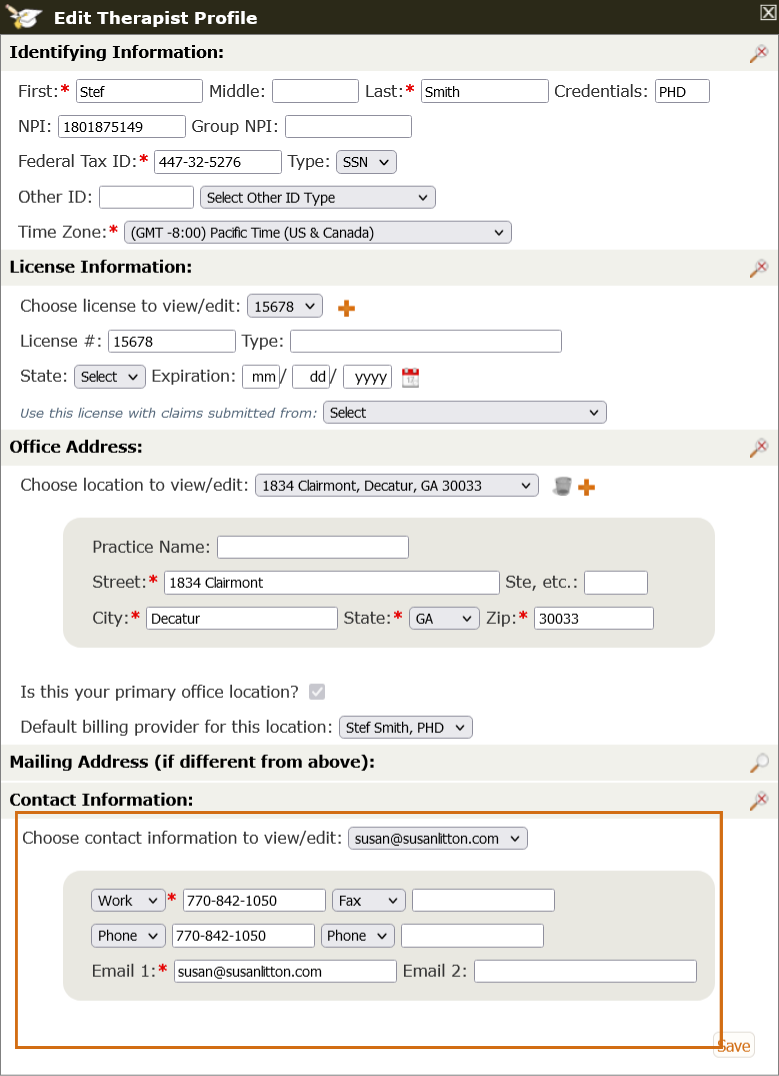
If you've entered contact info for more than one office, each will be listed in the "Choose contact information to view/edit" select box, allowing you to make changes in all contact information associated with your account.
Settings & Preferences
What this isThis is a tool on the left nav of Libraries > Therapists that allows you to change things such as login preferences, calendar settings, passwords, printer settings and time zone.What it looks like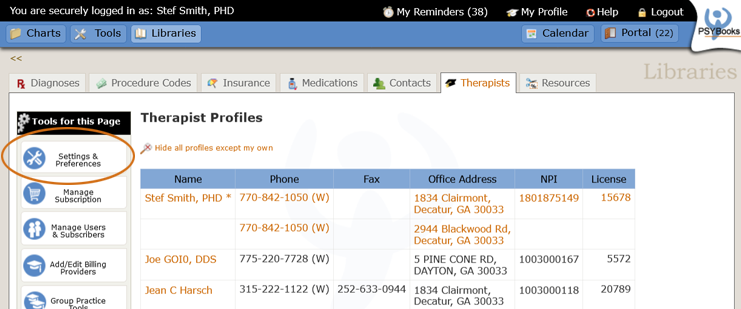 |
Where this isYou can get to this tool by clicking Libraries > Therapists in the global nav. The Settings & Preferences tool is on the left nav. |
When you click the Settings & Preferences tool, the form that opens looks like this:
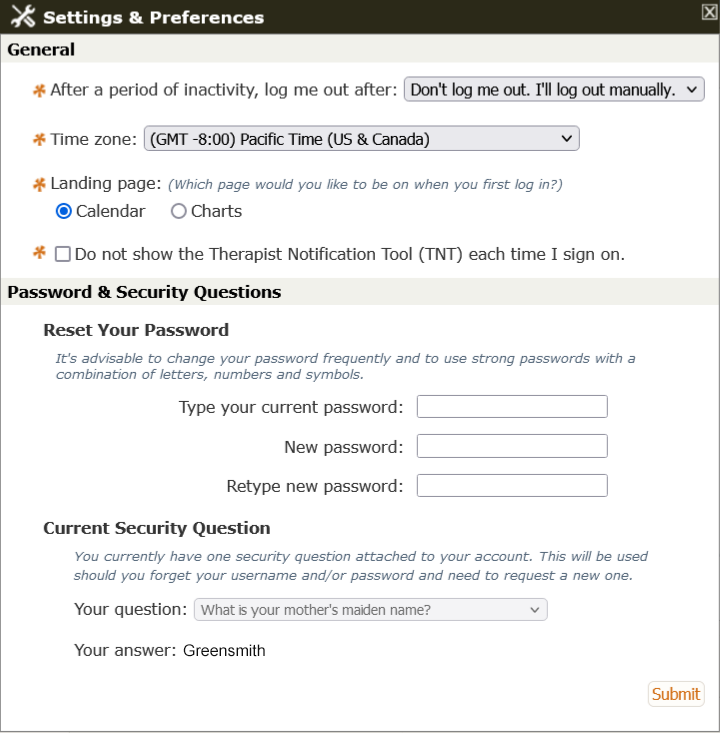
The Settings & Preferences tool allows you to tell PSYBooks how you'd like certain aspects of the program to be handled. Specific settings will be discussed below:
-
General
- Auto Logout

The Auto Logout feature allows you to choose when - or if - you will be automatically logged out. Some users prefer to log out manually, so would want the "Don't log me out" setting. Others might want the added security of knowing they will be automatically logged out if they should forget.
- Time Zone

When you first subscribe to PSYBooks, you're asked for your time zone. This information allows PSYBooks to use the correct time/date stamp on things such as appointments, video and other appointment reminders, claims, notes, etc. If you ever need to change your time zone while traveling, etc., you can do it here.
- Landing Page

The default landing page in PSYBooks is the Calendar. However, if you spend more time on Charts, you can change your default landing page here.
- Settings for the Therapist Notification Tool (TNT)
When you click the "Open link" by this setting, you're shown this:

The top item allow you to choose whether you want the TNT to be automatically delivered to you each time you open PSYBooks. Items under that pertain to the various "Unfinished Task" items the TNT tracks. This allows you to customize the TNT in a way to make it the most beneficial for how you use PSYBooks in your practice. For example, if you take paper notes instead of using the PSYBooks notes templates, it will not be helpful to you to be reminded when you haven't written and/or signed a note for a specific session.
- Auto Logout
-
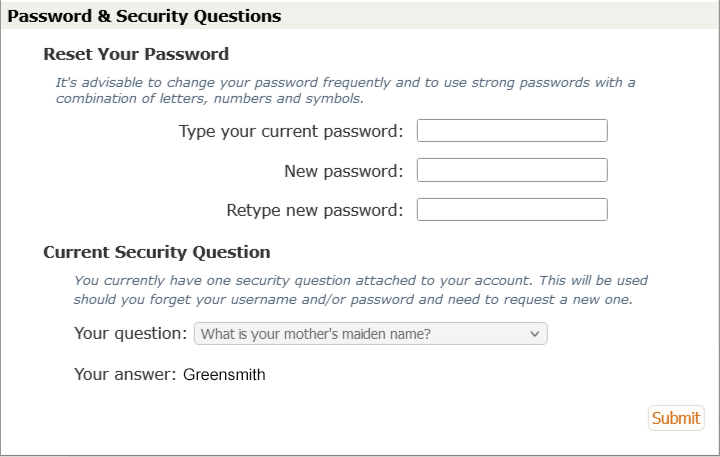
Password & Security Questions
The Password and Security Questions section allows you to change your existing password and also displays the security question and answer you chose when you first created your account and looks like this:
Manage Subscription
What this isThis is a tool on the left nav of Libraries > Therapists that allows you to manage your subscription to PSYBooks.What it looks like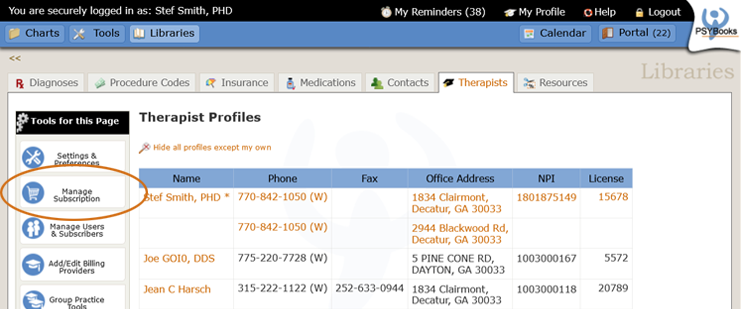 |
Where this isYou can get to this tool by clicking Libraries > Therapists in the global nav. The Manage Subscription tool is on the left nav. |
When you click the Manage Subscription tool, the form that opens looks like this:

The Manage Subscription tool is divided into two sections: Billing Info and Add Features. The Billing Info section allows you to see things like when your next payment is due, your past payment history, how much storage space you've used, etc. One thing of importance to note is the "Update your credit card info" link. Anytime you need to change your credit card information, e.g., if your card is about to expire, if you want to use a different card, etc., you do it with this link. Since PSYBooks doesn't store your credit card information, even if all you need to do is change the expiration date, you'll have to fill in everything on the form. The "Your name for your card" field can be helpful if you have more than one credit card and think you may forget which one you gave us.
The Add Features section is where you can add additional PSYBooks features. Although most new features on PSYBooks are free, when we release one that requires an extra charge, it will appear here. The subscriber in the screenshot does not currently have any additional features. If they did, the features they had would be listed in Your Features with a trash can icon which would allow them to remove the feature from their account.
The Manage Subscription tool is peppered with "More info" links. Clicking one of those will display a more in depth explanation of the item in question.
Manage Users & Subscribers
What this isThis is a tool on the left nav of Libraries > Therapists that allows you to manage any additional users and/or subscribers you want to add.What it looks like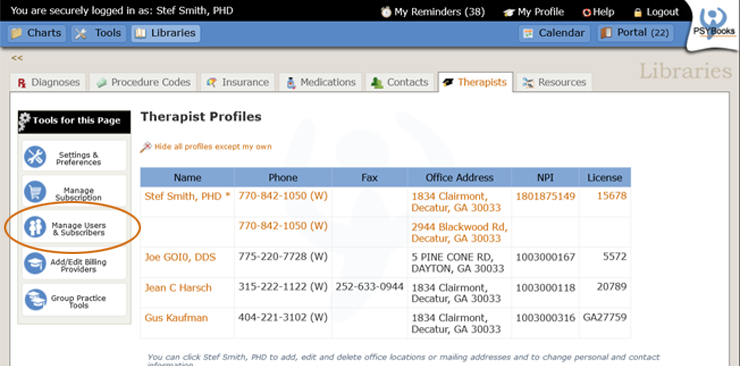 |
Where this isYou can get to this tool by clicking Libraries > Therapists in the global nav. The Manage Users & Subscribers tool is on the left nav. |
If you have an Individual account with PSYBooks and have not previously added any users or subscribers, clicking the Manage Users & Subscribers tool opens a form that looks like this:

There are only two tools on this page (aside from the Show/Hide toggles on the gold bars): "Add New Subscriber" and "Add New User". Before discussing these tools further, it's important to understand the distinction between subscribers and users.
Subscribers: A "subscriber" would be another therapist in your office - someone who shares your office address and who might want a PSYBooks subscription. Adding them allows each of you to receive the GOI discount (GOI = "Groups of Individuals"). Having other subscribers on your account also allows you to share certain features of the app. However, it's important to note that sharing is not automatic. All PHI is stored separately and other subscribers are not able to see your PHI unless you specifically give them permission.
Users: "Users", on the other hand, are people you might want to add to help you manage your practice. Users might or might not be therapists. For example, a user might be your front office, billing or scheduling personel (i.e., mostly likely not a therapist). But a user might also be someone who's going to cover for you while you're out of town or a supervisee (i.e., most likely therapists). You grant users the permission level you want them to have to ensure that they only have access to the PHI they need to perform their duties.
View/Edit User
If you've already added Users to your PSYBooks account, you'll be able to view them on your Manage Users & Subscribers tool. They'll appear in the middle portion of the tool in the "Other Users" section. The screenshot below has two Users on the account, Jason Jones and Robert Edwards. In the top section - Subscribers - you can also see that this particular account has a second subscriber, Jean C Harsch:

A closeup of the Users section looks like this - we'll discuss each numbered item below:

- Edit User:
 The pencil icon opens the Edit User form. Once the form is open, you can make changes to their account, including making them an Admin User (Individual and Master Clinical account types only), changing their name or email, adding them to the accounts of other therapists in your office, changing their permissions and the clients they're allowed to work with. You cannot change their username or password. They can change their own password, but you cannot. The username can't be changed.
 - Delete User:
 The trash can icon is to delete the User from your account. They will no longer be able to access your account once they've been removed.
 - Reset Password:
 Clicking the Reset Password tool will send an email to the User that allows them to change their password.
 - Email:
 The Email tool allows you to easily email the User from this form. Although there are other ways to email a User in PSYBooks, having it here may be helpful if you see something you need to tell them while viewing their User data.
 - Name: This is the User's first and last name, as entered on the Add User form.
- User Data: This row tells you whether or not the User has signed in to their account and, if so, what username they're using. This may be helpful information for you if, for example, they forget their username and ask you if you know it.
- Information on Other Subscribers: This user has been shared with the other subscriber in the office, Jean C. Harsch. This row shows us that Jean has accepted the User, which means this user, Robert Edwards, can work with both providers in the office. The first User on the account, Jason Jones, has not been shared with any other subscribers. Notice that there's also an Email tool by Jean's name, allowing you to email her from this form.
- Add New Subscriber Owners of Group/Clinic Practices check here for more info.
When you click Add New Subscriber, the form that opens looks like this:

PSYBooks uses the value you put in the "New subscriber's email" field to send the new subscriber their temporary username and password so they can log in. When you submit the form, the next window you see looks like this:

The "Add Another Subscriber?" button will allow you to generate GOI invites to each person in the practice in a matter of minutes. When you've sent the final invite, choose the "No thanks, I'm finished" button and you'll be ready for the next task.
The 'Normal' Way to Set Up Your Office
When the "Add New Subscriber" form is submitted, emails with the temporary username and password are sent to both the new subscriber and the Master Clinical subscriber. Additionally, the same information is displayed on the screen as can be seen in the screenshot above. This is done to give you maximum flexibility during the setup process.
In many cases, it works best to let the rest of this process happen naturally, i.e., allow each subscriber to create their own account when they receive the email. However, if you need to speed the process along for some reason (usually when one person is tasked with setting up the entire practice and wants to do it all at once), you can use the short cut method below:
The Short-Cut Sign Up Method
In larger practices that have both Subscribers (therapists) and Users (office staff) that all need to all be connected, it may make more sense for one person to set up the entire practice. There still may be reasons you decide to let each therapist accept their invite and sign themselves up, but if not, a person on your staff can create each therapist's account for them by copying and pasting their temporary un/pw from the Add New Subscriber feedback window in the login screen (https://secure.psybooks.com/login.php) and then completing the subscription process for each one. There are some drawbacks to doing it this way that can be avoided if you plan for them ahead of time:
- Since the admin will be setting up all accounts, subscribers won't be able to choose their own usernames. Once the permanent username on an account has been set, it cannot be changed. If this might be an issue for your office, you can avoid it by asking each subscriber what they want their username to be before you begin, or your office may decide to use a standard format for everyone in the practice (e.g., first and last name, all lowercase).
- If the admin uses the temporary usernames and passwords to create all accounts, when each therapist gets their system-generated emails, they will not be able to log in, because the temporary usernames and passwords will have already been used. The work-around for this is to instruct everyone in the office to ignore that initial email. Instead, the staff member who set up the accounts would be responsible for giving each subscriber the username and password they chose for them when they created their subscription. It's important that subscribers change the password they receive from the staff member, to comply with HIPAA tracking requirements and, also, to keep their accounts secure.
The Manage Users & Subscribers Tool Feedback
Once the Master Clinical subscriber sends an invite to a new subscriber, the new subscriber will appear in the Master Clinical's Manage Users & Subscribers tool. For example, in the screenshot below, the initial subscriber, Millie C. Smith, Ph.D., has sent an invite to her office partner, "Joe". Millie can see that Joe has not yet signed in, and she also has a set of tools by Joe's name where she can edit her invite (the pencil icon), email Joe (the envelope), or resend the invite (the envelope with the +). Millie can also add additional subscribers with the Add New Subscriber tool.

Notice that Joe has automatically been assigned the Clinical permission level, whereas Millie's permission level is listed as Master Clinical. The only difference between the two is that someone with Master Clinical permission rights can add new subscribers. Only one person on a GOI account can have the Master Clinical rights. All added subscribers are automatically given Clinical rights. However, the Master Clinical subscriber can transfer these rights at any time to another subscriber on the GOI account.
When Joe signs in, Millie's account will reflect that. Also, instead of the tool to resend the invite, Millie now has a tool to remove Joe as a user (the trash can):

Removing a GOI user does NOT deactivate their account although it can effect their GOI status. For example, in the scenario above, if Millie and Joe are the only two subscribers on the GOI account and Millie removes Joe, both accounts would be converted to Individual accounts.
Add New User Owners of Group/Clinic Practices check here for additional info.
-
Admin Status
The first thing to determine in adding a new User is whether you want this User to be marked as an "Admin." As you can see, this is the very first question you're asked at the top of the Add New User form:

Although you're free to use the Admin designation any way you want, there are some important features you should know about it:
- Admins are automatically connected to one another. This means that their names will appear in dropdown boxes allowing them to communicate with one another (and you) via email and interoffice memo. You would NOT want to mark someone as an Admin if you don't want them to have access to your other Admins.
- Similarly, you are also able to send interoffice memos to all Admins as a group. When you need to reach your entire staff, you can send to "all" and not have to select each one separately.
- If your PSYBooks account is the Group practice type, all of your Admins are listed in their own table and the Master Clinical account holder has tools they can use to manage their accounts.
However, to reiterate, Do NOT check the box to assign a user the Admin status if you do not want them to have access to your other Admin users.
Group Vs. Individual
The Add New User form is a bit different depending on whether it's being sent from an Individual account, a GOI account or a Group/Clinic account. The main distinction is that in GOI and Group/Clinic accounts, it may be helpful for the user to have access to more than one subscriber's accounts. For example, if one of a user's duties is to schedule appointments for the therapists in the practice, it might be helpful if the user could see all therapists' calendars in one place instead of having to log in and out of the various accounts. We'll discuss each account type below.
Individual Accounts
The screenshots below are examples of the Add New User form for Individual account holders.

When you select the Permission level, it opens another part of the form:

Submitting the form will send emails with a temporary username and password to both you and the new user (using the email address you provided in the form). In addition, information about the new user will appear immediately in your Manage Users & Subscribers tool. In the screenshot below, the subscriber has sent a User invite to Cho Burns, but Cho has not yet signed in:

GOI Accounts
The Add User tool for GOI accounts is just like an Individual account type, unless the Admin checkbox is checked. As discussed above, when that is done, that user automatically has access to all other Admins. Also, checking the Admin box from a GOI account opens a new section of the form which allows the user to choose which other therapists in the practice the Admin can work with:

The screenshot below is from a GOI subscriber, Henry Harsch, Ph.D., who's added two users: Jim Ellers and Sam Rho:

We can tell from the form that Jill has signed in and chosen a username whereas Joe has not. Because of this, the tools by each of these users are a bit different. Both Jill and Joe have Edit, Remove User and Email User tools (the pencil, trash can and envelope icons). Jill also has a Reset Password tool (the envelope with the blue asterisk). In contrast, Joe, since he hasn't yet signed in, does not have the Reset Password tool but DOES have the Resend Invite tool (the envelope with the orange +).
We can also see that when the original subscriber, Millie Smith, added user Jill Smith, she specified that her office partner, Gustav Smirnov, could add Jill as a user. However, Gustav has not yet accepted this user. In contrast, Millie did not add Gustav to Joe's invite. Had she done so, we would see Gustav's name below Joe's.
Permissions
An important aspect of adding a new User is assigning their permissions. There are 4 different permission levels that can be assigned to Users: Clinical, Clinical View, Associate and Associate View. Broadly speaking, the 2 Associate types (Associate and Associate View) cannot see any client notes nor any files the subscriber has uploaded that have Clinical permission levels. In other words, as the name suggests, Associate users do not have access to parts of the chart that are more clinical in nature. Also, "View" users cannot edit - they can view client charts and other areas of the app but not make changes.
As shown above, when the Add New User form first opens, it's faily simple and straightforward. There's a bit more to consider when you begin the process of setting the permission level. If you click the "Permission Level for this User" select box, you'll see this:

As explained above, use Clinical types to provide broadest access to your records. An example of when you might want a Clinical permission level would be if another therapist is covering for you and needs access to a client's complete record. On the other hand, Associate permission levels are usually fine for most tasks your office staff might need to do. Once you choose a permission level, a new part of the form opens that looks something like this:

The important parts of this form are the two links (which have been circled): General Permissions and Portal Permissions, and also the blue box. The blue box allows you to give this new User access to all, none or specific clients. Your general office staff would more than likely need access to all of your clients. An accountant might not need access to any clients - perhaps they would only need to access your reports. And, for example, if you have a supervisee or other employee seeing clients under your license, you might choose to enter them as a User on your account, add their clients to your PSYBooks subscription, and give them access to only the client(s) they actually see. If you click the bottom radio button for "The client(s) below:", a multi-select box listing all the clients you have entered in PSYBooks will appear, allowing you to assign just certain clients to the new User:

Going back now to the two links that appear above the blue box - General Permissions and Portal Permissions - these are optional links you may want to check if you want to fine-tune the default permissions assigned to your permission level by PSYBooks. Taking the links one at a time, if you open the General Permissions link, the form opens to reveal a list that looks like this:

Notice that the items on this list above are some of the things a user with this permission level (in this case, Associate) are normally allowed to do in PSYBooks. However, if you do NOT want your User to be able to do one or more of these items, you can check them off of the General Permissions list above to exclude them. An exception to this rule is the last item on the list: "View/Work Reminders & Memos in the Therapist Notification Tool." That one is checked by default since it was felt that most Subscribers would NOT want their Admin uses to work in the Reminders & Memos section of their TNT since it contains the therapist's personal correspondence with others in the office. However, those Subscribers who DO want their Admins to handle all correspondence for them can uncheck the box, which will allow that Admin to have access to that part of their TNT. Notice that ONLY Users that have Admin status (i.e., the Admin checkbox has been checked) will ever see ANY part of your TNT, so this permission only applies to Admin users.
Similarly, if you open the Portal Permissions link, you'll see a list of items pertaining to portal permissions:

The top section allows you to grant permission for access to entire features (tabs) in a User's Portal (i.e., Email, Portal Users, Video); whereas the bottom level, once again allows you to alter certain common tasks for this particular User.
Add/Edit Billing Providers
What this isThis is a tool on the left nav of Libraries > Therapists that allows you to add billing providers to your account.What it looks likeThe Add/Edit Billing Providers tool looks like this:  |
Where this isYou can get to this tool by clicking Libraries > Therapists in the global nav or by clicking "My Profile" in the black bar at the top of each page. The Add/Edit Billing Providers tool is on the left nav. |
When you first open the Add/Edit Billing Providers tool, before any billing providers have been added, it looks like this:

Notice that the default setting assumes that the subscriber (in this case, Millie C. Smith, Ph.D.) is both the billing provider and the rendering provider. Therefore, Millie Smith is listed in the Current Billing Provider(s) table. If Millie files any insurance claims, her information will be used in both Box 32 (Service Facility Location) and Box 33 (Billing Provider Info) on the CMS form. In many private practice situations, this is the desired result, in which case nothing needs to be done with this tool. However, if your practice requires separate billing providers and rendering providers, you can click the "Add new billing provider" link to open the rest of the form:
When adding a billing provider, it's important to use the same information that insurance companies have on file for that individual or entity. In some cases, this may mean that you need to add more than one billing provider in PSYBooks, even though it's only for a single individual/entity. For example, if billing provider John Smith, MD has given Insurance A his individual NPI and Insurance B his group NPI, John Smith, MD will need to be added as two separate billing providers - one with John's individual NPI to use with Insurance A, and another with his group NPI for insurance B. Similarly, if John has signed up with some insurance companies under the name of his practice - Creekside Counseling, LLC - Creekside Counseling would have to be added as yet a third billing provider.
Details of the form are discussed below:
Billing Provider's Name
Notice that you can enter a practice or group name and/or the name of an individual. You have to fill in at least one. If you choose to add both, you'll be asked which name you want to use on the CMS form:

Billing Provider's NPI
Similarly, you can add an individual and/or a group NPI. Again, only one is needed, but if you add both, you'll be asked which one you want on the CMS form:

Billing Provider's Address and Tax ID
These sections are fairly self-explanatory. However, again, it's important to make sure you enter the information the same way the insurance companies have it on file.
License Information
License information isn't required on the CMS form. However, if you want it to appear on client statements, you can fill in this section:

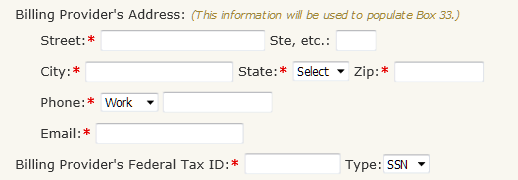
Service Facility Location(s)
All offices that the subscriber has entered on their profile will appear on the Add/Edit Billing Provider form. Use this part of the form to indicate which of the locations this billing provider may serve. For this question, it doesn't matter how often a billing provider's information might be used at a location - only if it might ever be used there. For example, the screenshot below has three offices. Maybe the billing provider typically provides services for the first two offices but only occasionally fills in for the third office. In that situation, all three offices should be selected. In multi-office situations such as this one, default billing providers can be set for each office individually in the Office Address section of the Edit Therapist Profile tool.
Your name for this billing provider
This information will seldom be needed. However, in the example above where we needed to add two different billing providers named John Smith, MD, it might be helpful to give them different names so you can tell them apart, e.g., "John Smith, Medicare" and "John Smith, other".

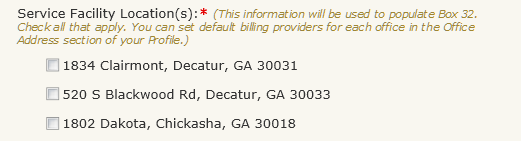
Once you complete the form above and save it, you'll get a confirmation window that instructs you to choose a default billing provider:
This is an important step because, as you can see from the Current Billing Provider(s) table at the top, the default billing provider stays on the subscriber until it's specifically changed. Although you can change billing providers on individual sessions - or for individual insurance companies, choosing a default billing provider here will save you time on the tasks you do most often.
Group/Clinic Tools
What this isThis is a tool for Group/Clinic Practices that allows the Master Clinical account holder to assign permissions and do other tasks associated with running a group practiceWhat it looks likeGroup/Clinic Tools looks like this: 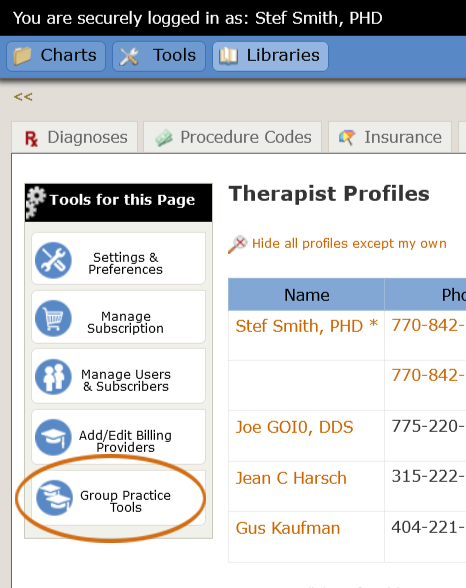 |
Where this isYou can get to this tool by clicking Libraries > Therapists in the global nav or by clicking "My Profile" in the black bar at the top of each page. Group/Clinic Tools is on the left nav. |
Group/Clinic Tools only appear on Group/Clinic accounts. Individual PSYBooks accounts or Group of Individuals (GOI) accounts do not have access to this tool. Additionally, only the Master Clinical account holder in a Group/Clinic account has access to this tool. Therefore, the discussion below primarily pertains to Master Clinical account holders.
When opened, the Group/Clinic Tools looks something like this:
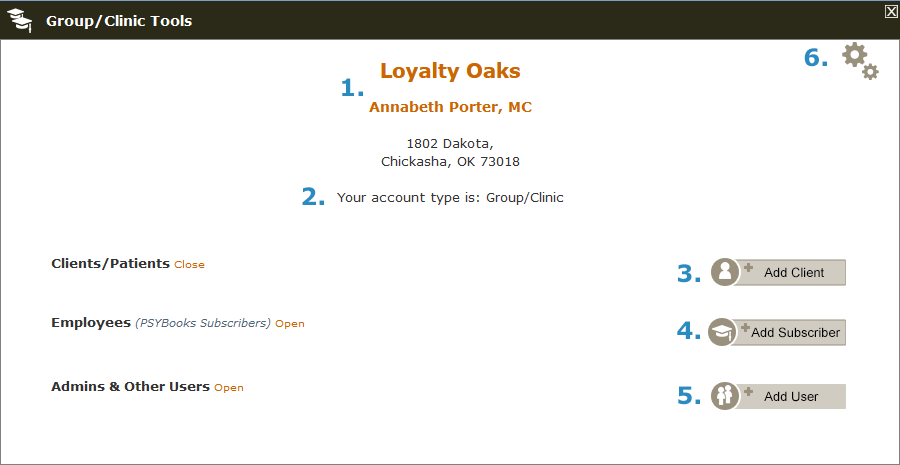
There are three tools in the top section: Edit Practice Info (#1), Account Type (#2) and Group Settings (#6). Beneath those, the body of the tool consists of three large areas, #3, #4 and #5, which are all closed in the screenshot. These areas, Clients/Patients, Employees and Admins are where almost all of your work will transpire. They are closed in the screenshot to make it easier to see the overall layout. However, the Clients/Patients area is typically open by default since that's where most of your daily work will occur.
Each numbered item on the image will be discussed separately below:
Edit Practice Info
Notice that both the practice name - Loyalty Oaks - and the therapist's name - Annabeth Porter, MC - are orange. That means they are links. If you click either of them, the Edit Therapist Profile tool opens, allowing you to edit your practice settings and also your personal therapist information. Changes made in the Edit Therapist Profile tool will automatically carry over to the Group Practice Tools. Even though the practice address isn't a link, if you need to change it, you can access the Edit Therapist Profile tool from either the practice name or the therapist name links, make the address changes you need, and your edits will be reflected on the Group Practice Tools window. We'll track this practice as they continue to use the PSYBooks app.
Account Type
This just indicates the type of PSYBooks Account you have. Most of the time, practices will remain either Group/Clinical or GOI for the lifetime of the practice. However, to handle situations where an MC may have accidentally signed up for the wrong type or times when the business model of the practice may change, the MC is allowed to switch the account type. The tool for doing that is in the Manage Subscription tool which is on the left nav of the Profile page. It looks like this:

Clients/Patients
The Clients/Patients area is by far the largest and most involved of all areas in the tool. In new Group/GOI accounts (such as the Loyalty Oaks practice we're tracking), clicking the Group/Clinic Tools button will open a window that shows the default settings, i.e., with the Client/Patients area open and the other two main areas closed:
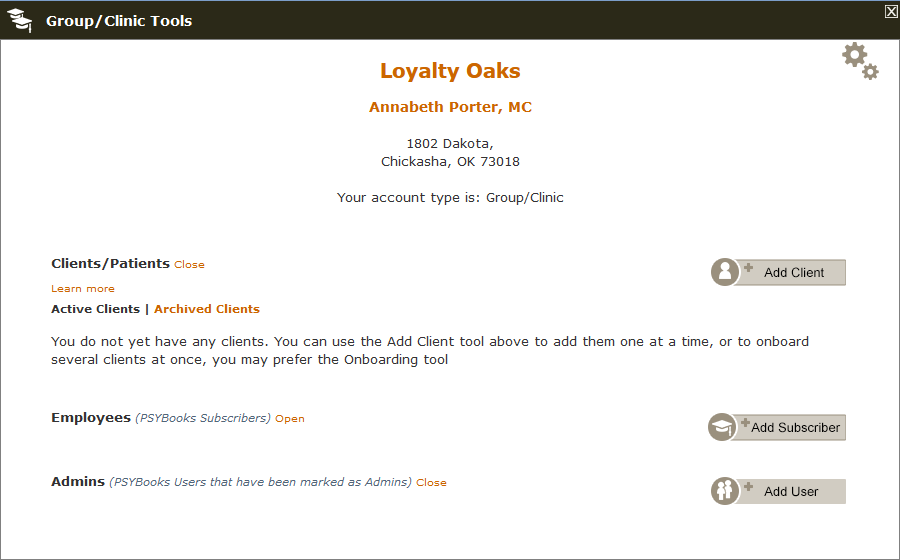
Adding Clients to the Practice
You can see that although the Clients section is open, Annabeth has not yet added any clients. The MC, as well as each employee and/or Admin, can add clients to PSYBooks. For now, whomever adds (or has added) the client is automatically assigned the role of "Therapist" for that client. Currently, this means that each employee (or Admin working in that employee's account) can use any of the standard tools for adding clients to PSYBooks, i.e., the Onboarding Tool, the Add Client Tool, or the Add Client from Appointment Tool. The MC may also use any of those tools or, they may also use the new Add Client tool in their Group/Clinic Tools.
However, regardless of how or by whom a client is added, each client in a Group/Clinic Practice is also assigned to the MC. This will allow the MC to assign other therapists to them (coming in a future release) and perform other tracking kinds of functions on both clients and employees in the practice (discussed below).
Annabeth Porter, the owner and MC of the Loyal Oaks practice we're following, has added two new subscriber employees to her practice: Nancy Ackworth and Buster Kinder. Each of the three members of this practice has added a single client. Annabeth's Active Clients table in her Group/Clinic Tools page now looks like this:

By looking at the Name column of the Active Clients table, we can see that the three clients the practice now has are named Bess Bruno, Kim Lester and David Smith. The Staff Assignment(s) and Role columns (circled), show us that employee Buster Kinder is Bess Bruno's Therapist and Nancy Ackworth is Kim Lester's Therapist. The final client, David Smith, is only assigned to the MC, Annabeth Porter. In the current release, there's no way to tell if Annabeth is also functioning as David's therapist or whether David is currently an unassigned client. For now, Annabeth has all the tools to allow her to function as David's therapist, including David's name showing up on the Charts page of her app. Future releases will allow Annabeth to assign David to herself or to anyone else in the practice.
Future releases will also add a "Group Practice Assignments" section to the Add Client tool in the Group/Clinic Tools, which will allow both the MC and also Admins to assign clients to employees in the practice as they are added and to give that employee a specific Role (Therapist, Supervisor, Intern, etc.):

Client Tools
There are several tools for working with clients in your practice that appear on the left side of the table:

- Active/Archived Toggle. As you'd expect, this set of links at the top allows you to toggle between your Active and Archived tables.
- Open/Close Rows Toggle. The small arrow pointing up or down appears when a client has more than one staff assignment. Right now, a client can only have two employees assigned to them - the MC and one therapist. However, future releases will allow you to assign multiple staff members with multiple Roles. You can use the arrows to toggle down to a single row per client or keep them open to see all assignments. The default state for this table is to have all rows closed, with the person assigned as the Therapist showing on the top row. This saves room on the page and allows you to toggle open any specific client you need to examine.
- Expanding Toolkit. Clicking the gold tape measure causes a toolkit to fly out which holds tools for working with the client in that row. Currently, there are three tools, but several others are in the planning stage, including a tool to allow the MC to open any client's chart, a tool to allow the MC to make additional staff assignments to each client, a tool to show the client's history with the practice (when they were first seen plus all staff assignments they've had since that time, etc.) These are the client tools the MC currently has:
- Reset Username/Password. This tool allows the MC to send username/password resets for any client in the practice. Notice that PSYBooks now allows both usernames and passwords to be reset and the MC has the ability to send those for any client. (Each employee can also send username/password resets, but only to their own clients.)
- Client History Tool. Clicking this tool allows you to see the history of any client in your practice. You'll be able to see when they were added to your practice, when various staff members were assigned or their Role with the client changed, if a client is archived and later returns, etc.
- Archive. This moves a client to an archived status. Once in the Archived Clients table, there's a corresponding Activate tool for clients who return to your practice. This enables you to always keep a complete file on each individual's time at your practice, even those who come and go. The Client History tool, discussed above, will also track when a client is archived and/or activated.
- Remove. The Remove tool totally deletes a client from your account and will likely only be needed in case of erroneous entries. Note that a record of every deleted client will always be kept in the Activity Log.
- Name Sort. The arrows next to the word "Name" in the blue table header allow you to sort your view.
- Additional View Tools. There are additional tools at the bottom designed to let you navigate large lists of clients more easily. If you change the default number of clients per page, we remember the number you chose so the view you prefer will always be the one you get, unless you change it.
Tracking Encounters & Notes
You may have noticed a rather large empty area on the right half of Annabeth's Clients table above. This entire section of the table is to allow the MC to track encounters on all client/employee pairs in the practice. The section in the orange box is the area we'll be discussing:

There are two main categories shown in the top table headers: Encounters and Notes. Under Encounters are subcategories of Date, Session and Payment; under Notes are Written and Signed. Finally, there's a column at the end called "Run Report". All of these columns, i.e., everything in the orange box, work together. We'll examine in more detail below.
- Encounters. An Encounter is an appointment. The 5 subcategory columns give you status information about what's going on with the appointment. Is it in the future or has it passed? If it's passed, has the Session been entered? The client payment? Has the note been written? Signed? That's the kind of information this part of the table gives you. Here's more detail:
- Date. Notice that even though Annabeth has three clients listed in her table, the Encounters > Date column cells all just say "N/A (no appts)":

As soon as any of the 3 therapists in Annabeth's practice add an appointment to their PSYBooks calendar, that will change. In this screenshot, we can see that Kim Lester, a client of Nancy Ackworth, now has an appointment on 5/12/2024:

The Date column actually has three possible states: N/A (no appts), a text appointment date (for a single appointment) and a date that's a link (for multiple appointments). If you click a link date, you'll be able to see all the dates this particular client/therapist pair has had:

- Session. By default, each employee is given a grace period of 24 hours to enter the session and the client payment before the MC is notified. (Each employee is notified on their TNT immediately if those tasks have not yet been completed.) The grace period is to allow them to have a day to complete those tasks before the MC is notified (the MC can shorten or extend the default settings in the Group Settings. After the grace period, both the Session and also the Payment columns will have status indicators to show whether or not those tasks have been begun, finished, or are somewhere in between. There are three possible states a session can have, which are explained in the legend below. Notice that for a session to be classified as completed, it must have been efiled and/or a print statement or CMS claim must have been generated:

Using the Nancy Ackworth/Kim Lester example above, Nancy would receive a reminder on her TNT immediately after the appointment that she needs to add the session for that appointment. After the MC's grace period for the session on 5/12/24 has passes (i.e., either the default 24 hours or a custom setting the MC has added), if Nancy has not yet entered this session, the Session column on Kim Lester's row would be marked as XSes. At any time during or after the grace period that Nancy enters the session, that column will change to either !Ses or ✓Ses depending on whether Nancy put the session in Process Claims & Statements or whether she completed it.
- Payment. Client payments have the same grace period as sessions. Therefore, if Nancy Ackworth has not completed either with the grace period, the MC's Active Clients table would reflect that. Although it's possible to add an unallocated client payment before a session has been processed, the payment can't be tracked here until it has been allocated to a session. So if the Session is in the XSes mode, the Payment will also be marked as not entered:

Notice that now, both the Session column and the Payment columns are marked as not having been done. Also, there is a tool in the Run Report column of that row. (Run Report is discussed below.) Payment States use a similar legend as Session States:

- Date. Notice that even though Annabeth has three clients listed in her table, the Encounters > Date column cells all just say "N/A (no appts)":
- Notes. Once a session has been marked as finished, the tracking function begins returning statuses on notes. With notes, we are trying to answer two questions: Have they been written, and have they been signed? The PSYBooks notes that are tracked by default are: Session Notes, Intake Notes, Treatment Plans, Progress Notes and Mental Status Exams. As with the Session Encounter tracking The MC can change the default settings in the Group Settings. Notes states are similar for both Written and the Signed:

- Written. Going back to our Nancy Ackworth/Kim Lester example, if Nancy finishes the Session requirement but has yet to write the note, Annabeth's Groups tool will look like this:
- Signed. The following example shows the MC that although Nancy has now written the note for this session, she has not yet signed it:


In the example above, Nancy also completed the client payment task. However, that's not required to advance to Notes tracking since client payments aren't always required or gathered in the same way. The table above would show the MC that Nancy has not written this note, since it's listed as XWritten. However, once Nancy enters one of the required notes, the encounters tracker will advance to the Signed condition.
- Run Report. The Run Report tool can be used on any row where it becomes available. It allows the MC to generate a wide variety of report results depending on the filters they set. If Annabeth clicks the Run Report tool on Kim Lester's 05/12/2024 row, she will see this:

She decides she wants to know if there are other notes that her employee, Nancy Ackworth, has failed to sign in a timely fashion, so she chooses only the XSigned filters and for dates, she chose "All". Here are the filters she chose for her report with the results underneath:

Not surprisingly, even though the MC chose to see "All" instances of times when Nancy Ackworth, has unsigned notes in Kim Lester's account, there is only one record in the results table. This is because Nancy has only had a single encounter with this client. However, we do get a bit more information in that we can see that the note type Nancy entered for this session was a Progress Note and that all other trackable activities have been completed:

In established practices, Status Reports would likely generate longer lists, such as this:

The Run Report Tool as a Status Indicator
There are actually two states of the Run Report Tool - the one you are likely to see most often is the regular Run Report tool. It signals you that at least one previous encounter for this client/therapist pair has tasks that are unfinished. However, when all tasks ARE finished, a tick appears before the tool, indicating that this therapist's records for this partcular client are completely updated:

The completed Run Report status can show up on an individual date as you scroll through the dates in the Date select box, or, if there are no future encounters listed and all past encounters have been completed, it can show up on the whole row. Here are two examples to illustrate. In the first one, the regular Run Report tool appears in the row, because there's an upcoming appointment:
In the next one, there ARE no upcoming appointments and all previous encounters have been completed, so the finished tick on the Run Report tool shows up on the top row:

However, in this row, although the top row has the regular Run Report tool, indicating that there are tasks to be done (in the case, the encounter date of 8/28/2024 has not passed), by checking the row underneath it, we can see that that row HAS been completed:

Using the Run Report tool on dates that include both of those enounters gives us a fuller picture:

In summary, the Run Report tool, which produces the Status Report, is a great way for an MC to keep track of what's going on in their practice, to ensure that all important paperwork gets done in a timely fashion.
When the MC does use the Run Report tool, they can either just look at it for their own information, or they can email it to the employee and/or themselves.
Employees
Now we'll backtrack a bit to see how Annabeth added the other subscribers. To do so, she again used her Group/Clinic Tools and this time, she clicked the Add Subscriber tool:

Clicking Add Subscriber opens this form, which allows Annabeth to add the employee and specify which features she wants them to have in one step:

When the new subscriber signs up, they will automatically be assigned to the Loyalty Oaks account and they will have all the tools Annabeth needs them to have. Notice that this allows the MC to assign features to some employee accounts and not others. This streamlines the set-up process and, should your needs change, features can be added or removed at any time.
Once the Add Subscriber form is sent, the new employee is added to the MC's Employees table, which can be viewed by clicking "Open". Notice that the new subscriber, Ravi Das, is placed in a pending table at the top since they haven't yet created their account. The other 2 subscribers, Nancy Ackworth and Buster Kinder are in the Active Subscribers table:

Tools for pending subscribers are Remind, Edit, Remove and Email. Tools for active subscribers are Permissions, Remove and Email.
Admins
The last set of tables and tools on the Group/Clinic Tool is for Admins, which are PSYBooks Users with Admin status. They are the members of your staff who do not see clients, but rather, have administrative duties for the practice as a whole. The Admins table is composed of users you've indicated as Admins on the Add/Edit User form by checking the "This user is an admin" checkbox. Admins automatically have access to each subscriber listed in your Employees table. They also automatically have access to one another via the Interoffice Memo tool, allowing them to easily leave notes for one another and you. Similarly, you are also able to send interoffice memos to all Admins as a group. When you need to reach your entire staff, you can send to "all" and not have to select each one separately.
Your non-Admin users can be found in the Manage Users & Subscribers Tool. Editing a user and removing their Admin status will cause them to be removed from this table and placed in the Manage Users & Subscribers Tool and vice versa.
When opened, Annabeth's Admins section looks like this, because she has not yet added any administrative personnel:

To add a User, she clicks the Add User tool:

The Admin status checkbox is checked by default. Notice that ONLY users marked with Admin status will appear in the Admins table in the Group/Clinic Tools. To learn more about when you might or might not want to use Admin status, click here. Permission Levels are explained on the form and allow for precise customization.
Once a new Admin User has been added, Annabeth's Admins table looks like this:

Tools on the Admin table are: Edit, Email, Reset Password (or Remind to Subscribe, which is the tool shown above) and Remove.
Group Settings
The tool to open Group Settings is on the top right:

The Group Settings tool will be part of what sets PSYBooks apart from most other EHRs in that this area will allow the MC to fine tune exactly what they expect and need from the program, their employees and other staff members. This is an area we are actively working on. The sections you see in this screenshot have all been planned but some have not yet been implemented. Here's the list we are working on:

We've planned three large areas: Financial Info, Global Settings for the Practice, and Reports. Each of those will have subsections. It's important to note that these tools are ONLY available for Group/Clinic account types. They cannot be used with GOI accounts. Also, even in Group subscription types, these tools are only available in the Master Clinical subscriber's account. No other subscriber in the Group account will have them.
Here's the current list of tools at least partially available as of Aug, 27, 2024:

Financial Info
When you open the Financial Info section of Group Settings, the window slides open to look something like this:
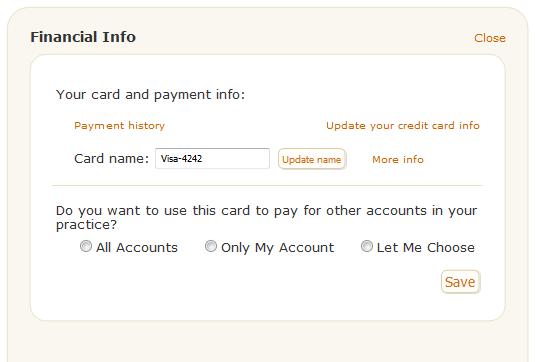
The top part allows you to update your credit card, view past payment history and rename your card.
The next section asks questions that will allow you to combine payments of other subscribers in your account into one payment to PSYBooks. You have maximum flexibility. For example, the first question asks if you want to use the credit card listed above to pay for all subscribers in your account, some subscribers, or only yours. This may be helpful for group practices who have a mixture of employees and independent practitioners. The independent practitioners can be included in your PSYBooks group and yet be billed separately.
If you choose "All", indicating that you'd like to put all accounts on one credit card, you're presented with a second question, asking if you want to synchronize the payments or have them billed at different times:
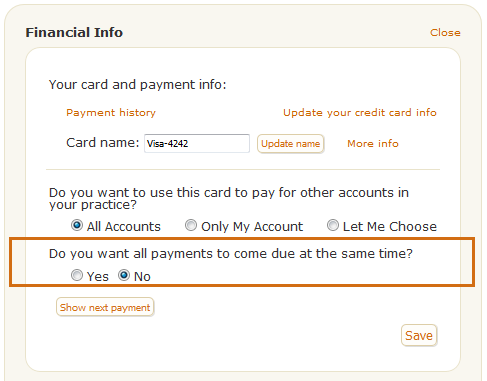
Similarly, if you select, "Let Me Choose," you get the question above, and you're also presented with a list of subscribers in your office so you can select which accounts you want to include in your payment:
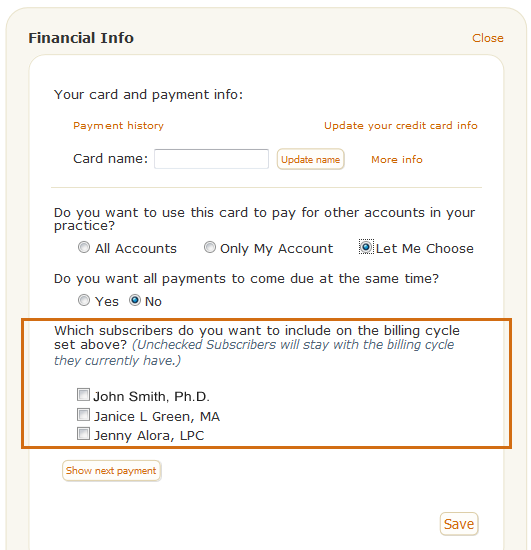
In the example above, John Smith, Ph.D. is listed first because he's the Master Clinical account holder. There are two other subscribers in the practice, Janice Green and Jenny Alora. However, Jenny Alora has not given John permission to access her account (which John can see in his Employee's Table on this same tool). However, John CAN still synchronize her payment if it's on his credit card. He does not have to access her account to pay for it. John, as the Master Clinical account holder, can choose which accounts he wants to pay with the credit card he's using for the practice.
If you answer "Yes" to the question that asks if you want the payments to come due at the same time, your window will change to something like this where you're allowed to choose a date that you want us to begin syncing the payments:
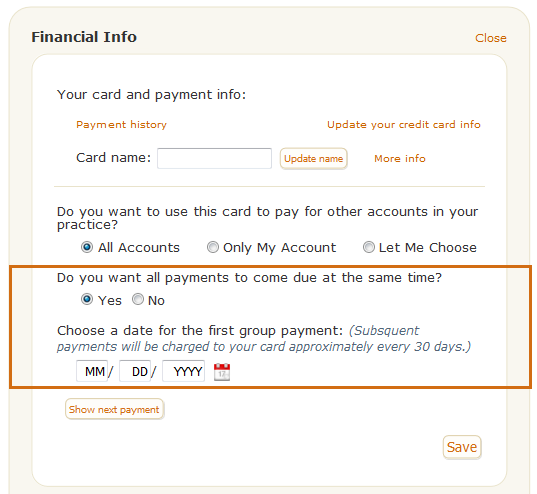
Calculations are done behind the scenes that pro-rate each subscriber's account, including taking into account any extra features each subscriber has, whether they are in their free trial period, and in some cases, whether the subscriber has been billed a Non-Par fee from Office Ally. The first synced payment will likely be different from all the others while we adjust each account for the start date you've chosen. After that, assuming nothing changes in your account, your monthly bill should be the same each month. If you're wanting to check on your next payment, you can click the "Show next payment" button at any time and get an indication of what the amount will be, should nothing in your account change between the time you checked and the next payment date:
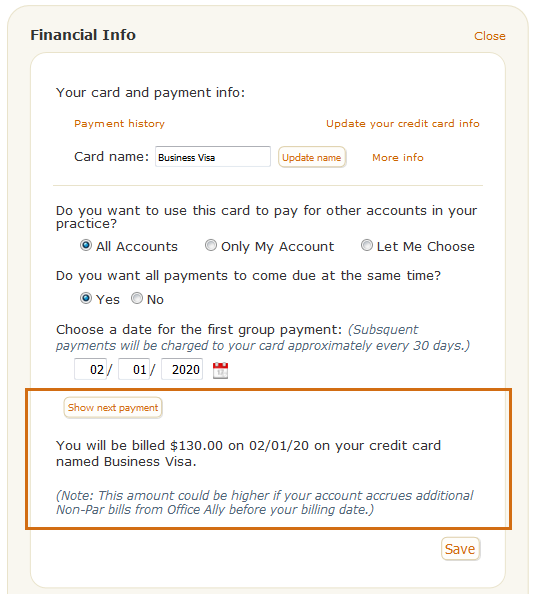
Groups changes to the Payments Received Report are also available now. That report can currently be accessed from Tools > Reports > Payments Received.
- When Encounters (Sessions) Are Not Entered
- When Notes Are Not Written
- When Notes Are Not Signed
Global Settings for the Practice
The Global Settings for the Practice section holds many of the remaining places where the MC and changes settings and also check statistics. Currently, there are two that are complete or partially complete:
Encounters & Notes
The Encounters & Notes section consists of two sections: Individual Notifications and Shared Notifications. Currently, only Individual Notifications are available, however, those settings have some important features. When you open Individual Notifications, it looks like this:

There are three Individual Notifications for you to use:
The purpose of this particular group of settings is to allow the MC keep track of all of their employees' "timely tasks" to help ensure that important things aren't being missed. This is discussed thoroughly above in the Tracking Encounters & Notes section. In short, it tells you when the items outlined in orange in the screenshot below will be added:

Each of these items is being tracked for you automatically and has default settings. If you are happy with the default settings, you do not need to make any changes here. If you would like to give your employees more or less time to finish these tasks before you're notified, the items in this section allow you to do that.
Roles & Permissions
Permissions for your clinical staff are set using Roles. The current release has Roles for Therapists. Subscribers who are assigned the Therapist Role currently have full permissions with all of their clients. Future releases will also allow MCs to provide different permissions for each Role and to assign role-based permissions for the entire practice. This will allow, for example, Supervisors to be assigned to Therapists and enable Supervisors to sign off on notes of those they supervise.
Resources
What this isResources is a page of free or discounted items that PSYBooks provides to its subscribers for no extra charge.What it looks likeYou can access the Resources page in the Libraries dropdown: 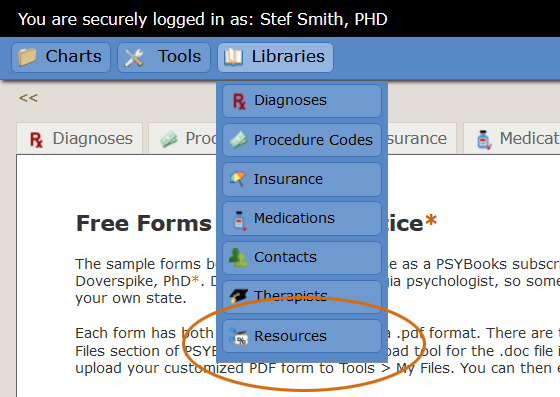 |
Where this isYou can get to this tool by clicking Libraries > Resources in the global nav or through the sitemap links at the bottom of each page in the app. |
Currently, the Resources page has two sections: Free Forms for Your Practice and PSYBooks Affiliates. The Free Forms section divides into two sub-sections: HIPAA Resources and General Office Forms. The Forms area contains form templates you can download, customize, and then use in your practice. Affiliates, on the other hand, are other companies with whom PSYBooks has an ongoing relationship to allow you to receive discounts for their products.
Free Forms for Your Practice
What this isThis is a section of free forms you can download and customize to use in your practiceWhat it looks likeYou find it by clicking the Resources tab on the Libaries dropdown: |
Where this isYou can get to this tool by clicking Libraries > Resources in the global nav or through the sitemap links at the bottom of each page in the app. |
The Free Forms page looks like this - except longer:
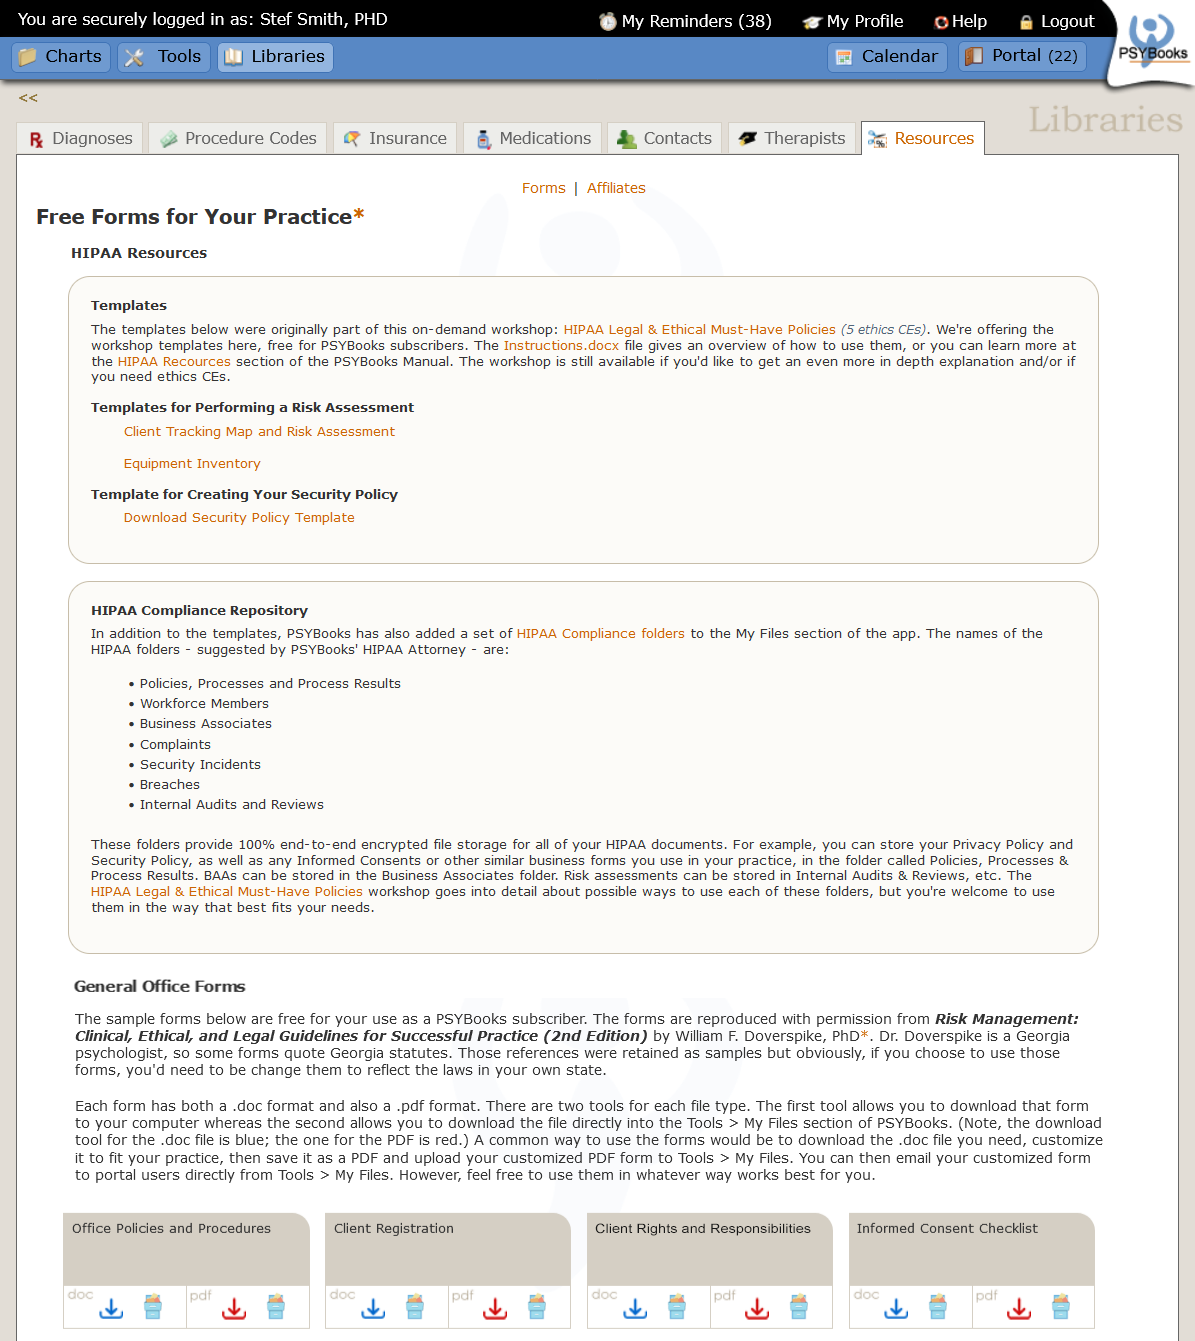
Notice that this page sub-divides into two main sections: HIPAA Resources and General Office Forms. The HIPAA Resources section sub-divides again into Templates and HIPAA Compliance Repository. Each of those will be discussed below:
HIPAA Resources
Templates
Your PSYBooks subscription comes with three templates to help you with your HIPAA Compliance requirements. Two of them are approaches you might want to use to perform risk assessments for your practice. The third one is to help you write your Security Policy.
HIPAA Risk Assessments
You must do a HIPAA risk assessment before you can write your security policy. A risk assessment is a comprehensive process designed to help healthcare organizations identify and manage risks to the security and privacy of patient data. Although the HHS doesn't have specific rules or guidelines for how we should do our risk assessments, these are the kinds of things you want to consider:
- Identify and Document the PHI in your organization including paper, electronic and verbal.
- Identify Threats and Vulnerabilities to the confidentiality, integrity, and availability of PHI. These threats might include cyberattacks, physical theft, human error, and natural disasters.
- Assess Existing Security Measures that are already in place to protect PHI. This includes technical safeguards (e.g., firewalls, encryption), physical safeguards (e.g., access controls, facility security), and administrative safeguards (e.g., policies and procedures, staff training).
- Assess Likelihood and Potential Risk Impact of security incidents or breaches. Consider factors such as the sensitivity of the PHI, the threat environment, and the effectiveness of current safeguards.
- Prioritize Risks. Determine which risks pose the greatest threat to PHI and patient privacy.
- Develop Mitigation Strategies. This includes implementing new security measures, improving existing ones, and establishing policies and procedures to address vulnerabilities.
- Document Findings.
- Perform Regular Updates. Again, HIPAA doesn't specify how often we should do our risk assessments, but set some kind of schedule. One possibility might be to do risk assessments once a year and also when there are changes in your personnel, hardware, software or ISP.
- Education and Training. Train your workforce on security policies and procedures to ensure they are aware of their responsibilities for protecting the PHI their job requirements cause them to contact.
- Continual Improvement. Use the findings from your risk assessment to continually improve your organization's security posture and response to emerging threats.
PSYBooks gives you two templates on the Libraries > Recourses page to use in preparing your risk assessments. The two templates are:
Client Tracking Map and Risk Assessment
Equipment Inventory
These are both spreadsheet types of documents that may be useful to you in both tracking all PHI in your office and in creating an inventory of your hardware and software. Both come with instructions.
Tools for Creating Your Security Policy
In addition to the two templates above, PSYBooks subscribers also have access to this template:
Security Policy Template
Once you've created your risk assessment, you should have most or all of the information you need to begin writing your Security Policy. This template is structured to follow a workshop called HIPAA Legal & Ethical Must-Have Policies: Let Us Help You Become Compliant. The on-demand version is still available and offers 5 ethics CEs, if you'd like additional training in this area. However, you can probably figure it out yourself just from the Security Policy Template. We'll look at that in some detail.
The Use of Variables within the Templates
The first page of each of the templates above has a page for you to enter variables. Those pages look something like this:

Each of the lines in square brackets [ ] is a clickable variable that should be replaced with your own info. The values you enter will then be carried to other places in the document so you don’t have to retype them each time.
For example, on the title page, if I change [Company] to the name of my practice, say Piney Shores Psychotherapy, then places in the document that look like this:

Will automatically populate with the value of the variable to say this:

The Format for Each Standard
The Security Policy Template is organized by the HIPAA Safeguards (Administrative, Physical and Technical) and then by the Standards that fall under each of those Safeguards. Each Standard is presented in the same format, similar to this one:
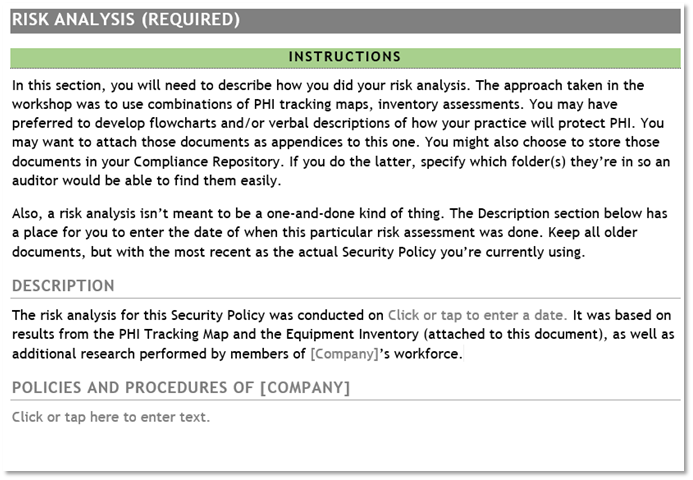
There are four sections to each Standard:
The name of the Standard is in the gray bar at the top - in this case "Risk Analysis." In some cases, such as this one, you're told whether the standard is required or addressable.
Following that is a green bar to delineate the "Instructions" section. These are meant to provide helpful hints to you about what you need to do to meet this standard. This entire section should be deleted before you publish your Security Policy from the Template.
Folowing that is a section called "Description." This can be left as is if you like it, or reworded as you see fit.
The last section is called "Policies and Procedures of [Company]." As we saw above, once you provide values for the variables on the first page of the Template, [Company] will auto-populate with the name of your practice. Under the heading is a section that says, "Click or tap here to enter text." This is where you describe how your practice will meet this standard.
Once you've made all the changes suggested above, a finished version of this particular Standard in your Security Policy might look like this:
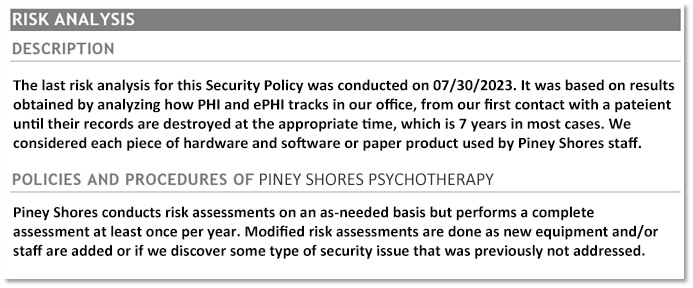
When you've completed all Standards, you can publish your complete Security Policy and store it in the folder called "HIPAA Compliance > Policies, Processes and Process Results." This folder has already been created for you in the My Files section of PSYBooks. All you have to do is upload your new Security Policy to the correct folder in your HIPAA Compliance Repository. We'll cover that next.
HIPAA Compliance Repository
PSYBooks offers a 100% end-to-end encrypted way to store all documents you need to be compliant with HIPAA. You can find it in the Tools > Files, Forms & Templates > My Files section of the app. When you have any kind of HIPAA document - your Privacy Policy, Security Policy, security complaint, a risk assessment, etc., you need a secure place to store them. It's also nice to have all HIPAA documents in one place so that if you're ever audited, you can produce everything you need without having to scramble to put it all together.
When you use the Add File tool in PSYBooks, you're given a list of categories - to help you keep all files on the page organized. You can make as many of your own categories as you wish, but PSYBooks gives you a set of nested HIPAA Compliance folders just for your HIPAA documents:
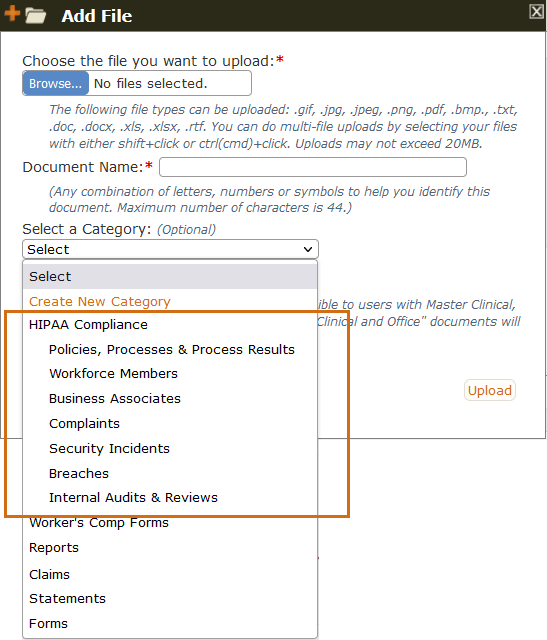
The names of the HIPAA folders - suggested by PSYBooks' HIPAA Attorney - are:
- Policies, Processes and Process Results
- Workforce Members
- Business Associates
- Complaints
- Security Incidents
- Breaches
- Internal Audits and Reviews
For example, you could put your policies (Privacy, Security, Informed Consents, Office Practices, etc.) in the Policies, Processes and Process Results folder, create a personnel file for yourself and any other workforce members in the Workforce Members folder, BAAs in the Business Associates folder, etc.
General Office Forms
Currently, there are 48 downloadable forms, but we hope to add more over time. The ones we have now are reproduced with permission from Risk Management: Clinical, Ethical, and Legal Guidelines for Successful Practice (2nd Edition) by William F. Doverspike, PhD. Each of the forms is listed in a separate block that looks like this:

Each form is available in both .doc and .pdf formats. The .doc forms (on the left) can be opened with Word and similar types of word processing programs. PDF formats (on the right) can be opened by most browsers and also Adobe Acrobat Reader.

Each section has two tools. One allows you to download the form to your computer; the other allows you to save the form to your Tools > My Files section of the app.
Download the Forms
The first tool is a tool to allow you to download the form - blue for the .doc format and red for the .pdf:

Save to Tools > My Files
The second tool in each section is represented by a filing cabinet:

Clicking a filing cabinet will open a window that will allow you to save that particular form into your Tools > My Files page. This is the regular popup window you're used to seeing for saving files, but it's now filled in with the file name and document name of the form you're adding:
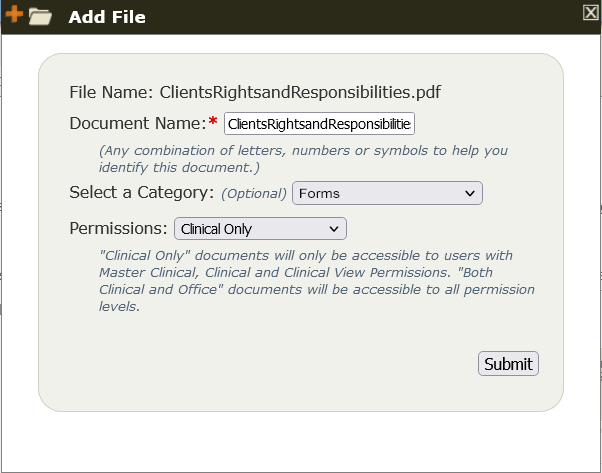
The Document Name is the one that will be displayed on Tools > My Files, so feel free to change it to whatever you'd like. The default name is just the file name without the extension. The default Category is "Forms", but, as always, both the Category Name and the Permissions level are changeable.
Although you're free to use these forms in whatever way works best for you, a common workflow would be:
- Download the .doc version of the form you want to your computer.
- Use a word processing program to make whatever changes you need to customize the form for your practice.
- Save your customized form as a PDF and upload it to Tools > My Files.
From the Tools > My Files page, you'll be able to easily email your customized form to your patients:
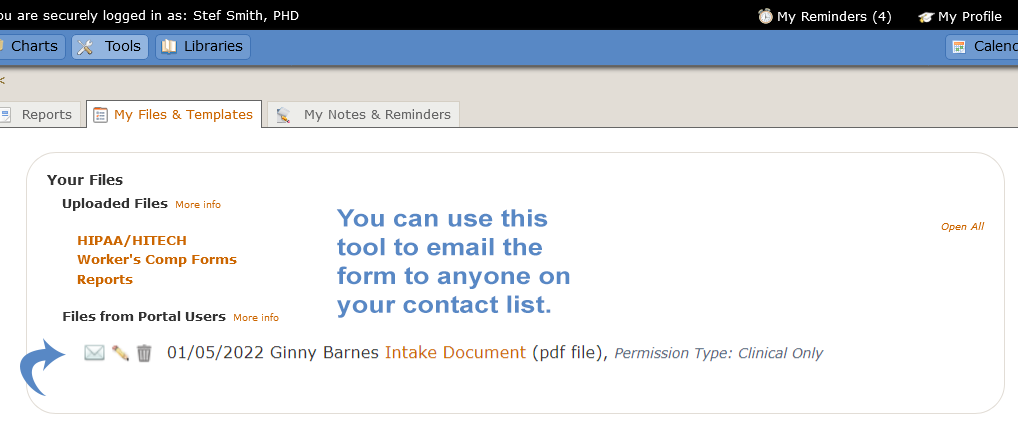
PSYBooks Affiliates
What this isThis is a section of the app that displays discounts from other companies that are offered to PSYBooks subscribers.What it looks likePSYBooks Affiliates are located at the bottom of the Libraries > Resources page: |
Where this isYou can get to this tool by clicking Libraries > Resources dropdown and then either scrolling down or clicking the "Affiliates" link at the top of that page. |
PSYBooks Affiliates are listed at the bottom of the Libraries > Page, under the Free Forms. There's a link at the top of the page that will take you to the Affliates section - or you can just scroll down.