

Manual Index
-
Chapters
The Manual is divided into seven chapters. Click a chapter title to display that chapter's table of contents in the area below.
Chapter Three
A Client Chart
PSYBooks Manual
Chapter Three
Intro to the Client Chart
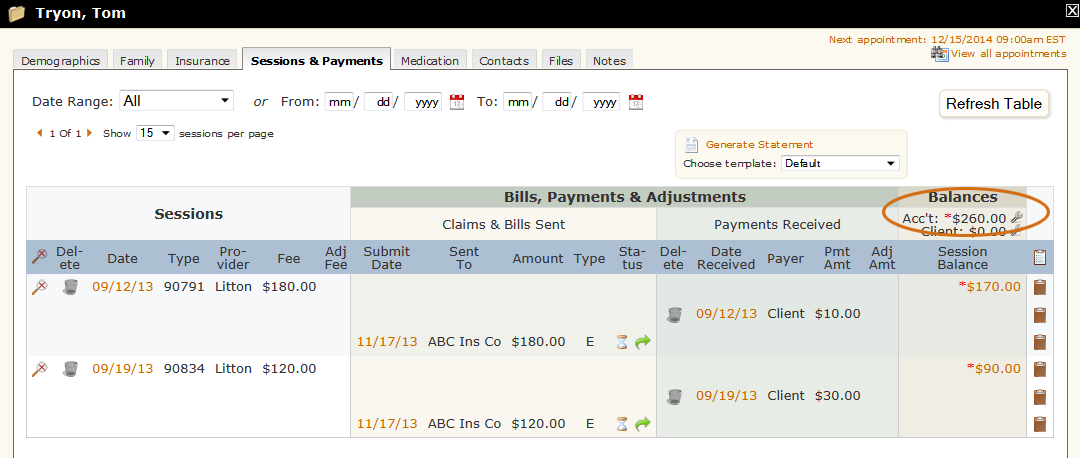
What this isA PSYBooks client chart is a digital version of a paper chart. It's divided into several different sections, or tabs, just like a paper chart might be. The sections of a PSYBooks chart are: Demographics, Family, Insurance, Sessions & Payments, Medication, Contacts, Files and Notes.What it looks likeA client's chart looks like this (you can see the tabs for the different sections across the top): 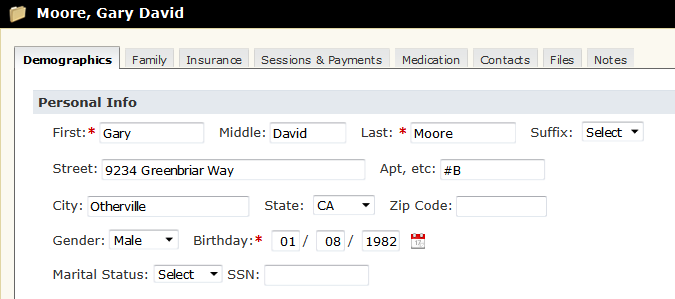 |
Where this isYour clients' charts are on the Charts page. To open one, click a client's name. |
A PSYBooks chart is designed to hold most or all of everything you might keep in a paper chart. However, you are free to use as much or as little of it as you need. In fact, the only required items in a chart are the client's name, birthday, and Time Zone, which are all on the Demographics tab. The other tabs are available if you want them, but not required. Most tabs have tools for working with the content. For example, the Family tab has an Add Client Family Member tool, the Insurance tab has Add Client Insurance and Add Authorization tools, etc.
Short descriptions of each tab follow:
- Demographics
This tab holds the demographic and contact information for your client, as well as emergency contact info. It is added with the Add Client tool but can be edited at any time in the chart.
- Family
The Family tab allows you to keep records on the client's family members, including ongoing notes as your client provides additional information.
- Insurance
The Insurance tab allows you to enter your client's insurance information. There are separate tables for insurance companies and authorizations.
- Sessions & Payments
The Sessions & Payments tab gets filled in automatically as you work within PSYBooks. For example, anytime you add a session for your client, it will appear in the table on the Sessions & Payments tab. Payments (both client and insurance), adjustments, claims and statements are also added to the table as they are created. If you efile claims to insurance companies, you will also be able to use the Sessions & Payments table to see whether a claim has been accepted by the clearinghouse and/or the insurance company.
Additionally, the Sessions & Payments table has a variety tools for working with the various items that it holds. For example, you can edit sessions, payments and adjustments, resubmit claims and perform many additional functions. This is THE tab for working with the business end of your client's account.
- Medication
The Medication tab is for entering your client's medications. If you prescribe, you can also use PSYBooks to write and print scripts to give to your clients. Since PSYBooks is designed for both prescribing and non-prescribing practitioners, the information you enter in the Medication tab can vary from being extremely thorough and detailed to only listing the name of the medications your client takes.
- Contacts
The Contacts tab allows you to enter contacts - both professional and personal - that play a role in the client's treatment. For example, if the client is on medication, you might want to enter the name of the doctor who prescribes their meds. If someone else is responsible for their bill, you could enter the payer's name.
- Files
The Files tab allows you to upload digital files to your client's chart. These might be documents that you've scanned, digital files you've created within PSYBooks or other digital files you've obtained elsewhere. PSYBooks provides categories for you to use for your files to help you keep organized. You're also free to create your own categories so you can truly make this area your own.
- Notes
The Notes tab, like the Sessions & Payments tab, gets filled in for you as you work. Most all forms in PSYBooks have a section at the bottom called "Notes" where you can add a note. PSYBooks collects all of these in one place in the client's Notes tab. The Notes tab also allows you to enter "speciality" types of notes, such as Intake Notes, Treatment Plans, Progress Notes and Mental Status Exams. Finally, you can also use the Notes tab to write personal psychotherapy notes for your own use. Psychotherapy notes are NOT considered part of the client's medical record.
Demographics Tab
What this isThe Demographics section of a client's chart gets its initial information from the Add Client form. Demographics holds general information about your client, such as name, address and contact information.What it looks likeThe tab to open the Demographics section of the chart looks like this: 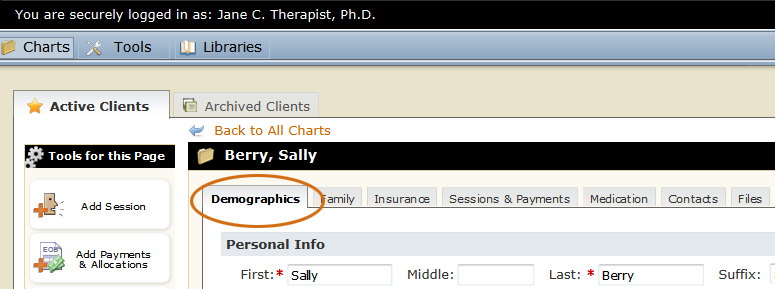 |
Where this isOpen a client's chart by clicking their name in the table on the Charts page. The chart will open to the Demographics tab.
|
The Demographics section of the client's chart looks like this:
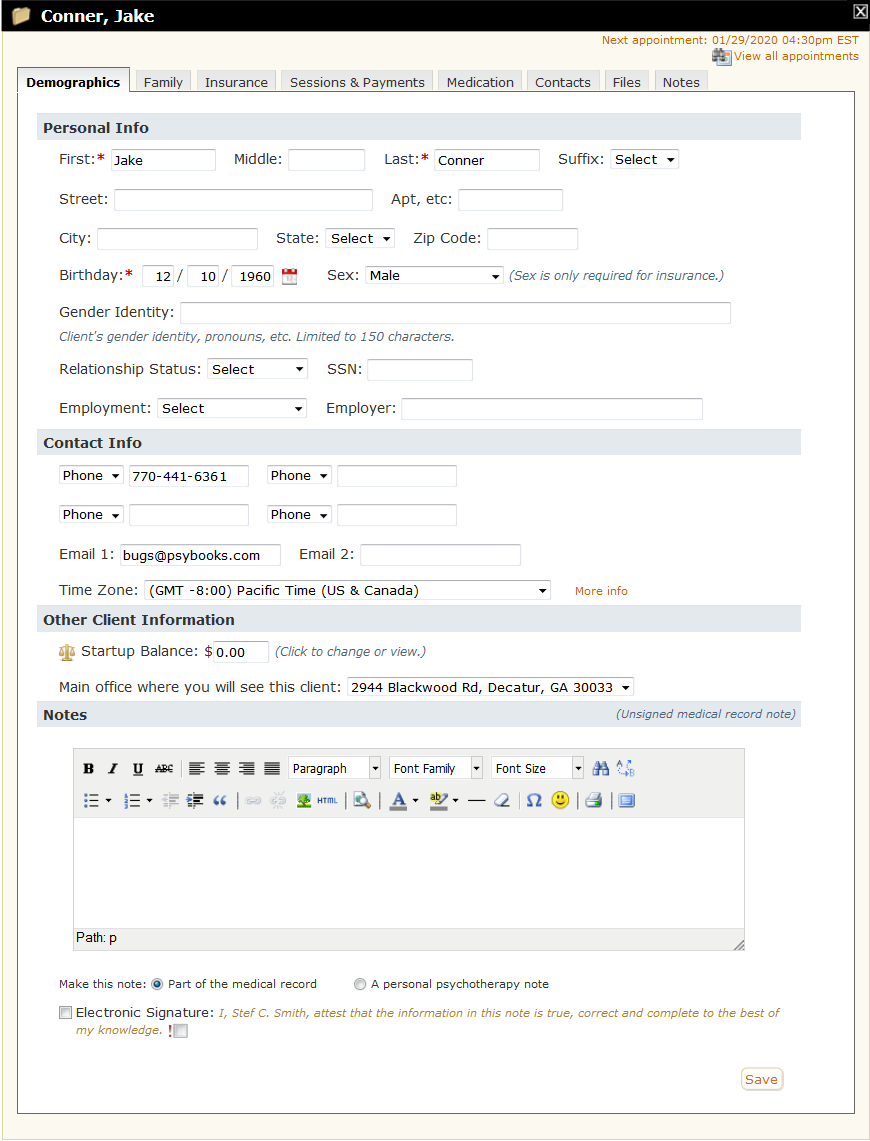
The Demographics page of a client's chart is like the face sheet of a traditional paper chart. It is created either by the client with the Profile tool and/or by the therapist with the Onboarding Tool or the Add Client tool. It holds contact information and general patient info like gender and birthday.
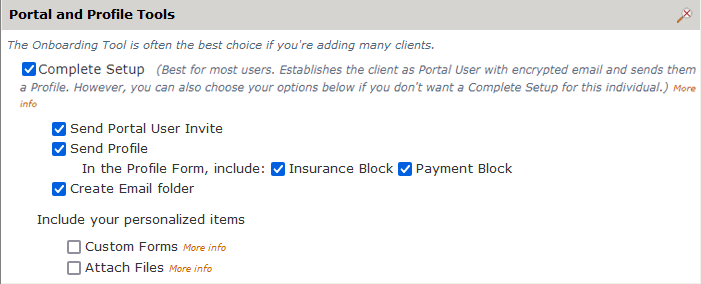
The Demographics page also serves as the Edit Client tool, meaning that you can make changes here at any time to update a client's information. If the client has already filled out a Profile form but needs to update it, the Portal and Profile Tools section of the Demographics page of the chart changes to display a link which allows you to resend the Profile tool:
The Portal and Profile Tools section gives you important information about your client's set-up. The example below is taken from the screenshot above and, at a glance, we can see that this client has not completed any of the set-up features:

This limits what they'll be able to do in PSYBooks and also means that you will be unable to use many common tools with them, such as secure email, Custom Forms, collecting esignatures and others. In most cases, it's suggested that you use the Complete Setup, which is the most HIPAA compliant solution and which also gives both you and your client access to all tools. Clicking Complete Setup does this:
If you're interested in or unsure about any of these options, there's more of a write-up in the Add Client secion of the Manual, or you can ask a member of the PSYBooks Support Team for help.
Family Tab
What this isThe Family section of the chart holds information about your client's family.What it looks likeThe tab to open the Family section of the chart looks like this: 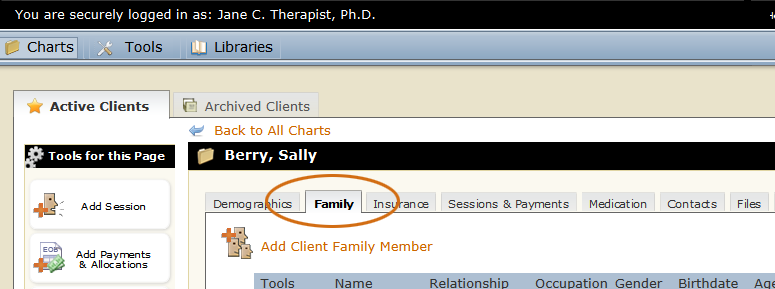 |
Where this isOpen a client's chart by clicking their name in the table on the Charts page. Then navigate to the Family section of the chart by clicking the Family tab.
|
The Family section of the client's chart looks like this:

You can use PSYBooks' Family tab to keep detailed notes on your clients' family members. Once you've listed a family member, each time your client gives you additional information about that person, you can add an additional note to their record in the Family section so that you'll have all information about that person in one place.
Family Members
What this isFamily Members is the table on the Family tab of the client's chart. It holds information on members of the client's family.What it looks likeThe Family Members table looks like this:
|
Where this isOpen a client's chart by clicking their name in the table on the Charts page. Then navigate to the Family section of the chart by clicking the Family tab.
|
The Family Member table displays information you've entered about your client's family. It also holds tools for editing and deleting family members.
Edit Family Member
What this isThe Edit Family Member tool is in the table of the Family section of your client's chart.What it looks likeThe Edit Family Member tool looks like this: 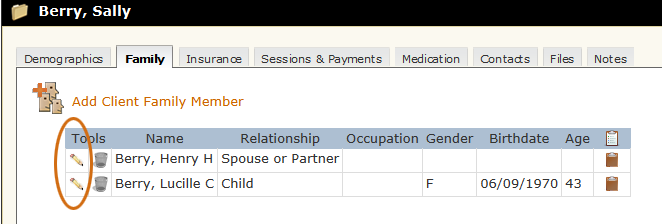 |
Where this isOpen a client's chart by clicking their name in the table on the Charts page. Then navigate to the Family section of the chart by clicking the Family tab. The Edit Family Member tool is on the left side of the table.
|
When you click the Edit Family Member tool, the form that opens looks like this:
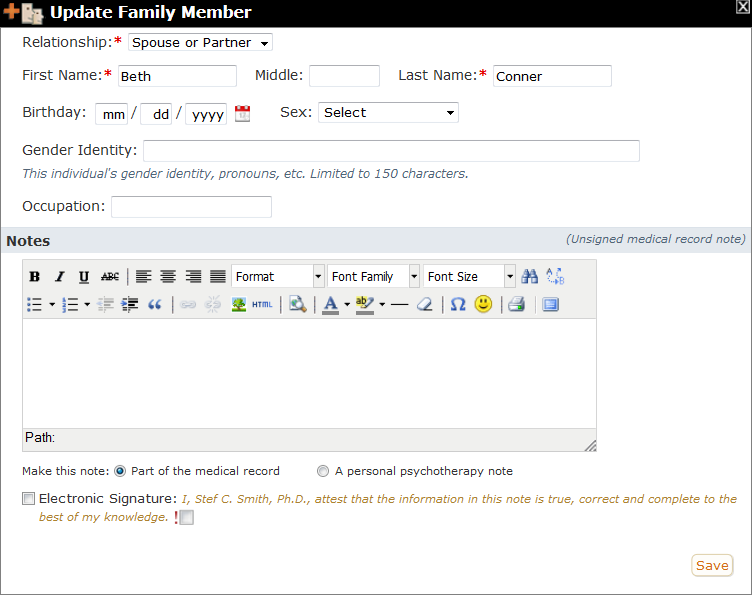
You may enter as little or as much as you want about a client's family member. Notes you add here will appear in the Notes section of the chart and can either be marked as part of the Medical Record (PHI) or as a Psychotherapy Note (not PHI). You can add to a family member's note as often as you want, building a fairly complete picture of that individual as your client discusses them over time.
Delete Family Member
What this isThe Delete Family Member tool is in the table of the Family section of your client's chart.What it looks likeThe Delete Family Member tool looks like this: 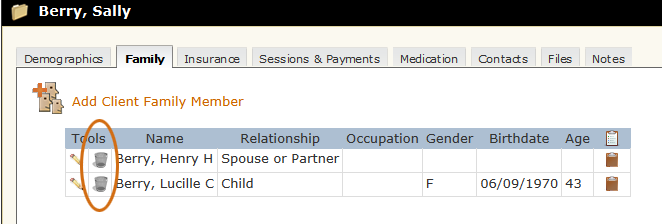 |
Where this isOpen a client's chart by clicking their name in the table on the Charts page. Then navigate to the Family section of the chart by clicking the Family tab. The Delete Family Member tool is on the left side of the table.
|
You may delete a client's family member at any time. Family member deletions are permanent so if you should want the entry back, you'd have to reenter it. However, when you delete a family member, you're given a choice about whether you also want to delete the notes you've written about the family member.
Add Client Family Member
What this isAdd Client Family Member is a tool at the top of the Family tab of your client's chart.What it looks likeThe Add Client Family Member tool looks like this: 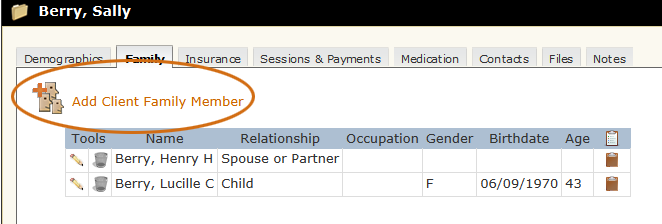 |
Where this isOpen a client's chart by clicking their name in the table on the Charts page. Then navigate to the Family section of the chart by clicking the Family tab.
|
Clicking the Add Client Family Member tool produces a form that looks like this:
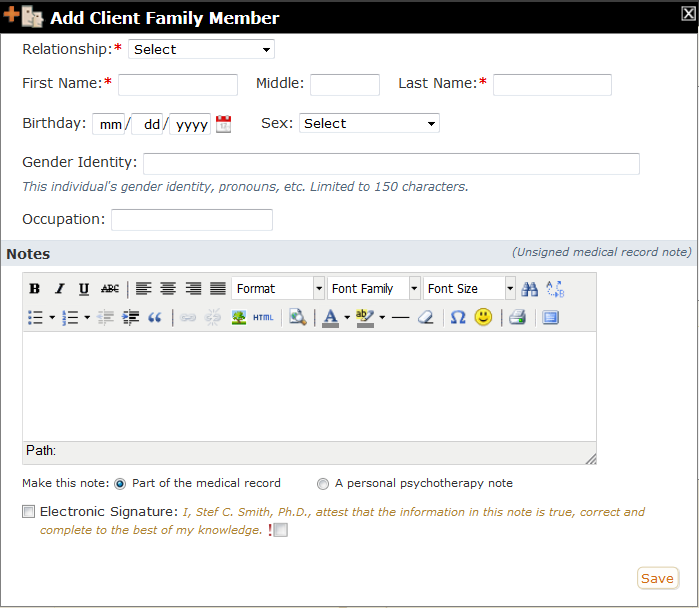
You can use the Add Client Family Member tool to enter significant members of your client's family and also for collecting family history. Notice that, like the Add Client form, the Family Member tool has fields for both sex and gender identity. The notes section on Add Client Family Member forms can be used to write as much or as little as you want about each family member. You can add to these notes at any time - either here or in the Notes section of the chart.
Insurance Tab
What this isThe Insurance section of the chart holds information about and tools for working with your client's insurance companies and authorizations.What it looks likeThe tab to open the Insurance section of the chart looks like this: 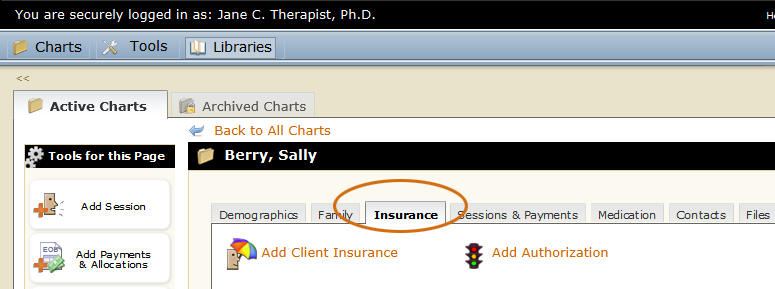 |
Where this isOpen a client's chart by clicking their name in the table on the Charts page. Then navigate to the Insurance section of the chart by clicking the Insurance tab.
|
The Insurance section of the client's chart looks like this:
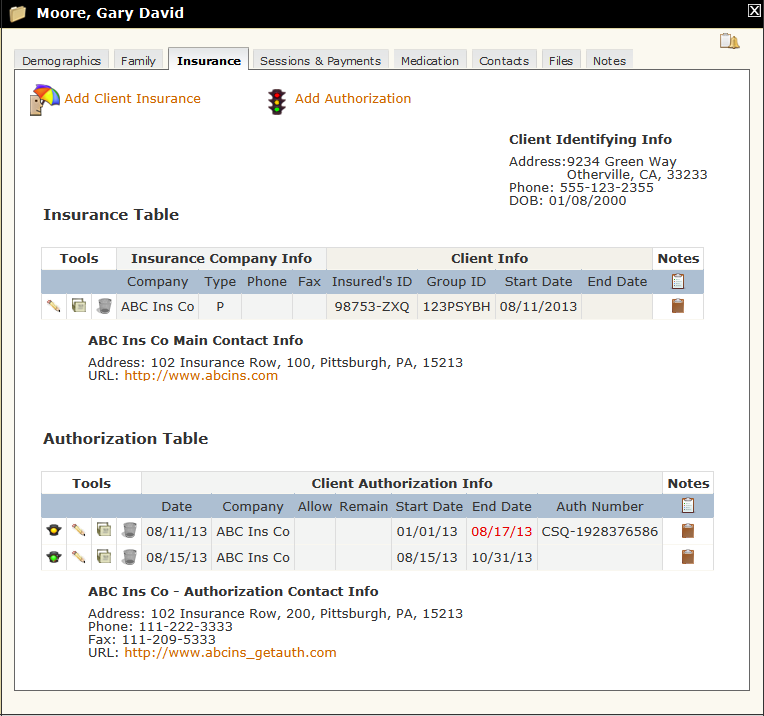
The Insurance section of the chart holds information about your client's insurance(s) including information on any authorizations you may have received on their behalf. There are tools for adding client insurance companies and authorizations as well as table tools for editing, archiving and deleting both of those kinds of items. In addition, the Authorizations Table also has a status indicator, so you can keep up with your authorizations with a quick glance.
This is the page to come to when you need to call an insurance company about your client or if you want to check a client's Elibility and Benefits. There are fields for most information you might need while on the phone: client identifying information (including birthday), client insurance information and insurance company contact info, including a separate section for authorization contact info in case it's different from the main contact info.
Client Insurance Table
What this isThe Client Insurance Table holds imporant information about your client's insurance(s). There are table tools to edit, archive and delete a client's insurance company.What it looks likeThe Client Insurance table looks like this:  |
Where this isOpen a client's chart by clicking their name in the table on the Charts page. The Client Insurance table is on the Insurance tab.
|
The Client Insurance table displays information you've entered about your client's insurance. You can enter both primary and secondary insurance companies. Primary companies are marked with a "(P)" and secondary ones with an "(S)" throughout the app. PSYBooks uses the values you enter here for things such as CMS-1500 forms and client statements, making it possible for you and/or your client to file a claim with insurance.
This table also holds tools for editing, archiving and deleting a client's insurance company. Deleting an insurance company here does not delete it from the Library.
For your convenience, the insurance company's Main Contact Info is reproduced here from the values you have entered in your Library. If you want to edit this information, go to Libraries > Insurance and make the changes there.
Edit Client Insurance
What this isThe Edit Client Insurance tool is in the table of the Insurance section of your client's chart.What it looks likeEdit Client Insurance tool looks like this:  |
Where this isOpen a client's chart by clicking their name in the table on the Charts page. Then navigate to the Insurance section of the chart by clicking the Insurance tab. The Edit Client Insurance tool is on the left side of the Insurance table.
|
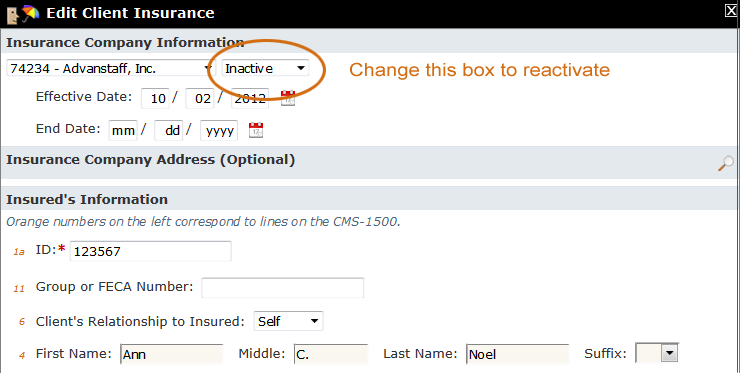
When you click the Edit Client Insurance tool, the form that opens looks like this:

You can change anything on this page. Items on lines 4, 7, 11a and 11b in the Insured's Information section have been carried forward from the Demographics tab. Changes to any of those items will overwrite the corresponding items in Demographics.
You can also make changes to the closed section called "Insurance Company Address (Optional)". That part of the form holds contact information for the insurance company. If any of this information has been completed at Libraries > Insurance, it will be pre-populated here. However, changes made here apply ONLY to this particular client. They are not carried back to the Library.
When the Insurance Company Address section is opened, it looks like this:
Deactivate Client Insurance
What this isThe Deactivate Client Insurance tool is in the table of the Insurance section of your client's chart.What it looks likeThe Deactivate Client Insurance tool looks like this: 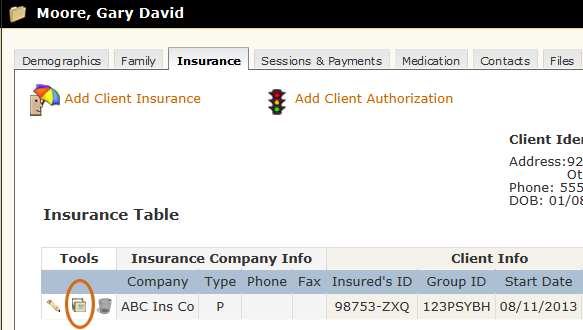 |
Where this isOpen a client's chart by clicking their name in the table on the Charts page. Then navigate to the Insurance section of the chart by clicking the Insurance tab. The Deactivate Client Insurance tool is on the left side of the Insurance table.
|
When your client no longer has an insurance company, you can archive it by clicking the Deactivate Client Insurance tool. This will automatically put today's date as the insurance company's end date in the client's Insurance Table. Deactivating an insurance company instead of deleting it allows you to keep the information in the client's chart in case you ever need to refer to it. If you should need to reactive the insurance company, you can click the Edit Insurance tool and change the Inactive status to either Primary or Secondary. Clicking Save will reactivate the insurance company:
Delete Client Insurance
What this isThe Delete Client Insurance tool is in the Insurance table of the Insurance section of your client's chart.What it looks likeThe Delete Client Insurance tool looks like this: 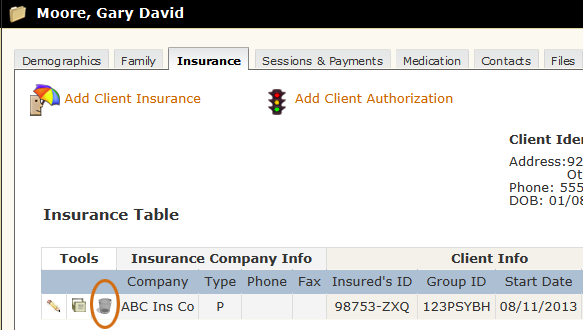 |
Where this isOpen a client's chart by clicking their name in the table on the Charts page. Then navigate to the Insurance section of the chart by clicking the Insurance tab. The Delete Client Insurance tool is on the left side of the Insurance table.
|
The Delete Client Insurance tool is a permanent deletion. You will not be able to retrieve the information except through your Activity Log in the Reports section of PSYBooks. If you think you may want to refer back to this info, you can archive the company or just set an End Date instead of deleting.
Client Authorizations Table
What this isThe Client Authorizations Table holds imporant information about your client's authorizations. There are table tools to edit, archive and delete authorizations.What it looks likeThe Client Authorizations table looks like this: 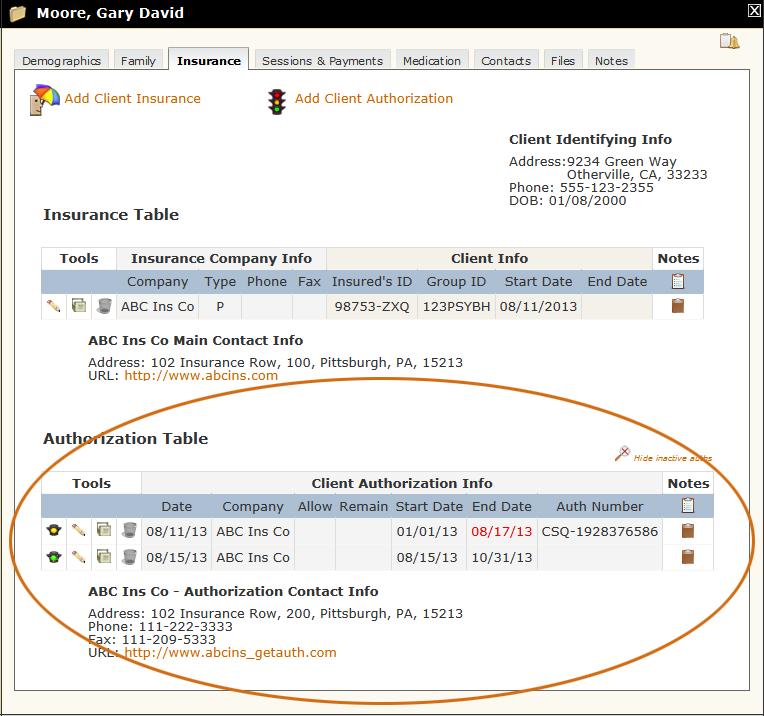 |
Where this isOpen a client's chart by clicking their name in the table on the Charts page. The Client Authorizations table is on the Insurance tab.
|
As with other sections in PSYBooks, the Authorizations Table does not appear on this page until you add at least one authorization (pre-cert). Once you do that, the table lists the auth you entered along with information to help you keep track of it. There is a tool to show you the status of the authorization (green, yellow or red traffic light), and others that allow you to edit, deactivate or delete an authorization. Each tool will be discussed separately below. Notice, that the table itself helps you easily notice expirations that are near expiration or have expired because the End Date text turns red.
There is a small Show/Hide Inactive Auths link above the table. This works like a toggle switch that allows you to remove inactive authorizations from the table in a way where you can retrieve them at any time.
The Authorization Contact Info section below the table comes from information that's been entered at Libraries > Insurance in the Authorization Contact Info section of either of the forms for adding an insurance company (Add Efile Insurance or Add Print Insurance).
Client Authorization Status
What this isThe Client Authorization Status tool is in the Authorizations table of the Insurance section of your client's chart.What it looks likeThe Client Authorization Status tool looks like this: 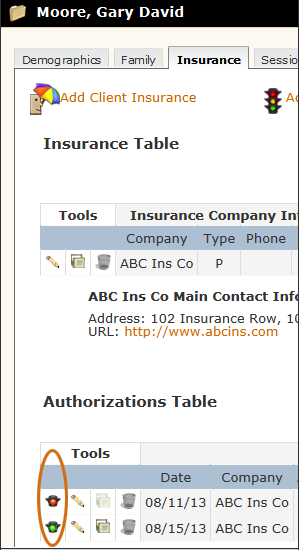 |
Where this isOpen a client's chart by clicking their name in the table on the Charts page. Then navigate to the Insurance section of the chart by clicking the Insurance tab. The Client Authorization Status tool is on the left side of the Authorization table. (The Authorization table is only present if you've entered authorizations for this client.)
|
The first tool on each row of the Authorizations table - the traffic light icon - is the Authorization Status tool. It changes color to warn you if an authorization is close to expiring (yellow) or if it's already expired (red). If you mouse over a status icon, it will give you additional information. For example, in the screenshot below, if you were on a real page in the app, mousing over the yellow traffic light in the top row would show you this tooltip:

Mousing over the green traffic light would show you a tooltip that says, "The authorization is current." Notice also that on the first auth, the text for the end date is red. This is because the screenshot was taken on 8/11/2023 so the authorization was less than 30 days from expiring.
Neither of the authorizations above have anything in the Allow column - which means that the number of sessions is unlimited (or at least the user didn't enter an allowed number of sessions). If the user enters a number of sessions in the Add Authorization form, the table might look like this:

The user only fills in the number of sessions allowed (e.g., 20, in the above screenshot). PSYBooks calculates the number of sessions that remain as sessions are entered into the program.
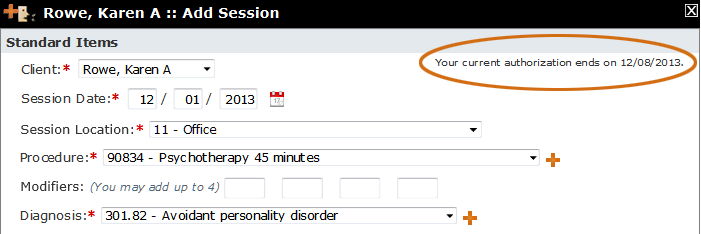
PSYBooks makes authorization tracking very easy. When a client has an authorization in their chart, each time you enter a session, you'll see an authorization message at the top similar to this:

You can also view all clients' authorizations by using the View/Edit Authorizations tool on the main Charts page so the Client Authorization Status is just one way to track your auths and pre-certs.
Edit Client Authorization
What this isThe Edit Client Authorization tool is in the Authorizations Table of the Insurance section of your client's chart. It allows you to make changes in existing authorizations.What it looks likeThe Edit Client Authorization tool looks like this: 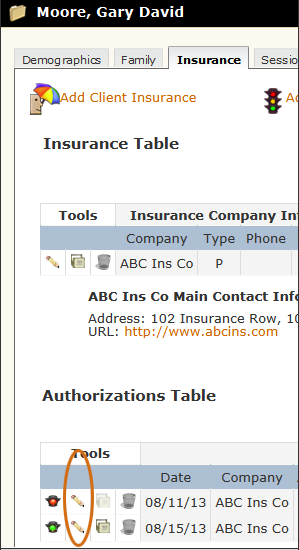 |
Where this isOpen a client's chart by clicking their name in the table on the Charts page. Then navigate to the Insurance section of the chart by clicking the Insurance tab. The Edit Client Authorization tool is on the left side of the Authorization table.
|
When you click the Edit Client Authorization tool, the form that opens looks like this:
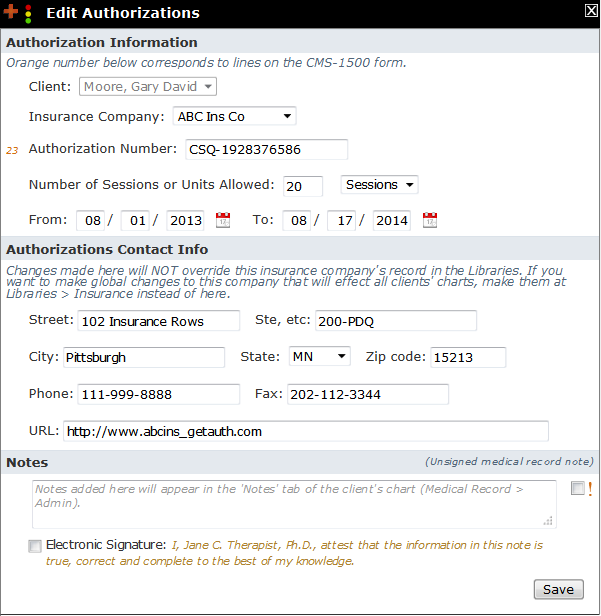
The fields on this form are fairly straightforward but it may be helpful to discuss some of the behind the scenes processes. You can alter anything on the form except the client's name. If the client has two insurance companies, both will be listed in the Insurance Company select box so you could even change that. If you make changes to the Number of Sessions or Units Allowed field and/or either of the date fields, PSYBooks will update your authorization status indicators here and anywhere else in the site that lists authorizations.
If there's already an active authorization in your Authorizations Table, when you click Save, PSYBooks will ask you if you want to overwrite the existing authorization or if you want to add a new one. Changes you make to the Authorizations Contact Info section will apply to this client only. If you want to make changes that will affect all clients' charts, make them in Libraries > Insurance instead of here.
Archive Client Authorization
What this isThe Archive Client Authorization tool is in the Authorization table of the Insurance section of your client's chart.What it looks likeThe Archive Client Authorization tool looks like this: 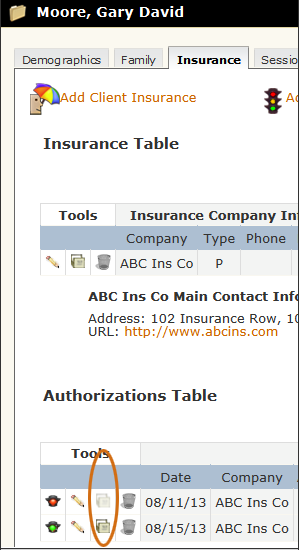 |
Where this isOpen a client's chart by clicking their name in the table on the Charts page. Then navigate to the Insurance section of the chart by clicking the Insurance tab. The Deactivate Client Insurance tool is on the left side of the Authorization table.
|
When an authorization expires, it will archive automatically - no need to do anything. However, if for some reason, you'd like to deactivate an authorization before that time, this tool will do it. Notice the top tool is dimmer. This indicates that it's already been deactivated, either by the user or because it's expired. The Archive Client Authorization tool doesn't toggle (i.e., you can't click it again to reactivate the auth). However, you CAN edit a deactivated authorization so if an auth gets archived by mistake, you can edit it and change the parameters needed to make it active again.
Delete Client Authorization
What this isThe Delete Client Authorization tool is in the Authorization table of the Insurance section of your client's chart.What it looks likeThe Delete Client Authorization tool looks like this: 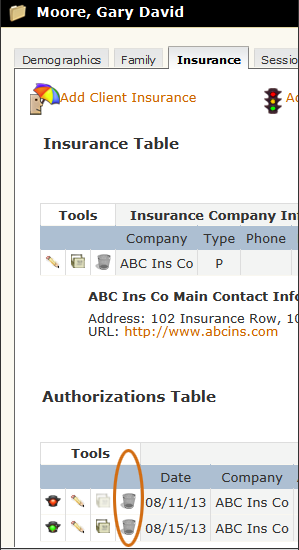 |
Where this isOpen a client's chart by clicking their name in the table on the Charts page. Then navigate to the Insurance section of the chart by clicking the Insurance tab. The Delete Client Authorization tool is on the left side of the Authorization table.
|
Deleting an authorization is permanent. If you want to maintain a record of all the client's authorizations, you will probably want to leave them in the chart. If you only want to view authorizations that are active, you can click the "Hide inactive auths" link at the top of the table. This will hide all auths that have expired or been deactivated but will still allow you to view them at any time and they will remain a part of the client's chart.
Add Client Insurance
What this isThe Add Client Insurance tool is at the top of the Insurance tab of your client's chart.What it looks likeThe Add Client Insurance tool looks like this:  |
Where this isOpen a client's chart by clicking their name in the table on the Charts page. The Add Client Insurance tool is at the top of the Insurance tab of their chart.
|
Clicking the Add Client Insurance tool produces a form that looks like this:
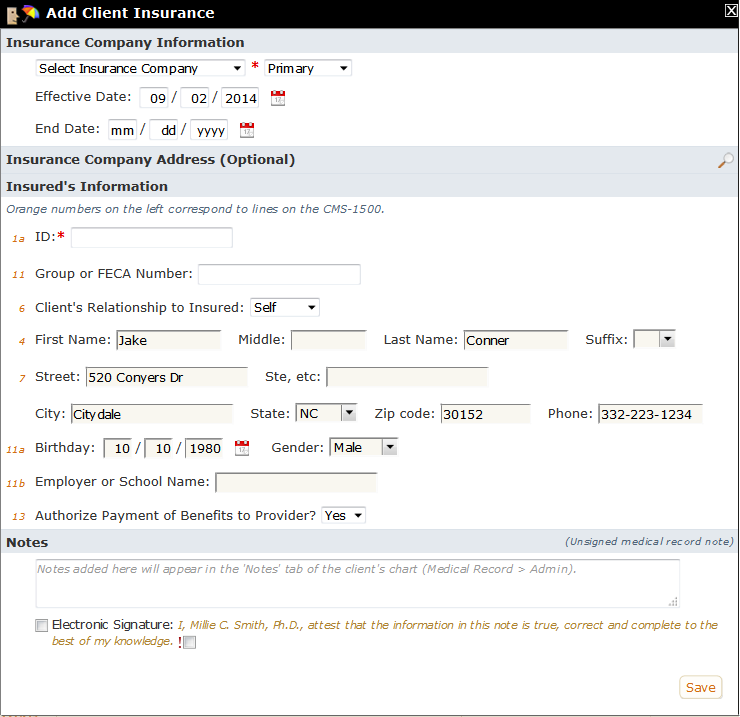
Despite its length, this is a very straightforward form. Only two fields are required: the Select Insurance Company dropdown box and the client's ID. Additionally, there are several things that are already done for you:
- The client's information is filled in by default so you don't have to enter it.
- The Primary/Secondary/Inactive select box is set to Primary unless the client already has an active primary insurance in their chart, in which case it's set to Secondary.
- The Effective Date is populated with today's date.
- The "Authorize Payment of Benefits to Provider?" is set to "Yes".
All of these items are changeable, but in many cases, all you'll have to do to enter a client's insurance company is to select the company from the dropdown box at the top, type in the client's insurance ID in the "Insured's Information" section and click "Save".
If the client has an insurance company you haven't yet entered into PSYBooks, you can enter it right from the Add Client Insurance form - no need to make a trip to the Library first. The Insurance select box has options for adding new efile and new print companies, just by clicking the orange link for either Add New Efile Company or, farther down, Add New Print Company:

Clicking the link you need will open the same form you'd have if you went to the Insurance tab in the Libraries and clicked the Add Efile Insurance tool or the Add Print Insurance tool. The Add Client Insurance tool remains open beneath the Library tool, which will enable you to enter the information you need to add the insurance company and, when you're finished, easily find the Add Client Insurance form so you can enter their ID and complete the original task. In the following screenshot, the user has opened the Add Client Insurance tool and then has clicked on the Add New Efile Company link in the Select Insurance Company dropdown box to add a new efile company to the Library:
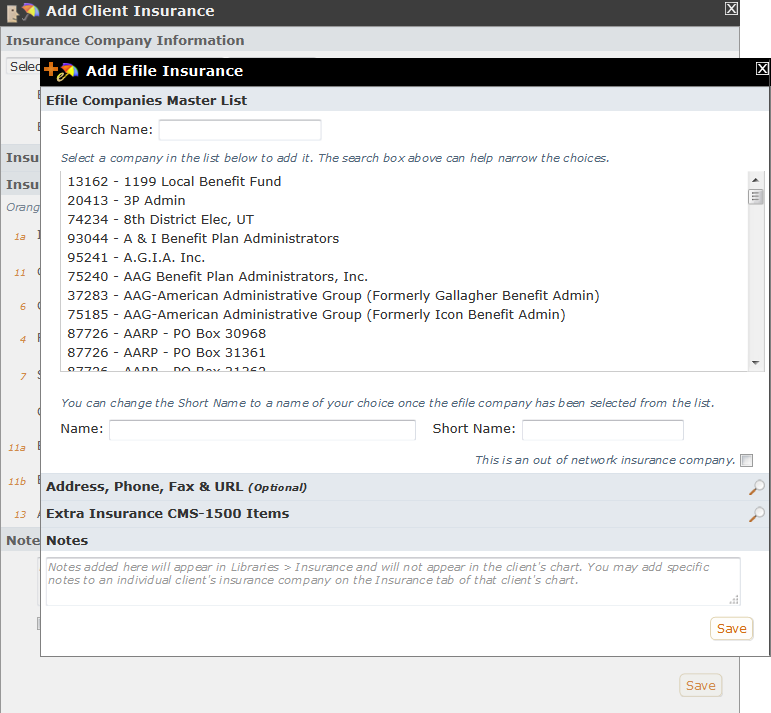
Notice that the form for adding new efile companies to the Library is on top, but you can still see the Add Client Insurance form in the background - sort of grayed out. Once you've finished entering information in the Add Efile Insurance Form on top, that form will close and the Add Client Insurance form will lose its gray appearance since it will once again, be the active form that you're working with.
It assumes you'll be efiling, so the Insurance Company Address section is closed and marked optional. However, if you select a print company from the Select Insurance Company box, the word "Optional" disappears and you'll need to open this section and fill out the fields you'll need in the Address Block at the top of your CMS-1500 form.
You can also add new insurance companies to your Library from the Select Insurance Company box. If the client's insurance company isn't in Libraries > Insurance, there's no need to visit the Library first and then come to the client's chart to fill in their insurance information. Save some clicks and enter the company here.
The form also assumes the Client's Relationship to Insured is Self - so all of the client's information is already filled in for you. If you change Client's Relationship to Insured to something else, the pre-populated values will disappear and you'll be able to fill in the correct information.
The Effective Date and End Date tells PSYBooks which claims to send to this insurance company. For example, if the Effective Date is listed as 06/03/2023 and you enter a session on 06/02/2023, that session will be billed to the client, not the insurance.
Add Client Authorization
What this isAdd Client Authorization is a tool at the top of the Insurance tab of your client's chart.What it looks likeThe Add Client Authorization tool looks like this:  |
Where this isOpen a client's chart by clicking their name in the table on the Charts page. The Add Client Authorization tool is at the top of the Insurance tab of their chart.
|
Clicking the Add Client Authorization tool produces a form that looks like this:
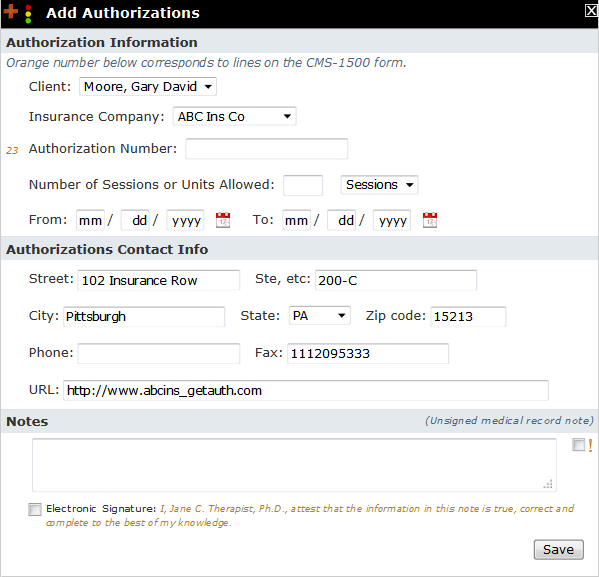
PSYBooks uses information you enter on this form to track your authorizations in several places throughout the app. You can see authorization information in the authorization table at Chart > Insurance and also by clicking the Add/View Authorizations tool on the main Charts page. Additionally, each time you add a session, PSYBooks will tell you the status of your authorizations - right at the top of the form, similar to this:
Notice that when you first open the Add Client Authorization tool, the client's name and primary insurance company - as well as that company's authorization contact information is already there for you. You have to fill in Number of Sessions or Units Allowed and/or a date range, click Save and you're finished.
The Authorizations Contact Info section is pre-populated from the information that is in this insurance company's file at Libraries > Insurance. However, if your client has different contact info and you'd like to enter it here, feel free. PSYBooks will allow you to either overwrite what's in the Library or to mark the new values as being unique to this client.
Sessions & Payments Tab
What this isThe Sessions & Payments section of the chart holds information about your client's sessions, payments and adjustments. In addition, claims you've sent to insurance companies and statements you've sent to your client are all listed in this table. In short, a record of almost all transactions regarding sessions and payments is kept in this table.What it looks likeThe tab to open the Sessions & Payments section of the chart looks like this: 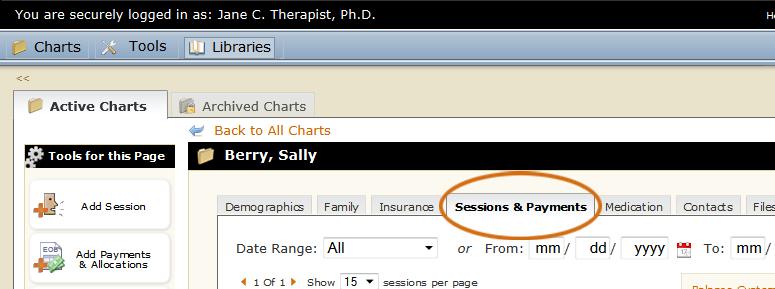 |
Where this isOpen a client's chart by clicking their name in the table on the Charts page. Then navigate to the Sessions & Payments section of the chart by clicking the Sessions & Payments tab.
|
The Sessions & Payments section of the client's chart looks like this:
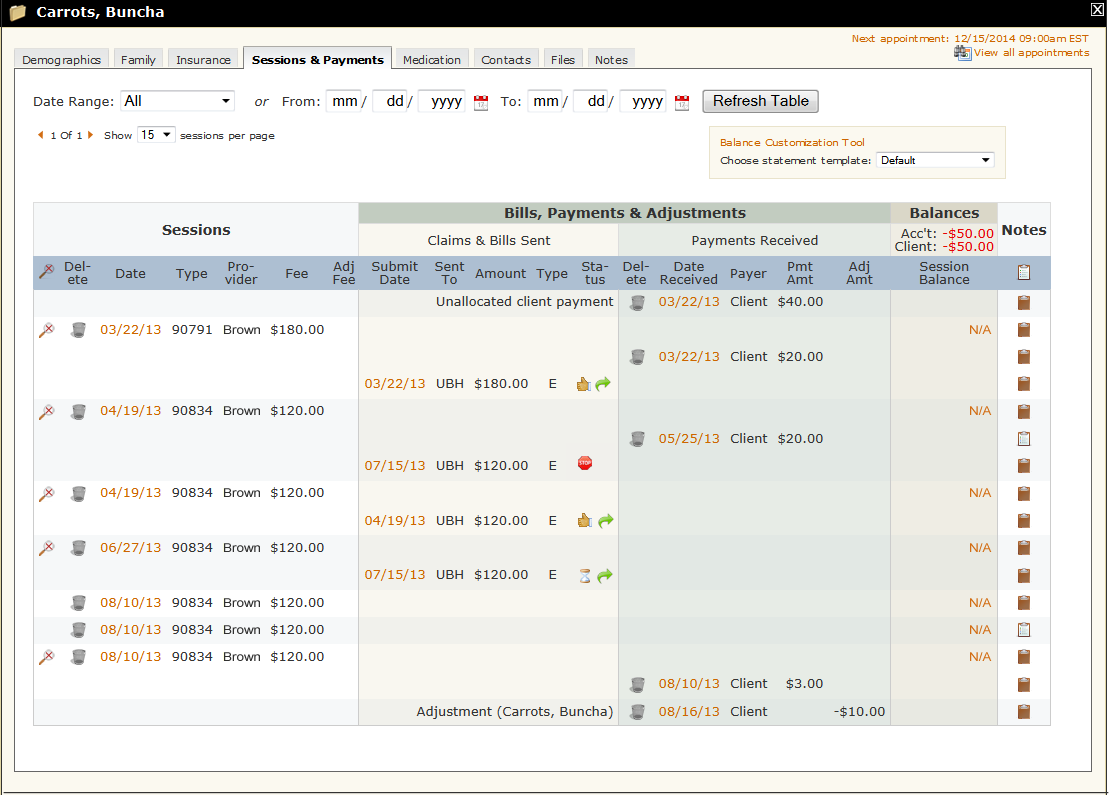
Organization and Color-Coding
The Sessions & Payments table holds information about your client's sessions, payments and adjustments. It's designed to have everything on a single page so you don't have to navigate through the app to find what you need. At first, the Sessions & Payments page may seem a bit intimidating. However, spending a few minutes learning the way it's organized should help.
The top part has the global tools, i.e., the tools for working with the page as a whole. The table, which is where the real meat is, is below the global tools area:
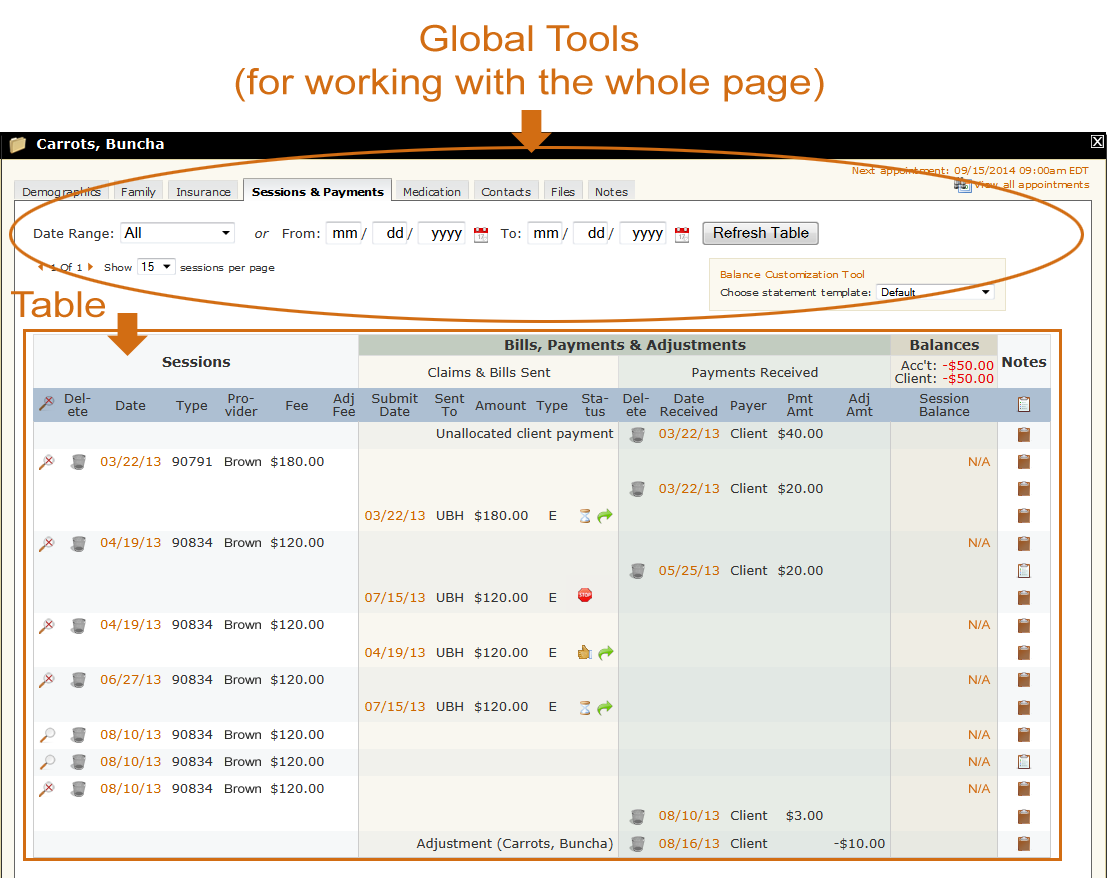
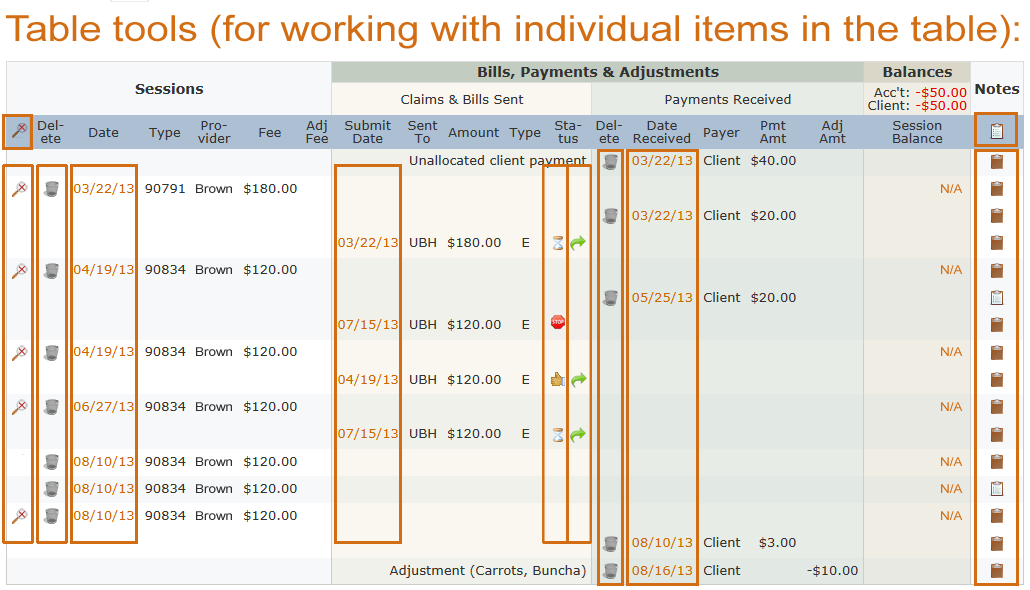
In addition to the global tools, there are many tools on the table itself. These tools are for working with individual items in the table and will be discussed separately later:
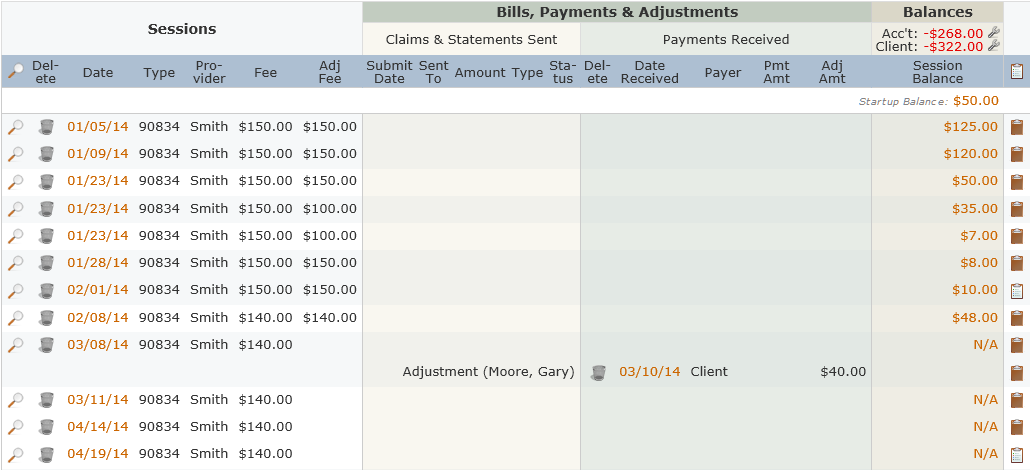
The table is divided into four groups of columns: 1) Sessions 2) Bills, Payments & Adjustments 3) Balances and 4) Notes:
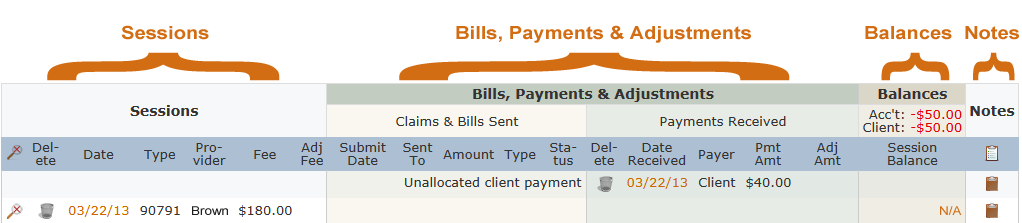
The largest column group - Bills, Payments & Adjustments - is subdivided into two smaller column groups: 1) Claims & Bills Sent and 2) Payments Received:

Finally, each of the individual table cells within a column group is labeled on the blue table header row. So, for example, the Sessions column group has the following labels for each of its table cells: Delete, Date, Type, Provider, Fee and Adj Fee. The Claims & Bills Sent column subgroup has labels for Submit Date, Sent To, Amount, Type and Status, etc. In addition, the blue row also holds two tools, one on each end, which work with the table as a whole:
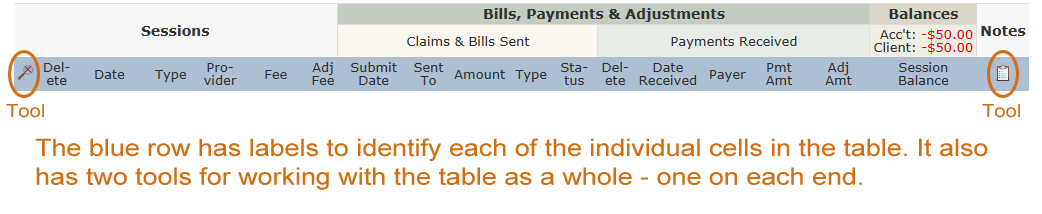
To help your eye group things better, the Sessions & Payments table also uses color-coding. The vertical column groups on either end of the table, (i.e., Sessions on the left and Notes on the right), are both white. The Balances column group is a beige color. Bills, Payments & Adjustments is color-coded according to its sub-categories: Claims & Bills Sent is a pale gold and Payments Received is green:

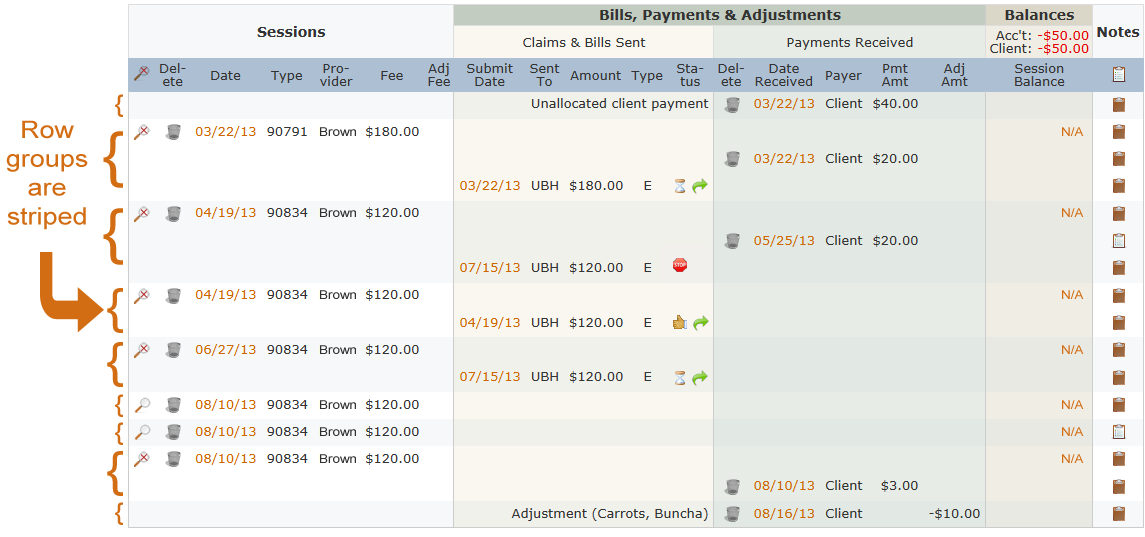
The Sessions & Payments table also has horizontal color-coding in that alternating row groups are zebra-striped:
Global Tools
What this isThe global tools are at the very top of the Sessions & Payments page. The tools in this section affect either how this page will be displayed or certain aspects of your client's account.The global tools are Date Range, Show # Sessions, the Balance Customization Tool and the Statement Template.What it looks likeThe global tools on the Sessions & Payments page look like this: 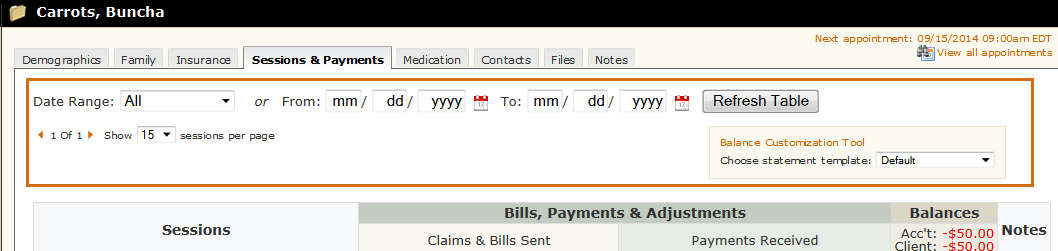 |
Where this isOpen a client's chart by clicking their name in the table on the Charts page then click the Sessions & Payments tab.
|
The Sessions & Payments global tools will each be discussed separately below.
Date Range
What this isThe Date Range tool allows you to select the dates of the sessions you'd like to view in the Sessions & Payments table. The default selection is All, but that can get unweildy with long term clients so you may want to change it. PSYBooks will remember your selection so, for example, if you choose Last 30 Days from the select box, each time you visit this client's Sessions & Payments tab, you'll be viewing the last 30 days of their session and payment activity.What it looks likeThe Date Range tool on the Sessions & Payments tab looks like this: 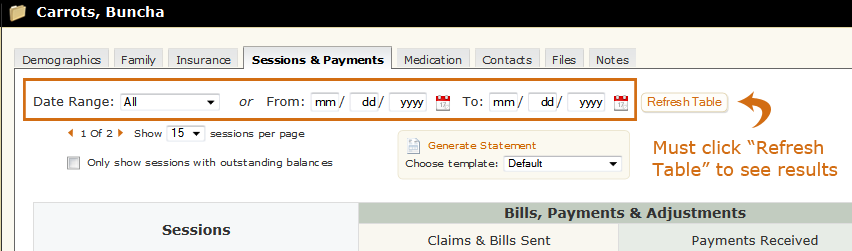 |
Where this isOpen a client's chart by clicking their name in the table on the Charts page then click the Sessions & Payments tab. The Date Range tool is near the top of the page.
|
The Date Range tool allows you to select the sessions you want to view on the Sessions & Payments table. There are two ways you can set this parameter. You can select an option from the select box:
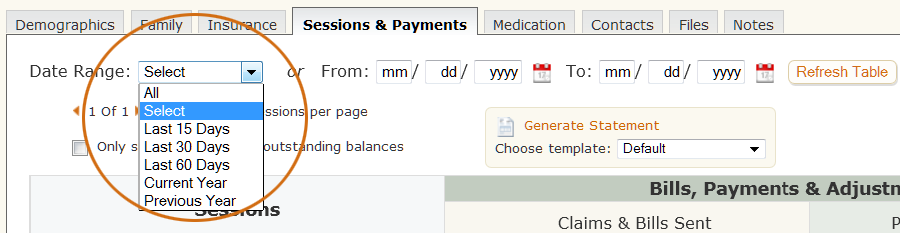
or you can set specific dates by entering them manually in the textboxes or by using the Date Picker tool (the red and white calendar icon):

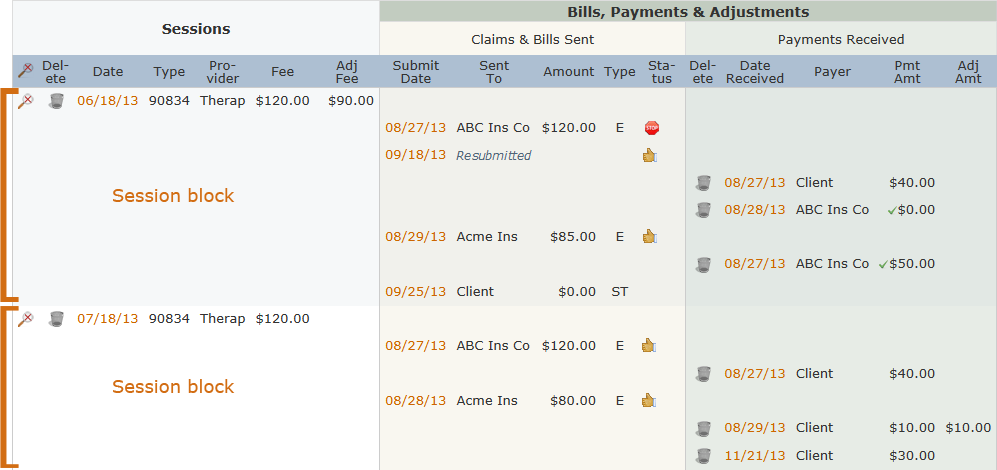
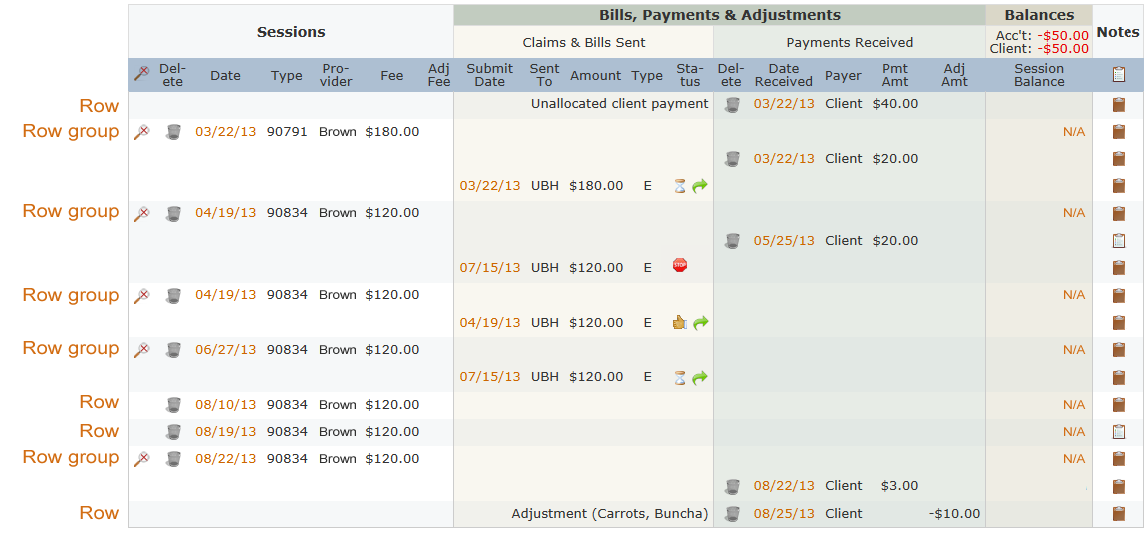
Once you make your selection, click the "Refresh table" button and the sessions in your Sessions & Payments table will be filtered to show only the dates you select. (It's important to remember to click the Refresh button. The table doesn't change until you do.) One thing to note is that the Date Range tool considers entries in "blocks". For example, a session block consists of the session plus all payments, adjustments, claims, statements, etc. that are grouped with that session. It's also possible to have other kinds of blocks, e.g, unallocated client payment blocks and adjustment blocks. Blocks are "zebra striped" in the Sessions & Payments table to make them easier to identify. A typical Sessions & Payments table illustrating the block concept might look something like this:
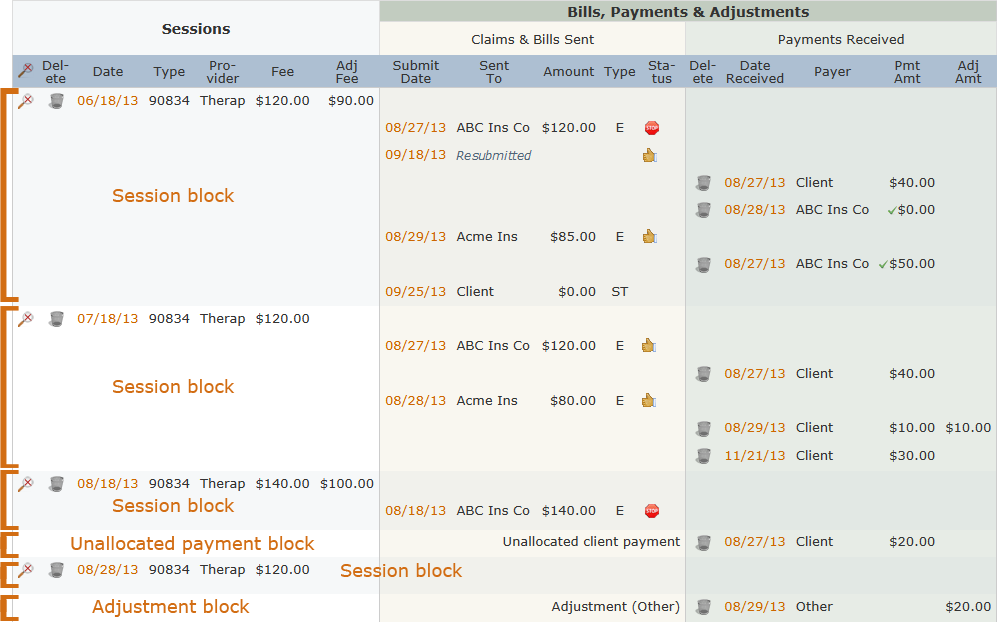
Using the table above, if the user sets the Date Range tool for 6/18/24 - 7/18/24, they would get the result below. Notice that while the session dates fall within the requested range, dates of some of the claims and payments do not. The Date Range tool only considers the date of a block's "parent" and ignores the dates of any "child" entries that belong to that parent:
Similarly, if the user entered a Date Range of 8/18/24 - 8/29/24, they would only be shown this portion of the table:
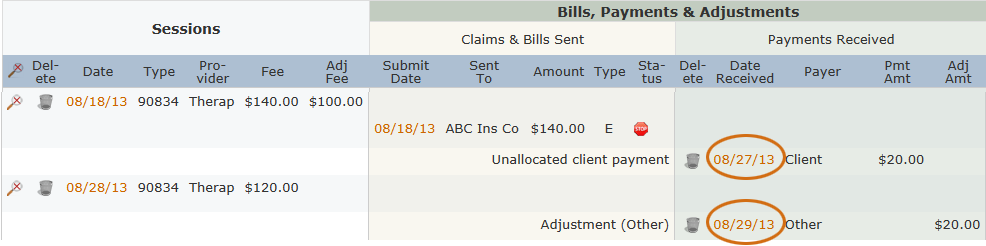
Notice that dates for unallocated payments and also for adjustments are in the Payments column group instead of the columnn for session dates.
Number of Sessions
What this isThe Number of Sessions tool allows you to choose how many sessions you want to display on a single page. PSYBooks will remember your choice for subsequent visits to this page.What it looks likeThe Number of Sessions tool on the Sessions & Payments page looks like this: 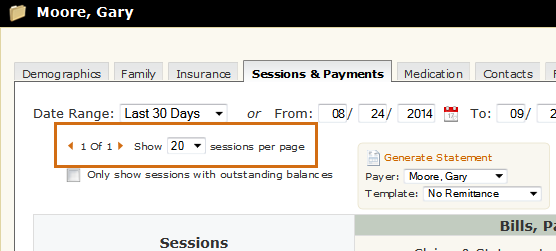 |
Where this isOpen a client's chart by clicking their name in the table on the Charts page then click the Sessions & Payments tab.
|
The Number of Sessions tools displays session row groups. In other words, if you select 10 from the Number of Sessions select box, PSYBooks will show you ten sessions plus all child items that relate to those ten sessions (payments, adjustments, claims, statements, etc.)
Only Show Sessions With Outstanding Balances
What this isThe Only Show Sessions With Outstanding Balances tool allows you to filter out sessions that have a zero balance.What it looks likeOnly Show Sessions With Outstanding Balances is a checkbox on the top left of the Sessions & Payments page. It looks like this: 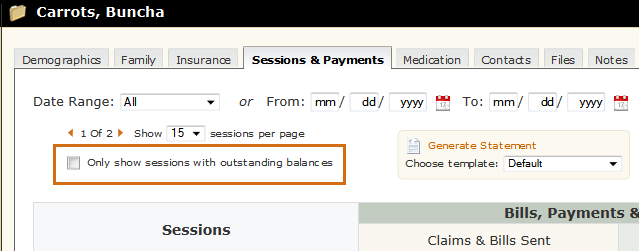 |
Where this isOpen a client's chart by clicking their name in the table on the Charts page then click the Sessions & Payments tab. Only Show Sessions With Outstanding Balances is in the header section on the left.
|
This tool is just a simple checkbox. Click it and all of your zero balance sessions will disappear, allowing you to focus on only those sessions with outstanding balances. Uncheck the box and all sessions reappear. Notice that this tool works within the parameters of the Date Range filter. For example, if the Date Range is set to the last 60 days, checking the Only Show Sessions With Outstanding Balances checkbox will show all non-zero balance sessions within the last 60 days.
Generate Statement
What this isThe Generate Statement tool allows you to create a statement PDF from the client's chart.What it looks likeThe Generate Statement tool on the Sessions & Payments page looks like this: 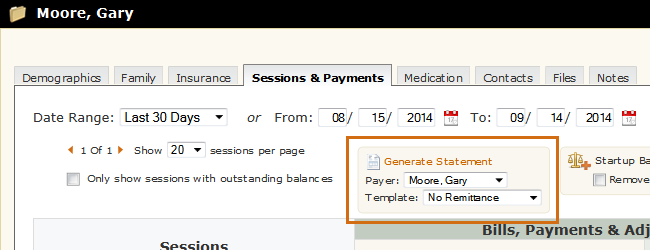 |
Where this isOpen a client's chart by clicking their name in the table on the Charts page then click the Sessions & Payments tab.
|
The Generate Statement tool is like the Client Statements tool in the Reports section except that you have the ease of producing a statement for a specific client with a single click right from their chart. All you have to do is to choose the date range you want the statement to cover. PSYBooks will calculate a beginning balance (based on all previous transactions), then will create a statement for the client that itemizes transactions for the specific dates you chose. You can also change the template you use for the statement or even create a new template, just like you can in the Reports section. The only thing the tool in the Reports section has that this one doesn't is the ability to create statements for all clients at once.
Startup Balance Tool
What this isThe Startup Balance tool allows you to enter an outstanding balance a client has when you first enter them into the program so you can apply subsequent payments to it.What it looks likeThe Startup Balance tool is on the Sessions & Payments page and looks like this: 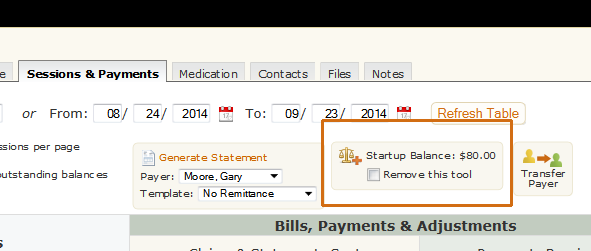 |
Where this isOpen a client's chart by clicking their name in the table on the Charts page then click the Sessions & Payments tab. |
The Startup Balance tool is for a client that had an existing balance - either from insurance companies and/or from the client - at the time the client was entered into PSYBooks. This tool can be extremely useful but if you're already finished with it, or didn't need it in the first place, it just clutters the page. Because of this, you can hide the tool by clicking the "Remove this tool" checkbox. This will permanently remove the tool from this one client's chart to enable you to keep the tool in charts that need it but remove it from those that don't.
As far as how it works, when you click the Startup Balance tool, the form that opens looks like this:
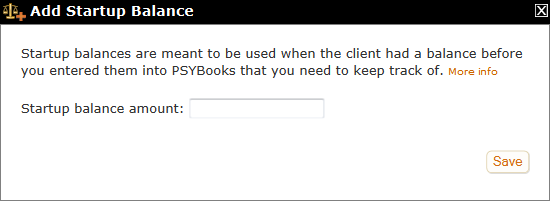
As you can see, the form is very straightforward. It just has a single field to allow you to enter the total amount that was owed on the client's account at the time you started using PSYBooks. In other words, you'd enter the sum of all amounts you expect to receive from insurance companies plus all amounts you expect to receive from the client in the Startup balance amount field.
Once you have an amount in a client's startup balance, you can allocate both client and insurance payments toward it. The "Allocate to Startup Balance" tool appears in the allocation sections of the Add Client Payment and the Add Insurance Payment forms:
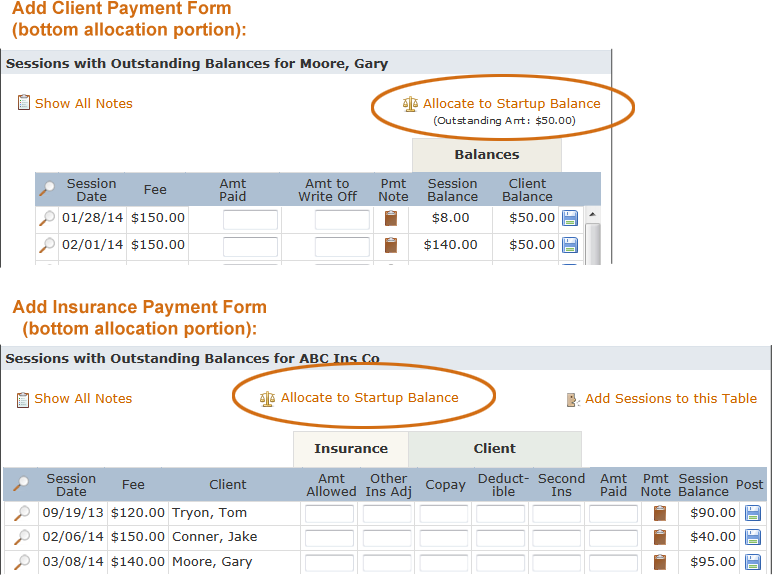
Clicking Allocate to Startup Balance from either form will get you to a window that looks something like this:
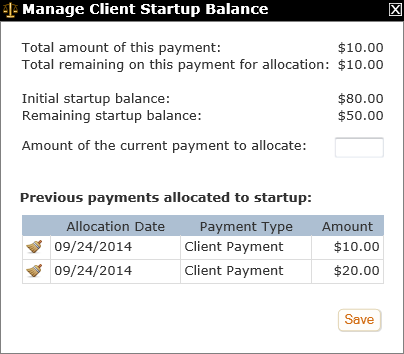
The Manage Client Startup Balance window allows you to allocate some or all of the current payment toward the client's startup balance and also shows you a summary table of previous payments that have been allocated to startup. You can clear payments from this table if they were entered by mistake or need to be allocated elsewhere or deleted.
Transfer Payer Tool
What this isThe Transfer Payer tool is used to reassign the responsible party for any session from one payer to another. It is only present in charts which have one or more additional payers added in the client's Contacts section.What it looks likeThe Transfer Payer tool on the Sessions & Payments page looks like this: 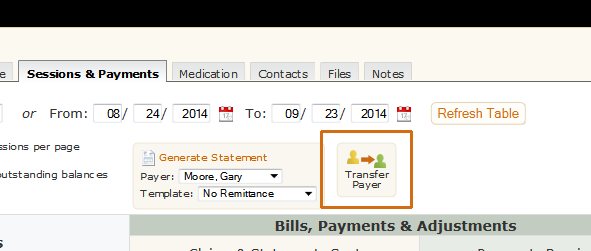 |
Where this isOpen a client's chart by clicking their name in the table on the Charts page then click the Sessions & Payments tab. The Transfer Payer tool is at the top of the table of those accounts that have added payers. |
The Transfer Payer tool only appears in client charts that have at least one payer other than the client added to the chart. (Payers are a type of "Contact" so they can be added in the Contacts tab.) Payers are the person or persons who may be responsible for paying the client's portion of the bill. They might be the client him/herself, one or more parents, a guardian or legal representative, etc. Payers are assigned on a session-by-session basis but there may be times when you want to transfer a session from one payer to another. The Transfer Payer tool allows you to do so.
When you click the Transfer Payer tool, the form that opens looks like this:
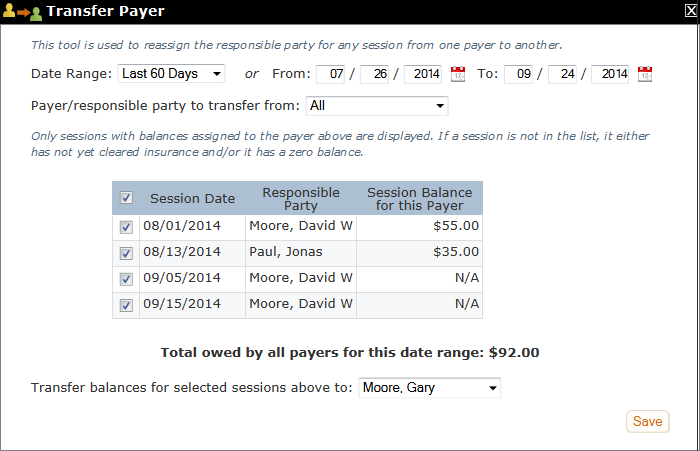
You can choose the range of session dates you want to work with at the top. After that is a line that says, "Payer/responsible party to transfer from". Both of these filters are just for you to choose which sessions you want to view. They can be helpful in situations where a client has a lot of sessions and you have a fairly specific idea about the ones with which you want to work. In other words, these filters determine which sessions will be displayed in the table. They do NOT determine which payers will actually be changed.
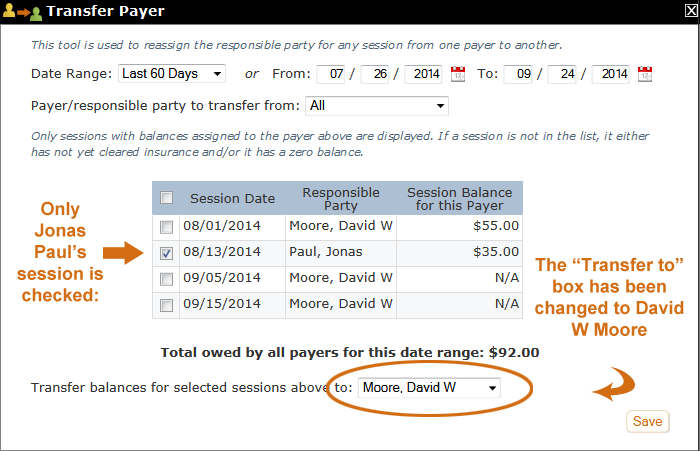
The checkboxes to the left of each session date are used to select the actual session(s) you want to change. By default, all checkboxes are checked, but you can uncheck all sessions by unchecking the checkbox in the blue header row, or you can uncheck individual sessions on a row-by-row basis. Once you've selected the sessions you want, the next step is to choose the payer you want to transfer the session balance(s) to in the select box at the bottom. For example, in the form above, if you wanted to change the session that's currently assigned to Jonas Paul to Gary W. Moore instead, you'd change the form so it looks like this:
When you click "Save", the resulting form will look like this:
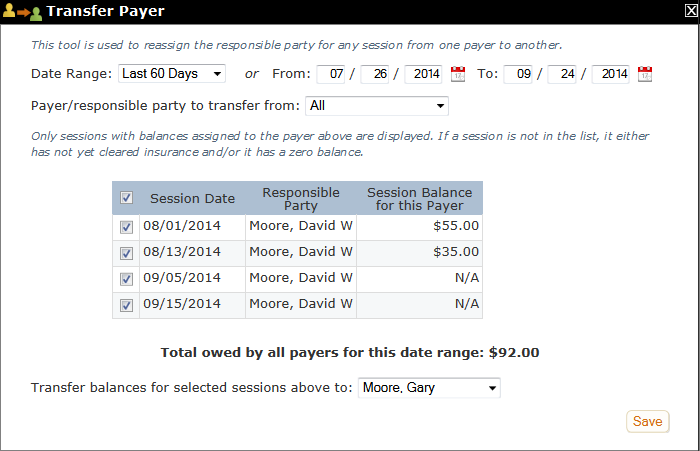
Notice that all sessions within this date range are now assigned to Gary W. Moore. The form remains open to allow you to double-check the changes and also to allow you to work with additional sessions.
Sessions in this table with an N/A in the Session Balance for this Payer column are probably sessions that have not yet cleared the insurance company. When insurance is involved, the client's portion of the bill cannot be calculated until all insurance payments have been entered.
Balance Customization
What this isThe Balance Customization tools are only visible in client charts that have one or more insurance companies. For therapists who are insurance providers, it can be difficult to determine exactly what a client's balances are at any given time. The Balance Customization tools give you several methods for computing balances to help make this task easier. There is one tool for customizing Account Balances and another for customizing Client Balances. Balance Customizations are set on the client level and can be changed as often as you like.What it looks likeThe Balance Customization tools are on the Sessions & Payments tab in a client's chart next to the Account & Client Balances. Each tool is a small wrench that looks like this:  |
Where this isOpen a client's chart by clicking their name in the table on the Charts page then click the Sessions & Payments tab. The Balance Customization tools are on the right side of the page by the Account and Client Balances.
|
If you're not an insurance provider, you will never need either of these tools and, in fact, if you don't enter your clients' insurance companies in their charts, you will never even see these tools. However, if you are a provider, the tools may come in handy. The Balance Customization tools - one for computing a client's total Account Balance and the other for computing the amount the client owes - only appear in clients' charts' that have at least one in-network insurance company. The tools allow you to switch back and forth among several different accounting methods to provide a more accurate picture of your client's transactions. You can select one method and stick with it, or change methods anytime you want to get a different perspective. If a client starts out with an insurance company that requires a $20 copay, then six months later, the same client changes to a new company that requires a $40 copay, you'll be able to make the adjustment with the Client Balance Customization tool so your accounting won't miss a beat. Also, these are client level tools, which means you can use one method with one client and another with others.
There are three methods for customizing the Account Balance: Default, UCR and Billing. The Client Balance can be customized in two ways: Default and Copay. In both the Account Balance tool and the Client Balance tool, the Default method is the billing method used by most medical billing programs, i.e., the UCR adjustment must have been set and all insurance payments posted before the amount the client owes can be calculated. If used correctly, this method works well and you never need to change it. However, since mental health practitioners tend to see clients on a more frequent, ongoing schedule than non-mental health practitioners, the Default billing methods may not be the best ones for your particular practice. If you're getting Account and/or Client Balances that aren't what you would expect, the Account Balance Customization tool and/or the Client Balance Customization tool may be able to help.
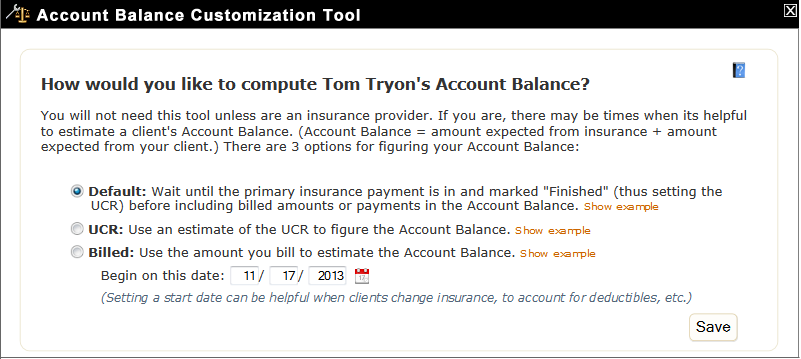
Account Balance Customization Tool
What this isA client's Account Balance consists of the total amount due from the insurance company plus the total amount due from the client. The Account Balance Customization Tool gives you a choice about how this balance is calculated on a client by client basis.What it looks likeThe Account Balance Customization tool is on the Sessions & Payments tab in a client's chart next to the Account Balance at the top of the table. It is a small wrench icon that looks like this: 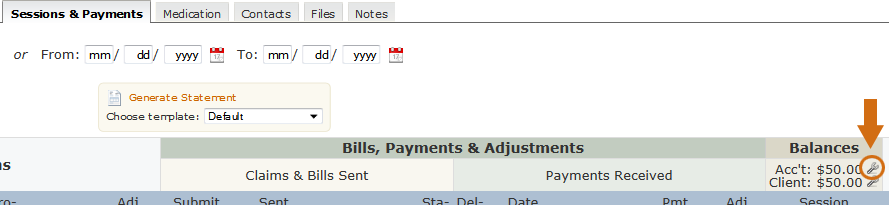 |
Where this isOpen a client's chart by clicking their name in the table on the Charts page then click the Sessions & Payments tab. The Account Balance Customization Tool is on the right side of the page by the Account Balance.
|
If a client doesn't use insurance or if you are out of network for their insurance, this tool will not appear in their chart. However, if you are a provider for their insurance it may come in handy. The Account Balance Customization tool gives you a choice of methods for computing a client's Account Balance (Account Balance = the amount owed by insurance + the amount owed by the client.) The tool is "client specific", which means you can have one setting for one client and other settings for others. With any one client, you can change back and forth between methods at any time or choose one method and stick with it. Each method has advantages and disadvantages and you may find that one works best with one client whereas another works best with another.
There are three ways to compute a client's Account Balance: Default, UCR and Billed. Each will be discussed separately:
- Default
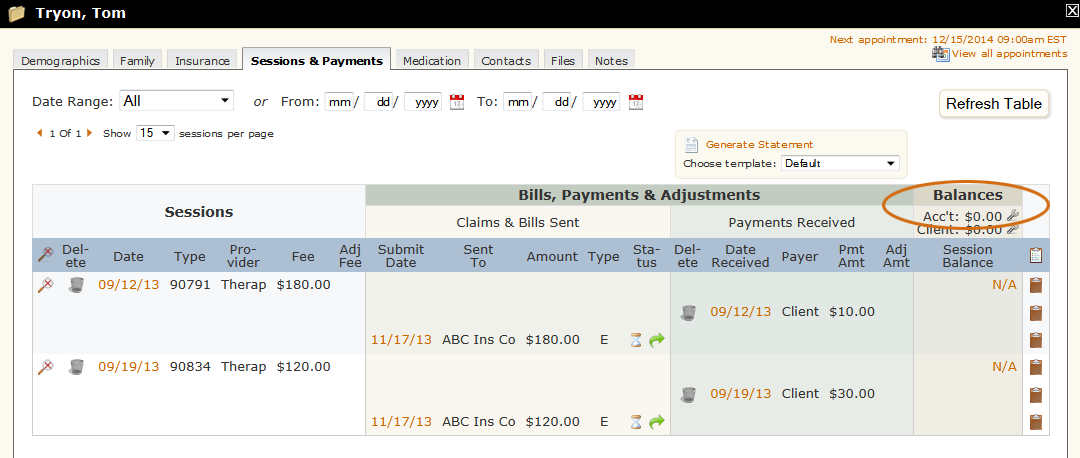
The Default method for figuring a client's Account Balance is the method used most frequently by medical billing software. With this method, the UCR (Usual and Customary Rate) and all insurance payments must be posted before the amount due from the client is calculated. The Default method works extremely well if you routinely wait until all insurance payments for a session are posted before you collect the client payment. If you do collect client payments at the time of the session, the Default method still works well for clients who are conscientious about paying and users who are conscientious about allocating client payments. However, if the client's payments are sporadic or if the user doesn't stay on top of allocations, the Default method may produce unexpected results. For example, consider the following scenario:
Client Tom Tryon has a session with Jane Therapist on 9/12 and pays $10.00 toward his expected copay of $20.00. On 9/19, Jane sees Tom for a second session and he gives her a check for $30.00 - $20.00 for the 9/19 session and $10.00 for the balance due on the 9/12 session. Jane is in a hurry so she allocates the entire $30.00 to the 9/19 session thinking she'll go back and fix it later. At this point, since no insurance payments have come in, we don't yet know what the insurance's UCR will be, nor do we know how much they will pay, so the account balance is still at $0.00, which is what we would expect. Notice the "N/As" in the Session Balance column for each of these sessions, which is further indication that these balances are not yet able to be computed and therefore cannot be added to the Account Balance:
Once insurance pays for a session, assuming it's the full amount the therapist expects to receive from that company, a Session Balance can be calculated. Continuing the scenario, on 9/30, Jane receives an insurance payment and EOB for the 9/12 session. The insurance company has set the UCR for the 9/12 session's CPT code at $80.00 and includes a check for $60.00 indicating that the rest is due from the client. Jane enters this information in PSYBooks and since this is the total amount she expects to receive from this insurance company, she processes the claim to Tom. However, Jane forgot about the allocation error in Tom's payments so that remains uncorrected. Notice what happens to the Account Balance now:
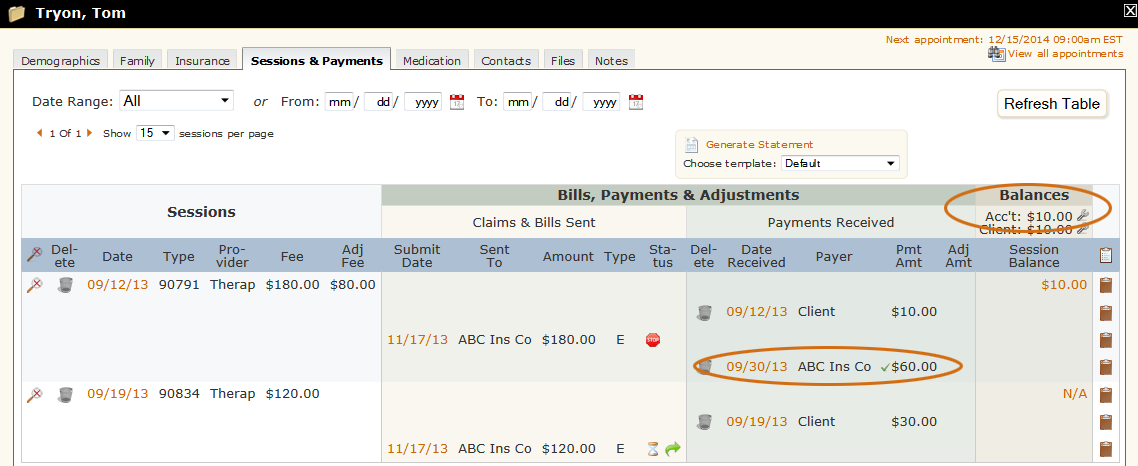
Because of the allocation error, the program assumes that Tom still owes $10.00 on the 9/12 session, so that session now shows a session balance of $10.00, which creates an erroneous Account Balance of $10.00. If Jane notices her mistake right away, she can easily correct it by clicking the date beside Tom's 9/19 payment of $30.00 and then reallocating that payment correctly. This would cause both the 9/12 session balance and the Account Balance to be recalculated with the correct balances. However, if Jane doesn't notice the error and especially if she continues to make allocation errors on subsequent payments she enters, it might eventually be difficult to understand what's really going on here.
The example illustrates both the main advantage and also the disadvantage of the Default Account Balance Method. The advantage is that, when used correctly, it is 100% accurate - potentially more accurate than either of the other two Account Balance billing methods. The main disadvantage is that it is only as accurate as the data it has to work with. With this method, the user has to make sure all of their entries, including payment allocations, are always correct.
A second disadvantage is that only sessions with complete payments from the insurance company are considered in the Account Balance. For example, in the scenario above, Tom's 9/19 session balance is still marked N/A. When insurance payments come in a timely fashion, this isn't really an issue. If you see a client fairly often, Account Balances will always lag behind since they have to wait for insurance payments, but eventually everything reconciles. However, if an insurance payment is NOT received for a certain session and the therapist fails to notice it, that session as well as any client payments allocated to it would never be considered in the Account Balance. Once again, the Default method, although accurate, is less forgiving than the other two methods for computing Account Balances.
- UCR
Technically, the UCR Account Balance method is considered an estimated method but as long as you know the insurance company's UCRs for the CPT codes you use, it will produce balances that are just as accurate as the Default method and more timely. With this method, you enter client's insurance company's UCRs for the CPT codes you normally use. Each session balance is then computed as you enter it, based on the amount you entered for the session's CPT code. The Account Balance is updated accordingly. Client payments are also deducted as you go which makes this method more forgiving of allocation errors and oversights than the Default method.
As an example, let's use the same scenario we had above and see what Tom's Account Balance would look like with the UCR method. Jane clicks the Account Balance Customization tool (the wrench icon by Tom's Account Balance) causing a window similar to this one to open:
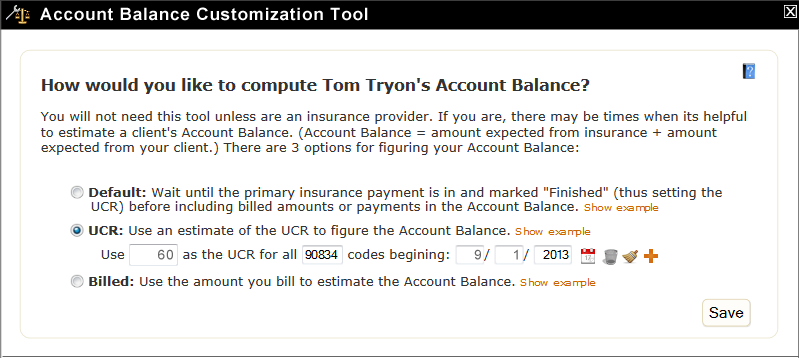
Since this is the first time Jane has opened the Account Balance tool in Tom's chart, it is set for the Default billing method. Jane decides to try the UCR method to see if that gives her more accurate results. So far, she has used two CPT codes with Tom: 90791 for the initial appointment and 90834 for the subsequent appointment. When Jane chooses the UCR radio button, another row opens beneath it where she can enter the first UCR:
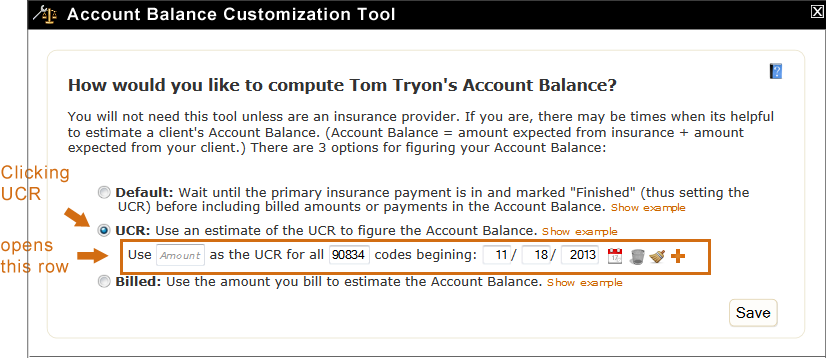
Notice that 90834 is already filled in. This is just a user aid since almost all therapists use 90834s at least occasionally. If you don't need a 90834, you can just type over it. However, this is one of the two CPT codes Jane needs so she'll fill in the amount Tom's insurance company pays for a 90834, which is $60.00. Jane also wants to change the date. By default, this tool opens with today's date in the UCR date textboxes. Jane wants to make sure she includes all of Tom's sessions so she changes the date to 9/1/13:
Jane also wants to enter $70.00 as the UCR for a 90791. To do that, she must click the orange plus (+) at the end of the row to add an additional row:
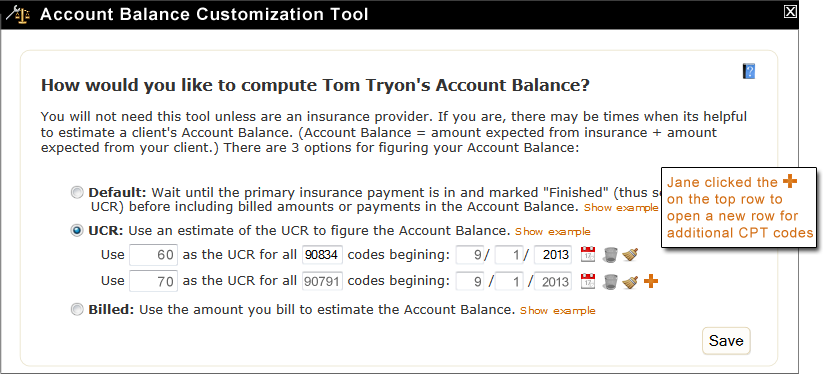
Jane fills in the values she needs for the 90791 and clicks Save. Let's look at Tom Tryon's Sessions & Payments table to see what happened:
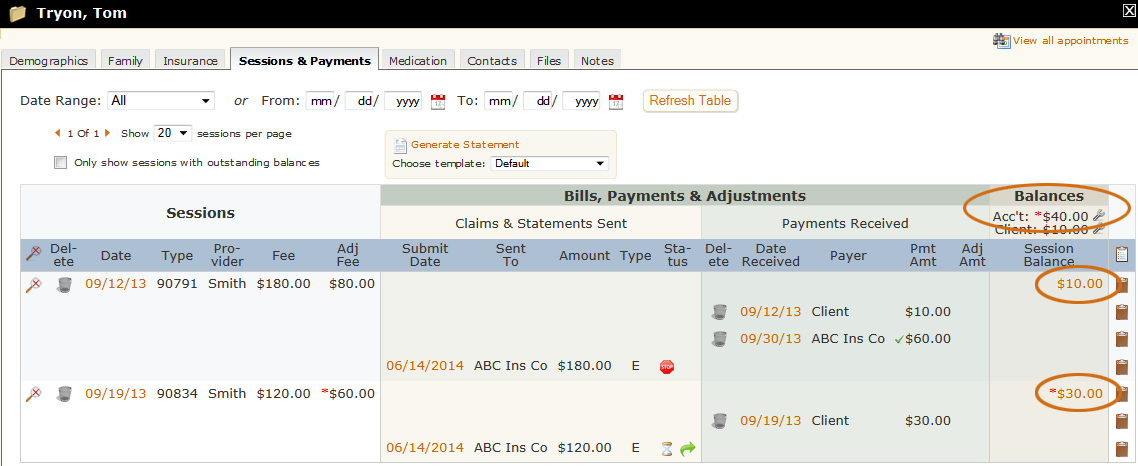
Notice that the Account Balance now has a red asterisk beside it. This lets you know that this balance has been estimated. It may not be accurate once all payments are in and reconciled correctly. The estimated Account Balance on Tom's account is listed as *$40.00. If you look at each of the session balances, you'll see that the balance for the 9/12 session is $10.00. This amount does not have an asterisk beside it because, since Jane has posted the insurance payment and included the actual UCR, PSYBooks has been able to provide an accurate balance for this session. The balance on the 9/19 session is *$30.00, an estimation, since we don't have an insurance payment to apply toward this session's balance. PSYBooks derived the 9/19 session balance by taking Jane's estimated UCR for a 90834 of $60.00 and subtracting Tom's $30.00 payment. The Account Balance (amount expected from insurance + amount expected from client) has been estimated to be *$40.00, i.e., ($10.00 for the 9/12 session) + (*$30.00 for the 9/19 session). We don't really know yet how accurate this estimation might be because although we have a sense of what the UCR for a 90834 is, there are still missing pieces in the puzzle. We could estimate more closely if we knew how much the insurance is expected to pay for a 90834 or what Tom's expected copay will be. However, the estimated Account Balance of $40.00 is likely to be more accurate than the non-estimated Account Balance of $10.00.
- Billed
The Billed method for computing Account Balances almost always produces less accurate results than the UCR method, but is still helpful in some situations. The Billed method uses the amount the therapist bills (i.e., the session fee) as the assumed allowed amount. The advantage is that Jane will be able to see individual session balances without having to wait for the insurance payments. Let's look at what Tom's Sessions & Payments table would look like with the Billed method before the insurance payment comes in:
Notice that now the Account Balance is based on the amounts that Jane billed and that it is not dependent on whether the UCR or any insurance payments have been received. Also, since we're computing Session Balances as we go, we can also deduct client payments wherever they appear in the table. This means that Jane's account allocation error is less of an issue. The total amount the client has paid (in this case, $40.00) is deducted from the total billed amount ($300.00) to produce an Account Balance of $260.00.
Client Balance Customization Tool
What this isThe Client Balance is the amount your client owes you and is the amount that's used when you create a client statement. The Client Balance Customization Tool gives you a choice about how this balance is calculated on a client by client basis.What it looks likeThe Client Balance Customization tool is at the top of the table on the Sessions & Payments page and looks like this:  |
Where this isOpen a client's chart by clicking their name in the table on the Charts page then click the Sessions & Payments tab. The Client Balance Customization Tool is at the top right of the table by the Client Balance.
|
The Client Balance is important because it's the balance that shows how much your client owes you. As such, it's also the balance that's used when you create a client statement. When insurance is not involved, computing a client balance is very straightforward because you just deduct the amount the client pays from the amount they owe. However, if you're a provider for the insurance company, computing the client balance is a bit harder.
The normal way of calculating client balances is to wait until all insurance payments are in and the allowed amount for the session is set before determining the amount the client owes. This is the default method used in PSYBooks. However, as was seen with the examples in the discussion of calculating account balances, this method can produce some unexpected results. For example, let's revisit the fictional client scenario we used above in discussing the account balance. The client, Tom, was seen by therapist Jane for a 90791 on 9/12 and a 90834 on 9/19. At the 9/12 session, Tom paid $10.00 toward his expected copay of $20. At the 9/19 session, he paid $30.00 - the copay for the 9/19 session plus the remaining $10.00 he expected to owe for the 9/12 session. An insurance payment was received on 9/30 that set the allowed amount for the 90791 at $80.00 and paid $60.00. Jane has not yet received the insurance payment for 9/19. The screenshot below shows the default method of computing the client balance for these two sessions:

Tom's balance on the screenshot above shows $10.00. We are fairly certain that his balance at this point is actually $0.00 since he paid Jane an extra $10.00 at the 9/19 session. However, the default method doesn't take that into account since insurance hasn't yet paid on the 9/19 session. (Notice the "N/A" in the Session Balance column for the 9/19 session, indicating that that balance cannot yet be determined.)
This is where the Copay client balance method can help enormously. The Copay method allows you to enter the amount you anticipate your client's copay will be for the various CPT codes you have billed. To use this tool, Jane would click the Client Balance Customization tool, which is the small wrench icon next to the Client Balance on Tom's Sessions & Payments tab:

Clicking the Client Balance Customization tool opens this window:

As expected, the setting is currently on the Default method. Changing from the Default to the Copay method opens a new row to allow the user to enter additional information:

Jane enters 20 as the expected copay for a 90834 and she changes the start date to 09/01/2013 so it will include all of Tom's sessions:

Before she saves the form, she realizes that she needs to enter the copay for a 90791 since she has also billed Tom for that CPT code. She clicks the orange plus beside the first row to open a new row for this additional information:

Jane clicks "Save" and then checks Tom's Client and Session Balances again:

Tom's Client Balance now has a red asterisk beside it, indicating that it's an estimated amount but it's showing the zero balance that we believe to be more accurate: *$0.00. If you are reasonably certain of your client's copays, the Copay Client Balance Method can be an extremely accurate way to compute these balances.
Whether you use either of the balance customization tools is entirely up to you. You can play with them for a while and see if you like them and always go back to the Default settings if you prefer. These tools just apply a different formula for computing your balances - they don't change any of your data.
The Table
What this isThe Sessions & Payments table consists of many different table cells, each of which holds information about your client's session and payment transactions. The blue table header row labels each column to help you identify what's in each cell.What it looks likeThe blue table header row of the Sessions & Payments page looks like this:  |
Where this isOpen a client's chart by clicking their name in the table on the Charts page then click the Sessions & Payments tab.
|
We'll discuss each of the individual table cells by column group or subgroup, beginning with the Sessions column group:
Sessions Columns
What this isThe Sessions section of the Sessions & Payments table displays information about your session. Columns within the Sessions column group are: Show/Hide, Delete, Date, Type, Provider, Fee and Adj Fee.What it looks likeThe Sessions column group of the Sessions & Payments tablelooks like this:  |
Where this isOpen a client's chart by clicking their name in the table on the Charts page then click the Sessions & Payments tab.
|
Table cells in the Sessions column group
Sessions > Show/Hide
When a session is entered in a client's chart, it appears here in the Sessions & Payments table. Subsequently, any bills, payments, adjustments or notes that are made against that session are listed directly below it, creating a session "row group". The default view of the Sessions & Payments table is for all entries except Notes to be visible, resulting in something that might look like this:
Notice that some of the sessions that have been entered are listed as rows instead of row groups. This is because those sessions do not yet have anything applied to them - they are stand-alone sessions with no other items listed beneath them. Also, non-session items such as payments or adjustments that have not been allocated to a session are listed on rows by themselves, such as the Unallocated client payment at the top of the table above and the Adjustment at the bottom.
By default, session row groups have a Hide icon (
 ) at the beginning of the row group. Clicking the Hide icon will hide everything except the parent row that contains the session. In other words, all "child" rows of the session row will be hidden. When the child rows are hidden, the Hide icon is replaced by a Show icon (
 ) which, when clicked, opens the row group again. Open and closed session row groups look like this:
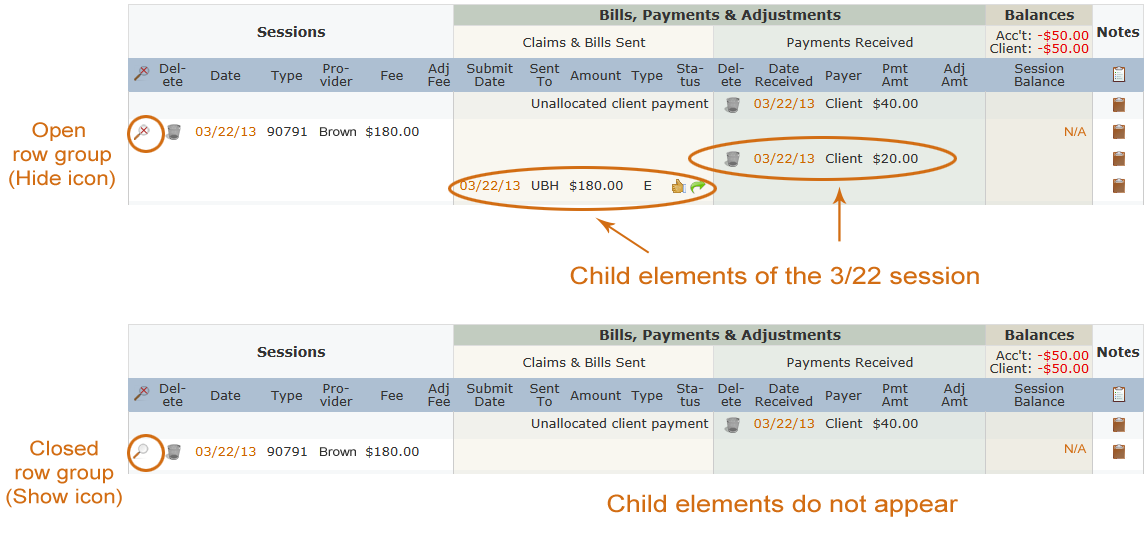
Sessions > The Global Hide Tool
There is also a Global Hide Tool in the blue table header row. It's function is to allow you to hide some of the details in the table to make it easier to find things:

When you click the Global Hide Tool, a window like the one below opens:

You can choose the option or options you need to produce the view you want. For example, if your client's balance isn't what you expect it to be, you may have an unallocated adjustment somewhere in the table. In the default view, the first four sessions in the client's Sessions & Payments table might look something like the screenshot below:
As you can see, it might be difficult to find a single adjustment with all the details showing and the screenshot is only for four sessions. Clicking the Global Hide Tool and selecting "Everything but unallocated adjustments" will hide all items in the table except the main row for each session plus what you requested to see: the unallocated adjustments. The result might look something like the example below, which would easily allow you to see the adjustment that needs to be allocated:
Sessions > Delete

The tool for deleting a session is the trash can icon. Deleting a session is allowed in PSYBooks but it may not always be advisable, especially when payments and/or adjustments have been allocated to the session. If you do delete a session, any allocations to the session will be retained in the program but become unallocated amounts. A PDF of the information in the session will be obtainable from the Activity Log in the Reports section, but you will not be able to restore the session. Deletions are permanent.
Sessions > Date (Edit/View Session)

The orange session date link is an edit and/or view session tool. If the session has already been processed to an insurance company (i.e., a CMS-1500 has been generated), clicking this tool allows you to view the session form that was used to generate the CMS-1500. If the session has not been processed to an insurance company, clicking this tool opens an Edit Session form allowing you to make changes to the session.
Sessions > Type

This column displays the CPT code you entered on the Add Session form. If you used a Custom Procedure Code (i.e., one you've created specifically for your practice such as Supervision, Consultation, Cancellation Fee, etc.), and the Custom Code has a number, it will be displayed here. If not, the column will be blank.
Sessions > Provider

This column in the Sessions & Payments table displays the first 6 letters of the last name of the provider who generated the Add Session form.
Sessions > Fee

This column displays the Fee that was entered on the Add Session form.
Sessions > Adj Fee

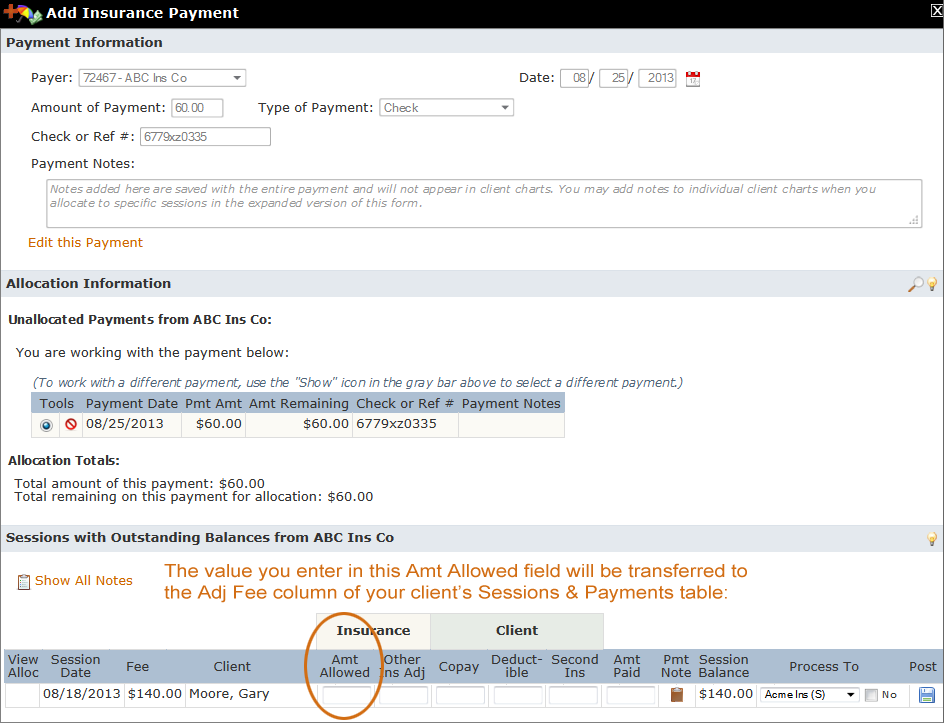
The Adjusted Fee column is for providers who accept insurance. This column is filled in by PSYBooks from values entered with The Add Insurance Payment Tool and represents the Usual and Customary Rate allowed by the insurance company. The example above doesn't have anything in the Adjusted Fee column because although a claim has been sent to the insurance company, no insurance payments have been entered. When an insurance payment comes in, PSYBooks will carry the amount from the Amt Allowed column of the Add Insurance Payment form to the Adj Fee column in the Sessions & Payments table above. The Amt Allowed field of the Add Insurance Payment form looks like this:
Claims & Bills Sent Columns
What this isThe Claims & Bills Sent column group of the Sessions & Payments table provides information about claims that have been processed to insurance companies and statements that have been processed to your clients. Individual columns in this section are Submit Date, Sent To, Amount, Type and Status.What it looks likeThe Claims & Bills Sent column group on the Sessions & Payments page looks like this:  |
Where this isOpen a client's chart by clicking their name in the table on the Charts page then click the Sessions & Payments tab. Claims & Bills Sent is a section of the table.
|
The Claims & Bills Sent section is color-coded a light gold and is a subgroup of the larger Bills, Payments & Adjustments section of the Sessions & Payments table. Individual column headers in Claims & Bills Sent are Submit Date, Sent To, Amount, Type and Status. Each will be discussed separately below.
Claims & Bills Sent > Submit Date (View Statement/CMS)

The value in the Submit Date column is a tool that allows you to view the CMS-1500 (if your client has insurance) or the client statement that was generated with this session. If you need to print a statement or CMS form for a single session, you can do it from here. (Statements or CMS forms for multiple sessions can be generated in the Reports section of PSYBooks.)
Claims & Bills Sent > Sent To

The Sent To column displays the Short Name of the insurance company to whom the claim was sent or, for statements, the name of your client. This column makes it easy to see where you are in the payment process especially when a client has more than one insurance company. You can quickly see when bills have been sent to the primary insurance, the secondary and finally, to the client.
For example, in the screenshot above, a claim has been sent to UBH (the primary insurance) but no one else. The client has already made a payment (listed in the green Payments Received area) but the user has not actually issued a statement for the client. PSYBooks provides some tools for issuing client statements automatically once all insurance payments have been posted. It's also possible to generate client statements at any time in the Reports section.
Claims & Bills Sent > Amount

The Amount column in the Claims & Bills Sent section displays the amount due on the statement or CMS-1500 form. The primary insurance claim amount will always be the same as the Fee in the Sessions section.
Claims & Bills Sent > Type

The Claims & Bills Sent > Type column can have three possible values: E, P or ST. E means that it's an efile claim, P indicates a print insurance claim and ST represents a client statement.
Claims & Bills Sent > Status
The Status column of the Sessions & Payments table is only used for claims that are efiled. In that circumstance, the Status column actually has two separate tools: the Status tool and the Resubmit tool. Each will be discussed below:
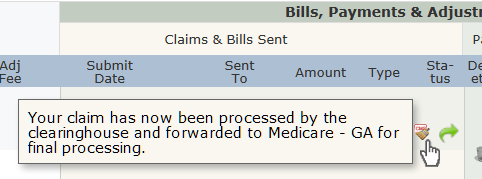
Status Tool

The Status tool gives you a visual representation of how your claim is progressing through the clearinghouse/insurance procedures. The normal route a claim takes is:
- PSYBooks sends your claim to the clearinghouse.
- The clearinghouse checks it for errors. If there are errors, the clearinghouse sends a message back to PSYBooks. In most cases, the clearinghouse will tell you what the errors are, which means you can fix them and resubmit the claim. If there are no errors, the clearinghouse forwards the claim to the correct insurance company.
- The insurance company either accepts or rejects the claim.
There are five possible icons you may see in this area depending on where the claim is in the above process:
 Pending: The claim is still waiting for a response from the clearinghouse.
 Partial Acceptance: The claim has been accepted by the clearinghouse but the insurance company has not yet responded.
 Clearinghouse Rejection: The claim has been rejected by the clearinghouse as having errors.
 Accepted: The claim has been accepted by the insurance company.
 Insurance Rejection: The claim has been rejected by the insurance company.
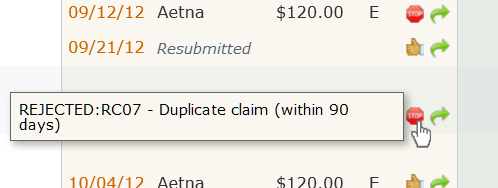
When you see a status icon in the app, if you move your cursor over it, you can get additional information about the status of the claim. For example, here's a sample hover message for a Partial Acceptance status:
This feature can be especially helpful when a claim is rejected because the tooltip may give you information that tells you why the claim was rejected. In some cases, you will be able to correct the claim and then resubmit. An example of a Rejection hover message is:
The Edit & Resubmit Tool
The Status column also has a Resubmit tool (
 ) which appears next to the Status tool:
Clearinghouse Errors:
If the claim is rejected due to clearinghouse errors (e.g., an incorrect client birthday or address), you can simply correct the issue based on the clearinghouse's feedback and resubmit the claim. (You can also use this tool as a regular Resubmit tool in cases like the screenshot where the claim may appear to be stuck on the "Pending" status.)
Insurance Company Rejections:
For rejections originating from the insurance company, additional edits to the claim form are often required. In these cases, clicking the Edit & Resubmit Tool will open the Edit Claim Form, allowing you to make the necessary adjustments before resubmitting the claim.
This dual functionality makes the Edit & Resubmit Tool a versatile solution for regular resubmits (when the claim seems not to have made it to the Clearinghouse) and also for managing both clearinghouse and insurance company rejections efficiently. Clicking the Edit/Resubmit tool in that case of an insurance rejection will open this form:
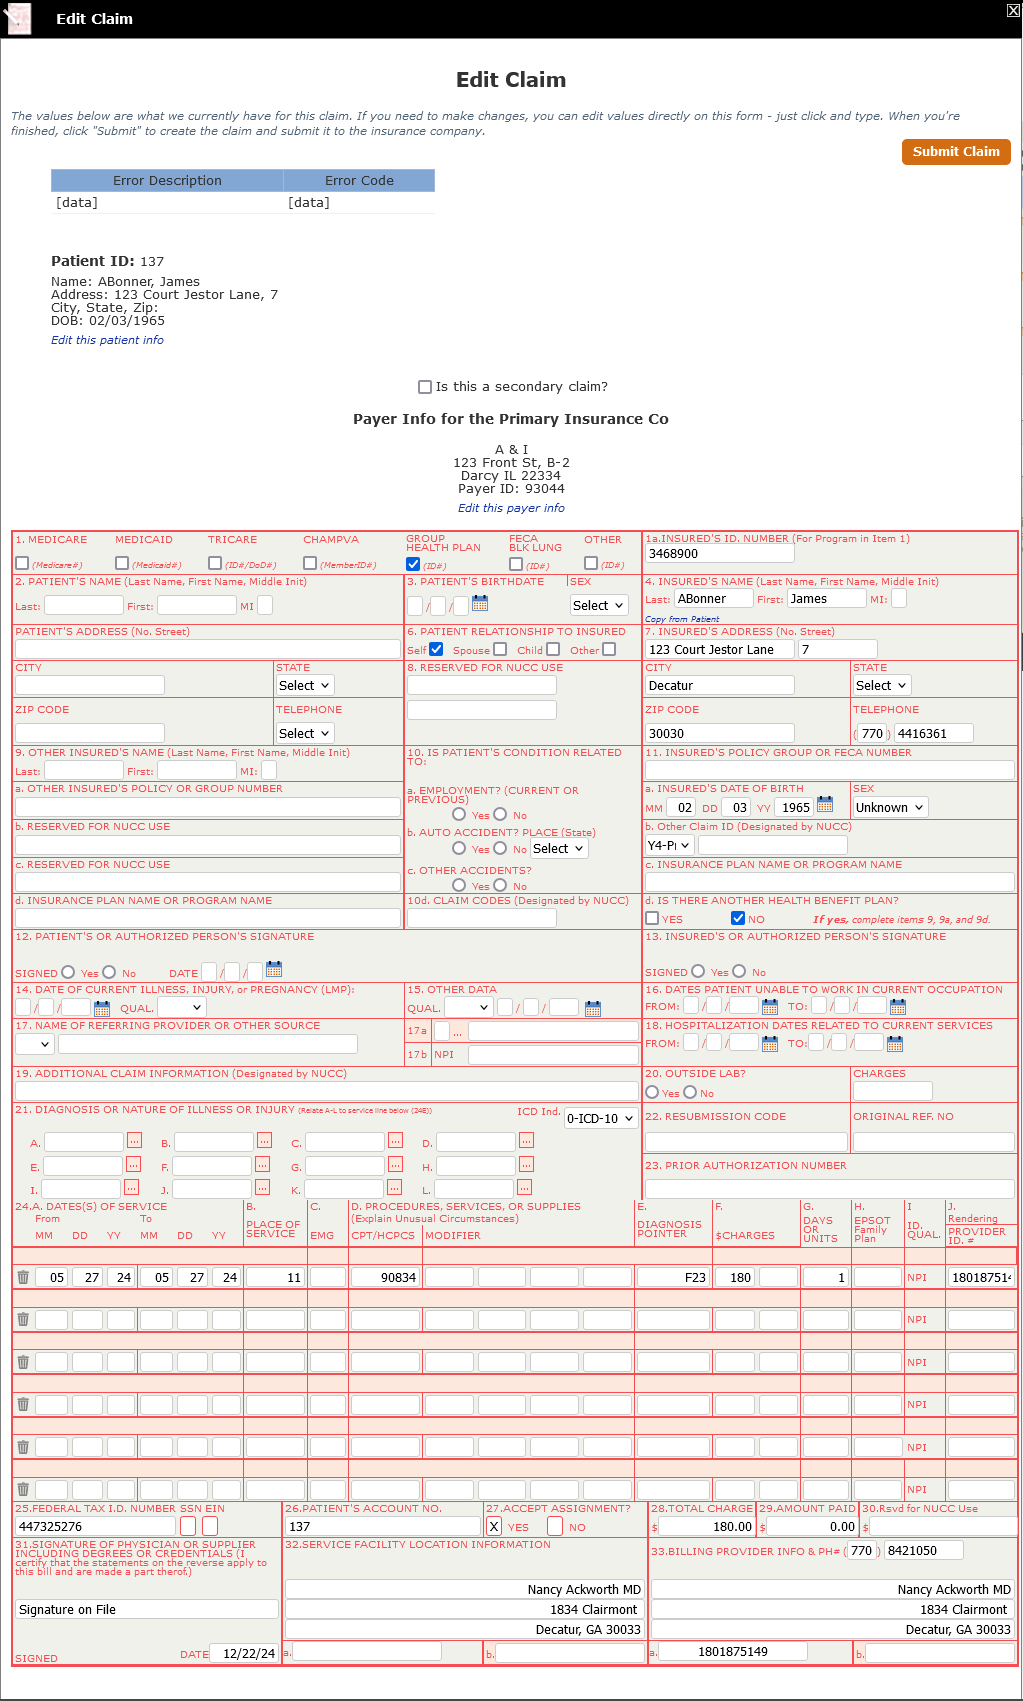
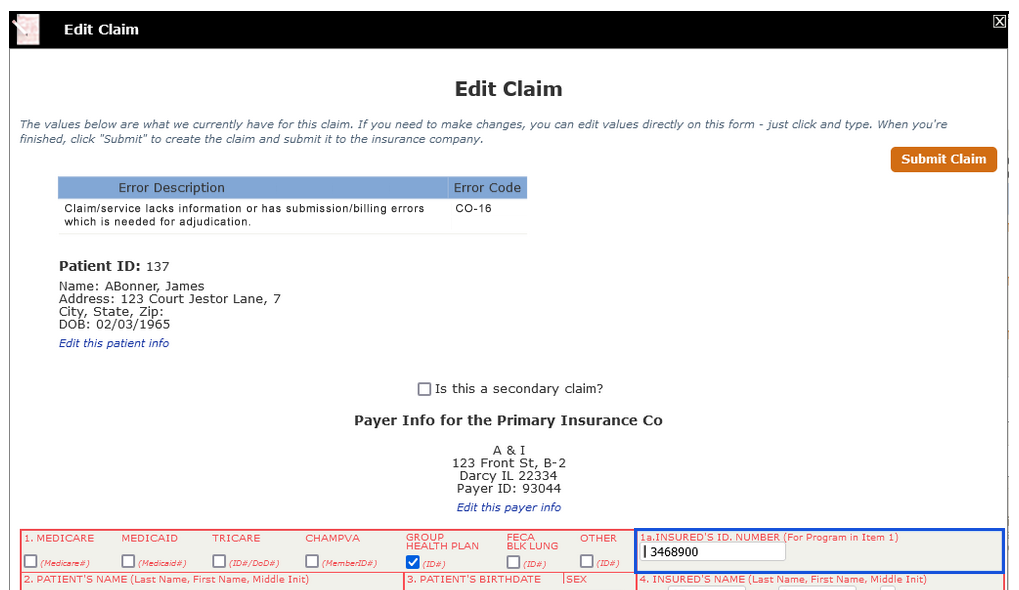
If this were an actual claim that had been rejected by the insurance company, data would be filled in, not blank like it is in the image above. For example, the table at the top with columns named Error Description and Error Code would tell you WHY the claim was rejected. A common reason for rejection would be this:

This code most likely means that the patients ID number (which goes in Box 1a on the CMS form) is either incorrect or missing. Assuming that to be the case, the program will highlight Box 1a on the form and put your cursor there so it will be easy to enter the data and resubmit. It might look something like this:
Of course, if you discern that it is NOT Box 1a that needs to be changed, but rather, something else, you can move the cursor and type in any box you like. However, if the number in 1a is indeed wrong or missing, you'll be able to do so quite easily - and then click the "Submit Claim" button at the top. Your claim will be resubmitted in a way that will NOT cause it to be rejected as a duplicate claim.
Payments Received Columns
What this isThe Payments Received column group of the Sessions & Payments table provides information about payments and adjustments from clients and/or insurance companies. Individual columns in this section are Delete, Date Received, Payer, Pmt Amt and Adj Amt.What it looks likeThe Payments Received section is a subgroup of the larger Bills, Payments & Adjustments section of the table on the Sessions & Payments page of the client's chart.  |
Where this isOpen a client's chart by clicking their name in the table on the Charts page then click the Sessions & Payments tab. Payments Received is a section of the table.
|
The Payments Received section is color-coded in green and is a subgroup of the larger Bills, Payments & Adjustments section of the Sessions & Payments table. Individual column headers in Payments Received are Delete, Date Received, Payer, Pmt Amt and Adj Amt. Each will be discussed separately below.
Payments Received > Delete

Like the Session Delete tool, the icon for the Payment Delete tool is also a trash can. Before we can talk about the Payment Delete function, we need to discuss a bit about payment allocations.
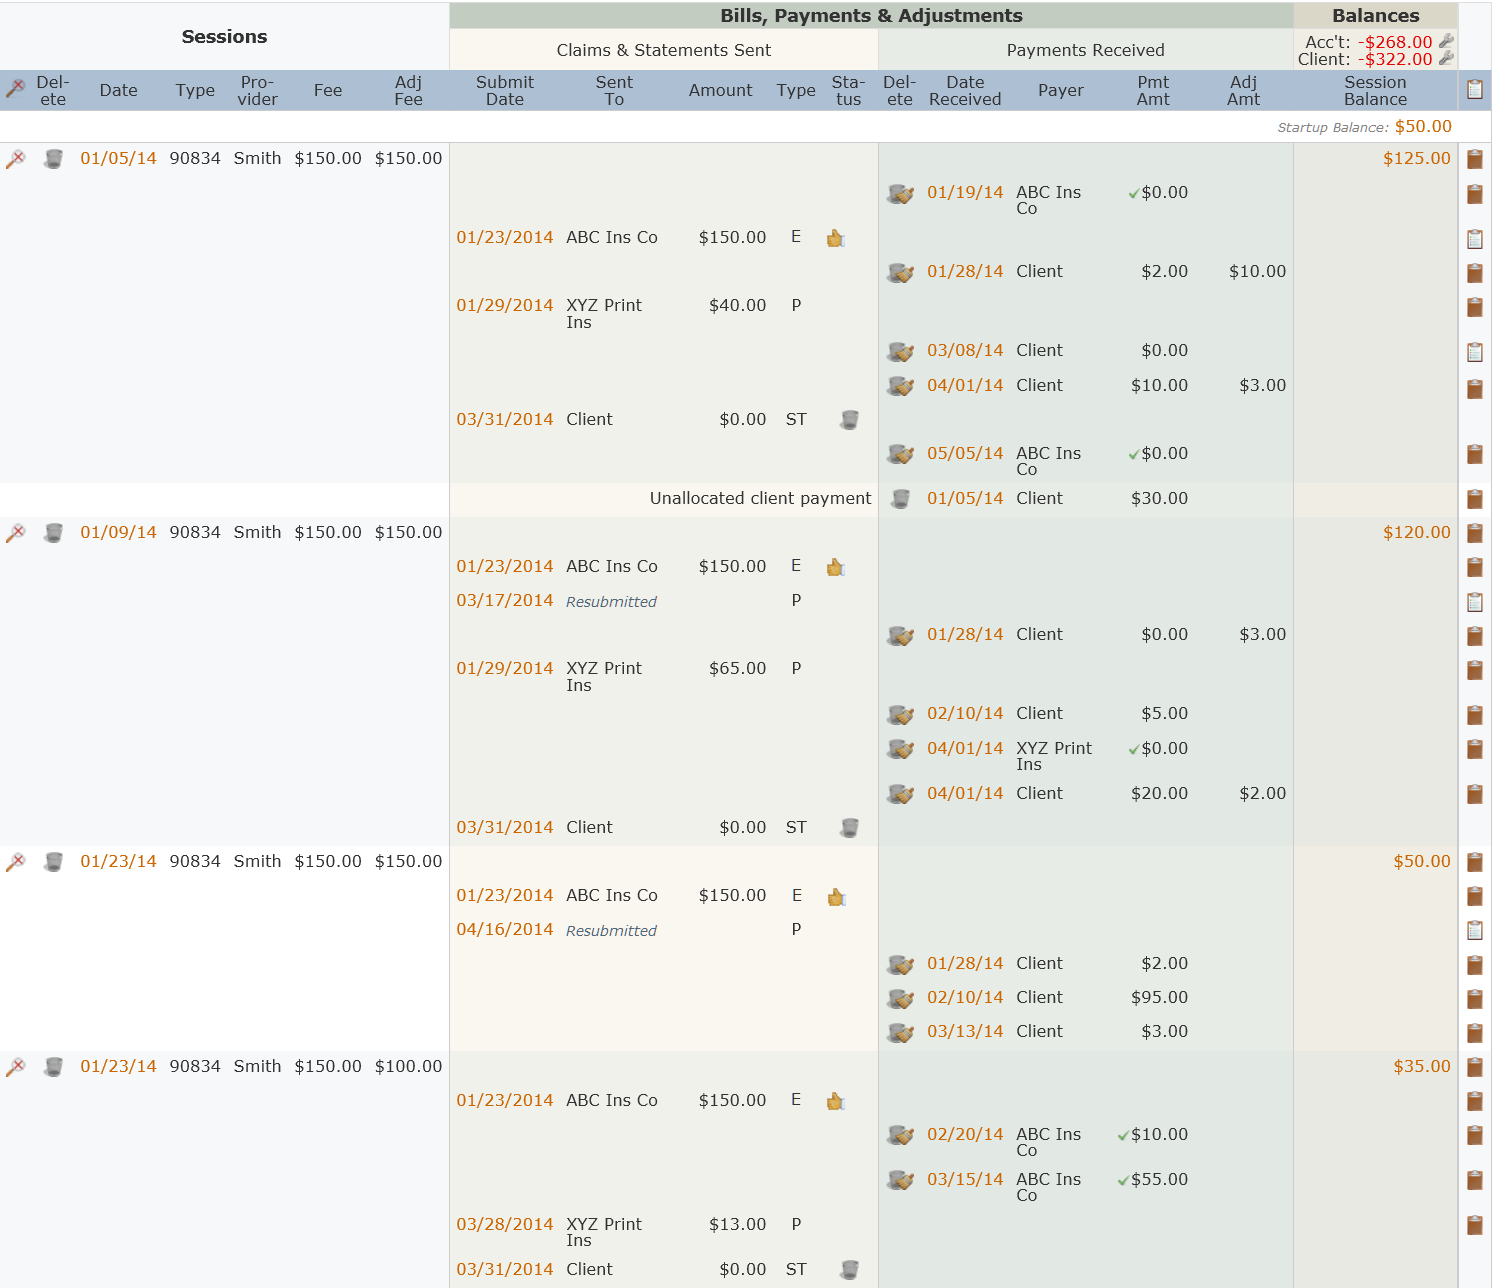
The "payments" you see listed in the Pmt Amt column of the Sessions & Payments table are actually payment allocations, i.e., the amount of a payment that you've allocated to that particular session. The screenshot below shows 5 client "payments" - $40 that's been applied to the 6/18 session, another $40 applied to the 7/18 session, two $10 payment amounts applied to the 8/18 session and an unallocated payment of $30 that hasn't been applied to any sessions yet:
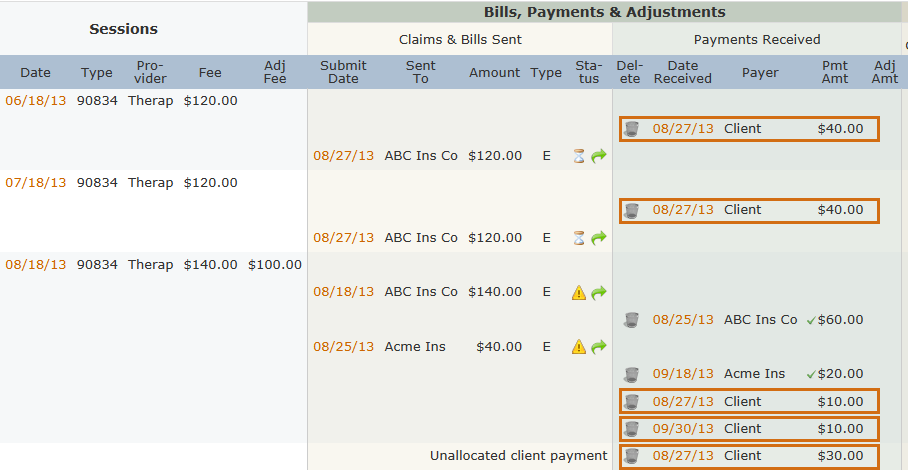
By looking a little more closely, we can see that four of the five payments listed have the same date, i.e., 8/27/2013. We can guess that maybe those are all part of a larger payment but we don't know for sure.
The issue for the delete tool is that you need to know exactly what you're deleting. Consider these scenarios:
- Let's say you applied $40 of a $100 payment to the 6/18 session and you really meant to put it on the 7/18 session. In this case, what you'd like to do is delete the $40 allocation. You don't want to delete the entire $100 payment and have to start all over again.
- There may be other times, however, when you really want to delete an entire payment. For example, maybe you received a payment for $100 and allocated all of it to various sessions in Jon Smith's account . . . and then you realized the payment had actually been for Jane Smith.
PSYBooks lets you see if the payment amount you want to delete is a stand-alone payment or if it's part of a larger payment. In the above screenshot, clicking the trash can by the first $40 payment (the one allocated to the 6/18 session) opens this Confirm window:
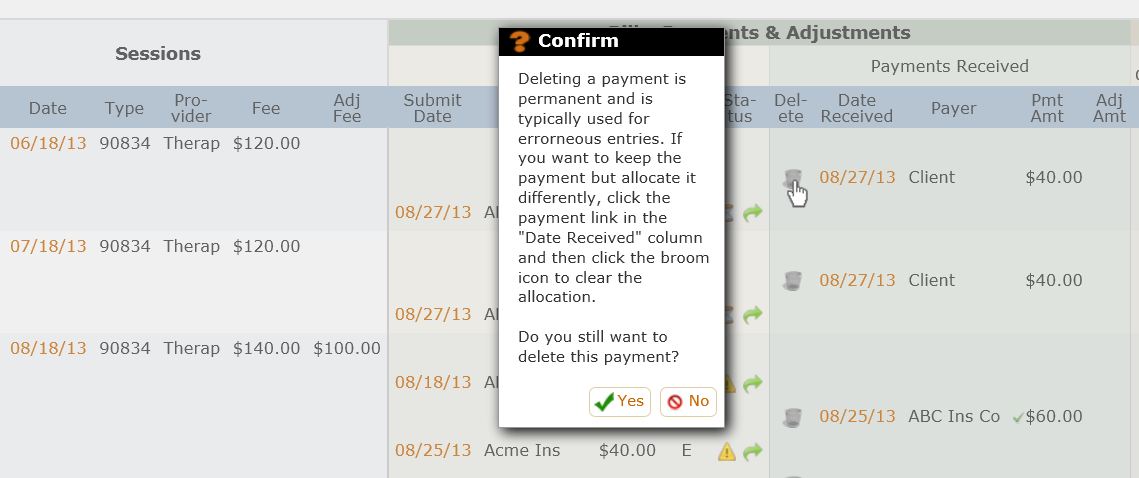
There are instructions on the Confirm about what to do if you're trying to reallocate the payment instead of actually deleting it. Let's assume, however, that you do want to delete the payment so you click the 'Yes' button to go ahead. If the payment allocation is a stand-alone (i.e., it's not part of a larger payment), the next window will allow you to delete the payment and you're finished.
However, if, as we suspect, the payment you're trying to delete is part of a larger payment, it takes a little more work. The next window is another Confirm that will look something like this:
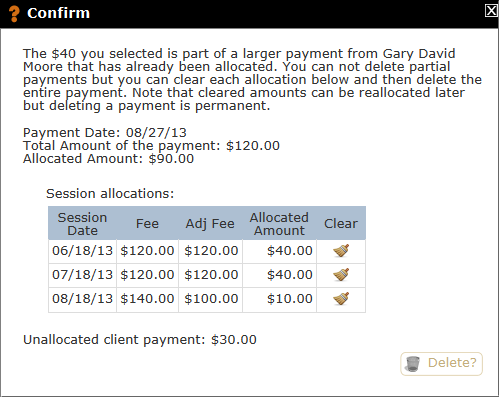
As we suspected, the payments on the Sessions & Payments table that were dated 8/27/13 are all part of one payment. The screenshot below shows the Confirm window above with the Sessions & Payments table behind it. If you compare the session dates and allocation amounts on the Confirm window with those on the Sessions & Payments table, you'll see that everything matches up:
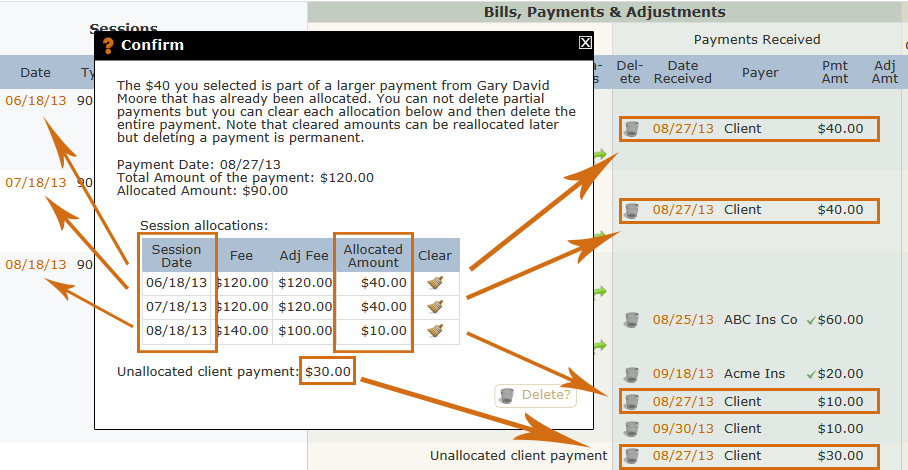
If you read the Confirm window, you know that before you can actually delete the payment, you have to clear the allocations. Once you've done that, you'll get a confirmation window similar to this one, which will allow you to delete the entire $120 payment:
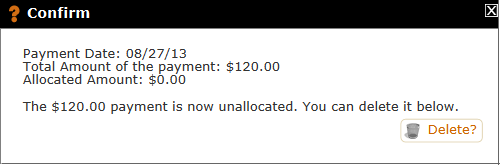
Payments Received > Date Received

Similar to date link in the Sessions section of this table, the Date Received link is really an edit/view payment tool. Since payments listed under a session are actually payment allocations (i.e., the amount of a payment that's been allocated to that particular session), the window that opens when you click a Date Received link also allows you to edit all allocations of that particular payment. Insurance payments and client payments are handled similarly in that each form has an Allocation Information section at the bottom where you can manage the allocations:
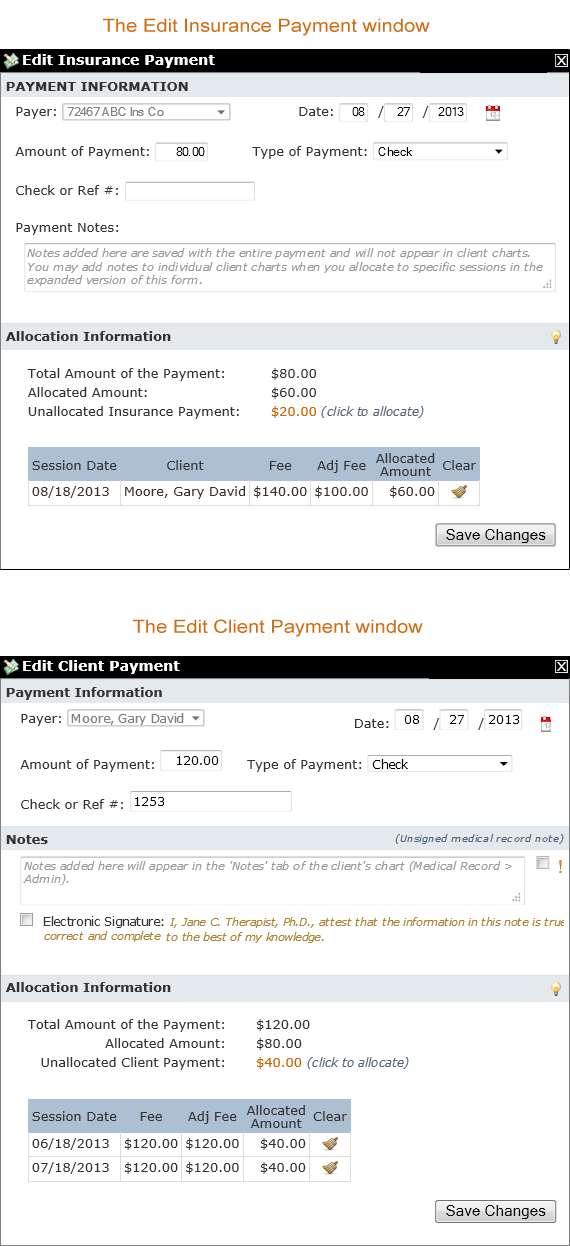
Whether you're in the insurance payment form or the client payment form, the first part of the Allocation Information section has three lines that will be similar to these:
- Total Amount of the Payment: $120.00
- Allocated Amount: $80.00
- Unallocated Client Payment: $40.00 (click to allocate)
These three lines provide summary information about the payment and its allocations. For example, in the sample above, you can see that the total amount of the payment was $120.00 of which $80.00 has already been allocated, leaving an unallocated amount of $40.00.
Below these lines of text is a table, similar to this one which shows exactly where the $80.00 has been applied:
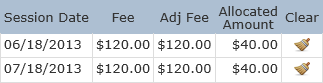
There is a lot you can do from this one page. You can click the orange link by the Unallocated Client Payment line in the top part to allocate the remaining portion of this payment:
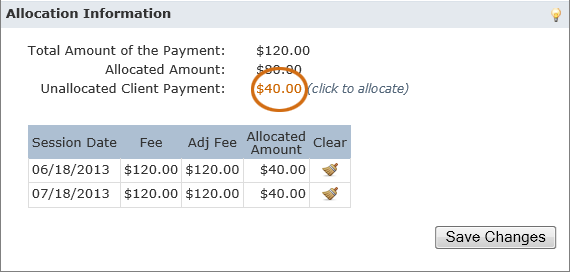
Clicking that link opens the complete Add Payment form (either Add Insurance Payment or Add Client Payment) allowing you to make allocations. (If you're not sure how to make allocations check the Add Insurance Payment or Add Client Payment sections of this manual.)
You can also use the Clear icons in the table to remove one or more allocations:
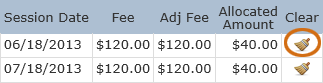
With the Click to Allocate and the Clear Allocation tools on this window, you can make as many changes to your payment allocations as you like.
Payments Received > Payer

The Payer column tells you whether the payment is from your client or an insurance company. Insurance companies are listed by the Short Name you gave them at the time they were entered or the default Short Name used by PSYBooks, which is just a truncated version of the actual name.
There is another feature in the Payer column: the Finished indicator, which is the small green checkmark that sometimes appears by an insurance company's name:
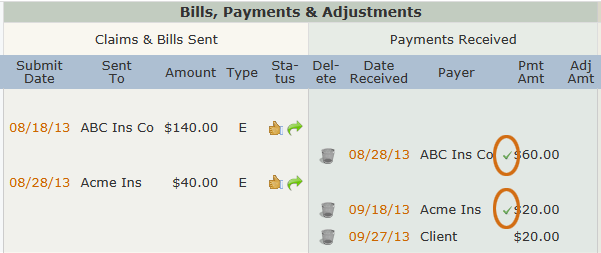
The Finished indicator tells you whether the claim was processed from that insurance company to the next payer on the list, i.e., whether the insurance company was "finished". For example, when the primary insurance pays what they're expected to pay (making them a "finished" payer), the claim is sent to the secondary insurance company (if there is one). The secondary company pays what they're going to pay so they're also "finished", and the remainder is billed to the client. This is the scenario depicted above where a claim was sent to ABC Ins Co on 8/18, ABC paid $60 on 8/28 and the claim was then sent to Acme Ins. Acme Ins paid $20 on 9/18 and the client paid the remaining $20 on 9/27. Each of the insurance companies is marked Finished because when the user entered the payment, they indicated that the claim was ready to progress to the next payer.
However, in some cases, you may want to hold a claim back. For example, if the primary company sends you a partial payment and you expect to receive additional payments from them, you might decide NOT to process the claim to the next payer since the payments from the first company aren't all in. In that case, the green Finished indicator would not appear by the insurance company's name in the Payer column until the final payment had been received and the user had processed it to the next payer.
Payments Received > Pmt Amt (Payment Amount)

The term 'Payment Amount' is a bit of a misnomer here because the entry in this cell is actually the amount of the payment that's been allocated to this particular session - which may or may not be the total amount of the payment. For example, a client might have paid the therapist $100 on June 15. The therapist, knowing that the client's copay is $25, might apply $25 to their June 1 session, $25 to the June 8 session, $25 to the June 15 session and hold back the remaining $25 as an unallocated amount to be applied to a future session. That action would result in something that looks like this in the Sessions & Payments table:

Notice that all four payment allocations have the June 15th date and that each of them is only a part of the total payment. (The unallocated client payment amount is just another type of allocation, i.e., that amount is "allocated" to the "unallocated" category.)
Payments Received > Adj Amt (Adjustment Amount)

There are two ways an entry can be added to the Adjustment Amount column: 1) with the Add Adjustment tool on the left nav and 2) as a write off amount when adding a client payment. Entries added with the Add Adjustment tool will show up on the Sessions & Payments table in a separate row, similar to this:

When adjustments are added with the Add Adjustment tool, the user can indicate whether the payer of the adjustment is the client, an insurance company or 'Other'. In the case above, the user selected 'Other' as the Payer.
The other way an adjustment can show up in the Adj Amt column is if the user enters an amount in the 'Amt to Write Off' cell in the Add Client Payment form. Those types of entries are displayed in the Sessions & Payments table as part of a regular client payment row like this:

Balances Column
What this isThe Balances column holds three types of balances: the Account Balance (total amount you're owed), the Client Balance (amount your client owes) and Session Balances (the amount due on each individual session). All three of these balances are displayed in the Balances column.What it looks likeThe Balances column of the Sessions & Payments table looks like this: 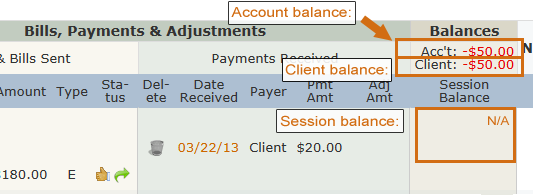 |
Where this isOpen a client's chart by clicking their name in the table on the Charts page then click the Sessions & Payments tab. The Balances column is near the right edge of the table, next to the Notes column.
|
PSYBooks figures three separate types of balances for you: the Account Balance, the Client Balance and the Session Balance. Each will be discussed separately below.
Account Balance
What this isThe Account Balance shows you the total amount due on that client's account including amounts due from both the client and their insurance companies.What it looks likeThe Account Balance is displayed in the top header of the Balances column of the Sessions & Payments table: 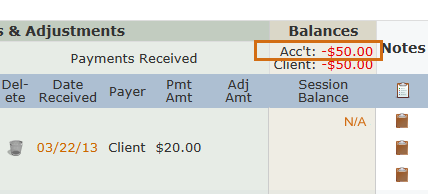 |
Where this isOpen a client's chart by clicking their name in the table on the Charts page then click the Sessions & Payments tab. The Account Balance will be displayed right below the word Balances at the top of the table.
|
The Account Balance is an important number in that it tells you the total amount due on your client's account from both client and insurance companies. When insurance is not involved, the Account Balance is straightforward and will always be the same as the Client Balance. However, if you are an insurance provider things get a little more complex.
When insurance is involved, the most common way of figuring account balances is to wait until the primary insurance pays before calculating the amount due on the session. It's done this way because the primary insurance typically sets the amount you're allowed to charge (sometimes called the Allowed Amount or the Usual & Customary Rate, i.e., UCR). So, for example, you might bill $180.00 for a 90791 session with Jim Smith on 1/7. Jim has ABC Ins and you're a provider. The balance due can't be calculated for the 1/7 session because we don't know ABC's UCR. Or even if we do, we may not know if the deductible has been met, if ABC will pay the amount we expect, etc. Once you receive the payment and EOB (Explanation of Benefits) from ABC and post the allowed amount and the payment amount (plus any unmet deductible), PSYBooks will include that session when calculating the Account Balance.
PSYBooks also allows you to estimate the Account Balance with the Balance Customization tool either by using the amount you billed (i.e., the session fee) or by entering the anticipated UCRs for the CPT codes you use most often. PSYBooks then uses the Balance Customization amount as an estimation of the Allowed Amount on each session. In both cases, the Account Balance would have an asterisk beside it similar to this:
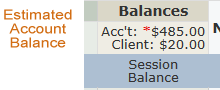
The asterisk tells you that this is an estimated amount. Once the necessary insurance payments have been posted, the actual Account Balance will be calculated and, assuming there aren't any other sessions with estimated amounts, the asterisk from the Account Balance will be removed.
For more information and examples on how balances work when insurance is involved, see the How Balances Are Calculated section below.
Client Balance
What this isThe Client Balance shows you the total amount due from your client.What it looks likeThe Client Balance is displayed in the top header of the Balances column of the Sessions & Payments table: 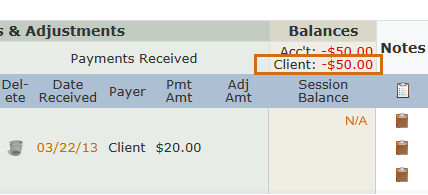 |
Where this isOpen a client's chart by clicking their name in the table on the Charts page then click the Sessions & Payments tab. The Client Balance will be displayed below the word Balances at the top of the table.
|
When insurance is not involved, the Client Balance and the Account Balance are the same. With insurance, the default PSYBooks billing method is to obtain the client amount via the normal payment flow process. In other words, when the final insurance payment is posted to a session, the remaining balance is forwarded to the client account and becomes part of the Client Balance. This means that normally, any client payments or adjustments that are allocated to a session aren't considered until after the Adj Fee is determined by an insurance posting. The example below may clarify:
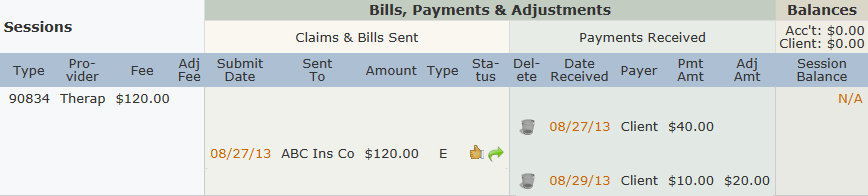
This session has two separate client payment allocations: a payment on 8/27 for $40.00 and a payment of $10.00 and adjustment (i.e., write off) of $20.00 on 8/29. However, the session balance has not yet been computed (as indicated by the N/A in the Session Balance category) because although a claim has been sent to ABC Ins Co, no payments from them have been posted. Since the Session Balance is N/A, the client allocations, which total $70.00, are not considered in the Client Balance at the top.
In some cases, you may want to use the Balance Customization tool to enter your client's Copay. When this is done, PSYBooks will use the amount you enter to estimate the Client Balance. In the example below, the user entered a copay of $30.00 on the same scenario we had above:
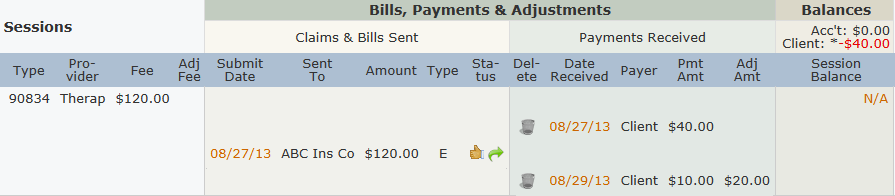
Notice that even though the Session Balance is still N/A, the Client Balance at the top is now *-$40.00. The asterisk means that the amount is estimated. Since the user entered the client's copay as $30.00 and the client had a credit of $70.00 ($50.00 in payments and a $20.00 write off), the client now has a credit of $40.00.
For more information and examples on how balances work, see the How Balances Are Calculated section below.
Session Balance
What this isSession Balances are the orange links in the Session Balances column on the top line of any session row group.What it looks likeSession balances look like this: 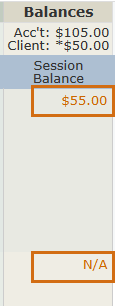 |
Where this isOpen a client's chart by clicking their name in the table on the Charts page then click the Sessions & Payments tab. If you've entered sessions, you'll see the orange Session Balances in the Balances column of the table.
|
Session Balances are the orange links that appear on the top row of all session row groups in the Balances column of the Sessions & Payments table. If you don't accept insurance and don't allocate client payments to specific sessions, Session Balances will not be useful to you. However, when insurance is involved, the Session Balances values allow you to quickly see which sessions still have outstanding balances. Also, if you're using the default billing method (i.e., you haven't changed the Account Balance billing method with the Balance Customization tool), you can easily spot sessions for which the primary insurance payment has not been posted because the Session Balance for such sessions will be N/A.
A table with several sessions, and thus, several Session Balances might look something like this:
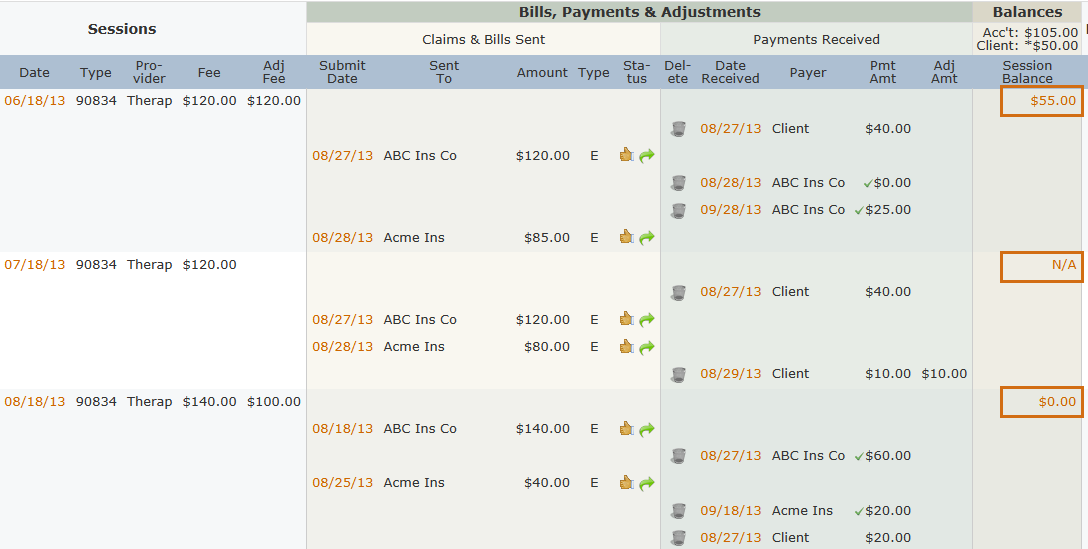
Session Balances are presented as links which provide additional information. Clicking a Session Balance link opens a popup similar to the one below that will show you exactly how that Session Balance was derived:
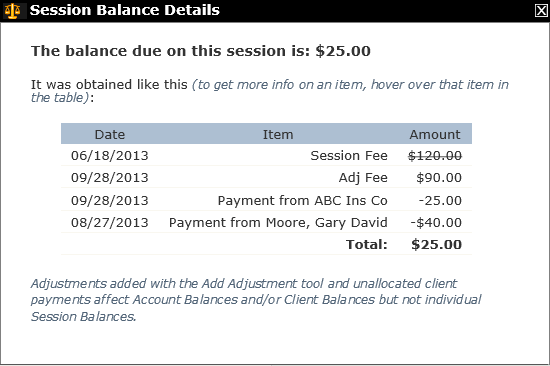
Notice that the original Session Fee has been marked through. This is because when the primary insurance payment was posted, an allowed amount was entered that resulted in an adjusted fee of $90.00. All subsequent payment or adjustment entries are deducted from the Adj Fee, not the original Session Fee. If you want additional information, you can hover over an item for more details. For example, the screenshot below was obtained by hovering over the $90.00 in the 'Adj Fee' row:
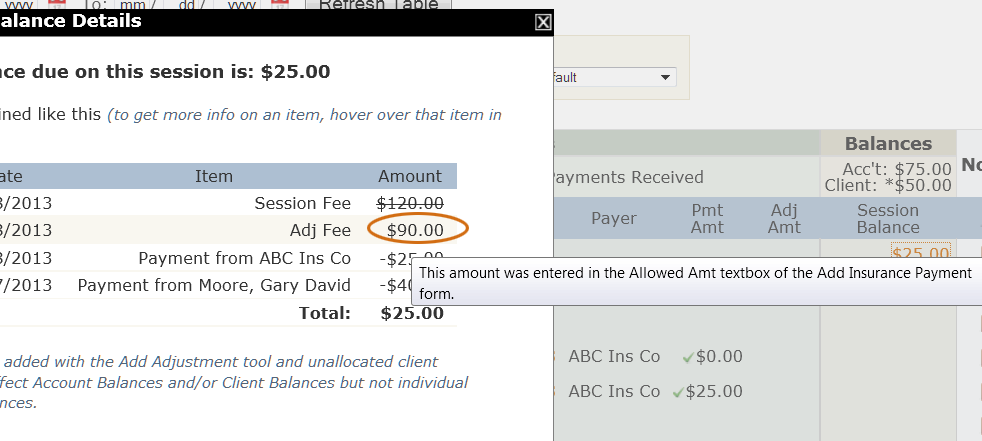
How Balances Are Calculated
What this isComputing account balances is straightforward for self-pay clients. When insurance is involved, PSYBooks has several tools to help simplify the process.What it looks likePSYBooks keeps track of three types of balances: The Account Balance, the Client Balance and individual Session Balances. The Account Balance and the Client Balance are displayed in the top header of the Balances column of the Sessions & Payments table. Session balances are displayed in the parent row of each session, in the Session Balances column: 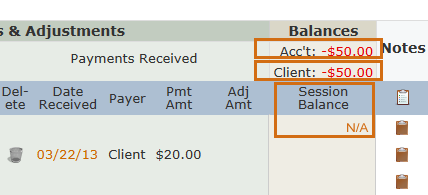 |
Where this isOpen a client's chart by clicking their name in the table on the Charts page then click the Sessions & Payments tab. All balances are displayed in the Balances column on the right side of the table: the Account and Client Balances at the top and the Session Balances in the body of the table.
|
When insurance is not involved all three balance types (Account, Client and Session) are straightforward and easy to understand. The Account Balance will always be the same as the Client Balance and each session balance will be your fee for the session minus the amount of client payments or adjustments that have been allocated toward it. However, if you are a provider for the client's insurance things get a little more complex.
For insurance providers, the most common way of figuring Session Balances is to wait until a session is reimbursed by the primary insurance company before calculating the amount due. It's done this way because the primary insurance typically sets the amount you're allowed to charge (sometimes called the Allowed Amount or the Usual & Customary Rate, i.e., UCR). So, for example, you might bill $180.00 for a 90791 session with Jim Smith on 1/7. Jim has ABC Ins and you're a provider. The balance due can't be calculated for the 1/7 session because we don't know ABC's UCR. Or even if we do, we may not know if the deductible has been met, etc. Once you receive the payment and EOB (Explanation of Benefits) from ABC and post the allowed amount and the payment amount (plus any unmet deductible, other insurance adjustments, etc.), PSYBooks can calculate the Account Balance. Let's walk through one:
The screenshot below is what Jim's Sessions & Payments table might look like after that initial session:

You can see the session date on the left and the claim submitted to ABC in the Claims & Bills Sent column. In the Balances column, you can see that both the Account Balance and the Client Balance are still at $0.00. This is because the Session Balance can't be figured yet (i.e., the "N/A" in the Session Balance column). The next screenshot shows what might happen once the ABC payment is posted:
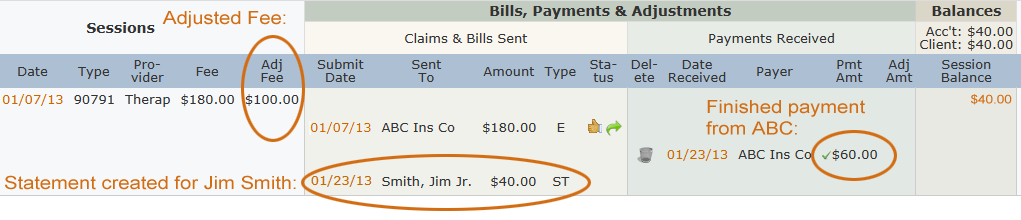
In the Sessions column group on the left side of the table, notice that we now have an Adj Fee of $100.00. This amount is calculated by PSYBooks from the value entered in the Amt Allowed column of the Add Insurance Payment form. Jumping over to the Payments Received column group (the green column), you'll see that a payment from ABC for $60.00 was posted on 1/23. The payment is marked as being finished (the ![]() by $60.00) and the remaining amount has been sent to the client as can be seen by the statement (ST) to Jim Smith in the Claims & Bills Sent column. With the Adj Fee and the Pmt Amt both posted, we can now calculate all three balances. The Account Balance, as well as the Client Balance and the Session Balance are all $40.00 (Adj Fee - Pmt Amt).
by $60.00) and the remaining amount has been sent to the client as can be seen by the statement (ST) to Jim Smith in the Claims & Bills Sent column. With the Adj Fee and the Pmt Amt both posted, we can now calculate all three balances. The Account Balance, as well as the Client Balance and the Session Balance are all $40.00 (Adj Fee - Pmt Amt).
If Jim Smith had had a secondary insurance, the balances would all still be $40.00 since it's the primary insurance that sets the amount you can expect to receive. The only difference is that instead of the remaining balance being sent to the client (in the form of a statement), it would have been sent to the secondary insurance as a CMS-1500.
The example above is an initial session, i.e., no other sessions have been posted to the account. Using only this example, it would be logical to assume that perhaps the Account and Client Balances can always be obtained just by adding the Session Balances. It's ALMOST this easy but not quite. However, before we can understand the exceptions to this rule, we need to discuss the items below:
Deductibles
A deductible is simply an amount that the primary insurance doesn't pay. Instead, they defer that amount to another payer, either a secondary insurance company or the client. The Add Insurance Payment form has a field for entering deductibles.
Looking only at the Sessions & Payments table, we can't tell if an insurance payment includes a deductible or not. In the example we've been using (with an allowed amount of $100.00 and an insurance payment of $60.00), the $40.00 that wasn't covered might all have come from the client's copay, or it might have been some combination of deductible and copay. So although deductibles can affect how much your client owes, they don't alter anything that's already been said about how balances are calculated. In other words, deductibles don't affect the (Account Balance) = (Client Balance) = (sum of Session Balances) formula.
Other Insurance Adjustments
Similarly, the Add Insurance Payment form has a field called 'Other Ins Adj'. This is probably not a field you will use often. It is NOT the allowed amount, but, instead, is for insurance companies that list both an allowed amount adjustment and some other type of adjustment on their EOBs. If you click the Session Balance link of a session where an Other Insurance Adjustment has been applied, you'll see it listed there:
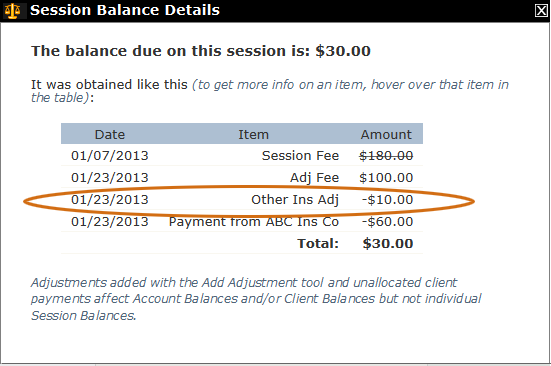
As you can see, an Other Insurance Adjustment doesn't affect the Adj Fee. Instead, it's deducted separately as an adjustment line item. As with deductibles, you don't really see the effects of an Other Insurance Adjustment if you're only looking at the various balances on the Sessions & Payments table. In other words, both Account and Client Balances are still equal to the sum of the Session Balances.
Unallocated Client Payments
Unallocated Client Payments, as you might have guessed, are payments which have not been allocated to a specific session. Because of this, instead of being listed underneath a session like allocated client payments, Unallocated Client Payments appear on a row by themselves:
There are several ways to end up with Unallocated Client Payments. For example, you might use the Add Client Payment form, click the Save and Allocate button (or the Open Allocation Table link), then close the next form without allocating. Or when the allocation form opens, you might allocate $0.00, or any other portion of the total payment, to a session and then close the form. You might clear a previously allocated payment and end up with an Unallocated Client Payment that way. Regardless of how you get them, Unallocated Client Payments, like all payments listed on the Sessions & Payments table, may or may not be the entire amount of the payment.
Unlike Deductibles and Other Insurance Adjustments, Unallocated Client Payments DO affect how balances are calculated. To demonstrate what happens, let's go back to Jim Smith's account that we were discussing above. We had the following:

Notice that since all we have so far is a session with a primary insurance payment, the Account Balance and Client Balance and Session Balance are all $40.00. However, when we add an Unallocated Client Payment of $10.00, watch what happens:

Notice that the $10.00 was deducted from both the Account Balance and the Client Balance so each of them is now $30.00. So far, so good: that much seems logical. However, the Session Balance is still $40.00, which, at first glance doesn't seem right at all. How can a Session Balance, which is just one portion of the entire Account and/or Client Balance, be MORE than either of them? The way to understand it is to realize that however tempting it might be to think that the sum of the Session Balances is equal to the Account Balance, they're actually independent balances that give you two different types of pictures of the account. An Unallocated Client Payment is sort of like money the client deposits in the bank. It's theirs - it adds to their total wealth - but it hasn't yet been spent on anything specific. A Session Balance is like a specific bill that's owed. Part of it might end up belonging to the client or part of it may belong to an insurance company. However, it's an amount that's owed that has nothing to do with how much the client has in the bank. So in the scenario above, the balance due on the "bill" for the session is $40.00 but the total amount the client owes is only $30.00 since they have a credit of $10.00 from the Unallocated Client Payment. If we allocate the $10.00 Unallocated Client Payment toward the session "bill", we get this:
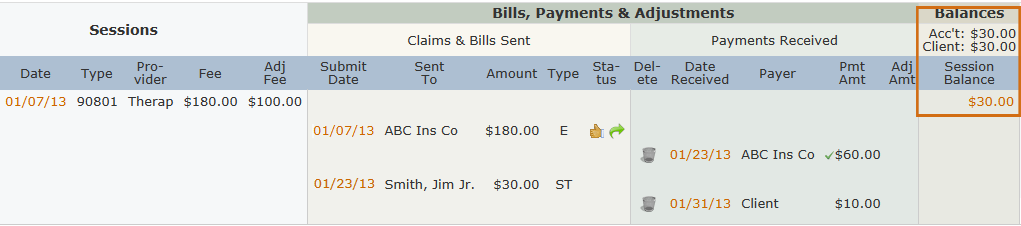
Now the three balances look more like what we might expect. Bottom line is that if you want all three balances to always "look right", make sure you allocate all client payments. If it doesn't bother you for the Session Balances to look a little "off" at times, and if you don't want to keep up with how much is due on any given session, you can allocate or not. PSYBooks will keep accurate track of your Account and Client Balances either way.
Adjustments (added with the Add Adjustment tool)
PSYBooks has several ways to add adjustments. Insurance adjustments can be included with The Add Insurance Payment Tool as Allowed Amount adjustments and/or 'Other Insurance Adjustments'. Similarly, client adjustments can be added with the Add Client Payment Tool in the form of Write Offs. All of those kinds of adjustments are 'folded in' to the payment allocation, which means they appear within a session row group. However, adjustments can also be added with the Add Adjustment which are NOT allocated to a specific session. (The Add Adjustment tool is on the left nav of the main Charts page.) These types of adjustments are similar to Unallocated Client Payments in that they appear on a row by themselves in the Sessions & Payments table. The table below has an example of a client adjustment that was added with the Add Client Adjustment tool:

Notice also that this type of adjustment affects the balances exactly like the Unallocated Client Payment, i.e., although both add or subtract from the account as a whole, they don't affect any specific session balance. Also like Unallocated Client Payments, adjustments added in this manner create the situation where you can NOT rely on the sum of all the session balances to equal either the Account or the Client Balance.
Unlike payments, adjustments made with the Add Adjustment tool can be either positive or negative. A negative adjustment, such as the one shown above, is like a payment or a write-off in that it deducts from the amount the payer (in this case, the client) owes. However, you can also enter positive adjustments, which will increase the amount owed:
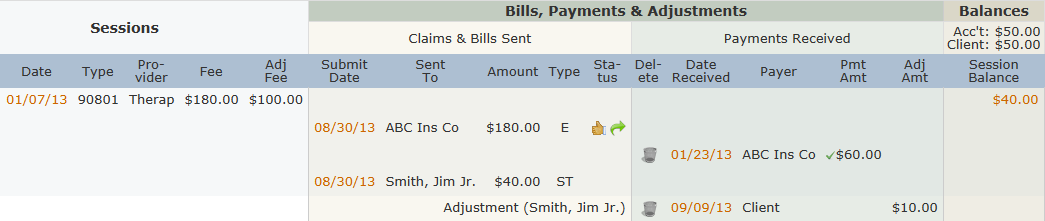
The examples above were both client adjustments. It's also possible to enter negative and/or positive adjustments from the client's insurance. In this case, the Account Balance is affected but the Client Balance remains unchanged as can be seen in the samples below:
A negative insurance adjustment:

A positive insurance adjustment:
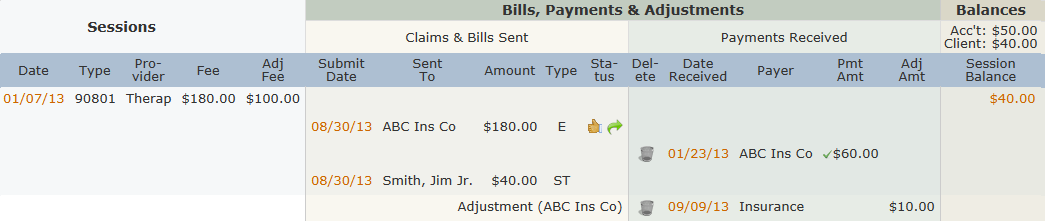
Notes Column
What this isThe Notes column of the Sessions & Payments table is a single table cell at the end of each row that holds the tool that allows you to add, view, edit, sign or mark a note as important. What it looks likeThe Notes column of the Sessions & Payments table looks like this: 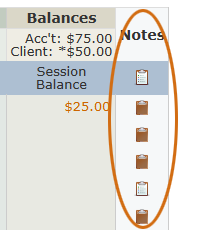 |
Where this isOpen a client's chart by clicking their name in the table on the Charts page. Then navigate to the Sessions & Payments section of the chart by clicking the Sessions & Payments tab. The Notes column is on the far right of the table.
|
The Notes column of the Sessions & Payments table holds tools that allow you to view or edit a note that has been written elsewhere in the app. The term "edit" actually refers to a group of different functions. For example, you can:
- Edit an unsigned note (i.e., overwrite the note that's there)
- Add a revision to a signed note (both the original note and the revision are saved)
- Sign a note or a revision
- Mark a note or revision as important
In the Sessions & Payments table (as well as elsewhere in the app), you can tell which rows have notes because the clipboard icon will be "full" (i.e., have a piece of paper on it like this ![]() ), as opposed to a row without a note, which just has a blank clipboard
), as opposed to a row without a note, which just has a blank clipboard ![]() . Examples of rows with and without notes are shown below:
. Examples of rows with and without notes are shown below:

The example above shows three potential notes that come from various places in the app. The row that actually has a note is the session on 8/18. The second row is for the claim that was efiled to ABC Ins Co on 8/18. The last row in this session group is for a payment allocation from ABC for $60.00. Neither the claim nor the payment rows currently have notes. However, if you wanted to add one, you could click the blank clipboard icon and add your note.
When you click a full clipboard, another row opens below the parent row which allows you to view, edit, sign and/or mark the note as important. For example, if we clicked on the session row note icon from the example above, we'd see something like this:

Similarly, notes added with a client payment appear on the row that holds information about that client payment, notes added with an adjustment appear on the row with the adjustment, etc.
You can also add new notes directly on the Sessions & Payments table. Just click any blank clipboard to open a window that will allow you to write a note. Once written, the icon will change to the full clipboard, signaling that there's a note on that row.
There may be times when you want to see all notes that are written on the Sessions & Payments table. The full clipboard icon in the blue header row is a "Show all notes" tool and will open all notes on that particular Sessions & Payments page:
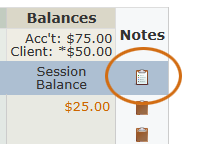
Medication Tab
What this isThe Medication section of the chart holds information about your client's medications. Their current meds are easy to see and work with and there's also a section for your client's medication history. If you are licensed to write prescriptions, you can use the Medication section in PSYBooks to create scripts for your clients.What it looks likeThe tab to open the Medication section of the chart looks like this: 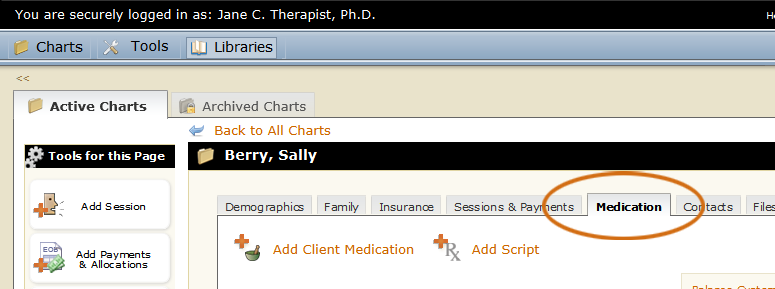 |
Where this isOpen a client's chart by clicking their name in the table on the Charts page. Then navigate to the Medication section of the chart by clicking the Medication tab.
|
The Medication tab in a client's chart is a place where both prescribing and non-prescribing clinicians can keep track of medications their clients are taking. Prescribing clinicians can also use this section to write and renew scripts.
If you don't write scripts, the Medication section of a client's chart will look something like this:
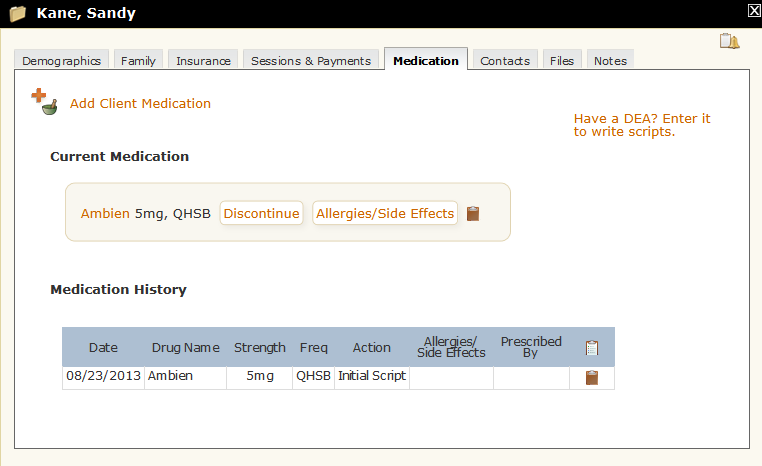
Notice that there's a tool at the top for adding client medications, a section in the middle for working with the client's current medications, and a table at the bottom for the medication history.
If you add a DEA number (by clicking the link on the right of the page, an Add Script tool appears at the top of the page beside the Add Client Medication tool. In addition, the Current Medication section now has a Renew tool and the Medication History table has some additional columns that only apply to scripts. The Medication section of a client's chart for those clinicians who add DEA numbers will look something like this:
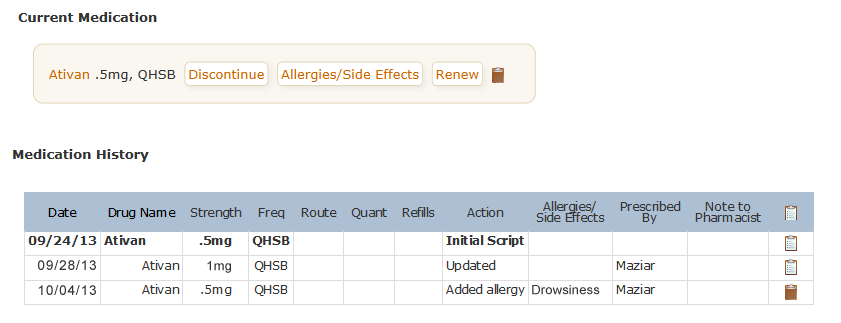
Current Medication
What this isThe Current Medication section of the Medication tab allows you to quickly see the medications your client is currently taking. In addition, there are tools that allow you to edit, discontinue and list any side effects and allergies your client may have had to the drug. If you've added a DEA number, there will also be a Renew button here which will allow you to quickly renew a script for the client.What it looks likeThe tab to open the Medication section of the chart looks like this: 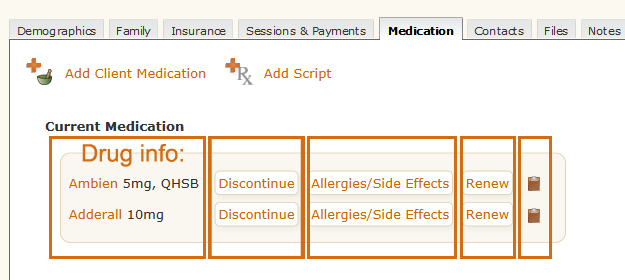 |
Where this isOpen a client's chart by clicking their name in the table on the Charts page then click the Medication tab. The Current Medications section is in the center of the page.
|
The Current Medication section of the client's chart can be divided into the Drug Info section followed by a series of tools as illustrated by the screenshot below:
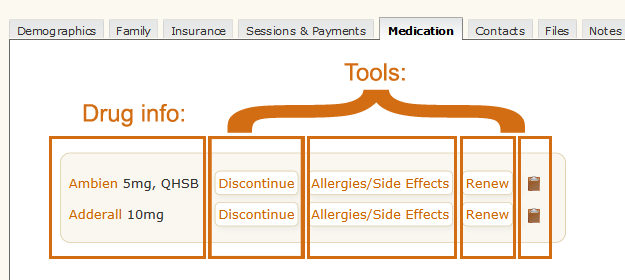
The first part of each row has information about the medication: the drug name, how much the client is taking and how frequently. After the drug information, users without DEA numbers have two tools: Discontinue and Allergies/Side Effects. Users with DEA numbers have a third tool: Renew. All users also have the standard Note tool at the end of the row, which allows them to write additional comments about the medication.
Edit Client Medication
What this isThe Edit Client Medication tool allows you to make changes to a medication or script you've entered for your client.What it looks likeThe Edit Medication tool is just the name of the medication which has been turned into a link. It's in the Current Medication list and looks like this: 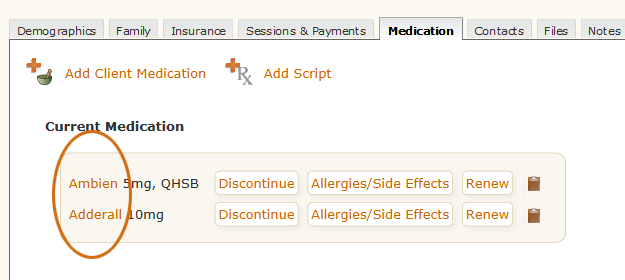 |
Where this isOpen a client's chart by clicking their name in the table on the Charts page. Then navigate to the Medication section of the chart by clicking the Medication tab. The Edit Medication tool is in the Current Medication section in the middle of the page.
|
The Edit Client Medication tool is actually an Edit Script tool for those with DEA privileges. Either way, it allows you to make changes to a medication or script that's in your client's Current Medication list. Depending on whether you have DEA privileges, the form that opens when you click the Edit Client Medication tool will either be the Edit Client Medication form (on the left in the screenshot below) or the Edit Script form (on the right):
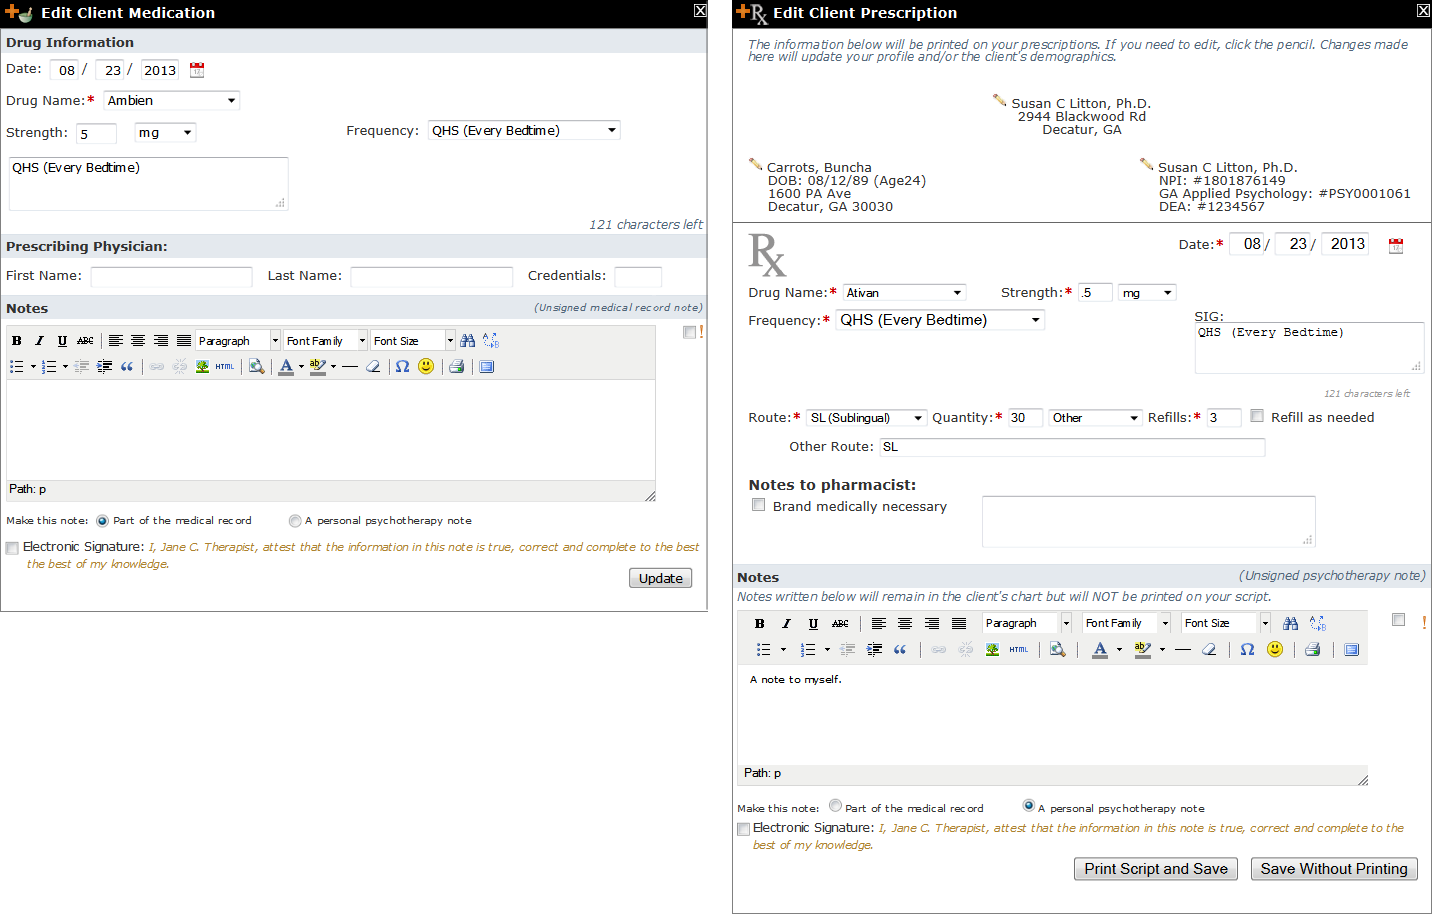
Even though the forms look fairly different, they both contain the same basic information. The Edit Script form just has a different format plus a few more fields to accomodate things that are necessary when writing scripts. Anytime you edit a medication, a new entry will appear in the Medication History table at the bottom of the page.
Discontinue Medication
What this isThe Discontinue Medication tool allow you to make a note in the client's Medication History table about when and why a medication has been discontinued.What it looks likeThe Discontinue Medication tool looks like this: 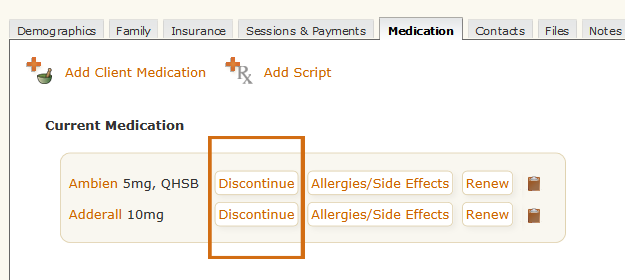 |
Where this isOpen a client's chart by clicking their name in the table on the Charts page then click the Medication tab. The Discontinue Medication tool is in the Current Medication section.
|
When you click Discontinue, a new row will open that allows you to indicate the reason you're discontinuing:
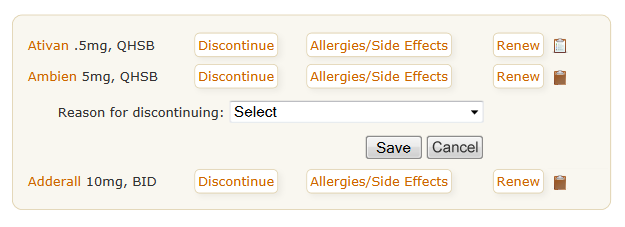
There are several common reasons listed in the select box, with the last reason being 'Other':
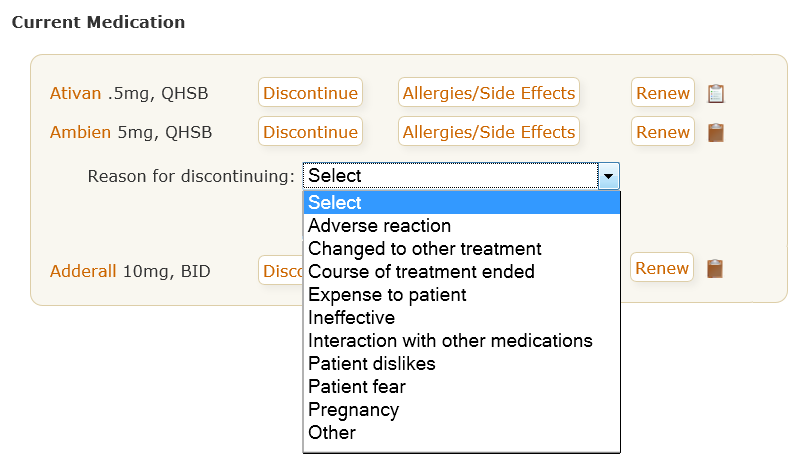
If you select 'Other', an additional row opens that allows you to list a different reason:
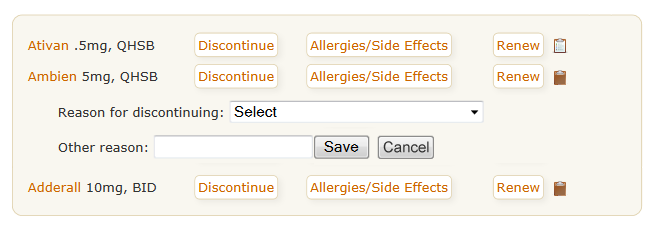
The reason you choose for discontinuing, whether from the select box or whether you write an 'Other' reason, will appear in the Medication History table.
Allergies/Side Effects
What this isThe Allergies/Side Effects tool allows you to enter any adverse reactions your client has to the medication and to indicate the severity.What it looks likeThe Allergies/Side Effects tool looks like this: 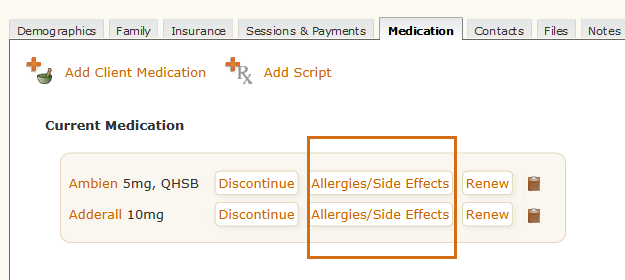 |
Where this isOpen a client's chart by clicking their name in the table on the Charts page then click the Medication tab. The Allergies/Side Effects tool is in the Current Medication section.
|
Clicking the Allergies/Side Effects tool reveals the section below:

Opening the select box gives you the following options:
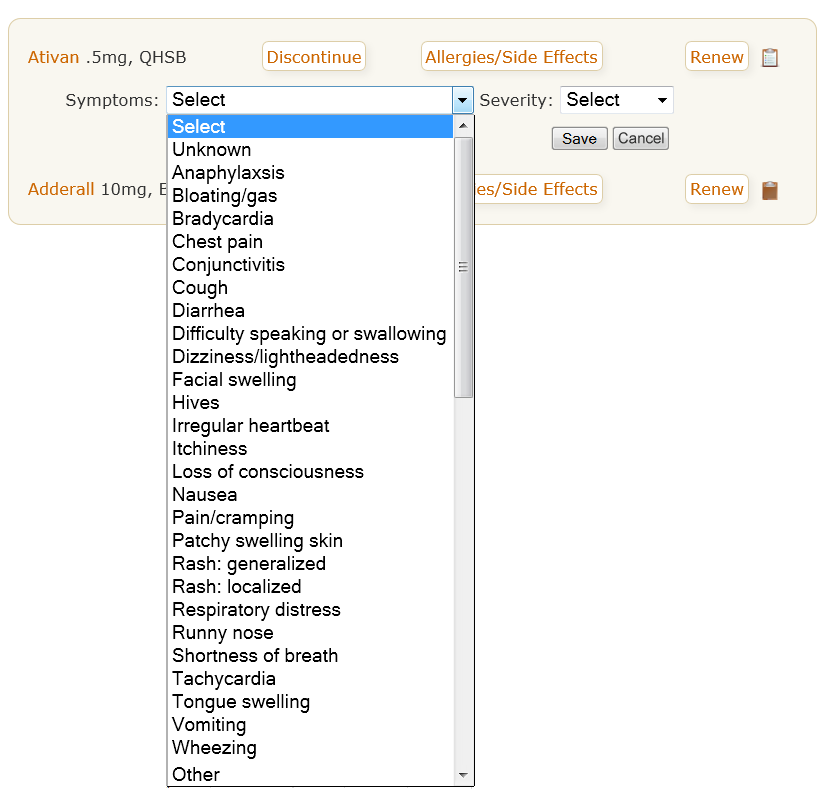
If you choose 'Other' from the select box, you'll be given a textbox to write the other side effect:
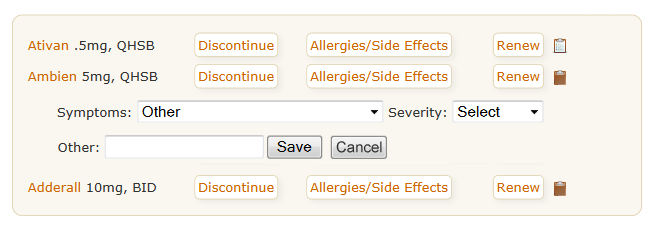
When you save, the allergy or side effect will be listed in the Medication History table.
Renew Medication
What this isThe Renew Medication tool is only present for those users who have entered a DEA number. It allows you to create and print a new script of the same medication without having to fill in everything from scratch.What it looks likeThe Renew Medication tool looks like this: 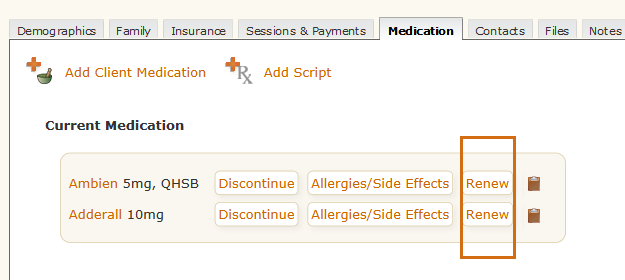 |
Where this isOpen a client's chart by clicking their name in the table on the Charts page, then click the Medication tab. The Renew Medication tool is in the Current Medication section (only available if you have a DEA number).
|
Clicking the Renew Medication tool opens the Edit Script form pre-populated with today's date. If you don't need to make any changes in the script, you can just click Save and print a new script for your client. However, you can also make changes before you save and then print the updated script. The Edit Script form looks like this:
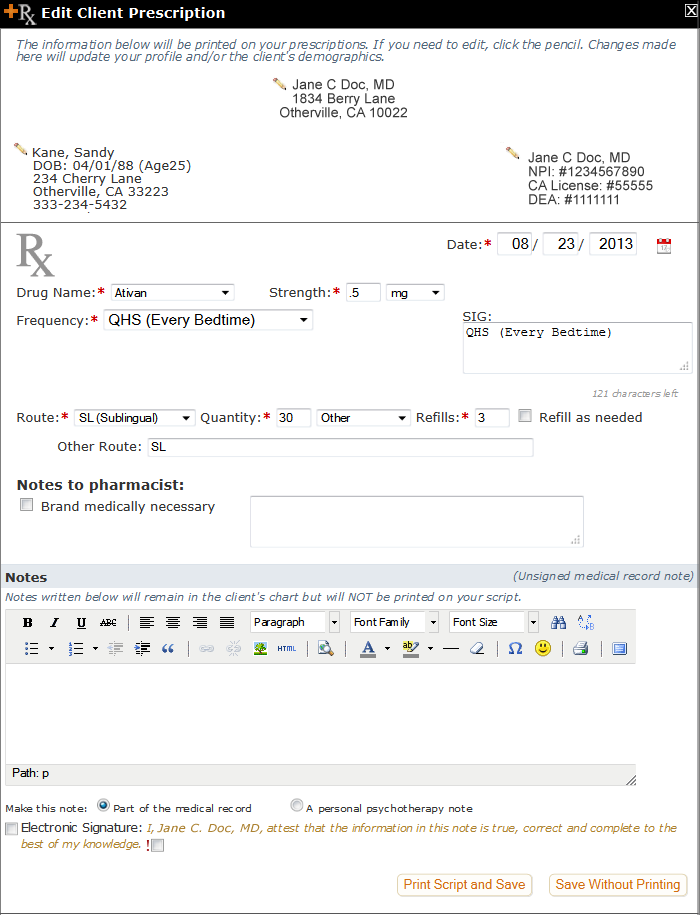
Medication History
What this isThe Medication History table keeps track of all medication entries you've made in your client's chart including all updates, renewals, notes, etc.What it looks likeThe Medication History table looks a bit different for DEA users and non-DEA users in that the DEA table has a few extra columns: 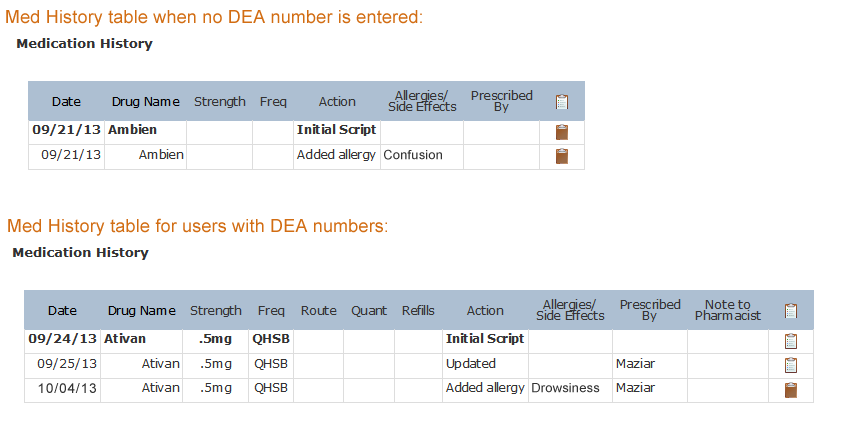 |
Where this isOpen a client's chart by clicking their name in the table on the Charts page then click the Medication tab. The Medication History table is at the bottom of the page.
|
A typical Medication History table with a relatively new client might look something like this:
Notice that this client's Current Meds area only lists one medication - Ativan. By checking the Medication History table, you can see that it was first prescribed (or entered into the application) on 9/24/24, that the dosage was increased and the prescribing physician's name added on 9/28/24 and that the dosage was brought back down and a side effect of drowsiness was added on 10/04/24.
The Medication History table is created automatically based on entries you make with the Add Client Medication and/or Add Script tools as well as the tools in the Current Meds area, e.g., Edit Medication, Discontinue, Allergies/Side Effects, Renew and Add/Edit Note. It's a view only table - there's nothing in it that can be changed.
Add Client Medication
What this isThe Add Client Medication tool is for users who don't need to write scripts but who want to keep track of their client's medications.What it looks likeThe Add Client Medication tool looks like this: 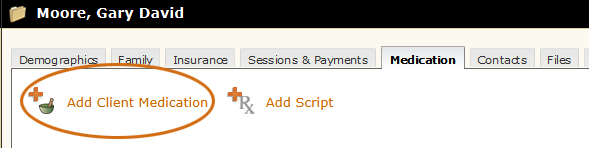 |
Where this isOpen a client's chart by clicking their name in the table on the Charts page then click the Medication tab. The Add Client Medication tool is on the top left.
|
When you click the Add Client Medication tool, the form that opens looks like this:
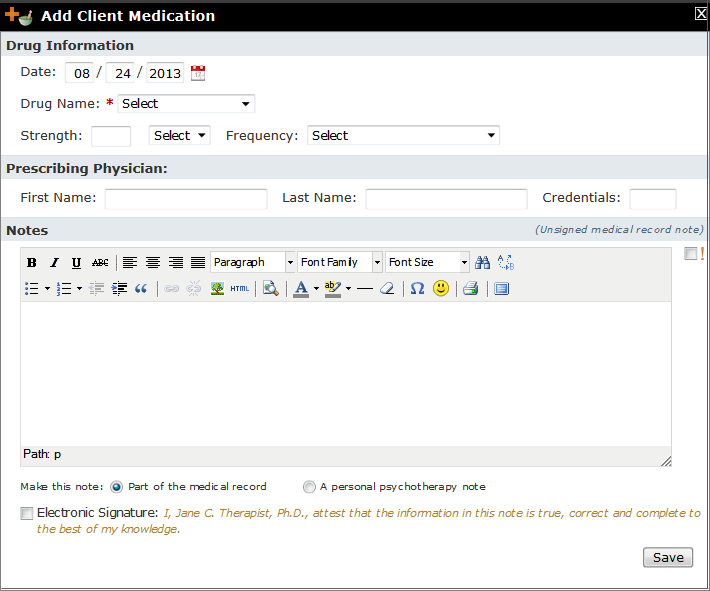
Since this form is not meant to write a script, the only required field is the Drug Name. This will allow you to quickly add your client's medications if that's the only info you have or plan to keep. However, other common fields are available if you want them. Information added here will be displayed in both the Current Medication section and the Medication History table.
Add DEA
What this isThe Add DEA tool allows clinicians who prescribe to enter their DEA number. This will enable the Add Script tool, which can be used to write prescriptions.What it looks likeThe Add DEA Number tool looks like this:  |
Where this isOpen a client's chart by clicking their name in the table on the Charts page then click the Medication tab. If you haven't already added your DEA number, the Add DEA tool will be on the top left.
|
Clicking the Add DEA tool produces this form:
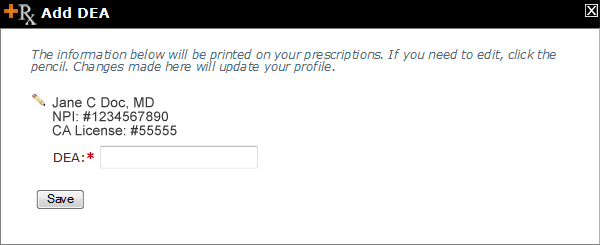
All of the information in the top block will be required on your scripts. If any of it is missing or incorrect, clicking the Edit tool will open this section of the form, which will allow you to make changes:
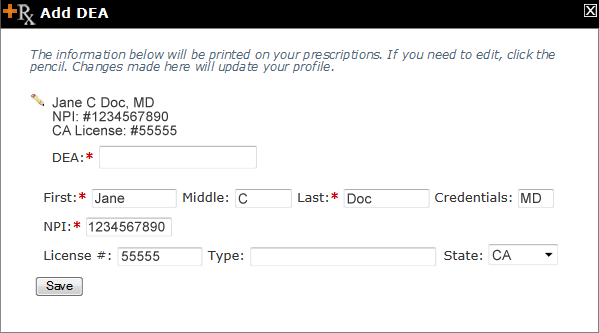
Add Script
What this isThe Add Script tool is only visible to users who have added a DEA. It allows you to create and print prescriptions for your clients.What it looks likeThe Add Script tool looks like this: 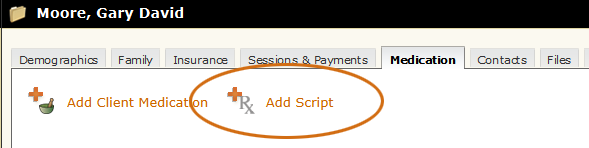 |
Where this isOpen a client's chart by clicking their name in the table on the Charts page then click the Medication tab. The Add Script tool is on the top of the page of those users who have entered a DEA.
|
Clicking the Add Script tool opens a form that looks like this:
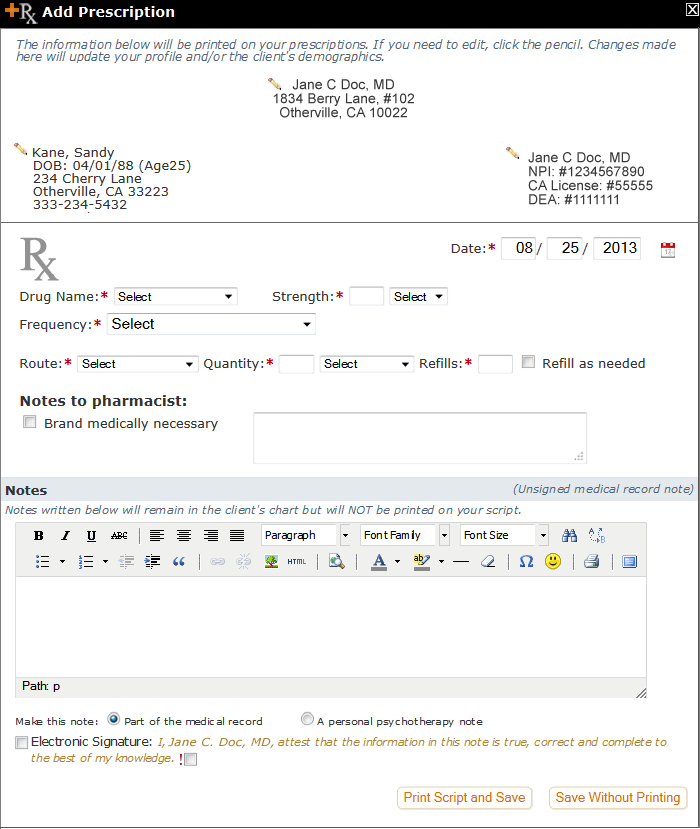
Many of the items on this form are in select boxes to save you time. However, each select box also has an 'Other' option which, when selected, will open a textbox where you can write what you need. Also, when a Frequency is selected, a SIG box opens that's already pre-populated with the frequency you selected. You can change the SIG box if needed, up to 140 characters.
An Add Script form with some of these extra features revealed looks like this:
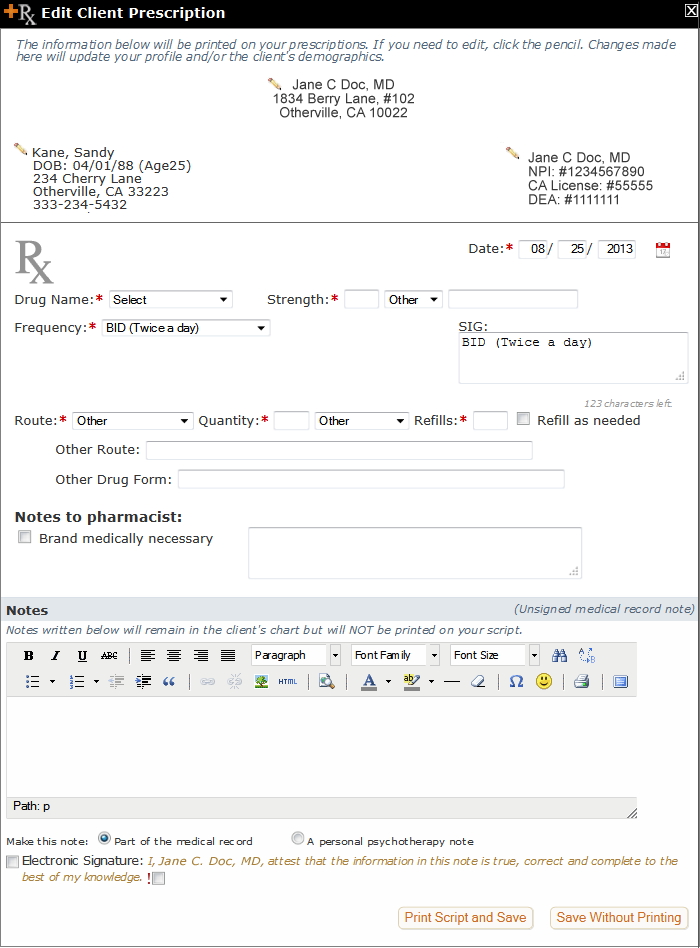
Contacts
What this isThe Contacts section of the chart holds information about professional and personal contacts that play a role in your client's treatment. It also has the necessary tools for working with those contacts.What it looks likeThe tab to open the Contacts section of the chart looks like this: 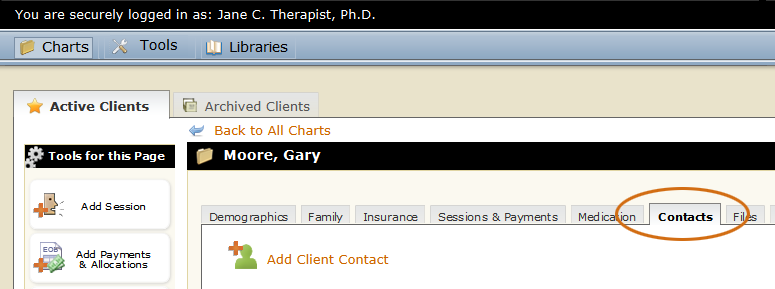 |
Where this isOpen a client's chart by clicking their name in the table on the Charts page. Then navigate to the Contacts section of the chart by clicking the Contacts tab. |
The Contacts area in a client's chart looks something like this:
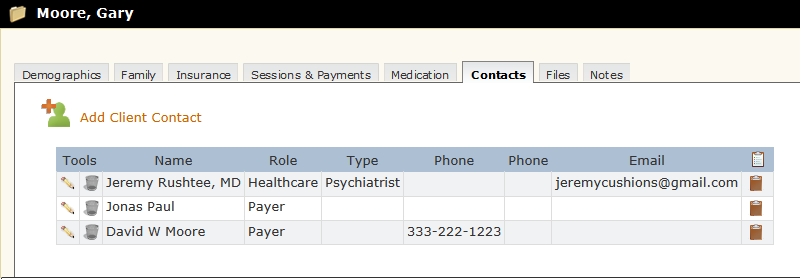
This section allows you to enter and work with contact information for other people that may play a significant role in your client's treatment. For example, you might want to enter your client's psychiatrist, emergency contacts, payers or legal representatives. Notice that, as with other sections of the chart, there's a table for displaying information and also several tools to allow you to work with the data. The Client Contacts Table as well as all tools on this page will be discussed below.
Client Contacts Table
What this isThe Client Contacts table holds information on the individuals that play some kind of role in your client's treatment.What it looks likeThe Client Contacts table looks like this: |
Where this isOpen a client's chart by clicking their name in the table on the Charts page. Then navigate to the Contacts section of the chart by clicking the Contacts tab. |
The table on a chart's Contacts page displays information such as phone and email to allow you to see at a glance how to get in touch with your client's contacts. The table also holds the tools for editing and deleting contacts.
Each Contact's "Role" is also displayed in the Client Contacts Table. Some roles have implications for other areas of the app. For example, contacts with a role of Payer will appear in the Responsible Party dropdown box on the Add Session form to allow for situations where someone other than the patient is responsible for the bill. Healthcare contacts will appear in the Prescribing Physician dropdown on the Add Medication and Add Script tools. This allows you to attach a psychiatrist or other prescribing professional to each of your client's medications and/or prescriptions with just one click.
Edit Client Contact
What this isThe Edit Client Contact tool is in the table of the Contacts section of your client's chart.What it looks likeThe Edit Client Contact tool looks like this: 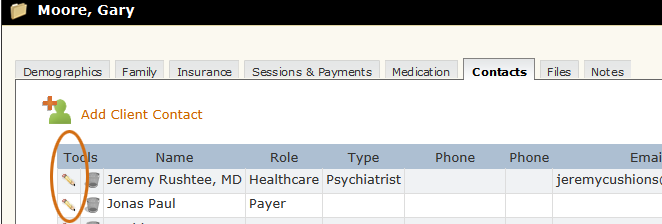 |
Where this isOpen a client's chart by clicking their name in the table on the Charts page. Then navigate to the Contacts section of the chart by clicking the Contacts tab. The Edit Client Contact tool is on the left side of the table. |
When you click the Edit Client Contact tool, the form that opens looks something like this:
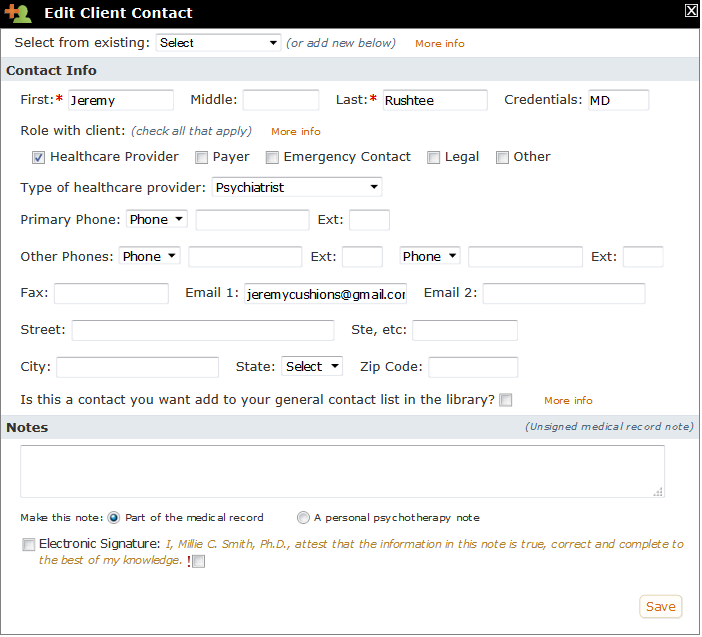
You can change anything on this form. If the contact doesn't already exist in your Contacts Library, you have the option of adding them by checking the box next to "Is this a contact you want add to your general contact list in the library?"
Delete Client Contact
What this isThe Delete Client Contact tool is in the table of the Contacts section of your client's chart.What it looks likeThe Delete Client Contact tool looks like this:  |
Where this isOpen a client's chart by clicking their name in the table on the Charts page. Then navigate to the Contacts section of the chart by clicking the Contacts tab. The Delete Client Contact tool is on the left side of the table. |
Deleting a client contact permanently removes that contact from your client's chart. However, you'll be able to access a record of the deletion in the Activity Log.
Add Client Contact
What this isAdd Client Contact is a tool at the top of the Contacts tab of your client's chart.What it looks likeThe Add Client Contact tool looks like this: 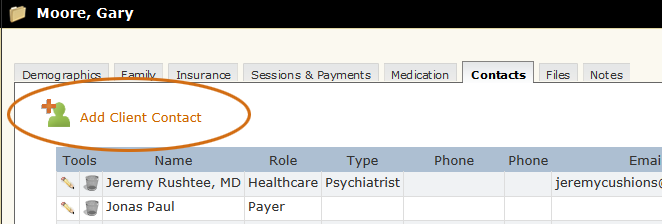 |
Where this isOpen a client's chart by clicking their name in the table on the Charts page. Then navigate to the Contacts section of the chart by clicking the Contacts tab. The Add Client Contact tool is on the top left. |
Clicking the Add Client Contact tool produces a form that looks like this:
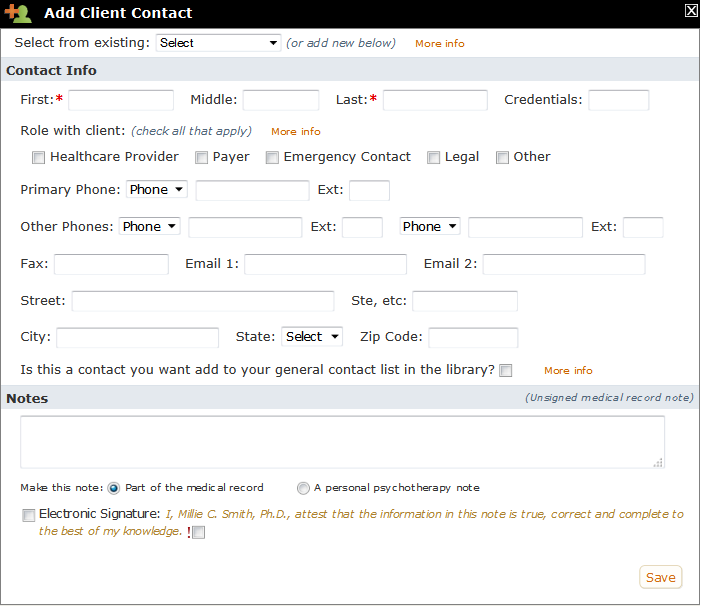
The top portion - where it says "Select from existing" - allows you to enter a contact that is already in your Contacts Library. For example, if you have psychiatrists to whom you routinely refer, you only have to enter them one time. Once they're in your Contacts Library, their names will appear in the "Select from existing" dropdown box on the Add Client Contact form. Selecting a contact from this dropdown will allow you to attach the contact to the client's chart without having to type in all of their info a second time.
If you do select an existing contact, you can make any changes you want at the client level. When you do, PSYBooks will ask you if you want those changes to apply to the library version of the contact - which would update not only the Contacts Library, but also all clients' charts that have that contact attached:
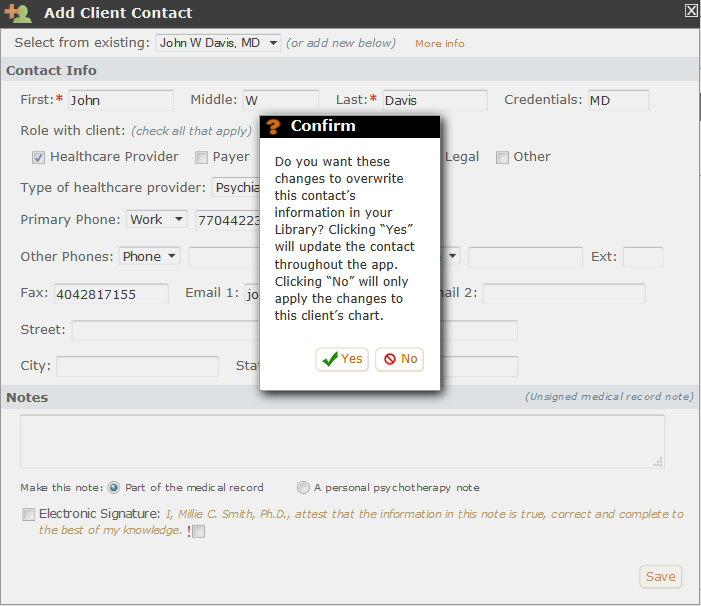
If you want the changes you made on the Add Client Contact form to only apply to this particular client, click "No" and the changes will not be carried to your Contacts Library. Notice that notes on the Add Client Contact form are always client-specific so if you create a new note - or add to an existing one - you will NOT get the alert above. Instead the note you add will appear in this particular client's chart but not in the library version of the contact.
If the contact is not in the Contacts Library, their name won't appear in the "Select from existing" dropdown box and you'll need to enter the rest of the contact's information by hand. If the contact is one you might want to use with other clients (such as a healthcare provider), you can check the box on the Add Client Contact form beside "Is this a contact you want add to your general contact list in the library?" to add the client contact to your Contacts Library:
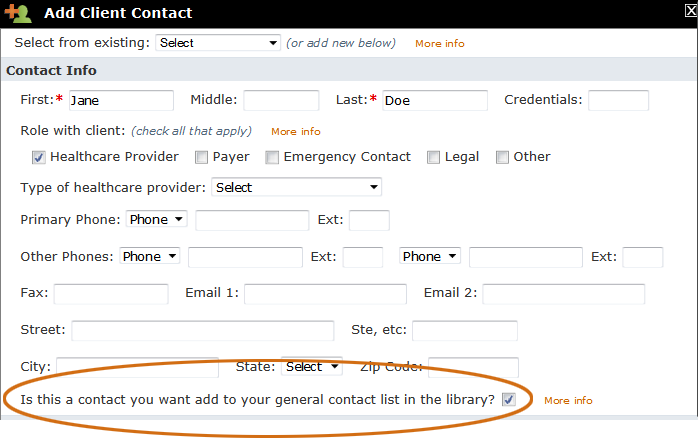
From then on, this particular contact will be accessible in the "Select from existing" dropdown on any Add Client Contact form.
Although the only required fields on the Add Client Contact form are first and last name, you may want to get in the habit of also adding a "role". This is especially important if the role is either Healthcare Provider or Payer since these roles have implications in other sections of the app. These two roles are discussed below.
The Healthcare Provider Role
The role of healthcare provider is added by checking the appropriate box on the Add Client Contact form such as shown in the example below: (The healthcare provider role can also be assigned to contacts that are added in the Contacts Library.)
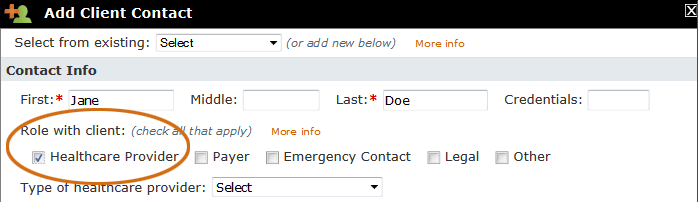
When a contact is a healthcare professional, checking the Healthcare Provider checkbox can be very helpful. Once a contact is assigned a role of Healthcare Provider, their name will appear in the "Prescribing Physician" dropdown boxes on both the Add Client Prescription and the Add Client Medication forms:

Notice that these dropdown lists have a link where you can add a new healthcare provider ("Add New Healthcare Contact") and also a "Self" option that allows you to indicate that you are the prescribing physician. After that, the list is divided into two groups: Client Healthcare Contacts and Library Healthcare Contacts. The first group, Client Healthcare Contacts, lists healthcare contacts that you've already added to this client's chart. Library Healthcare Contacts displays healthcare providers that are listed in your Contacts Library, but that have not yet been assigned to this particular client.
The Payer Role
The payer role can be added to a contact by checking the Payer box on the Add Client Contact form such as shown in the example below:
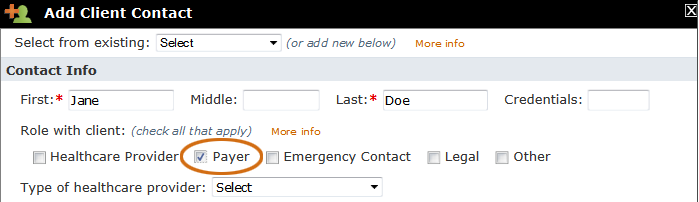
The payer role is another extremely useful feature and, in fact, if someone other than your client is responsible for their portion of the bill, you will have to enter that person as a contact and assign them a role of payer. Once a client contact has been designated as a payer, their name will appear on the Add Session form in the Responsible Party select box as shown below:
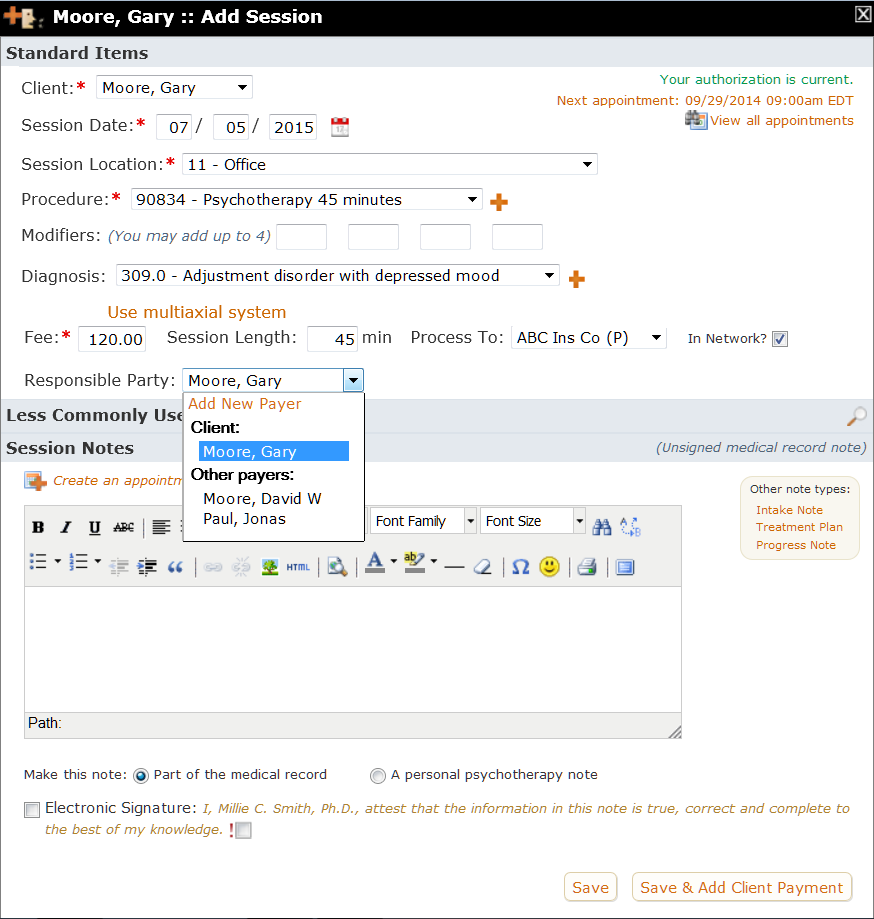
Notice that, similar to other places in the app, you can also add a new payer right from this dropdown list with the "Add New Payer" link. After that, the client's name is listed as a potential payer, followed by any other payers that have been attached to the client's chart. You can add as many payers as you need to a client's chart, assign different sessions or services to different payers, transfer payers from one session to another, etc.
Files Tab
What this isThe Files section of the chart allows you to upload files from your computer and/or certain sections of PSYBooks to help you maintain digital copies of your client records.What it looks likeThe tab to open the Files section of the chart looks like this: 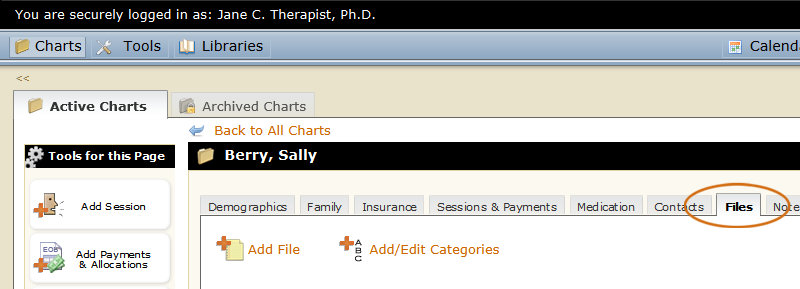 |
Where this isOpen a client's chart by clicking their name in the table on the Charts page. Then navigate to the Files section of the chart by clicking the Files tab.
|
The Files section of the client's chart looks like this:
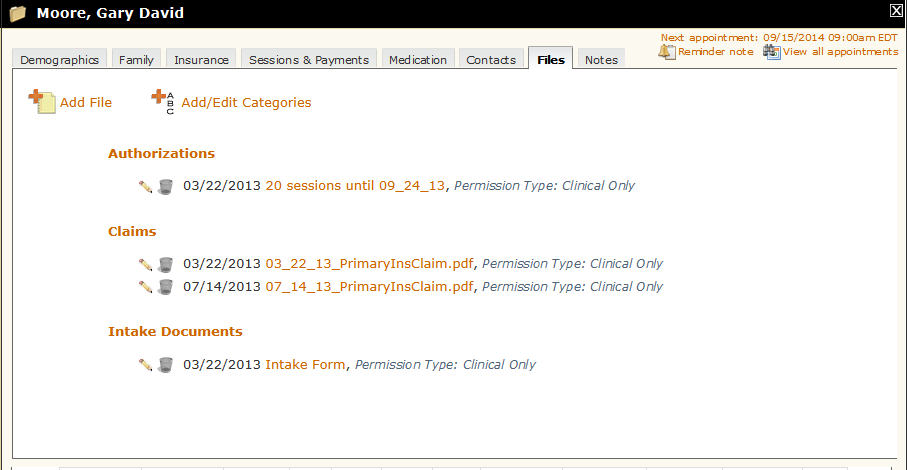
There are tools at the top of the page for adding (uploading) a file and also for adding and editing file categories. The files you've uploaded are listed beneath the tools - grouped by file category if you've entered them that way. (Files that aren't uploaded to any particular category are listed as Uncategorized.)
Files
What this isFiles is the list of files you've uploaded that appears on the Files tab of a client's chart. Files are arranged alphabetically within the categories you select.What it looks likeThe list of files you've uploaded looks like this:
|
Where this isOpen a client's chart by clicking their name in the table on the Charts page. Then navigate to the Files section of the chart by clicking the Files tab.
|
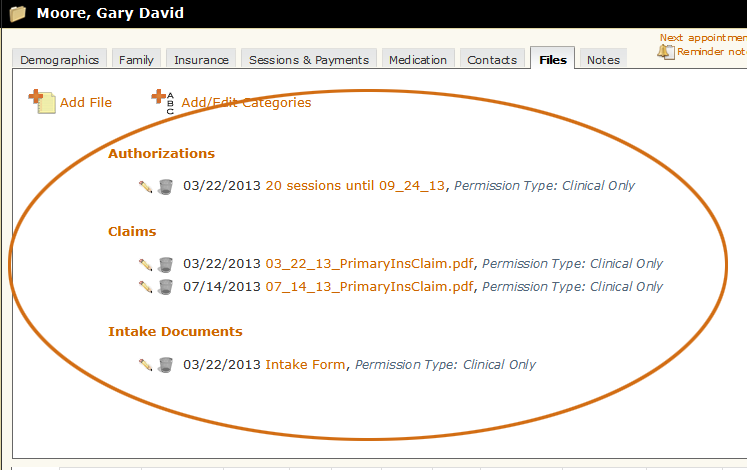
Files you upload from your computer will display on this page. The user that produced the screenshot above uploaded their files into categories (e.g., Authorizations, Claims, Intake Documents) so their files are automatically alphabetized under the category name they selected. If the user had NOT listed a category, all files would be listed as Uncategorized. There are tools for editing and deleting the file on each line followed by the date the file was uploaded and the name of the file. Notice that in this case, the edit function applies only to the name of the file you uploaded - not the actual file.
Edit File
What this isThe Edit File tool allows you to change the Name, Category and Permissions of a file you've uploaded to PSYBooks.What it looks likeThe Edit File tool is a pencil icon to the left of the file name. It looks like this: 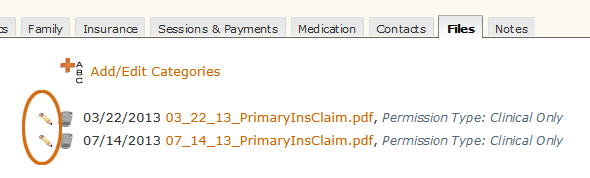 |
Where this isOpen a client's chart by clicking their name in the table on the Charts page. Then navigate to the Files section of the chart by clicking the Files tab. The Edit File tool will appear to the left of your file listing.
|
Clicking an Edit File tool opens a form that looks like this:
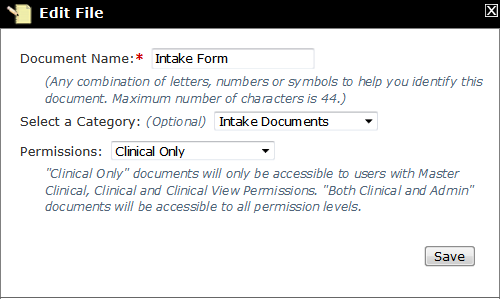
The Edit File tool allows you to change the Name, Category and Permissions of a file you've already uploaded.
Delete File
What this isThe Delete File tool allows you to delete a file you've previously uploaded to PSYBooks. Please note that FILE DELETIONS ARE PERMANENT. You will not be able to retrieve a copy of a deleted file, even in your Activity Log.What it looks likeThe Delete File tool looks like this: 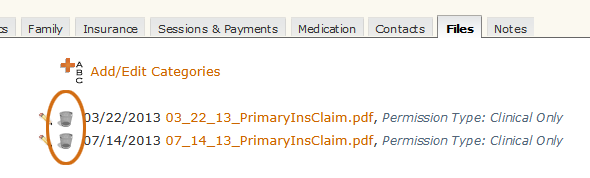 |
Where this isOpen a client's chart by clicking their name in the table on the Charts page. Then navigate to the Files section of the chart by clicking the Files tab. The Delete File tool will be to the left of the name of the file.
|
Although you can delete files you've uploaded to PSYBooks at any time, please note that FILE DELETIONS ARE PERMANENT. You will not be able to retrieve a copy of a deleted file, even in your Activity Log. (Your Activity Log will record that the file was deleted, but the file itself will not be able to be viewed or downloaded.) If you plan to delete a file, you may want to save a copy to your computer or other type of backup device before you delete it. To save a copy, just click the file's name. You'll get a dialogue box that asks you if you want to open or save the file.
PDF Preview Tool
What this isThe PDF Preview Tool allows you to preview PDF files you've previously uploaded so you can view them without having to download PHI onto your computer or other device.What it looks likeThe tool for previewing PDFs is just the link of the file's name. In a client chart, it looks like this: 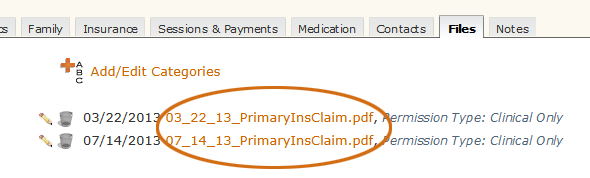 The presentation is similar in the therapist's "Files, Forms & Templates" area:  |
Where this isThe PDF Preview Tool is available on the Files tab of a client's chart and also in the Tools > Files, Forms & Templates section of the app.
|
Often, you may want to preview a file's contents without having to download it to your computer. If the file you've uploaded is a PDF, clicking the link on the Files page (either in a client's chart or in the Tools > Files, Forms & Templates section of the app) opens the PDF Preview tool, which allows you to do just that:
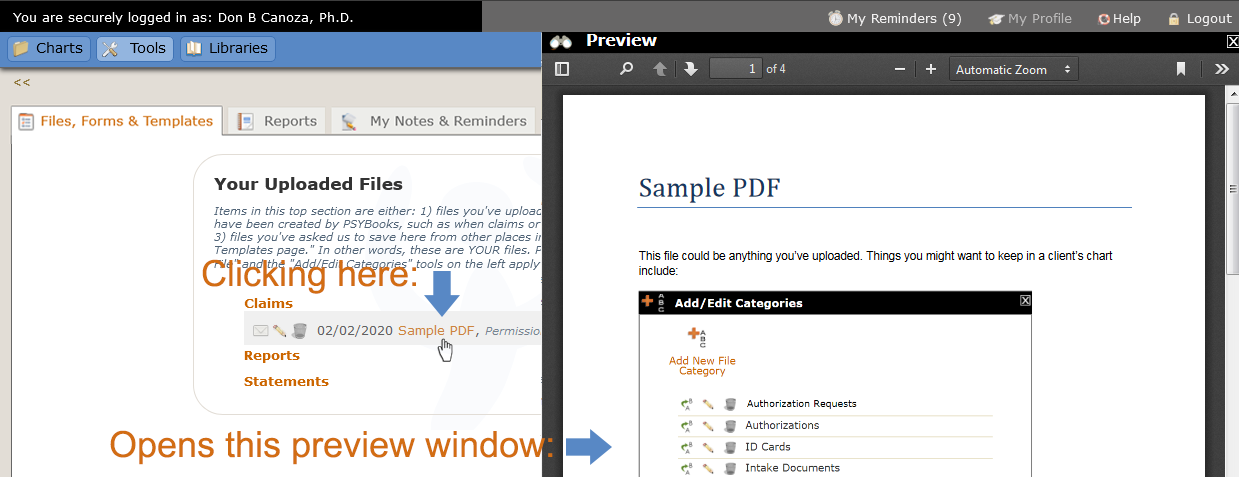
Being able to preview a file allows you to view it while keeping PHI off of your device for maximum, HIPAA-compliant security. The preview window opens in the middle of the screen, but you can move it by dragging the black bar at the top. The window can be resized by dragging any edge or the lower right corner.
The Preview Tool offers a large number of features. At the top left is a tool that allows you to show thumbnails when the PDF has more than one page:
Following that is a search tool with options to highlight all, match case, and find whole words:

Following search are tools to go to the Next and Previous pages in the PDF and also a textbox that will allow you to specify the page you want to visit:

Tools for zooming and also for viewing at preselected sizes are located in the center of the window:

A little farther over are tools that allow you to print the document, download it to your device or open the preview in a new tab:

The double arrows on the far right open another whole menu of tools. You can easily navigate to the first or last page of the document and also rotate your view. The Text Selection Tool allows you to select text within the PDF, a feature that's often difficult or impossible to do. You can then right click to bring up the contextual menu and copy the text to your clipboard, which can then be pasted wherever you need it. If you use a mouse, the hand tool allows you to quickly scroll through the document. If you have a touchscreen you can use your finger to accomplish the same thing. There are also options for horizontal scrolling, wrapped scrolling and different types of spreads:
All in all, PSYBooks' PDF Preview Tool gives you both maximum security and a large set of features for working with your uploaded PDF files. Currently, if you click on the link for a file you've uploaded that is NOT in PDF format (e.g., an image file, Word doc, etc.), the file will be downloaded to your computer. We have future plans to add additional preview features for other common file types, similar to the current PDF Preview Tool.
PDF Preview Tool Troubleshooting
If your PDF Preview window is blank, the most likely cause is that your browser is set to download them instead of viewing them online. The solutions are either to use a different browser and/or to change the settings in your browser. Each browser has their own settings page, and each time a browser updates, the settings page may be a little different. Because of that, we can't give you exact directions on how to change the settings, but the image below was taken from a recent edition of Firefox:
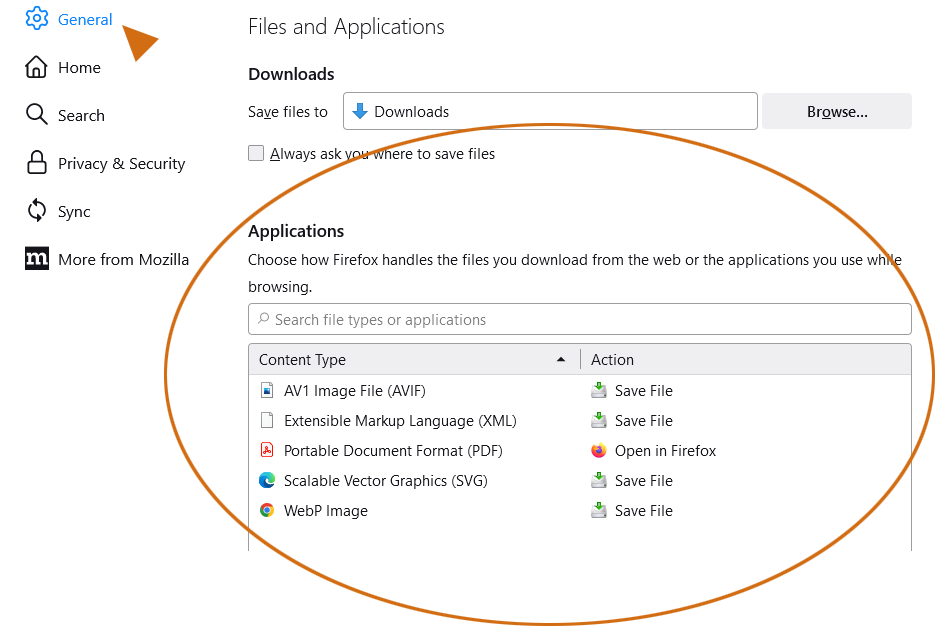
PDF is short for Portable Document Format. PDFs are created by an application (program) called Adobe Acrobat. Since they're made by an application, Firefox has them lumped in with other application files and asks you how you want Firefox to open them. The setting in the screenshot is correct, i.e., if you want to be able to use the PDF Preview Tool in PSYBooks, you would have to have Firefox set to open PDFs within Firefox.
Notice that it is not essential to change your browser's settings to open PDFs in this way. If you choose, you can continue to have your browser download them. The PDF Preview Tool is for those users who want to be able to view a PDF without downloading them.
Open/Save File
What this isThe Open/Save File tool allows you to open and/or save files you've previously uploaded to PSYBooks.What it looks likeThe tool for opening and saving files is just the link of the file's name. It looks like this: |
Where this isOpen a client's chart by clicking their name in the table on the Charts page. Then navigate to the Files section of the chart by clicking the Files tab. You can open/save a file by clicking its name in the Files list.
|
Clicking the name of a file you've uploaded will open the normal open/save dialogue box in your computer. Save dialogue boxes don't all look exactly alike, but yours will look something like this:
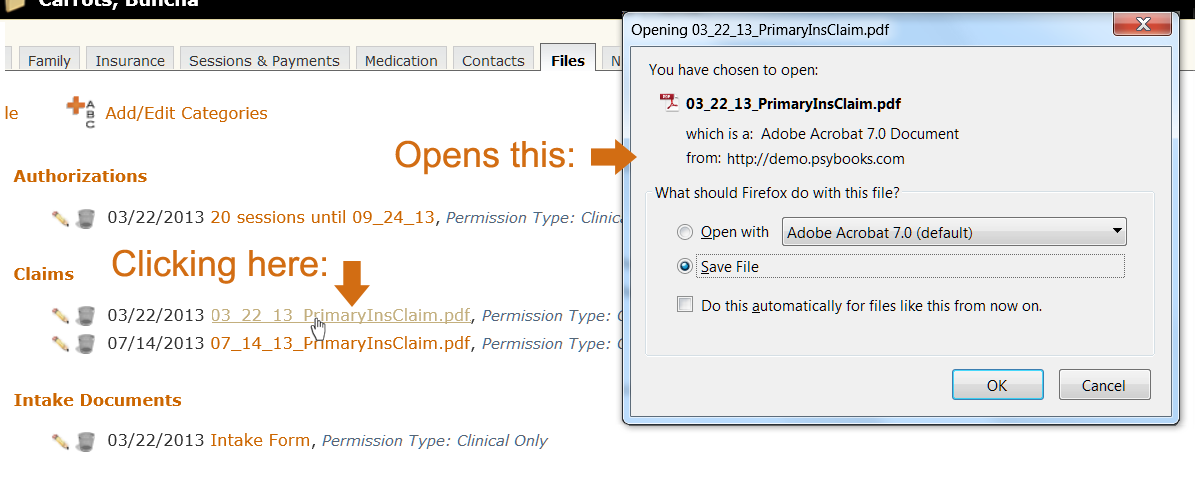
From this dialogue box, you'll be able to open the file (assuming there's a program on your computer that will open it) and/or save a copy to your computer or other storage device.
Add File (for Client Files)
What this isThe Add File tool allows you to enter a Name, Category and Permission level of a file you're uploading to a client chart.What it looks likeThe Add File tool in the client chart looks like this: 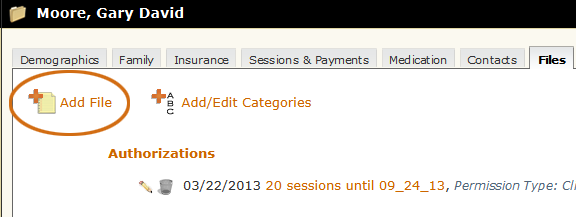 |
Where this isOpen a client's chart by clicking their name in the table on the Charts page. Then navigate to the Files section of the chart by clicking the Files tab. The Add File tool is on the top left.
|
Clicking the Add File tool opens a form that looks like this:
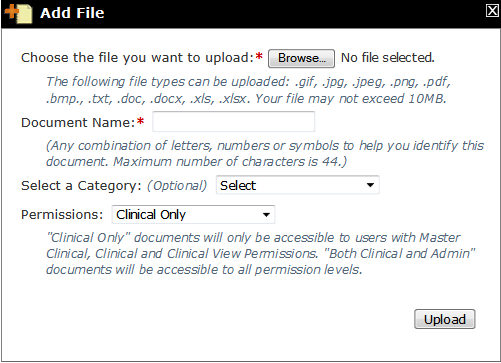
The first line lets you browse your computer for the file you want. Once you find your file, PSYBooks will automatically populate the Document Name field with the name of your existing file. However, you can change the name to anything you want. The next line allows you to select a category for your file. This is an optional tool to help you keep your files organized. The last line allows you to set a permission level for the file (i.e., specify which types of users are allowed to view the file).
Add/Edit Categories (Client Chart)
What this isThe Add/Edit Categories tool allows you to add, edit, delete and reorder the categories you use to organize client files. You can reach this tool from any client's chart but changes you make are global, i.e., they will affect the file categories in all clients' charts.What it looks likeThe Add/Edit Categories tool looks like this: 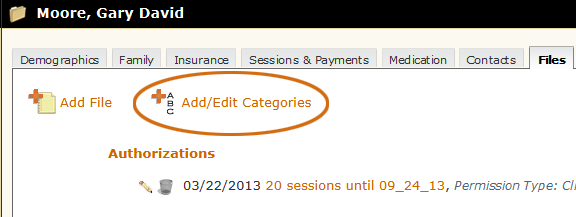 |
Where this isOpen a client's chart by clicking their name in the table on the Charts page. Then navigate to the Files section of the chart by clicking the Files tab. The Add/Edit Categories tool is at the top of the page.
|
When you click the Add/Edit Categories tool, the form that opens looks like this:
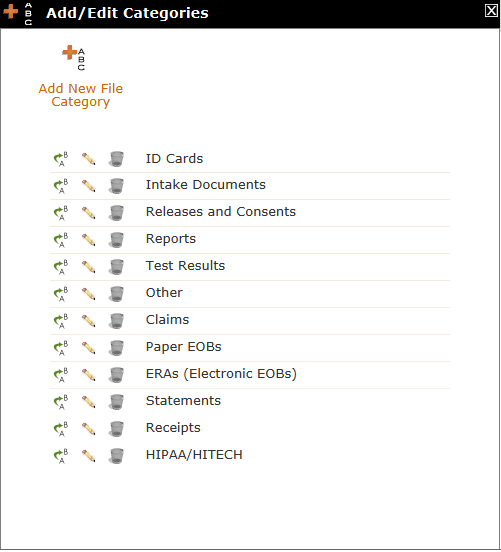
There are actually four separate tools on this form: The Add New File Category tool at the top plus three small table tools: Reorder, Edit and Delete. Each will be discussed below:
Add New File Category tool
The Add New File Category tool looks like this:
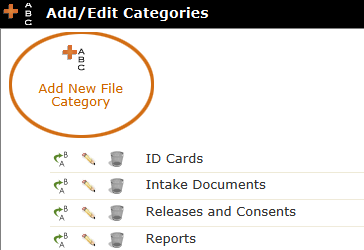
Clicking the tool opens a textbox right on the form where you can add your new category:
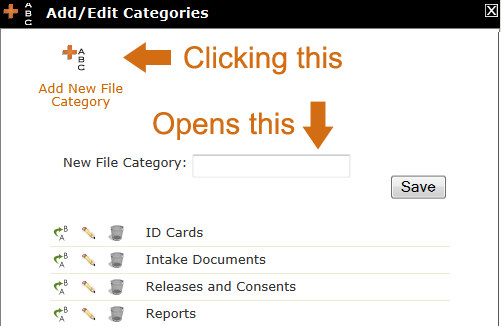
You can add your new category, click Save, and it will be added to the list below the tool.
Reorder File Categories tool
The Reorder File Categories tool is a small table tool beside the name of the category. It looks like this:
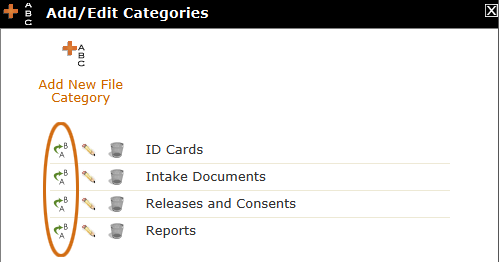
You can click this tool to drag any category to another place in the list.
Edit File Category tool
The Edit File Category tool looks like this:
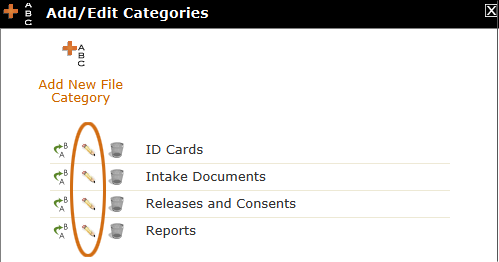
Clicking an Edit File Category pencil puts the category name in that row in a textbox where it can be edited:
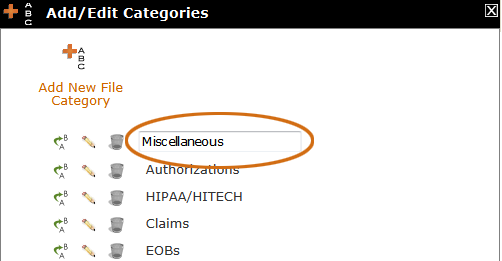
Delete File Category tool
The Delete File Category tool looks like this:

You can use this tool to delete file categories. You will be warned if a category contains files so you can decide whether you want to delete the files and the category or just the category.
Notes Tab
What this isThe Notes section of the chart is a list of the notes you've made in various forms in the client's chart throughout PSYBooks.What it looks likeThe tab to open the Notes section of the chart looks like this:  |
Where this isOpen a client's chart by clicking their name in the table on the Charts page. Then navigate to the Notes section of the chart by clicking the Notes tab.
|
The Notes section of the client's chart looks like this:

This page is a repository of all the client notes you've written throughout the site. The section at the top left of the Notes page is the Show Notes area. Show Notes consists of filters to allow you to choose subsets of notes to view. Once you've chosen the filters you want, you can also create a PDF of that particular note subset.
The section on the top right is Add Notes. Add Notes holds links to a few specialized notes you may want to use in PSYBooks including an open-ended psychotherapy note that is not part of the Medical Record.
Beneath Show Notes and Add Notes is the content area of the Notes tab. The content of most notes is easily visible, allowing you to scan what you've written. However, the longer structured notes (Intake Note, Treatment Plan, Progress Note and Mental Status Exam) are displayed on this page as orange links which can be opened by clicking.
Individual Client Notes
What this isNotes are collected from forms throughout PSYBooks. All are presented in one place - the Notes tab of the chart - and in addition to the content of the note (i.e., what you've written), each note has a wealth of metadata. The metadata shows information such as what type of note it is, if and when it was signed and by whom, and perhaps most importantly, whether it's part of the Medical Record (which makes it PHI) or whether you've marked it as a Psychotherapy Note, designating it your personal property.What it looks likeThe tab to open the Notes section of the chart looks like this: |
Where this isOpen a client's chart by clicking their name in the table on the Charts page. Then navigate to the Notes section of the chart by clicking the Notes tab. If you've written notes on this client anywhere in PSYBooks, they will all appear here.
|
An individual note from the Notes section of the client's chart looks like this:
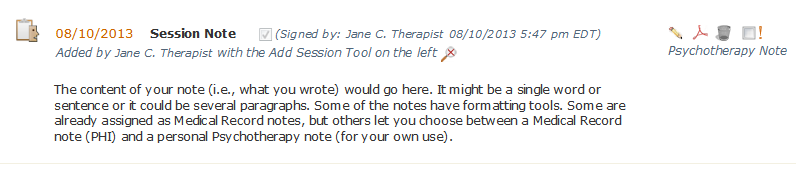
The content of what you wrote is at the bottom:
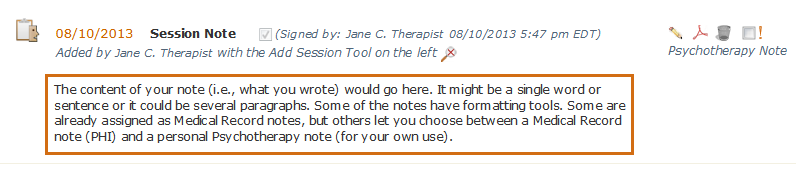
The parts above the content are either metadata about the note (on the left and middle) or tools for working with the note (on the far right). For the most part, the metadata section of a note gives you information about the note whereas the tools section allows you to work with the note. However, a couple of tools sneaked over to the metadata area and likewise, the tools section has a bit of metadata.
The complete note structure looks like this:
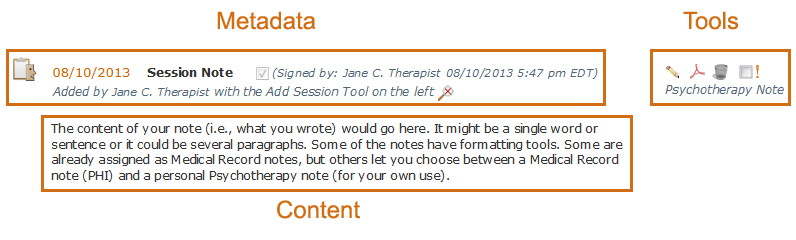
The content is the part you wrote. The metadata and tools sections are broken into individual items which will be discussed below.
Note Metadata
Note Metadata > Icon
Each note begins with an icon to help you identify where the note came from. The icons all have a clipboard in the background (to identify them as note icons) and then another graphic else to identify the specific type of note, such as the form it came from. The note below is a Session Note - which means it was written on the Add Session form when the session was entered:
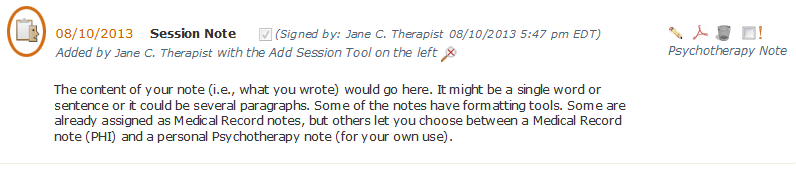
Note Metadata > Date
The date the note was written comes right after the icon. Dates are also links, which means you can click them to edit (if it's an unsigned note) or to add a revision (if it's a signed note).
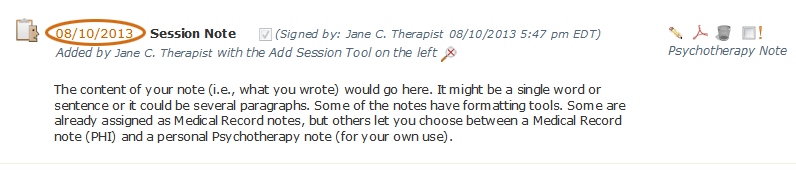
Note Metadata > Name or Type of Note
The name of the note tells you what kind of note is it. PSYBooks has both structured and unstructured note types. Most notes are unstructured, which means the form has a single textarea where you can write whatever you want to write. However, some notes have checkboxes, select boxes, etc., to save you time in filling out common information you may want to provide such as Axis IV items, which Strategies & Interventions you intend to use, whether there are any safety issues, etc. The name or type of note is here:
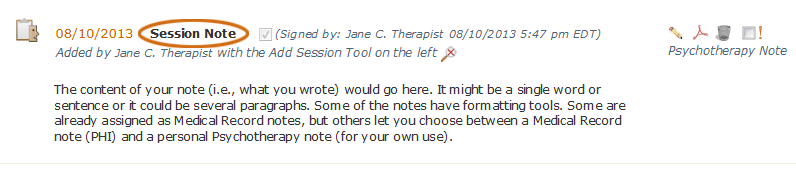
Note Metadata > Signature Block
The next section of the note gives you information about if and when the note was signed and by whom:
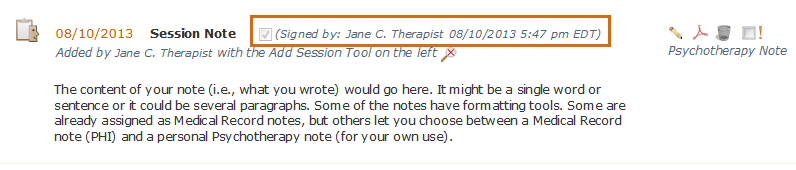
When the note has not been signed, the checkbox becomes a tool that allows you to sign the note. The signature block of an unsigned note looks like this:
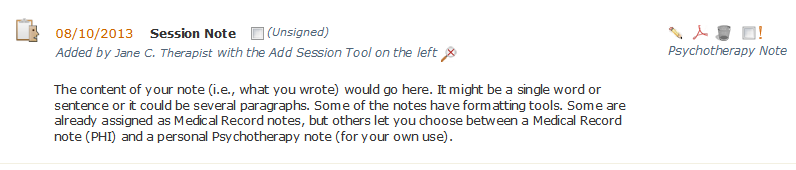
Checking the checkbox will sign the note, causing the signature block to reflect the correct status.
Note Metadata > CPT and Diagnosis
Session notes have some additional pieces of metadata that not all other notes have, including the CPT and Diagnoses codes, assuming the user added them with the session. These items are required by some insurance companies. The CPT and Diagnosis section of a Session note looks like this:
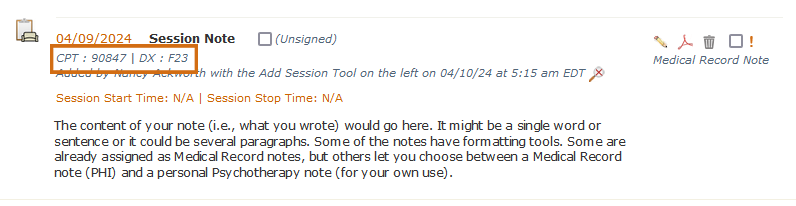
Note Metadata > 'Added By' Block
The next line tells you who actually wrote this note. In most cases, it will be you. But there may be times when another therapist in your practice sees this patient and adds some notes, or if you have front office staff, they may need to write administrative types of memos such as notes on payments, adjustments, authorizations, etc. You'll always be able to tell at a glance whether you added this note or someone else did. The added by block looks like this:
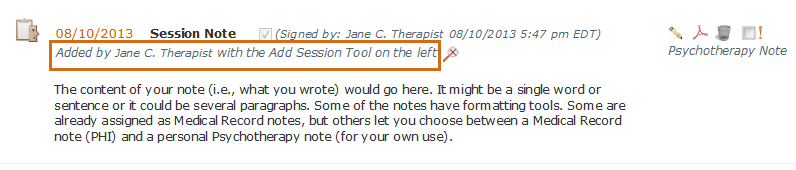
Note Metadata > Session Start and Stop Time
The final piece of metadata tells you the start and stop time of the session. These times are added to the note automatically based on the start and stop times of the appointment in the PSYBooks calendar. If the user has NOT entered the appointment in the calendar, the Start and Stop times will say "N/A". However, even if the user is not using the PSYBooks calendar, there is a section on the Add and Edit Session forms that allows you to add them:
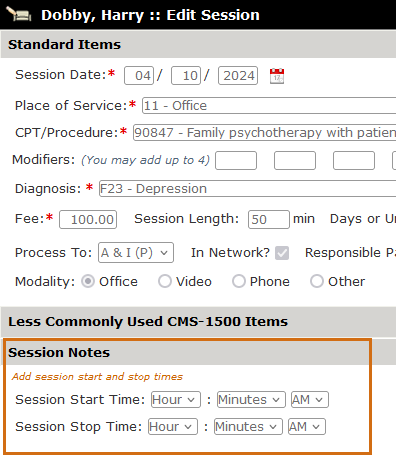
This section allows you to add or change the session start and stop times, whether they were added automatically by being matched with the calendar, or whether the user added them manually. This allow you to list the precise start and stop times, which are sometimes required by certain insurance companies. The Session Start and Stop Time section on a note looks like this:
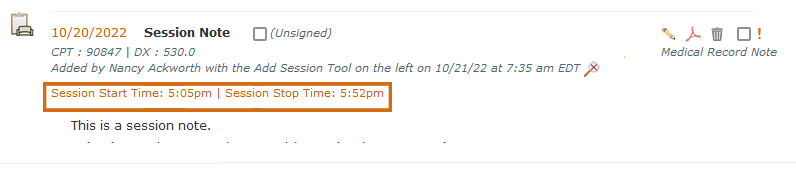
Note Metadata > Show/Hide Toggle
There's also a small tool located on the right end of the added by block. It's a show/hide toggle that allows you to open or close the note. Closing longer notes after you've read them can help you scan all the notes to find what you need. The note below is open, so the show/hide toggle is set to "Hide":
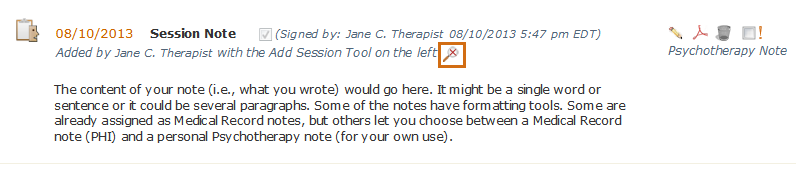
If you click the Hide version of the tool, the content of the note will collapse and the hide icon is replaced with the show icon for the next time you want to view the note:

Individual Note Tools
The main tools for working with an individual client note are on the far right:
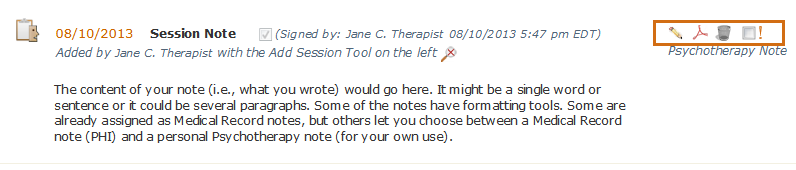
From left to right, they are:
Edit Note
This note allows you to actually edit (replace old content with new content) an unsigned note or, if the note has already been signed, the Edit tool will create a revision of the original note that will appear under it. Clicking the date of a note (on the metadata side) also opens the edit/revise tool.
A signed note with a revision below it looks like this:
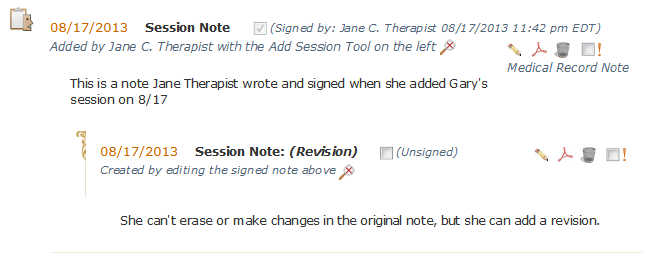
Actually, the revision that's written in the screenshot isn't technically true. When you click the Edit tool of a signed note, the original note is there in the textbox. To produce the image above, Jane would have had to have deleted it before she started typing. By having the original note present, Jane might have only wanted to change a word or two - maybe she just made a mistake in the original. However, the changed note would still show up as a revision under the original note.
Create PDF
This allows you to create a PDF of that individual note. PDFs can then be printed, saved to your computer, etc.
Delete Note
This tool permanently removes a note from the chart. However, portions of the medical record that you delete from PSYBooks are never actually deleted - just removed from view. A PDF of the deleted note will be added to your Activity Log in the Reports section which you'll be able to access at any time.
Mark as Important
You can mark notes throughout PSYBooks as important either on the original form when you write the note or at any time thereafter in the Notes tab with the Mark as Important tool shown above. The Mark as Important checkbox is a toggle, i.e., you can mark a note as important then remove the mark when you no longer need it. This allows you to use this tool to create reminders for yourself, i.e., you can mark a note as important until you no longer need the information, then you can unmark it.
When you're at the Notes tab, there's an "Only show those notes marked as important" checkbox that will remove all notes from the page except those you've specifically marked as important, allowing you to filter out notes you don't want to view.
Note Category
The note category is actually metadata instead of a tool. It tells you whether the note is part of the client's official medical record or whether it's a note you've created for your own personal use, i.e., a psychotherapy note. Medical record notes are considered part of the client's PHI whereas psychotherapy notes are not. The note category is below the row of individual note tools and looks like this:
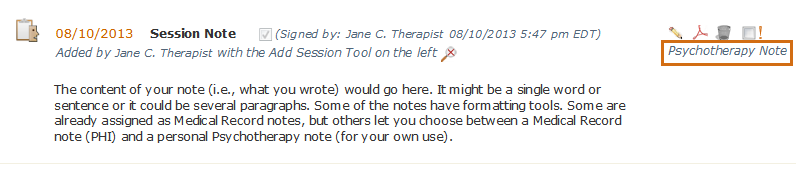
Show Notes
What this isThe Show Notes section contains filtering tools to allow you to view only the kinds of notes you want to see. Once you've chosen your filters, there's a tool for making a PDF of the set of notes you selected.What it looks likeThe Show Notes section of the chart looks like this: 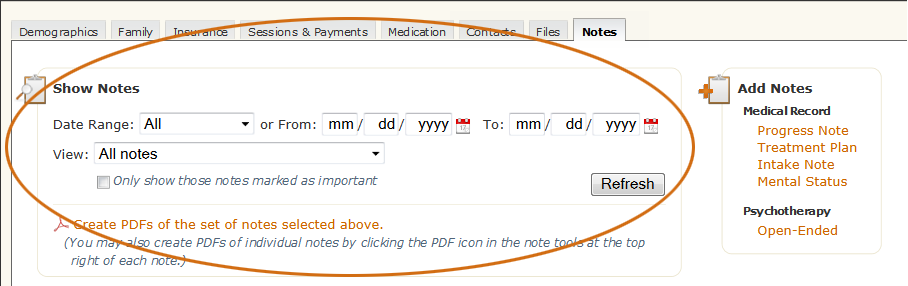 |
Where this isOpen a client's chart by clicking their name in the table on the Charts page. Then navigate to the Notes section of the chart by clicking the Notes tab. Show Notes is on the top left.
|
There are two basic filters for selecting the set of notes you want to view. One allows you to set the date range (the Date Range filter) and the other allows you to choose a subset of available notes (the View Notes filter). Each will be discussed below.
The Date Range Filter
What this isThe Date Range filter allows you to choose specific dates for the subset of notes you want to view.What it looks likeThe Date Range filter looks like this:  |
Where this isOpen a client's chart by clicking their name in the table on the Charts page. Then navigate to the Notes section of the chart by clicking the Notes tab. The Date Range filter is on the top left in the Show Notes section.
|
As in other places in the app, you can use the select box to choose your range of dates or enter specific dates in the From and To boxes.
The View Notes Filter
What this isThe View Notes filters allow you to choose the specific kinds of notes you want to view. With these two filters, you can go from the broadest selection (All Notes) to very detailed note subsets (e.g., only the Payment Notes that are marked as being important).What it looks likeThe View Notes filters look like this: 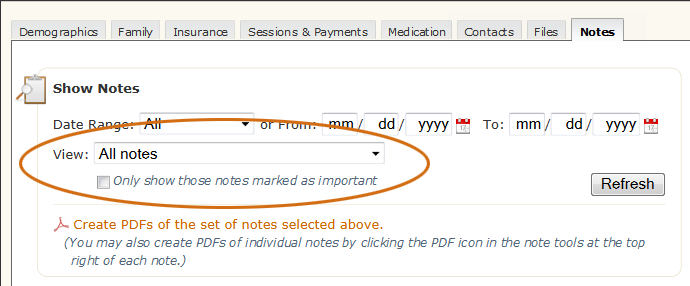 |
Where this isOpen a client's chart by clicking their name in the table on the Charts page. Then navigate to the Notes section of the chart by clicking the Notes tab. The View Notes filters are in the middle portion of the Show Notes section.
|
There are actually two filters for viewing your notes. One is the View select box and the second is the checkbox underneath that allows you to only view important notes in the subset option chosen with the select box. The options in the View Notes select box are:
- All notes
- Only medical record notes
- Only psychotherapy notes
- Specific medical record notes
You might want to select only your psychotherapy notes to view the thoughts you've had about your client, what they revealed during the previous session, etc. Conversely, you might need to create a set of medical record notes - or only specific medical record notes - if you're asked to produce a copy of the chart by your client or another outside person or agency with whom you need to comply. Checking the "Only show those notes marked as important" checkbox will further limit your selection to the subset of notes within that selection that you've specifically marked as being important.
The first three options are self-explanatory. The last one - specific medical record notes - has some interesting features that will be discussed below.
View Specific Medical Record Notes
What this isThe View Specific Medical Record Notes option in the View select box opens another section of Show Notes that allows you to choose to view only specific kinds of notes.What it looks likeChoosing the View Specific Medical Record Notes option opens another section of Show Notes that looks like this: 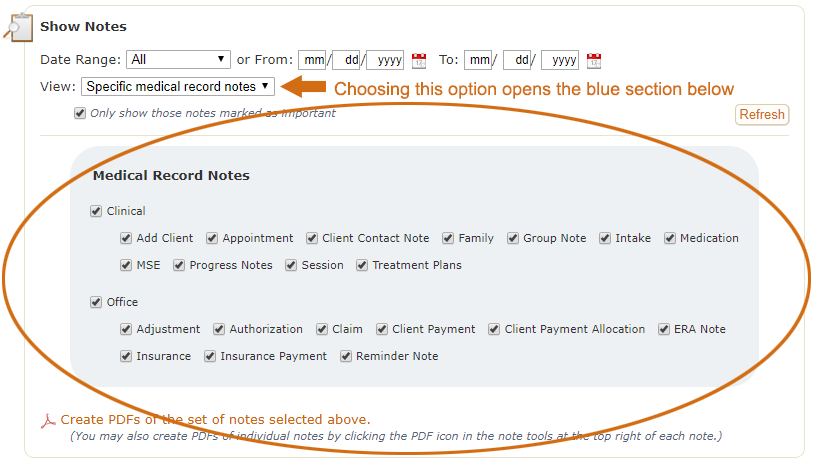 |
Where this isOpen a client's chart by clicking their name in the table on the Charts page. Then navigate to the Notes section of the chart by clicking the Notes tab. View Specific Medical Record Notes is an option in the View select box on the left.
|
Choosing the View Specific Medical Record Notes option in the View select box allows you to filter the notes in the Medical Record in any way you choose. The notes have been grouped into Clinical and Office categories but these category names have no special meaning outside of PSYBooks. Loosely speaking, notes designated as "Clinical" are more likely to be related to the clinical aspects of this case, whereas those designated as "Office" are more likely to be more administrative in nature. However, how you use them will be up to you. There is no right or wrong.
The Medical Record is actually a fairly large number of note types throughout PSYBooks. There may be times when you don't want to view the entire Medical Record - just a certain part of it. For example, you might only want to view those notes that are more clinically related, such as Session Notes, Treatment Plans, Progress Notes, etc. Conversely, you might decide to use notes related to payments to communicate with your accountant, which would make creating a subset of only payment-related notes helpful. In short, anytime you want to limit your notes view to just certain notes in the Medical Record, the View Specific Medical Record Notes option in the View select box will help you do it.
View Notes Marked as Important
What this isThe View Notes Marked as Important filter allows you to further limit the choice you made in the View select box to only those notes you've specifically marked as important.What it looks likeThe View Notes Marked as Important filter looks like this: 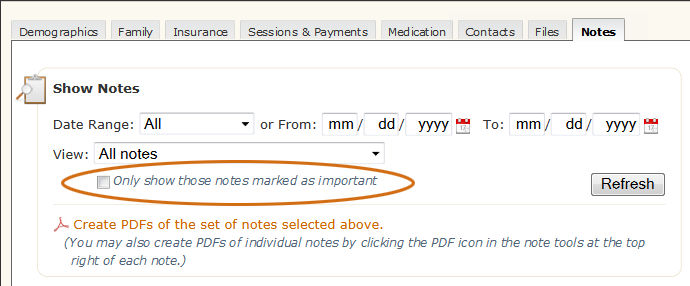 |
Where this isOpen a client's chart by clicking their name in the table on the Charts page. Then navigate to the Notes section of the chart by clicking the Notes tab. View Notes Marked as Important is in the Show Notes section on the left side of the page.
|
Any note in PSYBooks can be marked as important. The tool for doing this is just a single checkbox followed by an orange exclamation point: 
The reason you might want to mark a note as important is because it allows for finer-tuned filtering when viewing your notes. When you check the View Notes Marked as Important checkbox in the Show Notes section, you'll be able to view ONLY notes you've specifically marked. Also, since the Mark as Important tool is a toggle, you can use it to remind yourself of certain things. Once you no longer need the reminder, you can unmark the note and it will not appear the next time you check the View Notes Marked as Important checkbox in Show Notes.
Create PDFs
What this isThe Create PDFs tool allows you to make a PDF of the subset of notes you've selected to view. This enables you to save a digital copy of this group of notes, print them, etc.What it looks likeThe Create PDFs tool looks like this: 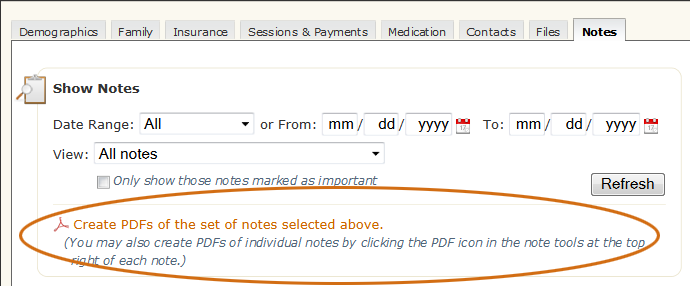 |
Where this isOpen a client's chart by clicking their name in the table on the Charts page. Then navigate to the Notes section of the chart by clicking the Notes tab. The Create PDFs tool is at the bottom of the Show Notes section.
|
Creating a PDF of a group of notes allows you to work with it outside of PSYBooks. You can save copies to your computer, send a copy to your bookkeeper, etc. There may also be times when you're asked to produce a set of notes for a 3rd party. The Create PDFs tool allows you to do that easily.
Add Notes
What this isThe Add Notes section allows you to add certain notes from the Notes tab of the client's chart. All of the note types in Add Notes can also be reached from the Add Session tool but Add Notes allows you to add stand-alone notes to the chart.What it looks likeThe Add Notes section of the Note tab looks like this: 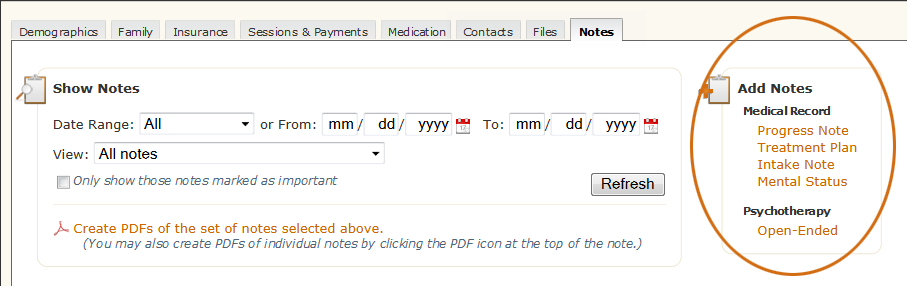 |
Where this isOpen a client's chart by clicking their name in the table on the Charts page. Then navigate to the Notes section of the chart by clicking the Notes tab. Add Notes is on the top right.
|
There are four types of Medical Record notes plus one Psychotherapy note that can be added from the Notes tab. The Medical Record notes that can be added here are: Progress Note, Treatment Plan, Intake Note and Mental Status Exam. These are all structured notes, i.e., with common items already listed for you so you can just check boxes and make selections from select boxes to save you some time. The Psychotherapy note is an Open-Ended note with formatting tools so you can say whatever you want and have some control over how it looks. Any of these note types can also be added from the Add Session tool. The Add Notes section here is for times when you want to add a stand-alone note that may or may not be specifically associated with a session. However, each of these notes has a Session Date select box that will allow you to attach the note to the session with which is belongs. Once a session date is attached to a note, the CPT code that was assigned to that session will appear and become part of the note.
Add Notes > Progress Note
What this isProgress Notes are designed to work in conjunction with Treatment Plans. If you fill out a Treatment Plan, subsequent Progress Notes will be pre-populated with values from the Treatment Plan, making Progress Notes quick and easy to fill out. However, PSYBooks doesn't require you to use them together so you can fill out Progress Notes as stand-alone items if you want.What it looks likeThe Progress Note is accessed here: 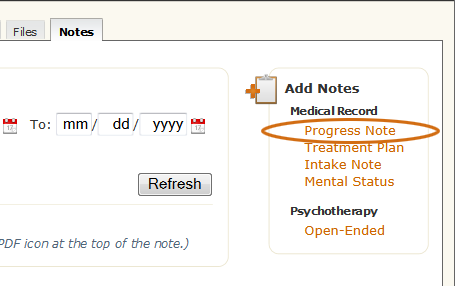 |
Where this isOpen a client's chart by clicking their name in the table on the Charts page. Then navigate to the Notes section of the chart by clicking the Notes tab and click Progress Note in the Add Notes section on the top right.
|
Treatment Plans and Progress Notes were designed to be used together, i.e., fill out a Treatment Plan and then submit Progress Notes after subsequent sessions. When used in this manner, most of the Progress Note will already be filled out when you open it because the majority of the fields are pre-populated from the most current Treatment Plan. If you don't use Treatment Plans, Progress Notes can also be used as stand-alone items. Progress Notes are structured notes so even when the form hasn't been pre-populated, it's quick to fill out.
When you click the link for Progress Note, the form that opens looks like this:
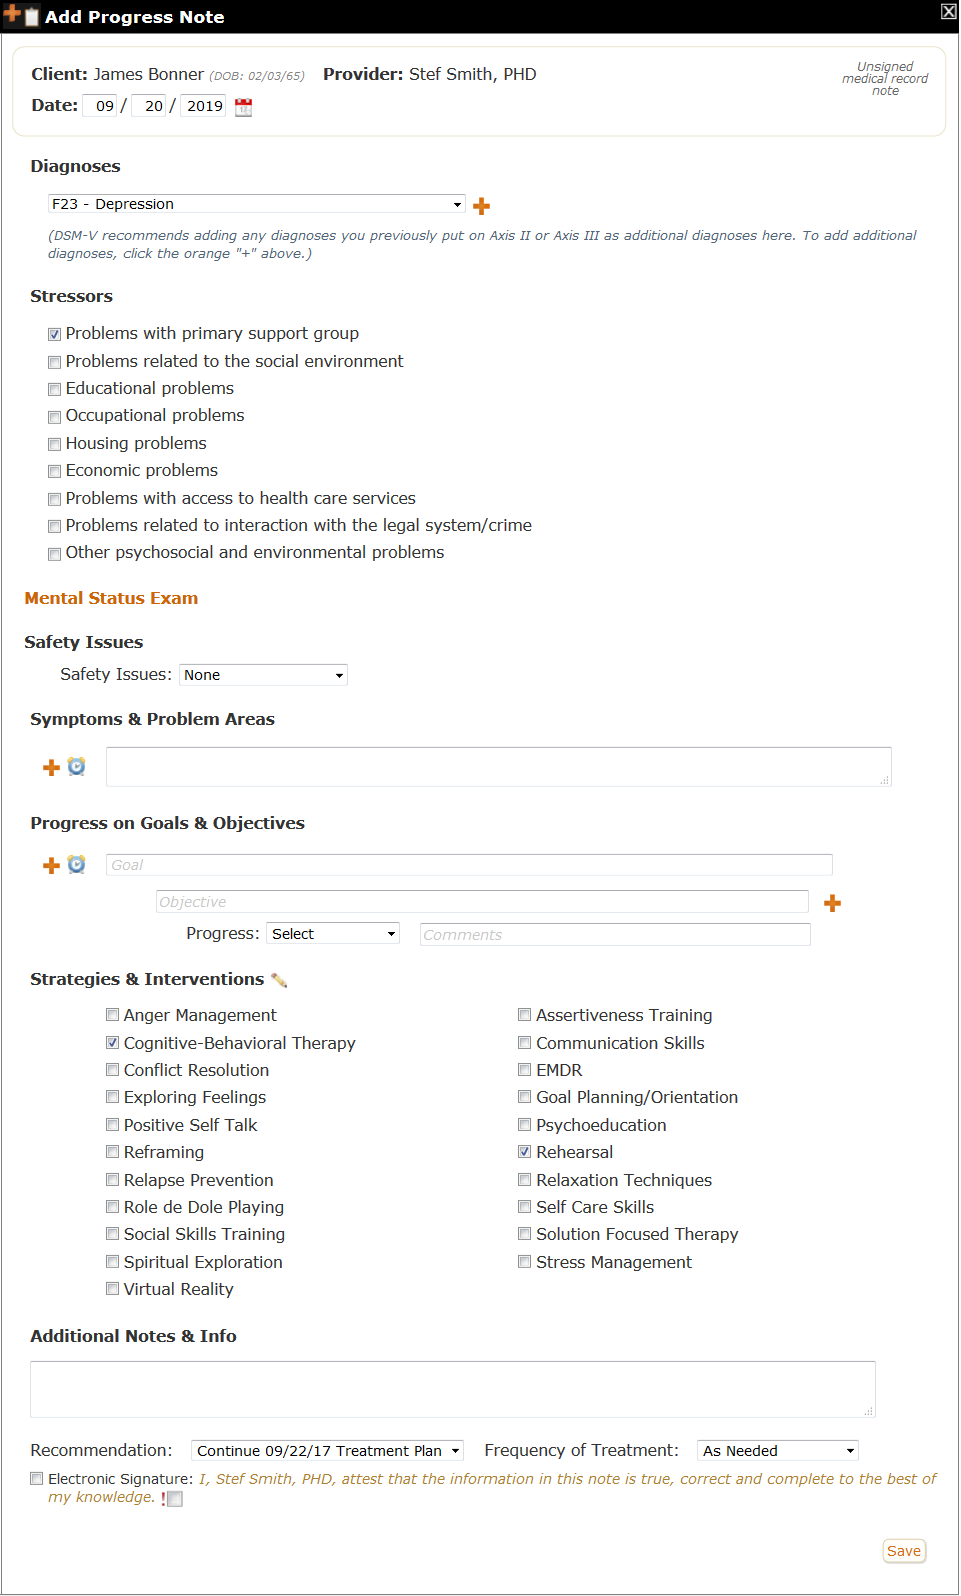
Had you filled out all the fields on the Treatment Plan, almost all of the Progress Note would already be filled in. You might want to add any new symptoms, report progress on previous goals and make any other necessary updates, but you wouldn't have to start this form from scratch.
Each of the sections of the Progress Note will be discussed separately below:
Diagnoses
The Diagnoses section of the Progress Note looks like this:

If you haven't completed a Treatment Plan, PSYBooks will check to see if you've entered a session with a diagnosis and use that diagnosis. All diagnoses you've added to the last session and/or the most recent Treatment Plan or Progress Note will appear here.
Mental Status Exam
Since the Mental Status Exam is a tool for assessing current status, it is not part of the Treatment Plan. This means that it will not be pre-populated on the Progress Note. Clicking the Mental Status Exam link on the Progress Note opens an MSE right on the Progress Note, making it easy to use. An opened MSE looks like this:
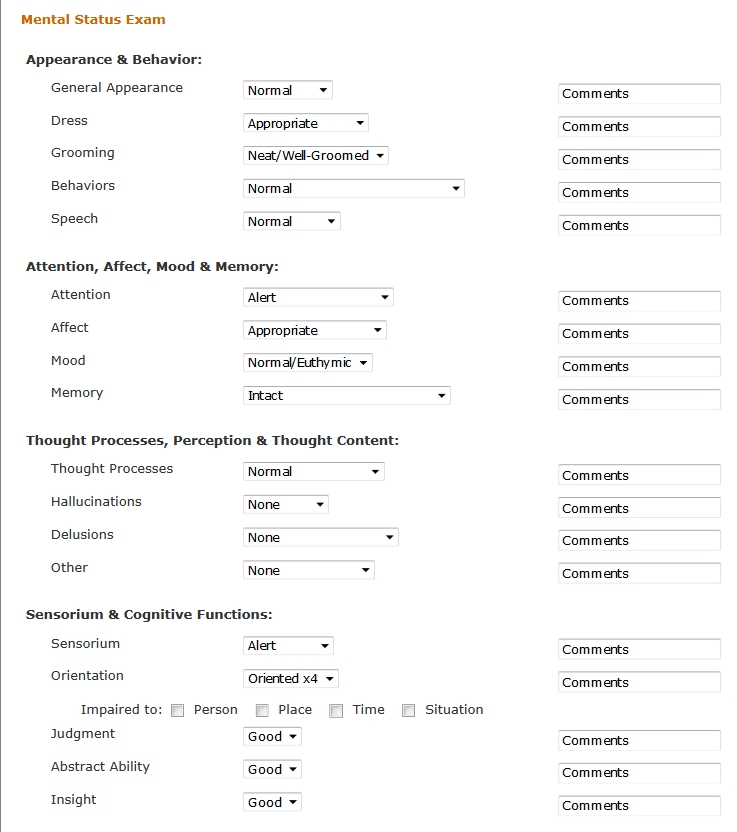
Values you enter will be listed on the Notes page as part of the Progress Note. If you'd rather have the MSE listed separately, you can also add stand-alone MSEs any time you want.
Safety Issues
The Safety Issues section is closed when the option in the select box is None. However, if you change the option to anything else, you'll see the extra form fields below:

Since determining a client's safety is normally considered part of a current assessment, the Safety Issues section is not on the Treatment Plan.
Symptoms & Problem Areas
The Symptoms & Problem Areas section of the Progress Note looks like this:

If you entered values in the Symptoms & Problem Areas section of the Treatment Plan, your entries will appear here. If you haven't completed a Treatment Plan, you can use this area to list your client's symptoms and problem areas on the Progress Note.
The Plus Icon
You can use the orange Plus icon to open a new textarea for writing additional symptoms and/or problem areas.
The History Icon (alarm clock)
The History icon opens a small window where you can see values you've entered in this field in previous Progress Notes.
Progress on Goals & Objectives
The Progress on Goals & Objectives section of the Progress Note looks like this:

Notice that this section is a bit different from the Treatment Plan. Whereas the Treatment Plan has a section called "Goals & Objectives" (which is place to list the actual goals and objectives), the corresponding section in the Progress Note is called "Progress on Goals & Objectives" and is a place to enter progress that's been made toward those goals.
The Plus icons
There are two orange Plus icons in the Progress on Goals & Objectives section. The one on the left beside the alarm clock opens a new Goal/Objective pair. The one to the right of the Objective textbox allows you to enter more than one objective per goal.
The History Icon (alarm clock)
The History icon opens a small window where you can see goals and objectives you've entered in this field in previous Progress Notes or Treatment Plans.
Strategies & Interventions
The Strategies & Interventions section of the Progress Note looks like this:
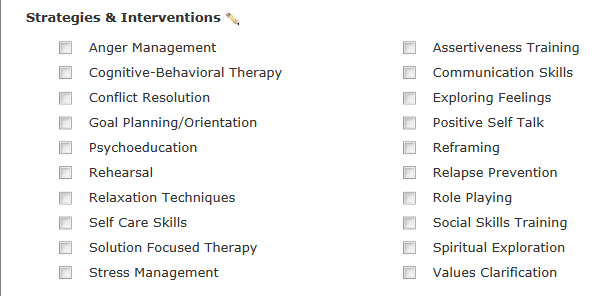
The checkboxes in this section are meant to save you some time by allowing you to just check boxes instead of having to type. PSYBooks provides you some samples of possible mental health strategies & interventions but you're free to edit the list in any way you choose with the tool below:
Edit Intervention List Tool
The pencil icon next to the title "Strategies & Interventions" is a tool that allows you to edit the list. The tool looks like this:

Clicking it opens this form:
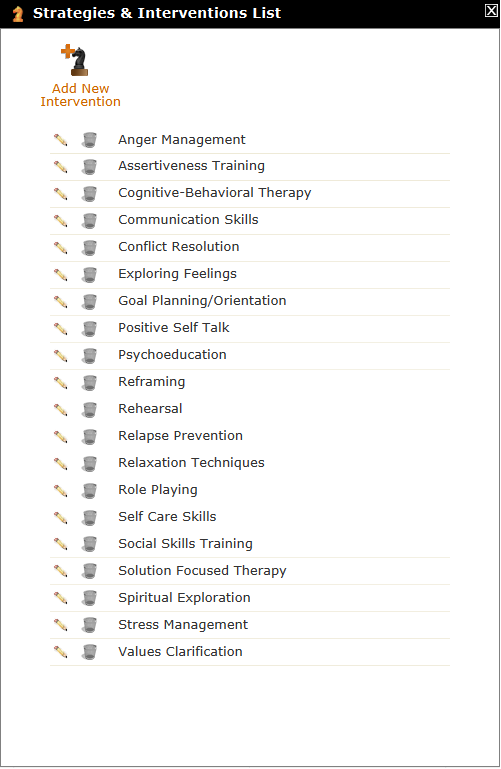
You can edit or delete items from this list. Deletions are permanent but you can always add an item again with the Add New Intervention tool at the top of this form.
Add New Intervention Tool
Clicking the Add New Intervention tool at the top of the Edit Strategies & Interventions form opens a section where you can add a new intervention to the list. It looks like this:
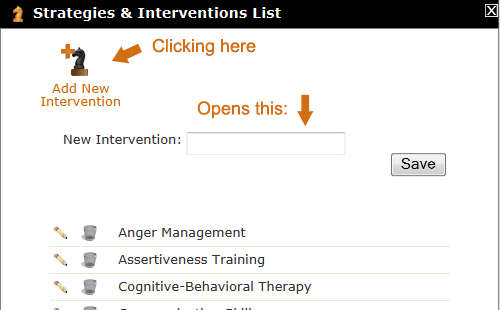
Additional Notes & Info
The Additional Notes & Info section of the Progress Note looks like this:
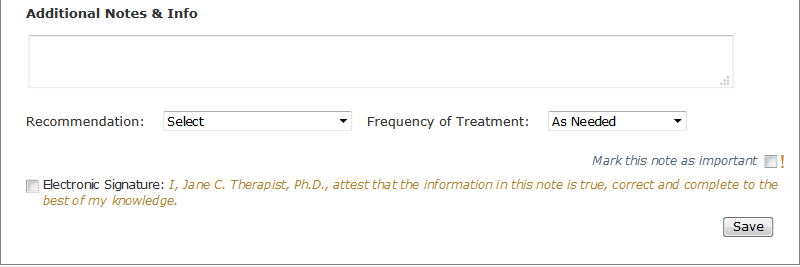
The Additional Notes & Info section of the Progress Note provides a textarea where you can write additional information. This area also contains some additional fields you may want, the Mark as Important tool and the signature block.
The Recommendation area is an important feature which allows you to indicate whether this Progress Note continues an earlier Treatment Plan. This is the default setting when there is a Treatment Plan available. Other options are to create a New Treatment Plan or mark this patient's therapy as terminated.
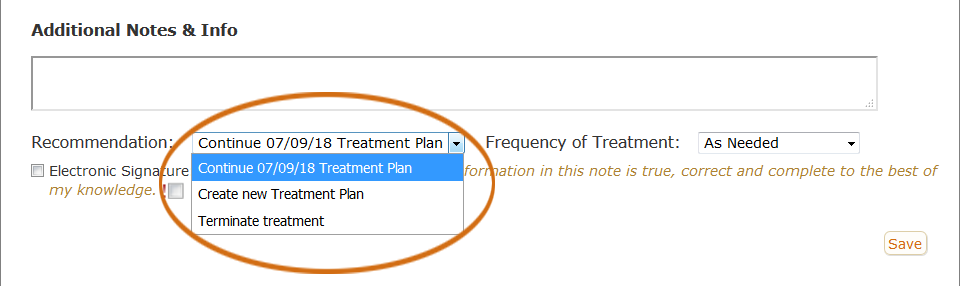
How the Progress Note is displayed on the Notes page
Since the Progress Note is a long form, it's displayed on the chart's Notes tab as a closed link like this:
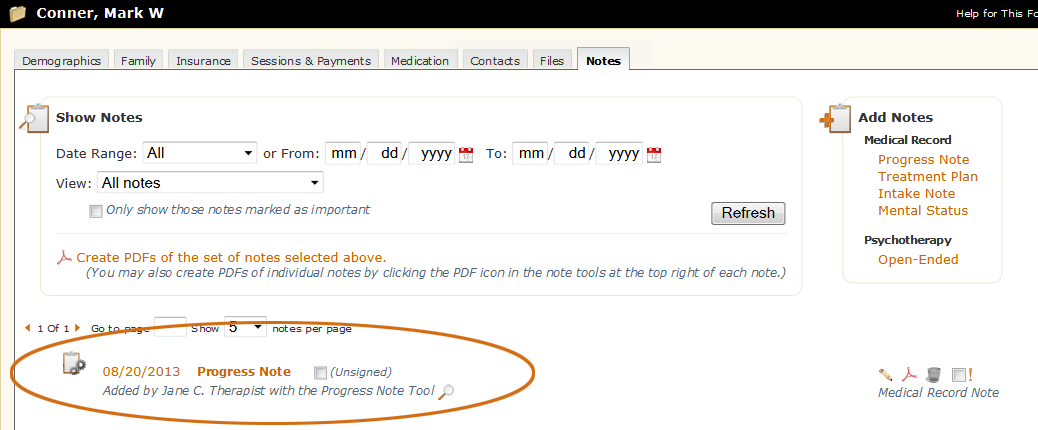
You can open it to read by clicking the Progress Note link or the Edit Note tool on the right.
Add Notes > Treatment Plan
What this isThe Treatment Plan is meant to be used in conjuction with Progress Notes, although each can be used as a stand-alone tool if you prefer. Treatment Plans are mostly structured - which means you fill them in primarily with checkboxes and select boxes instead of having to type everything from scratch.What it looks likeThe Treatment Plan is accessed here: 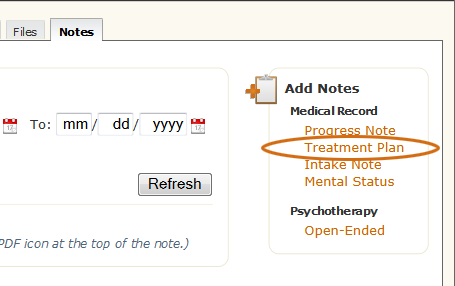 |
Where this isOpen a client's chart by clicking their name in the table on the Charts page. Then navigate to the Notes section of the chart by clicking the Notes tab. The link to the Treatment Plan is in the Add Notes section on the top right.
|
Although the form for the Treatment Plan may seem long, since it's a structured form, it can be filled out quickly. The Treatment Plan form looks like this:
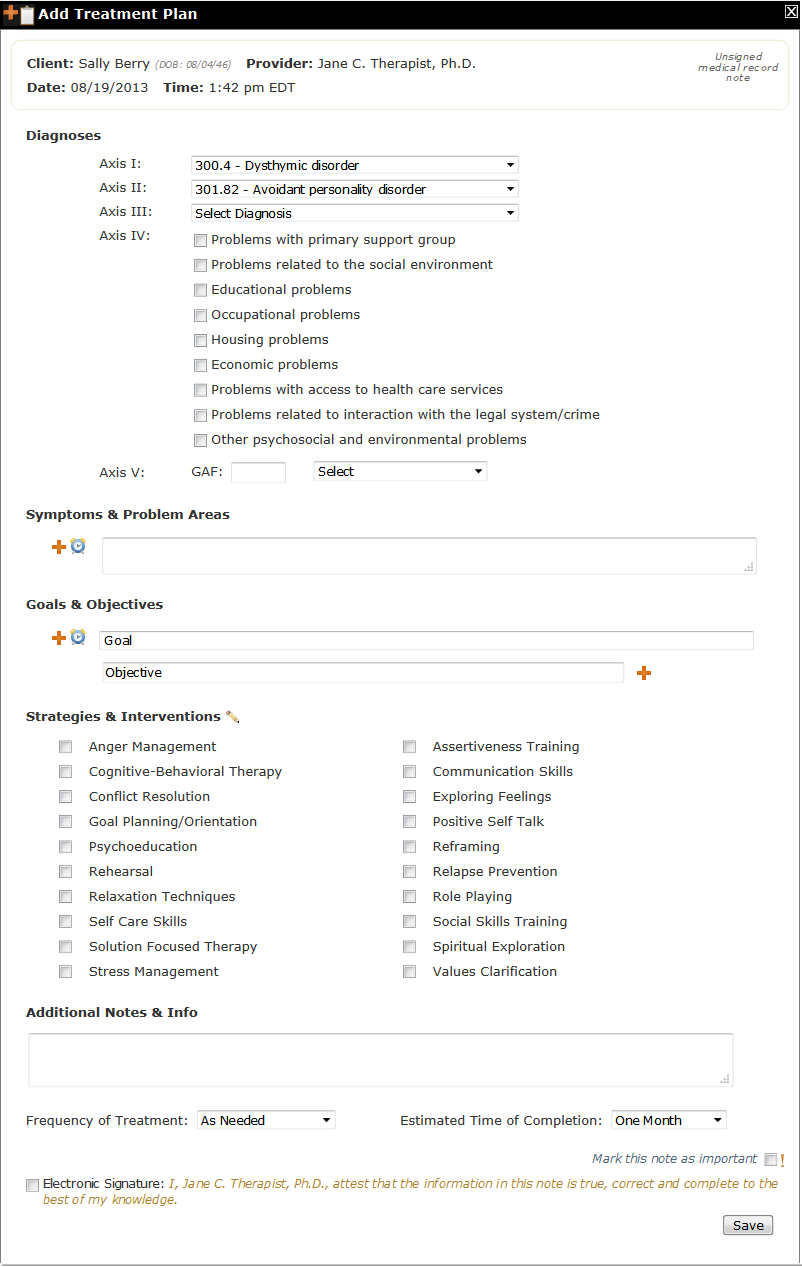
Since the Treatment Plan and Progress Notes were designed to be used together, the values you enter in the Treatment Plan will be used to pre-populate subsequent Progress Notes. The sections of the Treatment Plan, which are almost identical to the sections of the Progress Note, will be discussed separately below:
Diagnoses
The Diagnoses section of the Treatment Plan looks like this:
If you had already added a session with a diagnosis before opening the Treatment Plan, the diagnosis you used in the session would be listed here. However, you're free to change it at any time. The next time you add a session, if the diagnosis on the current Treatment Plan is different from what you last used for a session, you'll be asked if you want to change it.
Symptoms & Problem Areas
The Symptoms & Problem Areas section of the Treatment Plan looks like this:
You can fill in your client's symptoms and problem areas in the textarea. The orange plus icon on the left allows you to open additional textareas if your client has more than one type of symptom you want to report separately. PSYBooks keeps track of all of the values you've written in
The Plus Icon
The orange Plus icon will open a new textarea where you can write additional symptoms and/or problem areas.
The History Icon (alarm clock)
The History icon opens a small window where you can see values you've entered in this field in previous Treatment Plans.
Goals & Objectives
The Goals & Objectives section of the Treatment Plan looks like this:

Goals and objectives you enter here will be carried to the Progress Note form where you can report your client's progress toward the goals you set here.
The Plus Icon
There are two orange Plus icons in this section. The one on the Goal line to the left of the alarm clock opens new fields where you can write additional goal/objective pairs. The one to the right of the Objective textbox allows you to write more than one objective for any goal.
The History Icon (alarm clock)
The History icon opens a small window where you can see values you've entered in this field in previous Treatment Plans and Progress Notes.
Strategies & Interventions
The Strategies & Interventions section of the Treatment Plan looks like this:
The items in the list can save you some time by allowing you to just check boxes instead of having to type. PSYBooks provides samples of possible mental health strategies & interventions but you're free to edit the list with the Edit Strategies & Interventions tool discussed below:
Edit Strategies & Interventions Tool
The pencil icon next to the title "Strategies & Interventions" is a tool that allows you to edit the list. The tool looks like this:
Clicking it opens this form:
You can edit or delete items from this list. Deletions are permanent but you can always add an item again with the Add New Intervention tool at the top of this form. There is only one Strategies & Interventions list in PSYBooks but that list is accessed by both the Treatment Plan and the Progress Note. That means that any changes you make on the Treatment Plan Strategies & Interventions list will carry to the Progress Note list and vice versa.
Add New Intervention Tool
Clicking the Add New Intervention tool at the top of the Edit Strategies & Interventions List form opens a section where you can add a new intervention to the list. It looks like this:
Additional Notes & Info
The Additional Notes & Info section of the Treatment Plan looks like this:
This section of the Treatment Plan is an unstructured portion of the form with a textarea where you can write whatever you wish. This area also contains some additional fields (Recommendation and Frequency of Treatment), the Mark as Important tool and the signature block.
How the Treatment Plan is displayed on the Notes page
Since the Treatment Plan is a long form, it's displayed on the chart's Notes tab as a closed link like this:
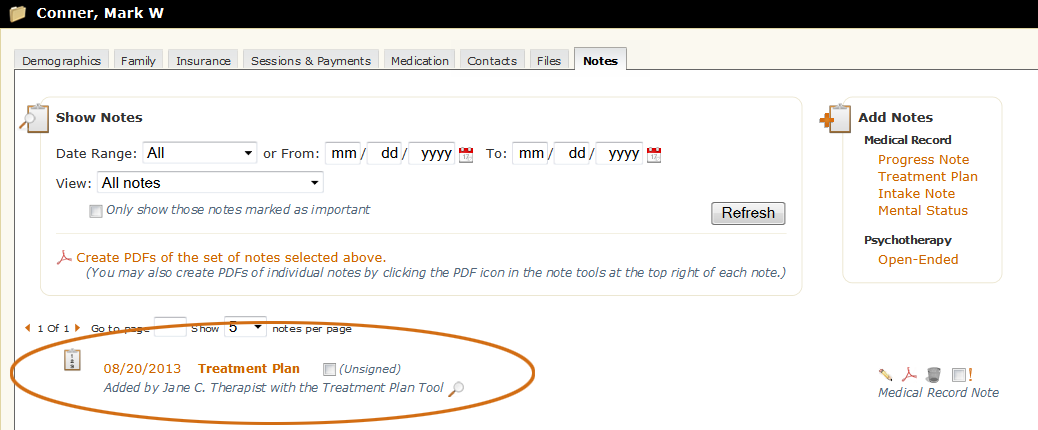
You can open it to read by clicking the Treatment Plan link or the Edit Note tool on the right.
Add Notes > Intake Note
What this isThe Intake Note is a form you may wish to use with new clients. It's designed to be flexible, allowing you to write an open-ended intake note or use the more structured format.What it looks likeThe Intake Note is accessed here: 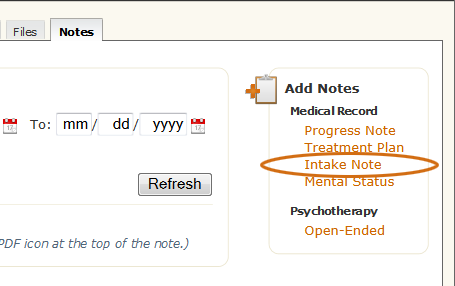 |
Where this isOpen a client's chart by clicking their name in the table on the Charts page, then navigate to the Notes section of the chart. The link to the Intake Note is in the Add Notes section on the top right.
|
When you first open the Intake Note, it looks like this:

Notice that there are three links at the top of the form which are all closed: Open-Ended Format, Structured Format and Mental Status Exam:
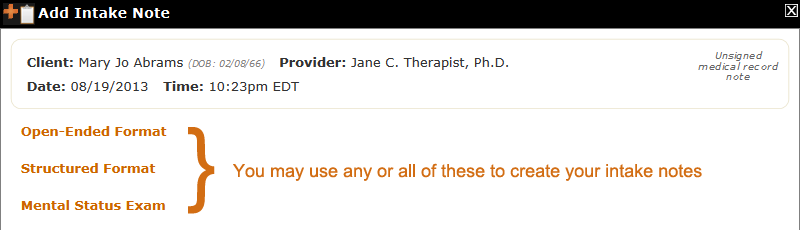
This gives you some flexibility so you can write the kind of intake note you prefer. There is also a checkbox for WNL (Within Normal Limits) which you may check when appropriate to save time. Each of these links will be discussed below:
Intake Note > Open-Ended Format
Clicking the Open-Ended Format link opens this section:
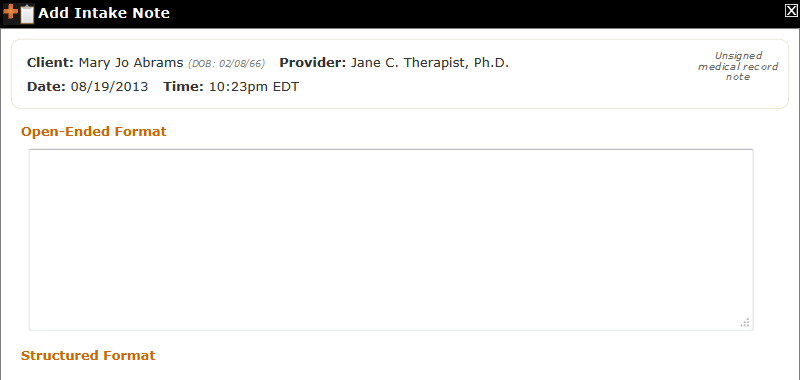
The Open-Ended section of the Intake Form provides a large textarea where you can write anything you'd like. However, notice that even though this is an open-ended format, it's part of the Intake Note which is always a Medical Record note. If you want to create open-ended intake notes for your own personal use (i.e., that are not part of the Medical Record), use the Open-Ended note type in the Add Note section that's specifically listed as a Psychotherapy Note.
Intake Note > Structured Format
The Structured Format section of the Intake Form looks like this:
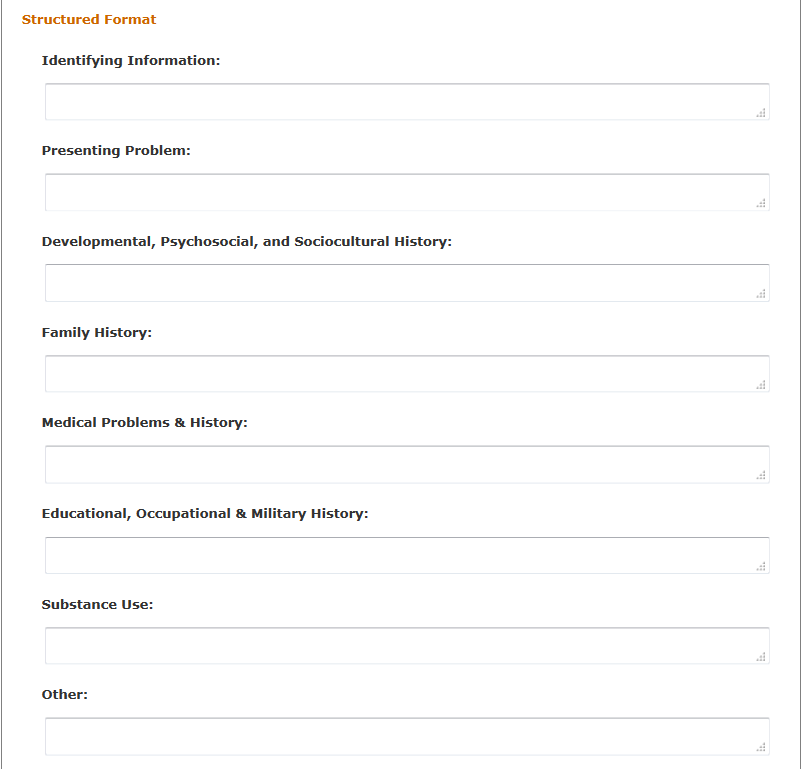
This section is actually a blend of a structured form and an open-ended one. The "structure" is that you're given some common types of items that are often covered in mental health intake sessions (e.g., Identifying Information, Presenting Problem, Developmental, Psychosocial, and Sociocultural History, etc.) However, there are textboxes beside each, allowing you to write whatever you want.
Intake Note > Mental Status Exam
The final link at the top of the Intake Form is for the Mental Status Exam. Clicking that link opens a Mental Status Exam on the Intake Form, making it easy to access. Notice that filling out the MSE here makes it part of the Intake Note and does not list it as a separate note on the client's Note tab. Checking the WNL limits checkbox, will submit these values:
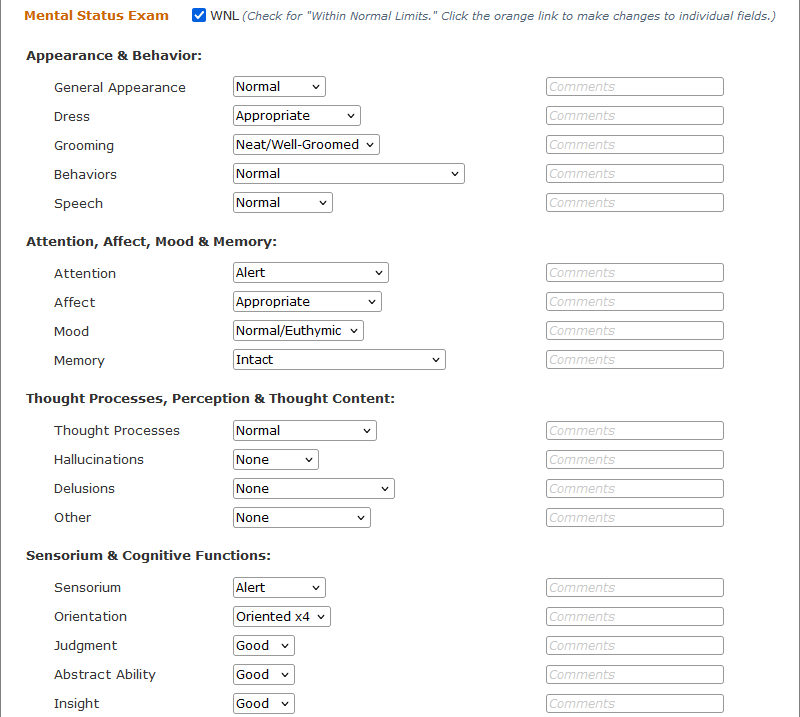
Intake Note > Safety Issues
The Safety Issues section is closed when the option in the select box is None. However, if you change the option to anything else, you'll see the extra form fields below:
Diagnoses
The Diagnoses section of the Intake Form looks like this:
You'll be able to choose among existing diagnoses that are already in your Libraries > Diagnosis section or you can also add new diagnoses, both ICD and DSM, right from this section of the Intake Form.
How the Intake Form is displayed on the Notes page
Since the Intake Form is long, it's displayed on the chart's Notes tab as a closed link like this:

You can open it to read by clicking the Intake Form link or the Edit Note tool on the right.
Add Notes > Mental Status Exam
What this isThe Mental Status Exam is a semi-structured note that allows you to record a routine MSE.What it looks likeThe Mental Status Exam is accessed here: 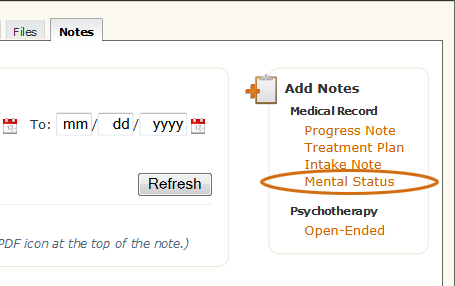 |
Where this isOpen a client's chart by clicking their name in the table on the Charts page. Then navigate to the Notes section of the chart by clicking the Notes tab and click Mental Status Exam in the Add Notes section on the top right.
|
The Mental Status Exam looks like this:
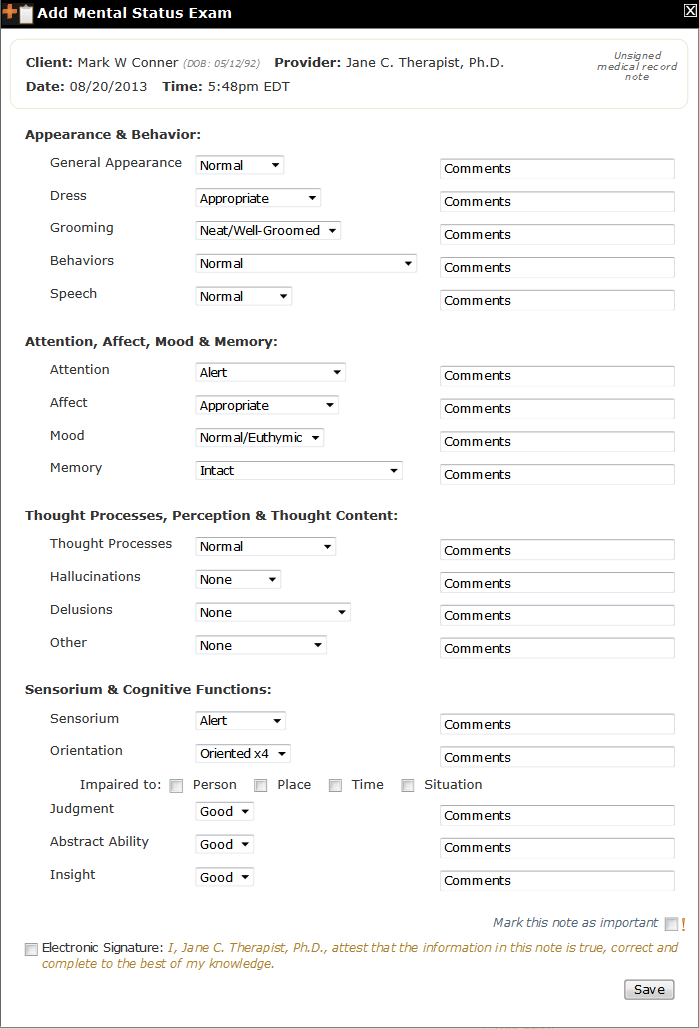
The Mental Status Exam (MSE) is structured in that you can select items from dropdown boxes but each item also has a textbox where you can add comments, giving you some of the flexibility of a more open-ended form. The MSE can be added as a separate note but it's also built in to the Intake Note, Treatment Plan and Progress Note forms. As discussed above, checking the WNL checkbox will insert normal values in the entire form.
How the Mental Status Exam is displayed on the Notes page
Since the MSE is long, it's displayed on the chart's Notes tab as a closed link like this:
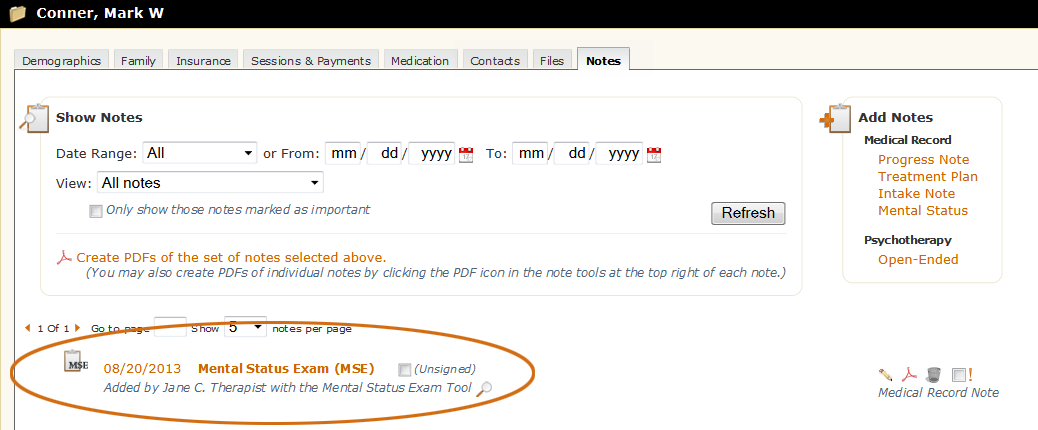
You can open it to read by clicking the Mental Status Exam link or the Edit Note tool on the right.
Add Notes > Open-Ended
What this isThe Open-Ended Psychotherapy Note is a place where you can write your personal thoughts and observations. It is not part of the client's Medical Record.What it looks likeThe Open-Ended Psychotherapy Note is accessed here: 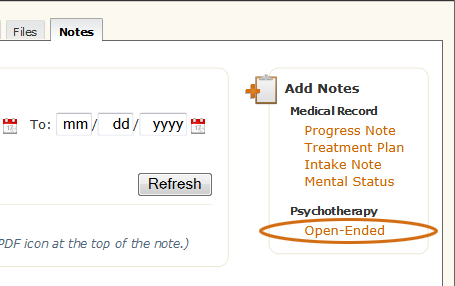 |
Where this isOpen a client's chart by clicking their name in the table on the Charts page. Then navigate to the Notes section of the chart by clicking the Notes tab and click Open-Ended in the Psychotherapy part of the Add Notes section on the top right.
|
When you click the Open-Ended link in the Psychotherapy section of Add Notes, the resulting form looks like this:
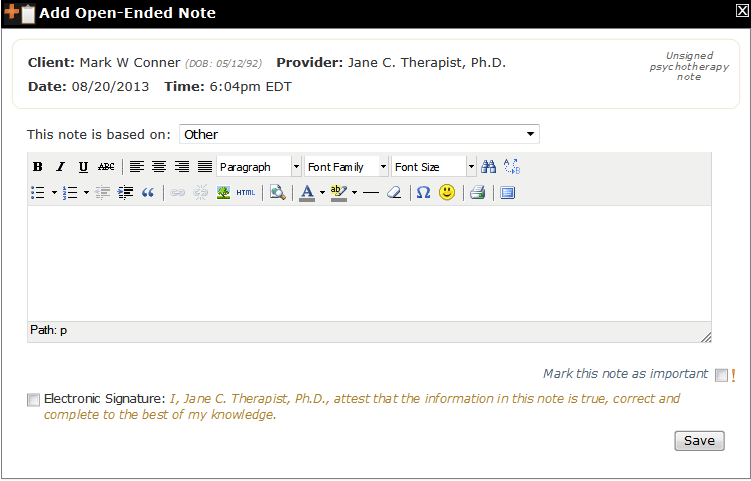
The Open-Ended Psychotherapy Note is your place to write your thoughts and associations about your client. It is not considered part of the Medical Record. The Open-Ended form has formatting tools to help you provide emphasis, create lists, etc.
This note is based on
The 'This note is based on' select box has these options:
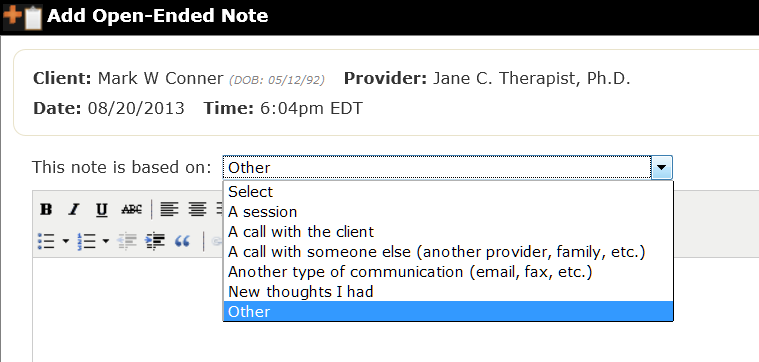
Some of the options above open a new set of fields for you to enter additional information. For example, choosing "A Session" produces this field that lists the client's recent sessions in a select box so you can choose:

Similarly, choosing "A call with the client" allows you to enter the date of the call and pre-populates the Caller textbox with the client's name:
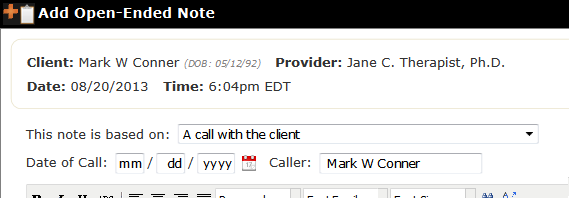
Check Eligibility & Benefits
What this isThe Check Eligibility & Benefits tool on the Insurance Tab of the client's chart allows you to check to verify a patient's insurance coverage and details about their benefits.What it looks likeThe Check Eligibility & Benefits tool looks like this: 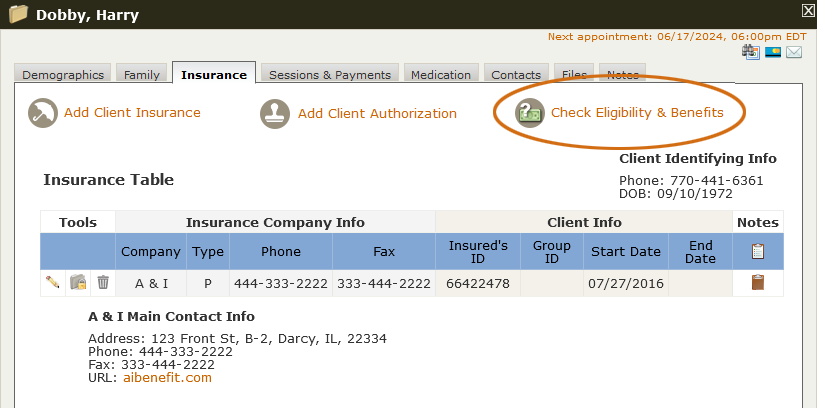 |
Where this isOpen a client's chart by clicking their name in the table on the Charts page. Then navigate to the Insurance section of the chart by clicking the Insurance tab.
|
When you click the Check Eligibility & Benefits tool, the window that opens looks like this:
The Insu.