

Manual Index
-
Chapters
The Portal Manual is currently divided into four chapters. Click a chapter title to display that chapter's content on the right.
Chapter Four
PSYBooks Connect
Manual for the PSYBooks Portal
PSYBooks Connect
Features
- PSYBooks Connect is our own built-from-scratch product, so we can offer it for less than SecureVideo.
- There's no software to download. It runs out of your browser. (Almost all modern browsers support the WebRTC technology used by PSYBooks Connect, but Chrome and Firefox are sometimes said to have an edge.)
- Connect has a relaxing, realistic-looking waiting room participants can enjoy while they wait for the meeting to begin.
- Connect sessions can have a maximum of 4 participants, including you.
- Connect allows you to record meetings. You can upload recordings to as many of these places as you choose:
- The My Files section of the "Files, Forms & Templates" page in your PSYBooks app.
- The Files tab of the client's chart in your PSYBooks app.
- The Files tab in the client's portal, which allows you to share the recording with the client.
As with any video program, quality and connectivity both depend on the internet connection of the people in the meeting. However, if either you or a participant gets disconnected, a simple refresh of your browser will get you reconnected. This makes rejoining sessions easier in Connect than with SecureVideo or Zoom.
Getting Started with Connect
Since there's nothing to download with Connect, all you have to do to get started is to add an appointment like you normally would, i.e., by clicking the correct time slot in the Calendar. If you have added Connect to your account, when you select the "Video" radio button in the Modality row at the top you'll see this:
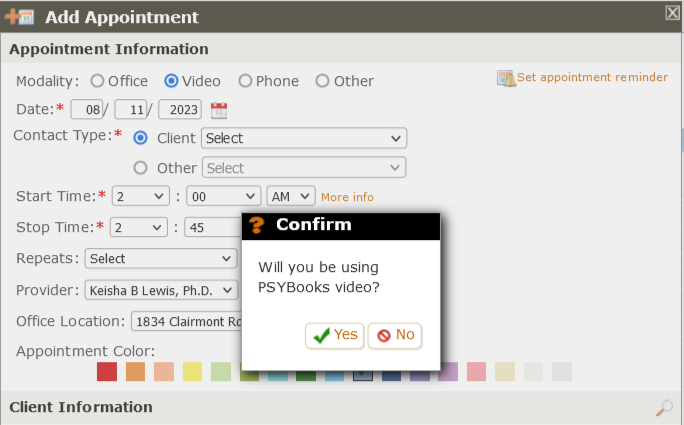
If you say Yes, and also have SecureVideo in your account, the alert will show both Connect and SecureVideo options and ask you which you want. If you only have Connect, just fill out the rest of the Add Appointment tool like you normally would - choosing your Invite Preference and anything else you want to include on that form, and then click Save.
On the Calendar, a Connect appointment block has the Connect logo (a video camera with the PSYBooks logo turned on its side to resemble a C):

When on an actual appointment block, it looks like this:

If a session is to be done with SecureVideo or some other non-PSYBooks program, different icons are used to help you keep track if you're using more than one video program. Here's the complete set of icons used for video sessions, depending on whether you choose PSYBooks Connect, SecureVideo or "Other" when you create the appointment:
- PSYBooks Connect icon:
- SecureVideo icon:

- "Other" icon:

For Connect or SecureVideo appointments, you can start the session from the Calendar by clicking the video icon on the appointment block.
Granting Permission to the Browser
This is information you'll need to know and that you may need to help your clients understand, because they'll be asked the same thing the first time they sign in to Connect. It's not hard, but it is important:
Connect operates out of a browser as opposed to being a product that you download. Because of this, browsers have to make sure you're OK with the Connect app using your microphone and camera. It's for security. The FIRST time anyone uses Connect, before their browser allows them to access the meeting, it will display a popup similar to this (each browser's form will look a little different, but the content will be the same):
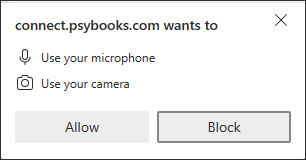
Notice that this particular browser has "Block" chosen by default. To be able to use Connect, you would need to change that to "Allow." Your browser remembers your choice, so once you've told it that it's OK for Connect to access your microphone and camera, you don't have to do it again. However, if you inadvertantly chose "Block," you have to either use a different browser and choose "Allow" - or manually change your settings in the browser that's blocked.
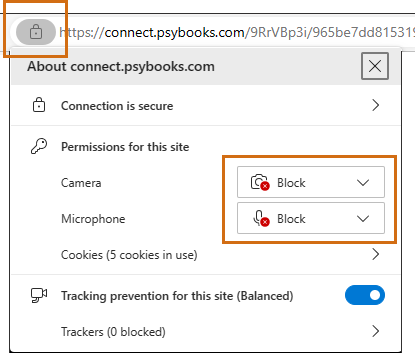
To fix a blocked browser, try again to log in to Connect. (You CAN log in - you just can't access your camera or microphone. It will display a black background.) Once you're logged in, clicking the padlock in the browser's address bar will bring up a settings window for that browser. You'll be able to see that both the microphone and the camera are blocked for connect.psybooks.com. You can change them to "Allow" there, refresh your browser and you should be good to go. Unless you chose "Ask", that browser will not ask you again. It will remember the "Allow" setting. Here's an example of the settings window displayed by a browser:
Participants Must Have PSYBooks Accounts
All participants of a PSYBooks Connect video meeting must have some type of PSYBooks account, i.e., either as a Portal User, another subscriber or admin in your pratice, or an "other person" you've added (maybe a colleague, friend, billing professional, etc.). In other words, everyone you invite to a meeting would have to have either a Client or an Other Contact Type on the Add Appointment form:
When participants click the join meeting link on their Connect invitation, it will take them to their PSYBooks login page. When they sign in with their credentials, they will be automatically placed in the waiting room. It may be helpful to let attendees know that they will need to remember their PSYBooks username and password. Although you, as therapist, have tools to let them reset their username and password, it can be anxiety-producing if they forget right when it's time for the session. Requiring users to login allows us to provide top notch security for your appointments.
The Connect Dashboard
Once the appointment is scheduled, you and your participant(s) receive invites to the session just like you would with SecureVideo or any other video program. The invites participants receive provide a way for them to RSVP. Therapists can go to their Connect Dashboard, which is at Portal > Video, and see whether the session was confirmed or declined in the RSVP column of the table. If the session you created is in the future, you will need to use the date filters at the top to find the appointment you want to check. Once you find the date, you should see your appointment, which will look like this:
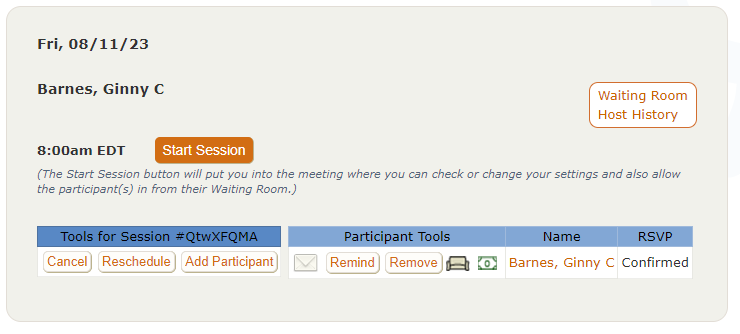
Notice that therapists have a row of tools in the table which allow them to Cancel, Reschedule or Add Participants. They can also send encrypted emails to the participant(s) from here, remind them of the appointment, or remove a participant from meetings with more than one participant. Once the session has ended, therapists can use this same page to add sessions and/or client payments. Sessions and client payments can also be added via the Therapist Notification Tool (TNT), the calendar, or the left nav tools on the main Charts page in your app. There's no right or wrong - just several ways to accomplish the same tasks.
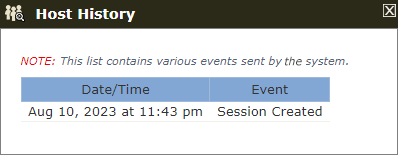
The Host History tool on the top right of the image above, can come in handy for showing what has and hasn't happened with this session so far. Here's what it looks like when you first create a session:
The Waiting Room in PSYBooks Connect is made to actually look like a waiting room. By default, when a participant clicks the invite to join the session, they land in the Waiting Room and remain there until you invite them to join you in your "office". Waiting rooms change with the season and are animated. The image below is a non-animated view of the summer waiting room:
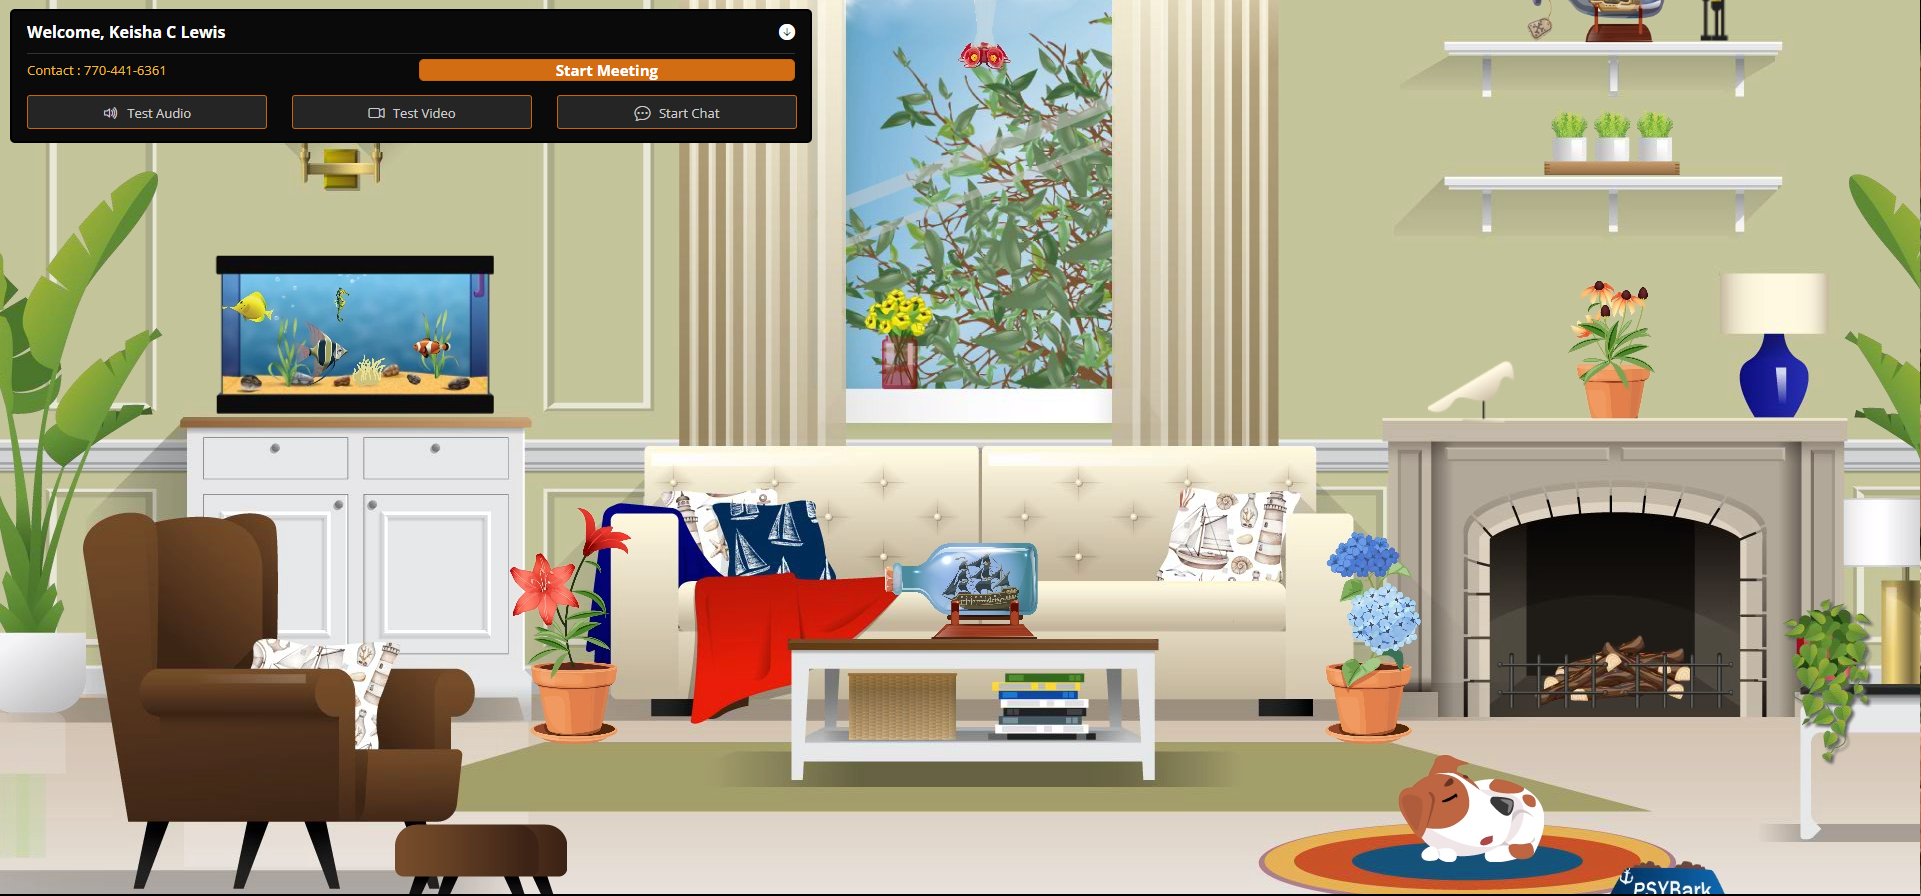
Notice in the black box at the top left, you can check your audio and/or video, or start a chat with any or all participants. Participants who are already in the waiting room will see your chat right away. Any participants who have not yet arrived will get your chat when they sign in. Your participants can also start a chat and you will receive one another's chats even before the meeting starts. This might come in handy if one of you is running late, or to send any other message either of you might want to send.
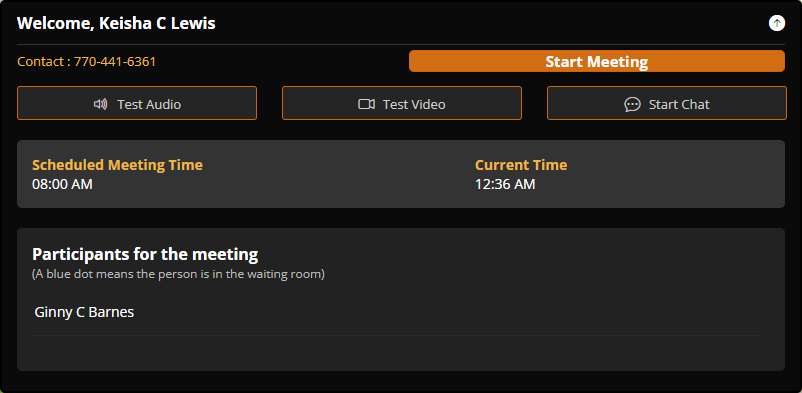
You can also expand the black window to see more info. The expanded version in the therapist's Waiting Room is shown below. As participant(s) arrive, a blue dot will appear beside their name and you can begin the session when you're ready. For example, we can see that this session only has one participant, Ginny C Barnes, and that Ginny is not yet in the Waiting Room, since there's no blue dot by their name. Notice that you, as therapist, can start the meeting but participants cannot:
You do not have to use the waiting room. Sessions can be launched from the calendar, which bypasses the waiting room and puts you directly in the video meeting. However, if you need to use any of the tools mentioned above, including testing audio and video and chat, you'll need to go to Portal > Video > Waiting Room and use the tools from there. Also, although participants are sent to the Waiting Room by default, there's a setting you can change if you want participants to also bypass the waiting room. This would mean they would be sent straight to the video, whether you're there or not. This usually isn't the best option, since it also means they can't check their audio and video before joining. However, the option is there if you want to change it. It's in your Settings window, which we'll discuss next.
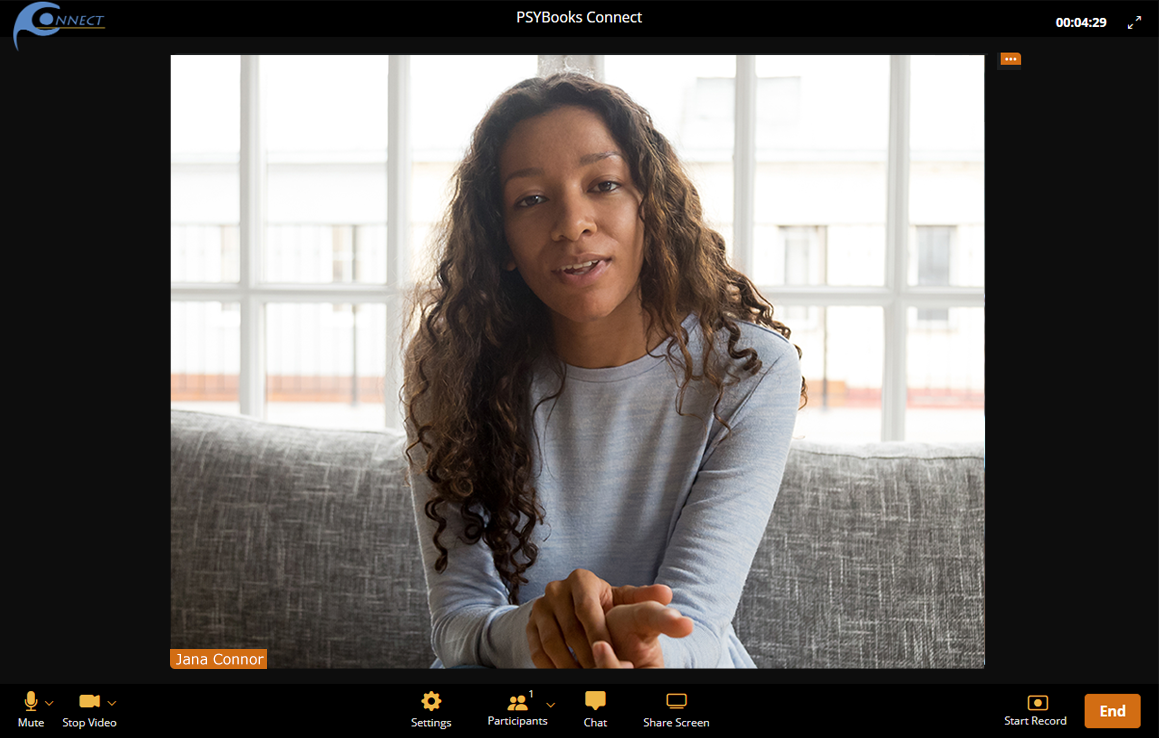
Connect's Video Window
Once you start the meeting, the interface changes to one that is very much like other video products. The Connect video window looks like this:
Top Tools
The only tools across the top that you might want are on the far right:
Rename
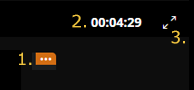
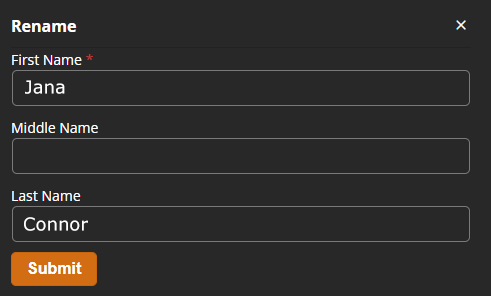
The rename tool is a small orange button with three dots on the top right, above the opening for the video:

Clicking that button opens this interface, where you can change the name that participants will see for you during the meeting. It will not change your name in your profile or anywhere else in the app. It is only to allow you to change the name that appears for you for different types of meetings:
Duration
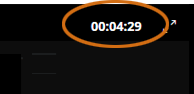
A clock in the upper right corner allows the therapist to keep track of session duration without glancing at a clock:
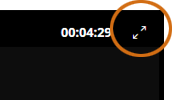
Full Screen
The final tool in the top row allows you to toggle to full screen and back:
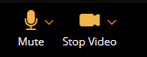
Bottom LeftTools
The bottom left tools are Audio (the microphone) and Video (the camera). Clicking either tool mutes or unmutes that feature. The default state is on (unmuted). When either tool is muted, there's a line through it. There's also a caret (⌄) which opens additional tools:
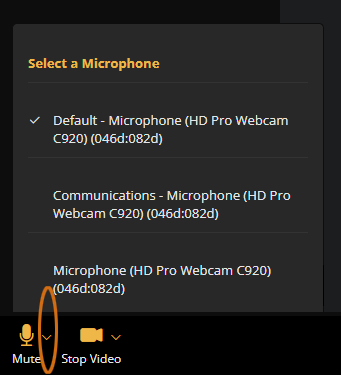
Audio
Clicking the caret beside the microphone opens a window that allows you to choose the microphone you want to use.
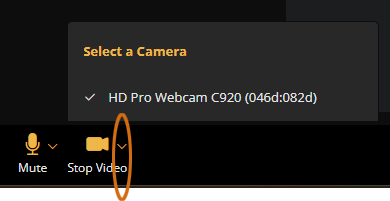
Video
Similarly, clicking the caret beside the camera opens a window that allows you to choose the camera you want to use.
Bottom Middle Tools
There are four tools in the bottom middle:

Settings
Clicking Settings opens this window:
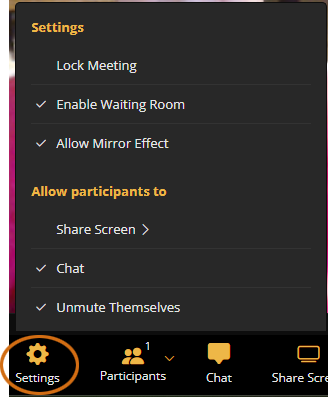
- Lock Meeting
The Lock Meeting tool is just an extra layer of protection that you may never need to use. When all participants are present, locking the meeting will prevent other users from entering the meeting, even if they have the URL. You should NOT use this tool if you are expecting additional participants to arrive, because you would not be notified of their arrival so they would be unable to join.
It is not necessary to use this tool unless you have reasons to suspect unauthorized users. This could happen if a participant gives the URL to someone else or if an unauthorized person has access to their email and decides to join. However, as long as the waiting room feature is enabled (see below), unauthorized users can NOT actually join your meetings. You, as therapist, would be notified that they were in the waiting room and then you can choose whether to admit them.
- Enable Waiting Room
As described earlier, Connect's waiting room feature is enabled by default. This means that all participants will be sent to the waiting room first and must wait until you allow them in - just as if you were meeting in person. (You are notified when someone is in the waiting room and can admit them when you're ready.) In most cases, this is preferable. However, if you prefer to disable the Waiting room, you can uncheck it here.
- Allow Mirror Effect
Some browsers display images as flipped horizontally by default. Others don't. If yours is flipped and you want to change it, uncheck this box.
- Allow Participants to: Share Screen
This setting has more than one option. If you click Share Screen, you'll be able to see them:
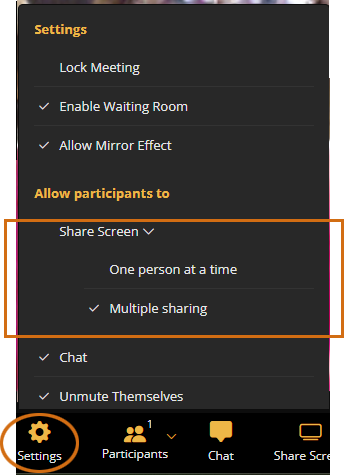
As you can see, the default is Multiple Sharing, which means that anyone in the meeting can share their screen for all to see. If that's not what you want, you can change it to One person at a time.
- Allow Participants to: Chat
By default, anyone in the meeting can chat with everyone else. If you do NOT want participants to be able to chat, unclick this option. (Notice that this is not how you actually begin or view a chat. This is just the setting for whether you want to allow chatting or not.)
- Allow Participants to: Unmute Themselves
Most of the time, you will want to leave this on the default so participants can mute or unmute themselves as they see fit. However, if you want control over whether participants are muted or unmuted, uncheck this box.
- Lock Meeting
Participants
Clicking the Participants icon opens a window on the side that shows all people who are scheduled for this meeting, whether they're currently present or not:
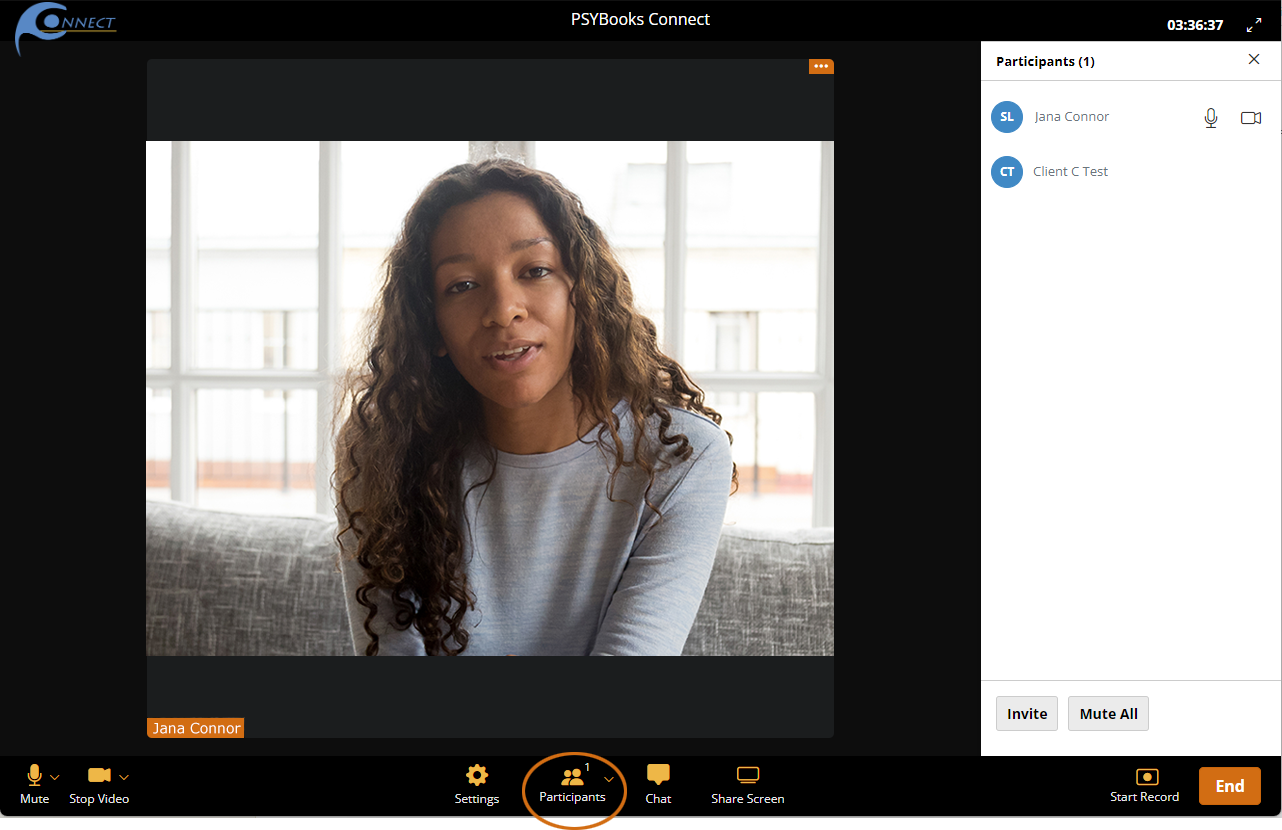
The Participants window is where you can mute or unmute any participant's audio and/or video. This will not fix issues where the participant has these features blocked and/or does not have a valid audio or video connection.
You can also invite participants to join this meeting by clicking the caret by the Participants tool:
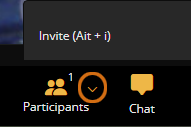
Clicking "Invite" (or using Alt + I) will open a box where you can select contacts you want to invite to this meeting:
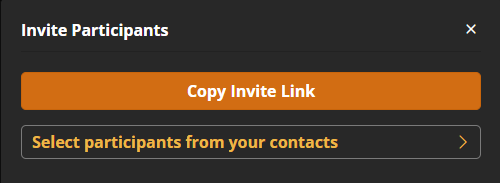
To use this tool, click "Copy Invite Link" and then open your contacts to choose the person(s) you want to invite. However, be cautious when using the Invite tool because of potential HIPAA violations if you accidentally invite one client to another client's session.
Chat
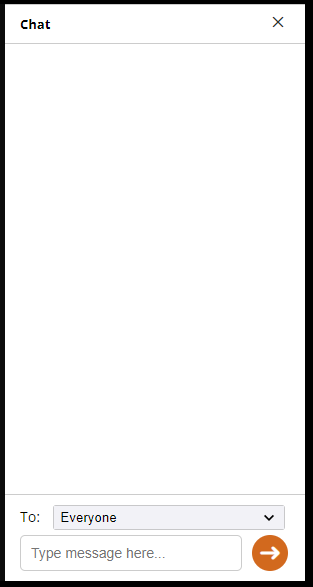
Similarly, clicking the Chat icon opens a chat window on the side. Participants can chat with everyone, or choose certain people with whom they chat.
Share Screen
Clicking Share Screen opens a window that allows you to choose the screen you want to share. Each browser has its own unique interface for this and PSYBooks has no control over how the sharing options are presented. The most common interfaces ask you to choose an option on the left and then they display it on the right so you preview what you would be sharing. Some allow choices between sharing other tabs on your browser, complete windows, or entire screens. Since we can't provide specific instructions, it may be helpful to play with this tool a bit with your favorite browser(s) to get a feel for it.
Once you have shared your screen, additional tools will appear at the top of your screen that will allow you to stop sharing when you're ready.
Bottom Right Tools
There are only two tools on the bottom right but they are both important:

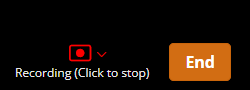
Start Record
When you click Start Record, you're shown a browser-specific window (somewhat like Share Screen, described above) to allow you to preview what will be recorded. You're asked to grant permission to make the recording. All Connect recordings stay within the PSYBooks app as opposed to being sent to a 3rd party company, so they are protected from unauthorized viewing. Once you agree to the recording, the Start Recording button changes to this:
When you stop recording, you will be shown this:
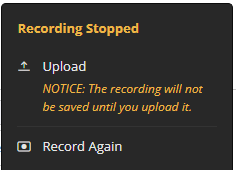
As the window says, you must upload the recording if you want to save it. If you click Record Again, it will overwrite the original file. If you click Upload, you get this:
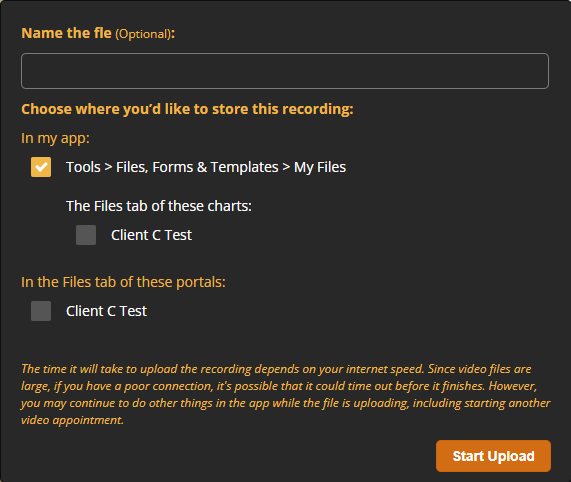
Notice that you're given two options within your own app (the Tools > Files, Forms & Templates > My Files section, and also the Files tab of each client participant's chart. If you choose both, you will have saved one copy to your own file repository and another copy in the client's chart. However, your clients don't have access to anything within your app, so if you want to share a copy with them, you can save a copy to the Files tab in their Portal.
End
Clicking End opens this window:
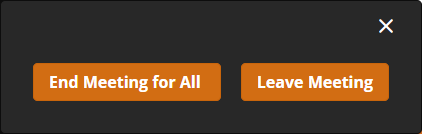
Clicking End Meeting for All closes and locks the meeting for all participants. No one will be able to join the expired meeting after it's been locked. Clicking Leave Meeting allows others to stay in the meeting after you leave.