
Manual Index
-
Chapters
The Portal Manual is currently divided into four chapters. Click a chapter title to display that chapter's content on the right.
Chapter Four
SecureVideo
Manual for the PSYBooks Portal
SecureVideo
PSYBooks has partnered with SecureVideo to provide our subscribers with the highest quality video we could find. PSYBooks video subscribers receive unlimited video sessions for two or many participants coupled with 24/7 support. Additionally, PSYBooks Video has features that enable you to share both your screen and controls, which can be useful for teaching situations.
Equipment Needed
Most computers, laptops and tablets manufactured 2011 and later have the necessary bandwidth to handle video. Additionally, newer laptops and tablets typically have both cameras and microphones built in. Some desktop computers - especially older ones - will require you to purchase an external camera and microphone. When this is necessary, you can often buy one device that has both a camera and a built-in mic. Using smart phones for video sessions with clients is not recommended but it is possible.
SecureVideo has some very good support articles about the equipment needed for running video chats. You can access this information on this page, then click the gold bar titled "Equipment Needed". However, since PSYBooks video runs on the Zoom platform, stay away from articles that pertain to the VSee platform, since those articles won't apply to your PSYBooks Video.
Installing Zoom
As mentioned above, the software that runs PSYBooks video is based on the Zoom video platform. This means that before you can actually have a video session, you have to have Zoom installed on your computer or other device. However, the emails sent by SecureVideo both to you and the other session participant(s) about a scheduled session provide easy-to-follow instructions and links for installing Zoom. Also, you only have to install Zoom once per device so once you've downloaded and installed it, you won't need to do it again unless you use more than one device for your video chats.
SecureVideo has detailed installation instructions for installing Zoom using a variety of operating systems and browsers. You can access this information here, then click the gold bar titled "Installation Instructions". SecureVideo uses both the Zoom and the VSee platforms, so make sure you're only reading the articles about Zoom since that's the platform PSYBooks Video uses.
Signing Up for PSYBooks Video
You can sign up for PSYBooks video in one of three ways:
- When you first subscribe to PSYBooks
- The "Manage Subscription" tool in your Profile
- The Video tab in your Portal
No matter how or when you sign up, you're automatically signing up at SecureVideo, too, so there's no need for any additional forms to fill out on their site. Each sign-up method will be discussed below.
Signing Up for Video When You Subscribe
The first page of the subscribe form has a place to add features. If you check the Video Conferencing checkbox, you'll be guided through the sign-up process in the subsequent screens.
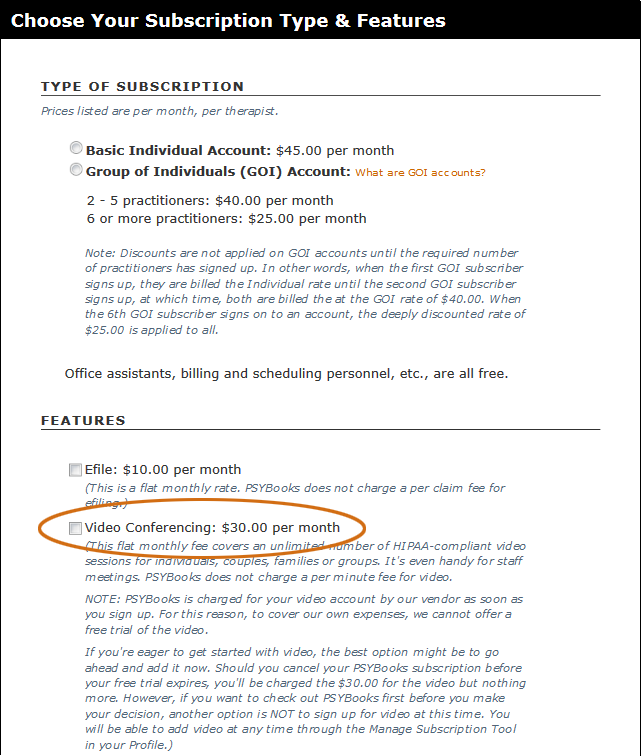
Once you've completed all the screens in the subscribe process, you'll be signed up both with PYSBooks and with SecureVideo. You'll be able to access your video tools through the Video tab of your PSYBooks portal or through the SecureVideo site. Both dashboards have the tools you need and the sites synch with one another so they both always have the same information.
Signing Up for Video Through "Manage Subscription"
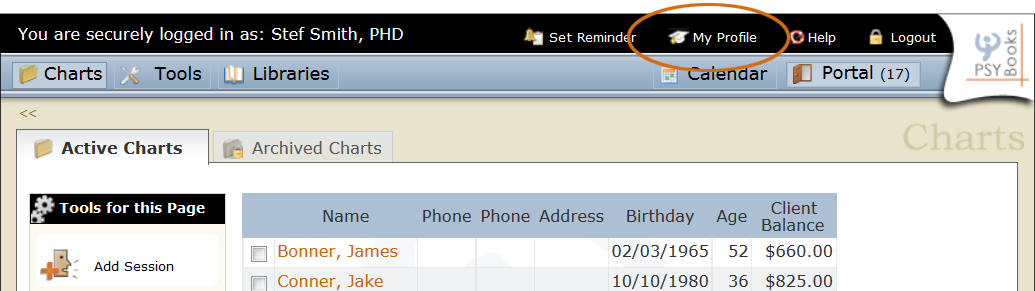
If you don't want to sign up for video at the same time you subscribe to PSYBooks, you can add it at any time through the Manage Subscription tool in your Profile. The easiest way to access your Profile is by clicking the My Profile link in the black bar at the top of any page:
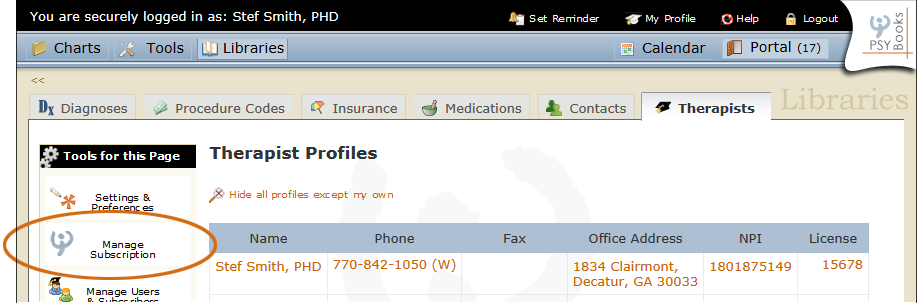
The Manage Subscription tool will be on the left nav once your Therapist Profile page opens:
When you click the Manage Subscription tool, the form will open and you can tell at a glance what features you have because they're listed in a section titled "Your features". In the screenshot below, the subscriber has not yet subscribed to Video because it's not listed in the Your features section. At the bottom of the form is another section called "Add Features". Notice that Video Conferencing is listed down there. Clicking the orange plus icon would add it to the account:
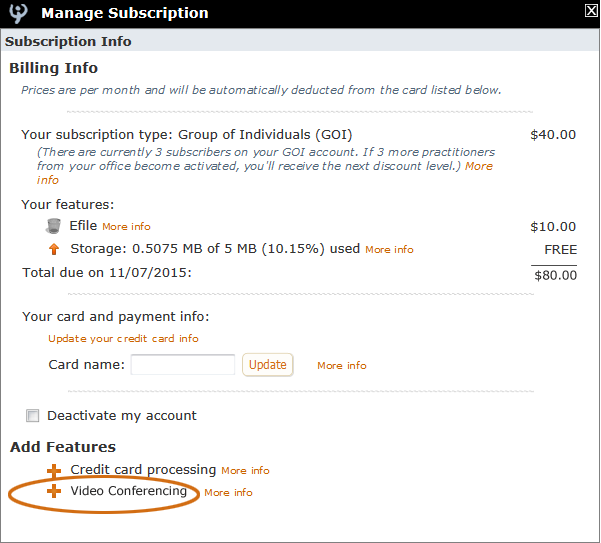
One thing that's different about video is that, because of PSYBooks' arrangement with SecureVideo, charges for video must be billed as soon as the subscriber adds it to their account. That means, that you'll notice a $30.00 charge on your credit card as soon as you sign up for video. However, if you add it mid-month in your subscription cycle, PSYBooks will pro-rate the video amount when it's time for your next monthly payment so that from then on, you'll only be getting one credit card charge per month instead of having one for your PSYBooks subscription and a separate one for your video. Once you've added video to your account, it will be listed in the Your features section at the top of the Manage Subscription form like this:
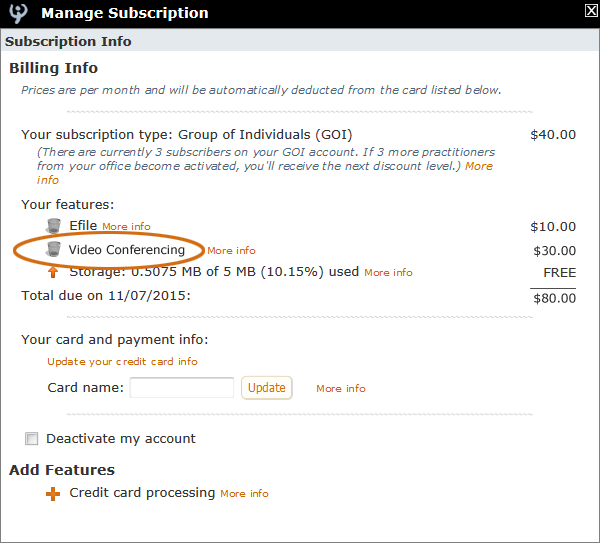
Anytime you want to discontinue the video feature, you can just click the trash can and it will go back to the Add Features section at the bottom. We are unable to give refunds for unused portions of your video account.
Signing Up for Video Through the Portal
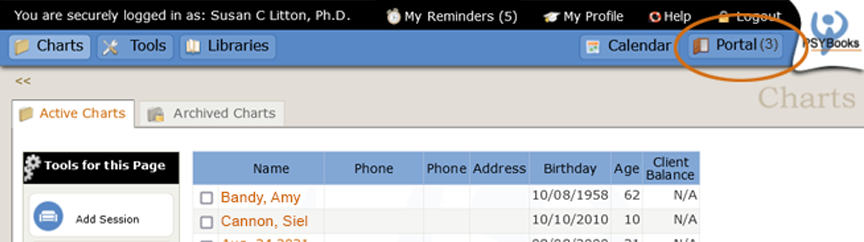
You can also sign up for video through your portal. You can access your portal from the blue global nav at the top of any page in the site:
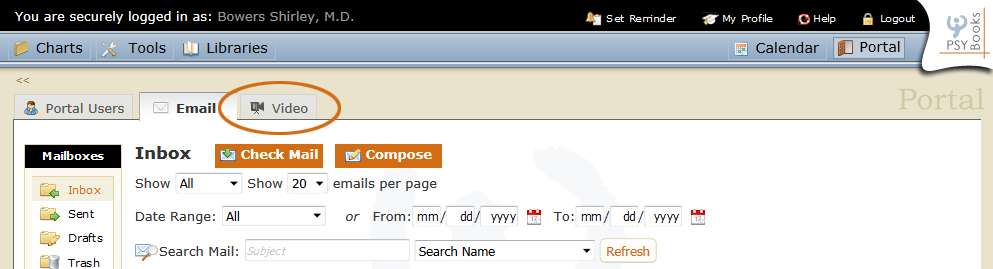
By default, the portal opens to the Email tab, but the Video tab is nearby:
If you're not signed up for video, the Video tab will present you with a form where you can:
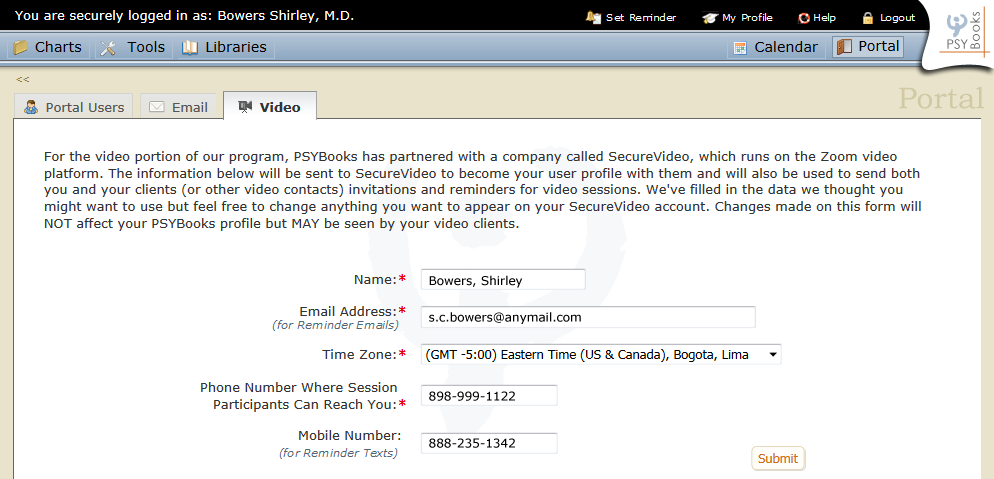
When you submit this form, you will be registering your video subscription both with PSYBooks and SecureVideo. It is not necessary to create accounts in both places. To save you time, we've prepopulated the form with data you've already entered in your PSYBooks account. If everything looks OK, you can click Submit and you'll be ready to start using your video. However, one thing to notice is that the form asks for the phone number where a client or other video contact can reach you if they're having trouble accessing the chat, need to reschedule, etc. This number will be included on video invitations and reminders that are sent to session participants so make sure you use the phone number you would want your clients to call for those purposes.
Also, you are not required to list a mobile number. However, if you think you might want to receive session reminders via text, be sure and enter a mobile number. You are always in charge of whether reminders get sent by text, email or not at all, so your mobile number will only be used if and when you specifically indicate that preference.
PSYBooks' Video Dashboard
No matter how you sign up, your initial video dashboard will look something like this:
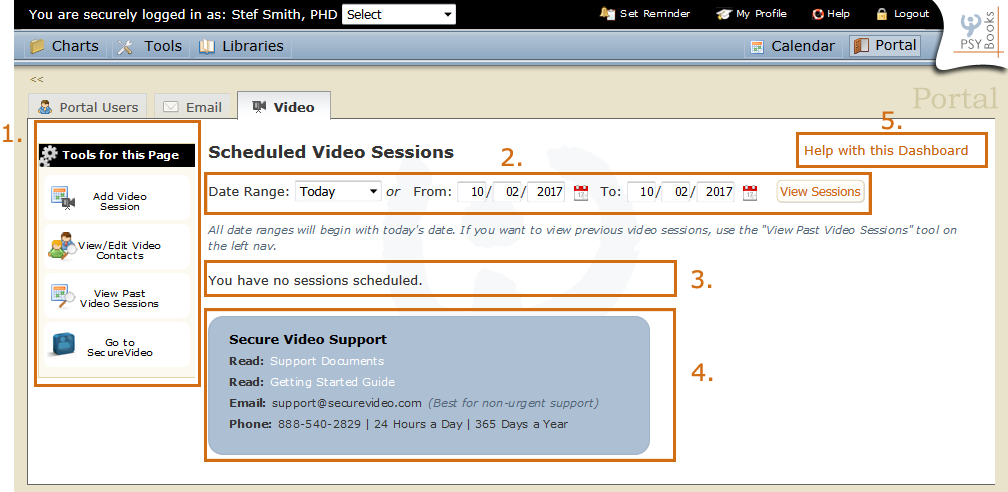
The sections of the video dashboard are:
- The Left Nav
- The Date Range Tool
- The Session Display Area
- Contacting SecureVideo Support
- Help with This Dashboard
Each will be discussed separately below:
- The Left Nav
The left nav, like other left navs throughout the site, holds the major tools you'll need when using video. The tools in the video left nav are:
- Add Video Session
- View/Edit Video Contacts
- View Past Video Sessions
- Go To SecureVideo

Each of these tools will be discussed in detail in the Using Your PSYBooks Video section below.
- The Date Range Tool
The default date for the Date Range Tool is "Today". The video Date Range Tool is a bit unlike other similar tools in the site in that, you can only use it to view sessions scheduled on today's date and/or in the future. If you need to view sessions that have already transpired, you can view them using the View Past Video Sessions tool on the left nav.

- The Session Display Area
If one or more sessions has been scheduled within the dates specified by the Date Range Tool, they will be displayed in the Session Display Area similar to the screenshot below. Video sessions are placed within a gold block to make them easy to see at a glance. In this example, the Date Range Tool is set for "Next Week" (3/19/17 - 3/25/17). There is one video session scheduled during this time period. It's on Monday, 3/20/17 at 10:00am EDT and has one participant, Jake Conner. Jake has not yet responded to the RSVP so that column is marked as "Unknown".

The specific tools on the Session Display Area will be discussed below.
- Contacting SecureVideo Support
At the bottom of your Video Dashboard in a blue box is everything you need to contact SecureVideo's support, should you need help. Notice that they provide help documents for you to read, and both phone and email service, 24/7:

The "Support Documents" link takes you to a section of SecureVideo where you can search for topics of interest. "Getting Started Guide" is a document that provides helpful information about video in general and/or about using the SecureVideo Dashboard. Notice that since the PSYBooks Dashboard and the SecureVideo Dashboard synch with one another, you can use either one to manage your video sessions.
One thing that's important to remember when contacting SecureVideo is that they will NOT have access to your PSYBooks Video Dashboard. However, any object you've created in PSYBooks will have been duplicated in your SecureVideo Dashboard so they will definitely be able to help you. However, if they need to do a screenshare with you to show you how to do something, they will do it using the SecureVideo Dashboard which will look a little different from what you're used to.
- Help with This Dashboard
The "Help with This Dashboard" at the top of the PSYBooks Video Dashboard is a link to the video section of the PSYBooks support site:

This is the place to go if you want more information about using the PSYBooks Dashboard.
The Left Nav: Using Your PSYBooks Video
Add Video Sessions
The Add Video Sessions tool is the first tool on the left nav of your video dashboard:

The first screen you see when you click the Add Video Session tool is this one, just asking you if you want to schedule a session for now or in the future:

Depending on which choice you make, you'll either get the short version of the form (for the "Now" choice):

Or, if you opt to schedule a session in the future, you'll get a longer version of the form that allows you to select the date and time for the session:

The Participant Name select box opens to the complete list of contacts you have in your PSYBooks account. You have not had to add any of these participants as video contacts - they are already included. Every contact added to PSYBooks can be scheduled for a video appointment with no extra steps. The only contact category that's omitted from the Add Video Session Participant Name list is Events - since in most cases, you wouldn't be having a video session with an Event. For GOI or group accounts, other subscribers in your office are listed first, followed by Users (such as front office staff, supervisees, etc.), then clients and others. As with other similar select boxes, you can also add new clients, people or groups from this form:

Under the Participant Name, there's a section for "Invite Preference" which gives you the option of having SecureVideo send reminders for this appointment via email, text, or not at all:

SecureVideo reminders are sent in addition to any regular PSYBooks Appointment Reminders you're sending this contact. One is sent when you create the session and others are sent at intervals including the day of the appointment. Reminders from SecureVideo are important because they contain specific information about the video session, including a link that will take the user to their video appointment. If you choose not to have SecureVideo send invites, the recipient must be a Portal User, so they can access the session via their Portal.
Although it's not necessary for a person to be a PSYBooks Portal User to conduct video sessions with them, if they are NOT Portal Users and you choose "Don't send an invite" they will have no way to access the session. (Portal Users can just open the Video tab in their Portal and access the session that way.) However, as long as you have a cell phone and/or an email address listed for the person, you can send them an invite to the video session. The invite will have a link to the session so the person will not have to enter via their PSYBooks Portal, thus, adding them as a Portal User isn't essential.
Add Video Contacts
Be careful with this tool - it may not be what you think, and in fact, most of the time, you won't need it. The reason is because ALL contacts in PSYBooks can be used as video contacts. You don't have to add someone in one capacity (client, user, etc.) and then add them again as a video contact. The only time you might need to use this tool is if you want to have a video session with someone who's not already in your app and who doesn't fall into any of the normal categories of contacts that you will want to add elsewhere. This means that this tool is NOT appropriate to use with clients, other PSYBooks subscribers in your office, admins, or other people and/or groups you've added from the Calendar page. Those contacts are all video contacts already. If you add them again here, you'll get a duplicate copy of the same person or group, which could be confusing.
The Add Video Contacts tool is on the left nav of your Portal > Videos page:

When you click the tool, the window that opens looks like this:

Notice that the name of this form in the black bar at the top is "Add New Other Person" - not "Add Video Contact." This is because, as discussed above, the only type of individual that can be added with this tool is an "other person." Clients, subscribers, admins and groups are all added elsewhere.
Notice that although neither Email nor Mobile are required fields, if you want the contact to be able to receive reminders, you'll need to add at least one of those. Each time you add a video session, you're given the option of whether to send a reminder and if so, what type - so there's no harm in entering the data here. Reminders will not be sent unless you specifically request them.
View/Edit Video Contacts
The View/Edit Video Contacts tool is on the left nav of your video dashboard:

It's important to note that the only video contacts you will see in this list are those with whom you've already scheduled a video appointment. All contacts added in PSYBooks - clients, other subscribers in your office, other persons, etc. - are automatically included as Video Contacts. You don't have to specifically add them. The names that appear in the View/Edit Video Contacts tool are a subset of that larger group, i.e., those PSYBooks contacts with whom you've already scheduled at least one video session.
Clicking the tool opens a window similar to the screenshot below, which will show you all of the video contacts you have in your account. (Video contacts are those people or groups with whom you've previously scheduled a video appointment.)

Contacts are listed by type, with your name at the top as the "Host", then any other PSYBooks subscribers in your office, Users you have added, followed by clients and other individuals. You can edit or delete a contact with the pencil and trash can tools on the left. Notice that deleting a video contact does NOT alter other roles those individuals might have in your account. For example, deleting a video contact will not delete a client, user or subscriber. It just removes them from this table. If you should schedule a video appointment with that person in the future, they would be added back to the table.
The items listed on this table allow you to see at a glance which users have the 3 key things they may need to accept an invitation to a video session: Email, Mobile and Time Zone. Time Zone is essential for video appointments to ensure that the recipient's time syncs with yours. By entering the time zone, PSYBooks automatically adjusts the session time to match their local time. Email and mobile are important for allowing SecureVideo to send an invitation to the session. If you only want email reminders sent, then it's not necessary to enter mobile numbers. Conversely, if you only want text reminders sent, you don't need email addresses. In the table above, those persons with neither email addresses nor mobile numbers would not be able to receive invitations to video sessions until the user edits their record and adds that information.
View Past Video Sessions
The View Past Video Sessions tool is on the left nav of your video dashboard:

Clicking the tool opens a form that looks something like this:

Notice that you can search for past sessions for one video contact or for all. Only sessions which actually took place and which had a duration of at least 8 minutes will be listed:

This tool can be helpful if you are ever required to verify start and stop times and/or duration of a session.
Go to SecureVideo
The final tool on the left nav will take you to your SecureVideo Dashboard. It looks like this:

As mentioned previously, although the PSYBooks Dashboard and the SecureVideo Dashboard look different, they share the same data and have the same tools for working with it. However, for example, if you're on the phone with SecureVideo's support and they want to show you something in the Dashboard, they'll be referring to the SecureVideo Dashboard. This tool will quickly take you there.
Tools for Working with Video Sessions
As mentioned above, when you have sessions scheduled within the date(s) chosen by the Date Range Tool, they will appear in the Session Display area, which is a gold colored block:

The top portion contains information about the session (participant name(s), day date and time) and also the "Start Session" button. The bottom section has tables with tools for working with the sessions. Below that are two tables side by side: the table on the left holds the Session Tools whereas the one on the right holds the Participant Tools. Each of the sections of this form will be discussed separately below.
- Session Name, Date & Time
The participant(s) name, as well as the date and time of the session are displayed at the top of the session block. Date and time are in the participant's time zone. For example, if you are in Eastern Daylight Time and the person with whom you're scheduling the video chat is in Mountain Daylight Time, your dashboard will show the session time as EDT and theirs will be in MDT:

One thing to be aware of is that participants you invite to video chats do not have a video dashboard in PSYBooks and, in fact, do not have to be PSYBooks Portal Users. When a recipient receives their email or text reminder to attend the video session, the links in the text or email will take them directly to the SecureVideo Dashboard. Since they do not need the same tools the therapist needs, there is no reason for them to have a PSYBooks Video Dashboard.
- The Start Session Tool
The Start Session tool is the orange button to the right of the session time. The actual window where you'll have your video session launches from the SecureVideo site. Clicking the "Start Session" tool in your PSYBooks Dashboard will take you to their site where you'll see a button called, "Enter Meeting". Clicking "Enter Meeting" will launch a Zoom video window which will enable you to conduct your session. It doesn't matter whether you or your participant enter the meeting first. You'll be notified when they arrive, so you can keep working while you wait for them. Or, if you prefer, you can go ahead and start the meeting and wait for them to join you.
- The Session Tools
The table on the left holds the tools you'll need for working with the session itself: Cancel, Reschedule and Add Participant. Each will be discussed below:
- The Cancel Tool

If you click "Yes," the session will be cancelled. The session participant(s) will receive reminder emails or texts informing them of the cancellation. Notice that canceled sessions do not show up in your View Past Video Sessions tool, since a session that is canceled never takes place. Canceled sessions remain on your Video page but have the video tools disabled. A canceled session on the Video page looks like this:

Notice that the name and session time are crossed out and the Start Button has been replaced with the word, "Canceled."Similarly, the original "Cancel" button has been replaced with an "Uncancel" tool, in case you need to reinstate the session. Tools that would allow you to edit the session have been disabled.
The corresponding canceled session on the Calendar looks like this - again, with a strikethrough on the name:

However, on the Calendar side, you CAN uncancel a session. Once you uncancel the session, you'll have access to the full range of appointment tools and can modify the session however you want.
- The Reschedule Tool

When you reschedule a session, all participants of the session are notified by either text or email, whichever you have specified for that person.
- The Add Participant Tool

Notice that adding a participant to a session is different from adding a Video Contact. The "Add Participant" tool only allows you to add people who are already Video Contacts, so if you don't see the individual you need in the dropdown list, you'll have to go back and add them as a Video Contact first. Once you've done that, you'll be able to add them as a partipant in the session.
In the session we've been using, once the new participant has been added, the display looks like this, with both participants listed in the Participants table:

- The Cancel Tool
- The Participant Tools
The tools in the Participant Table are meant to provide the most common tools you might need regarding the participant(s) in this session. Some of them - the Remind, Remove and RSVP tools - are specific to video chat and will appear in the SecureVideo dashboard as well as the PSYBooks video dashboard. However, the other tools in this table - Email, Add Session and Add Payment - are specific to your PSYBooks account and can also be found in other places in the app. They are just included here for your convenience. You can always access them where you normally would, if you prefer. Each tool will be discussed separately below.
- Email
The Email tool is here:

The Email tool behaves differently depending on whether the participant is also a Portal User. (If you're not sure what Portal Users are, you can read about them here.) The reason this distinction is important is because if you want to send encrypted email (which is recommended if the person is a client or someone with whom you may be discussing a client), you can only do that with Portal Users. When you click the Email tool on the Video Participant Table, if the video participant is already a Portal User, the Compose Email form from your Portal will open, allowing you to send them an encrypted email. The encrypted Compose Email form looks like this:

If the video participant is not a Portal User, you'll get the confirm below:

This confirm will allow you to send the person an invitation to join your Portal so you can send them encrypted email in the future. Since the person has to respond to your invite before they can become a Portal User, you won't be able to send them an encrypted email immediately. However, the confirm above allows you to send them a non-encrypted email while you're waiting for them to respond to your Portal User request.
- Remind
The Remind tool is here:

Clicking the Remind tool signals PSYBooks to send a new session reminder to the participant. SecureVideo sends periodic reminders anyway, so you probably won't need this tool often. However, if the session was scheduled quite awhile ago and the person still hasn't RSVP'd, you might want to send them an additional reminder. The Remind button on your PSYBooks Dashboard currently only sends email reminders. If you need to send a text reminder, you can use the "Go to SecureVideo" tool on the left nav to access your SecureVideo Dashboard and send a text reminder from there.
- Remove
The Remove tool is here:

This tool removes a participant from a session. It can only be used on sessions with multiple participants. The Remove tool does NOT remove the session. If you want to cancel/remove the entire session, use the Cancel button in the Session Tools table instead.
- Add Session
The Add Session tool is here:

The Add Session tool only appears in the Participant Table when then individual is also a client. In other words, if the session participant is another therapist in your office, an App User, or any other non-client Video Contact, the Add Session tool will not appear in this table. In the session below, we can see that both Jake and Portia Conner have been invited to the session but only Jake is a client. Portia could be his wife, mother or anyone else who just happens to share his last name:

The Add Session tool in your Video Dashboard is the same tool you have on the Charts page. It's just provided here to help with your work flow. When you complete a video appointment with a client, you will still need to enter the session in PSYBooks. You can enter it here, without ever leaving your video dashboard.
- Add Payment
The Add Payment tool is here:

Like the Add Session tool, the Add Payment tool only appears when the session participant is a client. If you have the client's credit card information - or if you've received some other type of payment from them - you can enter it here.
- View/Edit Video Contact
The View/Edit Video Contact tool is here:

This tool allows you to view and edit the video contact. When you click the tool above, you get a form similar to this:

If you need to make changes, you can make them here instead of having to open the View/Edit Video Contacts tool.
- RSVP Status
The RSVP tool is here:

The emails and texts that are sent from SecureVideo and/or PSYBooks ask the user to RSVP. When they do, the RSVP status in your PSYBooks video dashboard will change to either "Confirmed" or "Denied". When the RSVP status is "Unknown", as in the screenshot, it means that the participant has not yet RSVP'd.
- The Video Tab for Portal Users
Video Contacts who are also Portal Users will have a Video tab in their portals. However, what's on the Video tab varies depending on the type of user. For example, Clients, App Users and other PSYBooks subscribers in your office may all be both Portal Users and Video Contacts. ("App Users" are sometimes referred to just as "Users". You can read about them here.) It's also possible to add individuals who don't fit in any of the categories above but are both Portal Users and Video Contacts. Since the Video tab of each of these types of Video Contacts will be a little different, each will be discussed below.
- Clients Who Are Portal Users
Clients who are also Portal Users will only have access to information about their own video sessions on their Video tab. They do not have the tools for working with sessions like the host has. The only things they can do on their Video tab are the same types of things they can do from the reminder emails, i.e., RSVP, join the session, view information on past sessions and find information for what to do if they need help. A client Portal Users tab looks something like this:
")
- App Users Who Are Portal Users
App Users on a therapist's account will not be able to actually run video sessions through their personal account. For this to happen, they would be considered a separate subscriber to SecureVideo so they would need to pay for a separate account. For this reason, their video tab will take them to the therapist's video tab, to enable them to do the types of tasks they might be required to do for their therapist(s). When an app user works for several therapists in the same office, the app user will be able to toggle back and forth between the video tabs of any of the subscribers.
- Other PSYBooks Subscribers in Your Office Who Are Portal Users
Each subscriber in the office who signs up for PSYBooks Video will access their own video content on their video tab. They will not be able to view one another's video tab. Subscribers who do not sign up for PSYBooks Video, but who become Video Contacts of other subscribers in the office, will have the same type of Video tab as is shown above under Clients Who Are Portal Users.
- Other Individuals Who Are Both Portal Users and Video Contacts
Finally, it's possible to have individuals on your account who don't fall into any of the categories above, but who are both Portal Users and Video Contacts. Those invidivuals will also have the same type of Video tab as is shown above under Clients Who Are Portal Users.
- Clients Who Are Portal Users
- Email
Starting and Conducting a Video Session
So you've added your Video Contacts and scheduled a session. The computer or other device you intend to use for video sessions is equipped with both camera and microphone and you've tested them and know they work. Now what? If you don't currently have Zoom (our video platform) installed on the computer or device you intend to use, it's probably best to go ahead and get that done. The installation process is usually very fast, so you CAN wait to download and install it right before your first session by following the link in the reminder email. However, just in case you need help or something goes wrong, a better option is usually to get everything ready ahead of time. You can get more information about installing Zoom here. If you should run into difficulties, SecureVideo's Support Team is always available to help: support@securevideo.com and 888-540-2829.
Enabling Your Waiting Room
By default, the Waiting Room feature in SecureVideo is turned off. The implications of this are that if your patient arrives for the session before you do, they'll be able to actually get into the video chat and will be there waiting for you when you sign on. This may - or may not - be fine for individual sessions. However, if you're doing families or groups, you may want a little more control over when participants enter the video room. You can change the default setting in SecureVideo so that instead of entering the video room, participants are placed in a virtual Waiting Room. You're notified when they're there, and can bring them into your virtual office when you're ready.
If you want to enable the automatic Waiting Room feature, go to the Video tab in your PSYBooks Portal and click "Go to SecureVideo" on the bottom left:
Once you're on your SecureVideo dashboard, click the arrow by your profile icon on the top right and choose "My Options." Click the gold bar on the bottom that says "In Session." Change "Enable Zoom Waiting Room" to Yes:

Once you've done that, you'll be able to see who's in your waiting room. For those of you doing couples, groups and/or families, you can allow people into your virtual office in the order you prefer. On your end, it will look like this:

Your participants will see a message that they are waiting for the host to start the meeting (if you have not yet joined):

If you've already started the meeting, they will see a message to please wait for you to let them in:

What the Start Session Button Does
When you click the "Start Session" button on your PSYBooks video dashboard, it will take you to SecureVideo where you'll see a big orange button that says something like "Enter Waiting Room" or "Start Meeting":

Notice that there's an "Install Zoom" button at the bottom of the SecureVideo page. If you haven't yet done that, you can do it here before you enter the meeting. However, keep in mind that you only have to install Zoom ONCE for each device you plan to use, so there's no need to do it before each session.
If you don't want to go through your portal to access your video sessions, you can also just click the button in your reminder email that says "Join Session". That takes you to exactly the same landing page as is shown above, so you will still need to click "Enter Waiting Room" or "Start Meeting" to actually launch the Zoom software and begin your chat.
The Video Window
Once you click the Enter Waiting Room/Start Meeting button, the video window will open. If you're the first one in the room, your screen will look something like this (the outline represents your video image):

Arriving at the session a bit ahead of your client(s) will allow you to adjust your camera if you need to. Most camera software comes with controls that allow you to zoom in or out, as well as move the camera right or left, up or down. The view that you see when you are alone in the room is what your client(s) will see, so checking it out ahead of time may also allow you to notice things in the background that you want to change or move out of sight.
The tools in the video window will be discussed below. However, since those tools are maintained by SecureVideo and not PSYBooks, they could change at any time. For information that may be more up to date, you can check the SecureVideo Support Area and use their Search tool to find the information you need. Also, Mac users (including iPads and iPhones as well as all other Apple products) will have slightly different tools. The tools shown below are what you might see on a Windows machine. To see what tools are offered to Mac users, check the SecureVideo Support Area.
The tools in the video window are:
- Full Screen Toggle
In the top right of the video window is an "Enter Full Screen" toggle tool. Try it both ways to see which you prefer:

- Bottom Video Tools (To view these tools, hover your mouse over the bottom of the video window)
In addition, there are numerous tools at the bottom of the video window. They are only visible if you hover your mouse over the bottom of the window:

- Mute and Audio Controls (To view this tool, hover your mouse over the bottom of the video window)
If you need to mute your audio, you can do so quickly by clicking the microphone. Doing so will put a red line through the microphone icon so you can easily see if your mic is muted or not:

In addition, clicking the ^ next to the Mute tool opens a screen with a variety of audio controls. Clicking the "Audio Options" link at the very bottom of the popup will give you a broad range of tools for working with your audio:

- Stop/Start Video (To view this tool, hover your mouse over the bottom of the video window)
Similar to the Mute tool, you can also "mute" your video. When you do, other participants in the room will not be able to see you. Instead, they'll see a black screen with your name - they will not receive any input from your camera. When you click the "Stop Video" icon, your screen and the Stop/Start Video icon will look like this:

Clicking the ^ next to the Stop Video tool opens a screen with a variety of video controls and settings. As with audio, clicking the "Video Settings" link at the bottom of the popup will give you a broad range of tools for working with video:

In the screenshot above, the video is turned off, but you can access the Video Settings (by clicking the ^) whether the video is on or off.
- Invite (To view this tool, hover your mouse over the bottom of the video window)
The Invite tool allows you to invite other people to your video chat, even after the meeting has already begun. Clicking Invite opens this window which allows you to choose which email client you want to use. By using the buttons at the bottom of the window, you can choose whether you want to just send them the URL to the chat (Copy URL) or whether you want to send them the entire invitation (Copy Invitation):

- Manage Participants (To view this tool, hover your mouse over the bottom of the video window)
The Manage Participants tool allows you to work with the participants in your chat. For example, you can mute one or all participants, play chimes as someone enters or leaves, lock the chat so no one else can enter, etc. Clicking Manage Participants opens a window to the right of the video window which will list all participants in your session and give you tools for working with them. The meeting in the screenshot below only has one participant so only one name appears in the Participants area on the right. But if more participants were present, all names would appear in that area:

Notice that there are tools by each participant's name for working with them individually, but you also have some tools at the bottom for changing participant settings for the session as a whole:

- Share Screen (To view this tool, hover your mouse over the bottom of the video window)
The Share Screen tool can be extremely valuable for you in that its uses are almost endless. For example, you can present a Power Point presentation to your meeting attendees, perhaps put up restful photographs for a meditation or mindfulness exercise, show photos of a graduated series of feared objects to a phobic client for a desensitization treatment, etc. Also, your participants can share their screens with you, if you've allowed them to do that.
When you click Share Screen, a window will open over your video feed that shows all of the applications and/or other windows that are available to share. By default, it opens to your Desktop. You can see that the Desktop icon is highlighted in green in the Share Screen window:

Sharing your desktop is often a very good choice because it allows you to switch back and forth between applications you're sharing with your meeting/session attendees. However, you can also choose a single window or application. For example, in the Share Screen window above, I might just want to share my Power Point presentation, without risking my attendees seeing anything else I hadn't planned for them to see that might be on my Desktop or in my browser. In that case, I would select the Power Point icon to share and my attendees would only see my presentation.
Notice that the Share Screen window also offers a Whiteboard, should you want to take notes or draw illustrations during the meeting.
Once you've selected what you want to share, there are some other tools along the bottom you might want to consider, i.e., you can share your computer's sound and/or optimize the clip for full screen:

When you've selected what you want to share, clicking the blue Share Screen button on the bottom right will allow all participants in your session to see what's on your screen. While sharing, you can use your applications the way you normally would and participants will be able to follow along.
One thing to notice is that when you're sharing your screen, the tools that are normally along the bottom move to the top of the screen and have some additional tools added:

Specifically, you can create a New Share (which will open the Share Screen window to allow you to make a new choice), pause the sharing, stop sharing entirely (the red button at the bottom), or make annotations. The More icon at the end opens this window:

In the screenshot above, you can see a bit of the Power Point slide that is being shared in the background. Also, notice that the video window of our participant, Stef Smith, is no longer occupying the entire screen. It's been moved over to the far right side and her video window made farily small. We would still be able to watch her screen, see her gestures and facial expressions, hear what she has to say, etc. It's just that her window is smaller because the main focus at the moment is the Power Point. If there were more participants in the chat, their video windows would all appear along this edge.
- Advanced Sharing (To view this tool, hover your mouse over the bottom of the video window)
Going back to the tool set that's along the bottom of the video window before you've shared your screen, there's also a set of advanced setting tools you can use:

Clicking the last item on the list, Advanced Sharing Options, opens this window:

- Chat (To view this tool, hover your mouse over the bottom of the video window)
Sometimes in a video session, you may need a traditional chat type window where participants can type responses to you and/or to one another. This is especially helpful in large meetings or when one or more participants has background noise that could disturb the others. It's also useful if one or more participants is muted or does not have access to a microphone. With the chat window, they can still participate in the session or meeting. When you click the Chat icon at the bottom of the video window, it opens a new section along the side for a chat window. You type your message at the bottom and it appears along the top:

- Leave/End Meeting (To view this tool, hover your mouse over the bottom of the video window)
The final tool to discuss is the Leave or End Meeting tool. This tool is prominently placed on the far right along the bottom of the video window. (It sometimes appears in other places, for example if you're sharing your screen at the time you want to leave the meeting. However, it's always easy to find.)

When you click Leave or End Meeting, you'll get a window similar to this one:

Wording will be a little different for the host of the meeting than for the participants. For example, only the host can end the meeting for all.