

Manual Index
-
Chapters
The Manual is divided into seven chapters. Click a chapter title to display that chapter's table of contents in the area below.
Chapter Four
Tools
- Intro to Tools
- Files, Forms & Templates
- Reports
- My Notes & Reminders
PSYBooks Manual
Chapter Four
Add Reminder/Memo
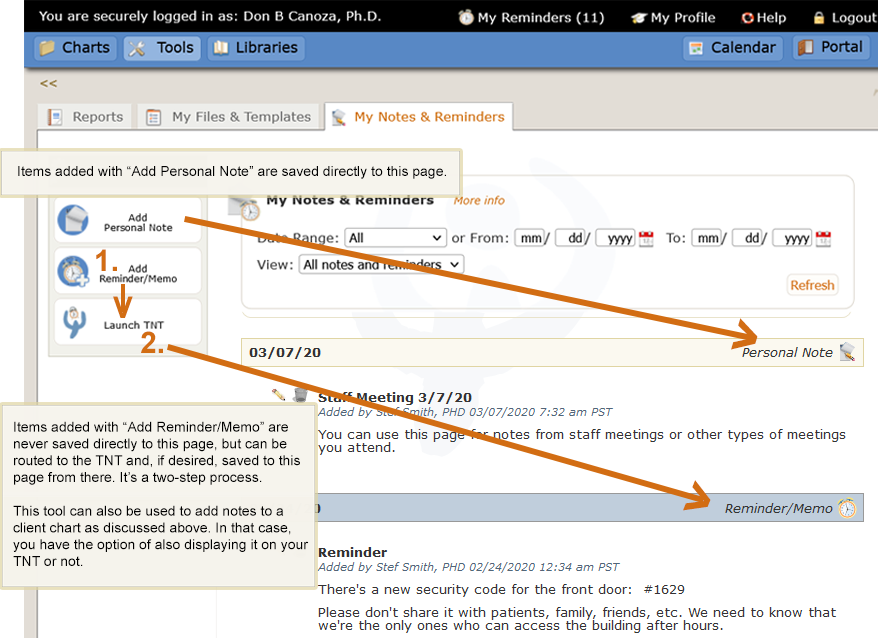
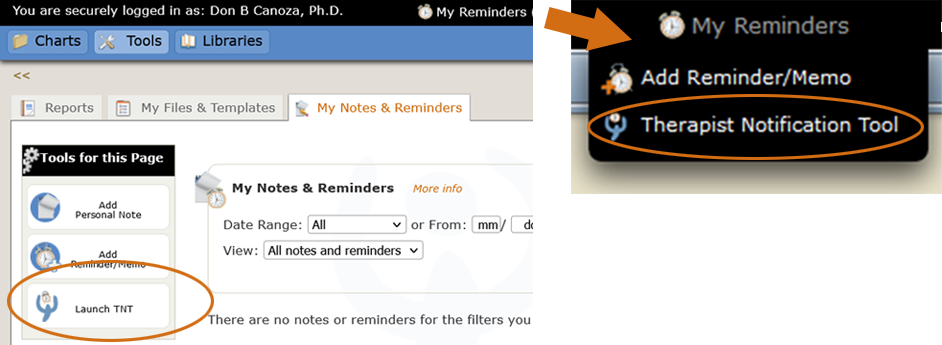
What this isThe Add Reminder/Memo tool allows you to create reminders for yourself (thus the "reminder" part of the name.) It also doubles as a tool for sending interoffice memos to staff and/or other subscribers in your office (i.e., the "memo" part of the name.)What it looks likeThere are two ways to access the Add Reminder/Memo tool - one in the dropdown list of the "My Reminders" link on the black bar at the top of every page in the app and the other as a tool on the left nav of the My Notes & Reminders page: 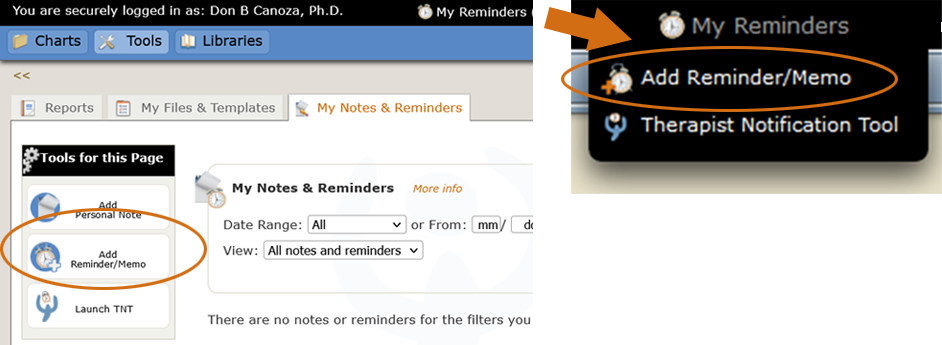 |
Where this isThe Add Reminder/Memo tool is on the left nav of the My Notes & Reminders tab in the Tools section and also in the dropdown menu of the "My Reminders" link in the black bar at the top of every page. |
No matter where you access the Add Reminder/Memo tool, it always opens this form:
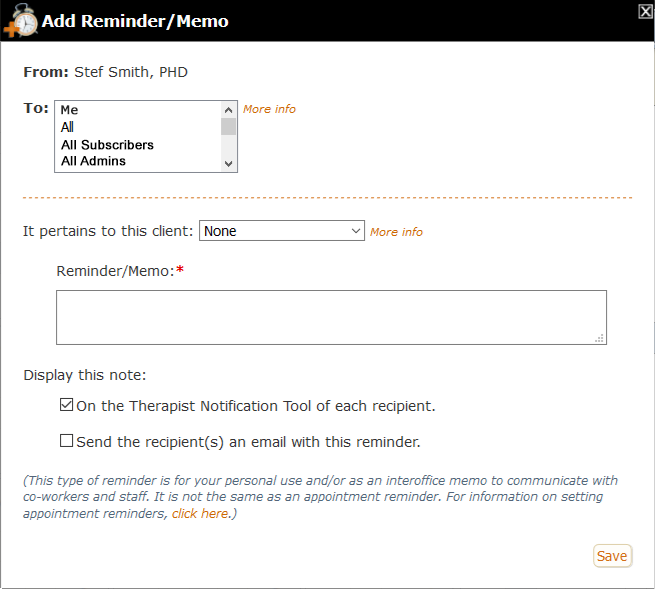
The only difference between a Reminder and a Memo is that Reminders are sent only to yourself whereas Memos are sent to others. They both use exactly the same tool, as shown above. If you select "Me" from the "To" multi-select box, you're sending yourself a Reminder. If you select any other option, you're sending a Memo to other professionals in your office. Another way to think about it is that Reminders are like Memos to yourself.
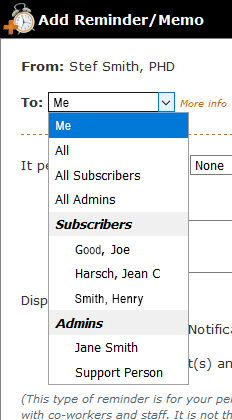
The Reminder/Memo tool is ONLY designed as an interoffice communication tool. Unlike PSYBooks email, you cannot add anyone you want to the list of potential recipients. If you're in practice by yourself and don't have office staff helping you, you can only use this tool to send yourself reminders. However, if you have other PSYBooks subscribers in your office and/or if you've added one or more Users and given them Admin status, those people will automatically be added to the multi-select dropdown for the "To" field. You don't have to add them manually or send them Portal User invitations. If you expand the To dropdown menu, it will show you a list of all other PSYBooks subscribers and Admins in your office. By selecting from the dropdown, you can now use this tool as interoffice memo. You can use the shortcuts at the top to send to "All" or just "All Subscribers" or "All Admins", or, if you only want your memo to go to certain other subscribers or Admins, you can use the multi-select box to select the specific ones you want by holding down the Ctrl (Cmd) key as you make your selections.
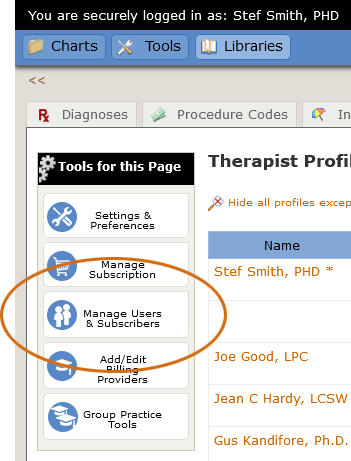
You add both Subscribers and Admins to your practice from your "My Profile" page with the "Manage Users & Subscribers tool:
An Admin is just a regular User that you've added and checked the box to make that user an Admin:

The Admin user type is designed specifically for people you hire to help you manage your practice. They do not have to be physically present in your office. They can manage your PSYBooks account from their own computer or tablet at their homes - or anywhere else. Mostly, they're like any other PSYBooks user you might add except that they have a few extra permissions that only users who are actually helping to run your practice might need - such as being included on the list of people to whom you can send interoffice memos.
Notice that in Group or GOI types of PSYBooks subscriptions, only the Master Clinical account holder has the ability to create Admins. This is because Admin Users are shared by the entire practice. This does not prohibit individual subscribers from adding PSYBooks Users to their own accounts, either for their own purposes or to share with other subscribers in the office. However, if a non-Master Clinical subscriber adds a User that they want to convert to an Admin, they would have to share that User with the Master Clinical subscriber and have the Master Clinical convert the User to an Admin.
Going back to the Add Memo/Reminder form, after the "To" multi-select, there are three remaining sections of the tool:
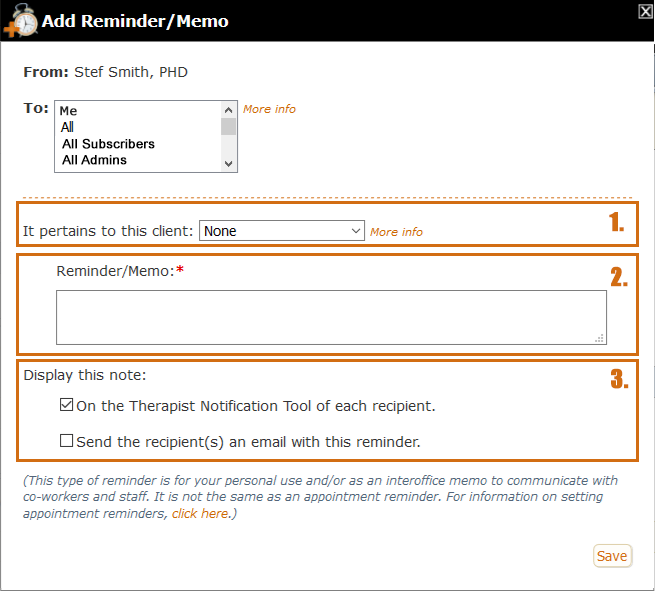
The first section allows you to choose a client, if the memo pertains to them. Although it is not necessary to select a client, there are times when it's helpful. For example, you might need to tell a co-therapist something about the client before that evening's couple's appointment. Or you might need to send an Admin a note to remind them to get the client's new insurance information when the client comes in. When a reminder only applies to one client, selecting them here will allow you to view the reminder when you open that client's chart and also to save the note in the Notes tab of that client's chart if you want. Reminder notes saved to a client's chart are assigned the Medical Record > Office type.
The next section down on the form - the textarea with the label "Reminder/Memo" - is where you write the body of your note or reminder. Notice, that like almost all textareas in PSYBooks, it has the dots in the lower right corner, indicating that the textarea can be expanded, allowing you space to write as much or as little as you want:
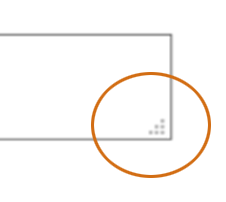
When you see those dots in the lower right corner of a textarea, just place your cursor over them, click and drag down. You can expand the box to whatever size you want:
The last section of the Add Reminder/Memo tool asks you what you want to do with your note:
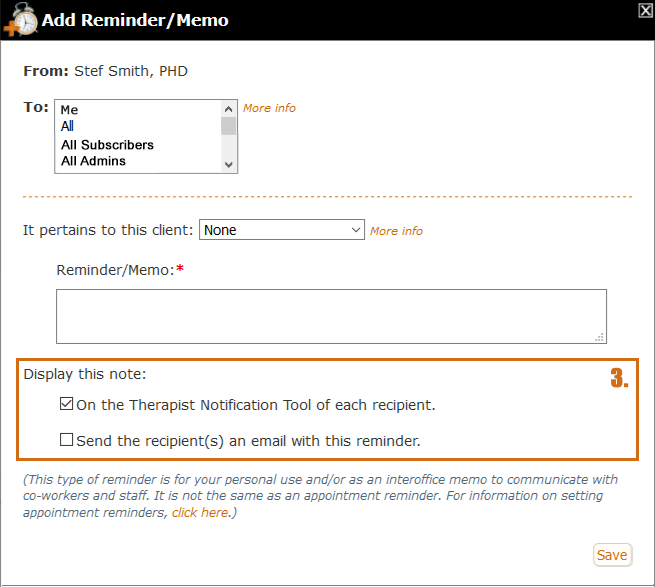
By default, the selected option is to display the note on the Therapist Notification Tool (TNT), which will be discussed next. However, you can also choose to have an email sent to the recipient(s) or you could do both: send emails and also add it to the TNT.
When you've indicated that your note pertains to a client, a third option is presented in the "Display this note" section:
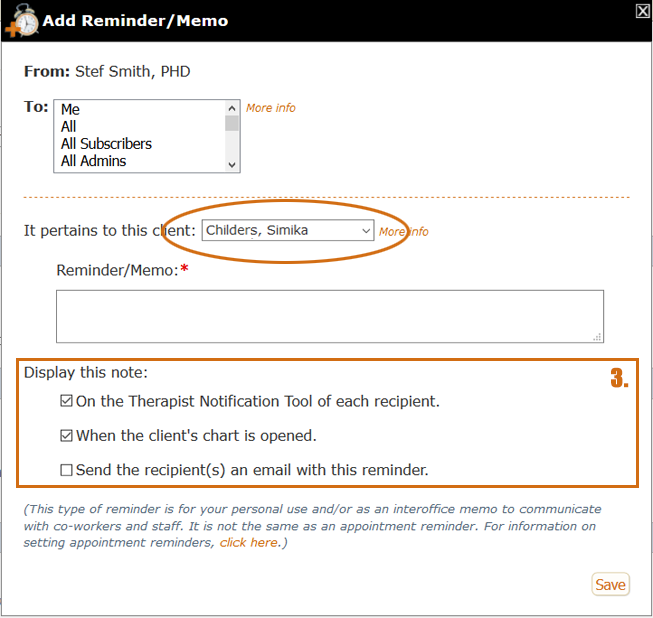
As you can see, the note above has been marked as pertaining to a client named Simika Childers. Now, in the "Display this note" section, we also have the option of having our Reminder/Memo displayed in a popup when we open the client's chart. Since the options in Display this note are checkboxes, you are not limited to a single choice. You can select as many as you want. It's important to note that the subscriber and also any Admins assigned to the account can add notes to a client's chart with the Add Reminder/Memo tool.
If you do choose the second option, i.e., to display the note "When the client's chart is opened," the next time you open that client's chart you'll see a popup like this:
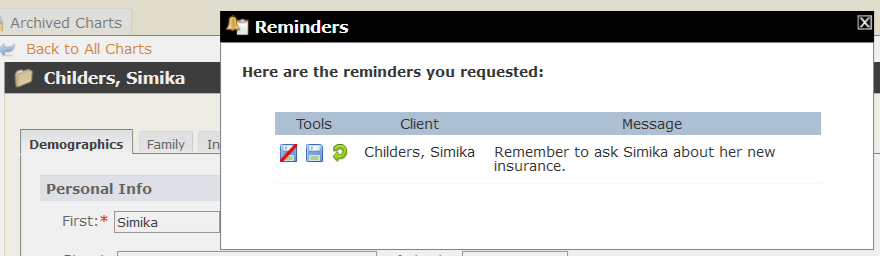
Notice that this reminder says that it's for a client named Simika Childers - and in the background, we can see that we are indeed in Simika Childers' chart. Notice also that there are three tools we can use with this reminder:
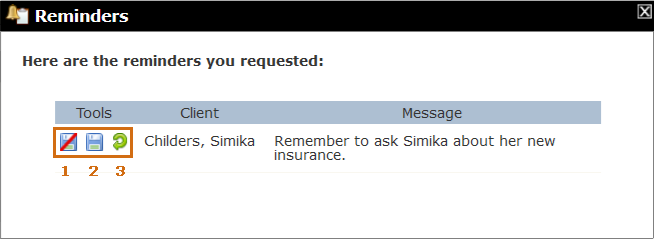
Here's what each tool does:
- Dismiss and Do Not Save: Clicking this option allows you to dismiss the reminder so it won't keep appearing when you open the client's chart. However, it won't be saved in the chart. (Note that if you had also chosen to display this reminder "On the Therapist Notification Tool of each recipient," when you delete the item from the TNT, you would be given an option to save it to your "My Notes & Reminders" page. In other words, the TNT allows you to save items to your OWN notes tab, i.e., My Notes & Reminders. If you want to save it to the client's chart, use the method described here.)
- Dismiss and Save to Chart: This option also dismisses the reminder, but it saves a copy of the reminder as a note in the Notes Tab of the client's chart.
- Remind me Again: This option allows the reminder to be displayed each time you open the client's chart. The popup will continue to be displayed until you dismiss it with one of the first two tools. Incidently, if you don't choose any of the tools, but just navigate away from this chart or close the app, it will have the same effect. In other words, the default choice for a chart reminder is that it's displayed in the chart until you dismiss it.
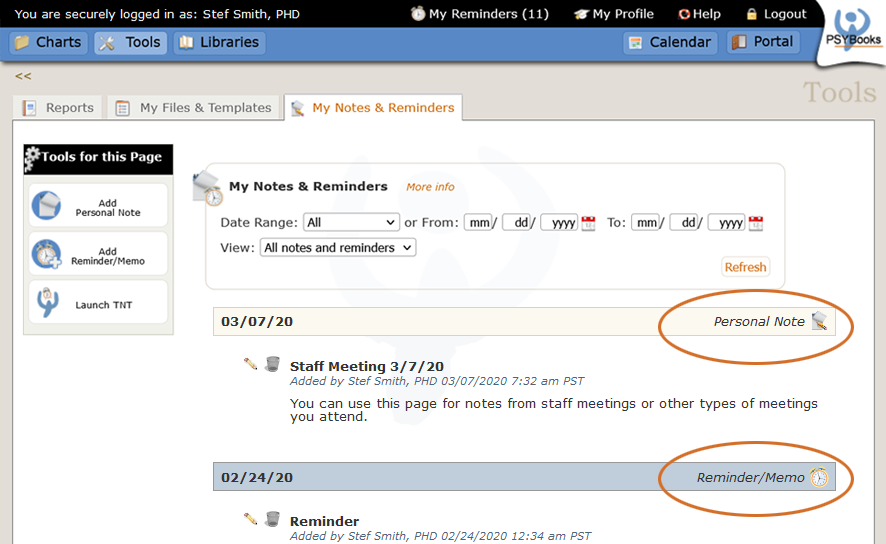
Notice that, unlike the "Add Personal Note" tool, items added with the "Add Reminder/Memo" tool will NEVER be directly displayed on the "My Notes & Reminders" page. They can be saved to "My Notes & Reminders," but only after they've been routed through the TNT:
Therapist Notification Tool (TNT)
Like the Add Reminder/Memo tool, the Therapist Notification Tool, or TNT, can be launched from two different places: you can access it from the My Notes & Reminders page and also from the dropdown of the My Reminders link in the black status bar at the top of every page in the app:
Also, by default, the TNT automatically opens each time you log in to your PSYBooks account unless you specifically indicate that you don't want it to. If you DON'T want it to open each time you log in, there are settings you can change in My Profile > Settings & Preferences.
Tools & Sections
As for what it is, the Therapist Notification Tool is really two sets of tools: 1) a "communication hub" for your office and 2) a dynamic to-do list to give you information to help you with practice management tasks. Each time your TNT opens, it will pull current information, enabling you to check for new information and/or unfinished tasks throughout your day. Furthermore, each task you're presented with will have tools right beside it that will allow you to either complete the task, save the task for later, or remove the task so it won't continue appearing on your TNTs.
Tools
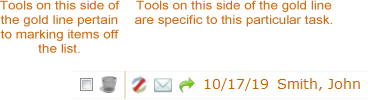
There are two tools that are used throughout the TNT that have similar functions wherever they appear. They are the Put Off tool (which is just a checkbox): , and the Delete tool, symbolized by the trash can: ![]() . Both of these tools have the end result of taking an item off of your TNT, i.e., marking it off of your to-do list. However, there's an important difference between them. You can see it by comparing the messages you're shown if you hover over a Put Off tool vs hovering over the Delete tool:
. Both of these tools have the end result of taking an item off of your TNT, i.e., marking it off of your to-do list. However, there's an important difference between them. You can see it by comparing the messages you're shown if you hover over a Put Off tool vs hovering over the Delete tool:


The Put Off tool allows you to mark something off of this current to-do list, while maintaining the option of coming back to it later. If the condition that caused this task to appear on this current TNT is still present when you view the next TNT, the item will appear again.
In contrast, an item that you mark off of your to-do list with the Delete tool will never appear on subsequent TNTs. The Delete tool can be used when you know about the item, but, for whatever reason, you don't plan to change the condition that caused it to appear on the TNT. Using the Delete tool will tell us not to keep reminding you.
It's also important to note that you don't HAVE to use either of these tools. They are there for users who like a visual representation of tasks they need to complete. You can view a TNT and close it again without checking any items off the list. Doing that is the same as using the Put Off tool in that unchecked items will appear on subsequent TNTs as long as they still meet the condition that caused them to appear in the first place.
When present, the two tools we've been discussing - the Put Off tool and the Delete tool - are always placed as the first tools in a row. They are followed by a vertical gold line, which separates them from the other tools on the row. This is because the tools to the right of the gold line can vary, depending on the item. They are task-specific. The mockup below was taken from a row alerting the user that their claim had been rejected by the clearinghouse:
Notice that even links are tools, so the item in the example has the two "mark off" tools to the left of the gold line and then five additional tools on the right.
Sections
The TNT consists of a header (which is always present) and three additional sections that might or might not appear on your TNT. Those three sections, which form the meat of your TNT, are:
- My Reminders/Interoffice Memos
- Unfinished Tasks
- Account Information
A section only appears if you have notifications in that area. For example, if you never use the Add Reminder/Memo tool, the My Reminders/Interoffice Memos section of the TNT will never be present. In other words, the TNT is customized to reflect how YOU use PSYBooks.
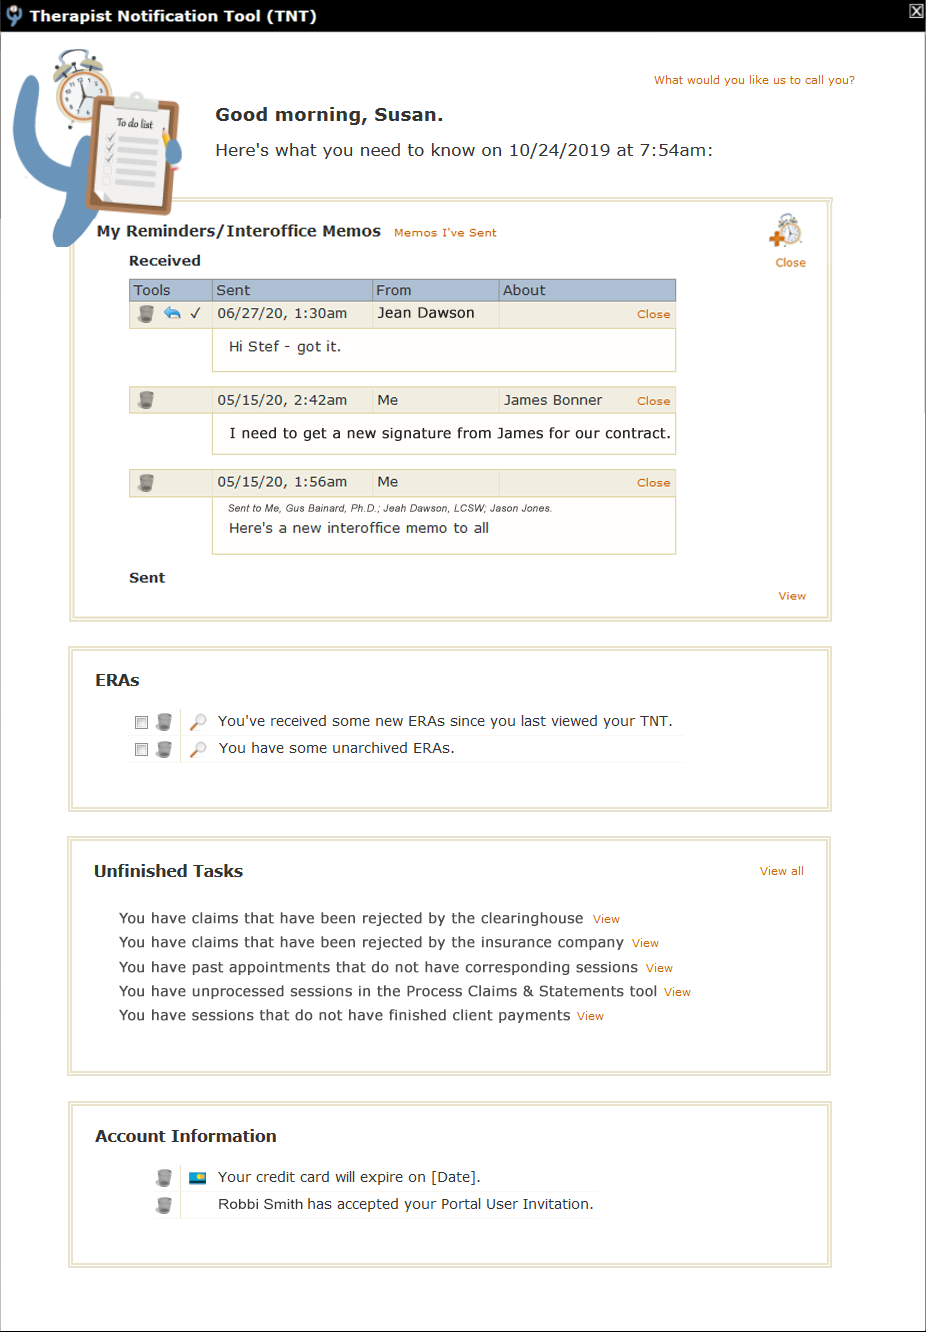
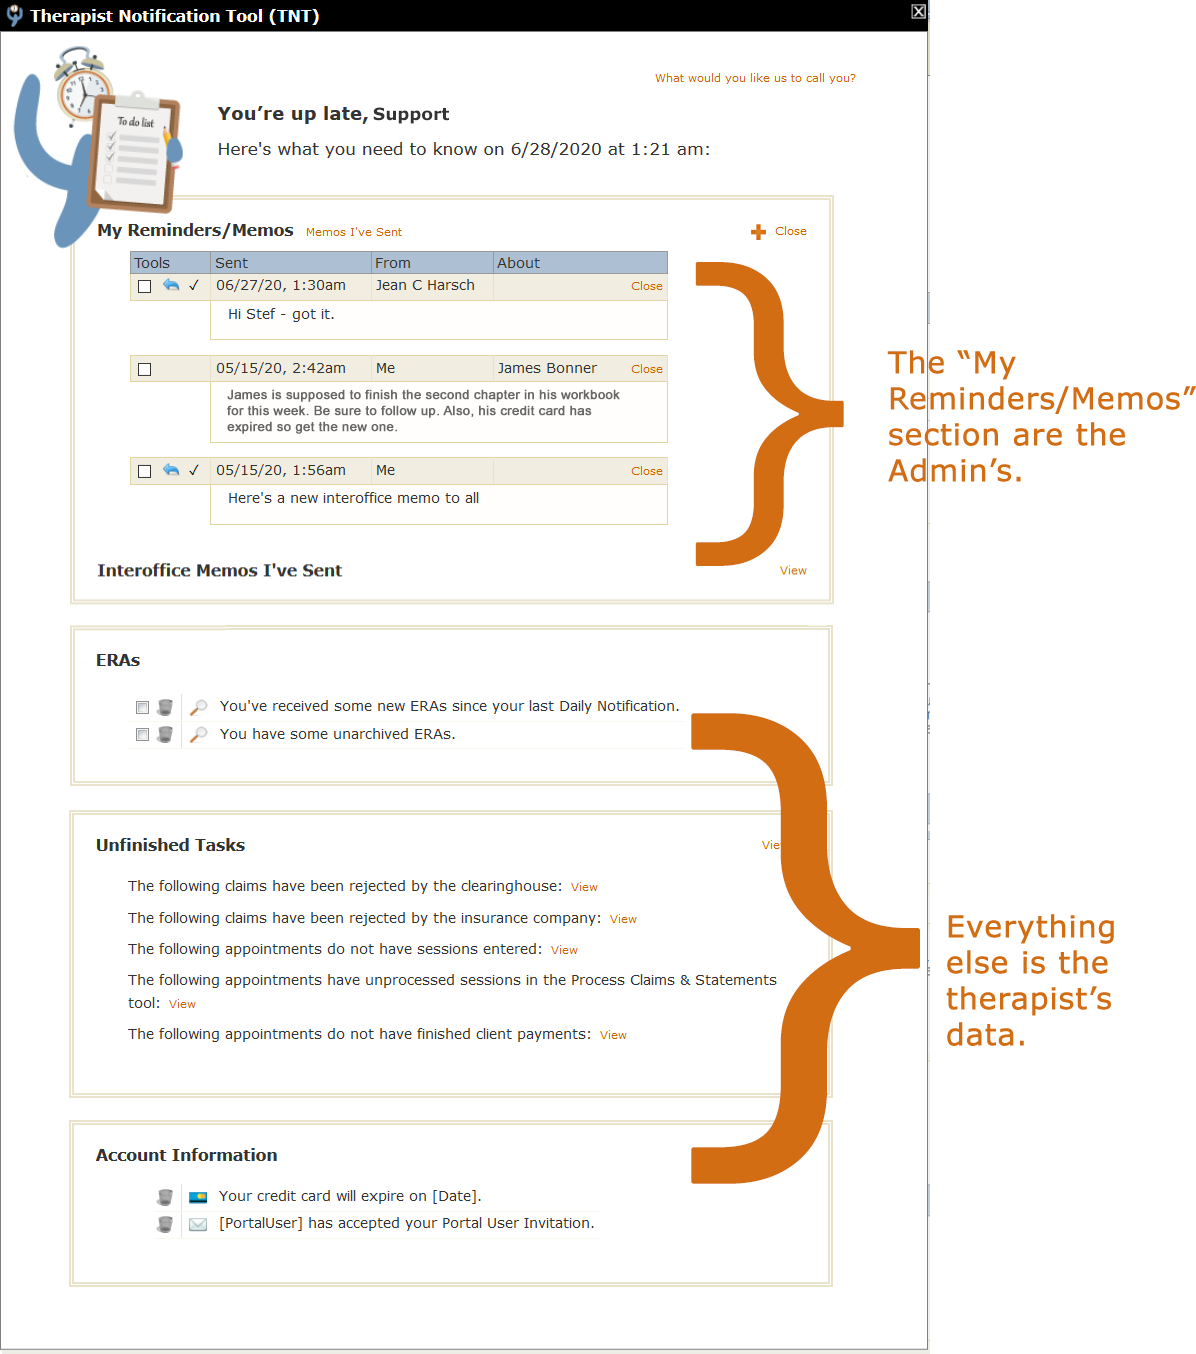
A sample TNT with all areas present might look something like this:
We'll look at each section separately:
Header
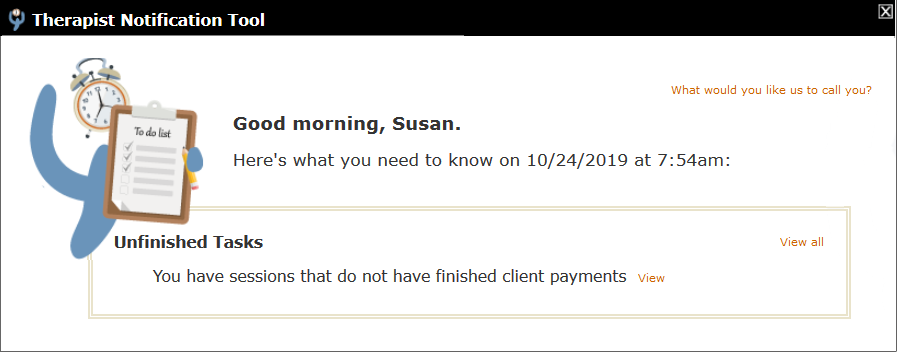
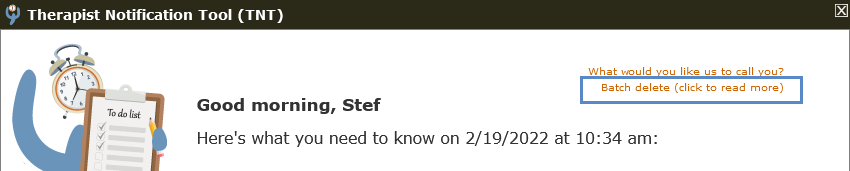
The header section has one tool: a way for you to personalize the page by telling us how you want to be greeted on the TNT. The default version is to use your first name, i.e., "Good morning, Susan."
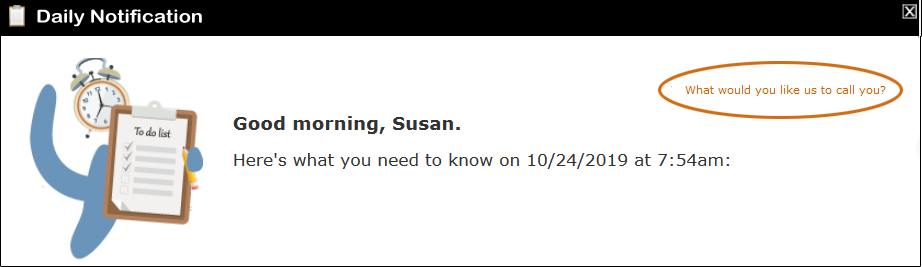
However, if you click the "What would you like us to call you?" link, you'll get a textbox where you can enter anything you want. You could say, "Dr. Smith," use a nickname or even get creative. What you write here will ONLY affect the TNT so unless you've given someone else access to your account, you're the only one who'll ever see it. This means you're free to play by leaving yourself fun or inspirational messages. Once you write your choice and click save, your greeting will change similar to the mockup below:

We'll remember your selection until you change it to something else.
My Reminders/Interoffice Memos
The "My Reminders/Interoffice Memos" section of the TNT is right below the header. This is a communication area for your office. For single practitioners without office staff, it will be a way for you to display reminders for yourself that you've set with the Add Reminder/Memo tool. Since the TNT as a whole is your designed to be a todo list, in a sense, the Reminders/Interoffice Memos section allows you to add your own todo items. If you have office staff, this section of the TNT becomes a way for you and your staff to leave messages for each other. Finally, in Group or GOI types of practices, this top section of the TNT becomes a full-fledged communication hub in that it allows you to exchange Interoffice Memos with all subscribers and/or Admin staff in your office. It looks something like this (numbers are to identify the tools, which will be discussed below):
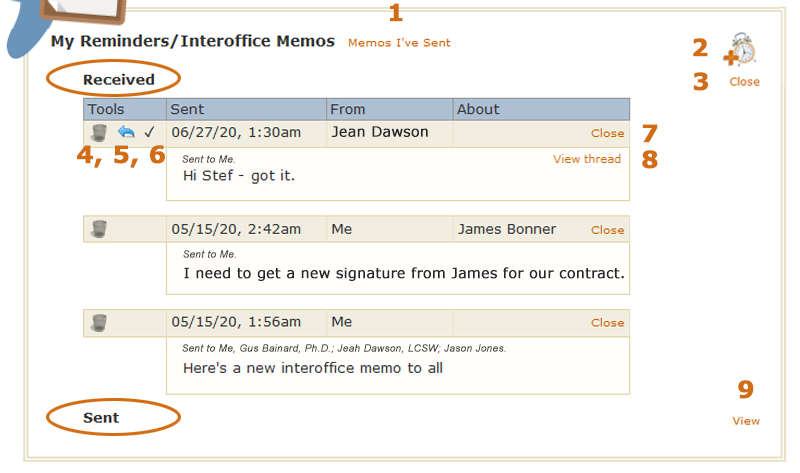
The first thing to notice about the Reminder/Memo part of the TNT is that it's divided into two areas: Received and Sent. When the TNT is first opened, your Received memos and reminders are visible, but Sent items are not. There are two ways to view Sent items. You can either click the "Memos I've Sent" link at the top of this section (tool #1 in the mockup) or you can use tool #9 - the "View" link in the Sent section. A discussion of all nine tools on the above mockup follows:
"Memos I've Sent" link. This link opens the Sent section and refocuses your page so the Sent section is easily visible.
 Opens the Add Reminder/Memo tool, so you can easily add new reminders from here.
"Close" link. This particular Close link closes the Received section. The Sent and Received sections work independently. If you leave the Sent section closed and also close the Received section, you'll get the configuration below (the Close link has toggled to become a View link):
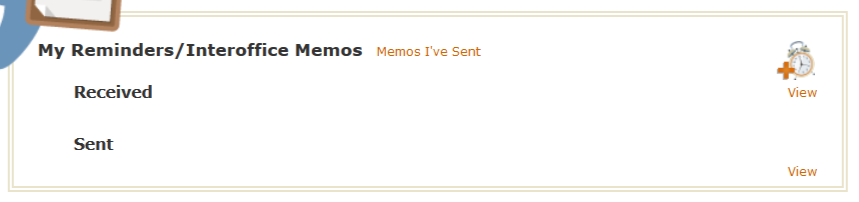
Notice that closing both sections does NOT remove the entire "My Reminders/Interoffice Memos" section from your TNT. That's because, in the example we're using, there are still reminders present that have not been marked off. If there were no Received or Sent reminders present, this section would not appear on your TNT.
Delete tool:
 The fourth tool in the mockup is the Delete tool:
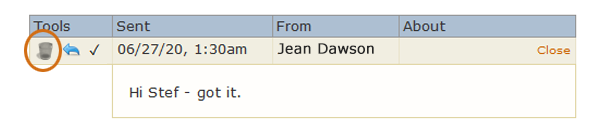
As mentioned above, the Delete tool is to mark an item off of the TNT in a way that's permanent. Items removed with the Delete tool will not appear on future TNTs. Hovering over a Delete tool on the TNT will produce a message similar to this, reminding you what the tool does:

However, you do have the option of saving your memos and reminders after you've removed them from your TNT. If you click a Delete tool beside a reminder, you'll get this alert:
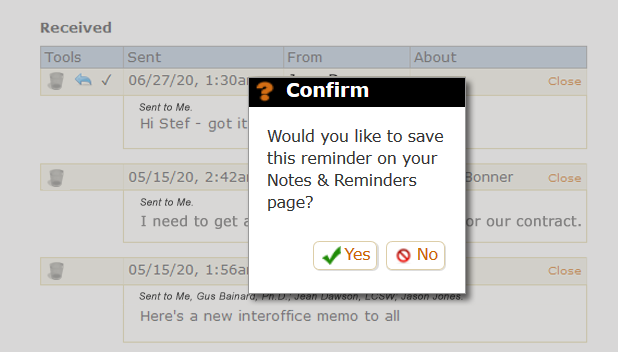
If the item you're removing is something you want to keep, you can save it to the My Notes & Reminders page. That page is designed to hold all of the personal notes you maintain for your practice as well as copies of any reminders and/or memos you've saved. However, whether you click Yes or No, the item will be removed from your TNT, thus taking it off of your to-do list.
You may have noticed that items in the "My Reminders/Interoffice Memos" section do NOT have the Put Off tool - the checkbox. If you want to keep a reminder or memo on your TNT, just don't use the Delete tool. This could be helpful, for example, if a colleague sent you a memo to which you want to reply, but you can't do it right then. Reminders and memos will appear on subsequent TNTs until you specifically remove them by clicking the Delete tool.
Reply tool:
 The fifth tool is only present on memos you've received from others in your office. It's a backwards facing arrow tool that allows you to reply to the memo:
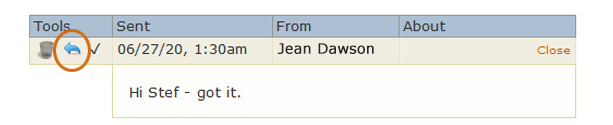
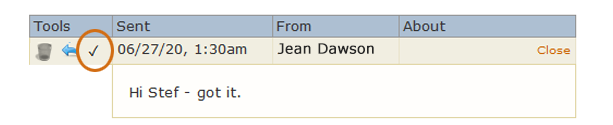
Mark Read tool: ✓The sixth tool is also only present on memos that you've received. It's a checkmark that allows you to mark the memo as read. Clicking the checkmark allows you to convey to the sender that you've read their message even if no response is necessary or if you intend to write a response later:
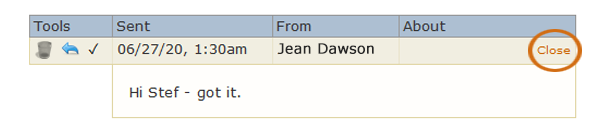
"Close" link. The seventh tool allows you to close individual messages. For example, you might have a really long message that you don't have time to deal with at the moment. You could close it, to get it out of your way while you work through the other items on your TNT:
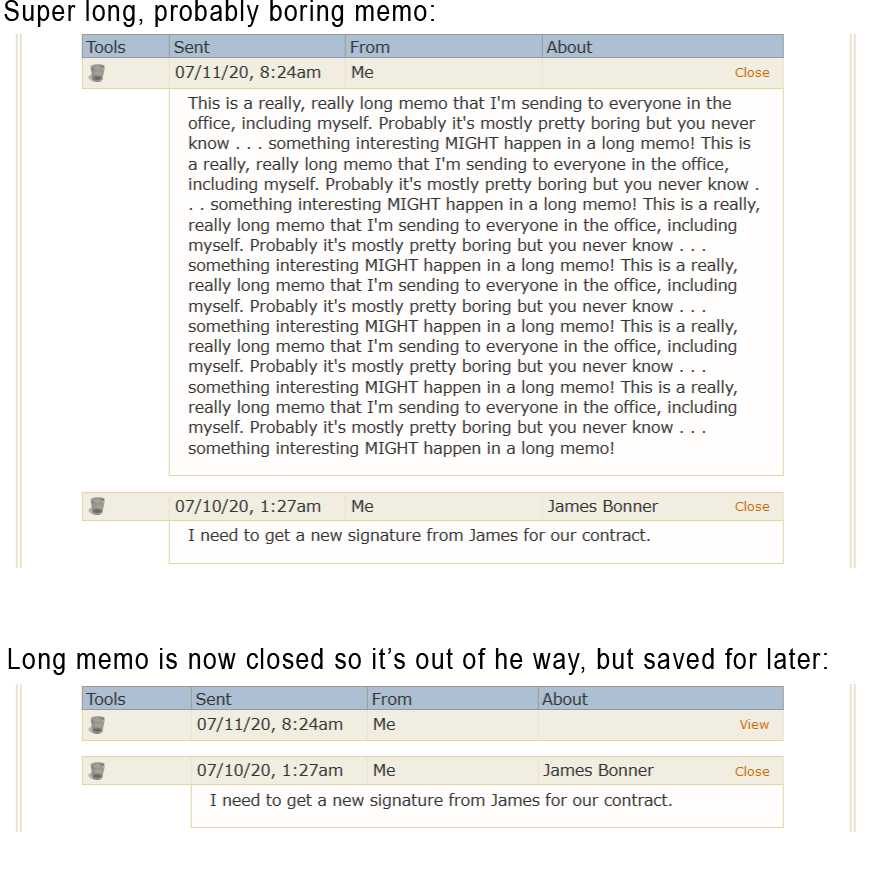
Here's an example of how this tool might help. Notice that once you use the Close tool, the link text changes to "View," meaning that you can open it again at any time:
"View thread" link. When a memo has other replies that came before it, a View thread link appears in the top right corner. Clicking it allows you to see all the memos that are part of this thread:
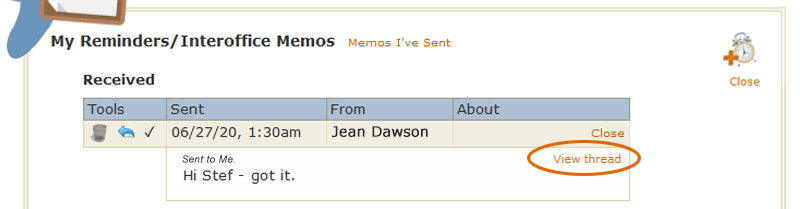
Clicking "View thread" will open a new area which will allow you to read any memos that are part of this thread. Notice that the text "View thread" changes to "Hide thread" which would allow you to close the threads again:

"View" link. As discussed above, clicking the View tool at the bottom of the form opens the Sent section. Once the Sent section is open, it might look something like this:
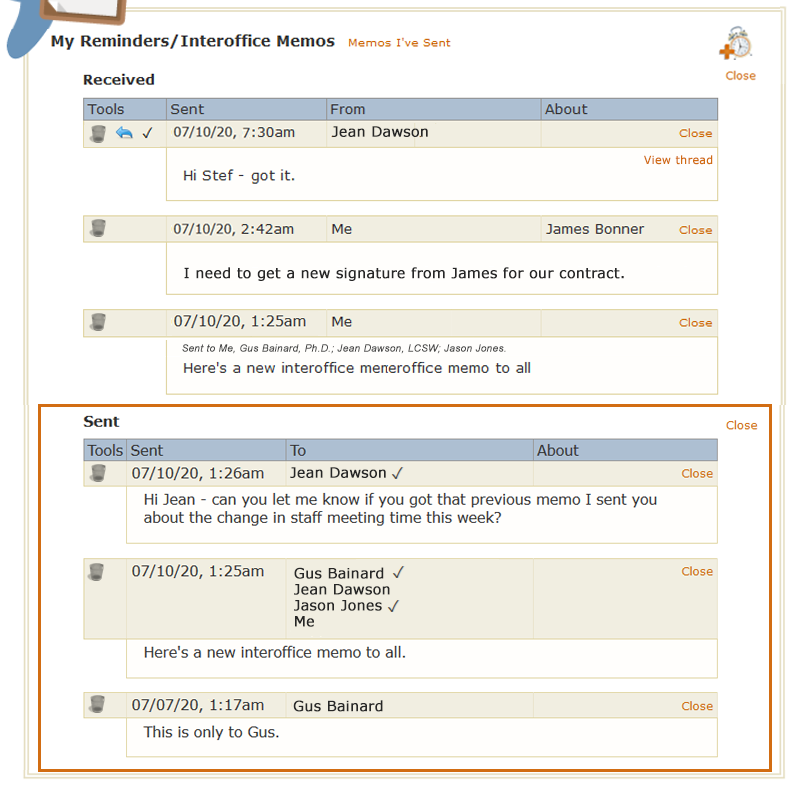
Notice that the original View tool has become a Close tool, which allows you to toggle between viewing states. Also, like Received items, Sent items have Delete tools, allowing you to clear them from your TNT. As with Received messages, Sent items will be retained on the TNT until you specifically delete them. When you click the Delete tool, you'll be shown the same confirm you get when deleting Received messages, asking you if you want to save the item on your Notes & Reminders page.
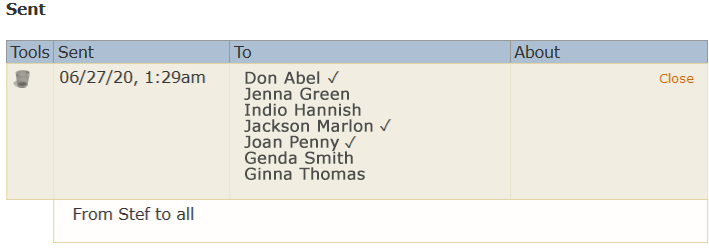
Notice that whereas Received items show you who a memo is from, Sent items show you the recipients, i.e., the "To" column. You can also see an indication of which ones have read the memo:
This concludes the discussion of the My Reminders/Memos portion of the TNT. After that top communication area, the rest of the TNT contains system-generated items designed to help you make sure you're not missing important information that may be coming into your account. There are two sections in this lower area:
- Unfinished Tasks
- Account Information
Each will be discussed separately.
Unfinished Tasks
Unfinished Tasks is one of the larger sections of the TNT. As with all other sections on the TNT, if you don't have any unfinished tasks, the Unfinished Tasks section will not be present. Currently, there are seven potential unfinished tasks. Only those that are applicable to you on any given TNT will be presented. An example of an account that has items in all seven unfinished tasks would look something like this:
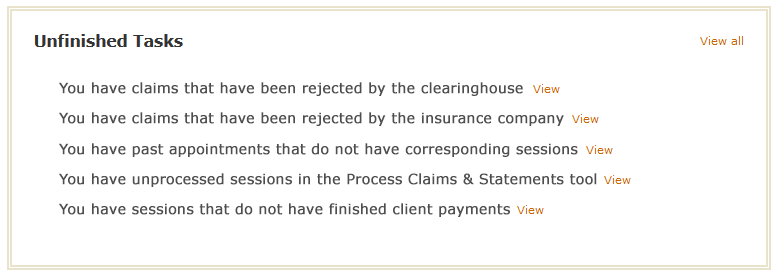
These are the seven Unfinished Tasks PSYBooks currently reports:
- You have claims that have been rejected by the clearinghouse
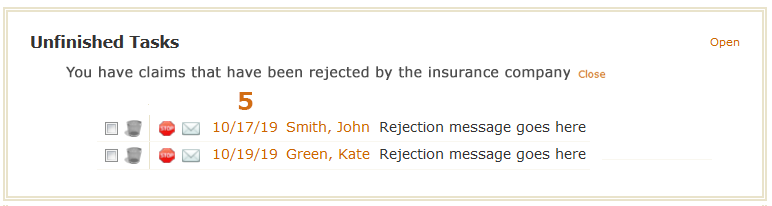
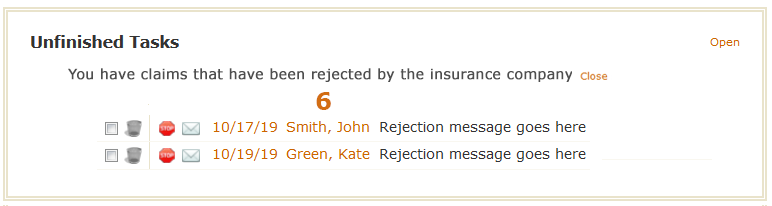
- You have claims that have been rejected by the insurance company
- You have past appointments that do not have corresponding sessions
- You have unprocessed sessions in the Process Claims & Statements tool
- You have sessions that do not have finished client payments
- You have sessions that do not have notes
- You have notes that have not been signed
Each of these tasks will be discussed below:
You have claims that have been rejected by the clearinghouse
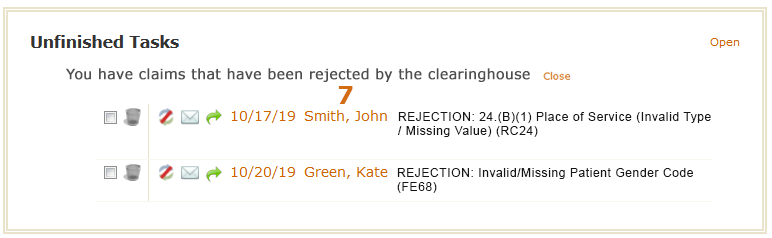
If this task appears on your TNT and you open it to reveal the content, you'll see something like this:
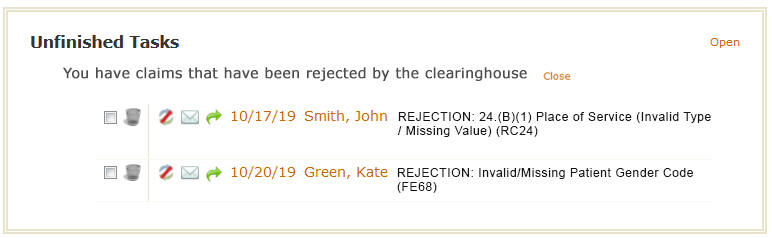
Items on this list will show you which claims have been rejected by Office Ally, the clearinghouse used by PSYBooks. This is the same basic information you can get with PSYBooks' Claim Status report in the Tools > Reports section. The advantage of having this information on the TNT is that it's sometimes hard to remember to check the Claim Status report to make sure all of your claims have gone through correctly. By having those that are rejected added automatically to your TNT, you're shown rejected claims each time you log in to PSYBooks (and/or each time you access the TNT manually). Also, as we'll discuss below, most of the tools you might need to make claim corrections appear right on the same line, allowing you to see the rejection, make necessary changes and resubmit - all in one place.
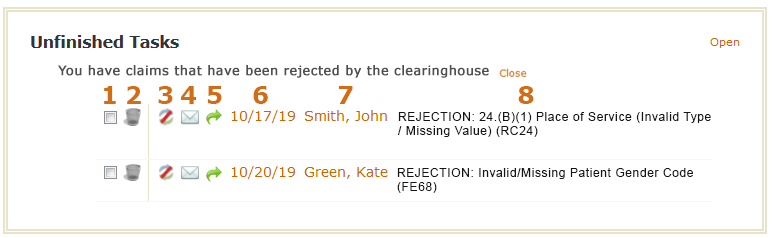
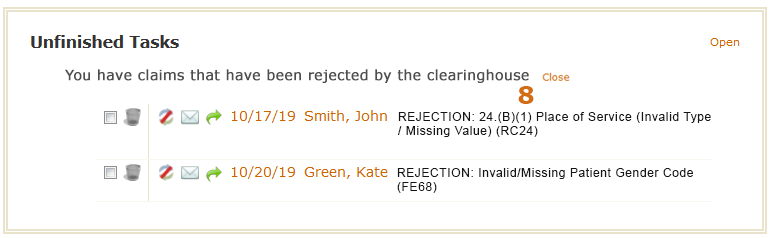
We'll discuss each of these tools separately by using the numbered mockup below:
-
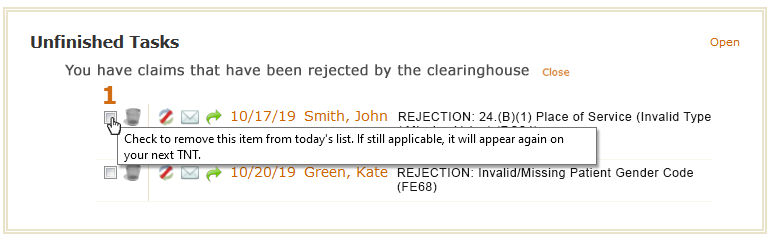
Put Off tool: The first tool is the Put Off tool. As described above, checking the checkbox allows you to mark an item off of this list if you don't want to address it now but plan to in the future. The Put Off tool removes the item from this current TNT but - assuming the conditions of being rejected by the clearinghouse still apply - it will appear again on subsequent TNTs. Hovering over it shows you a message explaining the functionality:
Delete tool:
In contrast, the second tool for clearinghouse-rejected claims is the Delete tool: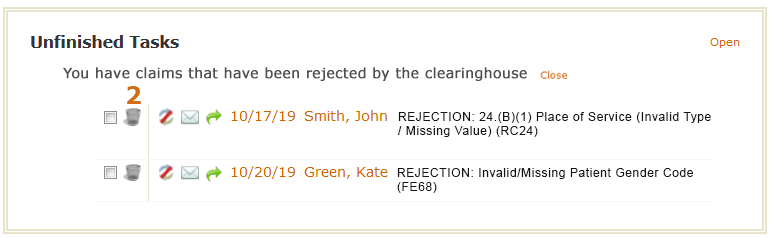
The Delete tool, symbolized by the trash can icon, is used throughout PSYBooks for permanent deletions. The hover message you're shown when your cursor is on a Delete tool indicates the same:
However, notice that what you're deleting is NOT the claim, but rather, its appearance on your TNT as being rejected by the clearinghouse. Let's say, for example, that you've seen the rejected claim and determined that you don't need to do anything further with it. There might be reasons you want to maintain a record of it in your app, but you would not want to be continually reminded of it on your TNT. The Delete tool gives you a way to take care of that.
Status Indicator tool:
 The first tool after the gold line is the Status Indicator tool. This is the same status icon used to indicate clearinghouse-rejections in the Reports > Claim Status tool. It has the same function here that it does there, i.e., you can hover over it to see the rejection code for the claim. However, in the TNT, the rejection code is written out for you in this table, so the main purpose of this tool is to give you a visual representation of where the claim is in the payment process, i.e., it's been rejected by the clearinghouse as opposed to being an insurance company rejection.
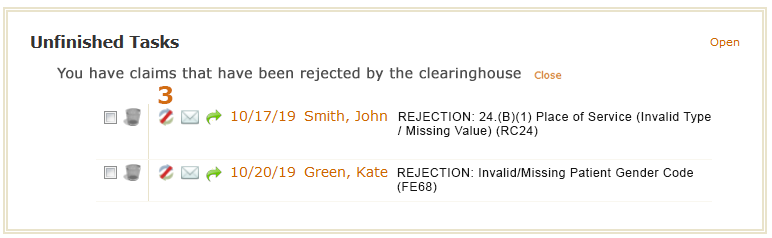
Send Mail tool:
 The fourth tool is to allow you to easily email the client to whom this claim pertains. This tool is put here because sometimes, when a claim is rejected, you need to contact your client to get additional information. Although there are other ways to email clients in the app, having this tool here makes it more convenient when you have a rejected claim. In the mockup, we can see that this particular claim is for John Smith, so clicking the Send Mail tool would allow you to email John right from the TNT.
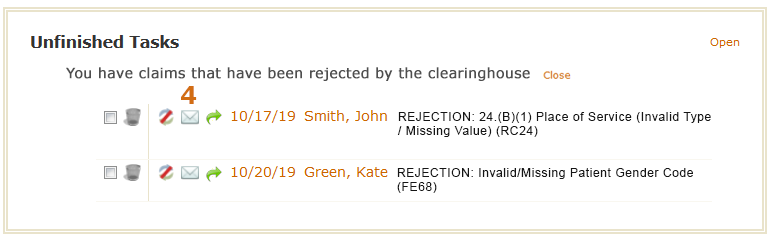
-
Resubmit tool:
 Once you've finished making all the edits you need to make on the form, you can resubmit the claim right from the TNT, using this Resubmit tool.
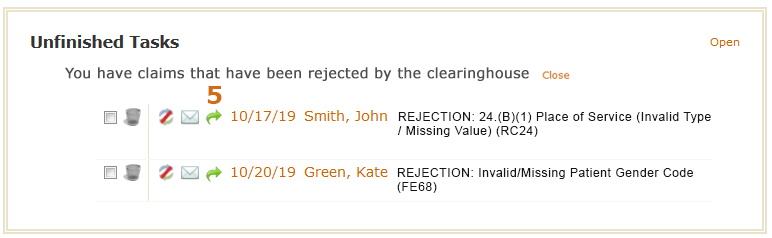
-
Date of Service link (Edit Session form): Another thing we sometimes need to change when we get a rejected claim is some field on the Edit Session form. For example, if our Rejection Code says "REJECTION: 24.(B)(1) Place of Service (Invalid Type / Missing Value) (RC24)," that likely means you need to choose a different option on the "Place of Service" dropdown on the Edit Session form. Clicking the Date of Service link opens the Edit Session form for this claim, allowing us to make the change here instead of having to go back to Charts to make the change.
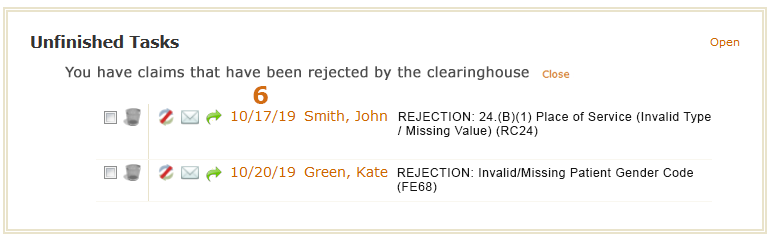
Client Name link: Similarly, another common tool you might need to correct a rejection from the clearinghouse is the Edit Client form. Maybe you forgot to enter their address - or maybe the address you entered isn't the one on file with the insurance company. You can make those kinds of changes by clicking the Client Name link on the TNT. That will bring up their Edit Client form.
Rejection Code: The final tool is a copy of the rejection code PSYBooks received from Office Ally, our clearinghouse. Notice that Office Ally writes these rejection codes - not PSYBooks. Because of that, if you need to get more information about what's needed for the claim to go through, you can often Google a rejection code like this. Sometimes it helps to include "Office Ally" in your search string. For example, if you had the rejection code "Invalid/Missing Patient Gender Code (FE68)," you could Google "Office Ally Invalid/Missing Patient Gender Code (FE68)" and find more information about what you need to do to fix the error.
-
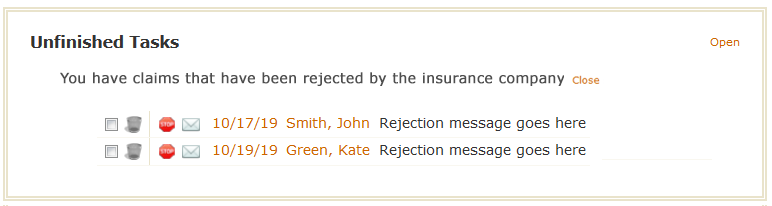
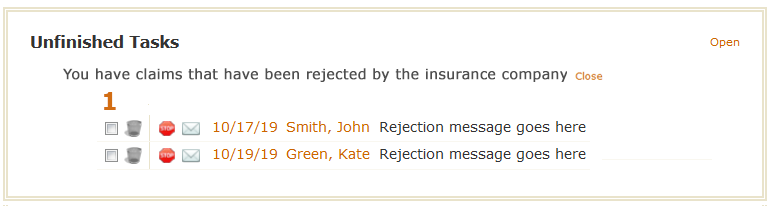
You have claims that have been rejected by the insurance company
The next category of items that could appear in the Unfinished Tasks section of your TNT are claims which made it through the clearinghouse, but were subsequently rejected by the insurance company. When this section is opened, the individual items inside look something like this:
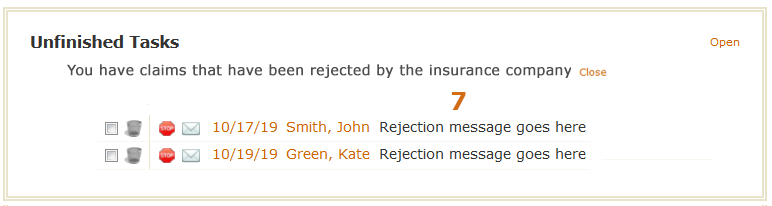
Although the tools for this type of task are almost identical to the ones described above for clearinghouse rejections, there are some minor differences, which will be discussed below, based on this mockup:
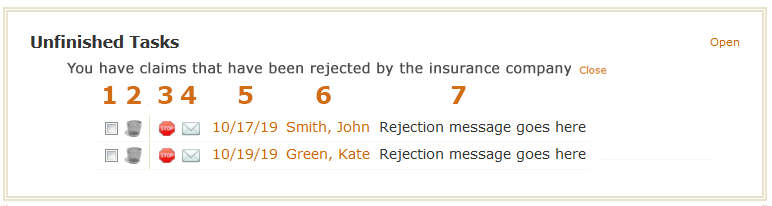
Put Off tool: Once again, this tool allows you to mark the item off of your TNT but have us save it so you can come back to it later.
Delete tool:
As elsewhere, the Delete tool permanently removes the item from future TNTs - whether the claim is ever accepted by the insurance company or not.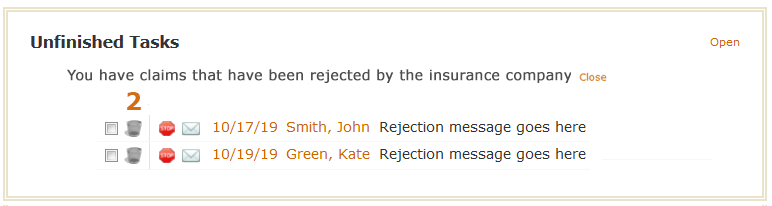
Status Indicator tool:
 The third tool is just a Status Indicator icon - the same one used on Reports > Claim Status - to indicate a rejection from the insurance company. Hovering over this icon will allow you to see the rejection code.
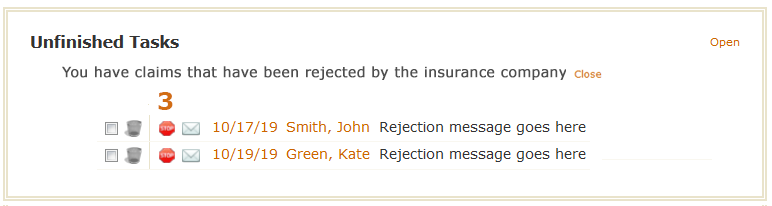
Send Mail tool:
The fourth tool allows you to email your client, e.g., you might need to get additional information from them about why the claim was rejected.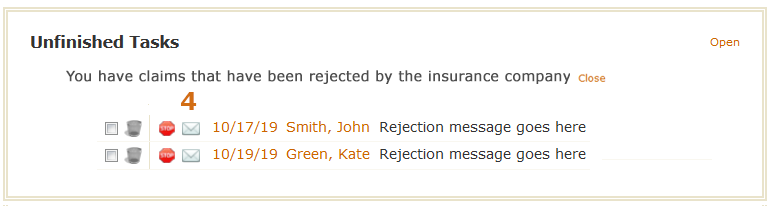
Date of Service link (Edit Claim tool): The fifth tool will open PSYBooks' Edit Claim tool. This tool is currently being beta tested but will launch soon. The Edit Claim tool is the main difference between dealing with a clearinghouse rejection vs a claim that has been rejected by the insurance company. Once a claim has been rejected by an insurance company, if you don't let them know that you're editing the claim and resubmitting it, the insurance company will most likely reject it, assuming it's a duplicate claim you made in error. The Edit Claim tool will allow you to make any edits to the claim that you might need - right on a copy of the CMS form - and then resubmit it to the insurance company in a way that lets them know it's an edited claim. By resubmitting with the Edit Claim tool, the insurance company knows this is a claim with new information you want them to consider instead of a duplicate claim.
Client Name link: Clicking the client's name will open their chart, allowing you to make any changes you might need to make there.
Rejection Code: The final tool is a copy of the rejection code the insurance company sends back to PSYBooks. Although the wording of these codes varies among insurance companies, often they will reference the exact line on the CMS form that contains the error. You can then use the Edit Claim tool (by clicking the date of service link on this row) to make the changes on the CMS and resubmit.
You have past appointments that do not have corresponding sessions
This unfinished task tells you that you have one or more client appointments on past dates on your PSYBooks calendar for which you have not yet entered a session. When you open this item, you might find entries similar to these:
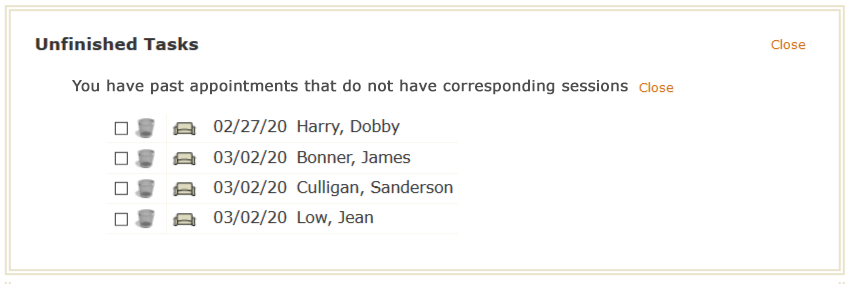
There are only three tools here: the familiar Put Off () and Delete (
) tools that we've seen elsewhere and the couch icon ( ) that's used on the PSYBooks calendar to open the Add Session tool. Here's what those tools do on this section of the TNT:
- Put Off tool: Checking the checkbox will mark that item off of this TNT. Unless you enter the session or delete the calendar appointment, this task will appear on the next TNT so you can be reminded of it again.
- Delete tool: The Delete tool will permanently remove this item from this and future TNTs, even if a session never gets added for this appointment.
- Add Session tool: Clicking the Add Session tool allows you to actually complete the task by adding the session for this appointment. This also removes the item from your TNT because it will no longer be an unfinished task.
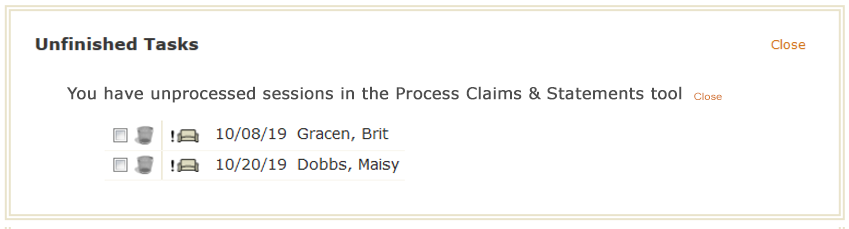
You have unprocessed sessions in the Process Claims & Statements tool
People sometimes save claims in the Process Claims & Statements Tool and forget they're there. Obviously, they won't get paid for claims that are sitting in the Process Claims tool and haven't been filed. This TNT task will remind you when you have unprocessed claims or statements in the Process Claims & Statements tool. When you open it, it will look something like this:
Again, there are only three tools here: the Put Off () and Delete (
) tools and the "pending" couch icon ( ) that's also used on the PSYBooks Calendar as an Add Session tool when a claim is in the Process Claims & Statements tool. Here's what those tools do here:
- Put Off tool: Again, the Mark Off tool removes the item from this TNT only. It will appear again on your next TNT if this session is still in the Process Claims & Statements tool.
- Delete tool: The Delete tool permanently removes the item from this and future TNTs, even if this item remains in the Process Claims & Statements tool.
- Add Session tool: The Add Session tool can be used to actually complete the task by adding the session for this appointment. This also removes the item from this and future TNTs because the claim will be out of the Process Claims & Statements tool.
You have sessions that do not have finished client payments
This task alerts you when you have entered a session and may have neglected to collect or enter the client's payment. Opening this item on the TNT will produce a screen similar to this:
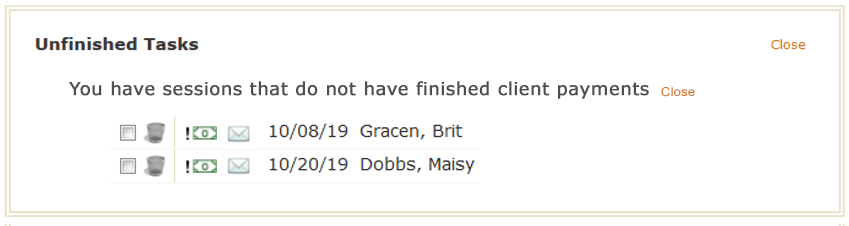
There are four tools to help you with this task: the Put Off () and Delete (
) tools plus the same Add/Finish Client Payment tool ( ) that's used on the PSYBooks Calendar. The fourth tool is the Mail tool () that allows you to email the client in case there might be issues you need to let them know about. The Put Off and Delete tools have the same uses we've seen elsewhere, i.e., the Put Off checkbox removes an item from this TNT only or the Delete tool removes an item from this and all subsequent TNTs. Clicking the Add/Finish Client Payment tool will open a window similar to this:
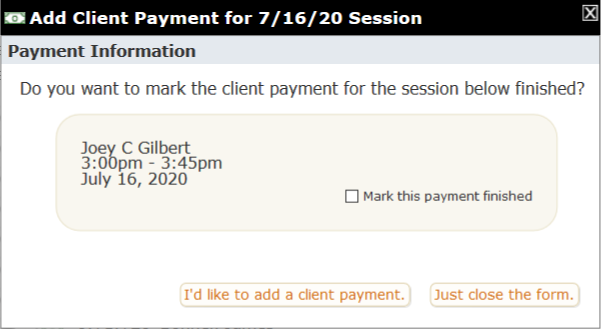
Notice that this form allows you to enter the client payment (the left button at the bottom) or to mark the payment as finished without actually entering a payment (the checkbox in the shaded gold area). If you choose to add a client payment, once you've allocated it, you'll be asked at that point if you want to mark the payment as finished. Until the payment is actually marked finished, it will continue to appear on your TNT. This will allow you to enter partial payments and have a way to be reminded via the TNT that there's still an outstanding balance.
You can read more about finishing client payments here.
You have sessions that do not have notes
PSYBooks tracks Session Notes, Open-Ended Notes, and all four of the special note types, i.e., Progress Notes, Treatment Plans, Intake Note and the Mental Status Exam (MSE) for this TNT entry. If you enter a session and include any of the notes above, the task will be considered complete and you will not get this TNT notification. However, if you do not, this notice will appear to remind you. As with other TNT entries, when you open it, you will not only get additional information about the item, but also tools to complete the task. Opening a session without notes entry will show something like this:

You can now see the session date (6/7/24) and client name (Simika Childers) that triggered this notification. After the familiar Put Off and Delete tools, is a note icon. Clicking the note icon opens a small window like this:
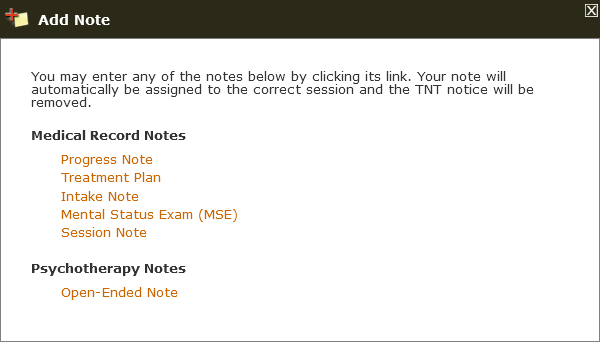
This window provides links to the six different note types you can enter to satisfy this requirement and indicates which ones are marked as Medical Record Notes and which are designated as Psychotherapy Notes, i.e., your personal notes about the session. Adding any one of these notes will remove the item from the TNT. If you want to add more than one note to any session, you can go to the Notes tab of the client's chart and add them there, attached to the session you need.
You have notes that have not been signed
This notification is similar to the one above except here, the note has been written but not signed. Opening it gives more detail:
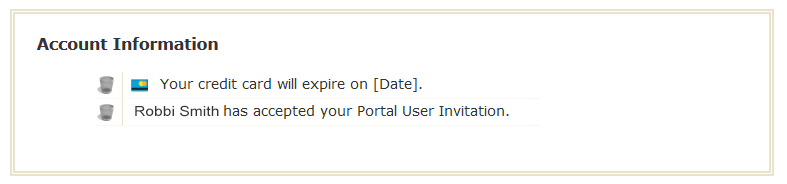
Account Information
The final section of the TNT is called Account Information. You probably won't see this section on your TNT often, because its purpose is to alert you to things in your PSYBooks account that may not happen frequently. Currently, this section is used to notify you when Portal Users, Admins and other Subscribers have been added to your account. The Account Information section of the TNT is also very useful in tracking Custom Forms you've sent and received.
The TNT Counter
In addition to the tools discussed above, the TNT also has a Counter tool that appears by "My Reminders" in the black status bar when new items have been added to your TNT. This can help you stay on top of practice management tasks as they come in, without having to keep checking manually:

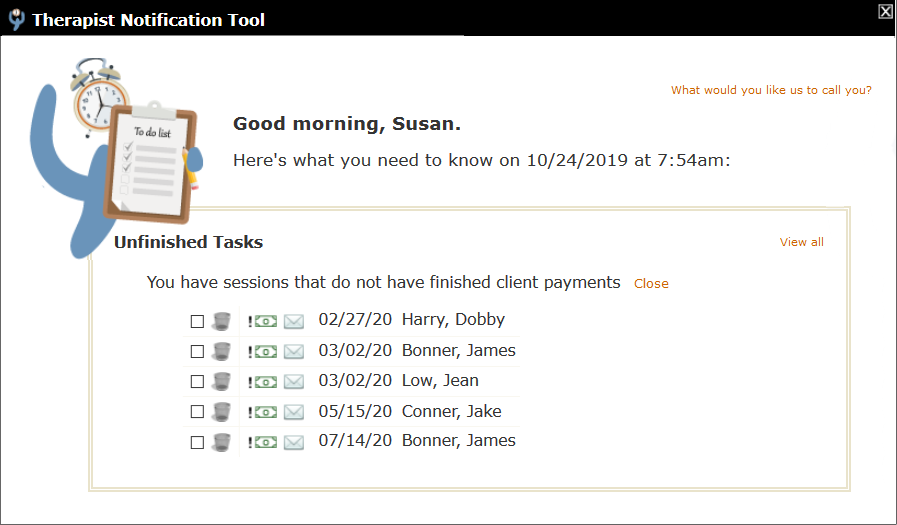
The Counter gets triggered by any type of TNT notification. In other words, although we can see from the screenshot above that we have five new notifications on our TNT, we don't know what they are. They could be interoffice memos, indications that we have a Custom Form to check, or any of the other potential items that are displayed on the TNT. Also, notice that the Counter is triggered by individual items, not sections or categories. For example, it could be that all five of the items listed in the Counter above are from unfinished client payments. When you open your TNT, it would look something like this - notice that it only has one section (Unfinished Tasks) and one category within that section (unfinished client payments):
When you view the unfinished client payment category, you'd see the five individual items that the Counter is referencing:
There are two possible ways you can cause the number in the Counter to decrease: by completing the items or by using the Delete tool to delete them. Using the Put Off tool does NOT decrease the Counter since technically, those items are still present in the TNT - they're just hidden from the current view. For example, in the sample above, you might look at each of the items and determine the following:
- Harry Dobby's insurance paid the full amount for the 2/27/20 session so no client payment is due.
- James Bonner paid you at his last session for both of the sessions listed here, but you haven't entered the payment yet.
- Jean Low has made a partial payment for the amount due on this session, but still has an outstanding balance.
- The Jake Conner session was entered in error, but you haven't deleted it.
Based on that information, you could:
- Click the Add/Finish Client Payment tool (
 ) to enable you to mark the client payment on Harry Dobby's 2/27/20 session as finished.
 - Enter the payment for James Bonner, allocate it and finish both of the sessions listed here. (Again, this can all be done here on this form with the Add/Finish Client Payment tool.)
- Use the Put Off tool () for the Jean Low session, since this client payment isn't finished and you may want to be reminded again.
- Use the Delete tool on Jake Conner's row, because you don't need to be reminded of it again. You may or may not also want to go back and delete the session, since it was entered in error.
By taking those steps, your TNT notification Counter would go from five to one - the one remaining item being for Jean Low's session, which we marked off.
Once Jean Low completes her payment for the 3/20 session, assuming no new items get added to the TNT, the user can mark that final item off. Any time there are no remaining items on the TNT, you'll get a congratulations message:
TNT Settings
PSYBooks gives you control over what appears on your TNT. You can access these settings by clicking My Profile in the black bar at the top, then Settings & Preferences on the left nav. The window that opens looks like this:
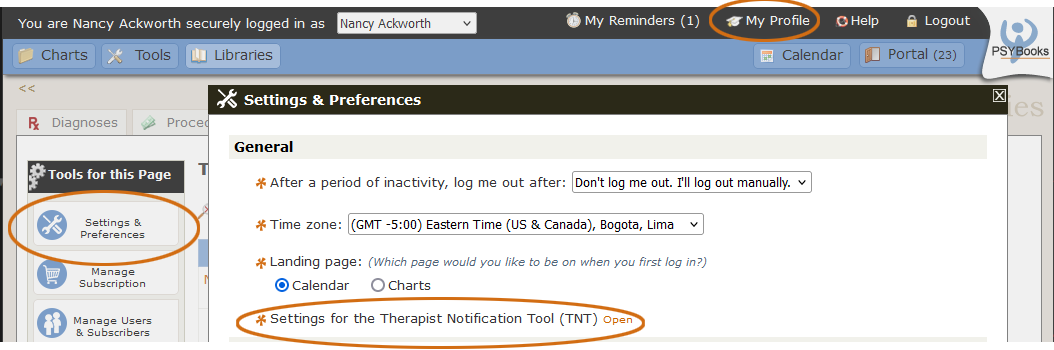
When you open the orange link by Settings for the Therapist Notification Tool (TNT), you'll see a list of choices you can make about this tool:
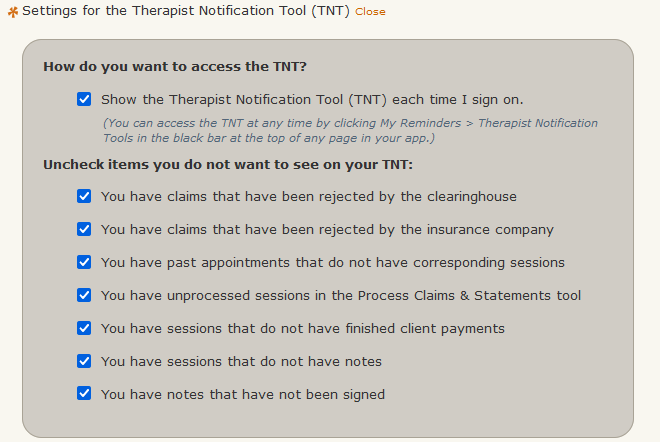
The top one addresses whether you want the TNT delivered each time you open the app. Each of the others is one of the Unfinished Tasks. There are also some "batch delete" tools that will allow you to clear all entries so you can start fresh:
TNT Admin Accounts
It's important to know that the ONLY type of PSYBooks Users that have access to the TNT are those who have been marked as Admins on the Add/Edit User form: (Note: In GOI and Group accounts, only the Master Clinical account holder can create Admins for the practice.)

Users who are not marked as Admins will not see your TNT when they log in to your account, nor can they access it. The only way you can give a regular User access to your TNT is by making them an Admin. The TNT is designed to be a set of tools specifically for the therapists in your office and your staff. If you're in a solo practice without Admin Users, you'll be the only one who ever sees your TNT.
When an Admin logs in to their account, they're actually logging in to the subscriber's account. This allows office staff to do the work they need to do on the therapist's records. On the TNT, this is true for everything EXCEPT the "My Reminders/Interoffice Memos" section at the top. In some ways, the Reminders/Memos section of the TNT is like an email account. Each person in the office - all subscribers and also all Admins - will have their own separate Reminders/Memos section on the TNT. That allows Admins to set reminders for themselves and to send and receive memos in their own name to others in the office. Therefore, when an Admin first logs in, they'll be presented with the therapist's TNT but any items they have in the "My Reminders/Interoffice Memos" section will be their own:
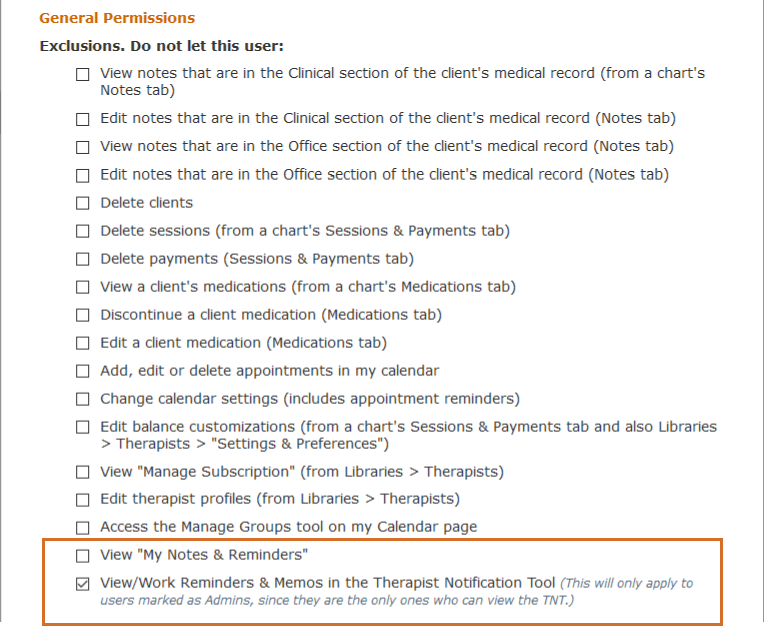
By default, an Admin can't view or work with the subscriber's Reminders and Memos. They have the type of setup shown above. However, there may be some subscribers who want certain members of their admin staff to be able to send and respond to Memos on their behalf. There are two related but separate permissions on the Add/Edit User form that address this: The screenshot was taken from the Associate Permission Level. Clinical Permissions also have the two highlighted items.
The first item determines whether or not the User can access your "My Notes & Reminders" page. Although this page is separate from the TNT, some parts are related in that it holds both the therapist's Personal Notes (which were never part of the TNT) as well as their Reminders and Memos (which were at one time saved from previous TNTs). The two types of items on this page are differentiated by the use of different colors as well as the labels and icons on the right of the color bars:
When Users - both Admin Users and regular Users - have permission to view "My Notes & Reminders," which is the default, they can view any Personal Notes and/or Reminders/Memos that the subscriber has saved to this page. (As discussed above, Admin Users will also be able to see their own version of this page.) If you do not want the User to be able to see those items, check the box beside the "View My Notes & Reminders" permission to exclude it:

The second permission that pertains to the TNT is:

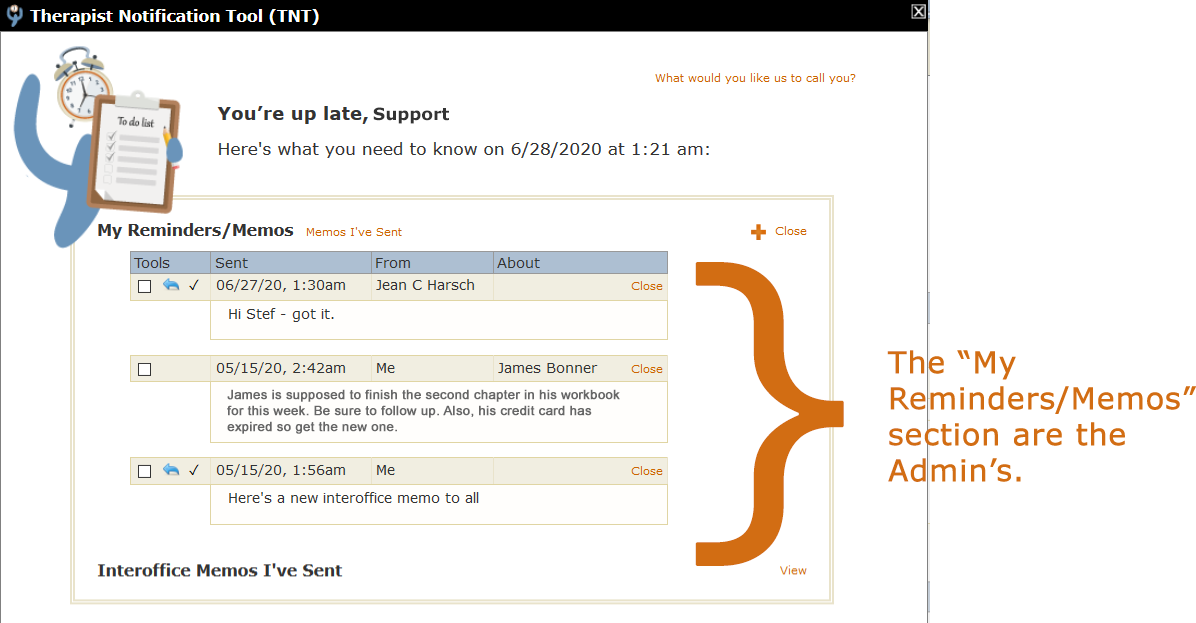
Notice that this permission is excluded by default. In other words, Admin users do NOT have permission to view or work the "My Reminders/Interoffice Memos" section of your TNT unless you uncheck this box. This permission is very specific. It's not saying that Admins can't view and work your TNTs. They can. It's only saying that they can't work that top "My Reminders/Interoffice Memos" section of the TNT. This is the default scenario discussed earlier where all items in the My Reminders/Interoffice Memos section are those that the Admin has sent and received:
Since Reminders and Memos can be saved from the TNT to the "My Notes & Reminders" page, that means that for Admin accounts (not all Users), the "My Notes & Reminders" page also belongs to the Admin. When an Admin goes to the "My Notes & Reminders" page, they're seeing their own data that they've saved to that page - not the therapist's data. Also, once on the "My Notes & Reminders" page, the Admin can ALSO use both the "Add Personal Note" and "Add Reminder/Memo" tools as their own. This gives Admins the same full range to all tools used for interoffice reminder and communication purposes - just like the therapist has. Admins can set Reminders for themselves - or create Personal Notes for themselves - and no one but that Admin will be able to view them.
If you want an Admin to be able to work that section, uncheck the box. Notice that giving permission for this section of your TNT also allows access to the "My Notes & Reminders" page.
Admin users that DO have permission to view your Reminders and Memos will have a toggle button like this on their TNTs:
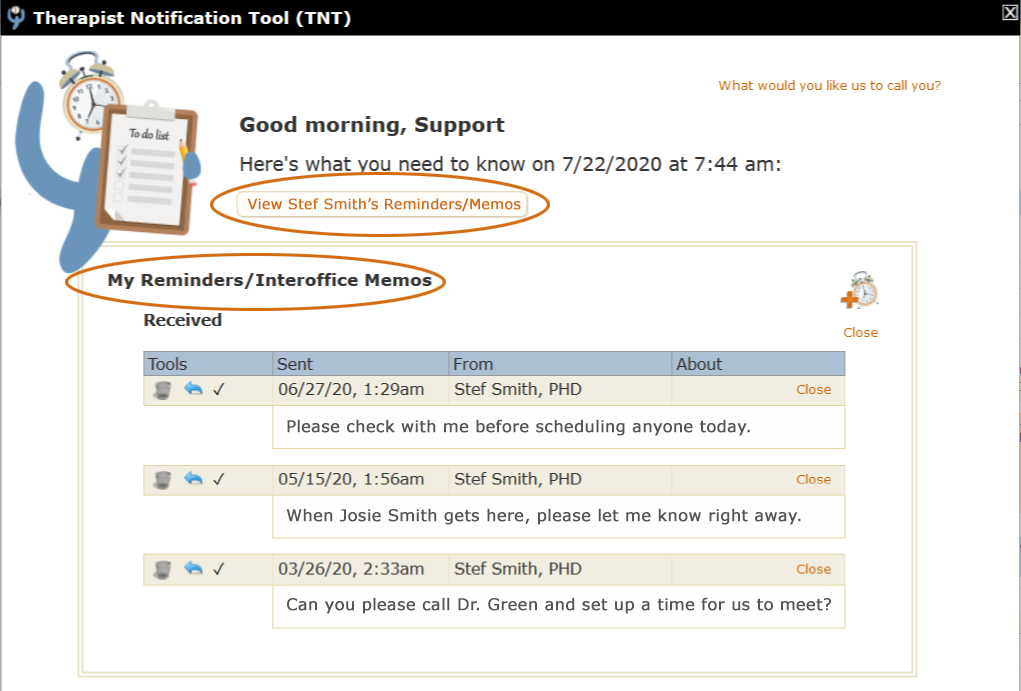
When the Admin first signs in, they're seeing their own reminders and memos in the top section. However, they can click the "View Stef Smith's Reminders/Memos" toggle button and view the therapist's reminders and memos instead of their own:
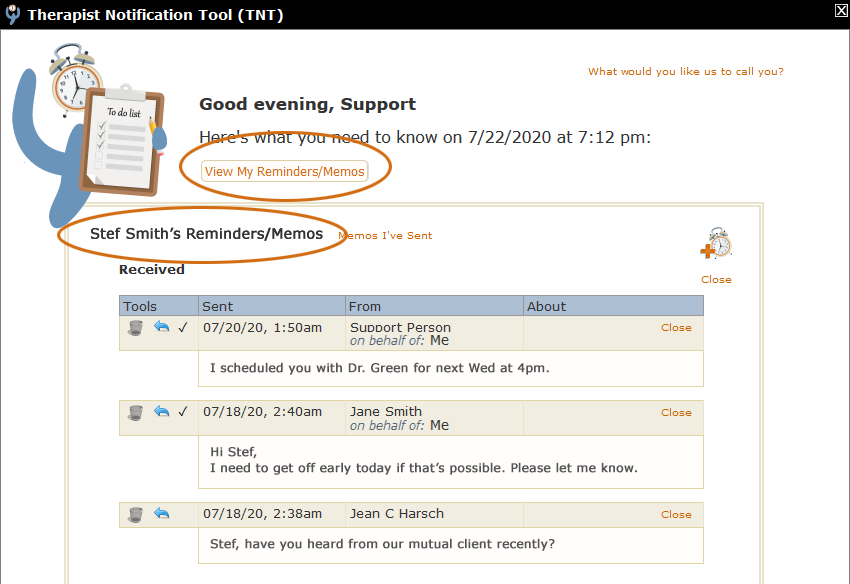
Now the Admin - in this case "Support Person" - is viewing the subscriber's memos. The text on the toggle button has changed from "View Stef Smith's Reminders/Memos" to "View My Reminders/Memos" and instead of "My Reminders/Interoffice Memos," the header for this section has changed to "Stef Smith's Reminders/Interoffice Memos."
Note also that this will allow the Admin to view memos they sent to the therapist (e.g., the top memo is from Support Person) and also any memos other Admins in the office may have sent Stef (e.g., the second memo is also from an Admin since it is designated as being sent "on behalf of: Me.") The third memo on this page is from another subscriber in the office.
Like the My Reminders/Interoffice Memos section of the TNT, the Notes & Reminders page also belongs to the person who has logged in, regardless of who actually owns the account. For example, when a therapist logs in, everything on their Notes & Reminders page belongs to them, e.g., they might have Personal Notes they've written to themselves and/or Reminders or Memos they've saved from their TNTs. Similarly, if an Admin logged in to the same therapist's account, they would see any Personal Notes, Reminders of Memos they (the Admin) have saved to the system.
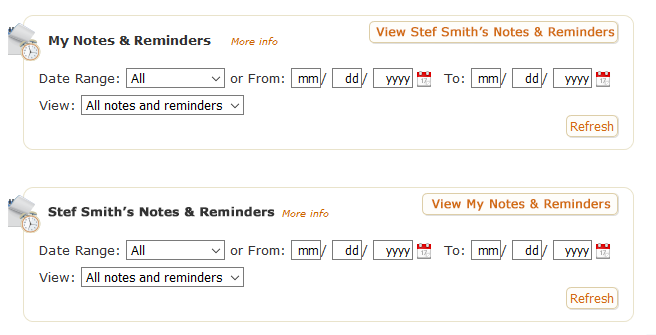
However, in cases where the therapist has changed the Admin's permission from the default, thus giving the Admin the ability to see their Notes & Reminders page, the Admin's page would have toggle buttons, like we saw on the TNT, that would enable them to switch between the two accounts (the initial view the Admin sees when they first sign in is on top; the view where they've toggled to the therapist's view is on the bottom):
If you're confused about the two permissions that affect the TNT and My Notes & Reminders page, hopefully the following will help:
The 'View "My Notes & Reminders"' permission:
Default: All Users, Admin & Regular, can view the therapist's "My Notes & Reminders" page. Admins will have a toggle so they can go between their own Notes & Reminders and those of the therapist.

Checked: No Users, whether Admin or Regular, can view the therapist's "My Notes & Reminders" page. Admins will be able to see their own "My Notes & Reminders page but will not be able to toggle to see the therapist's account.
The 'View/Work Reminders & Memos in the Therapist Notification Tool' permission:
Default (checked): Admin Users will only see their own Reminders and Memos on the TNT. They will not have the toggle button to allow them to see the therapist's Reminders/Memos. Non-Admin Users cannot access the TNT so this permission doesn't apply to them.
Unchecked: Admin Users will have a toggle button to allow them to see and work with their own reminders, plus those of the therapist. Non-Admin Users cannot access the TNT so this permission doesn't apply to them.
