

Manual Index
-
Chapters
The Manual is divided into seven chapters. Click a chapter title to display that chapter's table of contents in the area below.
Chapter Four
Tools
- Intro to Tools
- Files, Forms & Templates
- Reports
- My Notes & Reminders
PSYBooks Manual
Chapter Four
Clearinghouse Reports
What this isThe Clearinghouse Reports section holds those reports that provide feedback from the clearinghouse regarding claims you've efiled. There are also tools allowing you to work with this informtion. There are two reports in this section: Claim Status and ERAs (Electronic EOBs).What it looks likeThe Clearinghouse Reports are on the left nav of the Reports section about half way down: 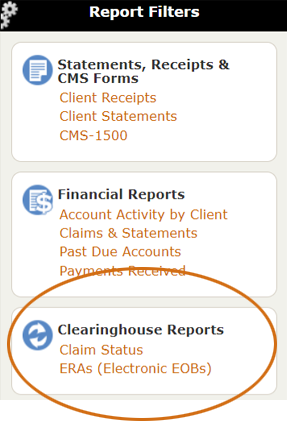 |
Where this isThe Clearinghouse Reports are on the left nav of the Reports tab of the Tools section. |
The Clearinghouse Reports section holds two report filters: Claim Status and ERAs (Electronic EOBs). Each will be discussed separately below:
Claim Status
When you first click the Claim Status report, the filters will look like this:
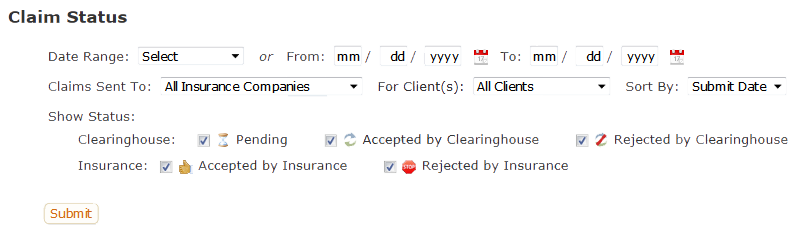
As you can see, you can filter by date range, insurance company, client and status. Also, although the first sort for this report is by insurance company, you can choose whether the second sort is by submit date or by client.
The status filters are divided into two rows - one for the status conditions that apply to the clearinghouse (Pending, Accepted by Clearinghouse, Rejected by Clearinghouse) and the other for the insurance company statuses (Accepted by Insurance, Rejected by Insurance). To understand what these mean, we need to understand the various stages a claim goes through as it's processed. Those stages are:
- The user sends a claim to the clearinghouse, either at the time the session is entered or by using the Process Claims & Statements tool. Between the time the claim is sent and the time the clearinghouse responds, PSYBooks displays the Pending icon:
 .
. - The clearinghouse receives the claim and checks it for obvious errors (e.g., the omission of something essenial such as a zip code or birthday.).
- The clearinghouse then sends the provider the results of its findings. If there are no obvious errors, the clearinghouse forwards the claim to the insurance company and simultaneously sends the user an acceptance message, represented in PSYBooks by this icon:
 . If there were errors, the claim is NOT sent to the insurance company and, instead, the user is sent a clearinghouse rejection message, represented by:
  . In most cases, the rejection messages will indicate what the specific errors are so the user can correct them and resubmit the claim. (Claims resubmitted at this juncture will NOT trigger a duplicate claim rejection from the insurance company since the claim hasn't yet made it to the insurance company.)
 - Assuming the clearinghouse accepts the claim and forwards it to the insurance company, the user will now receive either an acceptance or a rejection message from the insurance company. An acceptance message usually means that the provider can expect to receive an EOB or ERA and, if other conditions are met, a payment from the insurance company within a few days or weeks. The insurance acceptance icon is:
 . Conversely, if the insurance company rejects the claim, the provider may or may not receive an EOB or ERA but they will not receive a payment. The icon for an insurance rejection is a stop sign:
  . Rejection messages usually provide enough information about why the claim was rejected for the user to take appropriate action. At the insurance level, rejection messsages are usually for things like wrong patient ID, patient doesn't have coverage, a required authorization was not obtained, etc. Although claims rejected by insurance CAN be corrected and resent from PSYBooks, this will sometimes result in yet another rejection because the insurance company will treat it as if it's a duplicate claim. If you're in doubt, check with the insurance company for the correct protocol for resending a corrected claim once it's been rejected at the insurance level.
Once you've selected the report filters you want for the Claim Status report and clicked Submit, the actual report will look something like this:
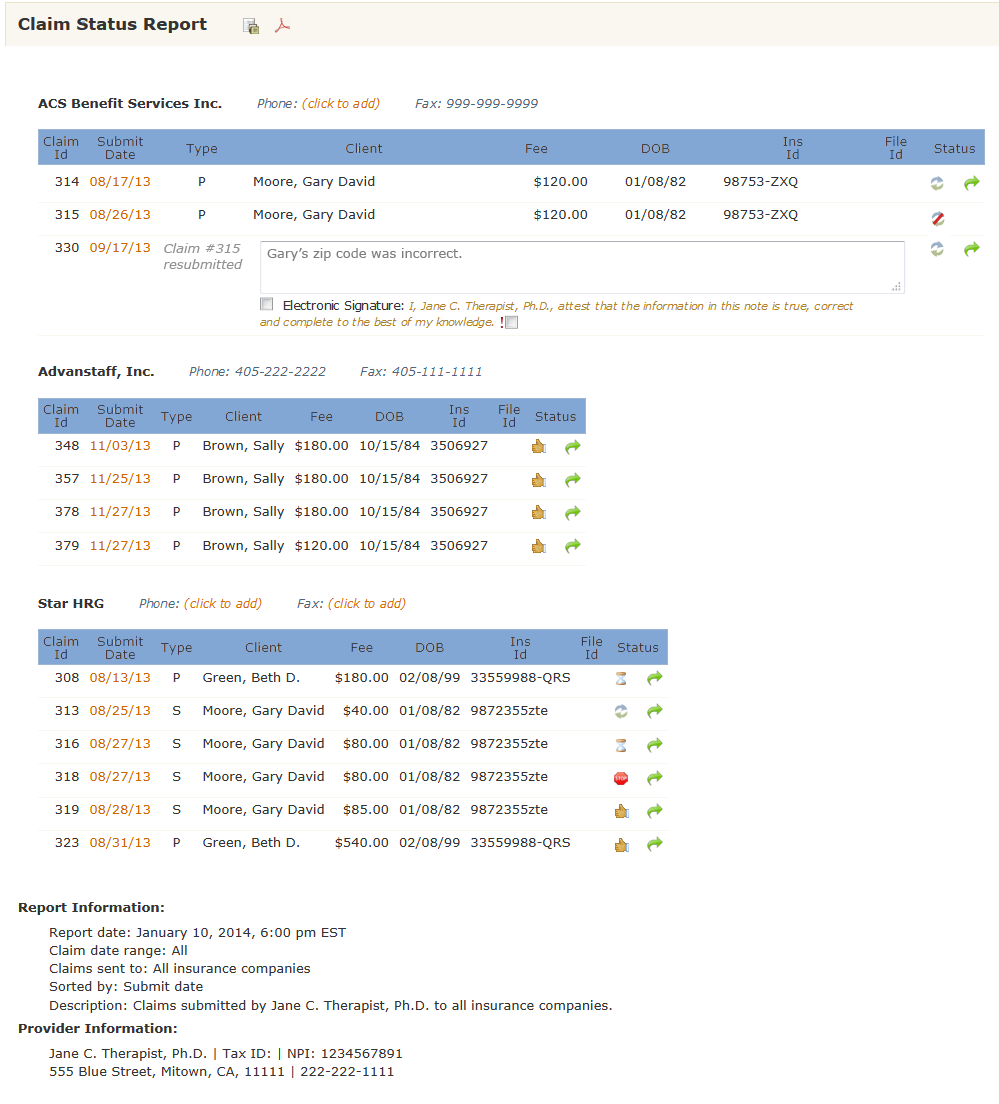
This report was designed to not only give you information about your claims, but also, to give you the information you might need in cases where you need to call the insurance company about a claim. Claims are grouped by insurance company and in the same row with the company name is a place for the insurance company's phone and fax numbers, if you've entered that information in the Library. If you haven't, PSYBooks allows you to enter it from this report. For example, the header row of the top insurance company from the report above looks like this:

If you click the "click to add" link beside Phone, a form similar to this one opens:
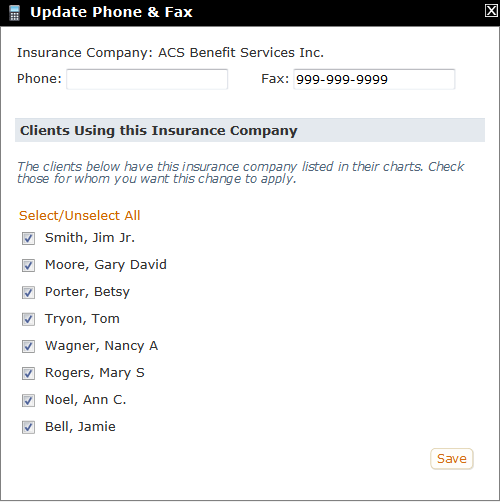
Adding or editing the phone or fax number is straightforward - you just make the changes in the appropriate textbox(es) at the top. Also, since insurance companies often have more than one phone number and these can vary from client to client, PSYBooks lists all clients in your app that use this insurance company so you can deselect those that you don't want to receive this update.
After the insurance company header row is the actual table of the report. Columns in the table along with a sample row would look something like this:

Starting from left to right, the Claim Id is an internal number assigned by PSYBooks. This is followed by the date you submitted the claim. The Submit Date is a link which will open a copy of your claim in case you need additional information such as the client's address. The Type column lets you know whether this is the client's primary (P) or secondary (S) insurance.
The next columns are the client's name, the fee you charged, the client's date of birth and the client's insurance ID - all information you may need if you're on the phone with an insurance company. After this is another internal reference number called the File ID.
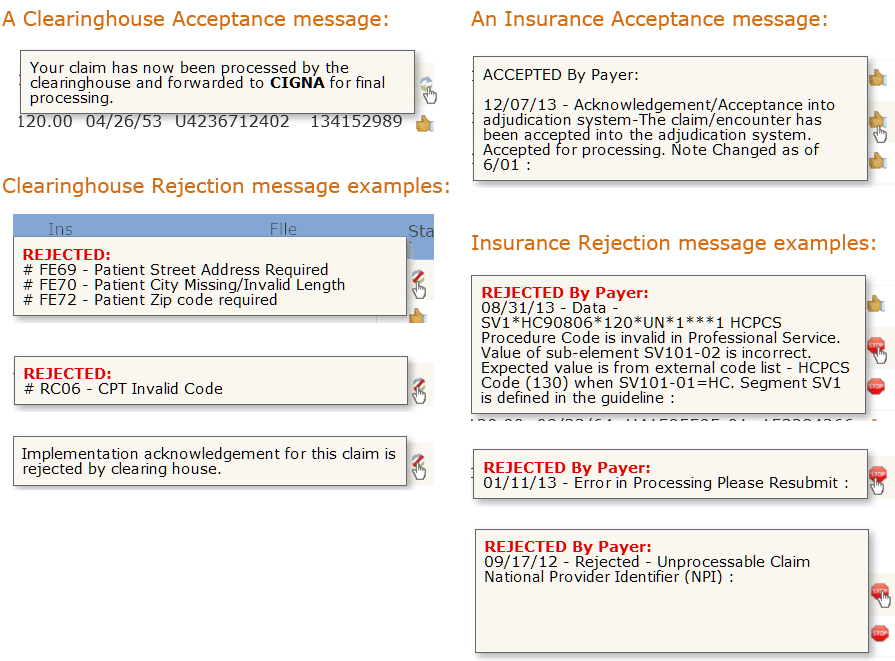
The final column, Status, contains two tools: the Status Indicator and, when available, the Resubmit tool (the green arrow). The Status Indicator is a "hover tool", which means you can hover your mouse over a status indicator and usually receive some additional information about your claim. This information is delivered to PSYBooks from the clearinghouse and/or the insurance companies so we have no control over the content of the messsages, or even whether we get one. As you can see from the examples below, some of these messages are more helpful than others:
Clicking the last tool in the Status column, the green Resubmit tool, opens this small window:
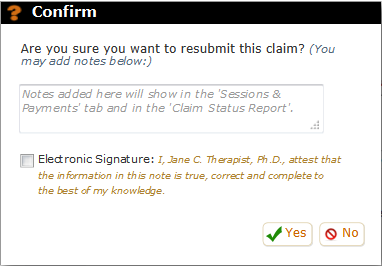
The purpose of this tool, in addition to making sure you didn't click the Resubmit button by mistake, is to give you a chance to write a note about why you're resubmitting the claim, what changes you made, etc. Notes written here do NOT get seen by the clearinghouse or the insurance company. They're for your records only.
- The user sends a claim to the clearinghouse, either at the time the session is entered or by using the Process Claims & Statements tool. Between the time the claim is sent and the time the clearinghouse responds, PSYBooks displays the Pending icon:
ERAs (Electronic EOBs)
The ERA Report is actually a report and a tool all built into one. As a tool, this report allows you to enter payment information from your Electronic Remittance Advice files (ERAs) into each client's chart - in most cases, just by clicking "Save". That function is discussed in the ERA Report Payment section above. In this section, we'll discuss some of the more advances features of the report, starting with the filters at the top:
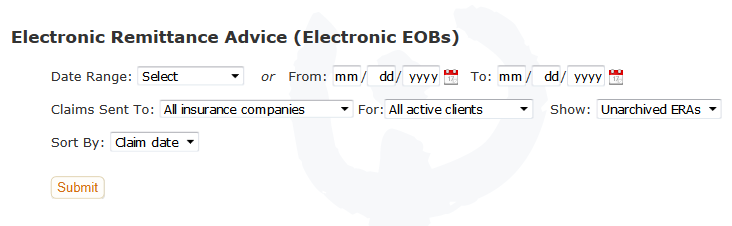
As you can see from the screenshot, the filters on the top row allow you to select the date range for the ERAs you want to view. In the middle row, you can select the insurance company (or leave it on "All insurance companies"), the client (or leave it on "All active clients") and whether you want to view all ERAs, only the unarchived ones or only the archived ones. Finally, on the bottom row you can choose whether you want to sort by claim date or by payer. Once you've run the report, additional tools appear on the report itself which will be discussed below.
Show/Hide All Sessions for All Claims. This is a global tool that appears as a link on the left above the table. It allows you to show or hide all sessions of all claims. By default, the session details for all claims are showing and the link says, "Hide sessions for all claims". Clicking that link makes the form look like this:
Notice that the link now says "Show sessions for all claims" and all rows under each claim have collapsed so that all we see are the parent rows. The magnifying glasses on each row no longer have the "x" over them, meaning that now if you click one, it will show you the sessions under that claim. You can also click the "Show sessions for all claims link" to open everything back up. This tool - like all show/hide toggles in PSYBooks - is only there to make your page easier to work with by allowing you to view more or less detail. Nothing else is happening behind the scenes.
ERA Report: Claim Level Local Tools
-
In addition to the filters and other global tools listed above, there are also four local claim level tools on the ERA Report - two in the Claim Tools column and two as links:

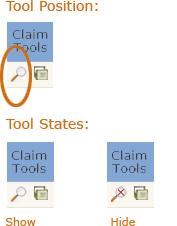
Claim Tools > Show/Hide Sessions. This is the local version of the "Show/Hide sessions for all claims" tool discussed above. You can use it to show or hide the detail on individual claims:
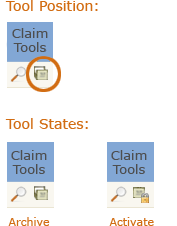
Claim Tools > Archive/Activate Claim. This tool allows you to archive claims that you've already processed so they don't clutter your workspace. Conversely, if you change the filters in the top part of the ERA Report to show your unarchived ERAs, you can then use the Activate state of this tool to bring a claim back to active status:
You may never need the Archive tool. Each time you save a session's ERA to your client's chart, you're given a confirm that asks you if you'd like to archive the ERA:

Clicking Yes will archive the claim so you don't have to use the Archive tool as a second step to keep your clients' accounts current.
There are two more claim level tools on the ERA report and they're both links that open files. Each is discussed below.
Link > View Claim. You can click the link in the Claim Date column to see a copy of the claim you sent to the insurance company that generated this ERA:

Link > View ERA. You can click the link in the Ref File column to see the actual ERA PSYBooks received from the insurance company. This is exactly the same thing you would have received from your insurance company had you gotten it any other way.

ERA Report: Session Level Local Tools
There are also quite a few tools for working with ERA data for individual sessions. Each will be discussed below.
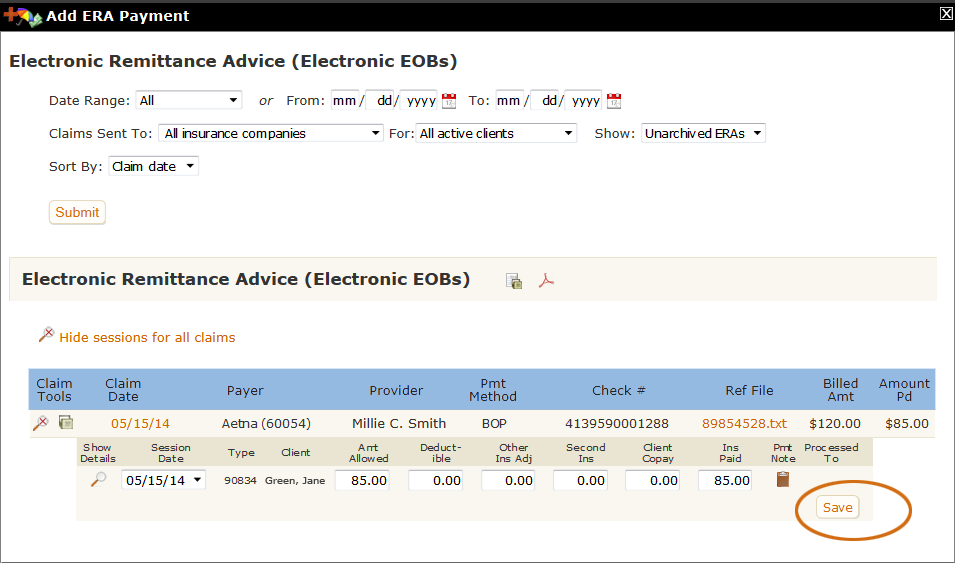
Show Details. This is the magnifying glass icon to the left of the session date in the Show Details column. Clicking it opens some explanatory text from the insurance company explaining their decisions. For example, in the example below, we can see that the client has not yet met her deductible, thus the entire allowed amount of $85 can be billed to the client:
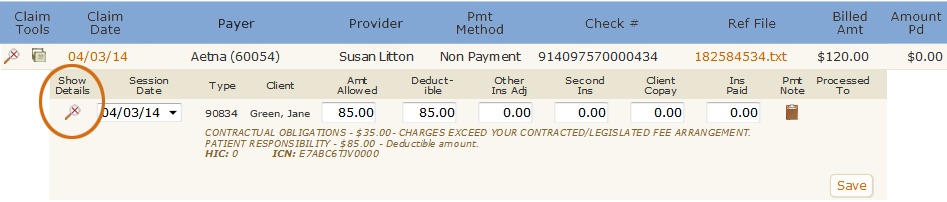

Everything else on the individual session row is pre-populated by PSYBooks. For example, in the screenshot above, $85.00 has been entered in the Amt Allowed column and Deductible columns, as per the instructions on the ERA. The amount paid by Aetna (the Ins Paid column) is entered as $0.00. Clicking Save will enter a $0.00 payment from Aetna in this client's chart and bill $85.00 to the client. However, if something looks amiss, you can click the Claim link and/or the ERA link discussed above to get additional information and make adjustments to any of the fields on this row. You can also click the clipboard if you want to attach a note to this claim.
The "Fix This ERA" Tools
Occasionally PSYBooks receives an ERA that can't be parsed automatically. When this happens, the "Save" button on the ERA is disabled, making it impossible to enter the ERA. There are many possible reasons for this, for example:
- The session may already have been processed to the client, which means it's not available to receive an insurance payment.
- The ERA payment might be a negative number, which isn't allowed. (Insurance companies sometimes send negative payments to adjust for a previous payment which was sent in error.)
- Entering the ERA might produce a negative balance for the session, which isn't allowed.
- The session may already have one or more ERA payments.
- The ERA may be for a session that does not exist in PSYBooks.
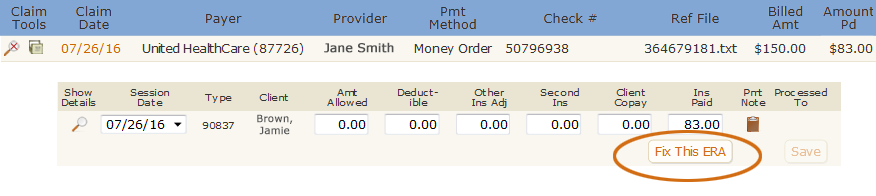
When PSYBooks receives an ERA that cannot be processed, a "Fix This ERA" button will appear beside the disabled "Save" button:
Clicking the button opens a set of tools that allow you to make changes to the ERA itself and/or to other payments that might have been allocated to the session. It looks like this:
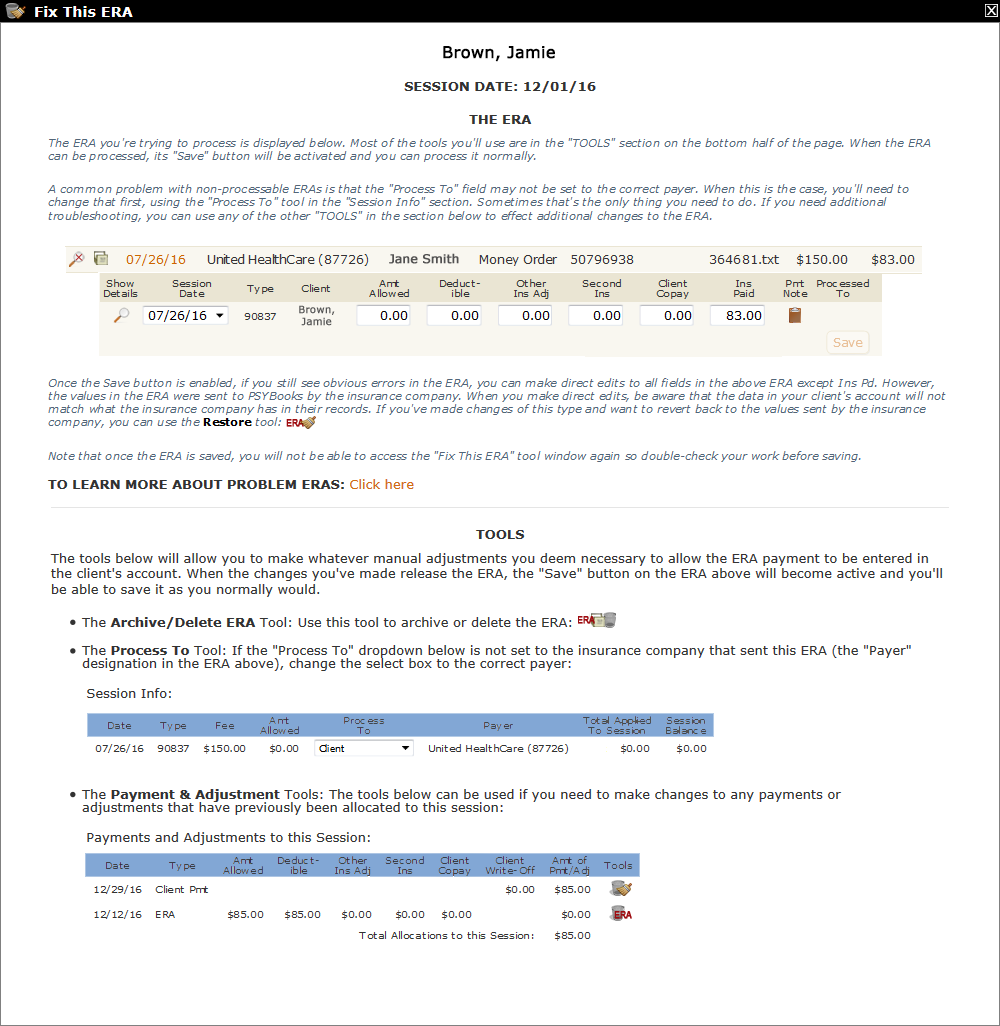
This interface may look intimidating at first, but breaking it down into its parts helps. Notice that there are two main sections: "THE ERA" at the top, followed by a line and then "TOOLS" in the bottom half. Each of these sections will be discussed below.
THE ERA. This section holds a copy of the actual ERA itself. The screenshot below is a detail from the Fix This ERA window above. Notice that the "Save" button is disabled just like it was on the regular ERA report because there are one or more issues that are preventing it from being processed:

As you use the tools to correct the issues with the ERA, the "Save" button will become enabled automatically when the ERA can be processed and you'll be able to save it like you normally would.
TOOLS. Despite the fact that the TOOLS section is the bottom half of the form, this is where you will need to begin when working with an ERA. There are three main tools in this section:
- The "Archive/Delete ERA" tool
- The "Process To" Tool
- The "Payment & Adjustment" Tools (there are several tools in this category)
Each will be discussed separately:
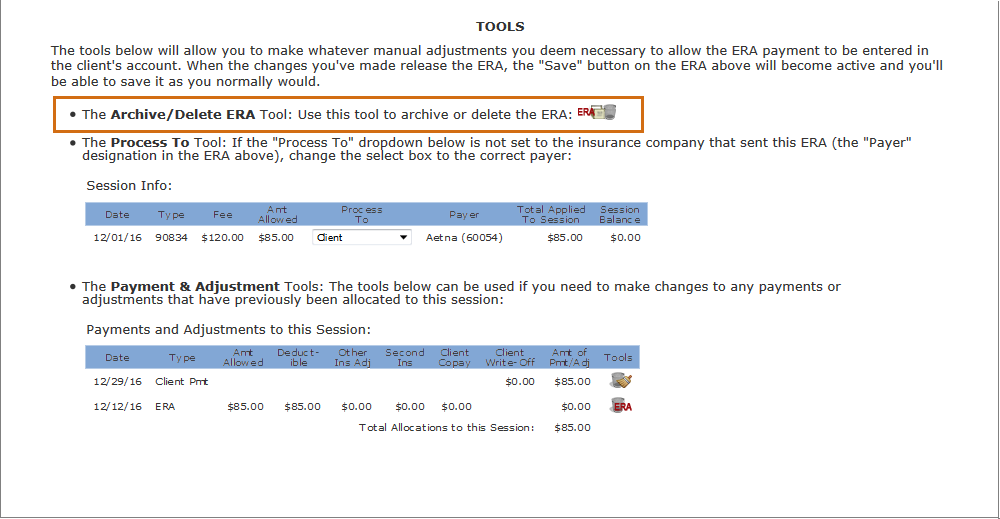
The "Archive/Delete ERA" Tool. This tool is probably the one you'd want to use if the ERA is a duplicate or some other type of erroneous ERA that you don't need. It offers two different methods for getting rid of the ERA without actually processing it. When you use this tool, none of the values of the ERA are added to your client's account or to your Payments Received report. The Archive/Delete ERA tool is the first one listed in the TOOLS section:
When you click the tool (the icon at the end of the line), this window opens:
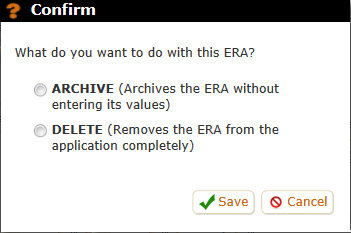
The difference between these two choices is that "Archive" will keep a copy of the ERA in your ERA report in case you want to maintain a record of having received it. It will be listed among your other archived ERAs. "Delete", on the other hand, will permanently delete the ERA from your account. You'd still be able to find it (with all its values) in your Activity Log as a deleted ERA, but it won't appear in any ERA reports you might run.
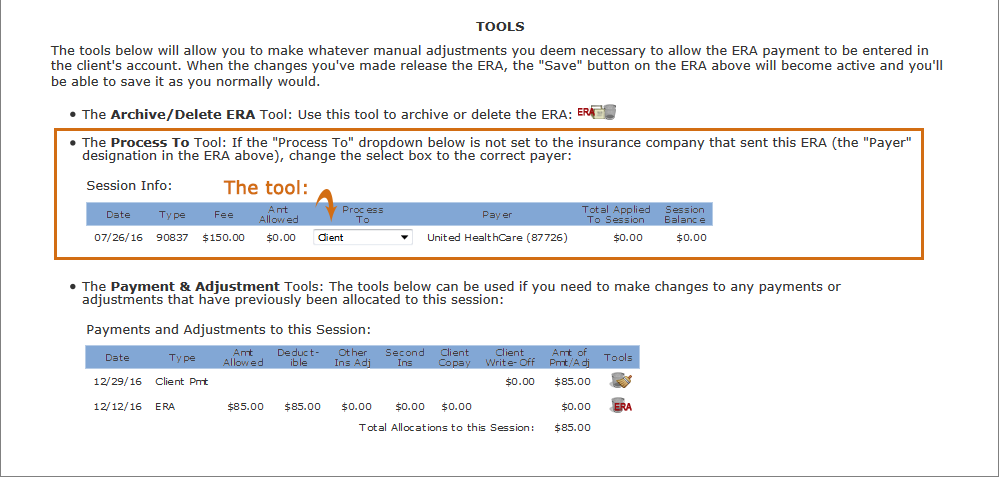
The "Process To" Tool. This is probably the tool you will use most often. The actual tool is the "Process To" dropdown box (i.e., the only thing you can change). Medical billing programs such as PSYBooks always process payments in this order: primary insurance company, secondary insurance company, client. Occasionally, for a variety of reasons, you need to be able to change that flow, i.e., to "process to" a different payer.
This situation can occur for a variety of reasons. For example, maybe an insurance payment comes in but is for the wrong amount. When you enter the insurance payment, the program will automatically send the remainder to the next payer on that client's list - either the next insurance company or the client. If you later receive some kind of adjusted payment from the initial insurance company, you wouldn't be able to enter it because the claim would have already been sent to the next payer.
This is the situation in the screenshot below. Notice that the "Payer" of the ERA is UnitedHealthCare, but the "Process To" box is set to Client.
If we click the Process To tool (the dropdown), we'll get something like the screenshot below:
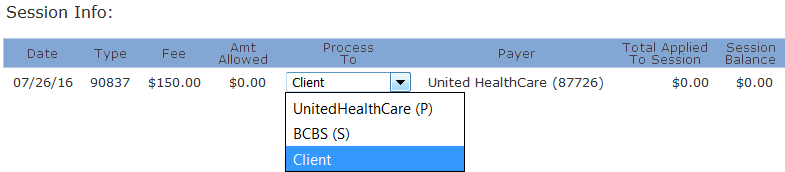
Notice that this client has two insurance companies listed. One of them, UnitedHealthCare, has a (P) beside it (indicating that it is the primary insurance company) and the other, BCBS, has an (S) (secondary). If we look at the Payer column, we see that this ERA is from the primary insurance - UnitedHealthCare. Once we change the dropdown to the correct payer, the Session Info section will look like this:

More importantly, the "Save" button on the ERA at the very top of the page will now be enabled:

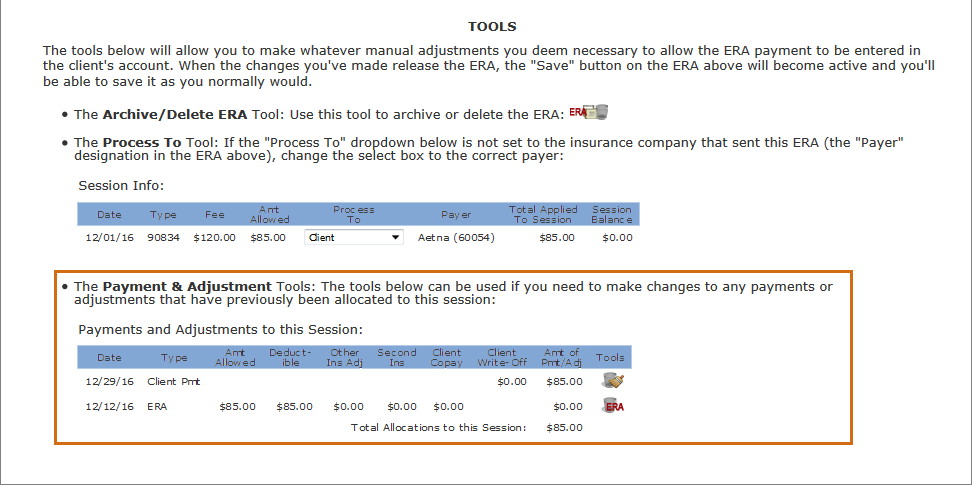
The Payment & Adjustment Tools: These tools only appear if other payments of any kind - client, insurance or ERA - have already been allocated to the session. If the session does not have any other payments, this section will not be present on your form.
The reason this section is important is because PSYBooks does not allow negative session balances. Therefore, if the amount of the current ERA you're trying to enter would create a negative balance, it will not be able to be entered. The tools in this section allow you to clear or delete previous payments to "make room" for the ERA payment. This Payment & Adjustment Tools section looks like this:
Looking at a close-up view of this particular table, the problem is readily apparent: the amount allowed, as set by a previously entered ERA, has been paid by the client since the ERA listed the full allowed amount as going toward the deductible:
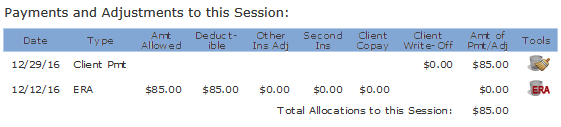
If the new ERA has a payment amount that's greater than zero, it will not be able to be entered. However, using the tools on the right-hand side of the table, the client payment can be removed and/or the previous ERA can be deleted, either of which might help, depending on the payment and allowed amounts of the new ERA. When client or insurance payment allocations are cleared from a session, they can be applied to other sessions. ERA payments can only be deleted - they cannot be allocated to a session other than the one to which they were assigned by the insurance company.
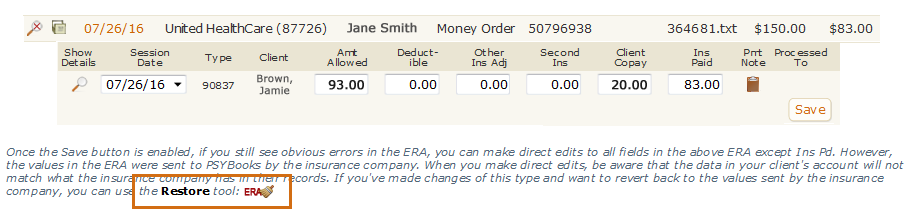
Making Direct Edits to the ERA: Once the Save button on the ERA at the top of the form has been enabled by working with one or more of the tools in the bottom section, there is one last set of tools you have available: you can directly edit all fields of the actual ERA except the Ins Pd field. For example, despite the fact the Save button of the ERA below is enabled, it's obvious from looking at it that we still can't enter it because the insurance payment amount (Ins Paid) is larger than the allowed amount (Amt Allowed):

In this kind of situation, the user may know what the correct allowed amount for this CPT code should be. Assuming it's larger than the paid amount, it is probably safe to go ahead and change the allowed amount so the ERA can be processed into the client's chart. However, values in ERAs are sent to PSYBooks by the insurance companies. When you make direct edits, be aware that the data in your client's account will not match what the insurance company has in their records for this claim. If you've made changes of this type and want to revert back to the values sent by the insurance company, you can use the final tool on this page:
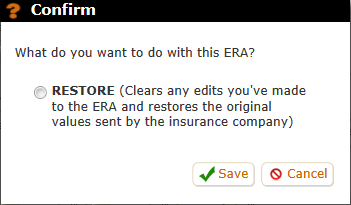
The Restore Tool: This tool can be used to restore the ERA to the original amounts sent by the insurance company if you've made some direct edits you've decided you don't like. It's the small icon at the end of the text under the ERA:
As an example of when you might use this tool, in the ERA above, the user has changed the Amt Allowed and also the Client Copay fields. However, this ERA still won't be able to be entered because the sum of (Ins Pd + Client Copay) is larger than Amt Allowed. In this situation, the user might want to use click the Restore Tool icon, which will open the window below, allowing them to start all over again:
Although direct edits may seem intrinsically appealing and there are times when they're the best option, it's wise to use them sparingly. Once the ERA has been saved, you will not be able to access the tools in the Fix This ERA window again. This means you would not be able to restore the original values sent by the insurance company once an edited ERA has been saved. Because of this, if you do decide to make direct edits to the ERA, check your work carefully before saving.