
Manual Index
-
Chapters
The Manual is divided into seven chapters. Click a chapter title to display that chapter's table of contents in the area below.
PSYBooks Manual
Chapter Two
Process Claims & Statements
What this isThis tool allows you to efile claims and to print CMS-1500 forms and client statements.What it looks likeThe Process Claims & Statements tool looks like this: 
|
Where this isThe Process Claims & Statements tool is on the left nav of the Charts page. |
What the Process Claims & Statements Tool Is
To understand this tool, we have to understand what the name "Process Claims & Statements" means. Let's look at how PSYBooks is defining each of the words:
- Process
In the vernacular, "process" is being used to mean:
To do whatever needs to be done with the information in a session to get it to where it needs to go so you can get paid.
"Whatever needs to be done" is determined by the payer. For example, if the payer is an efile insurance company, process would mean to efile the claim. If the payer is a print insurance company, process would mean to create a PDF of the CMS-1500 so you can print it, upload a digital copy to the company's website, etc. If the payer is the client, process means creating a statement you can give to the client.
- Claims
In general, PSYBooks uses the term "claim" to refer to a CMS-1500 form that is generated for insurance companies (either for an efile company or a print company).
- Statements
In contrast, the term "statement" is reserved for a statement you might generate to give or send to your client.
Putting everything together, "Process Claims & Statements" is a tool that allows you to process both claims (CMS forms for insurance companies) and statements (PDF forms to give your client). That being said, you may never use the Process Claims & Statements tool. In order to understand THAT statement, let's take a look at what the Process Claims & Statements Tool does.
What the Process Claims & Statements Tool Does
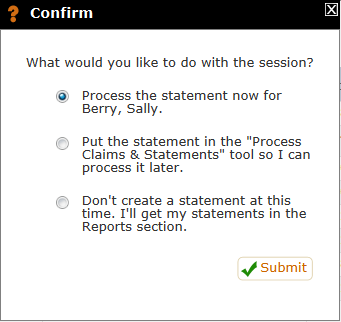
When you add a session, you're given a choice about whether to process it now or later. PSYBooks remembers whether the client has insurance so when you click Save on the Add Session form, you'll either see one of two confirms about processing. If your client does NOT have insurance, you'll see this confirm:
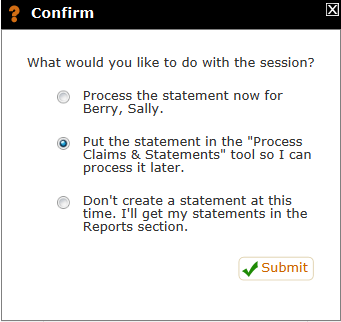
If they do have insurance, you'll see this confirm:
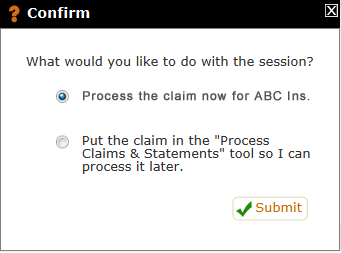
Notice that both confirms have "Process now" as the initial (and default) choice and "Save for later" (by putting it in the Process Claims & Statements tool) as the second choice. Much of the time, especially with insurance claims, independent practitioners will probably want to just accept the default and process as soon as the session is entered. However, there might be situations where you would want to chose the save for later feature. For example, if you have an office manager, you might want to put all of your claims and statements in the Process Claims & Statements tool so that person can run all of them through at one time. The save for later feature can also come in handy when you need to hold one certain claim or statement back for some reason.
To learn more about the tool, let's assume that our client has insurance, we just got the claim confirm above and we changed it to the second option before clicking Submit:

After clicking Submit, we get this confirm (the "P" after ABC Ins Co means that ABC is this person's primary insurance company.):
Similarly, we might have chosen to save Sally Berry's statement for later by choosing the second option on that confirm:
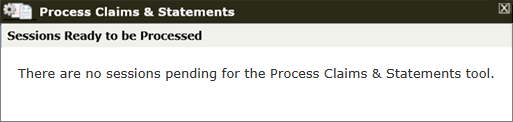
We've now put one claim and one statement in the Process Claims and Statements tool. Let's click the Process Claims & Statements tool (left nav of the Active tab of Charts) and see what happens:
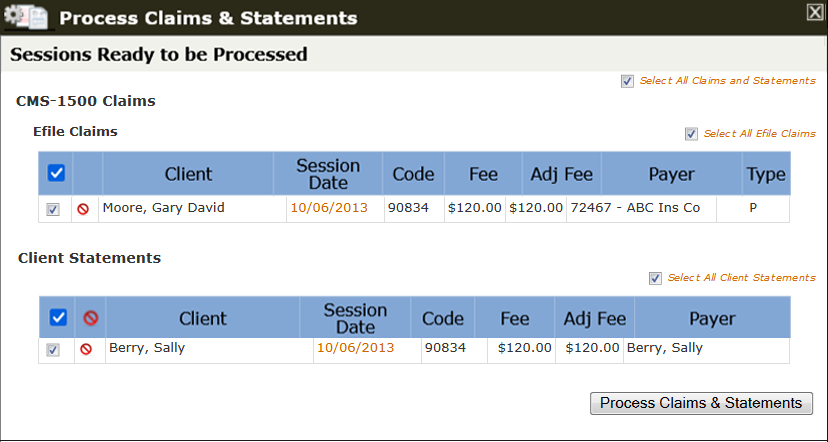
The tool shows us both sessions, ready to be processed whenever we want. Notice also that the session date for each is a link which is a view/edit session tool. Since neither of these sessions has been processed, you can make any changes you want on their Add Session forms. Thus, another excellent reason for using the Process Claims & Statements tool is if you think you might want to make changes to a session before you process it.
The tables on the Process Claims & Statements tool also have a tool that allows you to remove a session from the table:
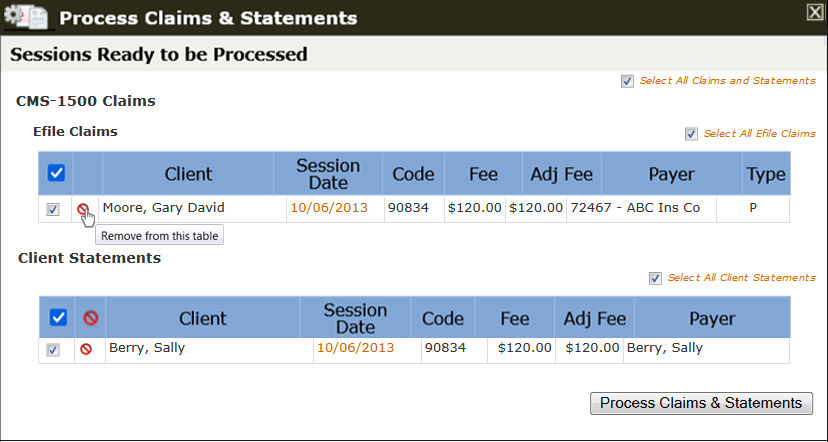
Notice that a Remove tool, which typically uses this icon: ![]() , is different from a Delete tool, which typically uses this icon:
, is different from a Delete tool, which typically uses this icon: ![]() . A Remove tool is for removing items from a table; it doesn't actually delete the item from the person's chart. The Remove tool is on this table to allow you to remove sessions that, for whatever reason, you never intend to process. You don't have to remove them but some users may want to declutter their tables. Sessions removed from this table will still be listed on the client's Sessions & Payments tab.
. A Remove tool is for removing items from a table; it doesn't actually delete the item from the person's chart. The Remove tool is on this table to allow you to remove sessions that, for whatever reason, you never intend to process. You don't have to remove them but some users may want to declutter their tables. Sessions removed from this table will still be listed on the client's Sessions & Payments tab.
Also notice that when you first open the Process Claims & Statements tool, all sessions in all tables are checked. This means that if you just open the tool then click the Process Claims & Statements button at the bottom of the page, all sessions on the page will be processed. If there are some sessions you want to hold back, uncheck the box beside those sessions. The Process Claims & Statements button only processes sessions that are checked.
When you click the Process Claims & Statements button, all checked claims and statements are processed to their respective payers. In other words, efile claims are efiled and the appropriate PDFs are created for print insurance claims and statements. When all processing is finished, you're given a feedback window. Assuming you left both of the sessions above checked and clicked the Process Claims & Statements button, the feedback window would look like this:
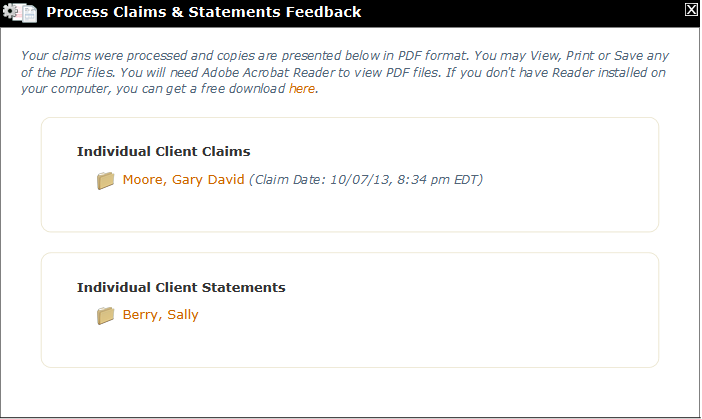
Notice that each client's name has been turned into a link and also, that each name has a Save to Chart tool in front of it:
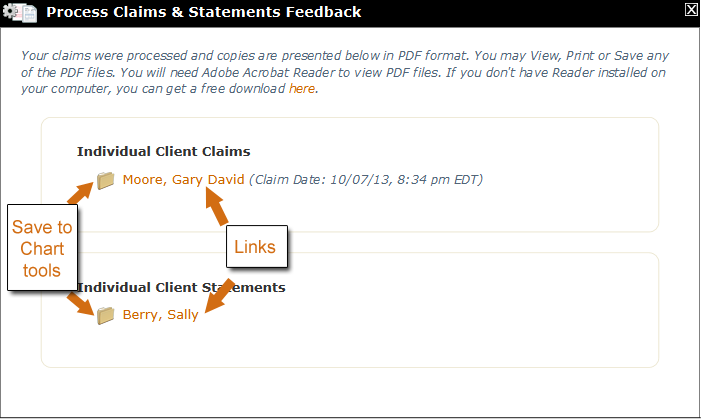
Clicking Save to Chart allows you to save this particular claim or statement to the Files tab of the client's chart. This step is not essential because copies of these same claims and statements will always be available on the client's Sessions & Payments tab. However, some users may wish to do this.
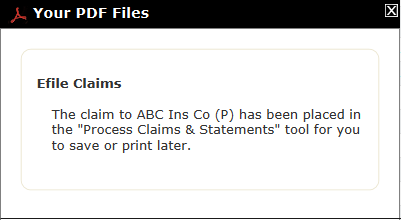
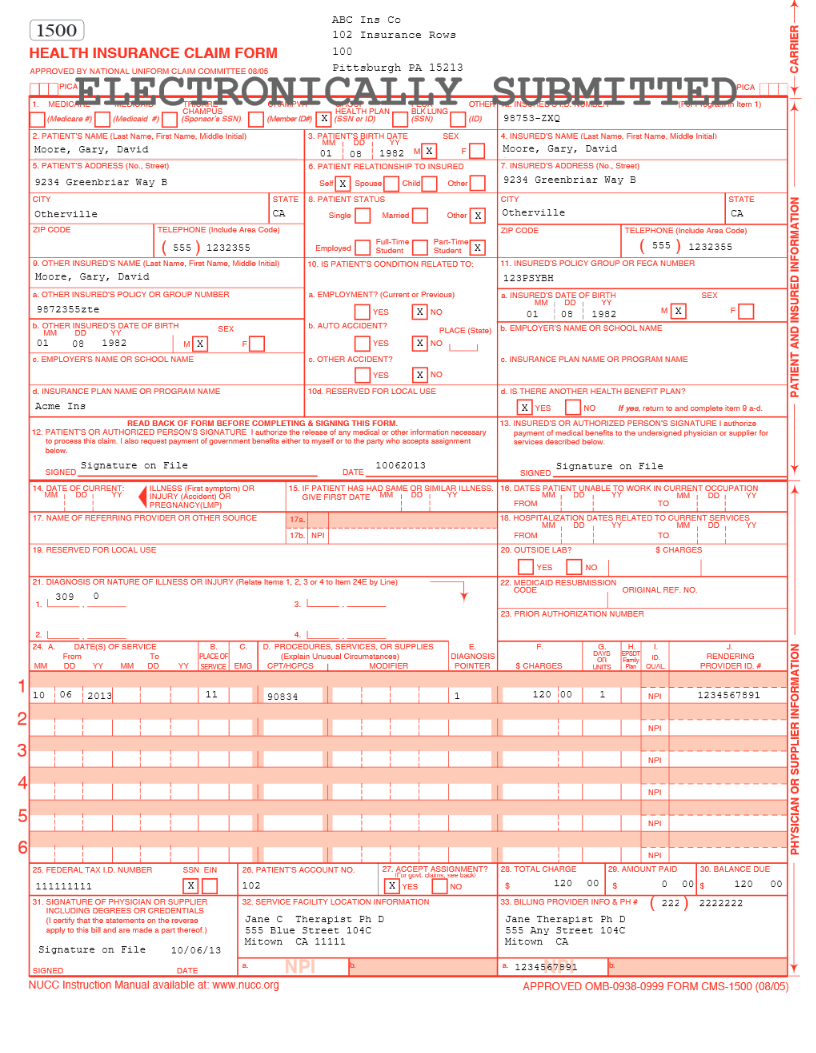
Clicking a link opens the claim or statement that was just created. Claims will be on CMS-1500 forms; statements will be on whichever statement template you've chosen. Clicking the link for Moore, Gary David, opens a copy of the claim that was just efiled for Gary:
Similarly, clicking the orange link for Berry, Sally, opens the statement that was produced for this session:
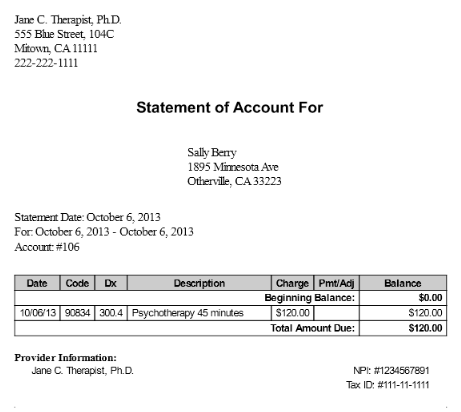
An important thing to know is that claims and statements produced with the Process Claims & Statements tool ONLY compute totals for the sessions that were processed with that particular batch. The beginning balance is assumed to be $0.00. If you need a claim or statement that includes several sessions (or that includes any balance that's been carried forward), use the CMS-1500 and/or the Client Statement reports in the Tools > Reports section of the app. Those reports allow you to indicate the specific dates you want to include in your statement or claim.
Since we processed all of the claims and statements that were in the Process Claims & Statements tool, once the feedback window is released, the tool is empty until the next time you save a claim or statement for later: