
Manual Index
-
Chapters
The Manual is divided into seven chapters. Click a chapter title to display that chapter's table of contents in the area below.
PSYBooks Manual
Chapter Two
Add Payments & Allocations
What this isThis tool allows you to add and allocate payments that you receive from a client or an insurance company. For insurance company payments, there are tools for adding the information from an EOB (Explanation of Benefits) as well as an automated way to enter ERA (Electronic Remittance Advice) payments.What it looks likeThe Add Payments & Allocations tool looks like this: 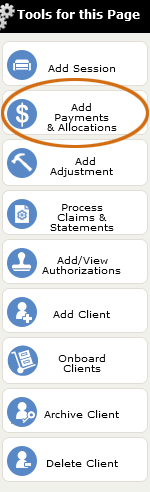
|
Where this isThe Add Payments & Allocations tool is on the left nav of the Charts page. |
When you're involved with medical billing, the tricky part about payments is not adding them - it's allocating them. In mental health, there are 3 possible allocation levels: 1) therapist, 2) client and 3) session (or other procedure). In other words, if the ABC Psychotherapy Practice receives a payment of $100.00, the person in charge of billing will want to make sure that $100.00 gets allocated to the therapist who provided the service, the client who received the service and the specific service dates or procedures that generated the income. And, of course, the billing person will also have to make sure the correct payer (usually a client or an insurance company) gets credit for making the payment.
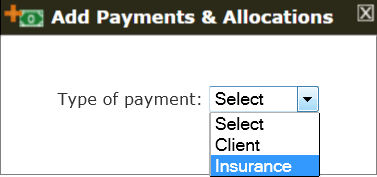
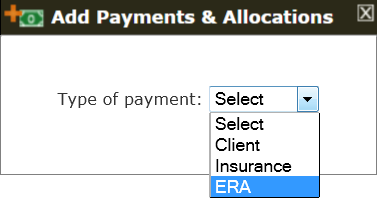
In PSYBooks, when you click the Add Payments & Allocations tool you get this small window:
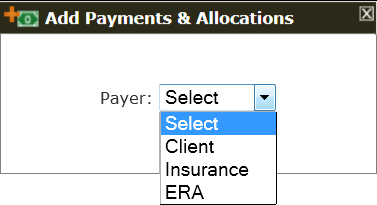
In the above popup, you're asked to specify whether the payment you want to enter is from a client, an insurance company (usually via a paper EOB) or is an insurance ERA payment. PSYBooks makes things easy for you by detecting whether you have ERAs waiting to be allocated. If you do, you'll see the popup above. If not, your select box will look like this:

Depending on your choice, the form that opens will either be the Add Client Payment form, the Add Insurance Payment form or the Add ERA form. Adding and allocating payments is probably the most complex part of the program so we'll discuss each form separately.
Add Client Payment
The Add Client Payment form can actually be accessed in two ways: 1) by choosing the Client option in the payer dropdown of the Add Payments & Allocations tool and 2) by clicking the Save & Add Client Payment button on the Add Session tool. The form is the same, no matter what your point of entry. It looks like this:
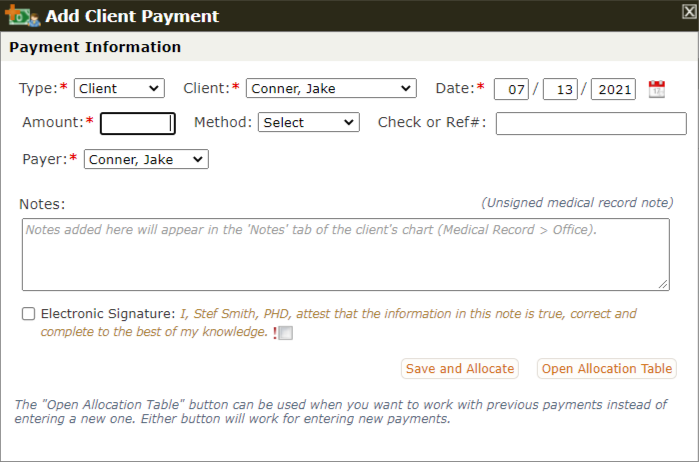
On the top row, notice that the Type (Client, Insurance or ERA) and Date select boxes are already pre-populated. If you had opened this form from a client chart, that client's name would also be listed in the Payer select box, making 3 of the 4 required fields on this form already done for you. If you need to change any of these fields, you can. The pre-selects are just included as a user-aid. However, if the fields are correct, all you have to do is enter a value in the Amount textbox and click either of the save buttons. Additional fields of "Method" and "Check or Ref#" are there only if you want to use them and, as with almost all forms in PSYBooks, you can attach a note.
Credit card processing is done right from the Add Client Payment form just by selecting Credit Card from the Method select box. That feature is discussed in detail below.
The Add Client Payment form has two buttons at the bottom: "Save and Allocate" and "Open Allocation Table". If you're entering a payment, you can use either one - they will do the same thing. However, there are times when, instead of entering a new payment, you want to work with payments you've already entered. Clicking the "Open Allocation Table" button allows you to do that. The only field required for that option is the client's name.
As mentioned above, entering a payment is not difficult. It's the allocation part that is more involved. The part of the form we've already covered completes the first part of the task: adding the payment. Once you click either "Save and Allocate" or "Open Allocation Table", the allocation part of the form opens and will look something like this:
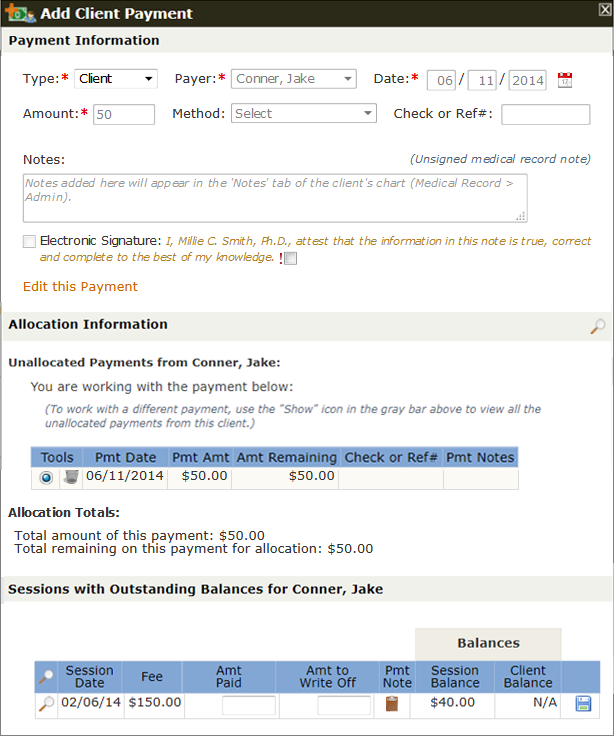
Notice that the top part of the form - the part in the "Payment Information" section - has stayed the same except for the addition of an "Edit this Payment" link that allows you to change the payment part of the form. But now there are two additional sections: "Allocation Information" and "Sessions with Outstanding Balances for (client's name)". The payment you're working with is listed in the "Allocation Information" section and all sessions of this client that have outstanding balances are listed for you in the "Sessions with Outstanding Balances" section. All you have to do is enter all or any portion of the $50.00 payment in the "Amt Pd" column by the appropriate session (in this case there's only one session) and click the "Save" icon at the end of the row (the blue disk).
You can also use this form for any client write-offs you want to enter. Notice, however, that if you're a provider and filed insurance for this session, this is NOT where you deduct the amount disallowed from insurance. That amount is written off when you enter the insurance payment with the Add Insurance Payment or Add ERA tools.
This form has some additional features you may want to use. For example, the "Allocation Information" section of the screenshot above has a "Show" icon (magnifying glass) on the gold bar, plus some text indicating there are additional payments from this client that have not been allocated:

If we click the magnifying glass, we are able to view all unallocated payments in this client's chart:
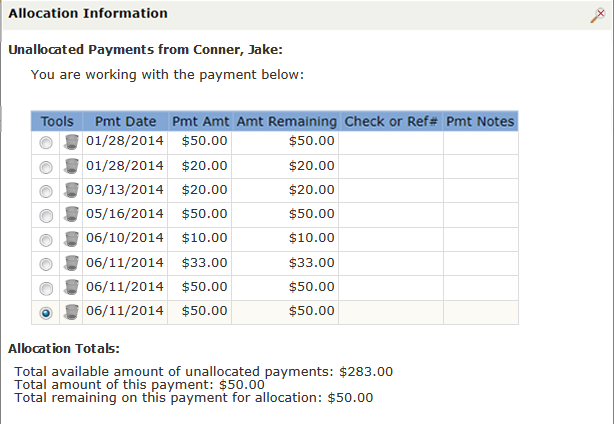
PSYBooks provides you with some additional info in this section, such as the total of all of this client's unallocated payments, the amount of the payment you're currently working with, etc. You can choose the payment you want to work with from this list or, if you don't want to choose, when you finish working with one payment, PSYBooks will automatically take you to the next unallocated payment in order until you're finished. You can store unallocated payments here until you're ready to allocate them. This allows you to enter payments when a client pays in advance and then allocate the portion of the payment that goes to each session as they occur. However, as a general rule it's best to keep payment allocations as up to date as possible.
Add Insurance Payment
The "Add Insurance Payment" tool is accessed from the "Add Payments & Allocations" tool. When you click "Add Payments & Allocations", select Insurance from the Payer dropdown box in the first popup:
The step above opens this form:
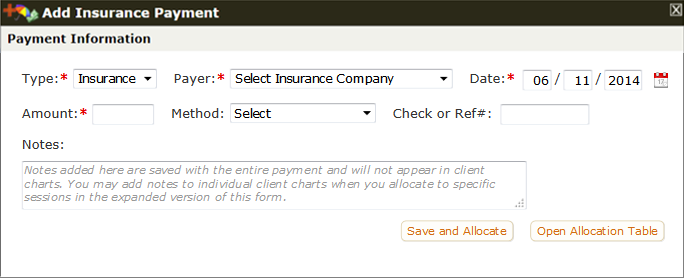
As with the Add Client Payment Tool, the Type and Date fields are already pre-populated when the form opens. If these values are correct, all you have to do is choose the insurance company and enter an amount. When choosing the insurance company, only those companies you've already added in your Libraries appear. Notice that they are grouped by Efile Companies and Print Companies:
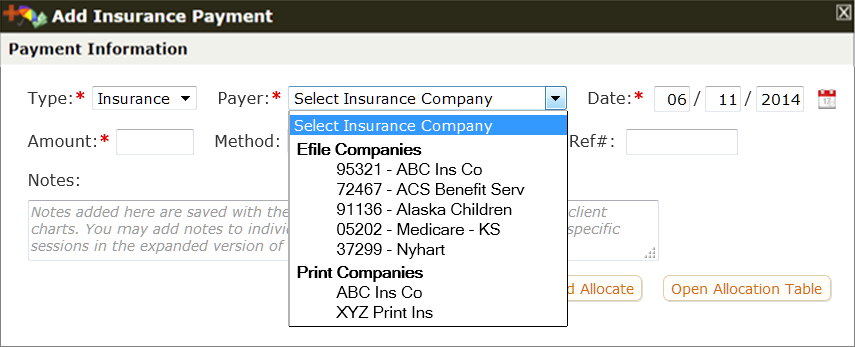
It's not uncommon to have the same insurance company listed in both places. For example, the screenshot above has ABC Ins Co listed both as an efile company and as a print company. This might occur if some clients have ABC Insurance as their primary and typically efile those claims, but other clients have the same company as a secondary and require print claims. A common mistake in entering insurance payments is to try to enter a print company payment as a payment from the efile company with the same name. Since PSYBooks lists the sessions that have outstanding balances based on type of insurance, you would not find sessions from the print company on the efile company's allocation list (or vice versa) and thus would not be able to allocate the payment.
Part of why this mistake is common is because when an insurance company sends a payment, they don't break it down by how the provider transmitted the claim (i.e., whether it was efiled or sent some other way). For example, the provider with the insurance companies listed above might receive a payment from ABC Ins Co for $500.00 where 5 sessions had been efiled and 4 sessions had been sent via print claims. To allocate this payment correctly, the user would need to enter it as two separate payments - one selecting ABC from the efile list for the total amount the efile payments, then a second payment selecting ABC from the print list for the remaining amount.
Once the insurance company has been selected and the amount entered, you're ready to save the payment and begin allocating. The bottom buttons on this form mirror those on the Add Client Payment Tool in that both "Save and Allocate" and "Open Allocation Table" can be used to enter a payment. However, if you don't want to enter a payment but need to work with payments you've already entered instead, the "Open Allocation Table" will allow you to open the allocation portion of the form without entering an amount.
Clicking either button opens the entire Add Insurance Payment form:
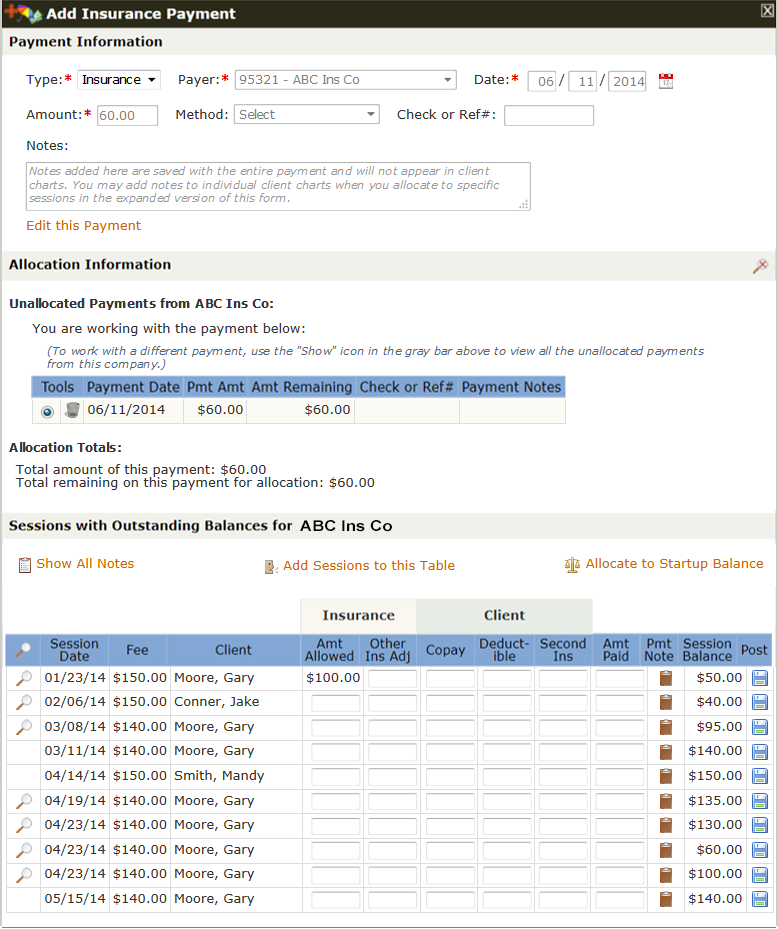
As with the Add Client Payment Tool, Add Insurance Payment is divided into 3 sections: Payment Information, Allocation Information and Sessions with Outstanding Balances for (insurance company). The Payment Information section is the original form where you entered the payment except that now it has a link that allows you to edit the payment if needed. The Allocation Information section gives you information about the payment you're currently working with and the Sessions with Outstanding Balances section is where you actually enter the payment allocations.
The table in the Sessions with Outstanding Balances section includes these columns: Amt Allowed, Other Ins Adj, Copay, Deductible, Second Ins, Amt Paid and Pmt Note. Most of these fields are not necessary for most payments but they're included in case you need them. An explanation of each is below:
- Amt Allowed. This is the Usual and Customary Rate allowed by the insurance company. If you're a provider, listing the insurance company's allowed amount here will allow PSYBooks to use this amount to calculate the amount(s) due from secondary insurance companies and/or the client to prevent you from overbilling. However, if you are not a provider for the insurance company, you may be able to leave this blank. EOBs report this amount differently. For example, some have it listed as the UCR or Allowed Amount and you can just copy that amount in the Amt Allowed field in PSYBooks. Other EOBs won't specify the amount they allow, but instead, will have calculated the difference between the amount you charged and the amount they allow and list it as some type of adjusted amount. In these cases, you'd have to subtract their adjusted amount from the amount you charged to obtain the correct value for the amount they allow.
- Other Ins Adj. This column is rarely needed but has been included in case the insurance company you're working with has their adjustments broken down into more than one type and you wish to enter them separately. Make sure you do NOT put the UCR adjustment here if you've accounted for it in the Amt Allowed field or you'll be deducting the same amount twice.
- Copay. This column is optional. Although most EOBs will have the client's copay or coinsurance amount broken out, PSYBooks calculates the amount the client owes by deducting the amount all insurance companies pay from the value you entered in the Amt Allowed field above. PSYBooks does not use amounts entered in the Copay field to determine the amount the client owes. However, if you want a record of what's listed on the EOB as the client's portion of the bill, you can enter it here.
- Deductible. Listing Deductible amounts in this field allows PSYBooks to know that this amount will not be paid by the primary insurance company and that you can bill it to a secondary company and/or the client.
- Second Ins. This is another optional field. If the client has a secondary insurance company and you want to list the amount the primary insurance's EOB specifies should come from the secondary company, you can list it. However, PSYBooks automatically bills the secondary company based on the amount entered in the Amt Allowed field minus what the primary company pays so PSYBooks does not use any amount you list here. It's only for your records.
- Amt Paid. This is the field you will use most often because it's where you list the amount the insurance company paid you. Even when the amount paid is $0.00, you will want to enter it here partly so you'll have a record of it but more importantly, so the claim can be sent to the next payer.
- Pmt Note. Clicking the clipboard will allow you to add new notes to this payment and/or to view notes you've written previously.
Most of the time, even if you're a provider, the only fields you may want to use in this section are Amt Allowed and Amt Paid. If the client's deductible hasn't been met, you'd probably also want to list those. The other fields can usually be skipped unless you need them for your own purposes.
Each allocation must be saved separately by clicking the blue disk icon at the end of the row. When you do so, you'll get a popup that looks something like this:
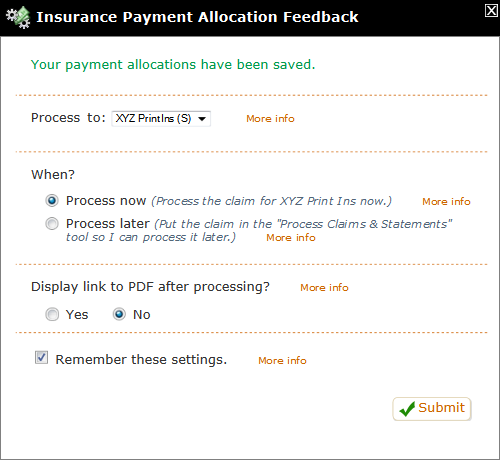
This window has 5 sections divided by orange dotted lines. Each will be discussed below:
- Feedback. The top section just gives you feedback about whether your allocations saved successfully.
- Process To.The second section allows you to choose the payer you want the claim to be sent to next. By default, PSYBooks pre-selects the next payer on this client's list and most of the time, that will be correct. However, there may be times when you want to change this. For example, if you believe the insurance company has made an error, you may want to hold this claim back until you've had a chance to investigate further and to rectify it.
- When? This section allows you to choose whether you want to process the claim now or whether you want to place it in the Process Claims & Statements tool to process later.
- Display link to PDF. If you want to view, save or print the PDF right away, you can select Yes here. However, a copy of the PDF will always be available in the Sessions & Payments tab of the client's chart if you don't need to see it right away.
- Remember these settings. This checkbox allows you to save your current settings on this form so that in the future, all you'll need to do in most situations is just click Submit.
Add ERA Payment
Payment explanations received via Electronic Remittance Advice are extremely easy to enter in PSYBooks. ERAs are sent to PSYBooks by your insurance company. If you have any new ones (i.e., ERAs you haven't yet processed), the ERA option will appear in the initial popup that opens when you click the Add Payments & Allocations button:
Selecting ERA actually takes you to the Reports section where there's a report you can run to see the specific ERAs you're interested in:
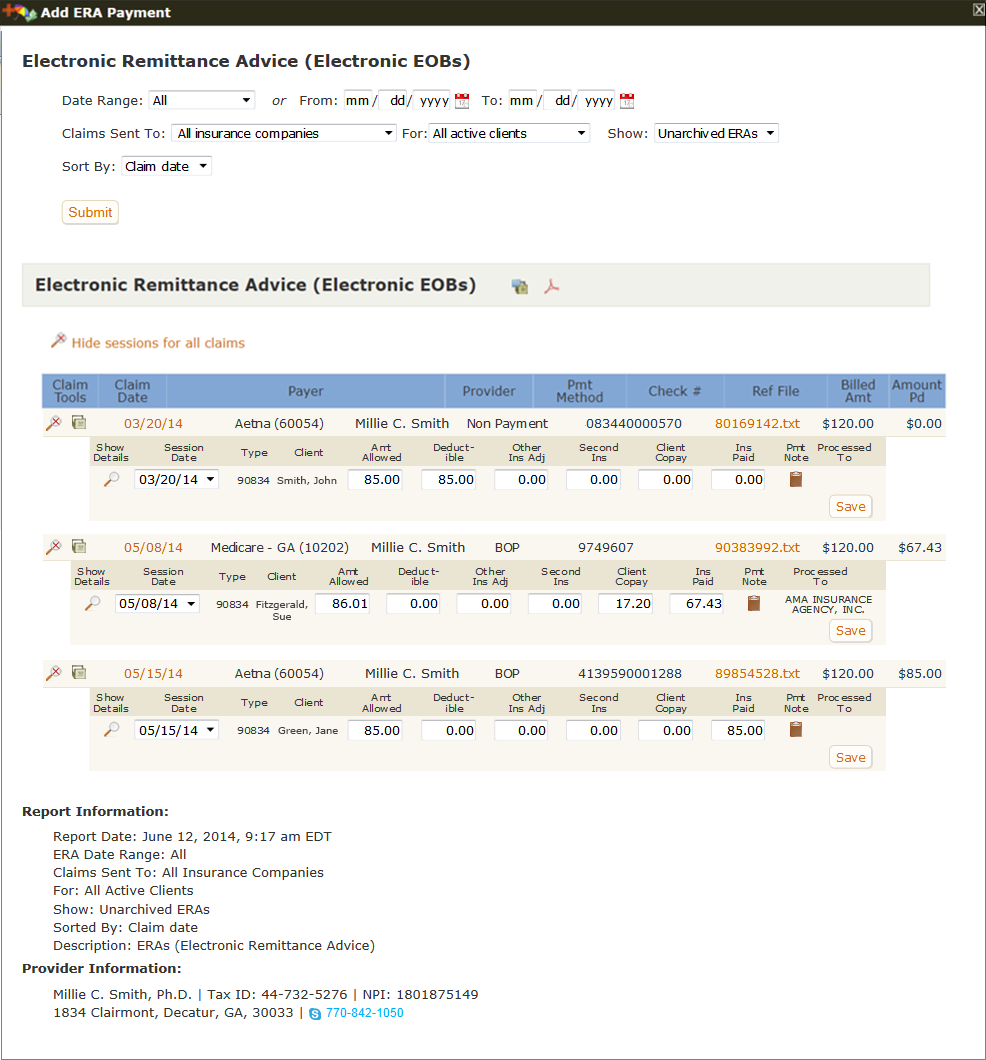
When the report opens, only the unallocated ERAs will be displayed since these are most likely the ones you'll want to work with. However, you can use the report filters at the top of the page to view and work with additional ERAs.
The ERA report might look a bit intimidating at first. However, PSYBooks has done most of the work for you which actually makes it extremely easy to use. For example, in the screenshot above, most likely all the user would need to do is click each of the three Save buttons that are about half way down on the right. Doing so would automatically enter that claim's information in the appropriate client's chart, update the client's balances and send the claim to the next payer. If you want to learn more, there is additional information about this tool in the Reports section under ERAs (Electronic EOBs).
Processing Credit Cards
The Method select box on the Add Client Payment form allows you to choose between Check, Cash, Credit Card and Other. If you choose Credit Card and have not yet signed up with Stripe (the payment processing company PSYBooks uses), the form will display some additional information:
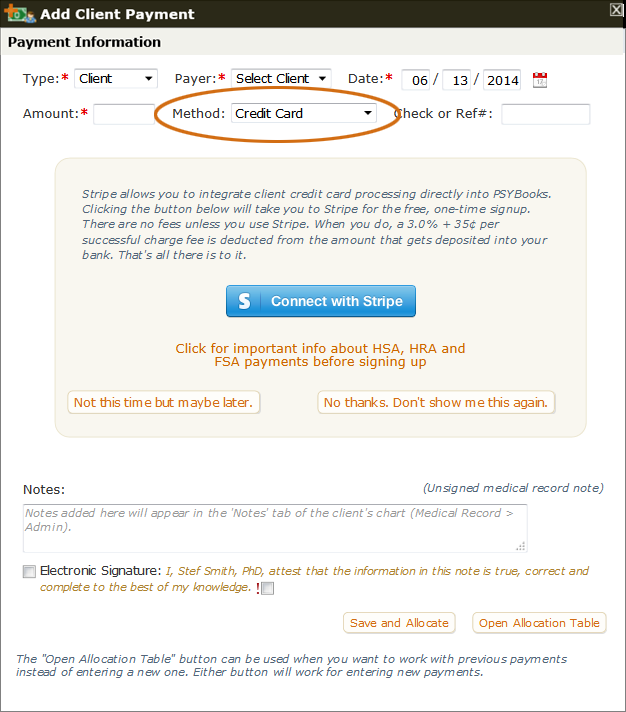
Clicking the blue "Connect with Stripe" button will take you to the one-time sign-up form for Stripe where they'll ask you things like the nature of your business and the routing and account number of the bank where you want your funds deposited. Note: the image above is just to show you what it looks like. Clicking the image will not connect with Stripe. You have to be on the Add Client Payment form in your app for the button to work.
Please note: Banks have certain guidelines and restrictions they must follow before allowing merchants to process cards from HSAs (Health Spending Accounts), HRAs (Health Reimubrsement Accounts) and FSAs (Flexible Spending Accounts). Unfortunately, neither PSYBooks nor Stripe has any control over whether the issuing companies will allow you to process these types of cards.
The best way to ensure success is to provide a brief, one or two sentence narrative of the services you provide as a healthcare professional on the Stripe sign-up form. This will allow the issuing companies to better determine whether your services fall within HSA and FSA rules and guidelines.
If you do sign up with Stripe, from that point on, if you change the Method select box to Credit Card, your Add Payment form will look something like the screenshot below:
Using and Creating Saved Credit Cards
You have several options here. If you've previously saved the client's credit card, it will appear in the first dropdown on the left that says "Saved cards". Selecting a card from the list produces a screenshot similar to this:
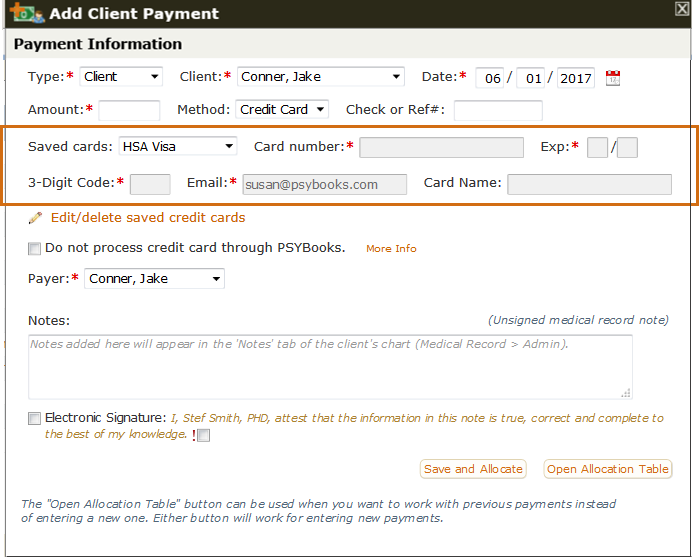
The name of the saved card - in this case, HSA Visa - now appears in the "Saved card" select box. The other fields are grayed out. This is to maintain the highest protection for the card in that none of the card details can be seen. However, since the card has been selected, all you have to do is to fill in the Amount of the payment and then click either the "Save and Allocate" or the "Open Allocation Table" and allocate it the way you would any other client payment.
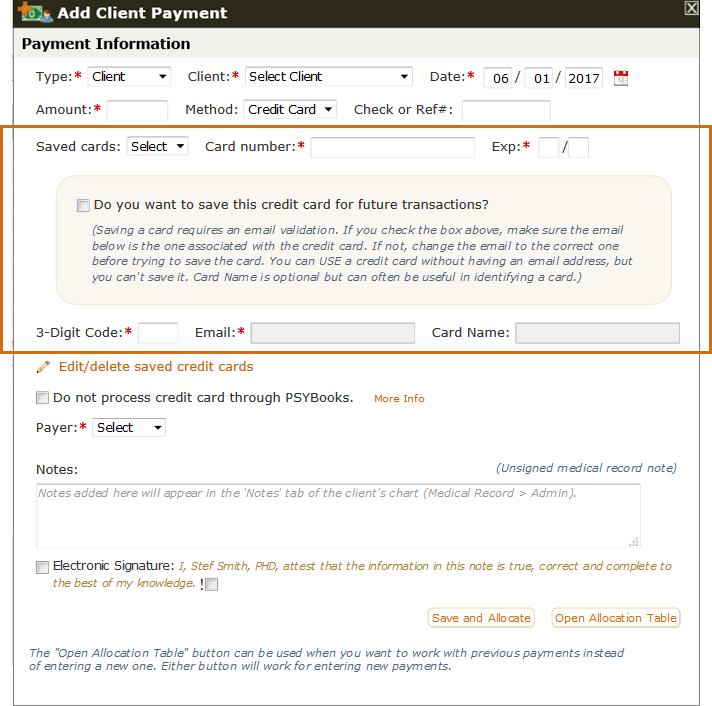
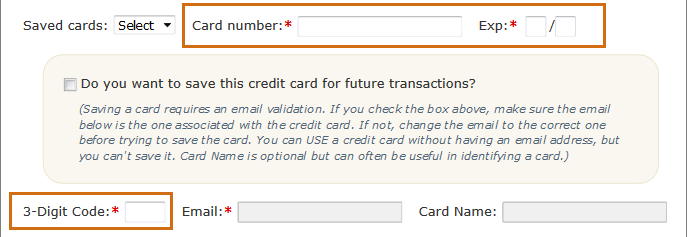
If you do not have any saved cards - or if you want to add a new card, you just fill in the normal fields you'd have for a credit card payment (card number, expiration date, 3-digit code) in this middle section of the form:
If you want to save this new card, there's a box to check that will allow you to do so. Notice that to save a card, you must also enter the email address that the client has on file with the credit card company as an extra validation. This is another step that helps protect the client's card. When you check the box to save the card, the Email and also the Card name fields become available for you to fill in. If you have an email entered in the client's chart, the email field will be populated with that email address to save you some steps. If it's the wrong email, you can change it.
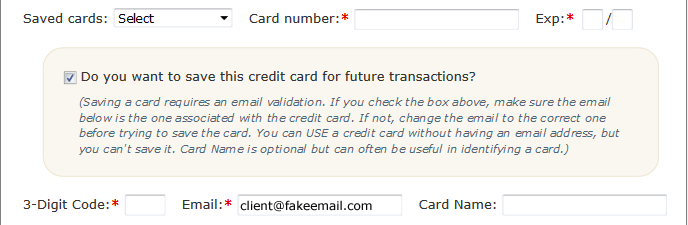
Notice that the Card name field is optional. If you don't fill it in, PSYBooks will create a name for you to help you identify the card.
If you do NOT want to save the card, don't check the checkbox and you will not be required to add an email address. You will still be able to process the payment normally, but if you want to use the same card again, you'll have to reenter it.
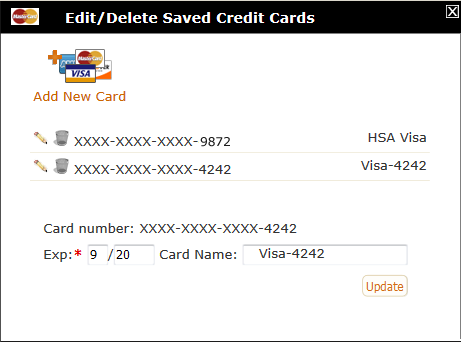
The Edit/Delete Saved Cards Tool
There's one more thing to discuss on this page: the Edit/delete saved cards tool:
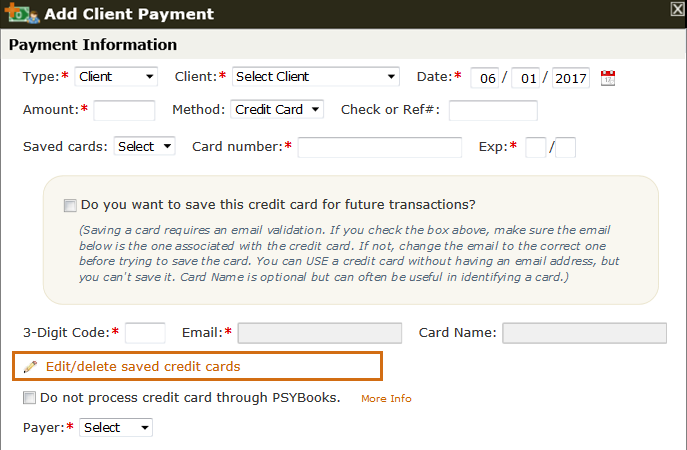
As the title indicates, this is to allow you to edit or delete any credit cards for this client that you have previously saved. Opening that form gives you a window like this:
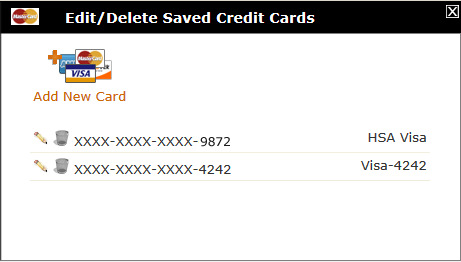
From this window, you can edit or delete any cards that have been saved. Notice, however, that you will never be able to edit - or even view - the complete credit card number. For safety reasons, PSYBooks does NOT store credit card numbers, which means that we can't display them for you to edit. If you need to change the card's number, you'll have to enter it again as a new card, which you can also do on this form. However, if you want to edit the expiration date or the card's name, clicking the Edit pencil at the beginning of that card's row will open some additional fields that will allow you to do so: